Understanding how to use Google Veo 3.1 reference images is essential for maintaining visual logic. Veo 3.1 analyzes the "ingredients"—such as a character’s face or a specific art style—and maps those features across every frame. This gets rid of the "morphing" glitches seen in older AI tools. No matter if you are making a 9:16 social clip or a 4K wide-screen movie, Veo 3.1 gives you the right setup. It ensures your AI videos look steady, high-quality, and professional.
The Shift from Generation to Orchestration
Creators must move from random AI results to intentional, brand-focused storytelling. In the AI video world of 2026, your job is more than just "hitting a button" and hope it works. You are now the director of the system.
You are the conductor, managing high-quality pieces to keep a character’s face or a product's look exactly the same in every shot. By using these "ingredients," you get professional control over your story. This ensures that every movie clip matches your original creative vision perfectly.
Comparison: Generation vs. Orchestration
| Feature | Traditional Generation | Veo 3.1 Orchestration |
|---|---|---|
| Input Method | Text Prompt Only | Text + 3 "Ingredient" Images |
| Consistency | Visual "drift" (faces change) | Locked Character & Object Identity |
| Creative Control | Randomized styles | User-defined Style & Texture |
| Workflow Role | Hopeful prompting | Strategic directing |
What are "Ingredients" in Veo 3.1?
To achieve professional results, Veo 3.1 utilizes a "Three Pillars" approach. Rather than relying on a single reference, you can now combine three distinct "ingredients" to anchor your production:
- Subject/Character Image: This locks in the identity of your protagonist or product, preventing the "morphing" often seen in earlier AI models.
- Environment/Setting Image: This keeps your world-building consistent by providing a steady background. It ensures your characters stay in a stable, recognizable space.
- Style/Texture Image: This set the visual look, from 35mm film grain to specific color sets. It makes sure the movie looks the same throughout.
By stacking these parts, creators get more control over the final video than ever before. The table below shows the big technical jump from older versions:
| Feature | Previous Version (Veo 3.0) | Veo 3.1 Improvements |
|---|---|---|
| Consistency | Visual drift between frames | Locked character & object identity |
| Aspect Ratio | Landscape only (16:9) | Native Vertical (9:16) for Shorts/TikTok |
| Resolution | Standard 1080p | State-of-the-art 4K Upscaling |
| Audio | Silent or basic SFX | Synced dialogue & ambient noise |
Transform Photos to Cinematic AI Video Step-by-Step Guide
Transforming a still image into a high-quality movie scene with Veo 3.1 is a clear process. It works much like directing a real film. By using this four-step method, you can move past simple testing and start creating professional results.
Step 1: Picking Your Images
Your final video quality depends on how clear your inputs are. When you choose your three "ingredient" images, follow these professional tips:
- High Resolution: Pick photos that are 1080p or higher. Veo 3.1 can improve the quality, but it needs clear pixels to track faces or background details accurately.
- Clear Subjects: Make sure your "Subject" image has a clean outline and easy-to-see details. Avoid blurry photos or messy backgrounds that might mix up the character-locking system.
- Style Match: Your "Style" image should clearly show the lighting and colors you want. For a steady movie look, pick images that show off specific film types or artistic textures.
Step 2: Picking the Right Size
Veo 3.1 now supports built-in aspect ratios. This saves you a lot of time on cropping later.
- Vertical (9:16): This is the ideal option for TikTok, YouTube Shorts, and Instagram. Using this size keeps your subject in the center without losing resolution to digital zooming.
- Widescreen (16:9): This is perfect for standard stories, YouTube videos, and high-quality presentations.
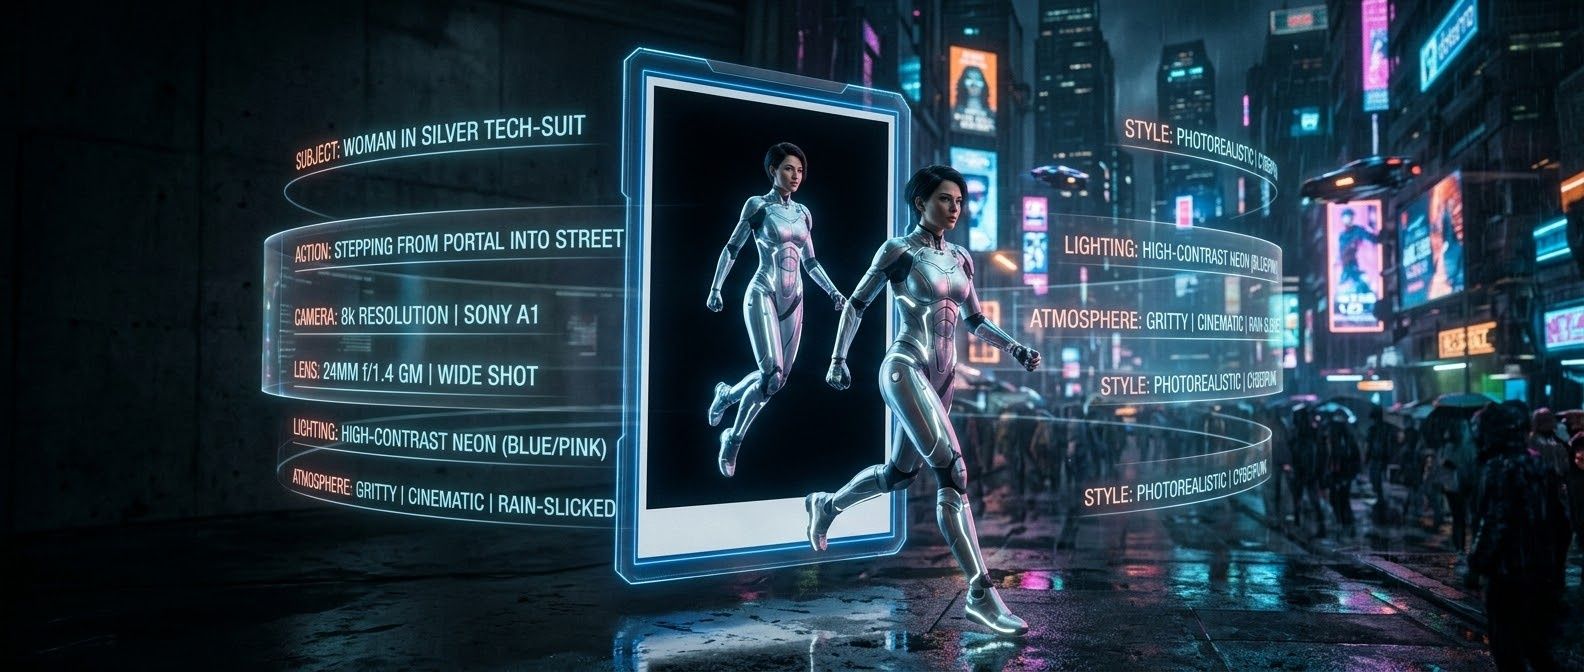
Step 3: The "7-Layer" Prompt Formula
To bridge the gap between your ingredients and the final animation, use a structured prompt. This "7-Layer" formula ensures that the AI understands exactly how to animate your static references:
The Formula: Camera & Lens + Subject + Action + Environment + Lighting + Style + Audio Cues
- Example Prompt:"Cinematic 35mm lens, a woman in a silver tech-suit walking through a neon-lit Tokyo street, high-contrast cyberpunk lighting, gritty texture, low ambient synth drone and footsteps on wet pavement."
By explicitly defining each layer, you guide the system's orchestration rather than leaving the motion to chance.
Step 4: Executing the Render
Once your ingredients and prompt are ready, you can execute the render across Google’s ecosystem. Veo 3.1 is integrated into several professional entry points:
- The Gemini App: Best for quick, creative iterations and mobile-first workflows.
- Google Vids: Ideal for business teams looking to incorporate cinematic AI clips into video presentations.
- Vertex AI: The go-to platform for developers and enterprise-level creators requiring advanced API controls.
After the initial generation, remember to use the 4K upscaling feature to bring your clip to broadcast-quality resolution, ensuring it is ready for any professional screen.
Veo 3.1 Prompting Framework and Genre Examples
These use the specific logic of Veo 3.1 to connect your "ingredient" images with the final animation.
Genre Example 1: Wildlife Film
Best for: 16:9 Cinematic Widescreen
Prompt: Drone camera rises up + A snow leopard + Creeping across a steep mountain crest + [Himalayan peaks at sunset, blowing snow + Natural light shines on the fur. + Professional nature documentary style, clear details + Sound of whistling wind and footsteps on snow
- Why it works: Using a specific camera move like "Drone camera rising" helps Veo navigate the scene. Adding audio details creates a realistic feel. This gives your movie the look and sound of a high-quality tv broadcast.
Genre Example 2: The Cyberpunk Sci-Fi
Best for: 9:16 Vertical
Prompt: Tight shot with a soft focus + A lead character wearing a glossy visor + Slowly nodding their head to look at a digital map + A rainy alley soaked in neon light + Flickering blue and pink lamps with heavy shadows + Gritty film grain, Blade Runner look + Quiet electric hum, rain tapping on steel, and a distant siren
- Why it works: Style & Texture layer is critical in sci-fi settings. Referencing "35mm film grain" prevents the video from looking "too digital," while the Lighting instructions ("cyan and magenta") ensure the AI uses the colors from your style ingredient correctly.
Genre Example 3: Luxury Fashion (Minimalist Elegance)
Best for: 9:16 Vertical (Social Media / Brand Story)
Prompt: Slow-motion camera glide with 85mm portrait lens + A pair of glowing leather sneakers + Floating in the air while the laces move slowly + A plain white studio with soft shadows + Bright natural sunlight and a small lens flare + High-end fashion style, clean details, 4K resolution + Calm piano music, deep bass beats, and the soft sound of silk
- Why it works: In fashion, the Camera & Lens (85mm) and Action steps are key to showing product details clearly. By using a "plain white studio" for the background, the Style part focuses only on the glowing leather. This makes the material look expensive and real to the touch.
Genre Example 4: Kids' Space Adventure
Best for: 16:9 Cinematic (YouTube / Learning Videos)
Prompt: Wide steady shot from a low angle + A young boy in a cardboard rocket suit + Pointing with excitement at a glowing purple space cloud + A bedroom floor that turns into a starry galaxy + Warm lamp light mixed with bright purple space glow + Pixar-style 3D look, soft edges, bold colors + Low space hum, magic chimes, and a child's quiet giggle
- Why it works: In stories for kids, the lighting is what really brings the "magic" to life. By mixing a "warm lamp glow" with "cosmic purple," you can show how to merge the bedroom with the boy.In a child's eye, this "low-to-the-ground" camera angle makes the whole scene feel like a huge adventure.
The 7-Layer Framework
| Layer | Your Input |
|---|---|
| 1. Camera | (e.g., Wide shot, Dolly-in, 85mm lens) |
| 2. Subject | (e.g., A vintage car, a lone hiker) |
| 3. Action | (e.g., Accelerating, looking at the horizon) |
| 4. Environment | (e.g., A sun-drenched desert, a rainy cafe) |
| 5. Lighting | (e.g., Soft morning glow, harsh neon) |
| 6. Style | (e.g., Minimalist, retro-film, oil painting) |
| 7. Audio | (e.g., Cinematic strings, nature sounds) |
Pro Tip: When using the "Style" layer, try to choose specific film types or eras. Using terms like "Kodak Portra 400" or "Technicolor" is far more effective than just stating "realistic."
Advanced Features: 4K Upscaling & Native Audio
Once you have mastered the art of how to use Google Veo 3.1 reference images to create a draft, it is time to polish the production.
- Upscaling Workflow: Veo allows you to transform photos into cinematic AI video by first generating a low-resolution preview. Once the motion is perfected, you can trigger the 4K upscaling engine. This process adds fine-grain textures—such as skin pores or fabric weaves—rendering a 5-second draft into broadcast-quality 4K resolution suitable for professional film projects.
- Audio Integration: A major breakthrough in this version is native audio generation. Unlike previous models that required third-party tools, Veo can now generate synced sound effects and ambient scores directly within the pipeline. If you use the Veo 3.1 Scene Extension guide to lengthen a clip, the AI intelligently extends the audio track, ensuring the foley and background noise remain seamless.
| Feature | Function | Benefit |
|---|---|---|
| Scene Extension | Lengthens clips | Maintains narrative flow |
| Native Audio | Synced soundscapes | One-stop production |
| 4K Upscaler | Enhanced Resolution | Professional-grade clarity |
Scaling Production: Accessing the Veo 3.1 API via Atlas Cloud
For developers and studios looking to move beyond manual generation, accessing Veo 3.1 through professional cloud infrastructure is essential. This is particularly relevant for high-volume tasks, such as generating bulk social media assets or integrating AI video into automated creative pipelines.
How to Obtain API Access
As of March 2026, there are two primary paths for developers to integrate Veo 3.1:
- Atlas Cloud (Developers): Atlas Cloud is now a top choice for running high-end AI. Their API lets you use Veo 3.1 and 300 other ready-to-use models through one simple link. This "one setup, one bill" style makes your work much easier. You can grab an API key from the Atlas Cloud dashboard and start your first project in just a few minutes.
- Vertex AI (Enterprise): For teams already deeply embedded in the Google Cloud ecosystem, Vertex AI remains a robust option. This path requires a Google Cloud project with the Vertex AI API enabled. It offers enterprise-grade security and specialized "Fast" model variants for rapid iteration.
High-Volume Quotas and Pricing
High-volume generation typically operates on a "pay-as-you-go" model, which is far more cost-effective for mass production than standard monthly subscriptions.
- Atlas Cloud Pricing: Currently, Atlas Cloud offers a highly competitive rate of approximately $0.09 per second for Veo 3.1. This includes native audio in the output file by default.
- Vertex AI Pricing: Google’s internal rates for the "Standard" 4K cinematic output are approximately $0.40 per second, while the "Fast" model (optimized for 1080p) is roughly $0.15 per second.
| Platform | Recommended For | Primary Benefit |
|---|---|---|
| Atlas Cloud | Automated Pipelines | 300+ models via one API; $0.09/sec pricing. |
| Vertex AI | Large Corporations | Deep integration with Google Cloud IAM & BigQuery. |
| Google AI Studio | Individual Prototyping | Fast "Paid Preview" keys for small-scale testing. |
Note: Since prices are not fixed, please visit Atlas Cloud for the latest pricing information.
Pro Tip: When scaling, use asynchronous batch processing on Atlas Cloud. This allows you to submit dozens of "Ingredients to Video" requests simultaneously rather than waiting in a web-based queue, drastically reducing your total time-to-delivery.
Atlas Cloud Veo 3.1 API Python Implementation Example
The following script demonstrates how to authenticate with the Atlas Cloud API and submit a generation request. This example uses the Reference-to-Video capability, allowing you to pass up to three images to define your character or scene.
plaintext1import requests 2import time 3 4# Step 1: Start video generation 5generate_url = "https://api.atlascloud.ai/api/v1/model/generateVideo" 6headers = { 7 "Content-Type": "application/json", 8 "Authorization": "Bearer $ATLASCLOUD_API_KEY" 9} 10data = { 11 "model": "google/veo3.1/image-to-video", 12 "aspect_ratio": "16:9", 13 "duration": 8, 14 "generate_audio": True, 15 "image": "{image to use for the generation}.jpeg", 16 "last_image": "{image to use for the generation}.jpeg", 17 "negative_prompt": "example_value", 18 "prompt": "{your prompt}", 19 "resolution": "1080p", 20 "seed": 1 21} 22 23generate_response = requests.post(generate_url, headers=headers, json=data) 24generate_result = generate_response.json() 25prediction_id = generate_result["data"]["id"] 26 27# Step 2: Poll for result 28poll_url = f"https://api.atlascloud.ai/api/v1/model/prediction/{prediction_id}" 29 30def check_status(): 31 while True: 32 response = requests.get(poll_url, headers={"Authorization": "Bearer $ATLASCLOUD_API_KEY"}) 33 result = response.json() 34 35 if result["data"]["status"] in ["completed", "succeeded"]: 36 print("Generated video:", result["data"]["outputs"][0]) 37 return result["data"]["outputs"][0] 38 elif result["data"]["status"] == "failed": 39 raise Exception(result["data"]["error"] or "Generation failed") 40 else: 41 # Still processing, wait 2 seconds 42 time.sleep(2) 43 44video_url = check_status()
Key API Parameters for Cinematic Control
- images (Array): Accepts 1 to 3 image URLs or Base64 strings. Use these to anchor your character's identity for AI character consistency.
- generate_audio (Boolean): Set to True to leverage Veo 3.1’s native audio generation, which syncs environmental soundscapes to the visual motion automatically.
- durationSeconds: Choose between 4, 6, or 8 seconds to fit your narrative requirements.
By utilizing this programmatic approach, developers can transition from manual creative testing to a robust, AI-driven cinematic scene production line, reducing the cost of high-quality video to via the Atlas Cloud platform.
Conclusion
Tasks that used to take hours of careful keyframing and editing are now done in minutes. This speed lets filmmakers spend more time on great stories and less time fixing technical bugs. Are you ready to create your first AI movie scene? Just pick your three main "ingredients" and get started today.
FAQ
How do I add images to Google Veo 3.1?
Adding "Ingredients" is a straightforward process within the Google Cloud Console or Google Vids interface. Under the "Reference-to-video (Subject)" task menu, you will find a "Subject Images" section. Tap "Add" and upload up to three reference photos from your computer or phone. These pictures work like a blueprint for your project. They show the AI exactly which person, item, or background you want to bring to life. This helps the tool understand the unique look of your animation.
Why does my character's face still change slightly?
Even after the January 2026 update boosted identity stability, small "drift" issues still happen. Usually, this occurs when your starter photos look too similar.
To correct it, choose three reference images that show the figure from various angles, such as a front view and a side profile. You should also use a structured JSON prompt to set traits like "wavy short hair" or "hazel eyes." This extra data helps the model stay accurate during fast or complex movements.
How long can Veo 3.1 clips be?
Most clips last about 8 seconds. But Veo 3.1 is built for longer stories. You can use the Scene Extension tool to connect these segments one by one. This lets you create full stories that run for a minute or more. The AI keeps the look and sound consistent across your whole project, making the transitions smooth and natural.
Is Veo 3.1 available for commercial use?
Yes, but usage rights are tied to your subscription tier. According to Google’s 2026 enterprise policies, full commercial rights—including the ability to use outputs in paid advertising and corporate campaigns—are granted to users on Vertex AI or Gemini Enterprise plans. It is important to note that all commercial content must include the SynthID digital watermark and, per the 2026 Generative AI Safety Pact, should be labeled as "AI-generated" when uploaded to platforms like YouTube to ensure transparency and maintain monetization eligibility.
| Tier | Usage Rights | Features |
|---|---|---|
| Free / Basic | Personal Only | Watermarked, no commercial redistribution. |
| Pro / Advanced | Limited Commercial | Suitable for personal branding and portfolios. |
| Enterprise | Full Commercial | Includes legal indemnity and resale permissions. |


