The Viral "AI Behind-the-Scenes" Trend Unveiled: How to Create Hollywood-Level Crossovers with Atlas Cloud
Master the art of the "AI Time Travel" video. Combine NanoBanana Pro for photorealistic images with Kling 2.5 Turbo for seamless video transitions. Double your efficiency, zero experience required.
Have you seen the "AI Time Travel" videos taking over social media lately? You know the ones: a cyberpunk warrior casually drinking tea in Middle-earth, or taking a selfie with the Na'vi on Pandora.
Want to jump on this trend but feel intimidated by the complex toolchain? Usually, it involves generating images in Midjourney, animating them in Runway, and stitching everything together in Premiere—switching between five different apps and burning through expensive subscriptions.
Not anymore. Today, we’re showing you how to do it all in one place with Atlas Cloud. By integrating the high-definition Nano Banana Pro image model with the Kling 2.5 Turbo video model, we’re using "Start & End Frame" technology to create cinema-quality clips at a fraction of the cost.
Let’s dive in!
👋 Why is this trend exploding?
On TikTok and Instagram Reels, these "AI On-Set" videos are breaking the fourth wall. They create a massive visual contrast—like a futuristic soldier appearing in a vintage movie set—filmed in a shaky, handheld "mockumentary" style. This blend of hyper-realism and absurdity is absolute engagement gold.
We get DMs all the time: "Is this hard to make? Do I need multiple pro subscriptions? Do I have to rely on luck?"
Previously? Yes. But Atlas Cloud has lowered the barrier to entry and the price tag. No more platform hopping. No more wasting money on "failed generations." Here is your step-by-step workflow to create a Hollywood-level "Time Travel" blockbuster.
🚀 The Core Strategy (Read This First)
The secret to these videos isn't just "text-to-video." It’s a specific sequence:
- Generate the Photo: Create a hyper-realistic "on-set photo" that looks like it really happened.
- Animate the Transition: Use a video model to bridge two specific moments.
- The Result: A seamless behind-the-scenes clip.
Step 1: Prep Your "Time Traveler"
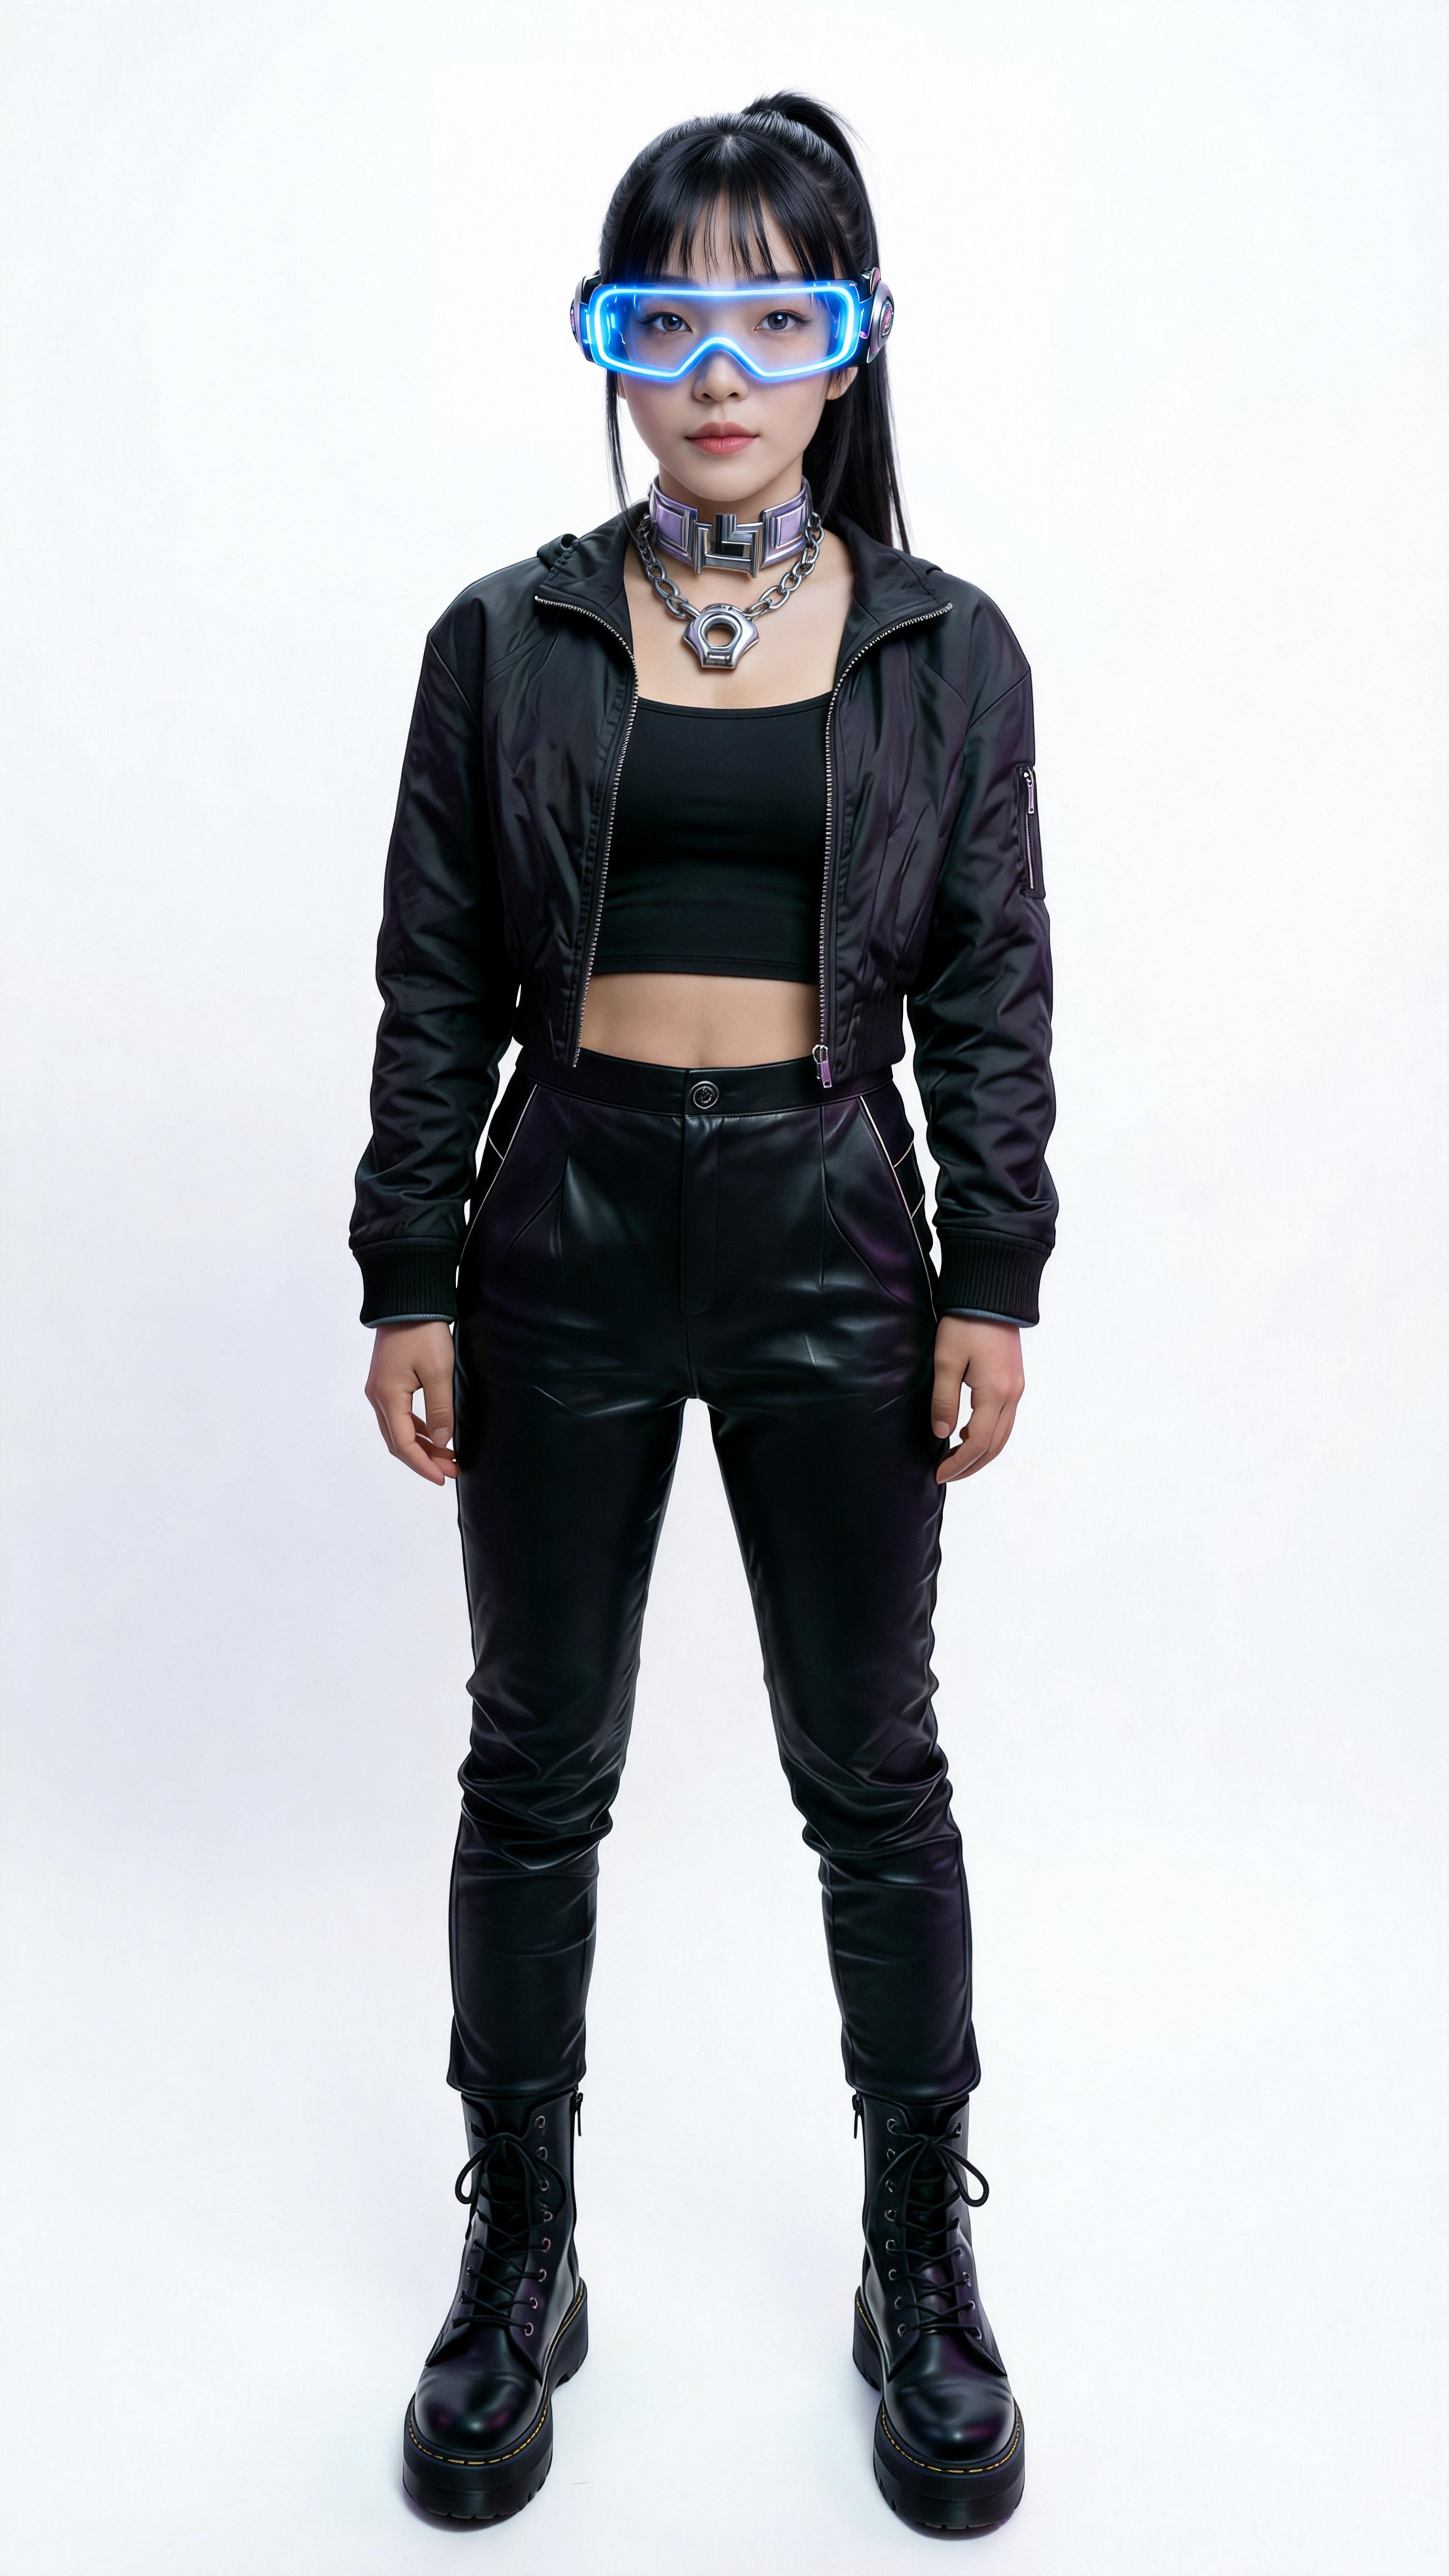
First, you need a reference image of your main character. Let's use A-01, a cool Cyberpunk girl, as our example.
💡 Atlas Tip: Use a clear full-body shot. This helps the model recognize character features for the blending process. (Ensure your reference aspect ratio matches your target output. If you want a 9:16 video, use a 9:16 reference photo).
📸 Step 2: Generate the "On-Set Photo" with NanoBanana Pro
Before we make it move, we need a flawless still image. This step requires a model with exceptional composition and fusion capabilities. NanoBanana Pro (available on Atlas Cloud) is perfect for "placing" your character into a movie scene with photorealistic lighting and texture.
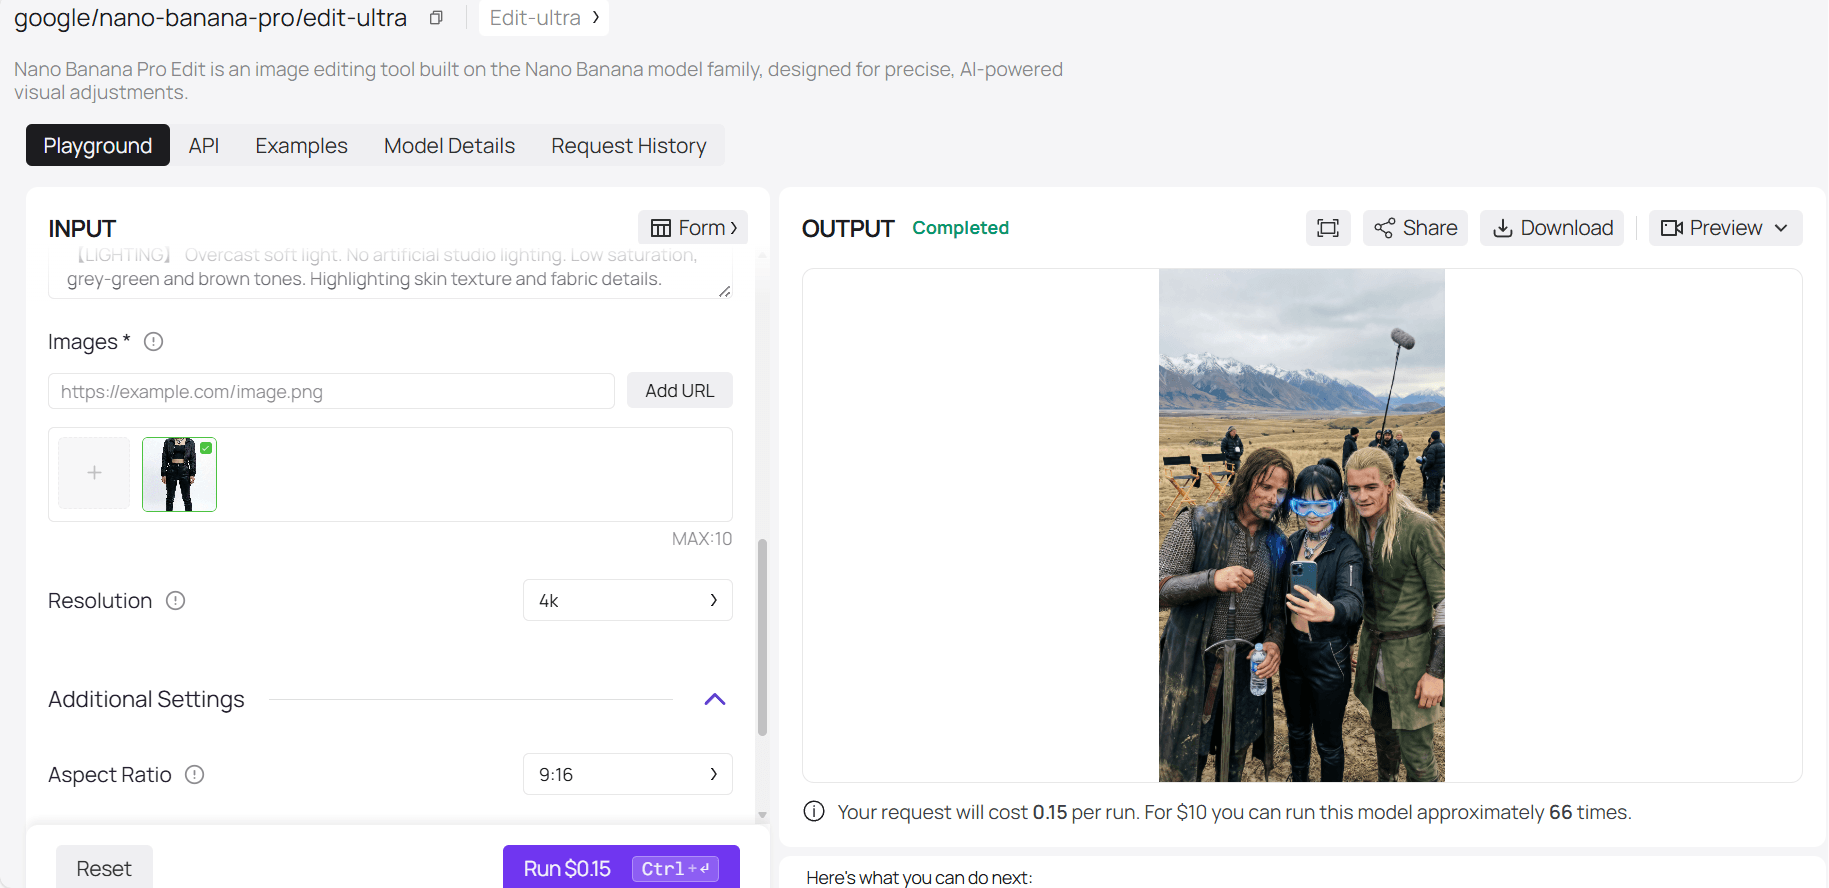
The Workflow:
- Open the Atlas Cloud Console.
- Select NanoBanana Pro from the Model Platform.
- Upload your character image as the "Reference Image" (Image Prompt).
- Input the "On-Set Prompt" (template below).
💡 Atlas Tip: How to switch movies instantly Want to switch from Lord of the Rings to Interstellar? You don't need to rewrite the prompt from scratch.
- Open any LLM (Large Language Model) on Atlas Cloud.
- Paste the prompt below and tell the AI: "The following is an AI image prompt. Please rewrite it to feature a group photo with characters from the movie [Insert Movie Name]. Keep the camera settings and atmosphere exactly the same."
In seconds, you'll have a brand new prompt that retains the perfect structure.
🌰 The Prompt Template (Lord of the Rings Example):
plaintext1【CAMERA】 iPhone original camera aesthetic, casual snapshot, mild sharpening, film grain, 9:16 vertical. Looks like a photo taken by crew members in the New Zealand wilderness during a break. Not a movie poster, but a candid moment showing "exhaustion and dirt" after a long shoot. 2 3【MAIN ACTION】 The character from the Reference Image (keeping her cyberpunk glasses, necklace, and leather jacket to create a time-travel contrast) is taking a group photo with core characters from "The Lord of the Rings": 41. Aragorn (Viggo Mortensen): "Strider" era. Greasy, wet hair, mud on chin. Wears a worn green cloak and chainmail. Leaning on his sword (Andúril), holding a modern plastic water bottle (to emphasize the on-set vibe). Eyes are gentle but tired. 52. Legolas (Orlando Bloom): Elegant but relaxed. Wears green/brown elven tunic. Blonde wig slightly messy in the wind. Standing straight, smiling faintly at the camera, perhaps unstrapping his quiver. 6 7【INTERACTION】 Standing against the epic New Zealand landscape. Your character is in the middle. The blue light from your cyberpunk glasses reflects on Aragorn's armor. They stand close, like colleagues finishing a shift. Expressions are natural, relieved, "Finally done with this take." 8 9【ENVIRONMENT】 Rohan Plains or Emyn Muil rock quarry. Background: New Zealand snow-capped mountains and tussock grass. Ground: Muddy and rocky. 10Details: Canvas director's chairs visible on the edge of the frame. Maybe a boom mic or a wind shield in the distance. 11Atmosphere: Cold air, windy, overcast light. No magic effects, just raw physical reality. 12 13【LIGHTING】 Overcast soft light. No artificial studio lighting. Low saturation, grey-green and brown tones. Highlighting skin texture and fabric details.
✨ Why this works: A perfect static photo is 90% of the battle. NanoBanana Pro ensures the lighting on your cyberpunk character matches the gloomy Middle-earth sky, eliminating that "bad Photoshop" look.
🎬 Step 3: Animate with Kling 2.5 Turbo
Now, let's bring it to life. Many video models distort faces when they move. However, Kling 2.5 Turbo on Atlas Cloud offers "Start & End Frame Control."
This locks your uploaded photos as the absolute beginning and end points of the video, generating a smooth 5-second transition between them.
The Workflow:
- Select Kling 2.5 Turbo in the Atlas Cloud Model Platform.
- Logic:
- Start Frame: Upload a photo of your character standing alone (or walking into frame).
- End Frame: Upload the "Group Photo" we generated in Step 2.
- Input the video prompt.
🌰 Video Prompt:
plaintext1The woman with blue-rimmed glasses and a high ponytail walks naturally from the left side of the frame towards the right. The handheld camera follows her movement smoothly. She enters the scene and stops next to the other characters. She turns to face the camera and poses naturally for a group photo. The transition should be seamless, looking like a candid behind-the-scenes documentary clip.
✨ The Atlas Advantage:
- Stability: Kling 2.5 Turbo keeps faces consistent. No morphing into monsters.
- Cost: Here is the best part. Generating a 5-second HD video on Atlas Cloud costs as little as $0.35. Compared to monthly subscriptions on other platforms, this is an absolute steal.
🏆 Why Creators Are Switching to Atlas Cloud
Content creation is a battle of Efficiency, Quality, and Cost.
- Stop Platform Hopping 🙅 Don't generate images in one app and video in another. Atlas Cloud integrates the best-in-class Image Gen (NanoBanana Pro) and Video Gen (Kling) in one browser tab.
- Higher Success Rate 🎯 Our optimized workflows reduce the "fail rate." High-quality input images + controllable video generation means every click counts. You get more usable content for the same budget.
- Unbeatable Value 💰 We are aggressive on pricing. We've optimized the tech to bring costs down. $0.35 for a high-end AI video allows you to experiment and produce at scale without breaking the bank.
👇Experience NanoBanana Pro image model & Kling 2.5 Turbo on Atlas Cloud today.
Atlas Cloud lets you use NanoBanana Pro image model & Kling 2.5 Turbo first in a playground, then via a single API.
Method 1: Use directly in Atlas Cloud playground
Method 2: Access via API
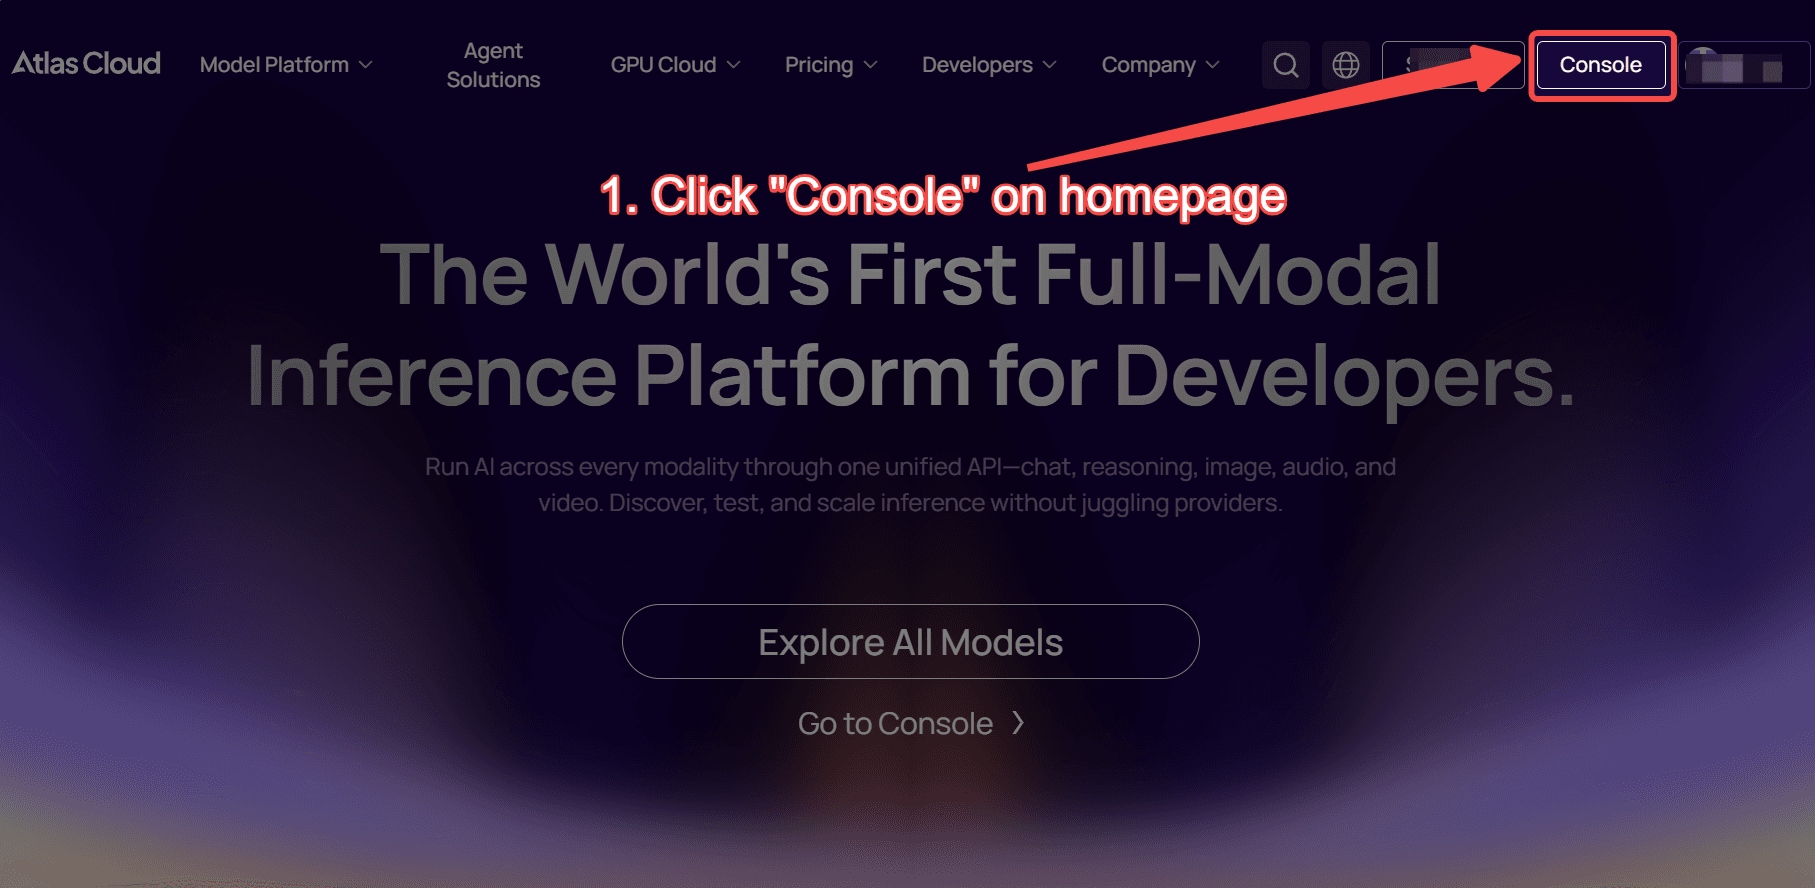
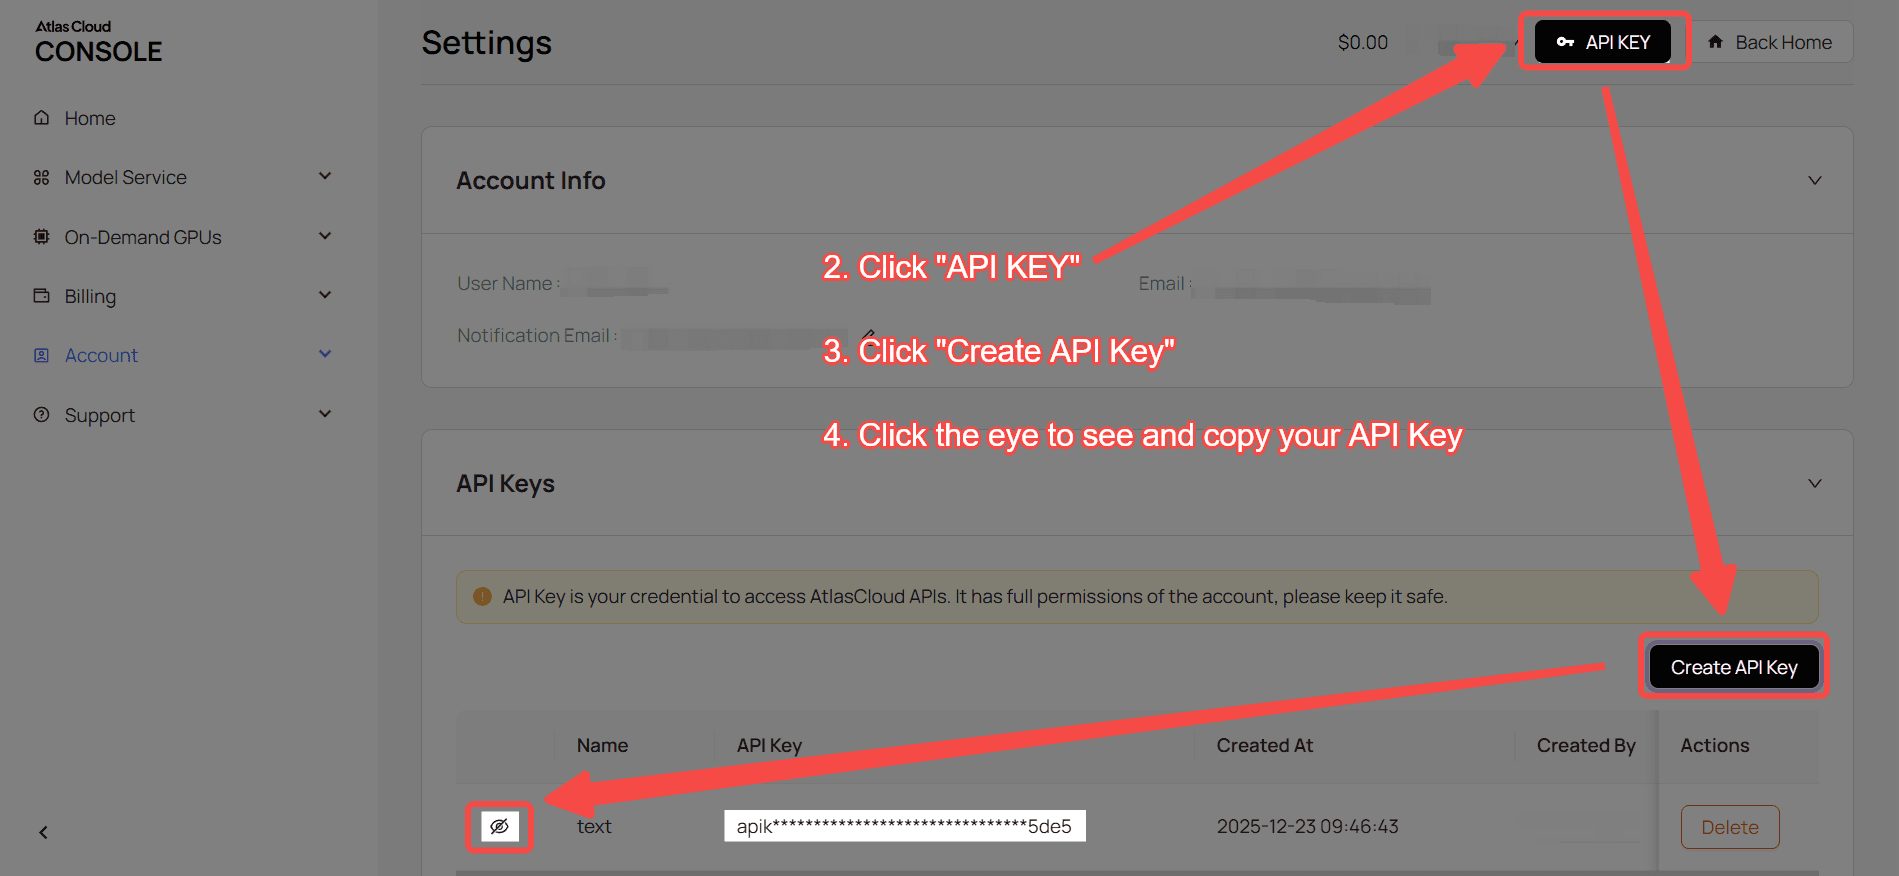
Step 1: Get your API key
Create an API key in your console and copy it for later use.
Step 2: Check the API documentation
Review the endpoint, request parameters, and authentication method in our API docs.
Step 3: Make your first request (Python example)
Nano Banana Pro Edit Ultra as example.
plaintext1import requests 2import time 3 4# Step 1: Start image generation 5generate_url = "https://api.atlascloud.ai/api/v1/model/generateImage" 6headers = { 7 "Content-Type": "application/json", 8 "Authorization": "Bearer $ATLASCLOUD_API_KEY" 9} 10data = { 11 "model": "google/nano-banana-pro/edit-ultra", 12 "aspect_ratio": "example_value", 13 "enable_base64_output": False, 14 "enable_sync_mode": False, 15 "images": [ 16 "https://static.atlascloud.ai/media/images/1763663642170358426_rcwQxM5q.jpeg" 17 ], 18 "output_format": "png", 19 "prompt": "Translate the anime subject into cinematic photorealism. Natural skin texture, accurate facial anatomy, grounded proportions. High-dynamic-range lighting, shallow depth of field, filmic contrast. 35mm lens perspective, subtle grain, live-action production design, True-to-life color grading. Frame as a live-action movie still.", 20 "resolution": "4k" 21} 22 23generate_response = requests.post(generate_url, headers=headers, json=data) 24generate_result = generate_response.json() 25prediction_id = generate_result["data"]["id"] 26 27# Step 2: Poll for result 28poll_url = f"https://api.atlascloud.ai/api/v1/model/prediction/{prediction_id}" 29 30def check_status(): 31 while True: 32 response = requests.get(poll_url, headers={"Authorization": "Bearer $ATLASCLOUD_API_KEY"}) 33 result = response.json() 34 35 if result["data"]["status"] == "completed": 36 print("Generated image:", result["data"]["outputs"][0]) 37 return result["data"]["outputs"][0] 38 elif result["data"]["status"] == "failed": 39 raise Exception(result["data"]["error"] or "Generation failed") 40 else: 41 # Still processing, wait 2 seconds 42 time.sleep(2) 43 44image_url = check_status()