For years, making high-quality AI video felt like putting a puzzle together. Developers had to use tools that only made short 5 or 10-second clips. These clips didn't always match, needed separate audio work, and took a lot of manual editing to fix. This was okay for quick social media posts or short art, but it didn't work for big "mass production" jobs. It just wasn't enough for movies, long ads, or full-length school videos.
That's all changing now. With the release of Kling 3.0, the landscape of AI video generation is transitioning into its production-ready phase. Developers finally have access to a robust Video API capable of producing continuous, coherent, and synchronized audio-visual content at scale, making true automated video generation API workflows a reality.

Key Upgrades: Redefining "Production Ready"
The core improvements in Kling 3.0 can be summarized through two major advancements that address the limitations of previous versions:
- Video 3.0 Omni: This means audio and video are made together. Before, you had to make a clip first, then find a separate tool for music or voices, and finally sync them up yourself. Video 3.0 Omni builds the video and the right sounds—like talking, noise, or music—all at once. This perfect timing is a must for a movie feel and cuts your editing work down a ton.
- Motion Control (Multi-Shot Power): Older versions had some control, but Kling 3.0 is a huge leap for camera moves and complex shots. Most importantly, it does more than just one shot at a time. The API now understands prompts with several linked camera angles, actions, and scene changes. This lets devs create long sequences—like a chase or a talk—with just one call. It keeps things smooth for 15 seconds straight, way past the old 5 or 10-second limits. These clips are perfect for building bigger video projects.
Kling 2.6 vs. 3.0: What’s New
To see how they really compare, here is a quick look at the tech specs for Kling 2.6 and 3.0. Heads up: always check the official [Kling 3.0 API docs] for the latest on links, speed limits, and file types.
| Feature | Kling 2.6 | Kling 3.0 |
| Max Generation Duration | Up to 10 seconds (typically generated as 5s segments) | Up to 15 seconds (native, single-shot or multi-shot) |
| Native Audio Support | No (External mixing required) | Yes (Audio-visual synchronized output) |
| Generation Model | Diffusion-based | Kling v3.0 & Video O3 (End-to-end Audio-Video) |
| Max Output Resolution | Typically 1080p | 1080p / 2K (Enhanced details and clarity) |
| Multi-Shot Coherence | Low (Requires clever prompting per shot) | High (Native support for camera/scene flow) |
| API Endpoints | Standard video generation, style control | Extended for multi-shot parameters, audio-only options, advanced motion control |
Kling 3.0 makes it way easier to mass-produce great, long-form videos. By using this new API, devs can build tools that turn scripts into cinematic scenes with perfect sound automatically. It is a huge move toward making AI video creation actually fast and efficient.
The Developer’s Guide to Mass AI Video Production
For devs, the fun starts when you swap manual work for an automated video API. If you plan to crank out hundreds of cinematic clips every hour, you'll need a tough backend to handle that much work.
Architecture: Setting Up for Scale
Building a real app with a video API takes more than just one simple request. You have to build a system that deals with slow wait times, keeps your logins safe, and tracks your spending as it happens.
Authentication & Environment
Kling 3.0 utilizes industry-standard security protocols. For developers using platforms like Atlas Cloud, the process typically involves JWT (JSON Web Token) verification.
Quick Start:
-
Get Your Key: Log in to your dash and grab your unique API Key and Secret. Taking Atlas Cloud as an example:

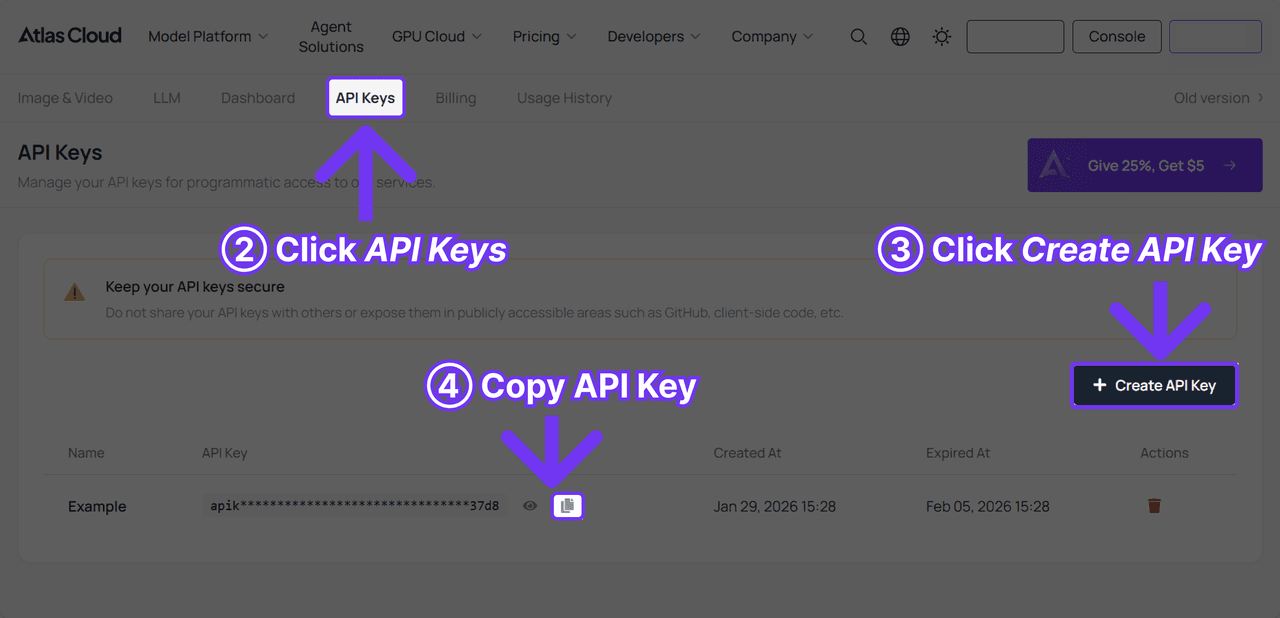
-
Trade for a Token: Use those details to get a temporary JWT. Put this token in the header of every call you make.
-
Hide Your Secrets: Don't type your keys directly into your code. Use a .env file or a proper secret manager instead.
Example Header Structure:
HTTP
plaintext1Authorization: Bearer <your_jwt_token> 2Content-Type: application/json
The Mass Production Loop
Since generating a 15-second high-definition video can take several minutes, a synchronous "wait-for-response" approach will crash your server. Instead, you must implement an asynchronous workflow.
The 4-Step Pipeline:
- Request: Send your prompt and parameters to the /v3/video/text-to-video endpoint.
- Task ID: You’ll get a task_id from the API instantly. Toss this into Redis or Postgres and set the status to "pending."
- Getting the Result or Polling: Have your server hit the /v3/task/{task_id} link every 30 seconds to check for updates.
- Webhook (Recommended): You provide a callback_url. The Kling API sends a POST request to your server the moment the video is ready.
- Storage: Once completed, the API provides a temporary S3 or CDN link. Your script should immediately download this file to your own permanent storage (Google Cloud Storage or AWS S3) before the link expires.
Cost Management: "Cost per Video Second"
To maintain a profitable SaaS or internal tool, you must track your burn rate. Kling 3.0 generally offers two modes that affect your billing and generation speed.
| Mode | Resolution | Processing Priority | Estimated Cost Factor |
| Standard | 720p / 1080p | Medium | 1.0x (Baseline) |
| Professional | 1080p / 2K | High | 2.5x - 3.0x |
Cost Calculation Formula:
TotalCost=(DurationtimesModeRate)+(Storage/Bandwidth)Total Cost = (Duration \\times Mode Rate) + (Storage/Bandwidth)TotalCost=(DurationtimesModeRate)+(Storage/Bandwidth)
Developer Tip: Use the Standard mode for rapid prototyping and prompt testing, then switch to Professional mode for final "production" renders.
Master the Multi-Shot API Schema
One of the most revolutionary features found in the Kling 3.0 API documentation is the ability to move beyond a single "clip" and think in terms of entire scenes. This is where Advanced prompt engineering for video becomes essential.
Thinking in Storyboards: The guidances Array
Instead of sending one long paragraph and hoping the AI understands the transitions, the Kling 3.0 schema allows you to define a guidances array. This acts as a digital storyboard, allowing up to 6 distinct shots in one generation.
Operational Code Example (JSON Payload):
JSON
plaintext1{ 2 "model": "kling-v3", 3 "guidances": [ 4 { 5 "index": 0, 6 "prompt": "Wide shot: Neon lights reflected in puddles on a futuristic cyberpunk city street at night.", 7 "duration": 3 8 }, 9 { 10 "index": 1, 11 "prompt": "Medium shot: Entering the screen, a detective wearing a trench coat checks a holographic map.", 12 "duration": 5 13 }, 14 { 15 "index": 2, 16 "prompt": "Close up: The detective's eyes narrowing as he spots a target off-screen.", 17 "duration": 4 18 } 19 ], 20 "motion_has_audio": true 21}
Subject Binding for Consistency
A common failure in AI video is "character bleed," where a person's face changes between shots. Optimizing AI prompts for consistency requires using the image_reference and video_urls parameters.
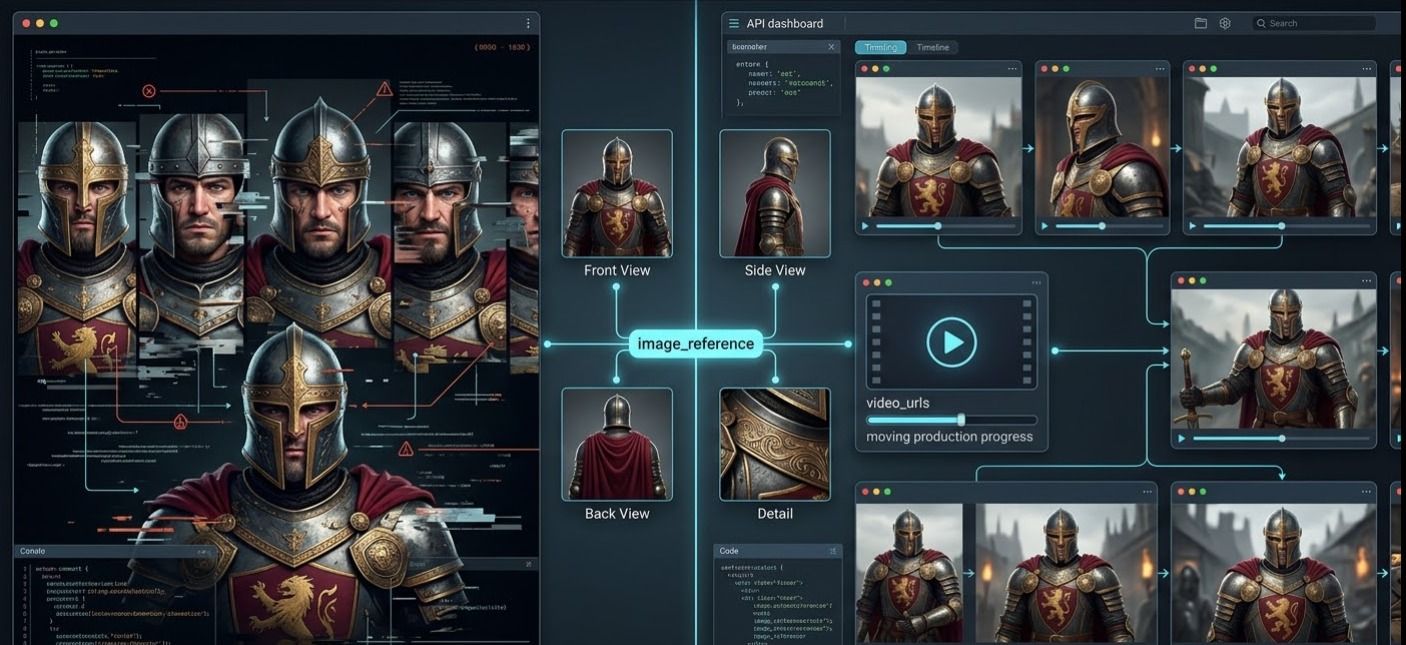
- Image Reference: You can upload up to 4 images (Front, Side, Back, Detail) of a character or product. The API uses these as "anchors" to ensure the subject remains identical throughout the 15-second generation.
- Video Reference: If you have an existing clip of a product moving, you can provide the URL to guide the AI on how that specific object should behave in the new generation.
Top AI video generation tips for consistency:
- Match the lighting: If you put "golden hour" in the first shot, put it in every other shot too. This stops the light from jumping around between scenes.
- Name your characters: Don't just say "a man." Give them a name like "Character_Alpha" so the AI doesn't lose track of who is who.
Native Audio Integration & Dialogue
Kling 3.0 is the first major API to successfully merge lip-syncing and soundscapes natively. By setting "motion_has_audio": true, the model generates spatial sound based on the prompt.
How to make cinematic AI videos with sound:
To get the best results, use structured dialogue tags within your text prompts. This informs the model of both the speaker and the emotional tone.
- Prompt Example: [Character: Male, deep voice, urgent]: "We have to leave before the drones arrive!" [Sound: Distant sirens and humming electronics]
Technical Optimization for Better "Directors"
In a mass-production environment, relying on "vibes" and poetic descriptions is a recipe for high failure rates. When working with the Kling 3.0 API, developers must transition from artistic prompting to structured, technical direction. To achieve the best practices for AI text-to-video, your system should treat every prompt as a sequence of explicit physical and cinematic instructions.
Prompt Engineering for APIs: Explicit Motion Instructions
The Kling 3.0 model series responds most accurately to terminology used by professional cinematographers. Instead of saying "the camera moves around," specify the axis and the speed. This level of detail is crucial for optimizing AI prompts for consistency in batch processing.
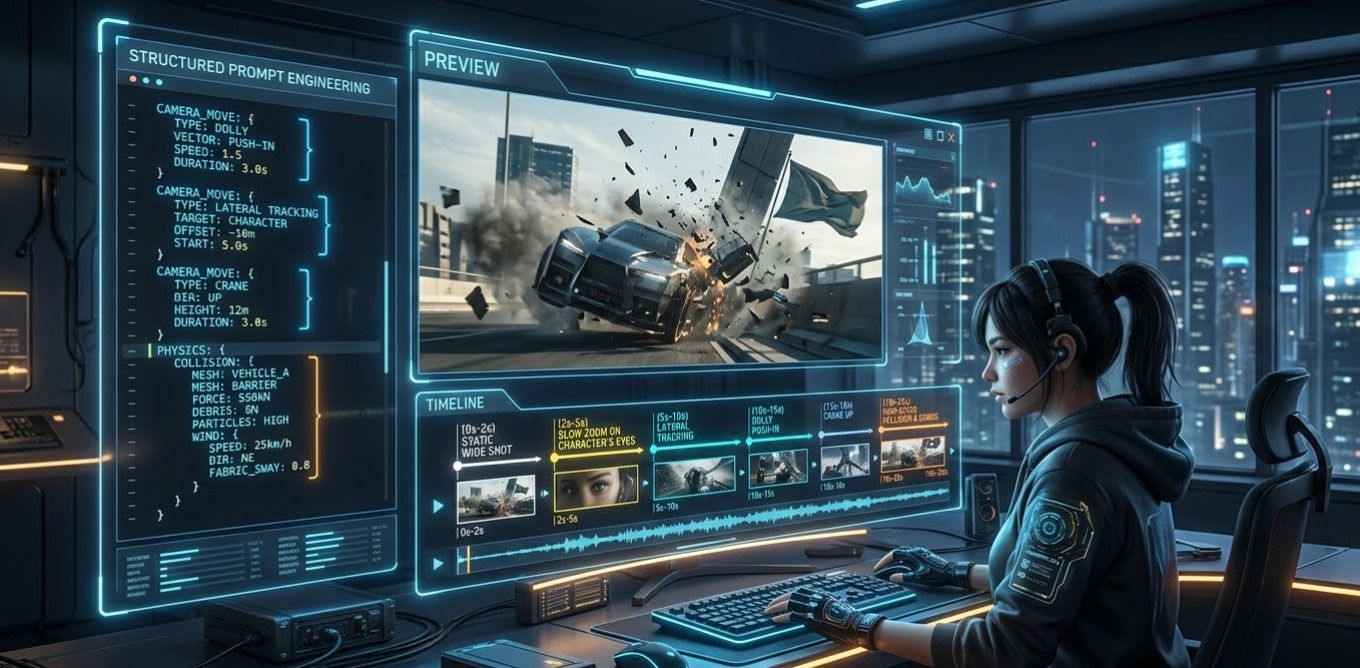
- Camera Movement: Use terms like “dolly push-in,” “lateral tracking,” “crane up,” or “360-degree orbit.”
- Physics-Driven Impact: Describe the energy of the scene. For instance, “high-speed collision with realistic debris physics” or “soft fabric simulation with wind resistance.”
- Temporal Pacing: Kling 3.0 allows for duration-specific triggers. You can specify: “(0s-2s) static wide shot, (2s-5s) slow zoom on the character’s eyes.”
Example Prompt Schema for API Integration:
[Camera: Shaky handheld]
[Subject: Cyberpunk runner in the rain]
[Action: Person jumps over a puddle with real water splashes]
[Lens: 35mm style, neon glow]
Resolution & Aspect Ratios
Getting your image shape and video size to match is the number one "hidden mistake" people make with video APIs. If you give it a square photo but want a wide 16:9 video, the AI will just make up fake pixels to fill the gaps.
Check this chart to get your dimensions right:
| Aspect Ratio | Mode | Resolution (Width x Height) | Common Use Case |
| 16:09 | Standard (720p) | 1280 x 720 | YouTube / Desktop |
| 16:09 | Professional (1080p) | 1920 x 1080 | Cinematic / TV |
| 9:16 | Standard (720p) | 720 x 1280 | TikTok / Reels / Shorts |
| 9:16 | Professional (1080p) | 1080 x 1920 | High-end Mobile Ads |
| 1:01 | Standard (720p) | 960 x 960 | Instagram Feed |
| 1:01 | Professional (1080p) | 1440 x 1440 | Premium Social Posts |
Start & End Frame Control
For developers aiming to make cinematic AI videos longer than 15 seconds, the "Start and End Frame" function is your most powerful tool. By uploading two similar images (Image A as the first frame and Image B as the last), the Kling 3.0 API "designs the in-between," ensuring a smooth, logical transition.
Operational Code Snippet:
JSON
plaintext1{ 2 "model": "kling-v3", 3 "image_reference": "url_to_start_frame.jpg", 4 "image_tail": "url_to_end_frame.jpg", 5 "prompt": "The camera performs a slow dolly zoom between the two points, maintaining character posture.", 6 "duration": 5 7}
Troubleshooting & High-Volume Pitfalls
Scaling to thousands of videos introduces edge cases that manual users never encounter. Here is how to navigate the technical hurdles of the Kling 3.0 API documentation.

Handling Occlusions: Face Restoration
One of the "Top AI video generation tips" for character-heavy content is leveraging the new Face Occlusion Restoration. In previous versions, if a character put a hand in front of their face or wore a hat, the facial features would often "melt" or change.
- The Fix: When using the API, enable face_consistency: true. This forces the model to refer back to your image_reference (Element Binding) to reconstruct the face even when partially blocked.
Handling API Limits and 429s
The 429 error will occur in high-volume production. A resilient system uses exponential backoff with jitter; a rigid system will simply fail.
How to manage your queue:
- Watch your speed: Use a local queue to stay at about 80% of your allowed rate. Keeping this buffer helps you avoid hitting the limit if things spike suddenly.
- Wait and retry: If a 429 pops up, wait 2^n + \\text{random\\\_jitter seconds. That "jitter" part is key—it stops all your failed tasks from hitting the server again at the same exact moment.
- Cap your tasks: Stick to 5 parallel jobs per API key. Unless you’re on a huge enterprise plan, trying to do more at once is just asking for a temporary ban.
Content Safety: Navigating Filters
Kling 3.0 maintains strict Content Safety protocols. Unlike open-source models, the Kling API runs prompts through multiple moderation layers before generation begins.
| Filter Category | Trigger Example | API Behavior |
| NSFW/Suggestive | Explicit attire or poses | Instant Request Rejection (Error 400) |
| Violence/Gore | Graphic injury descriptions | Request Rejection or "Empty Video" output |
| Sensitive Figures | Political or protected personas | Filtering based on regional guidelines |
Pro Tip: To save your credits, run a quick check script first. Use a small tool like Llama-3-Guard to catch risky prompts before they hit the Kling API. This keeps your video projects safe and stops your account from getting flagged for rule breaks.
Best Practices for AI Text-to-Video (Developer Edition)
To wrap up your integration, follow these best practices for AI text-to-video to ensure high success rates and low "hallucination" levels:
- Negative Prompting: Fill the negative_prompt box with things you don’t want, like "blurry, weird limbs, text, or low quality." This keeps the AI from adding those common mistakes.
- Matching Resolutions: Make sure your image_reference shape is the same as your final video (like 16:9). If they don’t match, the AI might crop your shot in a strange way.
- Saving the Seed: When you get a look you really like, lock in that seed number. Now you can change your text slightly without losing the overall style or layout.
- Batch Processing: To get the most done, send 10 to 20 tasks in one big group. Do this when the API's local time is late at night to get your results back much faster.
By using the multi-shot setup and keeping your characters consistent, you aren't just making clips. You are basically leading a digital film crew through your code.
Final Thoughts: The Future of Coded Cinema
Integrating Kling 3.0 isn't just about "making clips"—it’s about directing a virtual crew via code. By mastering the guidances array and implementing a robust webhook-based architecture, you can move from manual experimentation to a fully automated video engine.
My Final Advice: Don't neglect Negative Prompting. Always include [Negative: blurry, distorted limbs, text overlays] in your global config to keep your batch success rate above 90%.
FAQ
How do I ensure character and object consistency across a batch of 100+ videos?
Consistency is the biggest hurdle in Mass AI Video Production. For Kling 3.0, the "Golden Rule" is to combine Image References with Seed Locking.
- Image Reference Binding: Use the image_reference parameter to upload up to 4 angles of your subject (Front, Profile, 45-degree, and Back). This acts as a spatial anchor for the model.
- Seed Control: If you want to make a group of similar clips, use the same seed number from your first good result. This keeps the background patterns steady. It helps your lighting and textures look the same throughout the whole set.
- Negative Prompts: Always put [flicker, morphing, facial distortion] in your negative prompt box. This stops the AI from making weird glitches or adding "hallucinated" details when the video moves fast.
How to handle high-volume API requests affordably?
To build a professional Automated video generation API workflow, you must move away from synchronous requests.
- The Asynchronous Pattern: Do not wait for a live response. Send your request, save the task ID, and use a Webhook URL. Kling 3.0 will send the final video to your server when it is ready. This saves your server from wasting hundreds of hours just waiting.
- Smart Retries: Seeing a "Too Many Requests" error means it's time to pause. Start with a 5-second pause. After each failure, double that time and go to 10, 20, and 40 seconds.
- Tier Management: Use "Standard Mode" while you test your prompts. Switch to "Professional Mode" only for the final 1080p videos. This strategy can cut your API costs by up to 60% during the testing phase.
How does the "Multi-Shot" API schema differ from standard Video APIs?
Usually, AI video tools just make one short clip. Kling 3.0 is different because its Multi-Shot setup lets you act like a director by planning several scenes in one request.
- The Shot List: You can set up to 6 scenes, like moving from a Wide Shot to a Close Up, using the guidances setting. This helps the AI keep the background steady and the transitions smooth.
- Built-in Sound Sync: Most tools struggle with audio, but toggling "motion_has_audio": true lets the Video 3.0 Omni engine handle it. It builds sound effects and voices that fit the scene exactly. This saves you from making audio separately or trying to line up tracks by hand later.
| Feature | Standard AI Video API | Kling 3.0 Multi-Shot |
| Logic | Frame-by-frame | Storyboard-based |
| Transitions | Require manual stitching | Native AI-generated cuts |
| Audio | Silent or random noise | Context-aware sync |