대부분의 팀은 AI 영상 생성을 시작할 때, 영상 하나를 생성하고 다운로드한 뒤 다음 작업으로 넘어가는 식의 일회성 API 호출을 사용합니다. 이는 실험 단계에서는 충분한 방식입니다.
*최종 업데이트: 2026년 2월 28일*
모델들의 작동 모습은 아래에서 확인하세요:
파이프라인 아키텍처
코드를 작성하기 전에, 우리가 구축할 파이프라인의 상위 아키텍처는 다음과 같습니다:
plaintext1``` 2+-------------------+ +--------------------+ +------------------+ 3| 프롬프트 설정 | | Atlas Cloud API | | 결과물 저장소 | 4| (JSON/YAML) | | | | | 5| - prompts +---->+ /generateImage +---->+ /images/ | 6| - models | | /generateVideo | | /videos/ | 7| - parameters | | /prediction/get | | /manifest.json | 8+-------------------+ +--------------------+ +------------------+ 9 | | | 10 v v v 11+-------------------+ +--------------------+ +------------------+ 12| 파이프라인 엔진 | | 폴링 및 재시도 | | 비용 추적 | 13| | | | | | 14| - batch_generate | | - 지수 백오프 | | - 요청당 비용 | 15| - 동시성 제어 | | (Exponential) | | - 누적 비용 | 16| - 모델 라우팅 | | - 최대 재시도 횟수| | - 모델별 비용 | 17+-------------------+ +--------------------+ +------------------+ 18```
파이프라인은 다음과 같은 단순한 흐름으로 작동합니다:
- 구조화된 입력 파일에서 프롬프트 설정을 읽어옵니다.
- 각 프롬프트를 적절한 모델 및 엔드포인트(이미지 또는 비디오)로 라우팅합니다.
- 제어된 동시성을 사용하여 Atlas Cloud API로 모든 요청을 전송합니다.
- 지수 백오프(Exponential Backoff) 및 재시도 로직을 사용하여 결과를 폴링(Polling)합니다.
- 완료된 결과물을 다운로드하여 정리된 디렉토리에 저장합니다.
- 비용을 추적하고 요약 매니페스트 파일을 생성합니다.
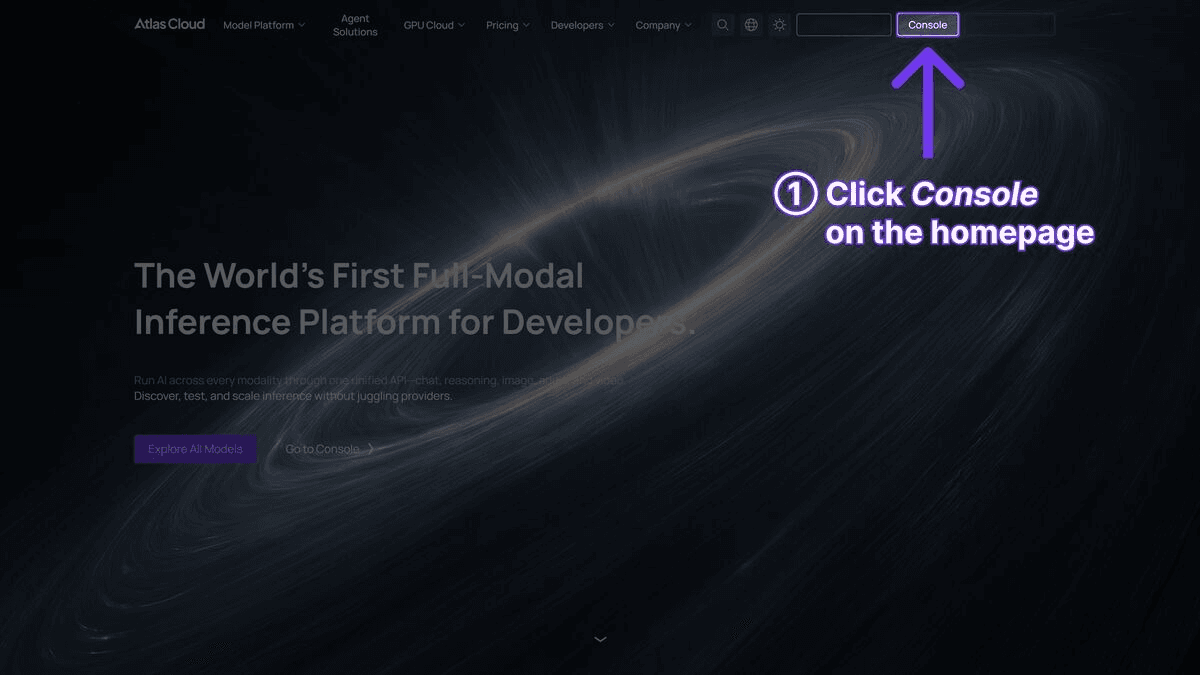
시작하기: API 액세스
1단계: API 키 발급받기
Atlas Cloud에 가입한 후 대시보드에서 API 키를 생성하세요.

2단계: 의존성 설치
plaintext1```bash 2pip install requests pyyaml 3```
복잡한 프레임워크는 필요 없습니다. 이 파이프라인은 HTTP 호출을 위한 requests, 설정 파일을 위한 pyyaml, 그리고 동시성과 파일 처리를 위한 파이썬 표준 라이브러리만을 사용합니다.
전체 파이프라인 코드
아래는 완성된 작동 파이프라인 코드입니다. 각 섹션에 대한 설명은 코드 블록 뒤에 이어집니다.
plaintext1```python 2import requests 3import time 4import json 5import os 6import logging 7from concurrent.futures import ThreadPoolExecutor, as_completed 8from dataclasses import dataclass, field 9from typing import Optional 10from datetime import datetime 11 12# 로깅 설정 13logging.basicConfig( 14 level=logging.INFO, 15 format="%(asctime)s [%(levelname)s] %(message)s", 16 datefmt="%Y-%m-%d %H:%M:%S" 17) 18logger = logging.getLogger("atlas_pipeline") 19 20@dataclass 21class GenerationResult: 22 """단일 생성 요청의 결과를 저장합니다.""" 23 name: str 24 model: str 25 media_type: str # "image" 또는 "video" 26 status: str # "success", "failed", "error" 27 output_url: Optional[str] = None 28 local_path: Optional[str] = None 29 cost_estimate: float = 0.0 30 duration_seconds: float = 0.0 31 error_message: Optional[str] = None 32 33class AtlasCloudClient: 34 """Atlas Cloud API를 위한 클라이언트 래퍼입니다.""" 35 36 BASE_URL = "https://api.atlascloud.ai/api/v1" 37 38 # 모델별 요금 (대략적인 수치) 39 PRICING = { 40 "black-forest-labs/flux-2-pro/text-to-image": 0.04, # 이미지당 41 "google/imagen4-ultra/text-to-image": 0.06, # 이미지당 42 "bytedance/seedance-v1.5-pro/text-to-video": 0.022, # 초당 43 "google/veo3.1/text-to-video": 0.03, # 초당 44 "openai/sora-v2/text-to-video": 0.15, # 초당 45 } 46 47 def __init__(self, api_key: str): 48 self.api_key = api_key 49 self.session = requests.Session() 50 self.session.headers.update({ 51 "Authorization": f"Bearer {api_key}", 52 "Content-Type": "application/json" 53 }) 54 55 def generate_image( 56 self, 57 model: str, 58 prompt: str, 59 width: int = 1024, 60 height: int = 1024 61 ) -> dict: 62 """이미지 생성 요청을 전송합니다.""" 63 response = self.session.post( 64 f"{self.BASE_URL}/model/generateImage", 65 json={ 66 "model": model, 67 "prompt": prompt, 68 "width": width, 69 "height": height 70 } 71 ) 72 response.raise_for_status() 73 return response.json() 74 75 def generate_video( 76 self, 77 model: str, 78 prompt: str, 79 duration: int = 5, 80 resolution: str = "1080p" 81 ) -> dict: 82 """영상 생성 요청을 전송합니다.""" 83 response = self.session.post( 84 f"{self.BASE_URL}/model/generateVideo", 85 json={ 86 "model": model, 87 "prompt": prompt, 88 "duration": duration, 89 "resolution": resolution 90 } 91 ) 92 response.raise_for_status() 93 return response.json() 94 95 def poll_result( 96 self, 97 request_id: str, 98 max_wait: int = 300, 99 initial_interval: int = 5, 100 max_interval: int = 30 101 ) -> Optional[dict]: 102 """지수 백오프를 사용하여 결과물을 폴링합니다.""" 103 start_time = time.time() 104 interval = initial_interval 105 106 while time.time() - start_time < max_wait: 107 try: 108 response = self.session.get( 109 f"{self.BASE_URL}/model/prediction/{request_id}/get" 110 ) 111 data = response.json() 112 113 if data["status"] == "completed": 114 return data 115 elif data["status"] == "failed": 116 logger.error(f"생성 실패: {data.get('error', '알 수 없는 오류')}") 117 return None 118 119 logger.debug(f"상태: {data['status']}, {interval}초 대기 중...") 120 time.sleep(interval) 121 interval = min(interval * 1.5, max_interval) 122 123 except requests.RequestException as e: 124 logger.warning(f"폴링 요청 실패: {e}, {interval}초 후 재시도") 125 time.sleep(interval) 126 127 logger.error(f"{request_id} 대기 시간이 {max_wait}초를 초과했습니다.") 128 return None 129 130 def estimate_cost(self, model: str, duration: int = 0) -> float: 131 """생성 요청 비용을 추산합니다.""" 132 base_price = self.PRICING.get(model, 0.05) 133 if "text-to-video" in model and duration > 0: 134 return base_price * duration 135 return base_price 136 137class VideoPipeline: 138 """이미지 및 영상의 배치 생성을 오케스트레이션합니다.""" 139 140 def __init__(self, api_key: str, output_dir: str = "pipeline_output"): 141 self.client = AtlasCloudClient(api_key) 142 self.output_dir = output_dir 143 self.results: list[GenerationResult] = [] 144 self.total_cost = 0.0 145 146 os.makedirs(os.path.join(output_dir, "images"), exist_ok=True) 147 os.makedirs(os.path.join(output_dir, "videos"), exist_ok=True) 148 149 def _download_file(self, url: str, filepath: str) -> bool: 150 try: 151 response = requests.get(url, timeout=60) 152 response.raise_for_status() 153 with open(filepath, "wb") as f: 154 f.write(response.content) 155 return True 156 except Exception as e: 157 logger.error(f"{url} 다운로드 실패: {e}") 158 return False 159 160 def _safe_filename(self, name: str, extension: str) -> str: 161 safe = name.lower().replace(" ", "_") 162 safe = "".join(c for c in safe if c.isalnum() or c == "_") 163 return f"{safe}.{extension}" 164 165 def _process_image(self, name: str, model: str, prompt: str, 166 width: int = 1024, height: int = 1024, 167 retries: int = 2) -> GenerationResult: 168 start = time.time() 169 cost = self.client.estimate_cost(model) 170 171 for attempt in range(retries + 1): 172 try: 173 logger.info(f"[이미지] '{name}' 생성 중 (시도 {attempt + 1})") 174 result = self.client.generate_image(model, prompt, width, height) 175 request_id = result["request_id"] 176 177 data = self.client.poll_result(request_id) 178 if data and data["status"] == "completed": 179 image_url = data["output"]["image_url"] 180 filename = self._safe_filename(name, "png") 181 filepath = os.path.join(self.output_dir, "images", filename) 182 self._download_file(image_url, filepath) 183 184 return GenerationResult( 185 name=name, model=model, media_type="image", 186 status="success", output_url=image_url, 187 local_path=filepath, cost_estimate=cost, 188 duration_seconds=time.time() - start 189 ) 190 except requests.HTTPError as e: 191 if e.response.status_code == 429: 192 wait = 2 ** (attempt + 2) 193 logger.warning(f"속도 제한됨, {wait}초 대기") 194 time.sleep(wait) 195 continue 196 logger.error(f"'{name}' 생성 중 HTTP 오류 발생: {e}") 197 except Exception as e: 198 logger.error(f"'{name}' 생성 오류: {e}") 199 200 if attempt < retries: 201 time.sleep(2 ** attempt) 202 203 return GenerationResult( 204 name=name, model=model, media_type="image", 205 status="failed", cost_estimate=0, 206 duration_seconds=time.time() - start, 207 error_message="최대 재시도 횟수 초과" 208 ) 209 210 def _process_video(self, name: str, model: str, prompt: str, 211 duration: int = 5, resolution: str = "1080p", 212 retries: int = 2) -> GenerationResult: 213 start = time.time() 214 cost = self.client.estimate_cost(model, duration) 215 216 for attempt in range(retries + 1): 217 try: 218 logger.info(f"[영상] '{name}' 생성 중 (시도 {attempt + 1})") 219 result = self.client.generate_video(model, prompt, duration, resolution) 220 request_id = result["request_id"] 221 222 data = self.client.poll_result(request_id, max_wait=600) 223 if data and data["status"] == "completed": 224 video_url = data["output"]["video_url"] 225 filename = self._safe_filename(name, "mp4") 226 filepath = os.path.join(self.output_dir, "videos", filename) 227 self._download_file(video_url, filepath) 228 229 return GenerationResult( 230 name=name, model=model, media_type="video", 231 status="success", output_url=video_url, 232 local_path=filepath, cost_estimate=cost, 233 duration_seconds=time.time() - start 234 ) 235 except requests.HTTPError as e: 236 if e.response.status_code == 429: 237 wait = 2 ** (attempt + 2) 238 logger.warning(f"속도 제한됨, {wait}초 대기") 239 time.sleep(wait) 240 continue 241 logger.error(f"'{name}' 생성 중 HTTP 오류 발생: {e}") 242 except Exception as e: 243 logger.error(f"'{name}' 생성 오류: {e}") 244 245 if attempt < retries: 246 time.sleep(2 ** (attempt + 1)) 247 248 return GenerationResult( 249 name=name, model=model, media_type="video", 250 status="failed", cost_estimate=0, 251 duration_seconds=time.time() - start, 252 error_message="최대 재시도 횟수 초과" 253 ) 254 255 def batch_generate(self, jobs: list[dict], max_workers: int = 3): 256 logger.info(f"{len(jobs)}개의 작업 시작 (워커: {max_workers}개)") 257 start_time = time.time() 258 259 with ThreadPoolExecutor(max_workers=max_workers) as executor: 260 futures = {} 261 for job in jobs: 262 if job["type"] == "image": 263 future = executor.submit( 264 self._process_image, 265 name=job["name"], 266 model=job["model"], 267 prompt=job["prompt"], 268 width=job.get("width", 1024), 269 height=job.get("height", 1024) 270 ) 271 elif job["type"] == "video": 272 future = executor.submit( 273 self._process_video, 274 name=job["name"], 275 model=job["model"], 276 prompt=job["prompt"], 277 duration=job.get("duration", 5), 278 resolution=job.get("resolution", "1080p") 279 ) 280 else: 281 logger.warning(f"알 수 없는 작업 유형: {job['type']}") 282 continue 283 futures[future] = job["name"] 284 285 for future in as_completed(futures): 286 result = future.result() 287 self.results.append(result) 288 self.total_cost += result.cost_estimate 289 status_icon = "OK" if result.status == "success" else "FAIL" 290 logger.info( 291 f"[{status_icon}] {result.name} -- " 292 f"USD{result.cost_estimate:.3f} -- " 293 f"{result.duration_seconds:.1f}s" 294 ) 295 296 elapsed = time.time() - start_time 297 self._save_manifest() 298 self._print_summary(elapsed) 299 300 def _save_manifest(self): 301 manifest = { 302 "generated_at": datetime.now().isoformat(), 303 "total_cost": round(self.total_cost, 4), 304 "total_jobs": len(self.results), 305 "successful": sum(1 for r in self.results if r.status == "success"), 306 "failed": sum(1 for r in self.results if r.status != "success"), 307 "results": [ 308 { 309 "name": r.name, 310 "model": r.model, 311 "type": r.media_type, 312 "status": r.status, 313 "output_url": r.output_url, 314 "local_path": r.local_path, 315 "cost": round(r.cost_estimate, 4), 316 "generation_time": round(r.duration_seconds, 1), 317 "error": r.error_message 318 } 319 for r in self.results 320 ] 321 } 322 manifest_path = os.path.join(self.output_dir, "manifest.json") 323 with open(manifest_path, "w") as f: 324 json.dump(manifest, f, indent=2) 325 logger.info(f"매니페스트가 {manifest_path}에 저장되었습니다.") 326 327 def _print_summary(self, elapsed: float): 328 success = sum(1 for r in self.results if r.status == "success") 329 failed = len(self.results) - success 330 cost_by_model = {} 331 for r in self.results: 332 cost_by_model[r.model] = cost_by_model.get(r.model, 0) + r.cost_estimate 333 334 print("\n" + "=" * 60) 335 print("파이프라인 요약") 336 print("=" * 60) 337 print(f"전체 작업 수: {len(self.results)}") 338 print(f"성공: {success}") 339 print(f"실패: {failed}") 340 print(f"총 비용: USD{self.total_cost:.4f}") 341 print(f"총 소요 시간: {elapsed:.1f}s") 342 print(f"\n모델별 비용:") 343 for model, cost in sorted(cost_by_model.items()): 344 short_name = model.split("/")[1] 345 print(f" {short_name}: USD{cost:.4f}") 346 print("=" * 60) 347```
파이프라인 활용
AtlasCloudClient 및 VideoPipeline 클래스가 정의되었다면, 일반적인 콘텐츠 제작 워크플로우에 다음과 같이 사용할 수 있습니다.
기본 사용법: 썸네일 + 영상
plaintext1```python 2API_KEY = "your-atlas-cloud-api-key" 3 4pipeline = VideoPipeline(api_key=API_KEY, output_dir="weekly_content") 5 6jobs = [ 7 # Flux 2 Pro로 썸네일 생성 8 { 9 "name": "제품 출시 썸네일", 10 "type": "image", 11 "model": "black-forest-labs/flux-2-pro/text-to-image", 12 "prompt": "눈길을 끄는 YouTube 썸네일, 굵은 텍스트 'NEW LAUNCH', " 13 "어두운 그라데이션 배경 위의 제품 강조, 활기찬 " 14 "포인트 컬러, 전문적인 디자인, 4K" 15 }, 16 { 17 "name": "튜토리얼 썸네일", 18 "type": "image", 19 "model": "black-forest-labs/flux-2-pro/text-to-image", 20 "prompt": "코딩 튜토리얼용 YouTube 썸네일, 코드 에디터와 " 21 "결과물이 보이는 분할 화면, 기술적 미학, " 22 "깔끔한 현대적 디자인, 가독성 좋은 굵은 텍스트" 23 }, 24 25 # Seedance 2.0으로 영상 생성 (비용 효율적) 26 { 27 "name": "Seedance 제품 쇼케이스", 28 "type": "video", 29 "model": "bytedance/seedance-v1.5-pro/text-to-video", 30 "prompt": "세련된 제품 공개 애니메이션, 부드러운 빛에서 " 31 "나타나는 현대적인 기기, 모든 각도를 보여주기 위해 천천히 회전, " 32 "미니멀한 흰색 배경, 영화 같은 조명", 33 "duration": 10 34 }, 35 { 36 "name": "Seedance 브랜드 인트로", 37 "type": "video", 38 "model": "bytedance/seedance-v1.5-pro/text-to-video", 39 "prompt": "역동적인 브랜드 인트로 시퀀스, 로고로 조립되는 추상적인 기하학적 " 40 "모양, 입자와 빛의 궤적, 전문적인 모션 그래픽 스타일, 어두운 배경", 41 "duration": 5 42 }, 43 44 # Veo 3.1로 영화 같은 영상 생성 (오디오 포함) 45 { 46 "name": "Veo 히어로 영상", 47 "type": "video", 48 "model": "google/veo3.1/text-to-video", 49 "prompt": "골든 아워의 현대적인 도시 스카이라인을 담은 영화 같은 항공 샷, " 50 "카메라가 천천히 앞으로 전진, 지는 태양의 렌즈 플레어, " 51 "도시의 주변 소리, 필름 그레인, 전문적인 색 보정", 52 "duration": 8 53 }, 54] 55 56pipeline.batch_generate(jobs, max_workers=3) 57```
설정 기반 방식 (Configuration-Driven)
반복되는 파이프라인의 경우 YAML 설정 파일에 작업을 정의하십시오:
plaintext1```yaml 2# pipeline_config.yaml 3output_dir: weekly_content 4max_workers: 3 5 6jobs: 7 - name: 제품 히어로 이미지 8 type: image 9 model: google/imagen4-ultra/text-to-image 10 prompt: > 11 충전 케이스에 담긴 무선 이어버드의 프리미엄 제품 사진, 12 어두운 반사 표면, 드라마틱한 조명, 고급스러운 기술 미학, 13 8K 해상도, 상업용 퀄리티 14 width: 2048 15 height: 2048 16 17 - name: 소셜 미디어 영상 18 type: video 19 model: bytedance/seedance-v1.5-pro/text-to-video 20 prompt: > 21 트렌디한 소셜 미디어 콘텐츠, 프리미엄 기술 제품의 언박싱, 22 만족스러운 공개 순간, 근접 상세 샷, 밝은 자연 조명, 23 세로 형식 24 duration: 10 25 resolution: 1080p 26 27 - name: 영화 같은 광고 28 type: video 29 model: google/veo3.1/text-to-video 30 prompt: > 31 프리미엄 헤드폰 광고, 붐비는 카페에서 헤드폰을 착용하는 사람, 32 세상이 조용해짐, 얕은 피사계 심도, 따뜻한 색감, 33 카페의 주변 소리가 서서히 사라짐 34 duration: 8 35 resolution: 1080p 36```
로드 및 실행:
plaintext1```python 2import yaml 3 4with open("pipeline_config.yaml") as f: 5 config = yaml.safe_load(f) 6 7pipeline = VideoPipeline( 8 api_key=API_KEY, 9 output_dir=config["output_dir"] 10) 11pipeline.batch_generate( 12 config["jobs"], 13 max_workers=config.get("max_workers", 3) 14) 15```
주요 구현 사항
지수 백오프 폴링 (Exponential Backoff)
영상 생성은 모델과 길이에 따라 30초에서 5분까지 소요됩니다. 파이프라인은 API를 무리하게 호출하지 않고 효율적으로 폴링하기 위해 지수 백오프를 사용합니다:
plaintext1```python 2interval = initial_interval # 5초에서 시작 3while time.time() - start_time < max_wait: 4 # ... 상태 확인 ... 5 time.sleep(interval) 6 interval = min(interval * 1.5, max_interval) # 최대 30초까지 증가 7```
첫 몇 번의 폴링은 5초 간격으로 진행하다가, 점차 최대 30초 간격으로 늘어나 불필요한 API 호출을 약 60% 줄여줍니다.
속도 제한(Rate Limit) 대응
API가 429(속도 제한) 오류를 반환하면 파이프라인은 즉시 실패하는 대신 지수적으로 백오프합니다:
plaintext1```python 2except requests.HTTPError as e: 3 if e.response.status_code == 429: 4 wait = 2 ** (attempt + 2) # 4초, 8초, 16초... 5 logger.warning(f"속도 제한됨, {wait}초 대기") 6 time.sleep(wait) 7 continue 8```
많은 동시 요청이 발생할 수 있는 배치 작업에서는 필수적인 기능입니다.
동시성 제어
ThreadPoolExecutor는 동시 API 요청 수를 제한하여 API나 네트워크 연결이 과부하되는 것을 방지합니다:
plaintext1```python 2with ThreadPoolExecutor(max_workers=3) as executor: 3 futures = {executor.submit(process, job): job for job in jobs} 4```
max_workers=3으로 시작하여 Atlas Cloud 계정이 더 높은 동시성을 지원한다면 5~8까지 늘려보세요. 10개 이상의 동시 요청은 대개 효율이 떨어지며 속도 제한 위험을 높입니다.
비용 추적
모든 생성 요청은 모델 가격표에 기반하여 비용이 추산됩니다:
plaintext1```python 2PRICING = { 3 "black-forest-labs/flux-2-pro/text-to-image": 0.04, 4 "bytedance/seedance-v1.5-pro/text-to-video": 0.022, # 초당 5 "google/veo3.1/text-to-video": 0.03, # 초당 6} 7```
영상 모델의 경우 비용은 시간에 비례합니다. 매니페스트 파일은 예산 관리를 위해 요청별 및 누적 비용을 기록합니다.
파이프라인 실행 비용 추산
일반적인 파이프라인 실행 비용은 다음과 같습니다:
| 파이프라인 시나리오 | 작업 수 | 사용 모델 | 예상 비용 | 예상 소요 시간 |
|---|---|---|---|---|
| 주간 소셜 미디어 팩 | 이미지 10개 + 영상 5개(각 5초) | Flux 2 Pro + Seedance 2.0 | USD0.95 | 약 10분 |
| 제품 출시 캠페인 | 이미지 20개 + 영상 10개(각 10초) | Flux 2 Pro + Imagen 4 Ultra + Seedance 2.0 | USD3.80 | 약 25분 |
| 월간 콘텐츠 라이브러리 | 이미지 50개 + 영상 20개(각 8초) | 혼합 | USD7.50 | 약 45분 |
| 이커머스 카탈로그(500 SKU) | 이미지 500개 | Flux 2 Pro | USD20.00 | 약 30분 |
| 영화 광고 시리즈 | 이미지 5개 + 영상 5개(각 8초) | Imagen 4 Ultra + Veo 3.1 | USD1.50 | 약 20분 |
Seedance 2.0과 Veo 3.1의 동일 영상 비용 비교:
| 모델 | 5초 영상 | 10초 영상 | 15초 영상 |
|---|---|---|---|
| Seedance 2.0 (빠름) | USD0.11 | USD0.22 | USD0.33 |
| Veo 3.1 | USD0.45 | USD0.30 | 지원 안 됨(최대 8초) |
| Sora 2 | USD0.5 | USD1.50 | USD2.25 |
Seedance 2.0은 대량의 영상 생성 시 가장 비용 효율적인 옵션입니다. Veo 3.1은 짧은 영화적 영상에서 품질과 비용의 균형이 좋습니다. Sora 2는 비용이 훨씬 높지만 타의 추종을 불허하는 물리 시뮬레이션을 제공합니다.
배포 팁
정기 생성을 위한 크론 잡(Cron Jobs)
크론을 사용하여 파이프라인을 정기적으로 실행하세요:
plaintext1```bash 2# 매주 월요일 오전 6시에 주간 콘텐츠 생성 30 6 * * 1 cd /path/to/project && python run_pipeline.py --config weekly.yaml 4```
간단한 진입점 스크립트 작성 예시:
plaintext1```python 2# run_pipeline.py 3import os 4import argparse 5import yaml 6from pipeline import VideoPipeline 7 8parser = argparse.ArgumentParser() 9parser.add_argument("--config", required=True) 10args = parser.parse_args() 11 12with open(args.config) as f: 13 config = yaml.safe_load(f) 14 15API_KEY = os.environ["ATLAS_CLOUD_API_KEY"] 16pipeline = VideoPipeline(api_key=API_KEY, output_dir=config["output_dir"]) 17pipeline.batch_generate(config["jobs"], max_workers=config.get("max_workers", 3)) 18```
큐 기반 아키텍처
더 큰 규모의 배포를 위해서는 Celery나 Redis Queue 같은 작업 큐를 사용하여 작업 제출과 처리를 분리하세요:
plaintext1```python 2# tasks.py (Celery 예시) 3import os 4from celery import Celery 5from pipeline import AtlasCloudClient 6 7app = Celery("video_tasks", broker="redis://localhost:6379") 8client = AtlasCloudClient(os.environ["ATLAS_CLOUD_API_KEY"]) 9 10@app.task(bind=True, max_retries=3) 11def generate_video_task(self, prompt, model, duration): 12 try: 13 result = client.generate_video(model, prompt, duration) 14 data = client.poll_result(result["request_id"]) 15 if data and data["status"] == "completed": 16 return {"url": data["output"]["video_url"], "status": "success"} 17 return {"status": "failed"} 18 except Exception as e: 19 self.retry(countdown=60, exc=e) 20```
환경 변수 관리
API 키를 절대 하드코딩하지 마십시오. 환경 변수를 사용하세요:
plaintext1```python 2import os 3 4API_KEY = os.environ.get("ATLAS_CLOUD_API_KEY") 5if not API_KEY: 6 raise ValueError("ATLAS_CLOUD_API_KEY 환경 변수가 설정되지 않았습니다.") 7```
에러 모니터링
운영 파이프라인의 경우, 에러 모니터링 서비스를 통합하십시오. 파이프라인의 로깅은 로그 집계 툴에서 쉽게 파싱할 수 있도록 구조화되어 있습니다:
plaintext1```python 2logger.info(f"[OK] {result.name} -- USD{result.cost_estimate:.3f} -- {result.duration_seconds:.1f}s") 3logger.error(f"[FAIL] {result.name} -- {result.error_message}") 4```
파이프라인 확장
이미지-to-비디오 생성 추가
일부 모델은 생성된 이미지를 영상 생성의 입력값으로 지원합니다. 파이프라인을 확장하여 이미지와 영상 생성을 연쇄적으로 실행해 보세요:
plaintext1```python 2def generate_image_then_video(self, name, image_prompt, video_prompt, 3 image_model, video_model, duration=5): 4 # 1단계: 기본 이미지 생성 5 image_result = self._process_image( 6 f"{name}_base", image_model, image_prompt 7 ) 8 if image_result.status != "success": 9 return image_result 10 11 # 2단계: 이미지 URL을 영상 생성의 입력값으로 사용 12 response = self.client.session.post( 13 f"{self.client.BASE_URL}/model/generateVideo", 14 json={ 15 "model": video_model, 16 "prompt": video_prompt, 17 "image_url": image_result.output_url, 18 "duration": duration 19 } 20 ) 21 # ... 이후 결과 폴링 및 다운로드 22```
웹훅 알림 추가
작업이 완료되었을 때 웹훅 알림을 추가할 수 있습니다:
plaintext1```python 2def _notify_webhook(self, result: GenerationResult, webhook_url: str): 3 requests.post(webhook_url, json={ 4 "name": result.name, 5 "status": result.status, 6 "url": result.output_url, 7 "cost": result.cost_estimate 8 }) 9```
자주 묻는 질문 (FAQ)
한 번에 얼마나 많은 동시 요청이 가능한가요?
Atlas Cloud는 API 키당 여러 동시 요청을 지원합니다. 워커 3개로 시작하여 계정 등급에 따라 5~8개까지 늘려보세요. 제한을 초과하면 파이프라인이 자동으로 지수 백오프를 수행하여 속도를 조절합니다.
동일한 배치에 이미지와 영상 작업을 섞을 수 있나요?
네. 파이프라인은 type 필드에 따라 각 작업을 올바른 엔드포인트로 라우팅합니다.
영상 생성 요청은 얼마나 걸리나요?
모델마다 다릅니다. Seedance 2.0은 3090초, Veo 3.1은 60120초, Sora 2는 60~180초 정도 소요됩니다. 폴링 메커니즘이 이를 자동으로 처리합니다.
배치 도중 작업이 실패하면 어떻게 되나요?
실패한 작업은 매니페스트에 에러 메시지와 함께 기록되며, 파이프라인은 나머지 작업을 계속 처리합니다. 각 실행 후 매니페스트를 검토하여 실패한 작업을 재시도하십시오.
파이프라인에 새로운 모델을 어떻게 추가하나요?
AtlasCloudClient의 PRICING 딕셔너리에 모델 ID와 가격을 추가하면 바로 사용 가능합니다.
결론
AI 영상 파이프라인 구축은 단순히 똑똑한 코드를 작성하는 것이 아니라, API 통합 과정에서 발생하는 속도 제한, 타임아웃, 에러, 비용 추적 등 현실적인 문제들을 다루는 안정적인 인프라를 구축하는 것입니다. 이 가이드에서 다룬 파이프라인은 이러한 문제들을 해결합니다. 내용을 복사하여 프롬프트와 모델을 사용자 사례에 맞게 최적화한 후, 정기적으로 배포하거나 큐 뒤에서 실행하십시오.
Flux 2 Pro(빠른 이미지 생성), Seedance 2.0(USD0.022/초의 비용 효율적 영상), Veo 3.1(USD0.03/초의 영화적 영상)의 조합은 콘텐츠 제작의 모든 요구 사항을 충족합니다. 이 모든 모델은 단일 Atlas Cloud API 키로 액세스할 수 있습니다.
────────────────────────────────────────────────────────────


