For a long time, AI creators have faced the "Inpainting Gap." This is a tough technical problem. Editing one small part of a photo often ruins the lighting or the feel of the whole thing. Old tools just fix pixels in one spot. This makes the finished work look weird and disconnected.
The Qwen Advantage
Unlike its predecessors, Qwen Image 2.0 utilizes a unified architecture. It doesn’t just fill a hole; it performs deep semantic reasoning to understand the entire image context during the editing process. Whether you are adjusting a shadow or replacing a subject, the model ensures global consistency.
- Speed: Go from concept to asset in under 5 minutes.
- Precision: High-fidelity results that maintain stylistic integrity.
- Accuracy: Native support for text-perfect rendering in marketing materials.
| Feature | Traditional Inpainting | Qwen Image 2.0 Unified |
| Style Retention | Low (Varies by patch) | High (Context-aware) |
| Text Rendering | Often garbled | Precise & Editable |
| Workflow | Multi-step/External tools | Single, fluid conversation |
By merging generation and editing into one logic stream, Qwen Image 2.0 transforms AI from a "random generator" into a professional-grade precision tool.
Module 1: The "Perfect Start": Generation
Successful AI design starts with a solid base photo. Making images with AI is about more than just short phrases. Now, we use clear, technical steps. This helps turn a creative idea into a real asset that is ready for professional use.
Prompting for Precision
Qwen Image 2.0’s standout feature is 1,000-token limit, which allows for unprecedented control. Unlike older models that lose context after a few sentences, Qwen remains responsive to deep-layer details. To maximize result accuracy, structure your ai art prompts hierarchically:
- Composition: Pick your framing first. Use phrases like "Low-angle shot" or "Wide cinematic view."
- Technical Specs: Set the lens and light. Try "35mm lens, f/1.8, with soft morning light hitting from the left."
- Subject & Layout: Pinpoint where things go. For example, "Put the item in the lower third. Place the gold 'ALTA' logo in a sans-serif font above the lid."
Most models lose the thread after 70 words. Qwen Image 2.0’s 1,000-token window allows you to define a Multi-Layered Composition. Instead of hoping for a good result, you are "coding" the visual. To maximize the token window, treat your prompt like a professional production sheet. Structure it into four distinct blocks: Atmosphere, Architecture, Subject, and Typography.
"Ultra-Dense" Prompt Example:
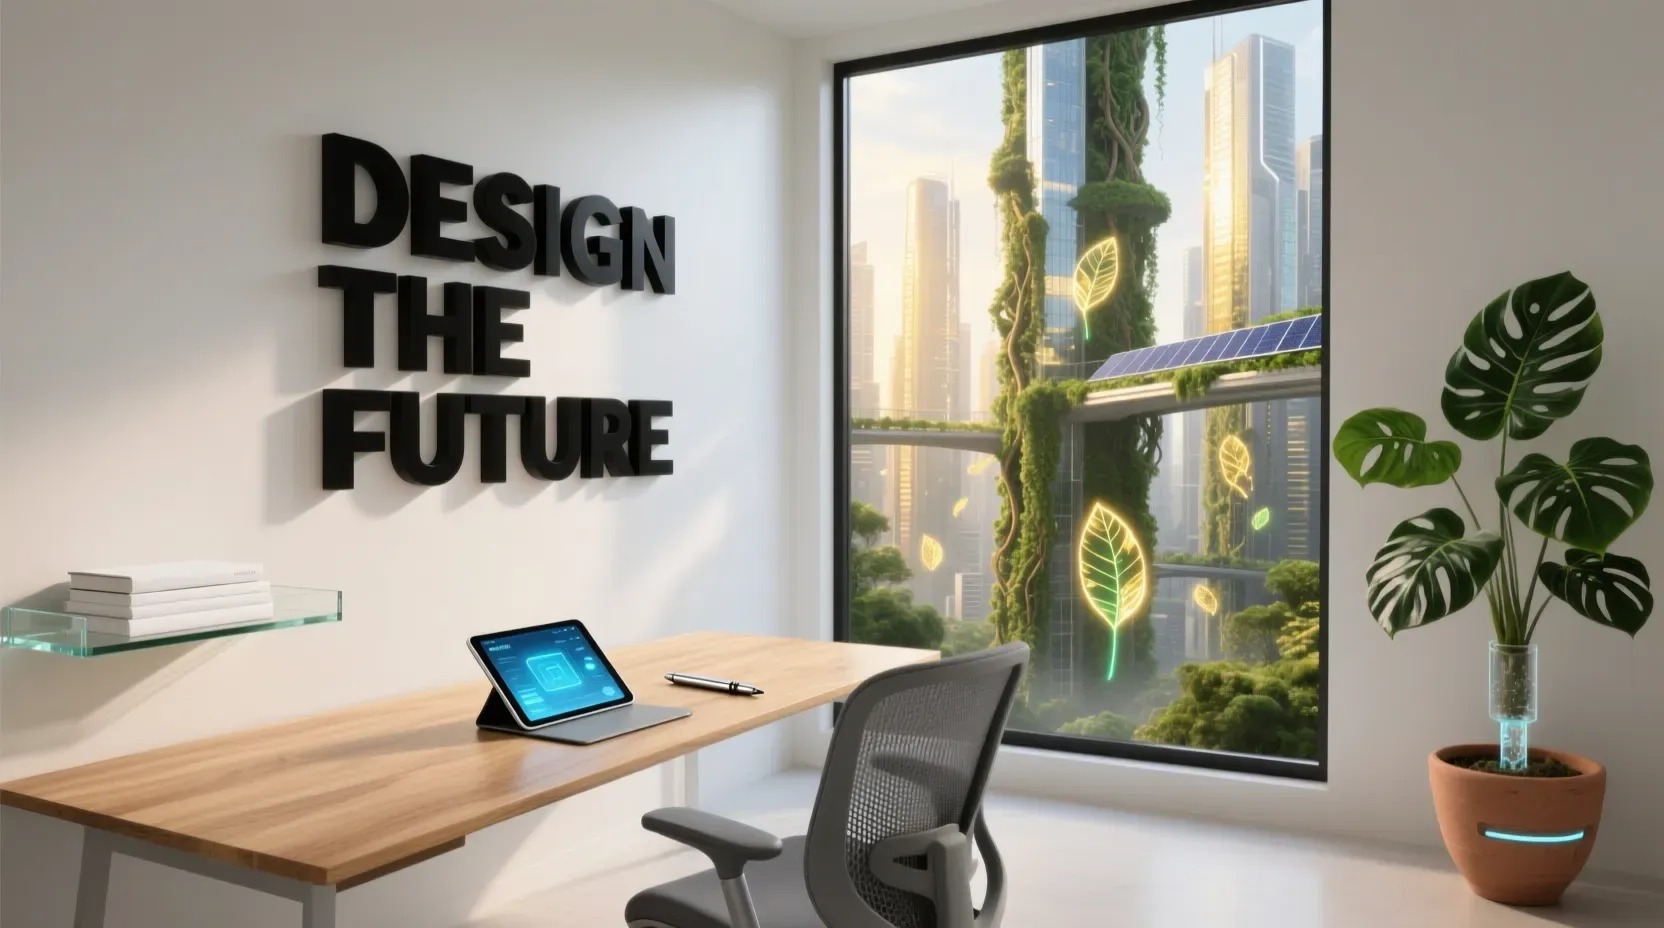
[Environment] A wide-angle view inside a futuristic Solarpunk home office in 2050. The space has smooth white walls and giant windows. Outside, a vertical forest city grows thick with greenery. Sunlight pours through holographic leaves. This creates soft patterns of gold and green light all over the room.
[Architecture] On the left, a hovering shelf built from recycled clear glass displays books with white covers. To the right, a big monstera plant grows in a matte terracotta pot. This ceramic container waters itself automatically.
[Subject] A simple light oak desk sits in the middle. It holds a shining holographic tablet and a smooth silver pen. Under the desk, there is a modern charcoal gray chair designed for comfort.
[Precision Typography] Above the desk, the words "DESIGN THE FUTURE" hang on the wall. The text uses a bold, black, blocky font. Each letter looks like a real 3D acrylic piece fixed to the surface. The edges are sharp and perfectly straight.
[Technical] Filmed with an Arri Alexa using a 24mm wide lens. The shot has a cinematic feel. This keeps the city in the distance soft and slightly blurry while the room stays sharp.
Setting the Stage: Pro vs. Max
Choosing the right model variant is essential for maintaining multi-image consistency AI tools demand. While both models support native 2K resolution, their optimization targets differ:
| Model Tier | Best Use Case | Primary Strength |
| Qwen-Image-2.0-Pro | Marketing assets & infographics | Superior text rendering & layout logic |
| Qwen-Image-Max | Film stills & product photography | Ultra-realistic textures & lighting fidelity |
For design-heavy tasks like posters or UI mockups, the Pro model’s ability to follow complex typographic instructions makes it the superior choice for a professional workflow.
Professional Design Brief Prompt Example:
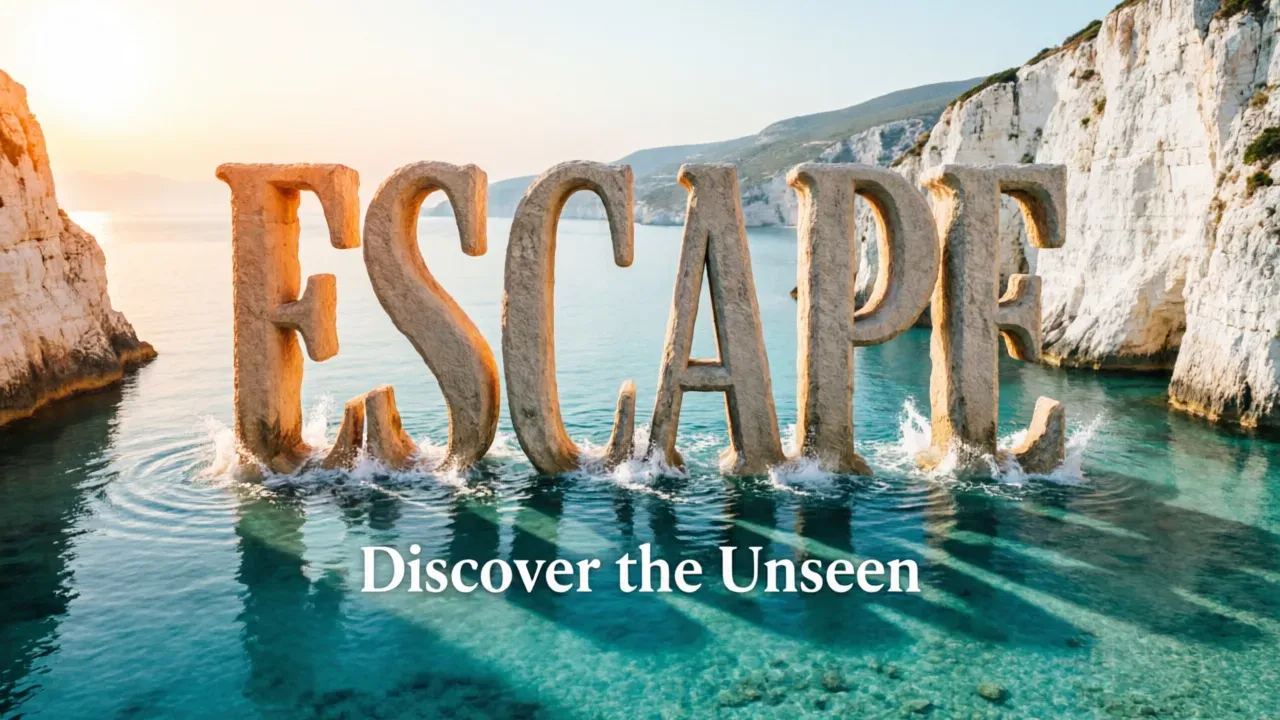
[Composition] A premium vertical social media layout for a luxury travel brand. A bright Mediterranean bay view is shown in the scenario. Tall white limestone cliffs surround clear turquoise water.
[Typography Block 1] In the top third of the scene, place the word 'ESCAPE' in big, bold, classy serif letters. These letters look like massive stone towers coming up from the sea. Real water ripples and white sea foam splash against the bottom of every letter.
[Typography Block 2] Put the sub-headline 'Discover the Unseen' right under the main title. Use a simple, white font without serifs. Space the letters out wide to keep the look clean and airy.
[Styling] The scene uses 'Golden Hour' lighting. Warm orange rays hit the left side of the 3D letters. This creates long, real-looking shadows that stretch across the top of the water.
[Quality] 4k resolution with sharp, clean edges on all text. It has professional color work and looks like it was shot on a Phase One XF camera.
Pro tips: When using the Pro model for UI or posters, follow these "Human-in-the-Loop" steps:
- Define the Material: Don't just say "Add text." Say "Render text as neon glass" or "brushed gold."
- Use Quotes: Always place your required text in "Double Quotes" to trigger the typographic precision engine.
- Specify Alignment: Use terms like "Left-aligned," "Kerning," or "Centered" to reduce manual post-production in Photoshop.
The "Base Image" Checklist
Before moving to the editing phase, ensure your generated output meets these "production-ready" criteria to avoid rework:
- Semantic Adherence: Does the layout match your spatial descriptions, e.g., is the "background mountain" actually in the background?
- Typographic Integrity: If text was included, are the characters rendered correctly and centered?
- Lighting Consistency: Is the light source direction uniform across all objects?
- Style Stability: Is the look, like Minimalist or Solarpunk, steady enough to use again later?
Starting with a solid "Base Image" keeps your future edits smooth. This stops the "style drift" that usually ruins tough AI projects. To unlock the full potential of these precision workflows, Qwen Image 2.0 is seamlessly integrated with Atlas Cloud. This enterprise-grade infrastructure provides the high-concurrency GPU clusters necessary to handle 2K native rendering without latency. By leveraging Atlas Cloud's optimized inference pipelines, creators can maintain sub-5-minute generation cycles even when executing complex, multi-layered "Ultra-Dense" prompts.
Module 2: The Art of "Semantic Editing": The How-To
The true breakthrough in AI design workflow optimization lies in moving beyond the "generate and pray" method. Qwen Image 2.0 introduces a "Semantic Editing" layer that allows creators to modify existing pixels through natural language. This eliminates the need for complex manual masking in external software, ensuring that AI image generation remains a fluid, conversational process.
Scenario A: Changing the Subject’s Attributes
A common pain point in creative production is the need to alter a specific detail—like a car’s paint finish or a model’s outfit—without disturbing the perfectly generated background.
- The Step: Utilize referential prompts. By referencing the original image and specifying the target area, the model uses its latent space to swap textures while locking the rest of the composition.
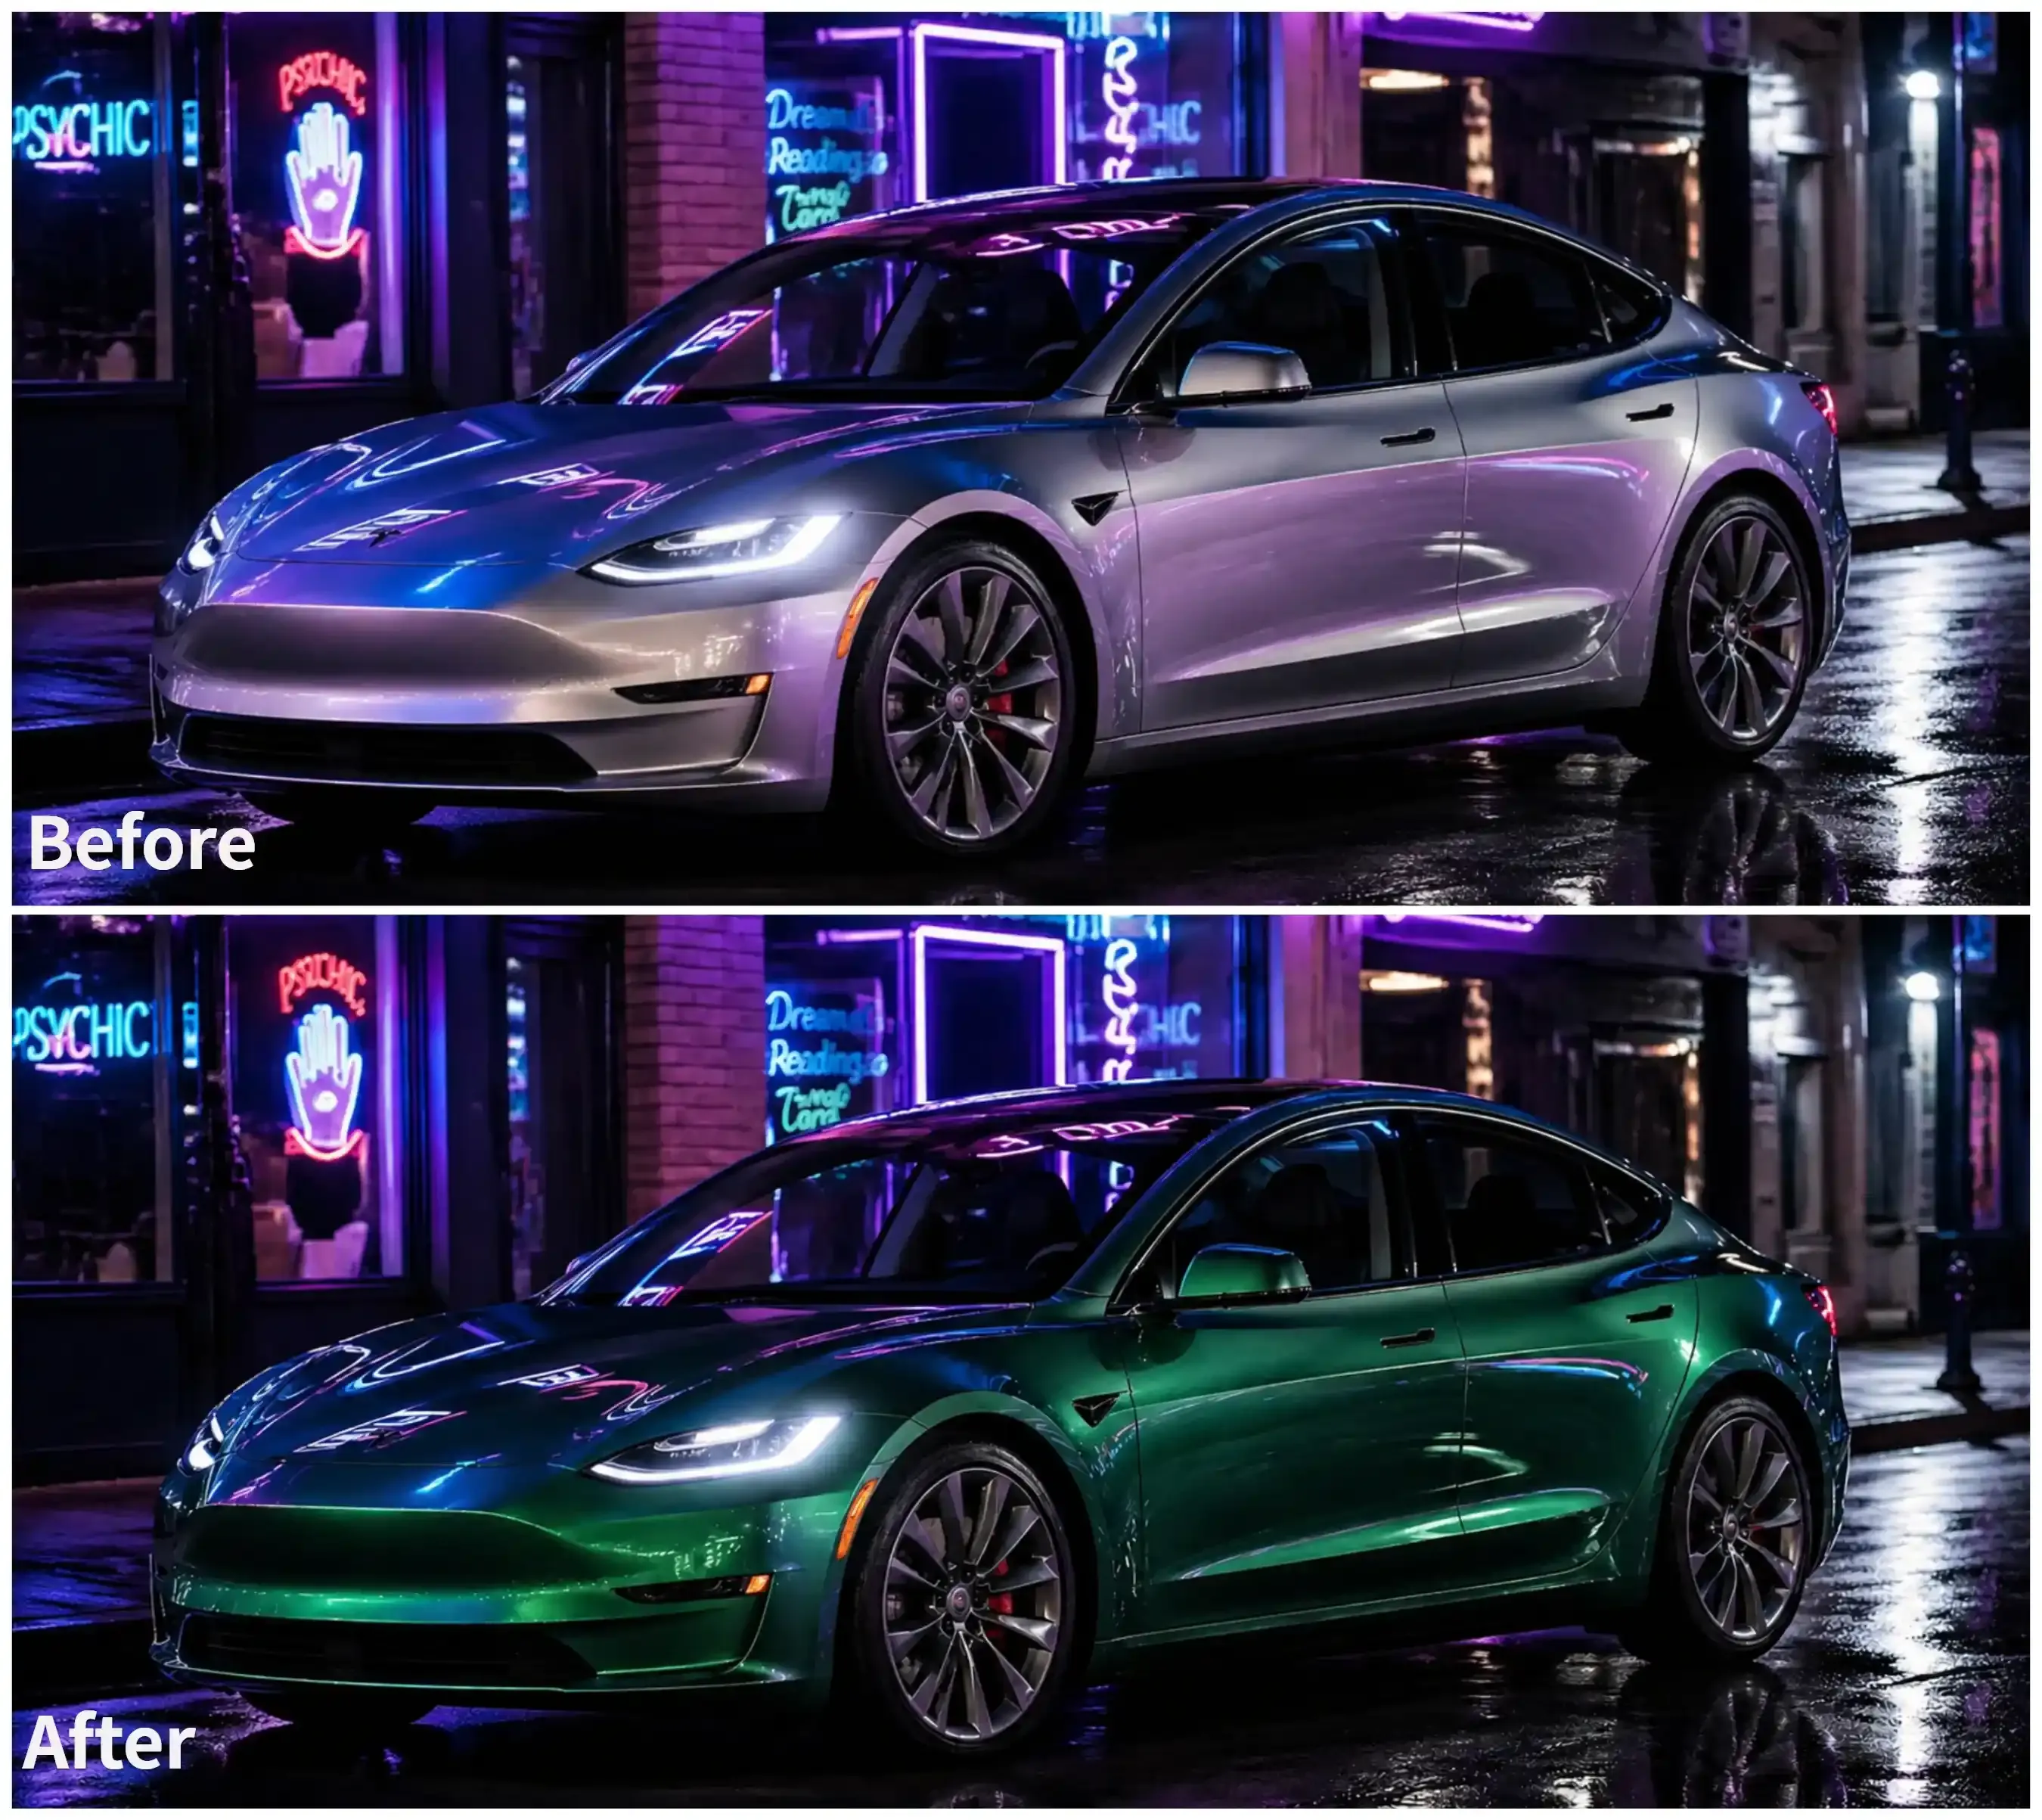
Example: The "Brand Pivot": Attribute Swap
- Context: You’ve got a solid lifestyle shot ready for a premium car brand. But, the client switches the theme and needs the car in "Emerald Green" for new ads.
- Operational Prompt:"Reference image and swap the car's paint to a rich Emerald Green with a metallic sparkle. Make sure the city light reflections on the doors and hood don't change from the original version."
Why it works: It uses Attribute Locking. By specifying the "reflections," you tell the AI to prioritize the environmental context over a simple color fill.
Scenario B: Adding or Removing Objects
Traditional multi-image consistency AI tools often struggle to place new objects into a scene without breaking the perspective or lighting. Qwen Image 2.0 employs "Natural Language Masking," which understands spatial relationships without requiring you to draw a mask manually.
-
The Step: Describe the placement relative to existing anchors.
- Task: Add a coffee cup.
- Instruction:"Place a white ceramic coffee cup on the desk to the right of the laptop, ensuring it reflects the blue light from the screen."
- Result: The AI calculates the occlusion and reflection automatically.
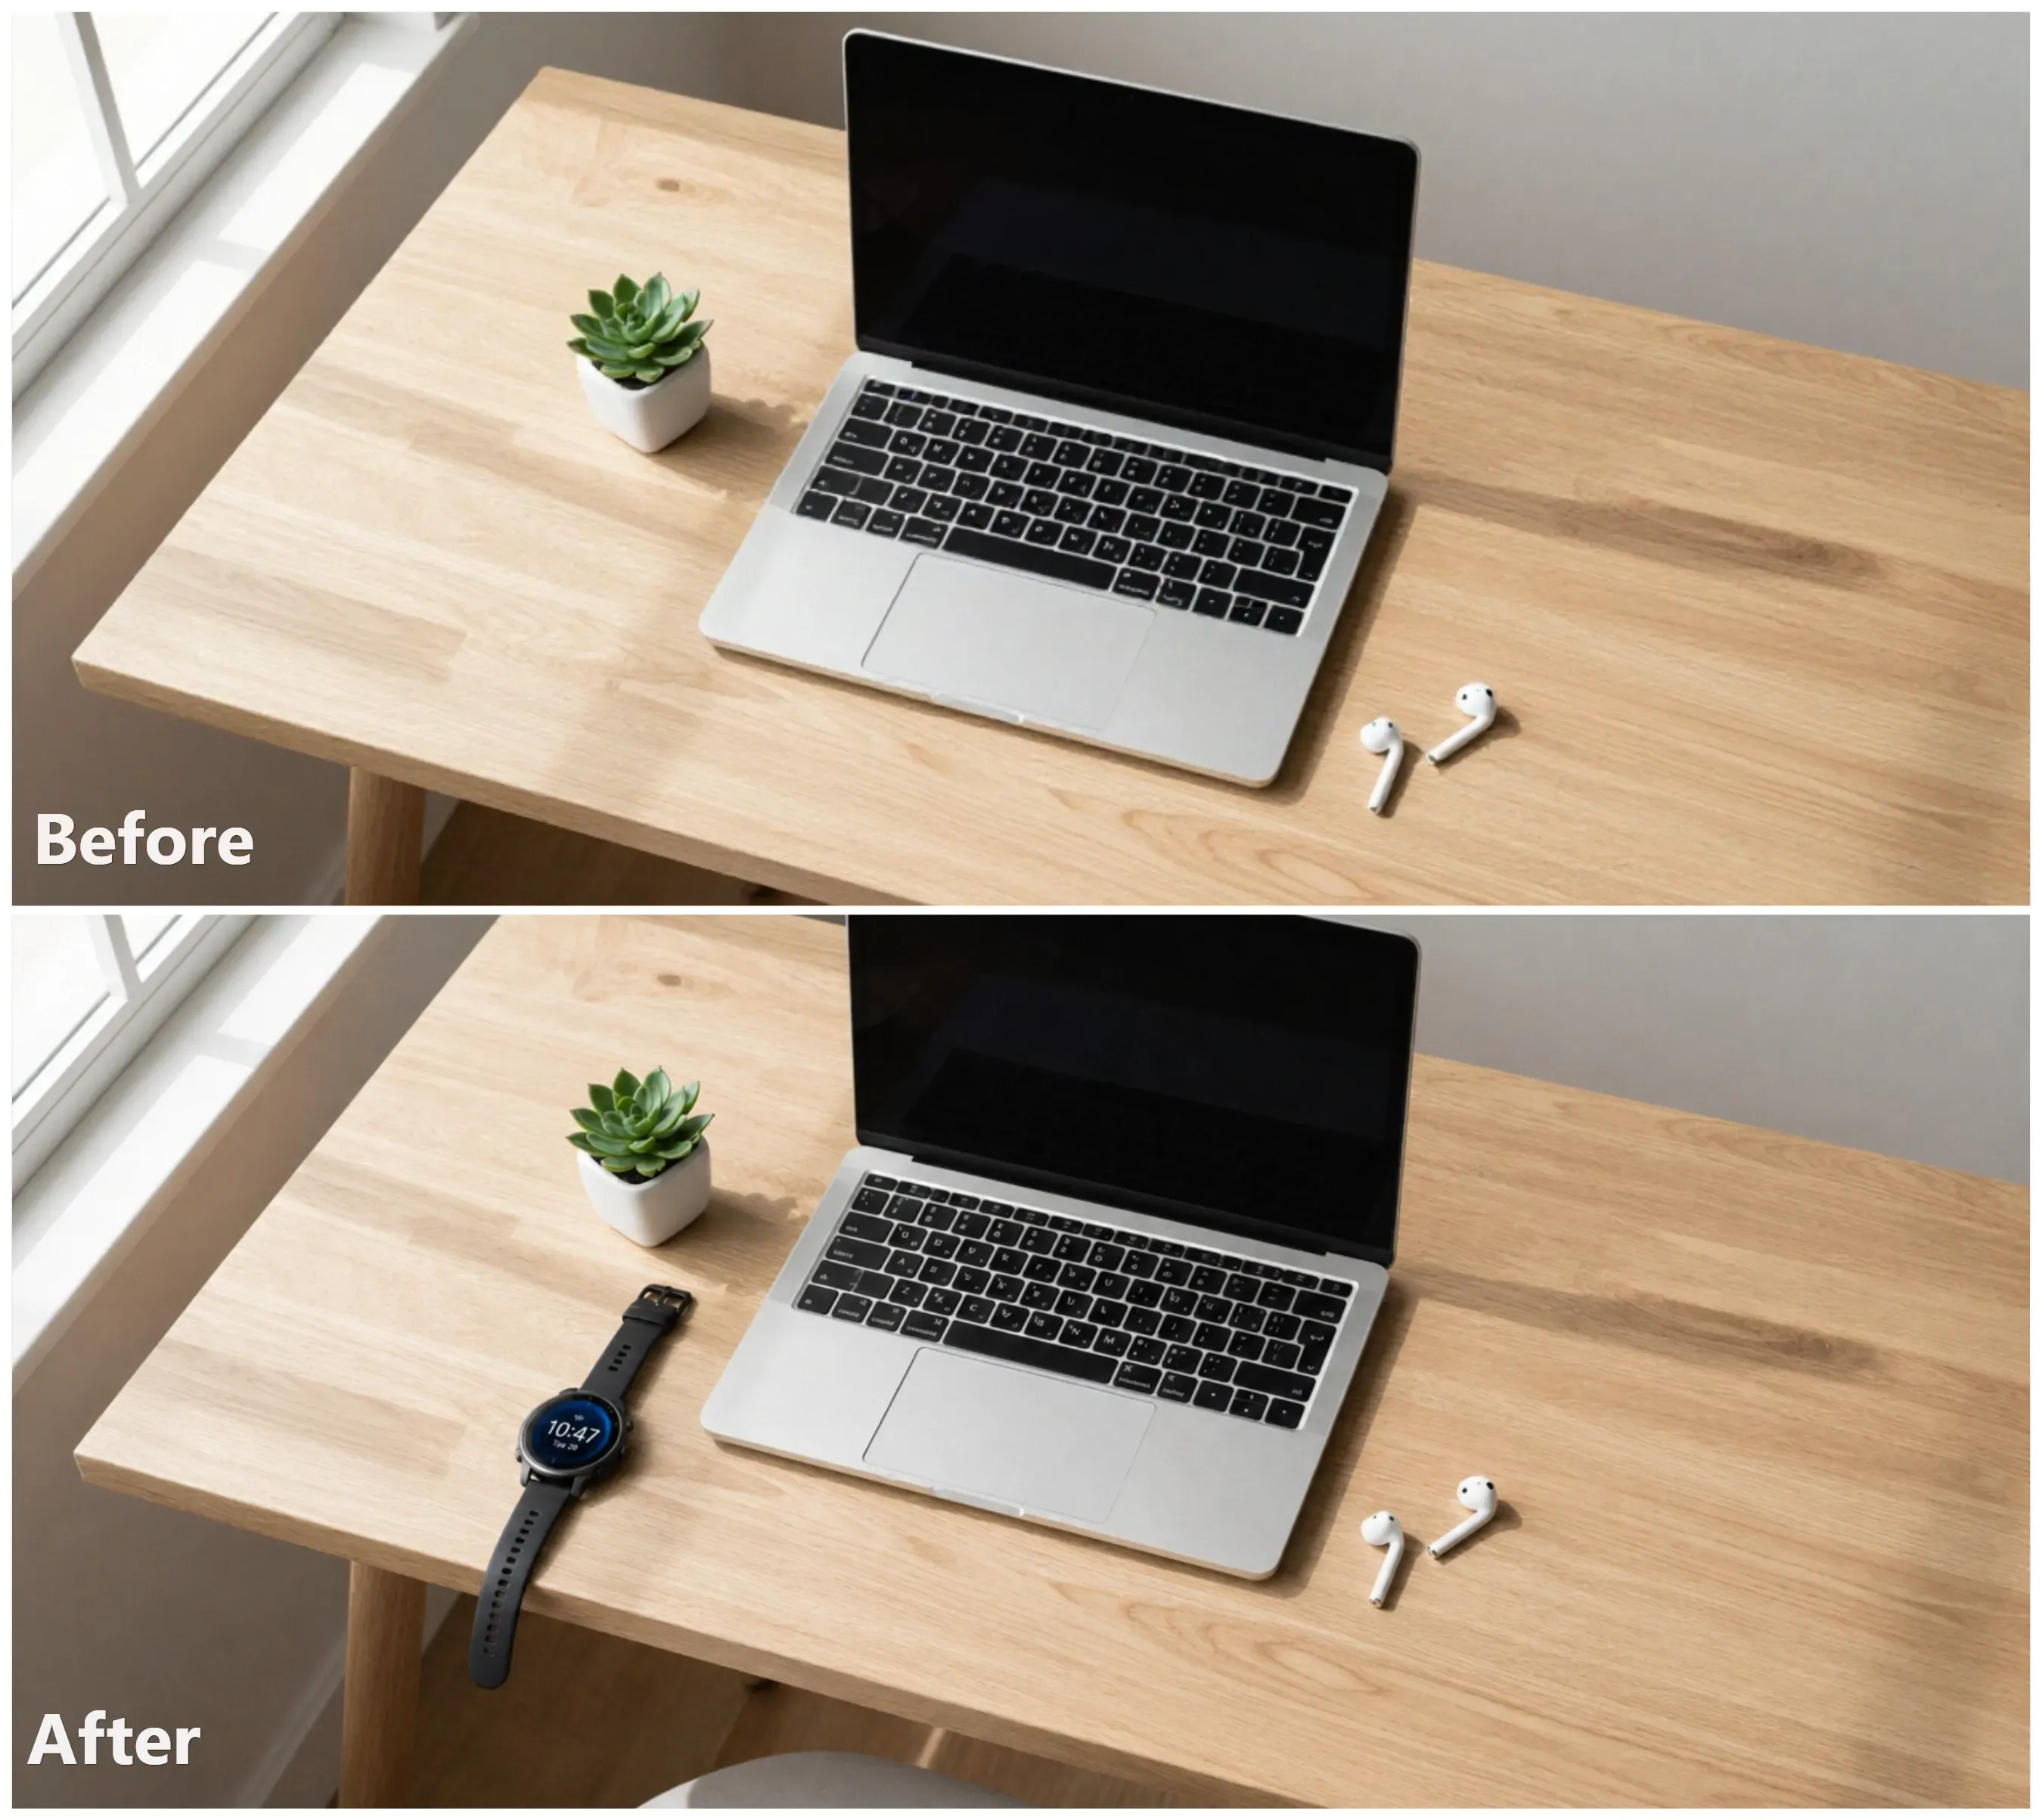
Example: The "Functional Update": Object Insertion
- Context: You have a minimalist desk setup, but you need to add a brand-specific item, like a "Smart Watch", to make it a product lifestyle photo.
- Operational Prompt:"Add a sleek, black smartwatch with a round face on the wood desk. Sit it right between the keyboard and the plants. The watch screen needs a gentle blue glow, and you should be able to see the numbers on the display clearly."
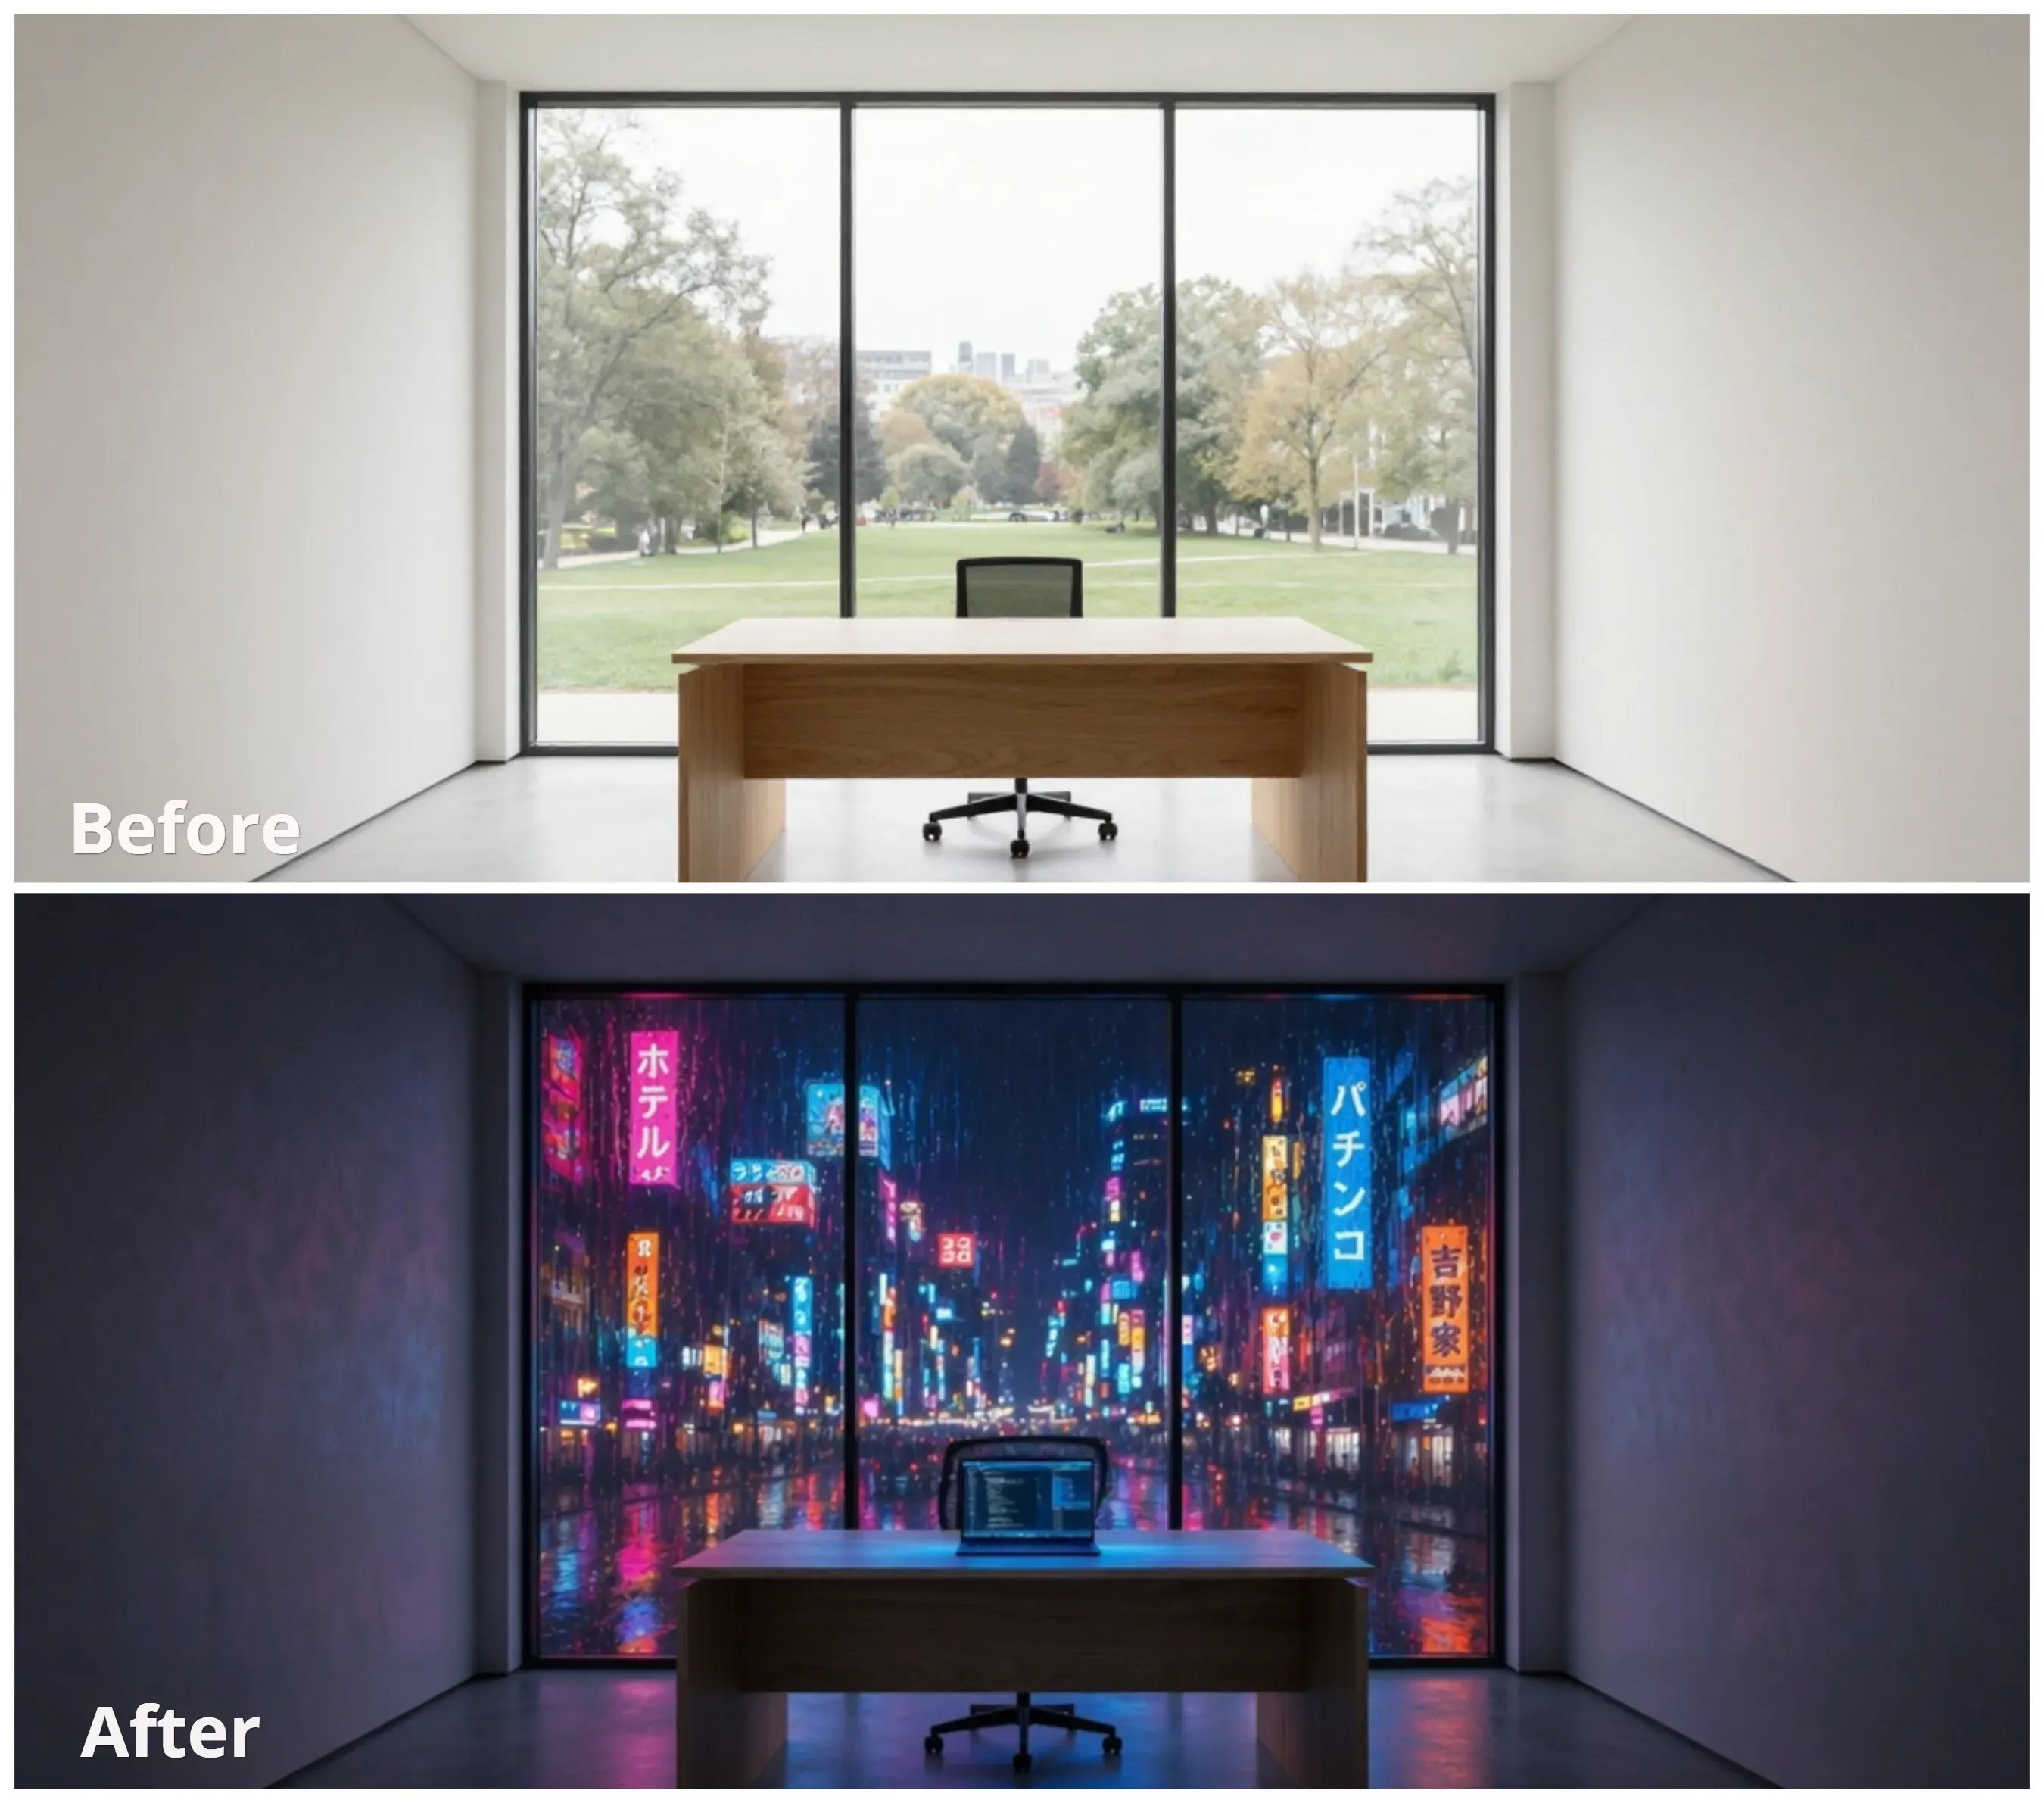
Scenario C: Lighting and Atmosphere Shifts
Instead of rerolling ai art prompts and losing your layout, you can perform global "atmosphere injections." This is critical for matching assets to specific brand moods.
| Target Effect | Operational Instruction | Key Logic |
| Golden Hour | "Shift the time to sunset, adding warm orange rim lighting." | Adjusts color temperature and shadow length. |
| Cyberpunk | "Change the lighting to high-contrast neon blue and pink." | Injects localized light sources without altering geometry. |
| Overcast | "Flatten the lighting to a soft, shadowless gray day." | Reduces contrast and diffuses light sources globally. |
By mastering these three scenarios, you transform the AI from a creative assistant into a high-precision digital darkroom, capable of executing complex revisions in seconds.
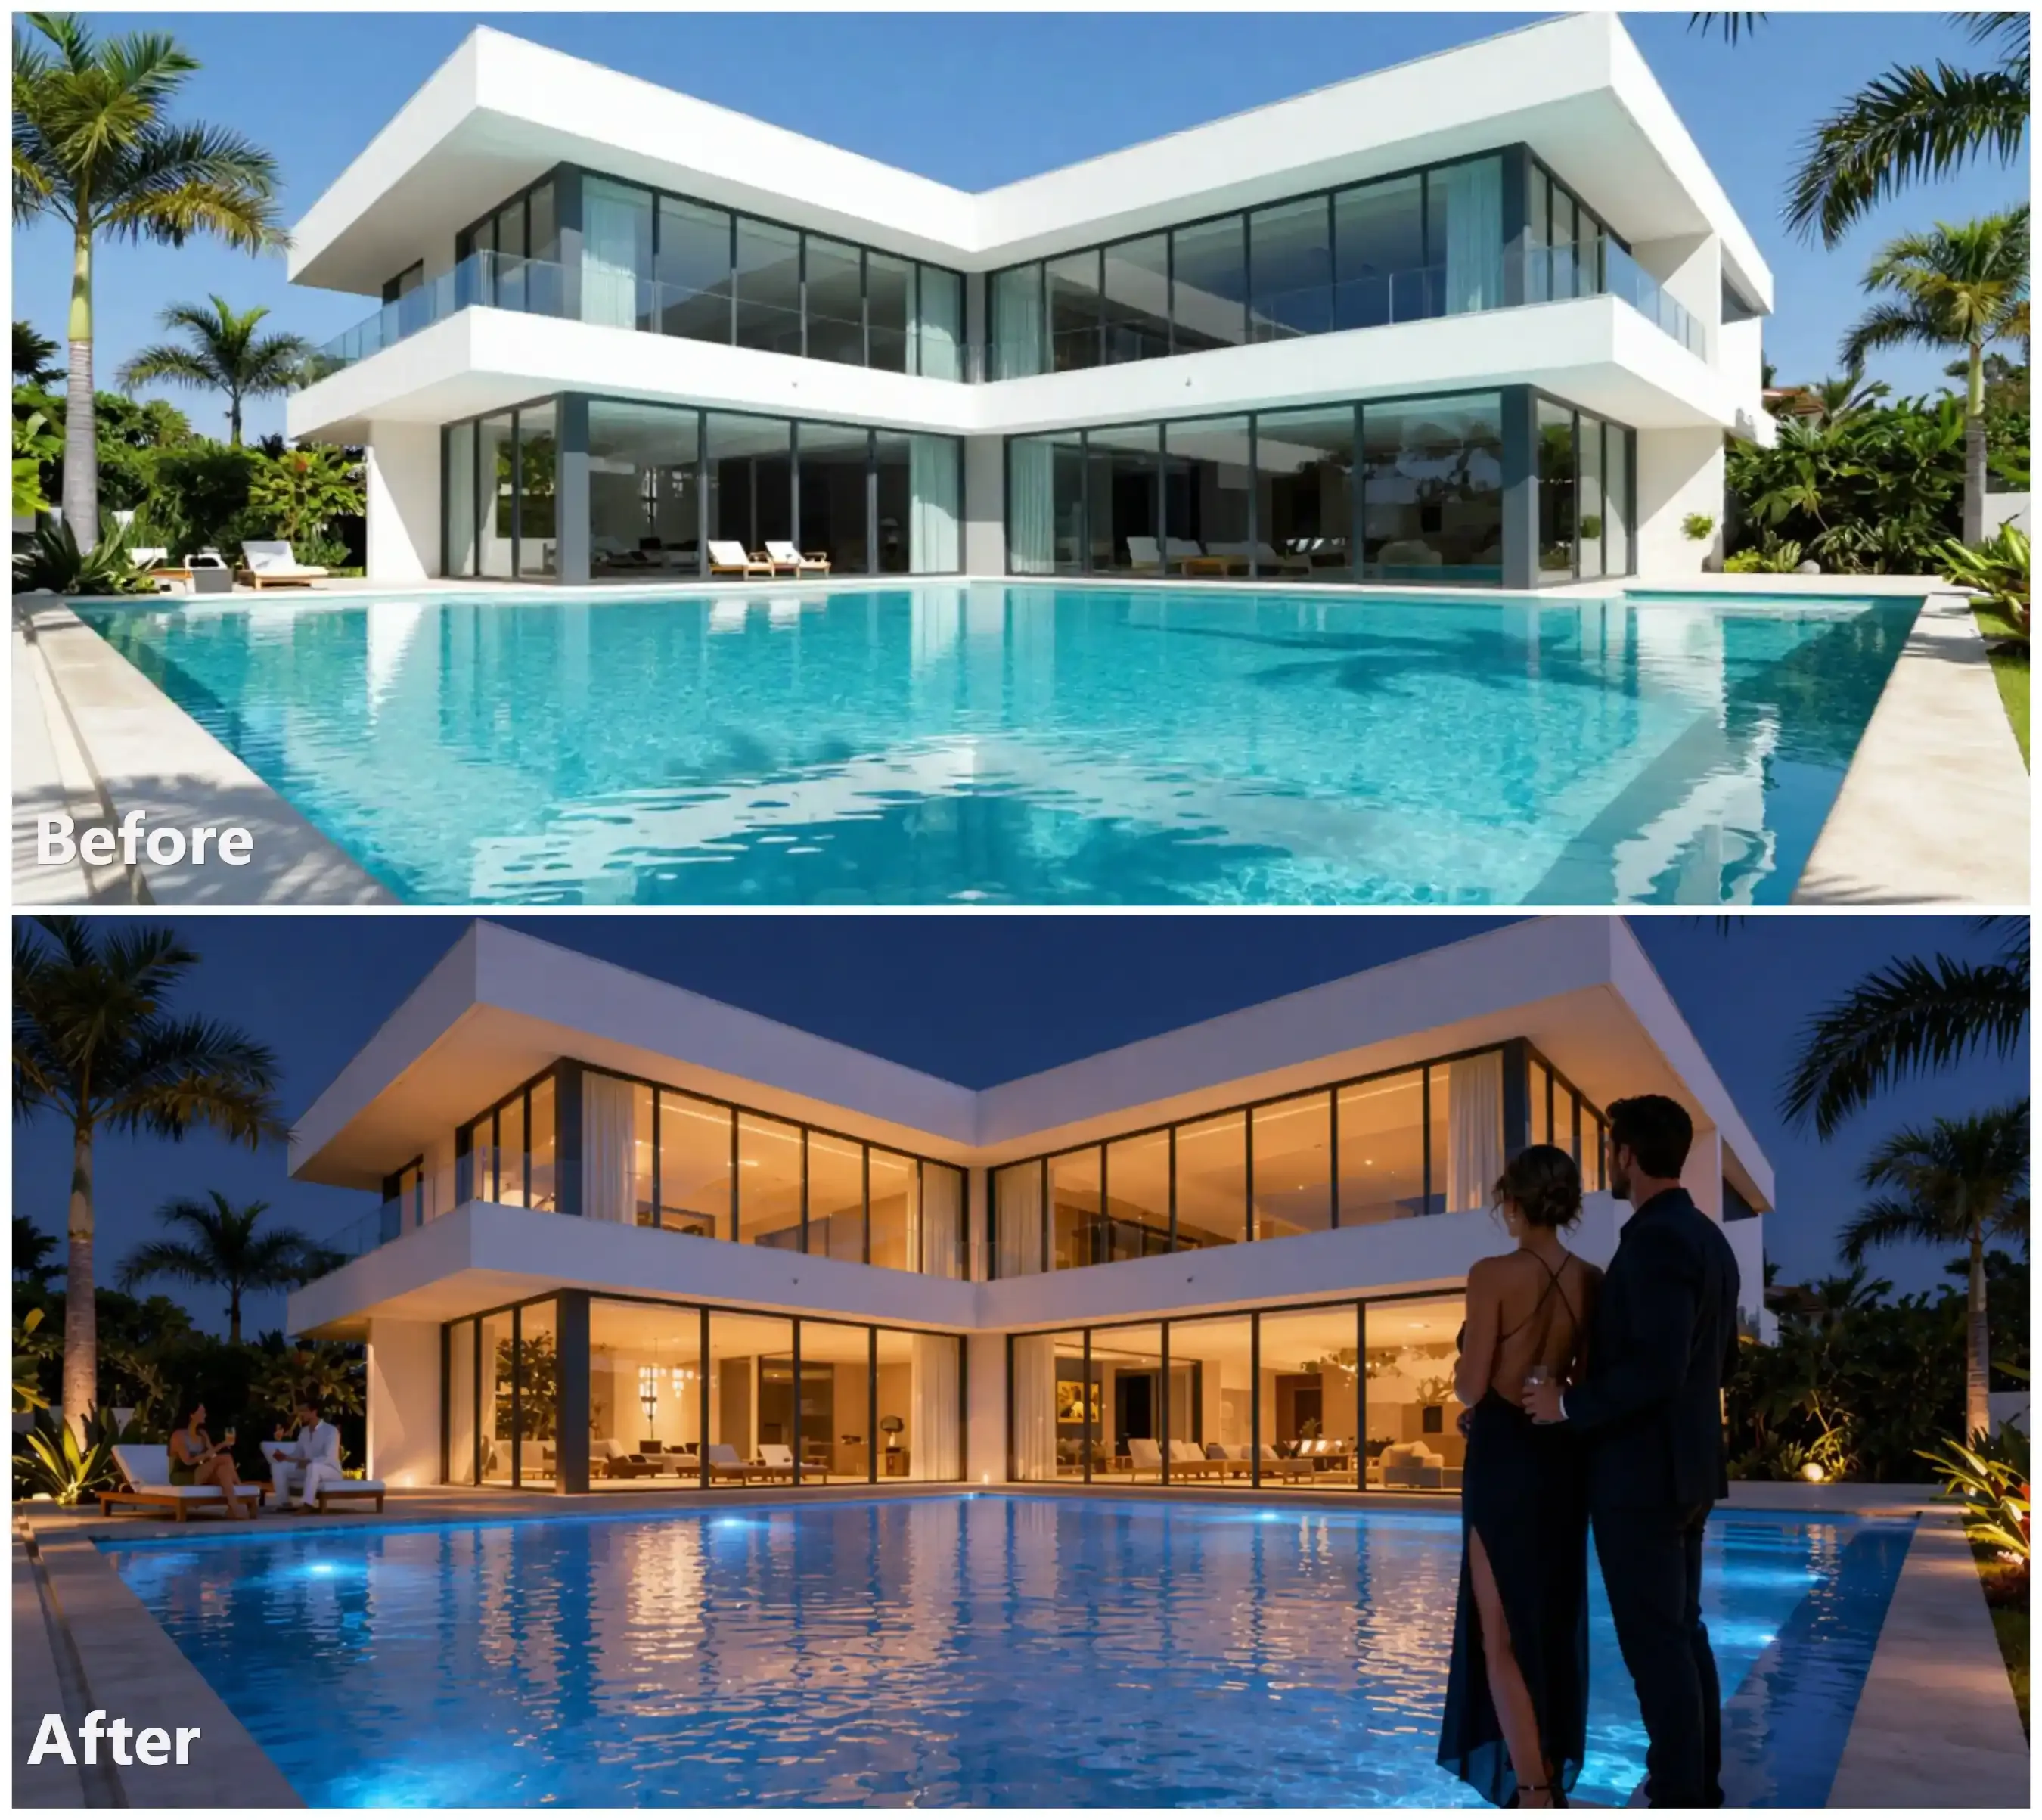
Example: The "Mood Shift": Environmental Override
-
Context: An architectural visualization of a modern villa looks too "cold" in mid-day light. It needs to feel "inviting" for a real estate brochure.
-
Operational Prompt:
Reference the current villa image. Perform a global environment shift from mid-day to deep indigo twilight immediately following sunset.
[Lighting] Turn on all warm interior lights so a golden glow spills onto the patio. Add soft blue underwater LED lights to the pool.
[People & Activity] Add a chic couple dressed for the evening near the pool edge. They should be gazing out at the view. Place two other people on the lounge chairs. They are chatting and holding drinks.
[Consistency] Ensure the new people are rendered in a realistic, non-AI style. Maintain the exact architectural structure, white concrete texture, and palm tree placement from the original.
When executing these examples, use this checklist to ensure AI design workflow optimization:
| Step | Focus Area | Technical Goal |
| 1. Reference | Image ID / Upload | Establish the "Ground Truth" for the AI. |
| 2. Target | Subject/Object | Isolate the specific area for modification. |
| 3. Preserve | Background/Style | Use tokens to "lock" the elements you don't want changed. |
| 4. Refine | Lighting/Physics | Ensure the new edit obeys the laws of the existing scene. |
Module 3: Mastering Professional Typography
A big problem in AI image making is the "alphabet soup" look. This is when models make weird shapes instead of real letters. Qwen Image 2.0 fixes this. It has a special engine that sees text as a real design piece, not just a random mess. This is a huge part of making AI workflows better. It lets designers create marketing tools that are ready to go. You won't have to fix the text by hand in other software anymore.
The "Zero-Error" Text Guide
To achieve professional-grade results, your ai art prompts must move beyond generic requests. Qwen Image 2.0 responds best to a three-step structural logic that defines the content, style, and spatial placement of typography.
- Define the Text String: Always place the exact characters within "double quotes." This signals the model to prioritize character accuracy.
- Pick the Font Style: Explain how the text looks. Use terms like "Modern Sans-serif," "Classy Serif," or "Bright Neon script."
- Set the Spot: Use clear directions to say where the text sits in the scene. You can try "centered in the top third," "aligned at the bottom," or "wrapped around the bottle surface" to show it fits the 3D shape.
Below are three practical examples demonstrating the "Zero-Error" structure across different design formats:
When using these examples, ensure you provide this hierarchical structure for your first generation pass:
| Design Priority | What to Specify in the Prompt | Resulting Benefit |
| Material/Effect | Neon, 3D stone, brushed gold, chalk. | High texture fidelity. |
| Hierarchy | "Large heading," "Small subtitle," "Main focal point." | Sets visual priorities. |
| Depth | "Wrapped around," "Behind the lens flare," "Mounted on the wall." | Professional 3D spatial integration. |
Performance Comparison: The Clarity Benchmark
The difference between standard generative models and Qwen’s precision engine is most evident when comparing typographic legibility. While traditional models often struggle with kerning and spelling, Qwen Image 2.0 maintains high-fidelity edges even at native 2K resolutions.
| Feature | Standard AI Text | Qwen Image 2.0 Pro |
| Spelling Accuracy | Frequent "hallucinations" | Near-zero error for quoted strings |
| Stylistic Control | Limited to "vibe" | Specific font weights and materials |
| Spatial Integration | Often looks "pasted on" | Follows 3D contours and lighting |
Whether you are designing a book cover or a complex social media poster, the ability to generate "crisp rendering" directly in the first pass drastically reduces post-production time, making it an essential skill for the modern digital designer.
Module 4: The Professional Refinement Workflow
The transition from a raw concept to a polished asset often requires multiple iterations. Traditional AI image generation workflows suffer from "style drift," where each new prompt results in a completely different composition. Qwen Image 2.0 solves this through its unified 7B-parameter architecture, enabling a seamless AI design workflow optimization where the model remembers the structural context of your previous steps.
Iterative Prompting: The Evolution of a Scene
Treat AI like a teammate instead of a gamble. This lets you build your scene one step at a time. This approach is the best way to keep the same look across many images. Most AI tools usually have a hard time with that part.
| Workflow Step | Operational Instruction (Prompt) | Visual Transformation |
| Step 1: The Base | "A modern tech office with a large window." | Establishes the room's geometry and lighting. |
| Step 2: Add Subject | "Add a sleek silver laptop on the desk with a glowing blue screen." | Introduces a focal point with localized light bounce. |
| Step 3: Environment | "Change the window view to a rainy Tokyo night with neon reflections." | Swaps the exterior without altering the interior desk setup. |
This step-by-step method lets designers tweak small details—like the lights or the gear—without changing the core layout. You keep the main structure of the image the same while you fix the tiny parts.
Upscaling for Delivery: The 2K Native Advantage
Unlike models that require secondary "upscaler" plugins—which often introduce unwanted artifacts—Qwen Image 2.0 supports native 2K resolution directly. This ensures that fine details like skin pores, fabric weaves, and small typography remain sharp for high-definition displays or print.
- How to Trigger: In your final production pass, simply set the output dimensions to 2048px.
- The Result: Microscopic precision that holds up under 100% zoom without the "plastic" look typical of post-process upscaling.
This precision, combined with a 2K output, makes it a powerful choice for professional ai art prompts that require a "print-ready" finish in a single, unified pipeline.
Troubleshooting: Common "Precision" Pitfalls
Even with the advanced reasoning of Qwen Image 2.0, high-complexity AI image generation can occasionally encounter technical hurdles. Achieving professional-grade results requires knowing how to navigate these common "Precision" pitfalls.
-
Hallucination Fixes: If the model introduces anatomical errors—like the classic "sixth finger"—or generates a floating object, do not start over. Use a referential prompt to isolate the error. For example, instead of a general request, try: "Keep the person's pose and face identical, but specifically redraw the right hand with five fingers resting naturally on the desk." This targeted correction preserves the rest of your hard-earned composition.
-
Managing Instruction Overload: While the 1,000-token limit is a superpower for AI design workflow optimization, providing too many conflicting commands can cause "prompt bleeding." If the model seems confused, simplify.
- The 3-Point Rule: Limit each iterative edit to three major changes, e.g., lighting, one object, one texture.
- Hierarchical Priority: Place the most critical change at the very beginning of your ai art prompts.
-
Consistency Tips for Character and Style: Maintaining multi-image consistency AI tools often comes down to "Seed Management." A seed is a unique identifier for the initial noise pattern. To keep the same character across multiple scenes:
- Lock the Seed: Copy the seed number from your successful base generation.
- Maintain the Descriptor: Keep the character's physical description, e.g., "curly red hair, silver glasses", identical in every subsequent prompt.
Conclusion: The Future of the Design Workflow
The arrival of Qwen Image 2.0 marks a shift from "random art" to "calculated design." By unifying generation and editing into a single conversation, the traditional, labor-intensive Photoshop pipeline is being replaced by a fluid, language-based loop. Designers can now iterate on lighting, typography, and subject matter in real-time, achieving native 2K results that were previously impossible without external upscaling.
Ready to build? Try Qwen image 2.0 on Atlas Cloud to test your prompting skills, or check out the [API Documentation] to integrate Qwen’s precision engine into your own creative applications.


