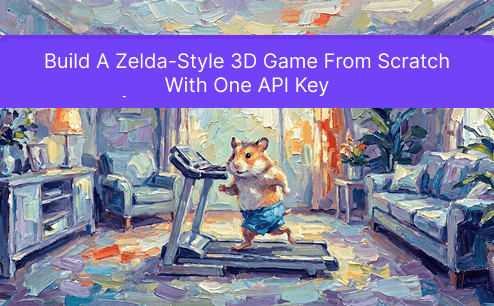
From a single sentence describing an environment, I ended up with a rigged 3D character who could walk and jump inside a game engine, wandering through a bioluminescent canyon in the visual spirit of Zelda. I never opened a modelling program, nor did I write a line of low-level rendering code.
This article walks through the entire process, including the mistakes I made along the way. Every AI capability I used came from the same platform, Atlas Cloud, and the whole workflow ran on a single API key.
The Short Version: What Once Took a Team Now Takes One API
In the past, building a playable 3D game meant clearing several technical hurdles. You had to know how to model in tools such as ZBrush or Blender, rig a character with a skeleton, animate it through keyframes or motion capture, and then write the code needed to bring those assets into a game engine. For most beginners, any one of those steps was enough to stop the project before it began.
What I wanted to test was simple: could AI now connect these steps end to end, allowing someone with no background in modelling or programming to create a 3D game demo that could actually run inside an engine?
The answer, after trying it, is yes. The entire AI pipeline, from image generation and 3D conversion to texturing and skybox creation, ran through one API key. The more technical engineering work, including Blender assembly and Godot project setup, was orchestrated by Claude. My role was largely to inspect the results and describe what I wanted next.
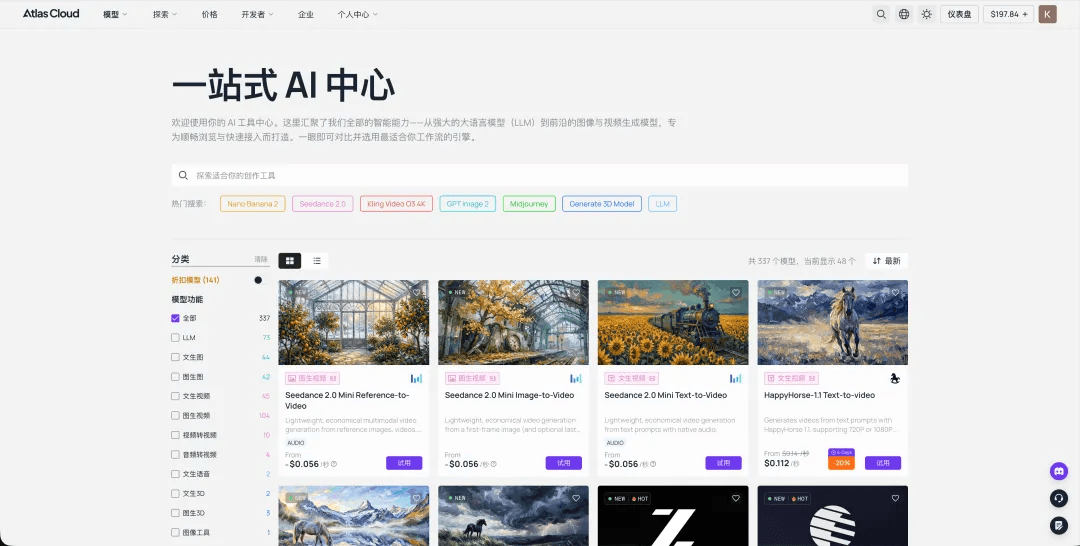
One API key carried the whole workflow. GPT Image 2, YouChuan MJ V8.1, Nano Banana 2, Seed 3D, Hunyuan 3D and other models all ran through Atlas Cloud using the same key. There was no need to register for one platform after another, top up separate accounts or integrate different APIs by hand.
Full Workflow Overview, in the Order I Actually Followed
plaintext1① GPT Image 2 → Environment concept art, setting the aesthetic: Zelda-style rendering plus a dark bioluminescent canyon 2② GPT Image 2 edit → Turn the environment into a “3D diorama” by cleaning it into an isometric base image 3③ Hunyuan 3D → Stress-test the full scene by turning the entire diorama into 3D in one pass 4④ GPT Image 2 → Generate a 360° skybox with the same model, used as the starry game background 5⑤ YouChuan MJ V8.1 → Design the ranger character concept, defining the soul of the protagonist 6⑥ Nano Banana 2 → Preserve character consistency and redraw the design as a front-facing T-pose reference 7⑦ Seed 3D → Convert the character image into 3D, with clean hair and finger geometry, rig-friendly structure, built-in PBR and ByteDance’s Seed model 8⑧ Nano Banana 2 + Hunyuan 3D → Build the lantern prop separately 9⑨ Mixamo + Blender × Claude → Automatic rigging and walk/run/jump animations with Mixamo, then Claude via MCP handles import, material hookup, alignment and GLB export inside Blender 10⑩ Godot 4 → Integrate everything: character controller, third-person camera, skybox, volumetric fog and glowing lantern
Steps ① through ⑧ all used AI capabilities available on Atlas Cloud, which positions itself as “One API for All Media AI,” a single interface for calling more than 300 models. That includes YouChuan MJ in Step ⑤. Mixamo in Step ⑨, Godot in Step ⑩ and Blender behind the scenes for material setup were all free third-party tools.
Below is the hands-on process, with the actual prompts I used at each step.
Step 1 | GPT Image 2: First, Draw the World
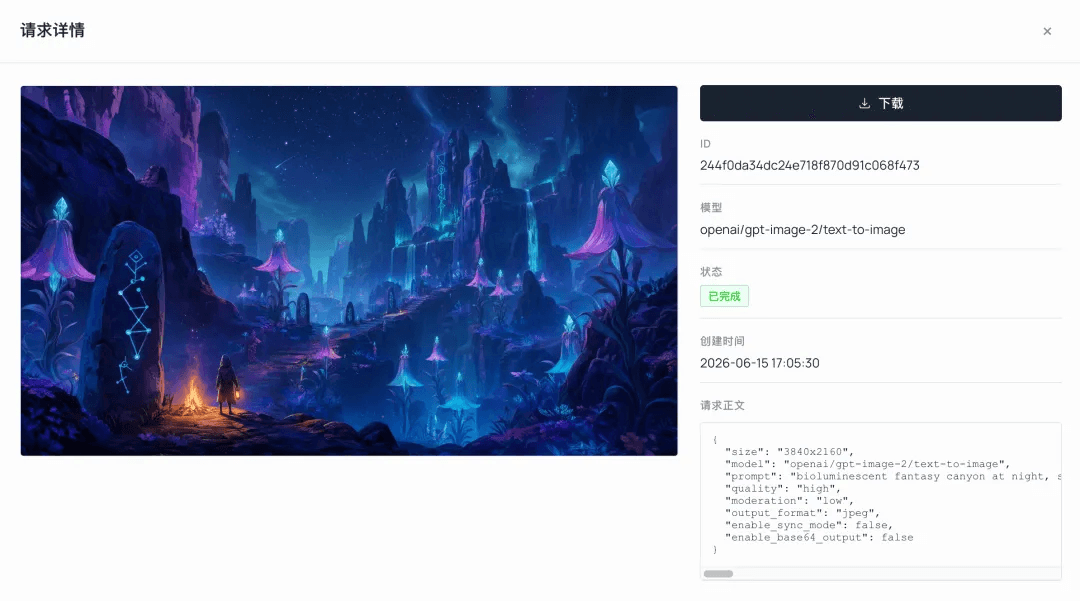
The starting point was not the character, but the aesthetic of the whole world. I used GPT Image 2 on Atlas Cloud to generate an environment concept image and define the tone: Zelda-style rendering, combined with a dark, bioluminescent canyon.
Environment prompt ('text-to-image'; I set the aspect ratio to '16:9' in the playground parameters):
plaintext1bioluminescent fantasy canyon at night, stylized painterly game concept art, towering deep-indigo and magenta rock cliffs glowing with teal veins, tall bell-shaped glowing flora with crystal tips, ancient carved standing stones with angular constellation glyphs, winding ridge path, a small hooded ranger with a warm lantern beside a campfire for scale, misty atmospheric depth, starry night sky, cool teal-and-violet palette with warm amber accent, dreamy magical mood, soft cel-shaded painterly rendering, cinematic wide establishing shot, high detail
This image became the aesthetic anchor for the whole project. The colour palette, lighting, and world-building were all decided here. At this stage, the only question was whether the image looked good. Whether it could be modelled came later.
Why GPT Image 2 for the environment: For the "environment scene plus later diorama conversion" pipeline, GPT Image 2 was the most stable option in my tests. Its compositions were clear and its colours held up well. When I tried other image models for the diorama conversion, they often washed the image into a white clay model, losing colour and material information that would be needed for modelling later. For the environment track, I therefore kept GPT Image 2 fixed.
Step 2 | GPT Image 2 'edit': Turn the Environment Into a 3D Diorama
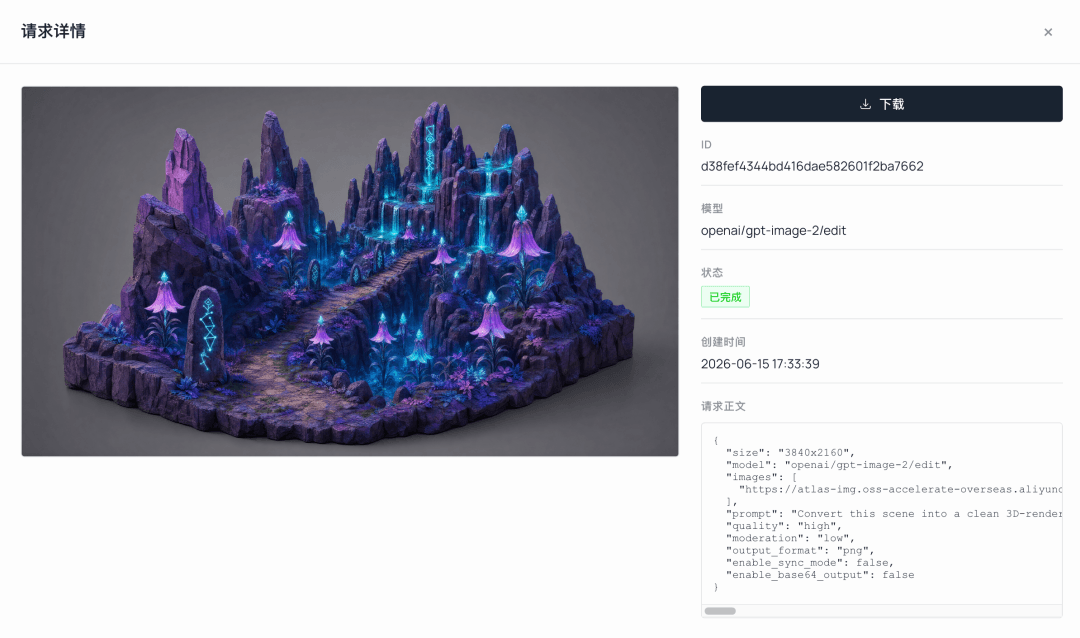
Next, the concept image had to be transformed into something a 3D model could understand. A wide-angle concept painting does not work well as a direct modelling input. The lighting is too dramatic and the background too cluttered. So I first used GPT Image 2's edit function to clean it into an isometric diorama-style base image, effectively preparing the material for the next stage.
Diorama conversion prompt (GPT Image 2 'edit', using the Step 1 environment image as input):
plaintext1Convert this scene into a clean 3D-renderable isometric diorama, keeping ALL original colors and textures fully intact — purple-magenta rock, teal glowing bell flowers, carved runestones, mossy ground. Plain simple background. Even soft neutral lighting so the true surface colors read clearly; remove only the heavy colored rim-light, fog and warm campfire glow. Do NOT desaturate, do NOT turn into grey clay. Preserve material and texture detail, single connected terrain chunk, 3/4 orthographic view, no text, no characters.
The easiest trap here: do not let the image turn into a grey-white clay model. Hunyuan reads the next stage’s texture information directly from the colours in the input image. If you feed it a grey clay-like image, it can only return a grey model. That is why the prompt explicitly says 'keeping ALL original colours' and 'Do NOT desaturate'. The goal is to remove only strong rim light, fog, and warm campfire glow, while preserving base colour and material detail.
Step 3 | Hunyuan 3D: Lift the Whole Diorama Into 3D in One Pass
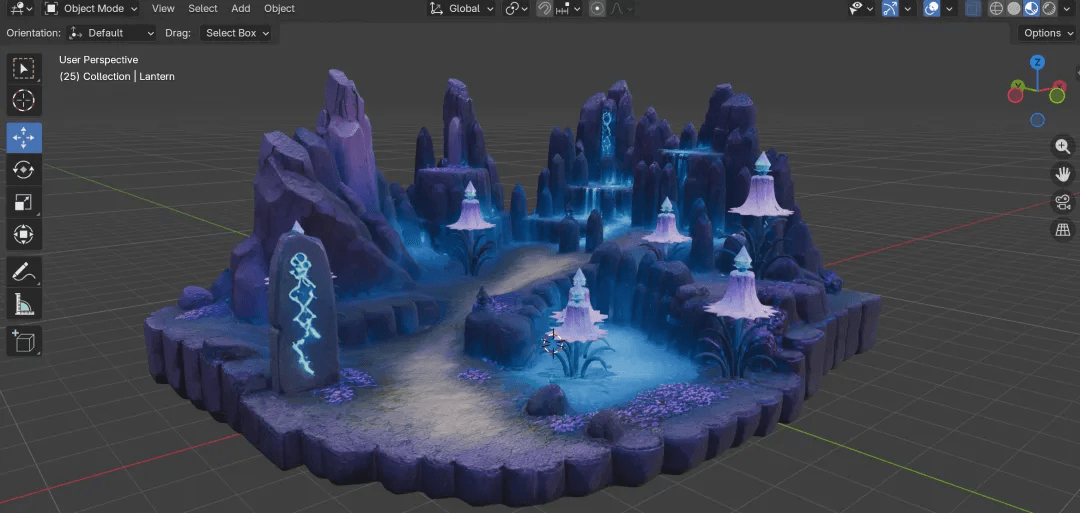
This step was a deliberate stress test. Instead of breaking the scene into separate assets, I fed the entire diorama image from the previous step into Hunyuan 3D to see whether it could reconstruct the whole scene in one go.
The result was more usable than I expected. The diorama came out at around 100,000 faces. Its overall structure, rock forms, and terrain relationships were preserved well, and it came with PBR textures rather than a bare white mesh. I had expected something closer to a flattened relief. After the diorama preprocessing, the full-scene model was much more usable than anticipated. It was a pleasant surprise worth noting.
A note on the principle behind it: This part used Hunyuan 3D's single-image generation, or image-to-3D. When given a full wide-angle image, it relies on the image and stylistic inference to fill in the missing three-dimensional structure. The most impressive part is that even with only one frontal wide-angle image, it can reasonably infer the unseen back and underside in the same style, producing a complete three-dimensional scene rather than a flat relief. For a diorama, that is already quite capable. For more refined environments, the more orthodox approach is still to split the scene into separate assets, model them one by one, and assemble them in the engine.
Why Hunyuan for the environment, not Seed 3D: I ran both models on the same diorama image. For environments, Hunyuan produced fuller and more solid textures. Rock patterns and ground details came through. Seed’s environment attempt missed a fair amount of texture and looked rougher overall. So for environments and scenes, I chose Hunyuan. For characters, the conclusion was the reverse, as explained in Step 7.
One rule runs through the entire project: keep the face count below 100,000. In a game, a model that runs smoothly matters more than one with excessive detail. Once the face count gets too high, rigging becomes harder, the engine slows down, and iteration takes forever. For playable game assets, 50,000 to 100,000 faces is usually enough. Modelling tools may offer 500,000 or one million faces, but that is more suitable for film or 3D printing. A playable demo does not need it.
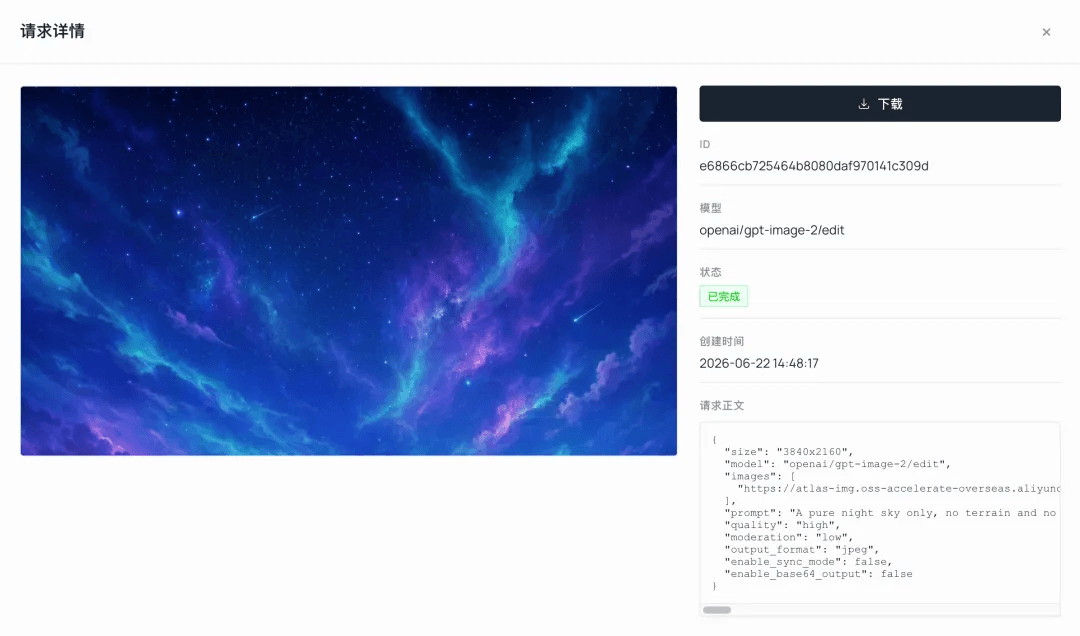
Step 4 | GPT Image 2: Generate a 360° Skybox With the Same Model
The starry sky in the game was not modelled. It was a skybox in the engine, a panoramic image that wraps around the entire world. I again used GPT Image 2, in two steps:
- First, I used the Step 1 environment concept image as an image-to-image reference and generated a clean starry sky, removing terrain and keeping only the sky. The colour and atmosphere stayed consistent with the original setting: deep indigo to royal blue, dense stars, teal-green aurora, meteors and nebulae.
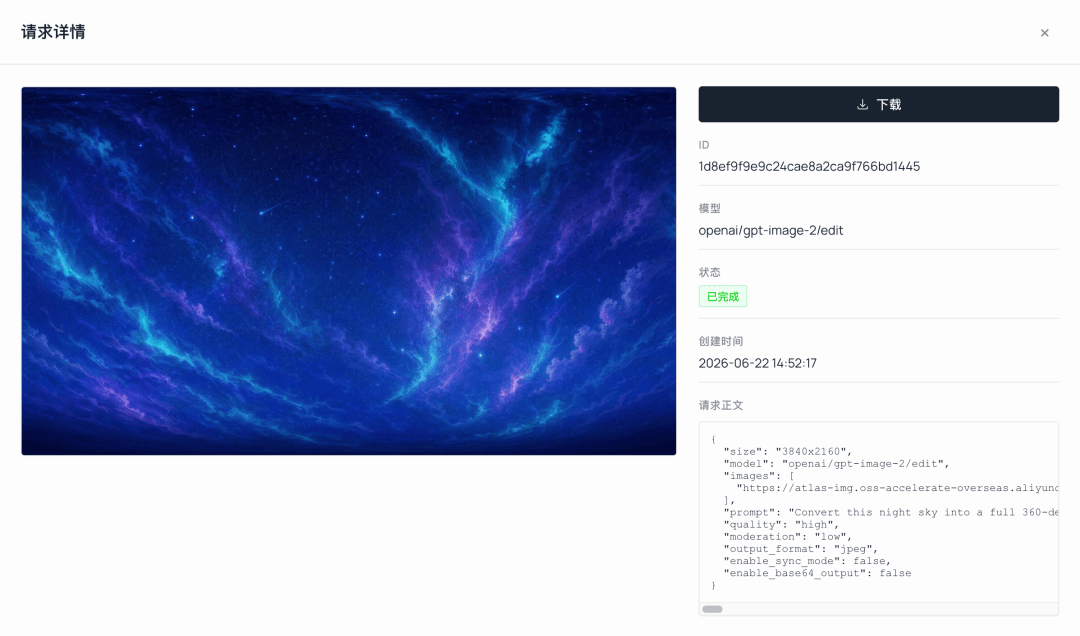
- Then I used
editto convert that image into a 360° equirectangular panorama with a 2:1 ratio and seamless left-right edges, ready to be dropped into the engine as a skybox.
Clean sky prompt (image-to-image, using the Step 1 environment concept image; aspect ratio '2:1'):
plaintext1A pure night sky only, no terrain and no horizon line, bioluminescent dark fantasy game sky: smooth deep indigo-to-royal-blue gradient, a dense field of bright white and pale-cyan stars, soft flowing teal-green aurora ribbons, a faint cyan-and-magenta nebula glow, one or two thin meteor streaks, dreamy magical atmosphere, soft cel-shaded painterly rendering, no ground, no mountains, no characters, sky fills the entire frame.
Convert to a 360° panorama ('edit', using the sky image above; aspect ratio '2:1'):
plaintext1Convert this night sky into a full 360-degree equirectangular spherical panorama with a 2:1 aspect ratio, for use as a seamless game skybox. Wrap horizontally so the left and right edges line up with no visible seam. Keep the same teal-and-violet palette, bright stars and soft aurora. No ground, no characters, seamless tiling.
This step again shows the advantage of one key covering the whole chain. The environment image, diorama base and skybox were all generated with GPT Image 2, without even needing to switch models.
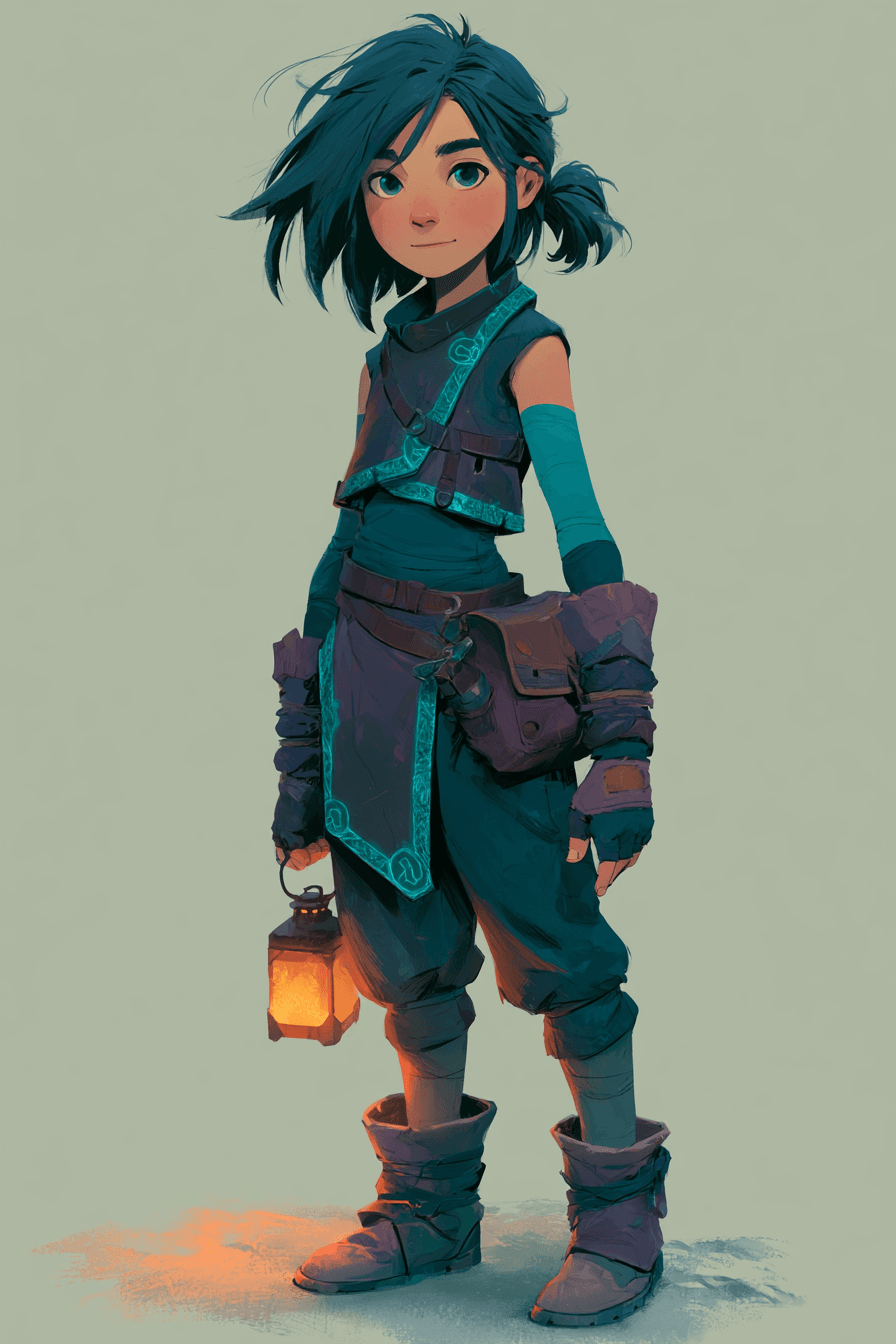
Step 5 | YouChuan MJ V8.1: Draw the Ranger Protagonist
Once the environment was set, it was time for the protagonist. The character is the soul of the project. I used YouChuan MJ V8.1 on Atlas Cloud because its style consistency and visual atmosphere suited the project well, making it a good fit for defining the protagonist’s overall feel.
I wanted a blue-haired female ranger who belonged to the same world: a tied-back ponytail, a fitted leather vest with glowing teal rune trim, a slim long-sleeve underlayer, fingerless gloves, fitted trousers and sturdy boots.
Character prompt (plain description; aspect ratio and style strength were set in the parameter panel, not written into the prompt):
plaintext1full body character design of a young female explorer-ranger, athletic slim build, short tousled hair or a low tied-back ponytail (no long loose hair over the shoulders), wearing a fitted sleeveless leather tunic with glowing teal-rune trim over a slim close-fitting long-sleeve underlayer, fitted trousers tucked into sturdy boots, fingerless gloves and forearm bracers, a small warm-amber lantern clipped at the hip, gentle determined expression, bioluminescent dark fantasy style, cool teal-and-violet palette with warm amber accent glow, soft cel-shaded painterly rendering, calm neutral standing pose with arms held clearly away from the torso, clean plain background, full body visible head to toe, clearly separated arms and legs, NO cape, NO robe, NO flared sleeves, NO face-covering hood, game character concept art, high detail
Parameter settings: aspect ratio '2:3' for a vertical full-body image, Style 'raw', Stylize '250'.
The most important lesson in the whole project: choose a rig-friendly character.
My first version of the protagonist was a hooded shrine maiden, with wide sleeves, long robes, a face-covering hood and loose hair over the shoulders. The artwork looked beautiful, but rigging completely collapsed. The robe merged the legs into a cone-shaped skirt, so automatic rigging could not identify where the legs were. The flared sleeves became large floating pieces of cloth that skeleton bones could not drive properly, causing severe clipping as soon as the character moved. The hood and face were also part of the same mesh, so the face distorted when the weights were pulled.
The underlying problem is that loose, suspended cloth is what cloth simulation is meant to handle. Forcing it onto a rigid skeleton has clear limits, especially for beginners.
That is why it is better to choose a character with clearly separated limbs and close-fitting clothing. The prompt’s repeated use of
fitted,NO flared sleeves,clearly separated arms and legsandNO hoodwas not accidental. Each phrase was there to block a specific failure mode. Choosing the right character can save half the trouble later in rigging.
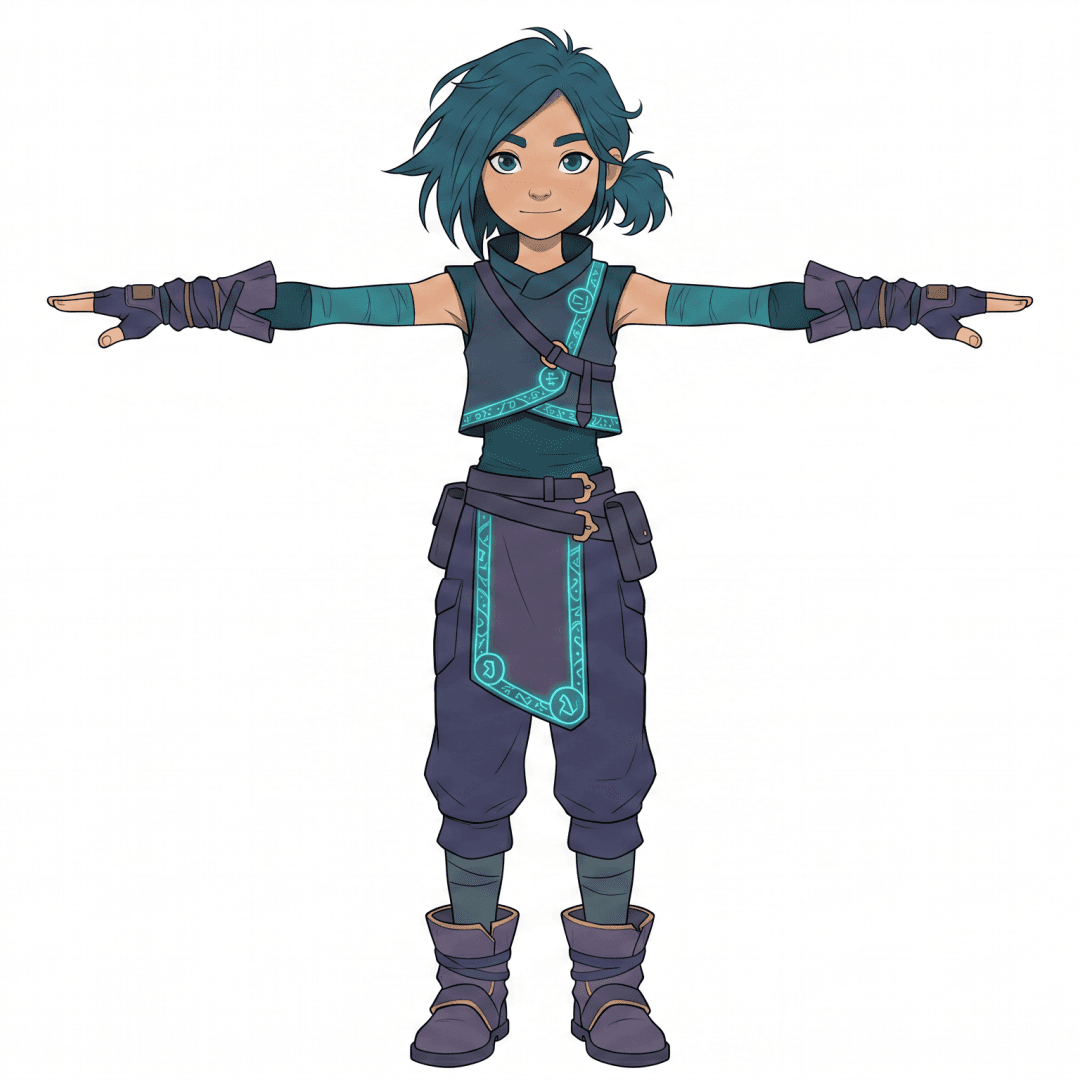
Step 6 | Nano Banana 2: Preserve Consistency and Redraw the Character in a Front-Facing T-Pose
The MJ image was beautiful, but it was still an illustration, with an irregular pose and viewpoint. It could not be used directly for modelling. The preferred input for 3D modelling and rigging is a front-facing T-pose reference: arms stretched horizontally, limbs separated and symmetry clear. That gives the AI the best chance of lifting it accurately into three dimensions.
This step went to Nano Banana 2. It redrew the MJ concept image into a clean front-facing T-pose while preserving the character’s identity. I also removed the lantern from her hand, since the lantern would later be modelled separately, and shortened and flattened the cloth flap at the waist so it would not turn into another cloth-simulation problem.
T-pose processing prompt (NB2 'edit', using the selected MJ character image as input):
plaintext1Redraw this exact character in a clean front-facing T-pose for 3D modeling: both arms extended straight out horizontally to the sides with a clear visible gap between the arms and the torso, hands open and empty, legs straight and clearly apart (not touching), standing upright, symmetric, facing forward. Keep the identical character identity — blue tousled short hair with a small ponytail, same face, sleeveless vest with glowing teal-rune trim, fitted long-sleeve underlayer, fingerless gloves, fitted trousers, chunky boots, cool teal-and-violet palette with warm accents. Remove the lantern and any held prop. Replace the bulky side hip pouch with a slim flat tactical belt. Shorten the hanging front cloth flap so it ends above mid-thigh, never between the legs. Even neutral lighting, plain pure white background, no shadows, full body head to toe, clearly separated arms and legs, everything fitted close to the body, NO cape, NO robe, NO flared sleeves, NO hood, clean game-character reference.
The reason for choosing Nano Banana 2 here was practical. It is strong at preserving character consistency, so the face and clothing do not drift when changing pose or viewpoint. It is also fast and inexpensive, which makes repeated iteration painless.
This step is essentially the translator of the whole pipeline. It turns an image that looks good to humans into an image a 3D model can read.
Why T-pose rather than A-pose? With the arms held horizontally, there is the least occlusion between armpits and torso. Image-to-3D generation produces cleaner geometry, and automatic riggers recognise the structure more reliably.
One more point: before feeding the image into an image-to-3D model, clean it thoroughly. Use a plain white background, centre the character, keep the full body in frame without cropping, simplify the background and make sure there is only one subject in the image. Step 7's Seed 3D model depends on this image to reconstruct the character. The cleaner and more prominent the input subject, the more accurate the generated geometry. Phrases such as
plain pure white background,full body head to toeandclearly separated arms and legswere there for a reason.
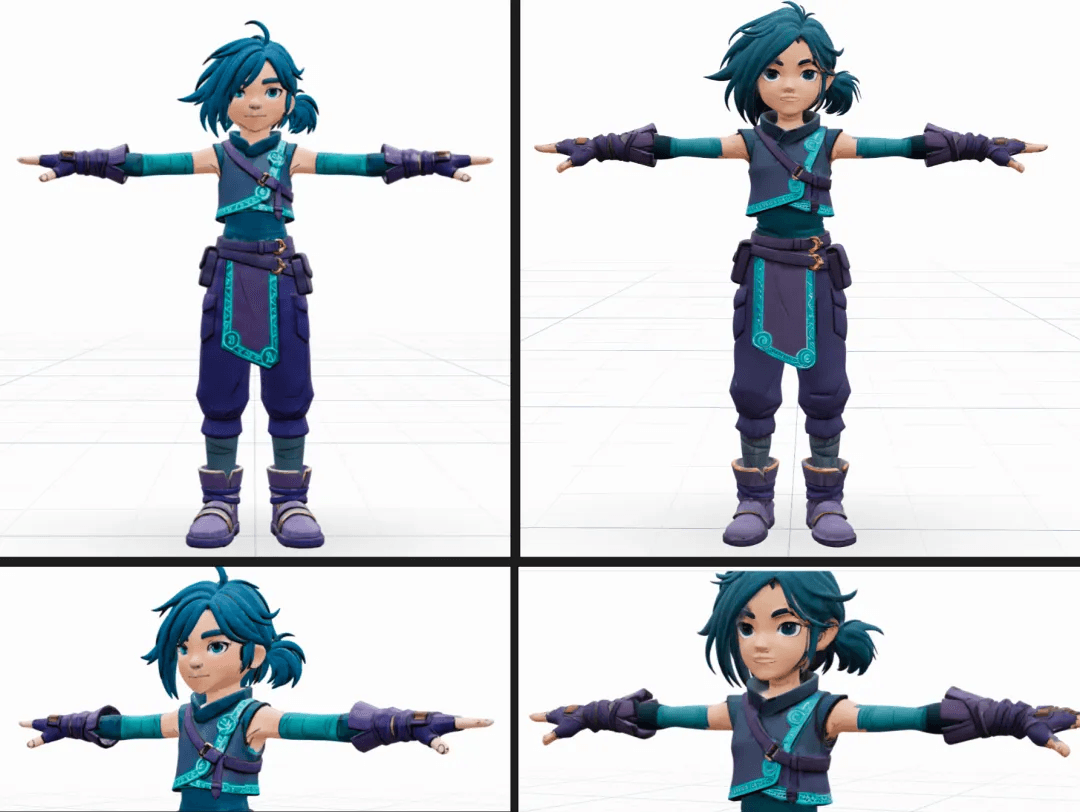
Step 7 | Seed 3D: From One Front View to a Fully Textured Character
This was the main event. For the character, I used Seed 3D on Atlas Cloud, a ByteDance model. I fed it the T-pose front view from the previous step, and it generated a complete character model with PBR textures. Geometry and material came together in one pass. The same API key carried the workflow seamlessly from image generation into 3D generation.
Why use Seed for the character but Hunyuan for the environment? I ran both models on the same materials. The conclusion was that they should be assigned by use case:
| Use case | Model | Reason |
|---|---|---|
| Character | Seed 3D | It separates hair and facial occlusion more cleanly, and the geometry and texture of gloves and fingers are better, making the result more suitable for rigging. The drawback is that the texture looks slightly rough at a distance. |
| Environment | Hunyuan 3D | It produces fuller and more solid textures for rock patterns and similar surface details, as seen in Step 3. |
Why character work prioritises geometry rather than texture: A character later needs to be rigged and animated. Geometry and topology, such as whether the hair and face are properly separated and whether the fingers are clean, determine whether the character can be rigged neatly. Those are hard defects if they go wrong. Rough texture is a softer problem. Lighting in the engine can narrow the gap, and textures can still be rebaked later. For the character, Seed’s geometric advantage mattered more.
In practice, Seed 3D performed well. From only a front-facing image, it reasonably inferred the back of the head, back of the body and soles of the feet in the same style. It also included PBR materials, and the hair and fingers came out clean. That last point is precisely why it worked well for a rigged character.
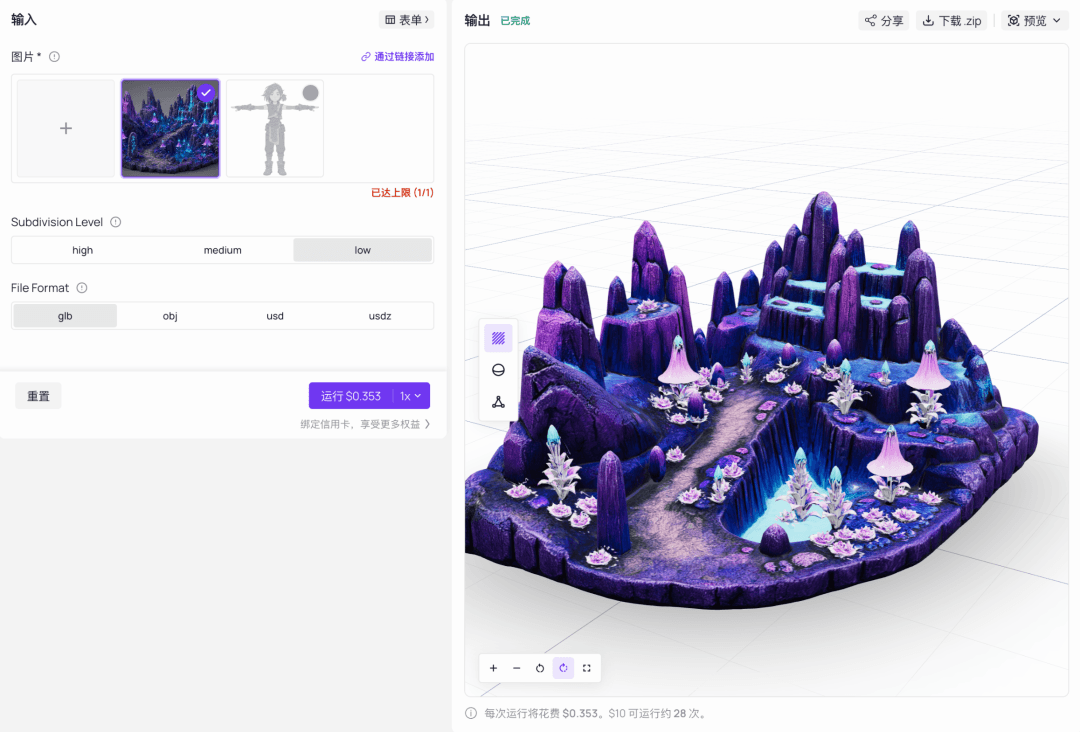
Seed panel settings: `Subdivision Level` has three levels. `low` is 100,000 faces, `medium` is 500,000 and 'high' is one million. Following the face-count rule, I kept it below 100,000 and used `low` for the character. For 'File Format', I chose GLB, which includes PBR textures and is natively recognised by both Blender and Godot. The download comes as a `.zip`.
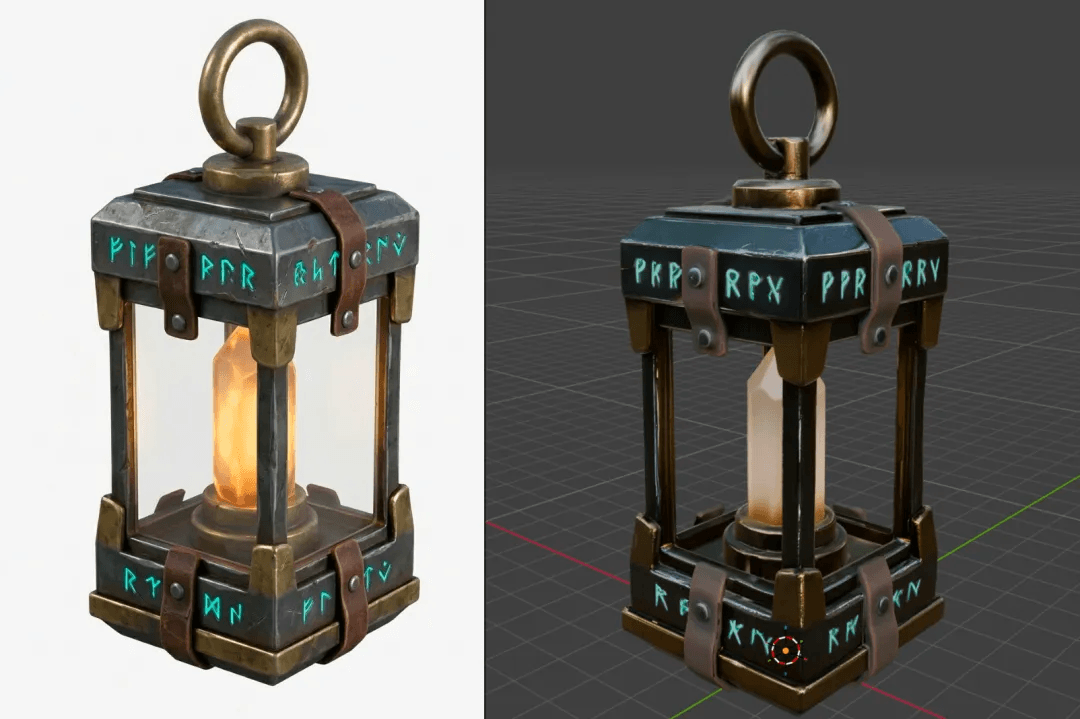
Step 8 | Nano Banana 2 + Hunyuan 3D: Build the Lantern Prop Separately
I did not weld the lantern into the character model. Instead, I made it as a separate prop asset. That keeps rigging and animation clean; inside the engine, the lantern can simply be attached to the character’s hand.
First, I used Nano Banana 2 to generate a clean standalone lantern image from a 3/4 view. I made sure not to bake the glow into the texture, leaving the brightness to be handled inside the engine.
Lantern prop prompt (NB2 'text-to-image'):
plaintext1A single rugged adventurer's handheld lantern as a standalone 3D game asset, compact portable explorer design, weathered dark gunmetal-and-brass frame with glowing teal-rune engravings, a warm-amber glowing crystal core behind simple flat glass panels, ONE single sturdy fixed carry ring on top only — no side handle, no swinging bail, a few practical leather straps and rivets, bioluminescent dark fantasy style matching a teal-and-violet explorer with warm amber accents, centered on a pure white background, even neutral studio lighting, full object visible, 3/4 orthographic view, true material colors, no strong glow baked in, no shadows, clean reference.
Then I fed it into Hunyuan 3D Pro, with face_count set to 40,000, enable_pbr enabled and GLB as the format. The metal frame and decorative rune textures were preserved.
Why Hunyuan for the prop instead of Seed: Hunyuan Pro allows the 'face_count' to be reduced to 40,000. Seed’s minimum is 100,000. For a small prop, 40,000 faces is lighter in the engine.
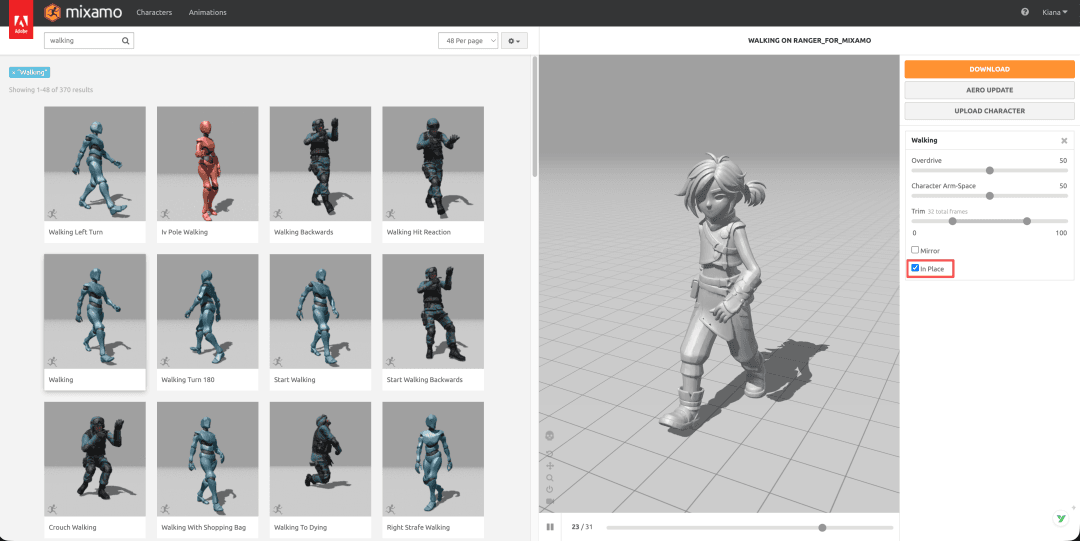
Step 9 | Mixamo: Free Rigging and Walk, Run and Jump Animations
At this point, the model was still a statue. To make it move, it needed a skeleton and animations. I used the web version of Mixamo, Adobe’s free tool. You can log in with an Adobe ID and use it without writing code.
Rigging and animation both happen inside Mixamo, using Mixamo's native skeleton, so there is no retargeting, no plug-in and no need to wrestle with complex Blender workflows. That is the main reason for choosing Mixamo. A beginner can upload the model, click a few times, and download a character that can already walk and jump.
- Rigging: Upload the character model and place a few markers on the chin, wrists, elbows, knees and groin. Mixamo then generates a standard humanoid skeleton automatically. Because this ranger had close-fitting clothing and separated legs, Mixamo recognised the limbs on the first attempt and rigged the character cleanly.
- Animation: Search
Walking,RunningandJumpingin Mixamo’s animation library, apply them to the character and preview the results directly. - Download: For each animation, choose
FBX Binary, selectWith Skinso the model is included, and checkIn Place, so the motion stays in place while movement is handled by the engine code. Otherwise, the animation’s built-in displacement may drag the character away.
Real pitfall No. 1: uploading an FBX produced the error "unable to map your existing skeleton." The first time, I used Claude to operate Blender and export an FBX. Mixamo assumed the file already contained a skeleton and tried to map that existing rig, which failed. Claude’s solution was to export the model as OBJ instead. OBJ has no concept of a skeleton, so Mixamo was forced to run its automatic rigging from scratch. That avoided the problem entirely. Since texture is not needed for rigging, OBJ is good enough.
Real pitfall No. 2: Mixamo downloads the model at scale 0.01. When imported into Blender or a game engine, the character becomes tiny. Claude automatically detected that the model was too small and reset the object scale to 1.0, roughly a 1.5-metre human height.
A behind-the-scenes truth: Mixamo handled automatic rigging and animation, but the cleanup work inside Blender was basically done by Claude.
More specifically, Claude was connected to Blender through MCP. You can think of MCP as a bridge that lets a large language model directly operate software on your computer. It handled a sequence of fragmented, error-prone steps for me: automatically importing the FBX files downloaded from Mixamo, restoring the scale from 0.01 to a normal size, aligning mesh and skeleton, reconnecting the textures that Mixamo had stripped back to the original Seed PBR materials, and finally exporting a GLB that the game engine could use directly. I only had to inspect the results and tell it what to do next.
Step 10 | Godot 4: Assemble Everything in the Engine and Make Her Run
The final step was Godot 4, which is free, open source, about 100MB to install, requires no registration and supports GLB natively. This is where the atmosphere came together. The engine itself is not the point; if you are familiar with Unity, that would also work. I chose Godot because it is lightweight and quick to learn. Its project files are also plain text, which meant Claude could write, modify and run the whole Godot project directly instead of requiring me to drag controls around manually.
Claude automatically brought the three GLB assets into the project: the character, the environment and the lantern. Then it set up the following:
- Character controller: using
CharacterBody3Dplus a few dozen lines of GDScript, it createdWASDmovement,Shiftto run, spacebar to jump, mouse-controlled camera rotation and a third-person follow camera that stays behind the character. - Animation state machine: idle when standing, walk or run when moving, jump when airborne. This was just a few
ifconditions switching between the three Mixamo animations. - Skybox:
WorldEnvironmentconnected toPanoramaSkyMaterial, with the 360° panorama from Step 4 dropped in. The starry sky then wrapped around the entire world. - Volumetric fog and glow: Godot 4 has built-in real volumetric fog. Combined with the emissive glow of the bell-shaped flowers and bloom, it quickly produced the atmosphere of a magical canyon.
- Lantern lighting: the lantern was parented to the character’s hand bone, with a warm yellow
OmniLight3Dpoint light placed inside it. Wherever she walks, warm light follows. The way it illuminates the ground gives the scene a strong sense of exploration.
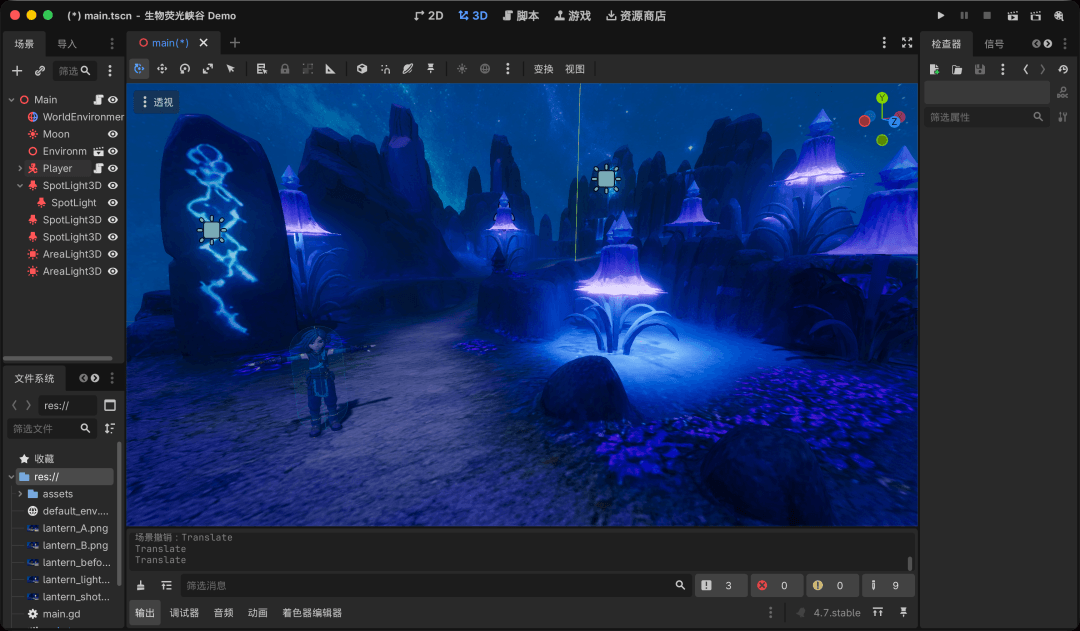
The Godot project itself was also written by Claude. Project configuration, scenes and the character controller script were all plain text. I described the interaction and camera atmosphere I wanted, and Claude wrote directly inside the project, modified it, and ran checks through several rounds until it felt right.
From image generation and 3D generation to Blender assembly and Godot scene setup, Claude did the programmer’s work throughout. I only had to describe what I wanted. When I say I did not write a line of low-level code, I do not mean there was no code. I mean Claude carried the technical burden for me.
Why I Used Atlas Cloud for the Whole Workflow
The hardest part of this workflow is not necessarily learning any single tool. The real pain is jumping among a dozen platforms, each with its own registration, billing and API integration. Atlas Cloud simplified that:
- One API key for the whole workflow. This was the most important part. GPT Image 2 for environments and skyboxes, MJ for the character, Nano Banana 2 for view conversion, Seed 3D and Hunyuan 3D for modelling: everything ran on the same key. No switching, no repeated integration. That is what made it realistic for one person to finish the project.
- One API for All Media AI. One interface can call more than 300 models, covering image generation, 3D, video and large language models. To switch models, you change the model name.
- A newly added 3D model category. The new 3D generation category includes ByteDance’s Seed 3D and Tencent’s Hunyuan 3D. Image-to-3D generation with PBR textures in one step was the key piece that made the workflow viable. In my tests, Seed worked better for characters and Hunyuan for environments.
- Frontier LLMs under the same key. Do not forget the conductor behind the scenes. Atlas Cloud also provides access to frontier LLM APIs. LLMs, image models and 3D models were all covered by one key, which is what made a one-person workflow possible.
- Competitive pricing. Image generation and 3D generation were inexpensive enough to allow repeated trial and error.
- More than an API: MCP, CLI and Skills. The interface is OpenAI-compatible and can be used as a drop-in integration. On top of that, Atlas Cloud also offers its own MCP Server, command-line CLI and Skills. Once AI itself can call the models on the platform, connecting image generation, 3D creation and the rest of the workflow into one line becomes natural.
In one sentence: what once required a team and a dozen accounts can now be done by one person, with one API key, starting from a single sentence and ending with a 3D world that can run and jump.
Try It Now
Open Atlas Cloud and go to the new 3D model category. Start by generating your first character. It does not matter if you do not know how to model or code. AI can handle the modelling, the engine can bring the atmosphere to life, and your job is to imagine the world.
All the models used in this article, including GPT Image 2, YouChuan MJ V8.1, Nano Banana 2, Seed 3D, Hunyuan 3D and Claude, are available in the same model pool
How to Use Both Models on Atlas Cloud?
Atlas Cloud lets you use models side by side — first in a playground, then via a single API.
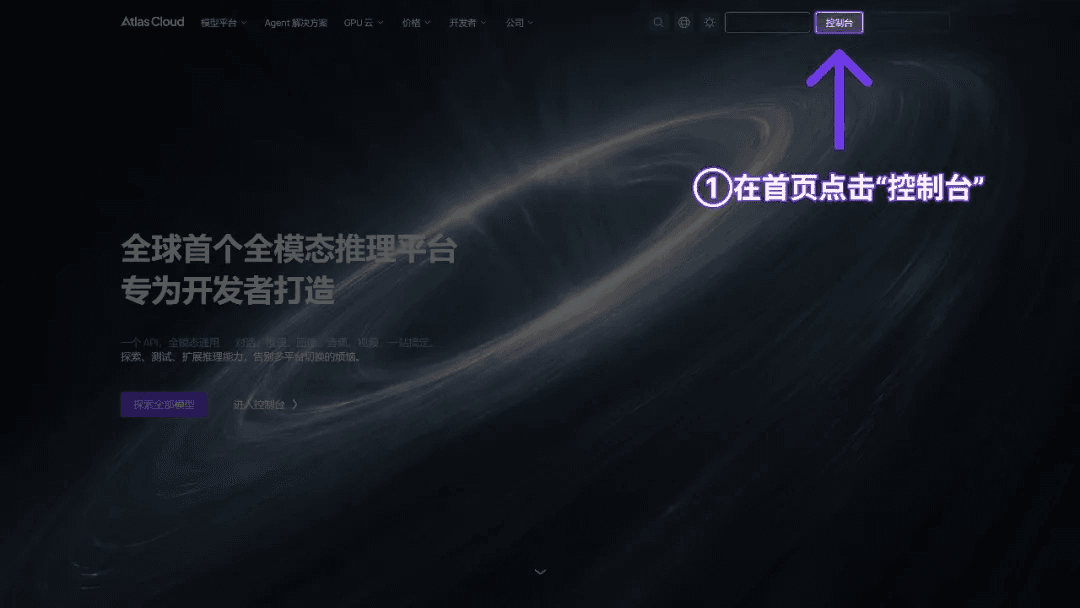
Method 1: Use directly in the Atlas Cloud playground
Click the link https://www.atlascloud.ai to use it in the playground.
Method 2: Access via API
Step 1: Get your API key
Create an API key in your console and copy it for later use.
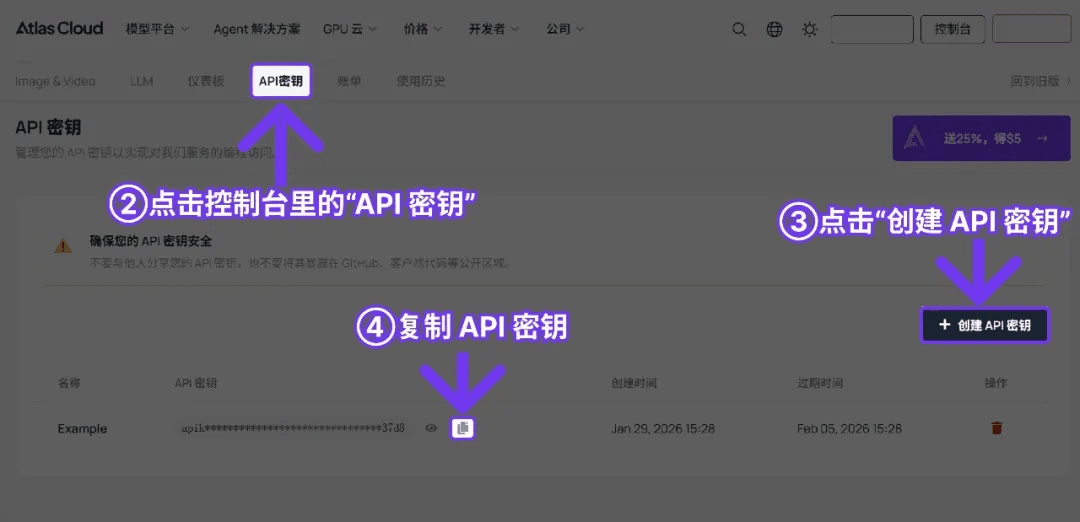
Step 2: Check the API documentation
Review the endpoint, request parameters, and authentication method in our API docs.


