OpenAI’s latest image generation model, GPT-Image-1.5, represents a significant step forward in controllability, visual fidelity, and multimodal integration.Unlike earlier standalone diffusion models, GPT-Image-1.5 is deeply integrated into the broader GPT ecosystem — enabling developers to generate, edit, and iterate on images using natural language with higher precision and consistency.
In this guide, we’ll break down:
- What GPT-Image-1.5 actually is
- What makes it different from previous image models
- How to use the API effectively
- A Production Workflow
What is GPT-Image-1.5?
OpenAI just put out a new image model. It is called GPT‑Image‑1.5. The idea is to give you high‑quality, controllable images through an API. This one is built for real work, not just messing around.
It also lives inside OpenAI's broader setup. So it works nicely with their text models — handy for generating prompts — and their vision models for understanding images. You can also hook it into automated workflows like agents, pipelines, or SaaS tools.
Core Capabilities – What OpenAI Says
- Text‑to‑image generation with strong prompt alignment
- Instruction‑based editing – change existing images by telling the model what to do
- Iterative refinement workflows – generate, tweak, generate again
- Better consistency across multiple runs
What Actually Changed
1. From creativity to controllability
Old models were highly creative but unpredictable. You never knew what you would get. The new one produces more structured outputs. It follows prompts better.
2. From single output to iterative workflow
Older versions encouraged you to generate one "final" image and call it done. GPT‑Image‑1.5 is built for a loop. Generate. Edit. Refine. Scale.
3. From demo tool to production infrastructure
This one matters. The model is designed for real workloads. E‑commerce image pipelines. Marketing creative automation. AI‑powered design tools. Not just gallery pieces.
td {white-space:nowrap;border:0.5pt solid #dee0e3;font-size:10pt;font-style:normal;font-weight:normal;vertical-align:middle;word-break:normal;word-wrap:normal;}
| Feature | GPT-Image-1.5 | DALL·E |
| Prompt Accuracy | High | Medium |
| Editing Ability | Strong | Limited |
| Consistency | High | Low |
| Workflow Support | Production-ready | Demo-focused |
| API Integration | Native | Limited |
Why Developers Actually Care
You have probably run into these problems before.
First, iteration takes too long.
You generate an image. It is almost right. But the color is off. Or the background is wrong. With older models, you had to regenerate from scratch. That wastes time and API credits. GPT‑Image‑1.5 lets you edit. Change the color. Swap the background. Keep everything else the same. That cuts iteration time by a lot.
Second, prompts get ignored.
You write a detailed description. The model does half of it. Or it adds things you never asked for. This model pays attention. Not perfectly, but measurably better. Object relationships stay intact. Scene composition matches your instructions. Style prompts actually work.
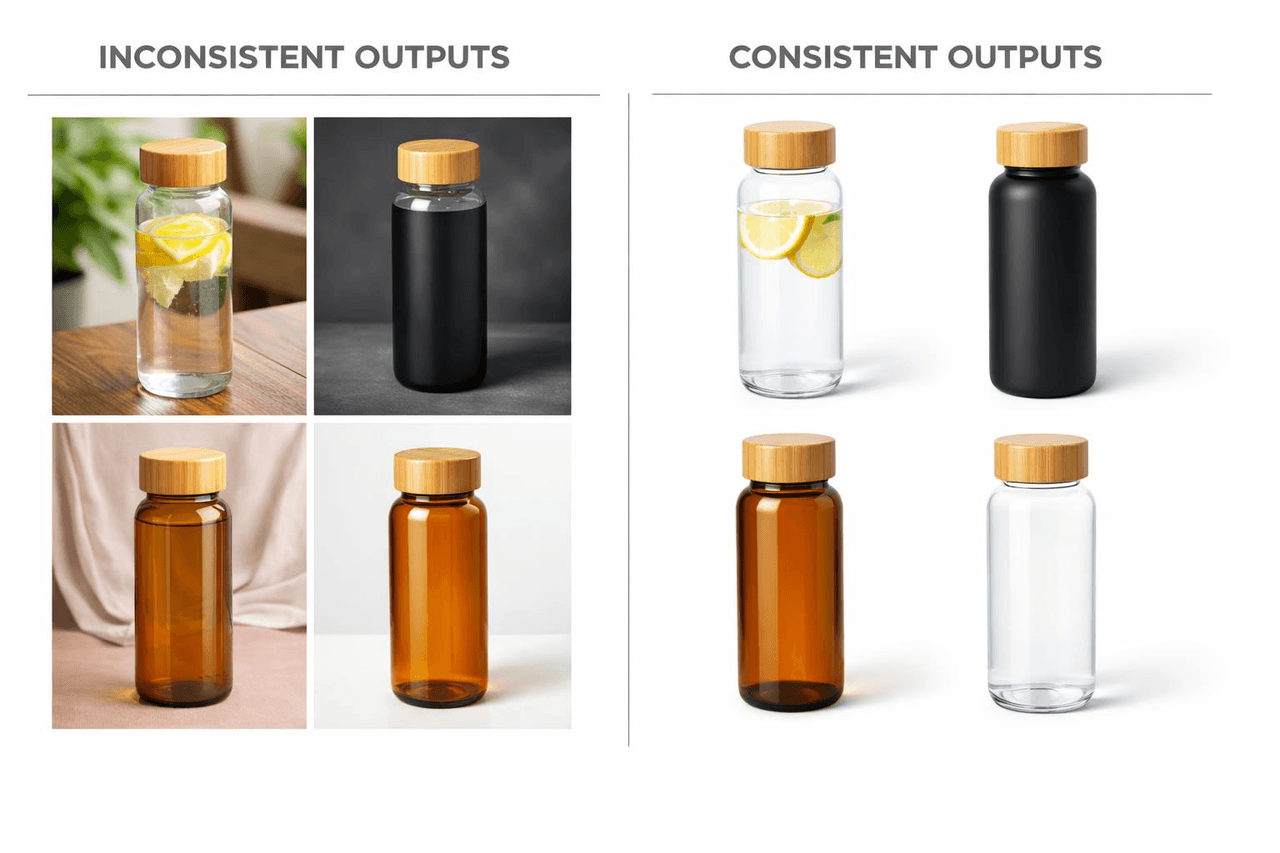
Third, scaling breaks consistency.
Generate ten images of the same product. They look like they came from ten different photographers. Lighting changes. Angles shift. Colors drift. That kills e‑commerce and branding work. GPT‑Image‑1.5 was trained to reduce that drift. The outputs across a batch look like they belong together.
Fourth, API integration feels like an afterthought in many tools.
Standalone apps are great for playing around. But when you need to hook image generation into a backend system, a web UI does not help. GPT‑Image‑1.5 ships with a proper API. Authentication. Endpoints. Rate limits. Webhooks. The kind of stuff developers actually need.
API Integration Guide
Atlas Cloud lets you try multiple models side by side. You can start in the playground. Play around. See what works. Then you call everything through a single API.
Method 1: Use directly in the Atlas Cloud playground
One of the simplest ways to get started with GPT-Image-1.5 is to use it directly in the Atlas Cloud Playground — a web-based interface designed for developers, designers, and marketers to experiment with AI image generation without writing any code.
Method 2: Access via API
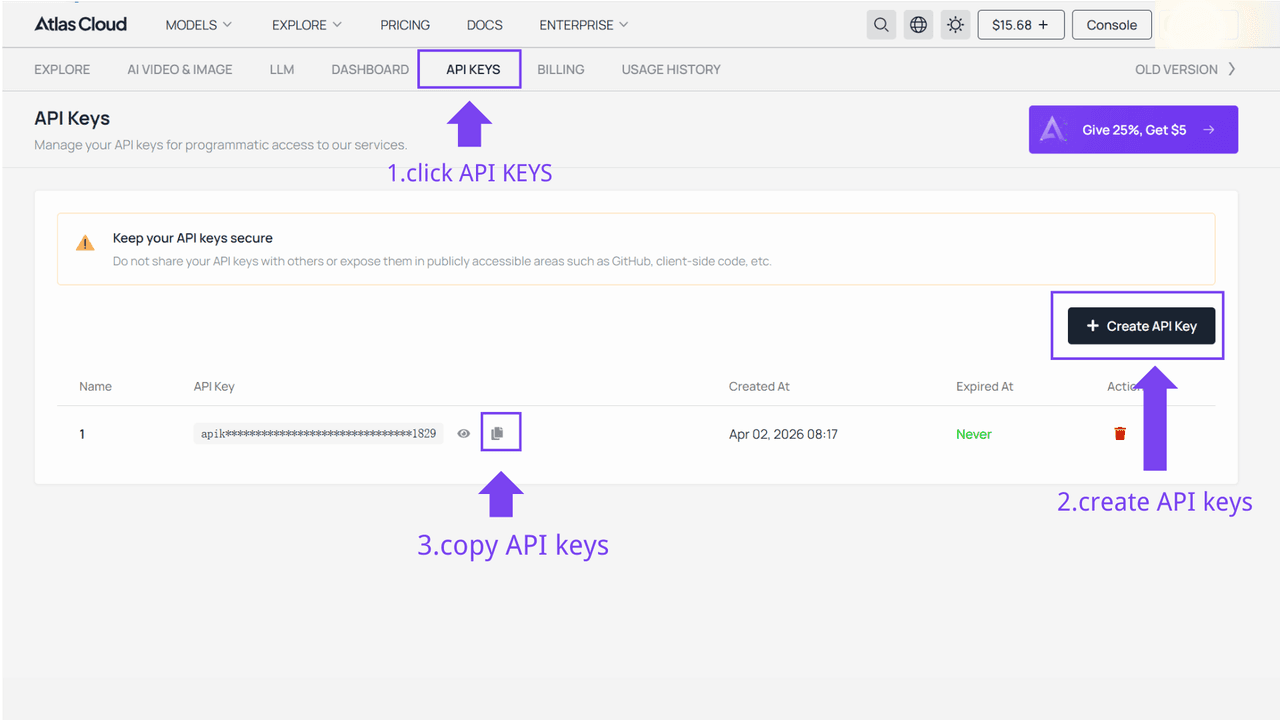
Step 1: Get your API key
Create an API key in your console and copy it for later use.
Step 2: Check the API documentation
Review the endpoint, request parameters, and authentication method in our API docs.
Step 3: Make your first request (Python example)
Here’s a simple example of generating an image using OpenAI GPT-Image-1.5:
plaintext1import requests 2import time 3# Step 1: Start image generation 4generate_url = "https://api.atlascloud.ai/api/v1/model/generateImage" 5headers = { 6 "Content-Type": "application/json", 7 "Authorization": "Bearer $ATLASCLOUD_API_KEY" 8} 9data = { 10 "model": "openai/gpt-image-1.5/text-to-image", # Required 11 "enable_base64_output": False, # If enabled, the output will be encoded into a BASE64 string instead of a URL 12 "enable_sync_mode": False, # If set to true, the function will wait for the result to be generated and uploaded before returning the response 13 "output_format": "jpeg", # The format of the output image. options: jpeg | png 14 "prompt": "end-to-end AI image production pipeline, prompt generation, image creation, QA, deployment, SaaS workflow diagram\n\n", # Required. The positive prompt for the generation 15 "quality": "medium", # The quality of the generated image. options: low | medium | high 16 "size": "1536x1024", # The size of the generated media in pixels (width*height). default: "1024x1024". options: 1024x1024 | 1024x1536 | 1536x1024 17} 18generate_response = requests.post(generate_url, headers=headers, json=data) 19generate_result = generate_response.json() 20prediction_id = generate_result["data"]["id"] 21# Step 2: Poll for result 22poll_url = f"https://api.atlascloud.ai/api/v1/model/prediction/{prediction_id}" 23def check_status(): 24 while True: 25 response = requests.get(poll_url, headers={"Authorization": "Bearer $ATLASCLOUD_API_KEY"}) 26 result = response.json() 27 if result["data"]["status"] == "completed": 28 print("Generated image:", result["data"]["outputs"][0]) 29 return result["data"]["outputs"][0] 30 elif result["data"]["status"] == "failed": 31 raise Exception(result["data"]["error"] or "Generation failed") 32 else: 33 # Still processing, wait 2 seconds 34 time.sleep(2) 35image_url = check_status()
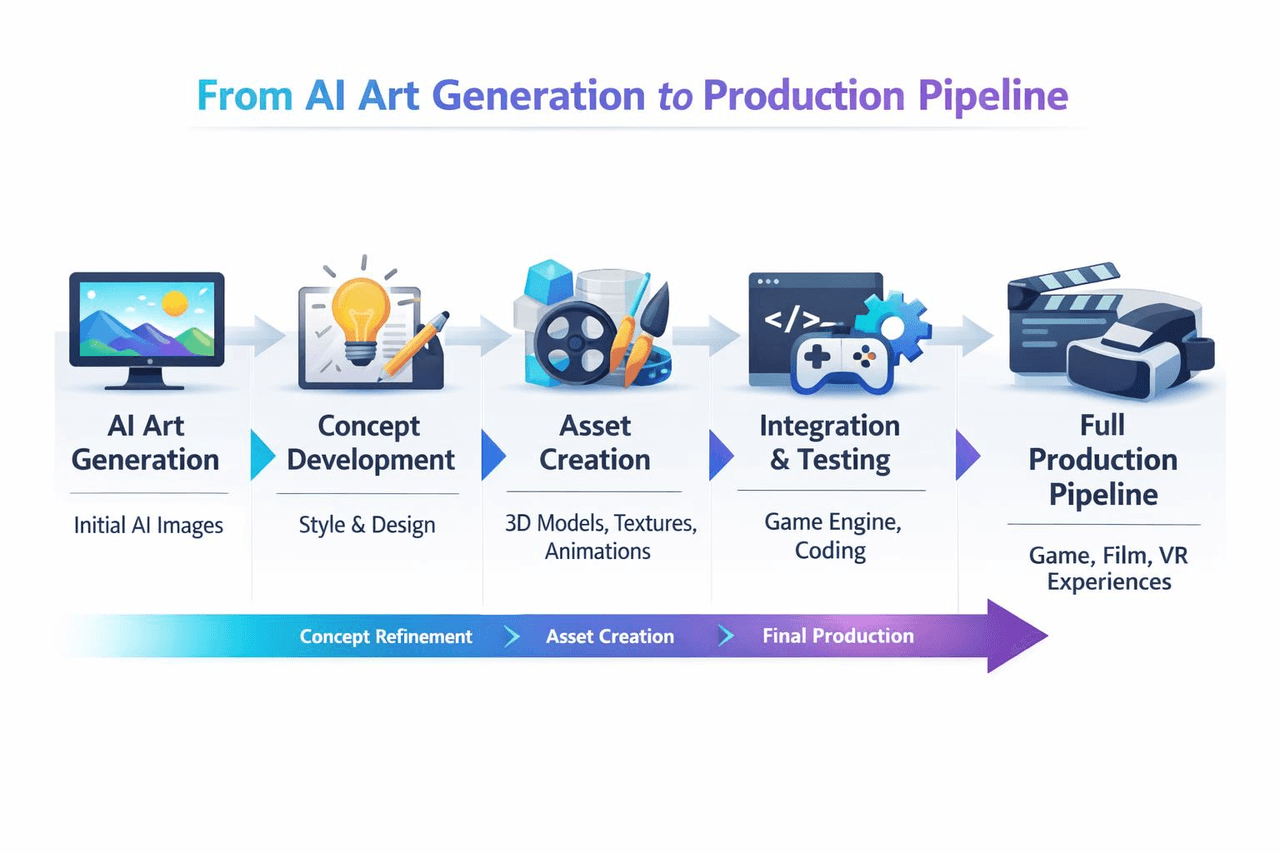
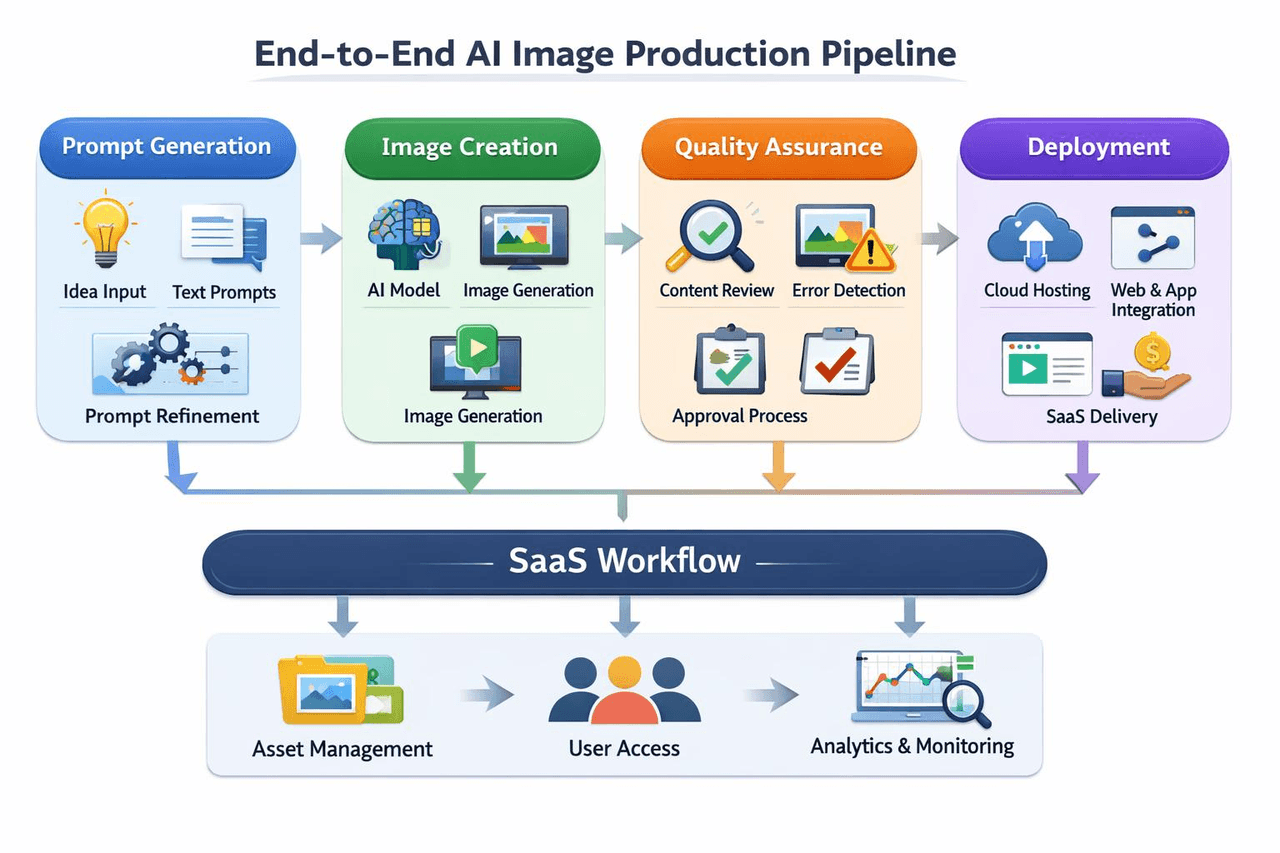
A Production Workflow – Putting It All Together
Real teams using GPT‑Image‑1.5 follow a pattern.
- Step one: standardise prompts. Some teams use GPT text models to generate structured prompts automatically.
- Step two: call the API. Generate images.
- Step three: automated QA. Check style consistency. Flag bad outputs.
- Step four: iteration loop. Edit images via prompts. Generate variations.
- Step five: deployment. Store assets. Serve them to your frontend or users.
FAQ
1. What is the difference between GPT-Image-1.5 and other AI product photography generators?
Most so‑called AI product photography tools are just open‑source models wrapped in a template. You upload a white‑background image, pick a scene, and it stitches something together. Fast, sure. But you can't tweak the details. Lighting looks off? Too bad. Shadows sit weird? Deal with it.
GPT‑Image‑1.5 doesn't work that way. It doesn't give you pre‑made templates. It lets you control things yourself. You can say "side light, shadows falling to the right, blur the background a bit," and it follows along. The downside? You have to learn how to write prompts properly. But once you do, the same prompt works on hundreds of images. That's why teams building real product image pipelines prefer using OpenAI's API to build their own system, instead of relying on those one‑click generator tools.
2. What types of prompts work best for the Text‑to‑Image OpenAI API?
Don't write too short. Don't write a novel either. The best format is to break it down: what's in the shot, where is it, how is it lit, what style.
Here's an example. You write "a modern chair," and the model gives you some random chair. You write "a walnut wood lounge chair, placed in a bright living room with large windows, soft daylight from the left, mid‑century modern style, clean composition," and the result is way more reliable.
The model can't read your mind. You have to break the scene into pieces and tell it. Do that, whether you're making product shots or something else, and you'll see a real difference.
3. What is the advantage of using an AI product photography generator over traditional photography?
Speed is the obvious one. Get your prompts right, and you can spit out dozens of product angles in a few minutes. A traditional shoot would still be setting up lights at that point.
The real advantage is flexibility. With regular photography, changing the background means a whole new shoot. Same for different lighting. With GPT‑Image‑1.5, you just type it. “Change the background to brick.” “Make the light warmer.” “Turn the red sneakers blue.” One sentence turns a static image into something you can tweak on the fly.
Then there is consistency. In a traditional shoot, the light drifts. Colors shift slightly between shots. Ten photos of the same product can end up looking like ten different photographers took them. With a model, keep the prompt the same, and those ten shots actually look like a set. For e‑commerce or branding, that matters a lot more than one pretty picture.


