The detail you want to keep may be your grandmother's slightly uneven smile. A cleaner photograph loses its purpose if that familiar expression disappears.
GPT Image 2.5 Old Photo Restoration can help you attempt scratch removal, restrained tonal correction, and optional colorization. Compare every result with the original: clearer faces can contain invented details, and missing features or undocumented colors cannot be treated as historical facts.
Start with one photograph, one narrow repair task, and a saved original. This guide gives you 5 copyable prompts, a single-model workflow, and practical acceptance checks for family albums, shared copies, and prints.
Key Takeaways
- Start with a real photograph and preserve the original scan.
- Use the first pass to address identifiable damage.
- Save colorization separately as an interpretation.
- Check every face and untouched area before keeping the download.
Evidence status, September 15, 2026: The public model page and its controls were checked. The restoration run could not reach the test playground because its access session required sign-in. The figures below show real archival inputs and controlled test preparation, not completed AI restorations. No restoration success or measured run cost is claimed.
GPT Image 2.5 Old Photo Restoration: What It Can Fix
OpenAI introduced Images 2.5 on September 8, 2026, describing improvements in reference-subject fidelity, focused editing, and consistency across successive edits. These are general model capabilities, not an old-photo accuracy guarantee. (OpenAI, September 2026)
A restoration request can involve 3 quite different jobs. Damage cleanup targets a mark covering otherwise readable material. Enhancement changes how easily you can see surviving information. Reconstruction generates an appearance for information the input does not contain. Decide which job you are requesting before uploading.
A narrow scratch across a plain backdrop offers nearby texture that can guide a repair. A missing strip across an eye removes information about the eyelid, gaze, and surrounding expression. Both might disappear in a polished output, yet the second repair needs much more judgment.
Use this decision table before choosing a prompt:
| Problem | Operation to try | Preserve | What remains unverified | Accept when |
| Dust and narrow scratches | Local surface cleanup | Hair edges, fabric, grain | Details under an opaque mark | Marks recede without changed structures |
| Fading | Modest midtone and contrast adjustment | Lighting and original tonal character | Color or detail already lost | Existing detail reads better without clipped tones |
| Blur | Restrained readability improvement | Naturally soft feature boundaries | Fine detail absent from the scan | No new facial structures appear |
| Small faces | Minor cleanup around visible features | Expression, proportions, softness | Eyes or teeth represented by very few pixels | Each person remains consistent with the input |
| Missing features | Preserve the unresolved region | Surviving facial evidence | The missing feature itself | No invented replacement is presented as recovered fact |
| Black-and-white colorization | A separately labeled color interpretation | Shapes and tonal relationships | Original colors without records | Color adds no structural changes and uncertainty is disclosed |
Start with the least ambitious operation that addresses your complaint. If the photograph already has a readable face, asking for an ultra-detailed face adds a new task you may not want.
Judge accuracy independently of sharpness. A crisp eyelash, straightened mouth, or newly legible badge can feel convincing even when the scan supplies no evidence for it. Keep softness when softness is the most faithful available record.
GPT Image 2.5 Old Photo Restoration: Prepare Your Scan
Keep an untouched master before you create a working copy. Save the highest-resolution scan you have, along with the photograph's front, back, and any handwritten identification. Give the working copy a different filename so an accidental save cannot replace the master.
If you photograph a print with your phone, fix capture problems first. Place the photograph flat, keep the camera parallel to it, and use even lighting that avoids reflections. A bright reflection across a face hides evidence. Moving the light or camera can recover that evidence before any model is involved.
Include the entire photograph and its boundaries. Check the corners for perspective distortion and make sure the camera has not cropped a hand or the edge of someone's clothing. Correct obvious capture tilt on a copy, and record that correction.
Inspect the file at its actual pixel size. A messaging-app preview may be a reduced copy of a larger scan. Locate the original download if possible. Increasing output dimensions can make a file larger, but it does not establish what an indistinct eye or unreadable sign originally looked like.
Preserve the source aspect ratio. A tall mounted portrait should remain tall; a wide family group should keep its width. Do not squeeze either into a standard landscape frame merely because that setting is convenient. If the output grid requires a small size adjustment, keep all content and avoid stretching people.
Warmth also deserves restraint. A brown or cream appearance can reflect the printing process, paper, storage history, or a combination. The Mrs. Boswell record identifies an albumen print on a card mount. That is a reason to examine the existing tone carefully before asking for neutral black and white.
Make a short evidence note before running:
- Known: date range, identified people, documented clothing colors, and any reliable family annotations.
- Visible: surface marks, readable facial features, boundaries, and background objects.
- Unknown: obscured detail, unrecorded colors, and uncertain identities.
Keep unknown entries open. When working with living relatives or privately held family pictures, confirm that the people involved are comfortable with uploading and sharing a copy. Read the service's current terms rather than assuming a particular retention or training policy.
GPT Image 2.5 Old Photo Restoration: The Workflow
Use Atlas Cloud as the editing entry point for this workflow. The model used throughout the tutorial is Sunburst Edit. Keeping one model and one photograph per request makes it easier to connect a change to a specific prompt.
- Prepare a named working input. Duplicate your master and name the task, for example
portrait-scratches-input.png. Keep a note of its pixel dimensions. Choose P1 for surface marks or P2 for genuine fading; do not combine every proposed improvement in the first request. - Open the editing model and upload one photograph. Go to GPT Image 2.5 Sunburst Edit. Remove the page's example image and example prompt. Add your working copy in Images, then verify that its thumbnail shows the intended photograph. Leave the optional mask empty for this basic workflow.
- Set quality, size, and format deliberately. The public page checked for this guide exposes Quality, Size, Background, Output Format, and Number. Select
maxwhen available. The official Sunburst settings includelow,medium,high,xhigh,max, andauto;highis not the highest named tier.
Use a size that follows the original photograph. 1024 × 1536 fits a 2:3 portrait and 1536 × 1024 fits a 3:2 landscape. They are examples, not instructions to crop every archive image to those shapes. Check the displayed width and height after leaving the input fields; a locked ratio can change the other dimension.
Choose PNG and Number 1. Keep the normal background treatment. A transparent background would remove part of a historical photograph's context. Read the current quote only after the image, prompt, quality, and dimensions have committed.
- Paste one complete prompt and run once. Copy P1 from the next section for scratches. Use its preservation instructions as written. Wait for your own result to finish; the page's sample picture and an Idle output panel do not show a completed restoration.
- Compare before accepting. Put the original and result side by side at the same displayed size. Inspect faces, clothing, background, and borders. If the expression changes, return to the original input and narrow the request. Do not try to restore the original expression through a chain of increasingly altered outputs.
- Download and label the version. Save the delivered image with its prompt and settings. Check its actual dimensions rather than relying on a requested size. Keep an accepted monochrome version before attempting optional colorization. A downloaded file remains a candidate until it passes the checks below.
GPT Image 2.5 Old Photo Restoration: Scratches and Fading
Scratches and fading need different instructions. A scratch interrupts a local feature; fading reduces tonal separation across a region or the whole photograph. A single request to make everything clean, sharp, and modern gives you too many changes to evaluate at once.
P1: remove dust and narrow scratches. Upload a working copy containing the marks you want to address, then paste:
plaintext1Edit the uploaded photograph conservatively. Remove visible dust specks and narrow surface scratches where the surrounding image provides enough information for repair. 2 3Preserve each person's facial proportions, expression, gaze, apparent age, wrinkles, hairline, pose, and clothing. Preserve the original framing, background objects, lighting, tonal character, and visible photographic grain. 4 5Do not beautify faces, smooth skin, relight the scene, add sharp facial detail, replace objects, or modernize the photograph. Do not colorize it. 6 7Where damage obscures a feature and the source does not show what was there, leave that area unresolved rather than inventing a replacement. 8 9Return one edited photograph with the original composition.
The portrait comparison uses a working copy of the 1860s photograph identified as Mrs. Boswell. Keeping the full scan alongside any damaged input lets you inspect details the model was supposed to leave alone.
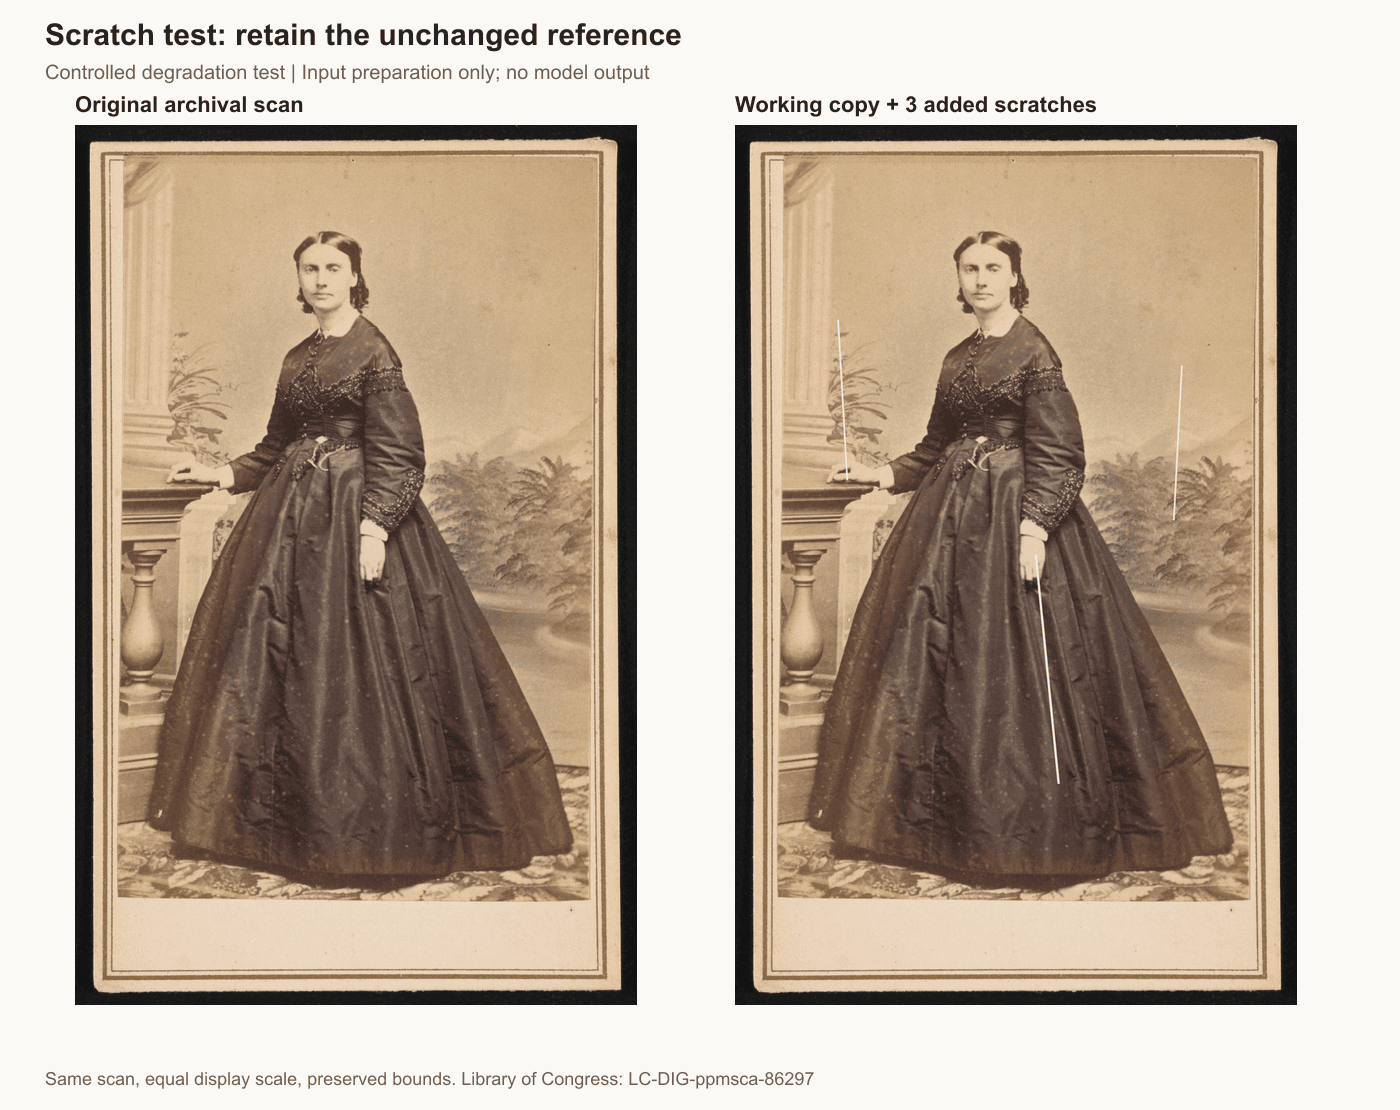
Mrs. Boswell archival scan beside the same working copy with 3 controlled scratches
Source A: Mrs. Boswell, photographed by William J. Shew in the 1860s; LC-DIG-ppmsca-86297. The record states no known restrictions on publication. Controlled degradation test: the right panel adds 3 tracked scratches to a 981 × 1536 working copy. This is input preparation only; no Sunburst output is shown. (Library of Congress, accessed September 2026)
For a controlled test, add a narrow scratch layer only to a duplicate and retain that layer. Compare 3 views: the unchanged scan, the marked copy supplied to the model, and the actual output. A mark removed from the skirt is useful only if the nearby folds and silhouette still agree with the unchanged scan.
Look especially at hair boundaries and backdrop lines. These can be mistaken for damage because they are thin and irregular. Inspect an untouched area too. A cleanup request can fail by changing a clear sleeve even when the scratch itself disappears.
P2: improve faded tonal separation. Start from the original faded photograph or an independent low-contrast copy, not automatically from P1's output:
plaintext1Edit the uploaded photograph to improve faded tonal separation conservatively. 2 3Restore readable midtones and gently improve contrast without clipping highlights or shadows. Preserve the photograph's existing monochrome or sepia character, original lighting, film grain, paper texture, and soft optical detail. 4 5Keep all faces, expressions, apparent ages, clothing, objects, and framing unchanged. Do not add new facial texture, sharpen blurred features into invented detail, whiten teeth, brighten eyes, or remove wrinkles. 6 7Do not apply modern color grading, HDR, studio lighting, or colorization. If an area contains no recoverable visual detail, keep it soft. 8 9Return one restrained tonal restoration.
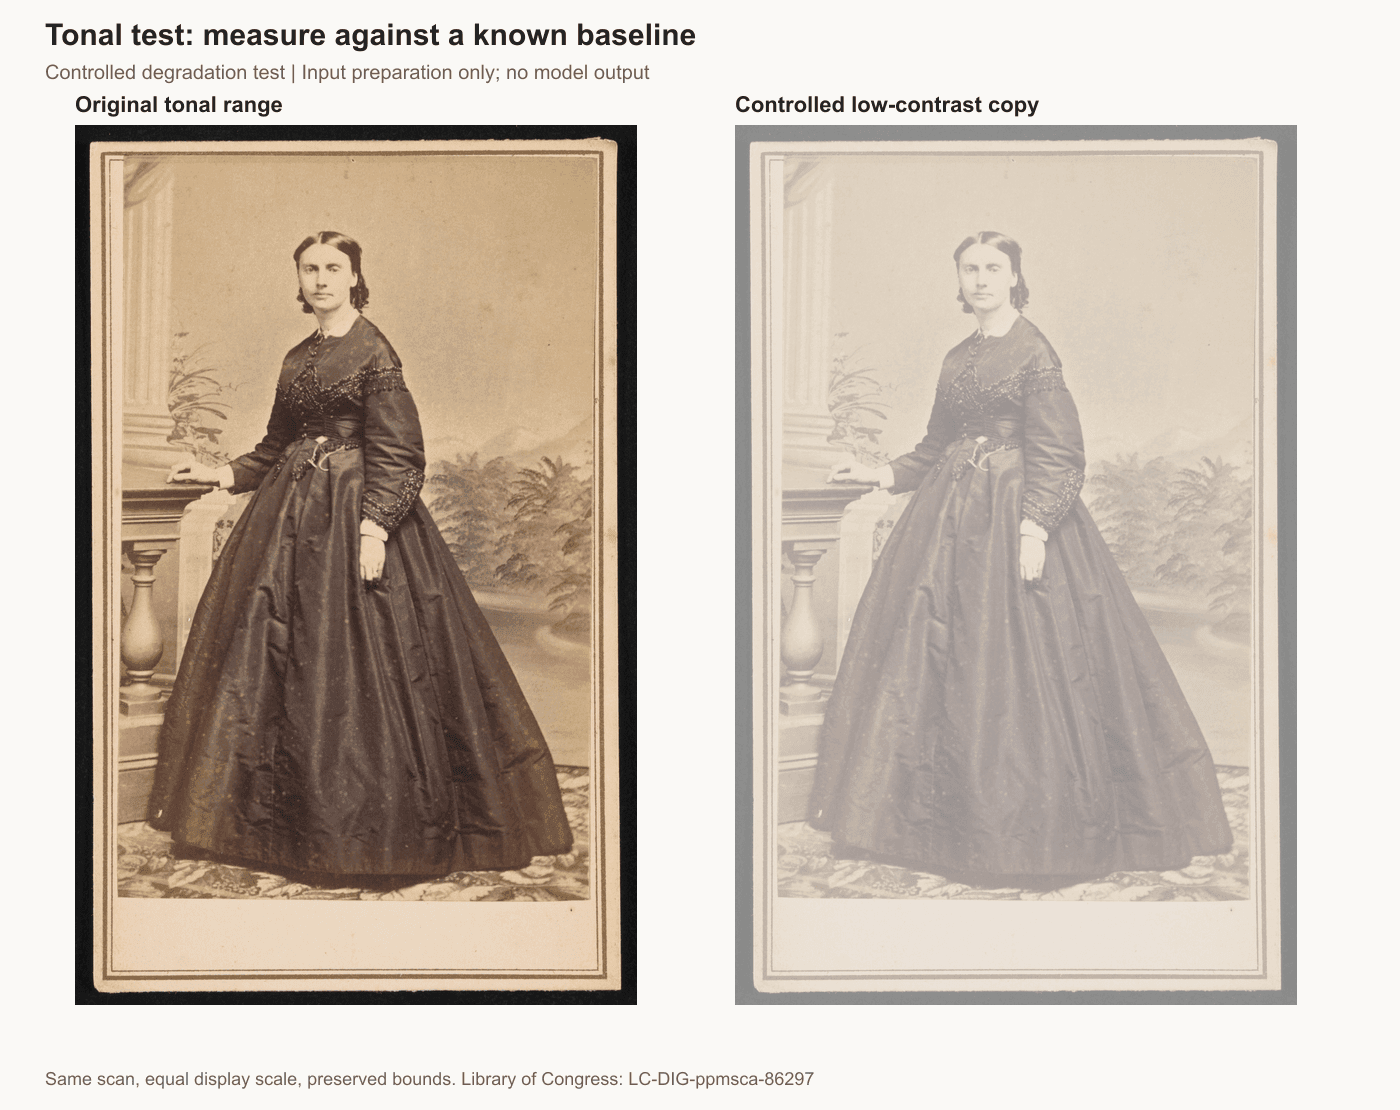
Original portrait beside an independent low-contrast test copy before AI restoration
Controlled degradation test: each channel in the right-hand copy follows output = 0.45 × input + 130, rounded to 8-bit values. This compresses the tonal range; it does not reproduce all effects of paper aging. No model output is shown. Source A, Library of Congress.
A useful tonal adjustment separates an existing cheek from its shadow without adding a new wrinkle pattern. Watch the brightest fabric and darkest hair: stronger contrast can hide detail at both ends. The face may also appear younger if weak lines disappear, even though you never requested an age change.
Record whether a result improves readability and whether it preserves evidence. Those are separate decisions. If the initial scan already communicates the expression better, keep it as your preferred version.
GPT Image 2.5 Old Photo Restoration: Group Photos
Group photographs need a person-by-person review. The most prominent face may look plausible while smaller faces acquire different eyes or smiles. Inspect everyone at the same scale before declaring the whole image acceptable.
The archival example, W. H. Jackson and family, dates to circa 1905. The downloaded 5034 × 4023 scan shows 3 adults and 1 child. A 1536-pixel-wide working copy preserves its proportions. It supports a review of expressions, hands, and overlapping clothing; it is not a test of a distant crowd with tiny faces.
P3: restore a historical group photograph. Upload that photograph alone:
plaintext1Conservatively restore this historical group photograph. 2 3Reduce visible dust and minor surface damage, and make only modest tonal corrections. Preserve the exact number of people, their positions, relative sizes, poses, expressions, gaze directions, clothing, hands, and background objects. 4 5Treat every face as equally important. Preserve distinctive visible facial features and apparent age. Small or blurred faces must remain naturally soft when the source does not contain enough detail. 6 7Do not invent eyes, teeth, jewelry, lettering, clothing patterns, or additional people. Do not make anyone younger, happier, or more symmetrical. 8 9Keep the original framing and monochrome treatment. Return one edited photograph.
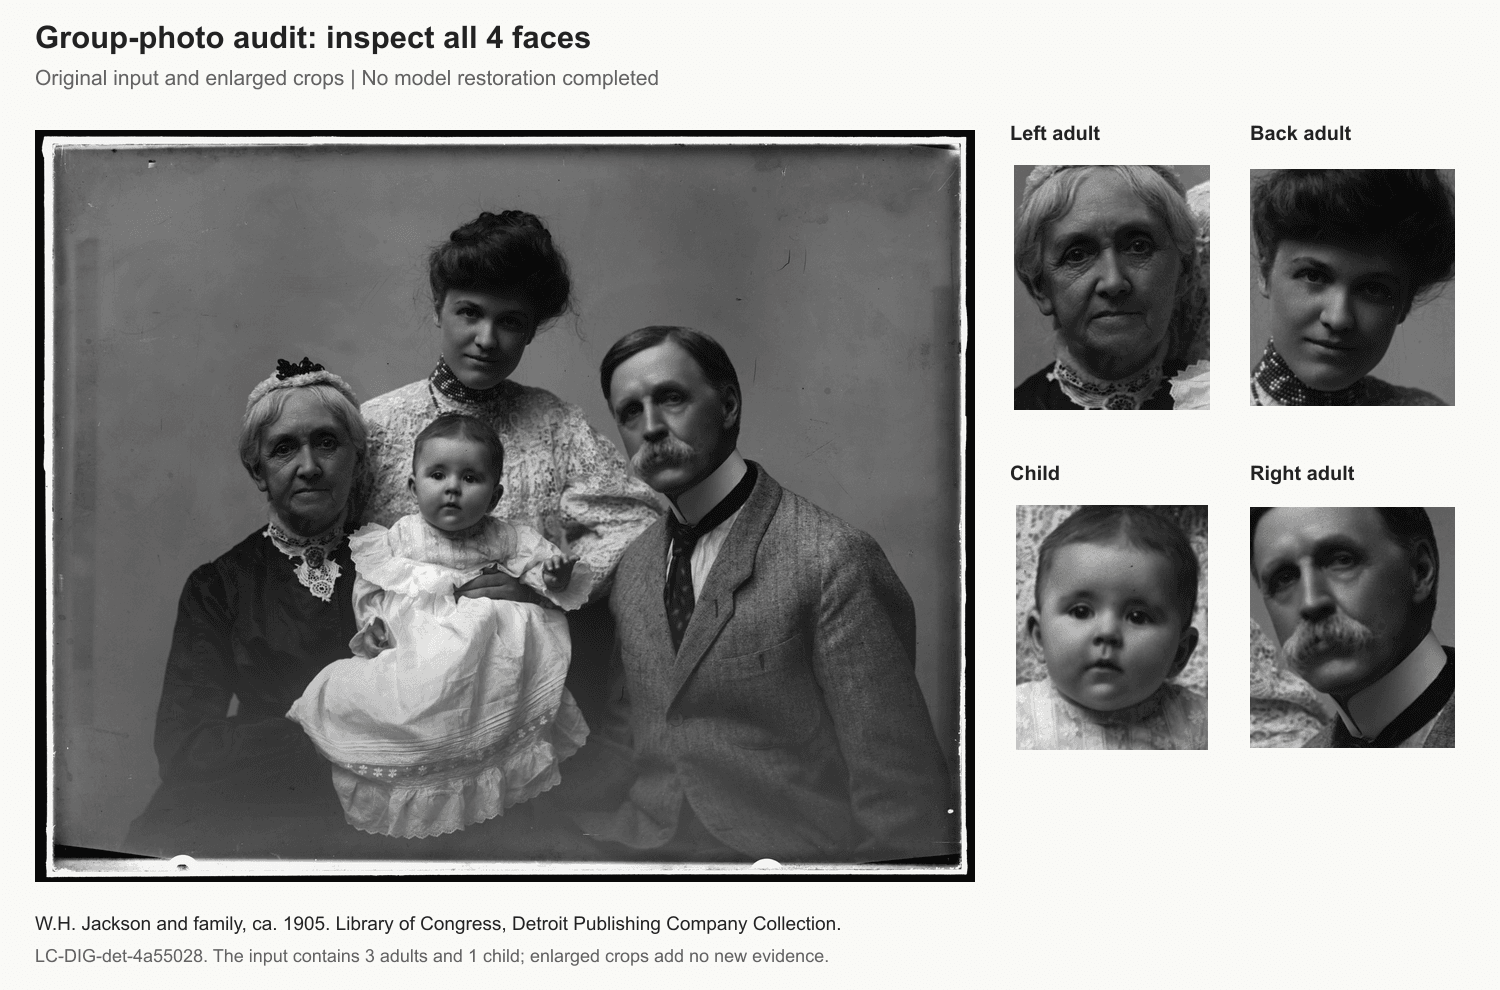
Original Jackson family photograph with enlarged crops of all 4 faces for restoration review
Source B: W. H. Jackson and family, circa 1905, LC-DIG-det-4a55028. Original input and enlarged crops only; no restoration output. Credit: Library of Congress, Prints and Photographs Division, Detroit Publishing Company Collection. The record states no known restrictions on publication. (Library of Congress, accessed September 2026)
First count people, then inspect their order and relative size. Follow a consistent route from left to right, row by row. Check where each person looks, how their hands rest, and how clothing overlaps a neighboring body. A changed overlap can alter a pose without attracting attention at thumbnail size.
Next compare the smallest face you can evaluate. If its mouth was a soft dark shape, separate bright teeth in the result need evidence. If an eye was unreadable, a crisply drawn iris does not demonstrate recovery. Record that as an unresolved or invented detail.
Keep the full group beside face crops so the reader can see where each crop comes from. Apply the same crop coordinates and display scale to both versions. Enlarging only the output makes the comparison misleading.
Avoid adding a second identity photograph by default. A portrait from another decade may encourage an age, hairstyle, or expression change. For the first pass, the original group photograph should remain the reference. Accept natural blur when the source cannot support a more precise face.
GPT Image 2.5 Old Photo Restoration: Colorization
Restoring faded color and assigning color to a monochrome photograph are different tasks. In the first, surviving color may provide clues. In the second, the model must choose colors unless you supply reliable references.
A dark garment in a monochrome print does not identify its original hue. Plausible period clothing colors remain interpretations. Keep any known information specific: a documented uniform color can constrain that uniform, but it does not establish someone's eye color or the color of nearby furniture.
P4: make an optional interpretive color copy. Use a monochrome restoration only after accepting its faces and composition. Save the color output separately:
plaintext1Create an interpretive colorized version of this photograph. 2 3Preserve the existing faces, expressions, apparent ages, clothing shapes, objects, framing, lighting, and photographic texture. Change color only; do not perform additional facial reconstruction, sharpening, beautification, or object replacement. 4 5No verified color references are supplied. Use restrained, plausible colors with modest saturation. Do not imply that these are the photograph's original colors. 6 7Keep the original tonal relationships and avoid cinematic grading, glowing skin, brightened eyes, or modern styling. 8 9Return one colorized photograph without added text.
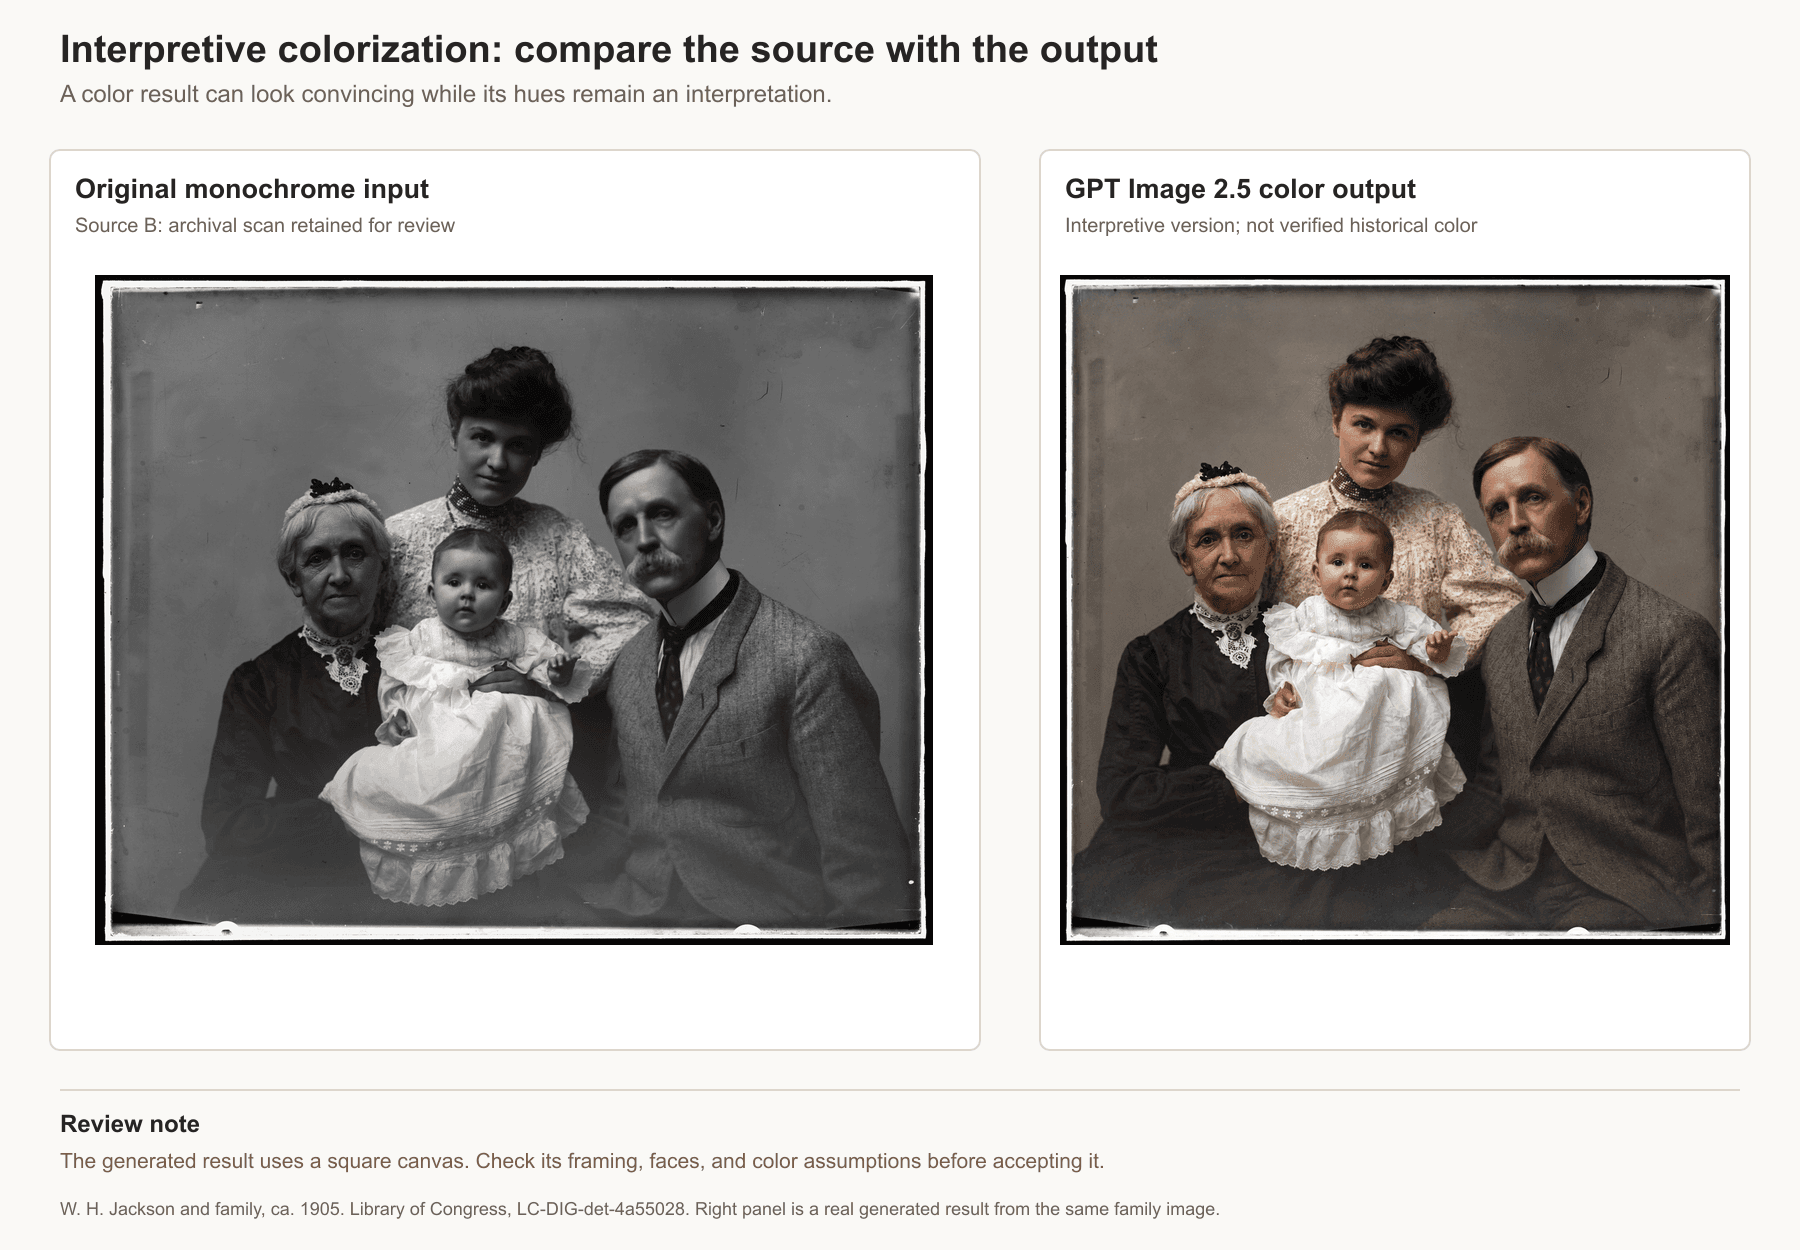
Original Jackson family photograph beside its GPT Image 2.5 interpretive color output
Original monochrome input beside a real GPT Image 2.5 interpretive color output generated from the same Jackson family photograph. The output is square while the source is 1536 × 1228, so its framing needs review before acceptance. Color choices remain interpretive rather than verified history. Source B: W. H. Jackson and family, circa 1905, LC-DIG-det-4a55028. (Library of Congress, accessed September 2026)
Review shape before color. Compare the edges of lips, eyes, hair, clothing, and props. A color-only request still needs the same identity check as a cleanup pass. If the eyes become brighter or the cheeks acquire new shading, inspect whether the model changed structure or lighting alongside color.
A temporary grayscale view of both versions can make changes in brightness relationships easier to notice. Use it as a review aid, not as proof that the underlying features match. Compare the actual monochrome original again before accepting.
If reliable color evidence exists, replace the no-reference sentence with only those documented facts. Keep a note describing where the evidence came from. Leave other colors unverified rather than expanding one known fact into a fully researched scene.
Retain the monochrome version even if the family prefers the color copy. Name the latter clearly, such as family-interpretive-color.png. Share both when the purpose is family history, so the more immediately familiar color appearance does not displace the surviving photographic record.
Check Faces, Missing Detail, and Print Readiness
Use 2 review passes. First compare the whole composition at a comfortable viewing size. Then inspect matching crops at actual pixels or equal enlargement. Switching between an overall view and close inspection catches different kinds of error.
Work through this checklist:
- Eyes: eyelid shape, gaze direction, spacing, and any newly drawn iris or highlight.
- Nose and mouth: nostril shape, mouth corners, lip boundaries, and the original expression.
- Age: wrinkles, hairline, cheek fullness, and visible asymmetry.
- Objects: clothing seams, jewelry, lettering, hands, furniture, and background items.
- Composition: people count, body proportions, photograph edges, and the position of every subject.
A Reddit contributor explored restoration by degrading an image with a known original and comparing the result. That earlier discussion supports the value of a baseline; it is not a GPT Image 2.5 benchmark. (Reddit, accessed September 2026)
P5: test the limit when information is missing. Use a damaged working copy, keeping the complete scan out of the model request:
plaintext1Edit this damaged photograph with preservation as the priority. 2 3Clean minor dust and repair narrow scratches only where neighboring visual information supports the repair. Preserve all surviving facial features, expressions, clothing, objects, texture, and framing. 4 5Do not reconstruct missing eyes, mouths, facial contours, fingers, lettering, or objects when their appearance is absent from the input. Leave larger missing regions visibly unresolved. Do not replace them with plausible-looking invented content. 6 7Do not colorize, beautify, relight, or modernize the photograph. 8 9Return one conservatively edited image that retains unresolved damage wherever the source is insufficient.
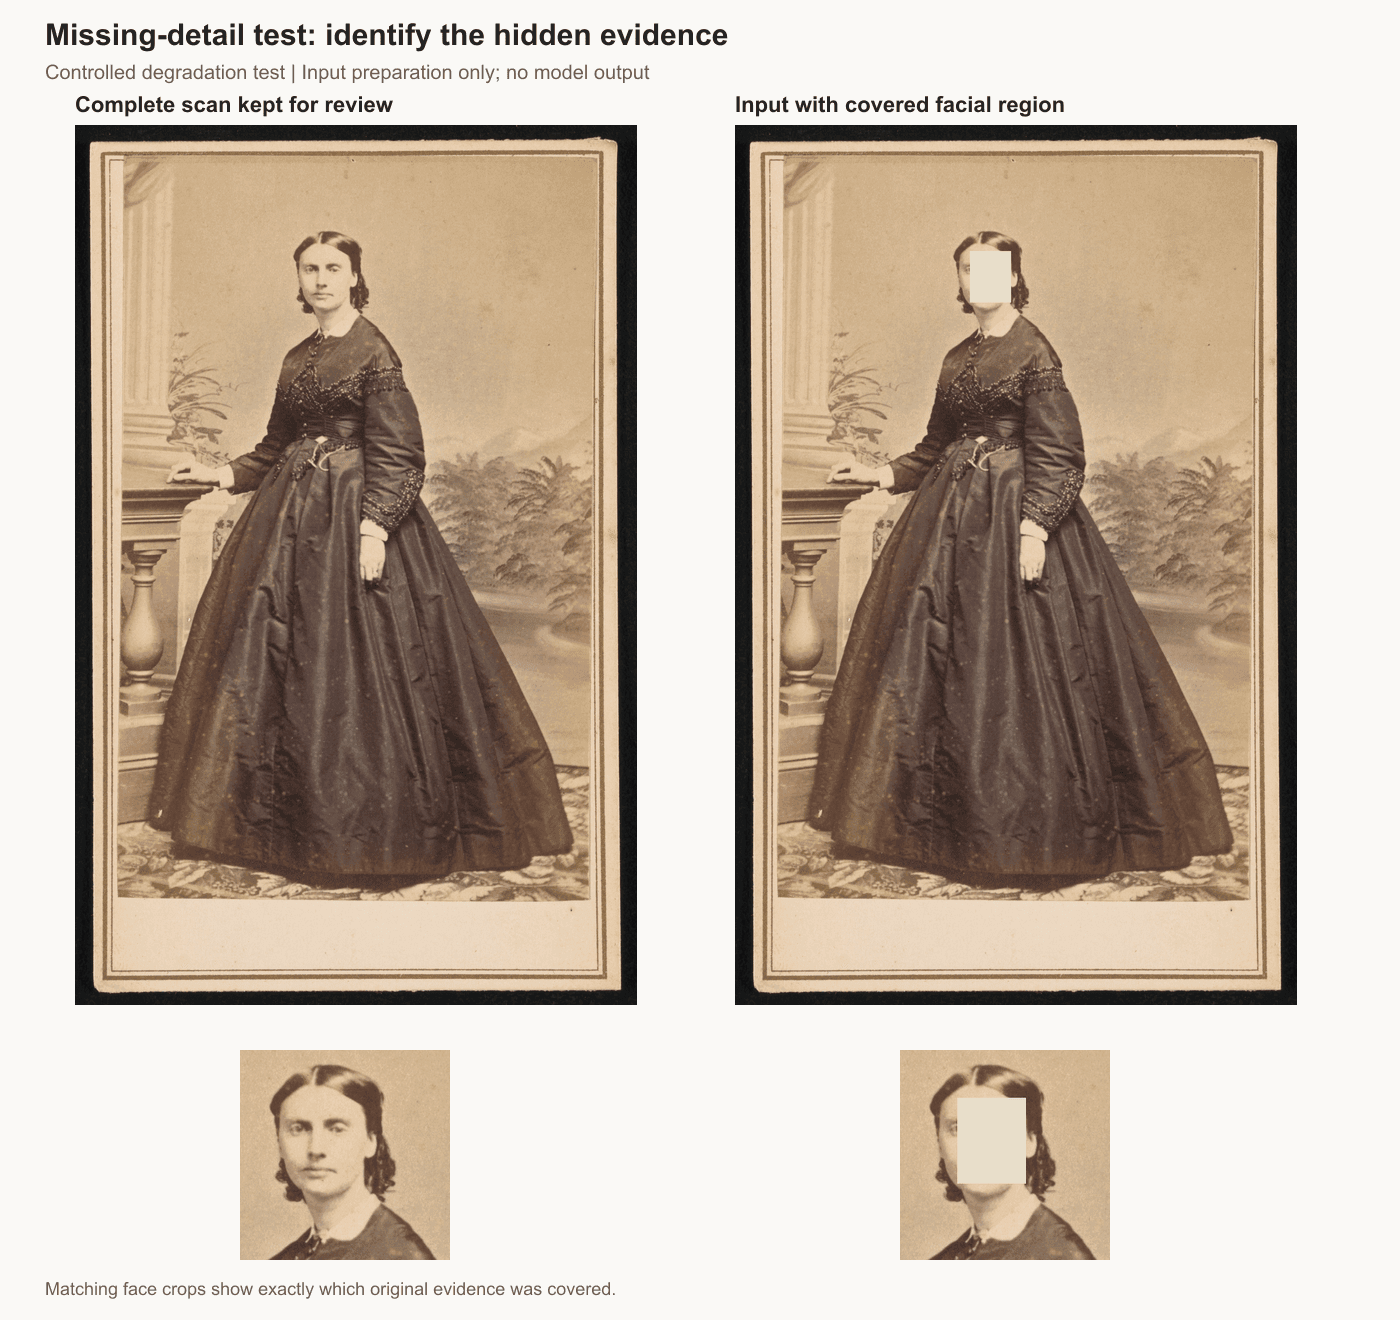
Complete archival portrait and controlled facial-region cover with matching face crops
Controlled degradation test: a 72 × 90-pixel rectangle covers part of the face in the 981 × 1536 working input. Matching crops show the removed evidence. The complete scan is retained for review. No model repair was completed, so this figure makes no claim about whether P5 would leave the region unresolved.
The prompt asks for restraint; it cannot guarantee restraint. If a missing eye becomes a new eye, reject the result as a faithful restoration even if its appearance seems plausible. Do not describe that reconstruction as recovered evidence.
td {white-space:nowrap;border:0.5pt solid #dee0e3;font-size:10pt;font-style:normal;font-weight:normal;vertical-align:middle;word-break:normal;word-wrap:normal;}
| Decision | Trigger | Next action |
| Accept | Requested marks improve; visible faces, objects, and framing remain consistent | Save the labeled derivative and the run record |
| Retry from original | Cleanup spreads into readable detail, or the task was too broad | Request one narrower change and compare again |
| Use manual retouching | A localized repair needs precise control while surrounding pixels must stay fixed | Work on a separate layer or give a retoucher explicit protected regions |
| Preserve unresolved damage | Essential features are absent or repeatedly invented | Keep the gap or softness and explain the limitation |
Set a retry limit before starting. After repeated identity changes, another broad prompt may add cost without resolving the evidence problem. A retoucher can constrain where changes occur, although manual work also cannot establish missing historical facts without a reference.
For printing, read the downloaded file's dimensions. 1800 × 1200 px at 300 ppi gives 6 × 4 in: divide each pixel dimension by 300. This calculates print size, not sharpness. Judge a small proof at the intended size, especially around faces and any repaired region.
Keep the original, accepted monochrome copy, optional color copy, and run notes together. A family member should be able to tell which version preserves the source and which contains an interpretation.
Model Choice and the Cost of a Usable Restoration
OpenAI positions Sunburst around detailed work and editing precision, while Flare emphasizes faster everyday image creation. That positioning explains the single-model choice here. It does not prove Sunburst is more faithful on every family photograph.
td {white-space:nowrap;border:0.5pt solid #dee0e3;font-size:10pt;font-style:normal;font-weight:normal;vertical-align:middle;word-break:normal;word-wrap:normal;}
| Model | Official emphasis | Role in this guide | Quality and dimensions | Quote and final charge |
| GPT Image 2.5 Sunburst Edit | More precision for detailed creative work | Intended for P1 through P5; no completed test | max requested; no settings committed in the blocked session | No request submitted; quote and settled charge unavailable |
| GPT Image 2.5 Flare Edit | Faster everyday image work | Context only; no restoration ranking | No settings tested in this guide | No test charge reported |
Check the current model list and pricing when planning your run. As checked on September 15, 2026, the list and Sunburst detail page showed a 20% discount. The list's rounded starting amount does not represent a max-quality restoration with your image attached.
The detail page describes token-based billing for text, reference images, and generated output. Its estimate changes with the configured request. Distinguish 3 amounts: the model-list starting price, the quote after your inputs are set, and the settled charge shown for the completed request.
Do not budget an album by multiplying the smallest displayed amount by the number of photographs. Include unsuccessful attempts and optional colorization. One photograph that needs several retries can cost more than another that passes on its first attempt.
For each run, record the source ID, input filename, model, prompt ID, quality, dimensions, elapsed time, attempt number, quoted cost, settled cost, and acceptance reason. A useful album-level measure is total settled spending divided by the number of accepted restorations. If none passes, there is no cost-per-accepted-result figure to report.
Execution record: 2 archival sources were downloaded and inspected. One playground attempt stopped at the access login page; 0 generation requests were submitted and 0 outputs were accepted. Quality, dimensions, generation time, quote, and settled charge remain unmeasured. The other prompts were not submitted through the same blocked session.
Try the preservation-first prompt on a copy of your photo, then compare the result with the original before downloading. For GPT Image 2.5 Old Photo Restoration, the version worth keeping is the one you can explain and check.
Frequently Asked Questions
Can GPT Image 2.5 restore an old photo without changing the face?
It can attempt a restrained edit, but face preservation is not guaranteed. Begin with visible surface damage and compare eyelids, mouth corners, gaze, age cues, and hairline against the original. Reject an altered expression even when the result looks cleaner. A prompt that says to preserve identity still needs visual verification.
What prompt should I use for scratches and faded old photos?
Use P1 for narrow scratches and dust, and P2 for fading or reduced contrast. Run them on separate copies of the original when evaluating each problem. Ask the model to keep existing faces, grain, lighting, and framing. Avoid adding sharpening, beautification, and colorization to the first cleanup request.
Can GPT Image 2.5 recover a missing face or unreadable detail?
It cannot verify an appearance that the input does not show. It may generate plausible features or lettering, which should remain labeled as reconstruction. Preserve a missing region when historical fidelity matters. Seek another original print or documented reference before treating newly visible details as factual.
Does colorizing a black-and-white photo recover its real colors?
No. Without verified color references, the result is an interpretation. A plausible garment color can be completely different from the original. Keep the monochrome version, label the color copy, and check that the colorization did not also change faces, shapes, or lighting.
Is GPT Image 2.5 old photo restoration free on Atlas Cloud?
Do not assume it is free. The model pages display metered pricing, and any promotional credit depends on the current account offer. Read the quote after configuring your upload and settings. Keep quoted and settled amounts separate, and include retries when deciding how many photographs to process.
What resolution do I need to print a restored photo?
Calculate dimensions from the intended print size and pixel density, then inspect a proof. A 6-by-4-inch print at 300 ppi requires 1800 by 1200 pixels. More pixels alone do not validate reconstructed detail. Choose a smaller print if enlargement makes faces or repair artifacts distracting.





