You have seen it a hundred times on your feed. Someone turns their selfie into an anime character and it looks incredible, until you realize the face staring back is a stranger. Cute art. Wrong person.
That is the quiet failure of most anime face swap attempts. Turning a photo into anime style is easy now. Keeping the actual person recognizable through all that stylization is the hard part. Google's own team calls holding a character's look steady across edits "a fundamental challenge in image generation" (Google Developers Blog, August 2025).
Here is where this is going. The image below started as a plain photo, became an anime beach scene, kept one consistent face, and then learned to move. Same face, real motion, made entirely in a browser.
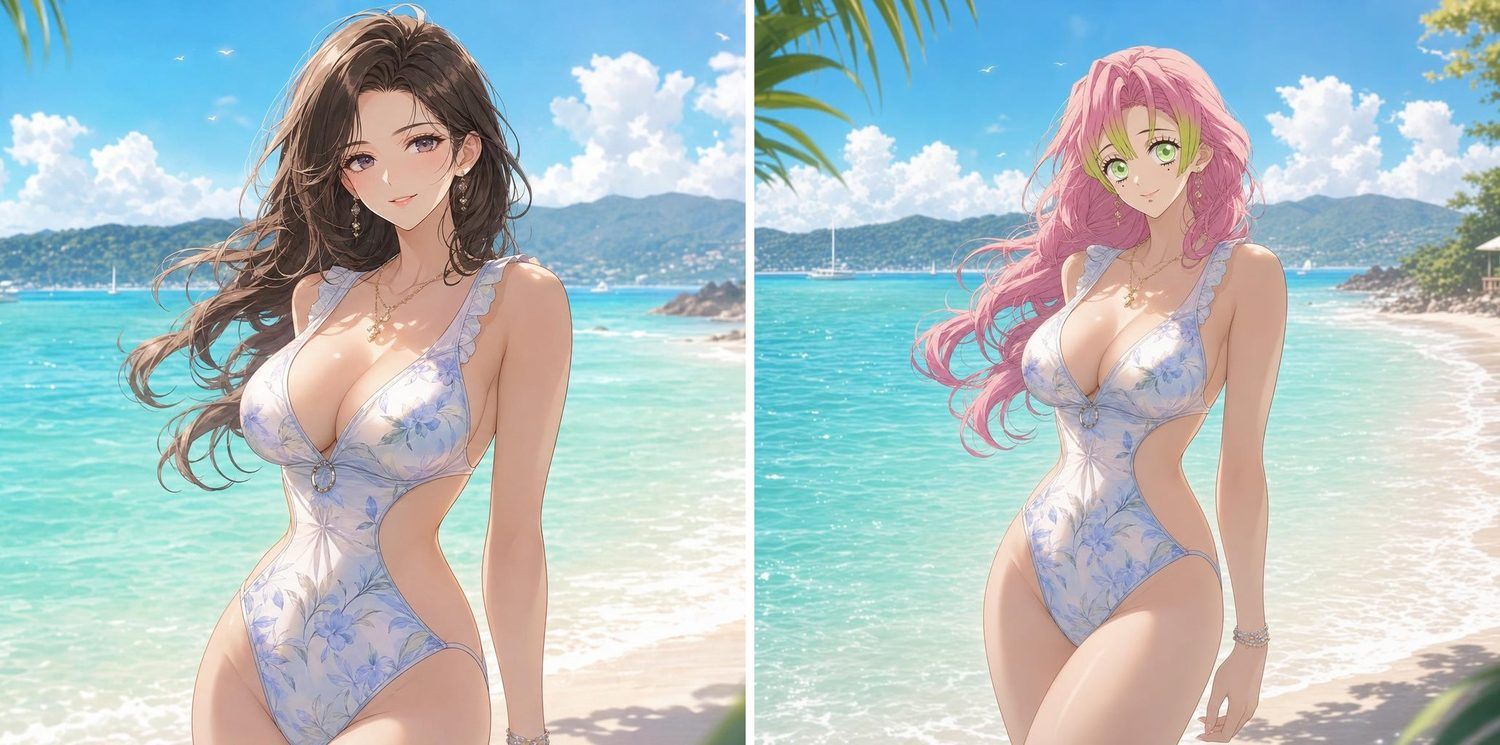 Single-scene before and after: GPT Image 2 designed the beach scene (left), Nano Banana 2 swapped in the reference face (right), lighting and outfit unchanged
Kling V3 video result (animated GIF): the swapped pink-and-green-haired character walking on a summer beach
The rest of this guide is exactly how that was built, step by step, plus how to scale it into a whole set of scenes and a second character.
Key takeaways
- One model cannot design a great anime scene and preserve a specific face at the same time. Split the job and both get better.
- Step 1 uses GPT Image 2 to build the scene, outfit, and lighting. The face it invents does not matter yet.
- Step 2 uses Nano Banana 2 Edit with a reference face and one crucial instruction: keep the lighting from the original scene.
- Step 3 uses Kling V3 to turn the finished still into motion, which is where a swap stops being a picture and starts being a moment.
Why Your Anime Face Swap Keeps Coming Out Wrong
Anime-ifying photos is not a fringe hobby anymore. It became a mass event in 2025. When ChatGPT shipped its upgraded image generator, users made over 700 million images in a single week, a wave driven largely by anime and Ghibli-style selfies (TechCrunch, April 2025). Demand got so heavy that Sam Altman posted that OpenAI's "GPUs are melting" and the free tier was briefly capped (Sam Altman on X, March 2025).
So the appetite is real. The disappointment is too. Here is why.
A text prompt can ask for "big expressive eyes" or "pink twin braids," but it cannot describe the exact spacing of your eyes or the shape of your jaw. When a single model draws the scene and the face together, it fills in a face that fits its training data, not yours. Anime style makes this worse, because heavy stylization throws away the fine skin and proportion cues a real face is recognized by. Regenerate once and the face drifts again.
Face swapping solves it by changing the order. First you lock a scene you love. Then a separate edit pass drops a real reference face into it. The scene stops shifting, the identity comes from pixels instead of adjectives, and the output becomes repeatable.
The Anime Face Swap Workflow: Three Models in One Browser Tab
The workflow uses three models, each doing the single thing it is best at.
| Step | Model | Job | Price on Atlas Cloud (July 2026) |
|---|---|---|---|
| 1. Design | GPT Image 2 Text-to-Image | Scene, outfit, pose, lighting | From $0.009 per image |
| 2. Swap | Nano Banana 2 Edit | Replace the face using a reference photo | $0.08 (1K) / $0.12 (2K) / $0.16 (4K) per image |
| 3. Animate | Kling V3 Turbo Image-to-Video | Turn the still into a short video | From $0.095 per clip |
GPT Image 2 is OpenAI's image model, strong at following layout instructions like cel shading, a specific outfit, or a full four-panel grid. Nano Banana 2 is Google's image editor, built for the opposite skill: it takes reference images and keeps a subject consistent across edits, which is the heart of a face swap. Kling V3 is Kuaishou's image-to-video model, and it is what makes the finished portrait actually move.
Normally these are three platforms, three logins, three bills. The reason this stays simple is that all three sit in one catalog on Atlas Cloud, and every model page has a browser playground. That makes the whole thing an anime face swap online, with no install and no code: you run Step 1 on the GPT Image 2 page, Step 2 on the Nano Banana 2 Edit page, and Step 3 on the Kling V3 Turbo page. One account and one credit balance covers all three, and there is an OpenAI-compatible API underneath if you later want to run batches.
Across the whole walkthrough below, this is the single reference face we keep swapping in. It is what makes every scene read as the same character.
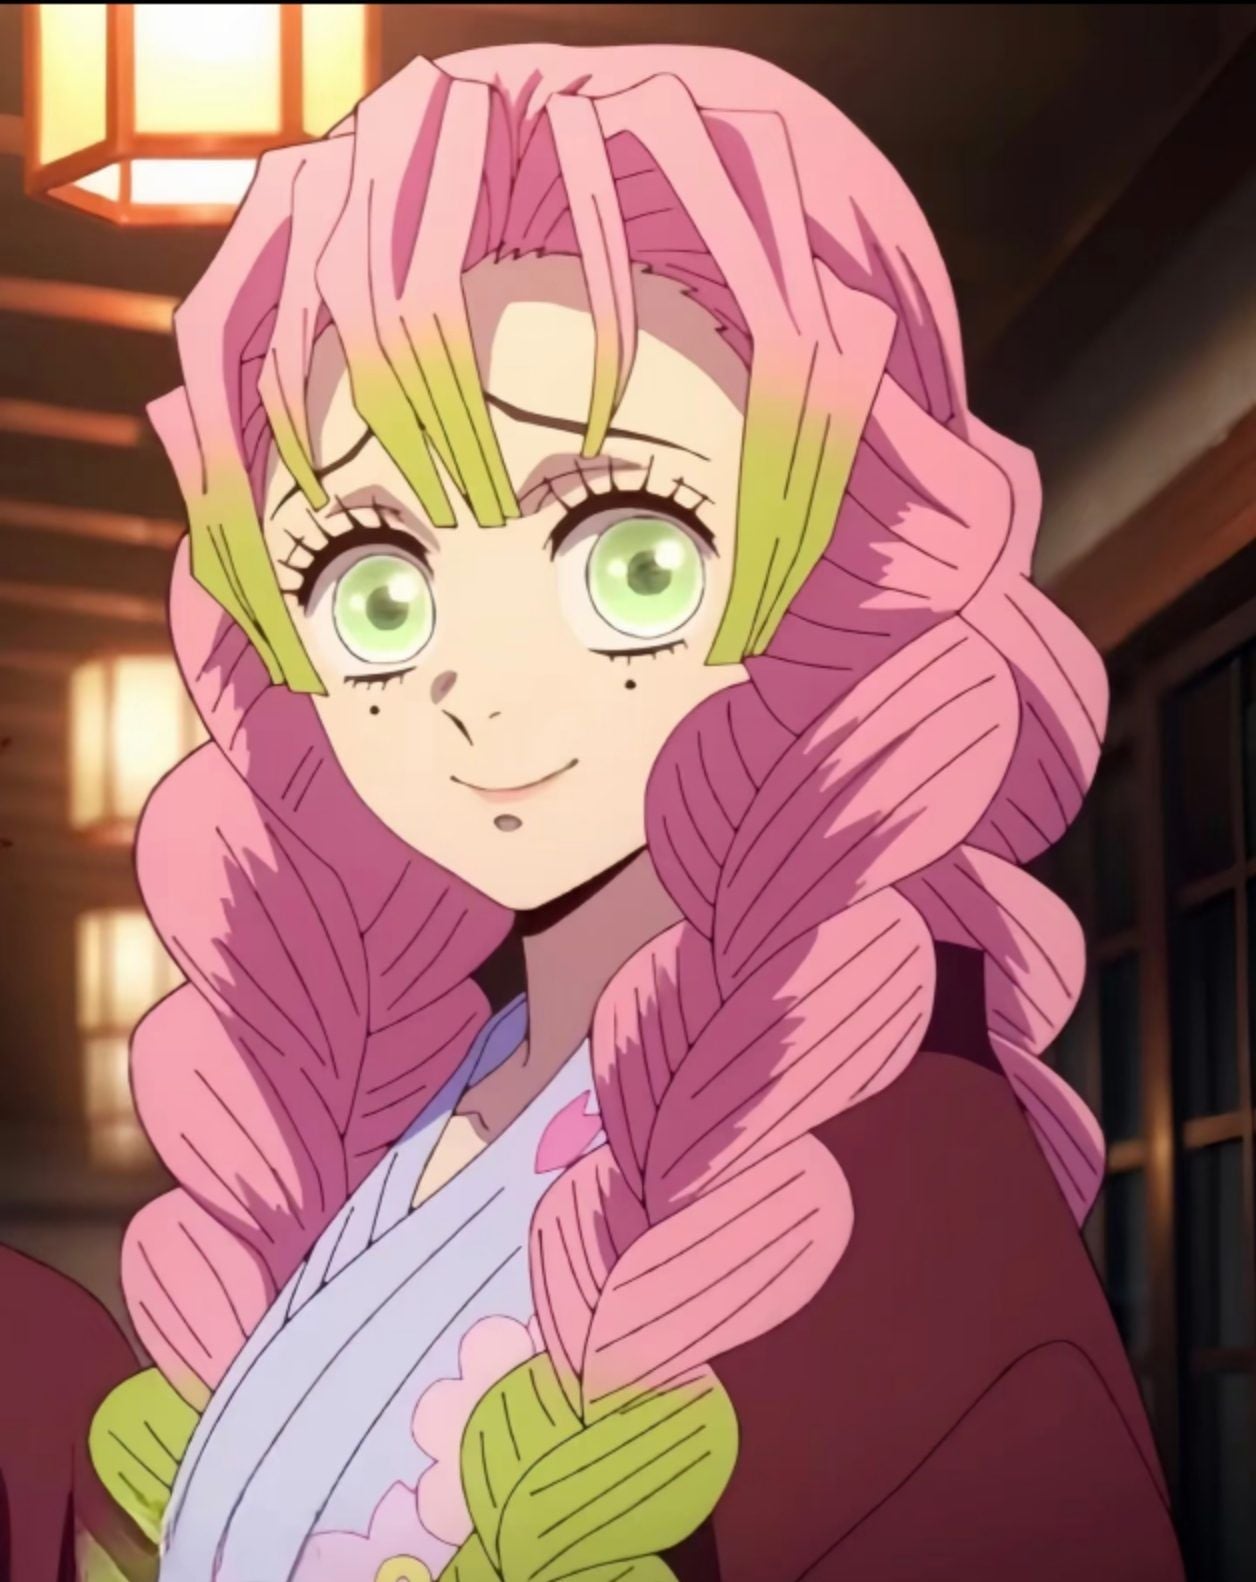 The reference face used throughout: a pink-and-green-haired anime character portrait
One number to notice early. Steps 1 and 2 cost pennies, so iterate freely there. Step 3 is where real money goes, so arrive at the video stage with a still you already love.
Step 1: Design the Anime Scene With GPT Image 2
Counterintuitive rule first: in Step 1, ignore the face entirely. Do not describe your eyes or your face shape. Whatever face the model draws will be replaced. Spend the whole prompt on the parts that survive: art style, wardrobe, pose, setting, and light.
This is a lightly trimmed version of the actual prompt behind the beach scene:
High-quality Japanese TV anime style, refined cel shading, watercolor-blended background, cinematic soft lighting. A confident adult woman with an elegant figure in a tasteful one-piece swimsuit, pastel color, delicate pattern, standing relaxed on a sunny beach by a turquoise sea, sea breeze in her hair, large expressive eyes, bright fresh palette.
Here is the click path in the GPT Image 2 playground:
- Open the model page and sign in. The prompt box and settings sit on the left, the output preview on the right.
- Paste your scene prompt. Describe the anime substyle explicitly, since "anime" alone is too vague to be useful.
- Set Size. The demo used 16:9 at 2048x1152. Match the shape to where the image will end up.
- Set Quality. Use low or medium while you test layouts, then switch to high only for the keeper, because high quality costs more per image.
- Choose Output Format, JPEG or PNG, and hit Run.
- Regenerate until composition and outfit are right, then download the winner. That file is your base image for Step 2.
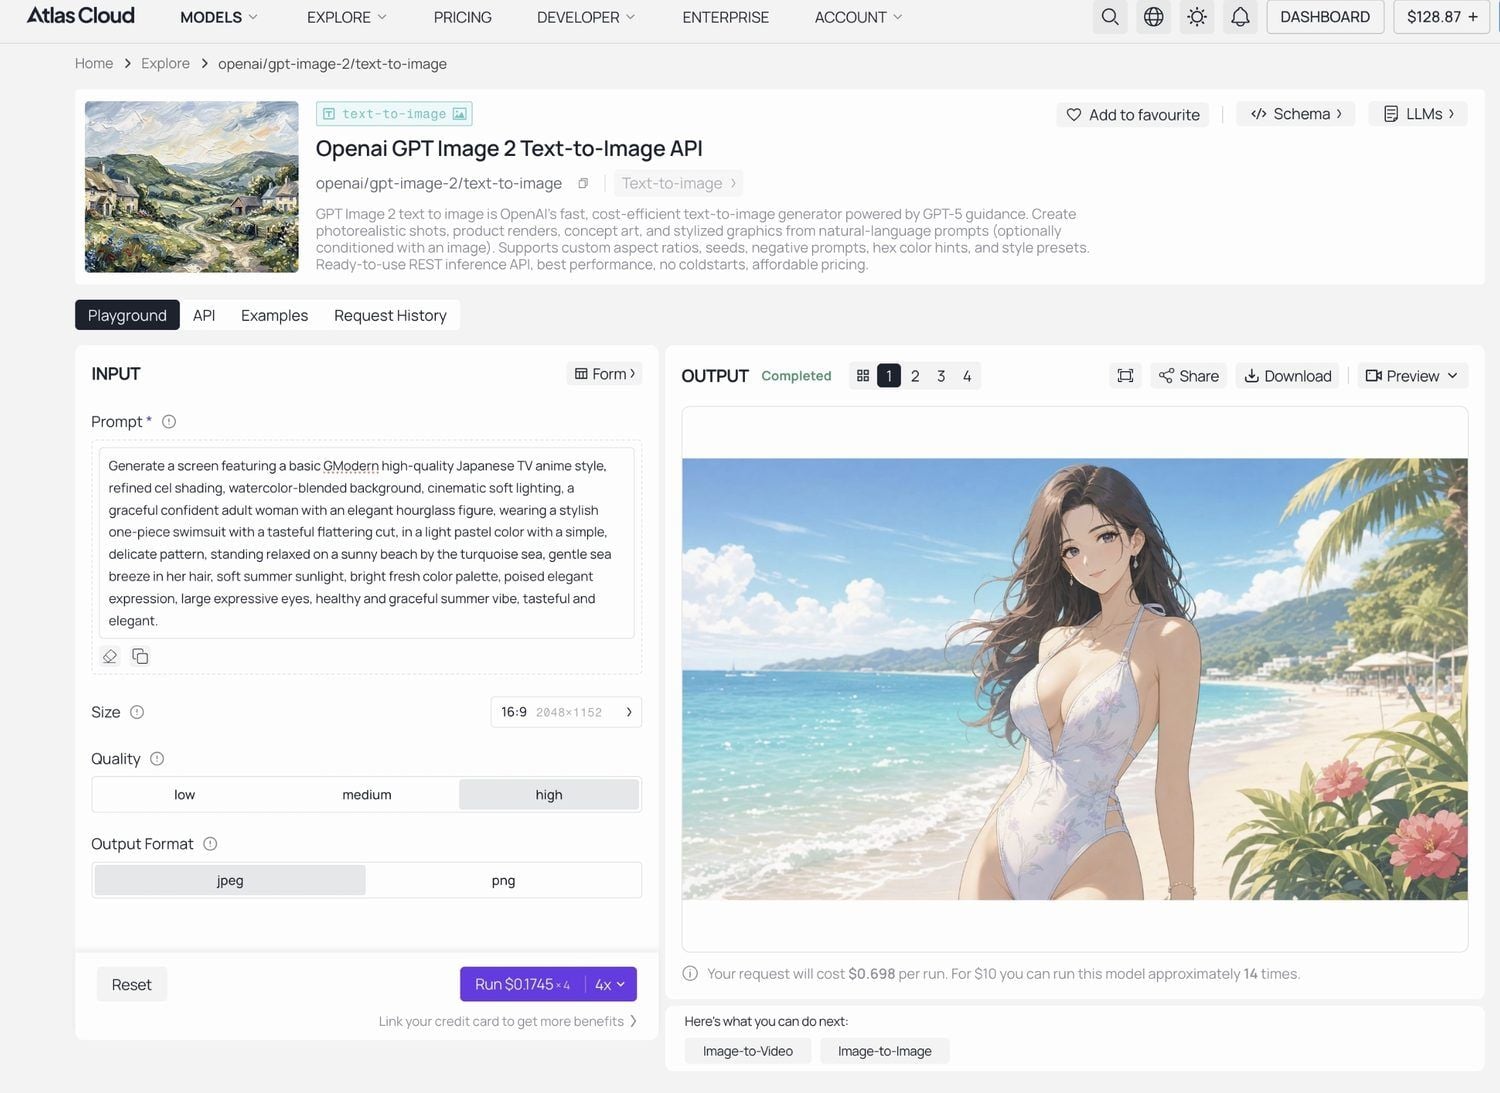 GPT Image 2 Text-to-Image playground: the anime beach-scene prompt at 16:9, high quality
At the default estimate the model quotes about $0.009 per image, so a dozen drafts is spare change. At high quality and 2048x1152, the playground quoted about $0.1745 per image, so save that tier for the final scene, not the experiments. This is why cheap drafting matters: you stop settling for a "good enough" layout.
Step 2: The AI Anime Face Swap, Handled by Nano Banana 2
Now the identity work. This is the AI anime face swap step, and it takes two inputs: the scene from Step 1 as the base image, and the reference face from earlier as the second image. That reference can be your own selfie or a character design you are keeping consistent.
The prompt matters more than people expect. This is the exact one used for the demos, straight from the playground:
Replace the face in Image 1 with the character's face from Image 2. Keep the facial features and makeup consistent with Image 2, and also use the hair and hairstyle from Image 2. Keep the facial lighting and shadows consistent with Image 1. Blend image2 into the art style of Image 1.
Two lines in there do the heavy lifting. "Keep the facial lighting and shadows consistent with Image 1" is what stops the new face from looking pasted on, since edit models otherwise re-light faces with flat neutral studio light. "Blend image2 into the art style of Image 1" is what keeps a photo reference from breaking the anime look.
Here is the click path in the Nano Banana 2 Edit playground:
- Open the model page. In the Images field, upload the Step 1 scene as Image 1.
- Click + Add Item and upload the reference face as Image 2. The model takes up to 14 images, but two is all you need here.
- Paste the swap prompt above. Keep the "Image 1 / Image 2" naming so the model knows which is the scene and which is the face.
- Set Aspect Ratio to match your base image, so the poster does not get cropped.
- Set Resolution: 1K at $0.08, 2K at $0.12, 4K at $0.16. Draft at 1K, then rerun the winner at 2K or 4K.
- Hit Run, then compare the result against the original around the hairline and jaw.
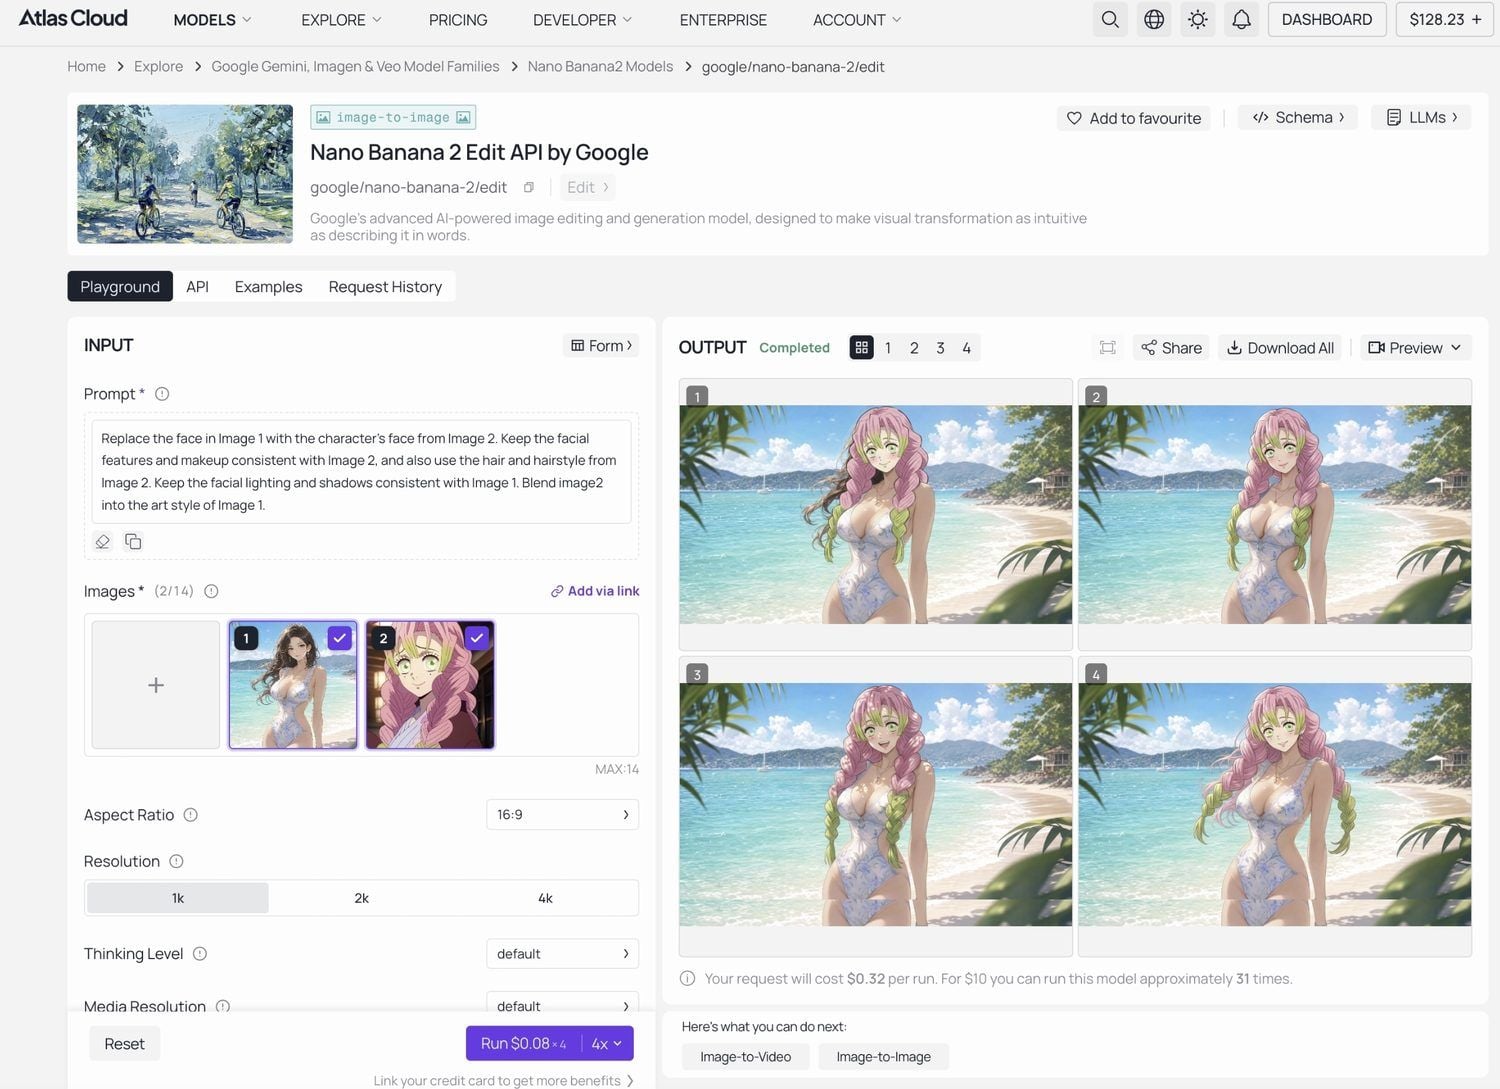 Nano Banana 2 Edit playground: Image 1 is the scene, Image 2 is the reference face, four swapped results on the right
Why Nano Banana 2 for this step? Identity consistency under editing is exactly what this model line was built for, and it has been stress tested at scale. Google reported more than 5 billion images generated with Nano Banana within its first two months (Google blog, October 2025). The same prompt is style-agnostic too, so pointing it at a photorealistic scene instead of an anime one behaves the same way.
Step 3: Turn Your Anime Face Swap Into Video With Kling V3
A still is nice. A still that moves is what actually stops the scroll. Step 3 feeds your finished swap into Kling V3 Turbo Image-to-Video, which animates the frame with motion and optional sound. The beach clip at the top of this page came out of exactly this step.
This is the motion prompt behind it:
The character comes to life naturally, moving with graceful, confident poise. Her movements are light and fluid. She then walks slowly toward the sea, wading into the water and playing among the waves with a relaxed, cheerful expression. Soft lighting, bright summer seaside atmosphere.
The click path in the Kling V3 Turbo playground:
- Open the model page and upload your swapped still as the start frame.
- Write a motion prompt. Describe the action and camera feel, not the appearance, since the look is already locked in the image.
- Set Resolution, 720p for drafts or 1080p for final.
- Adjust cfg_scale if you want stricter prompt following, and toggle sound if you want audio.
- Hit Run and download the clip.
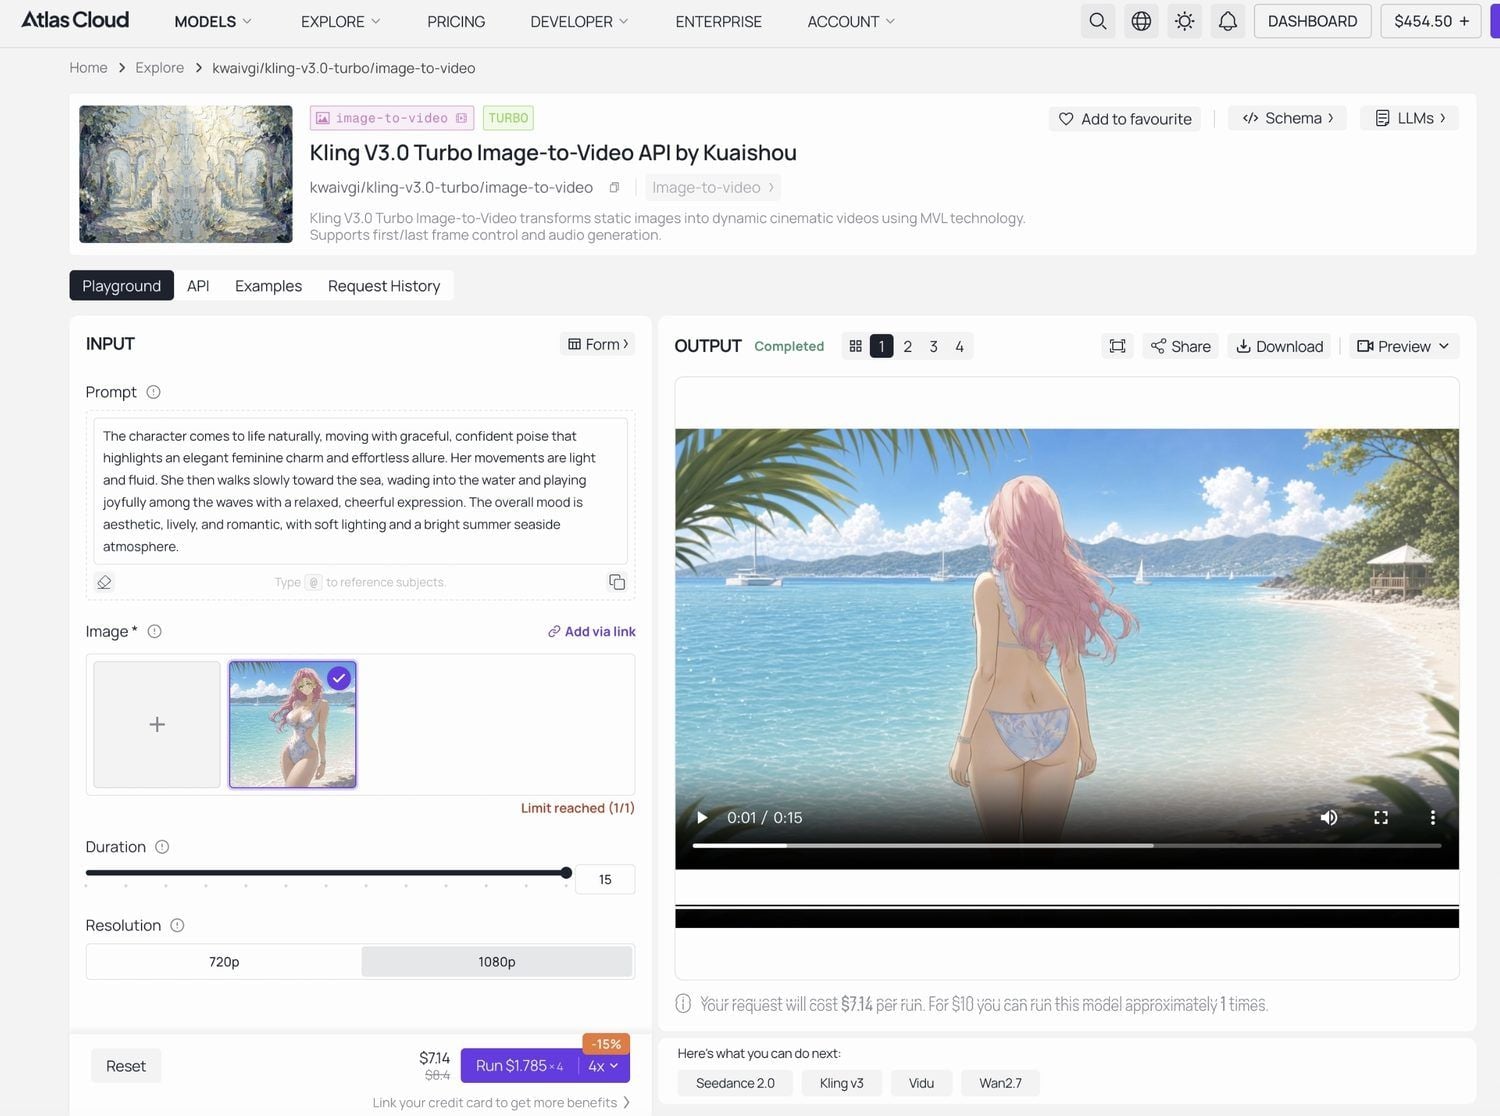 Kling V3 Turbo Image-to-Video playground: the swapped still plus a motion prompt at 1080p
Pricing is where video earns respect. Kling V3 Turbo starts at $0.095 per clip for short, low-resolution runs, currently 15 percent off a $0.112 list price as of July 2026. At 1080p the playground quoted roughly $1.79 per clip, discounted from about $2.10. So draft your motion cheap, then spend on the final render once.
How to Face Swap Anime Characters Across a Whole Scene Set
Single swaps are the warm-up. The real payoff is holding one face steady across an entire set of scenes, which is how you build a consistent original character, a lookbook, or a matching pack of profile pictures. This is what it means to face swap anime characters properly: not one lucky frame, but the same person across four completely different shots.
Start from a base grid where Step 1 gave every panel a different invented face:
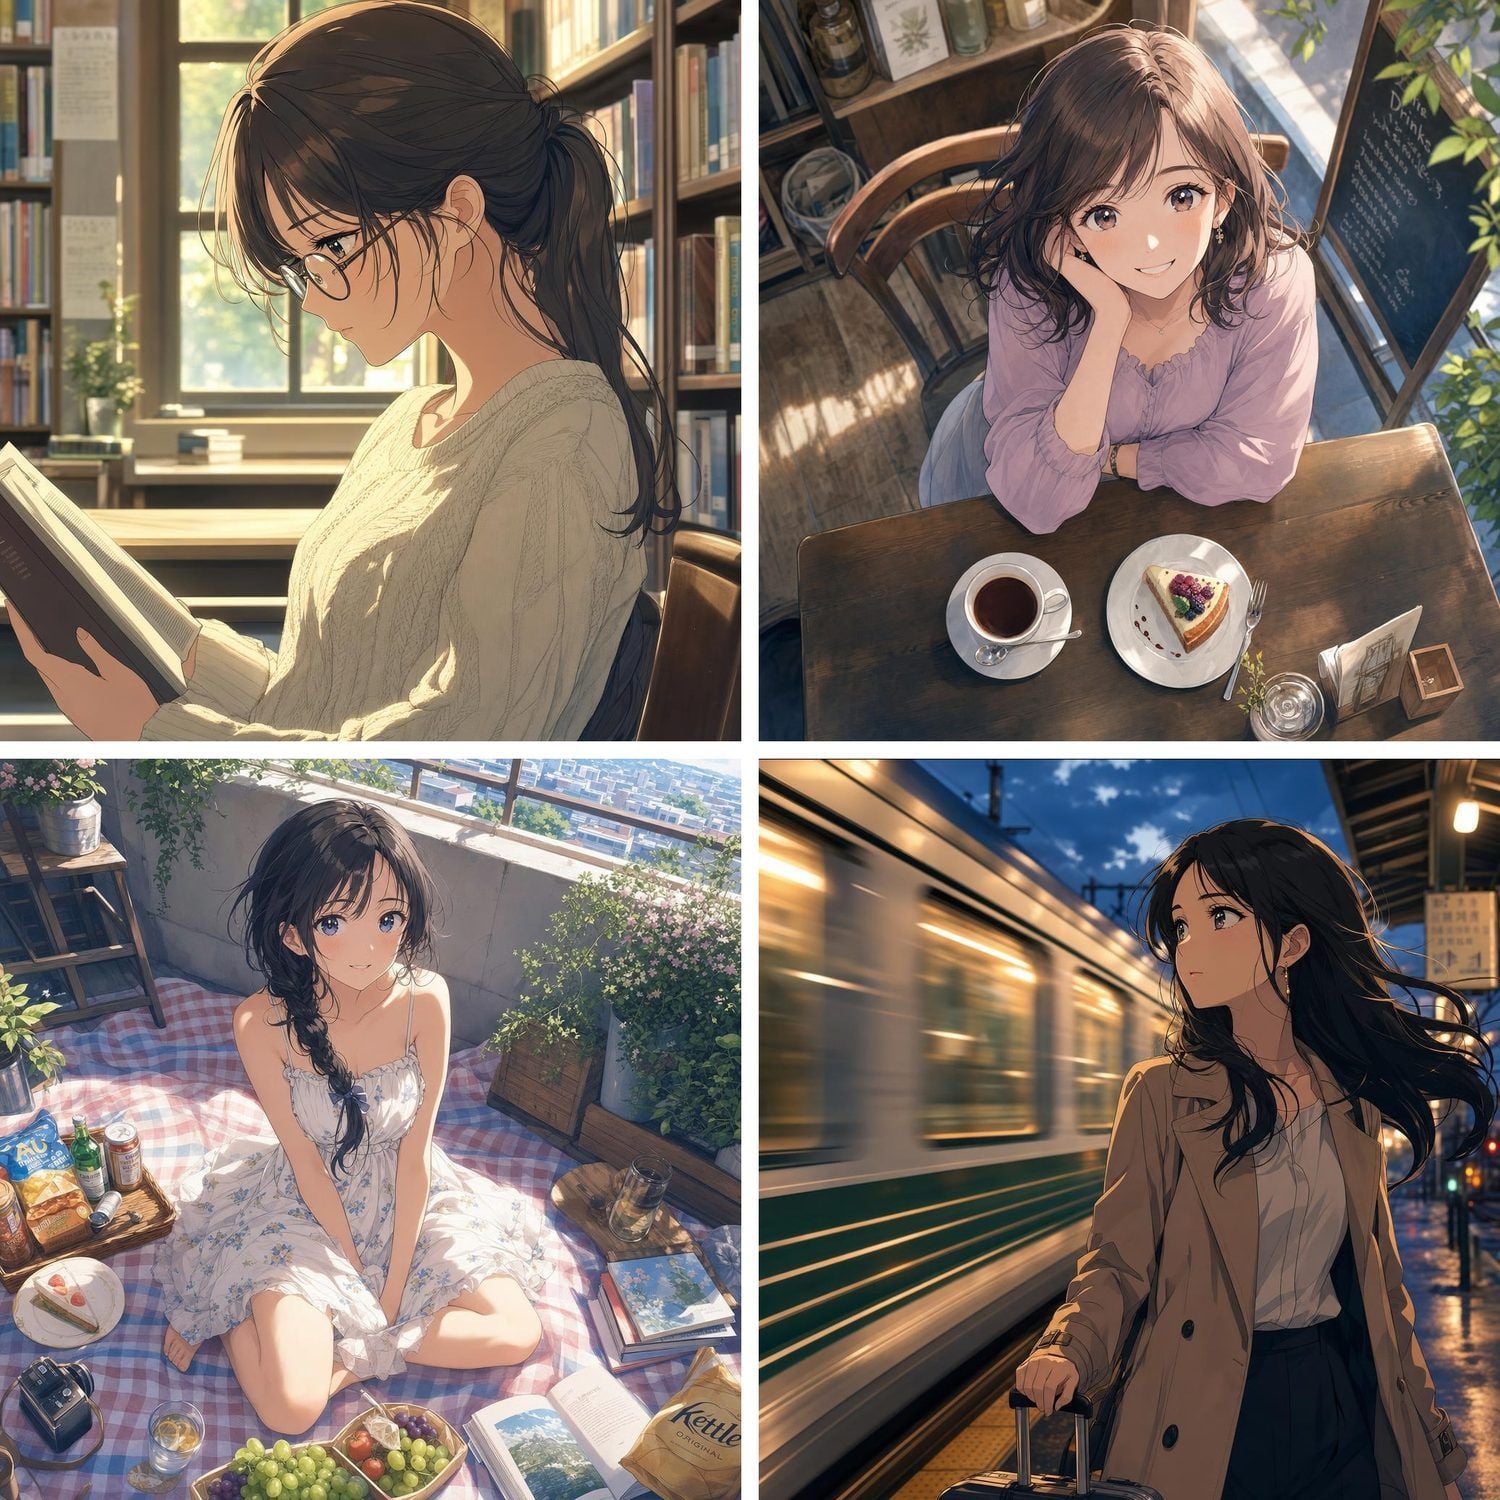 Step 1 grid: library, cafe, rooftop picnic, train platform, four different invented faces
Run the reference face through Step 2, and the same person now anchors all four panels while every scene, outfit, and light setup stays intact:
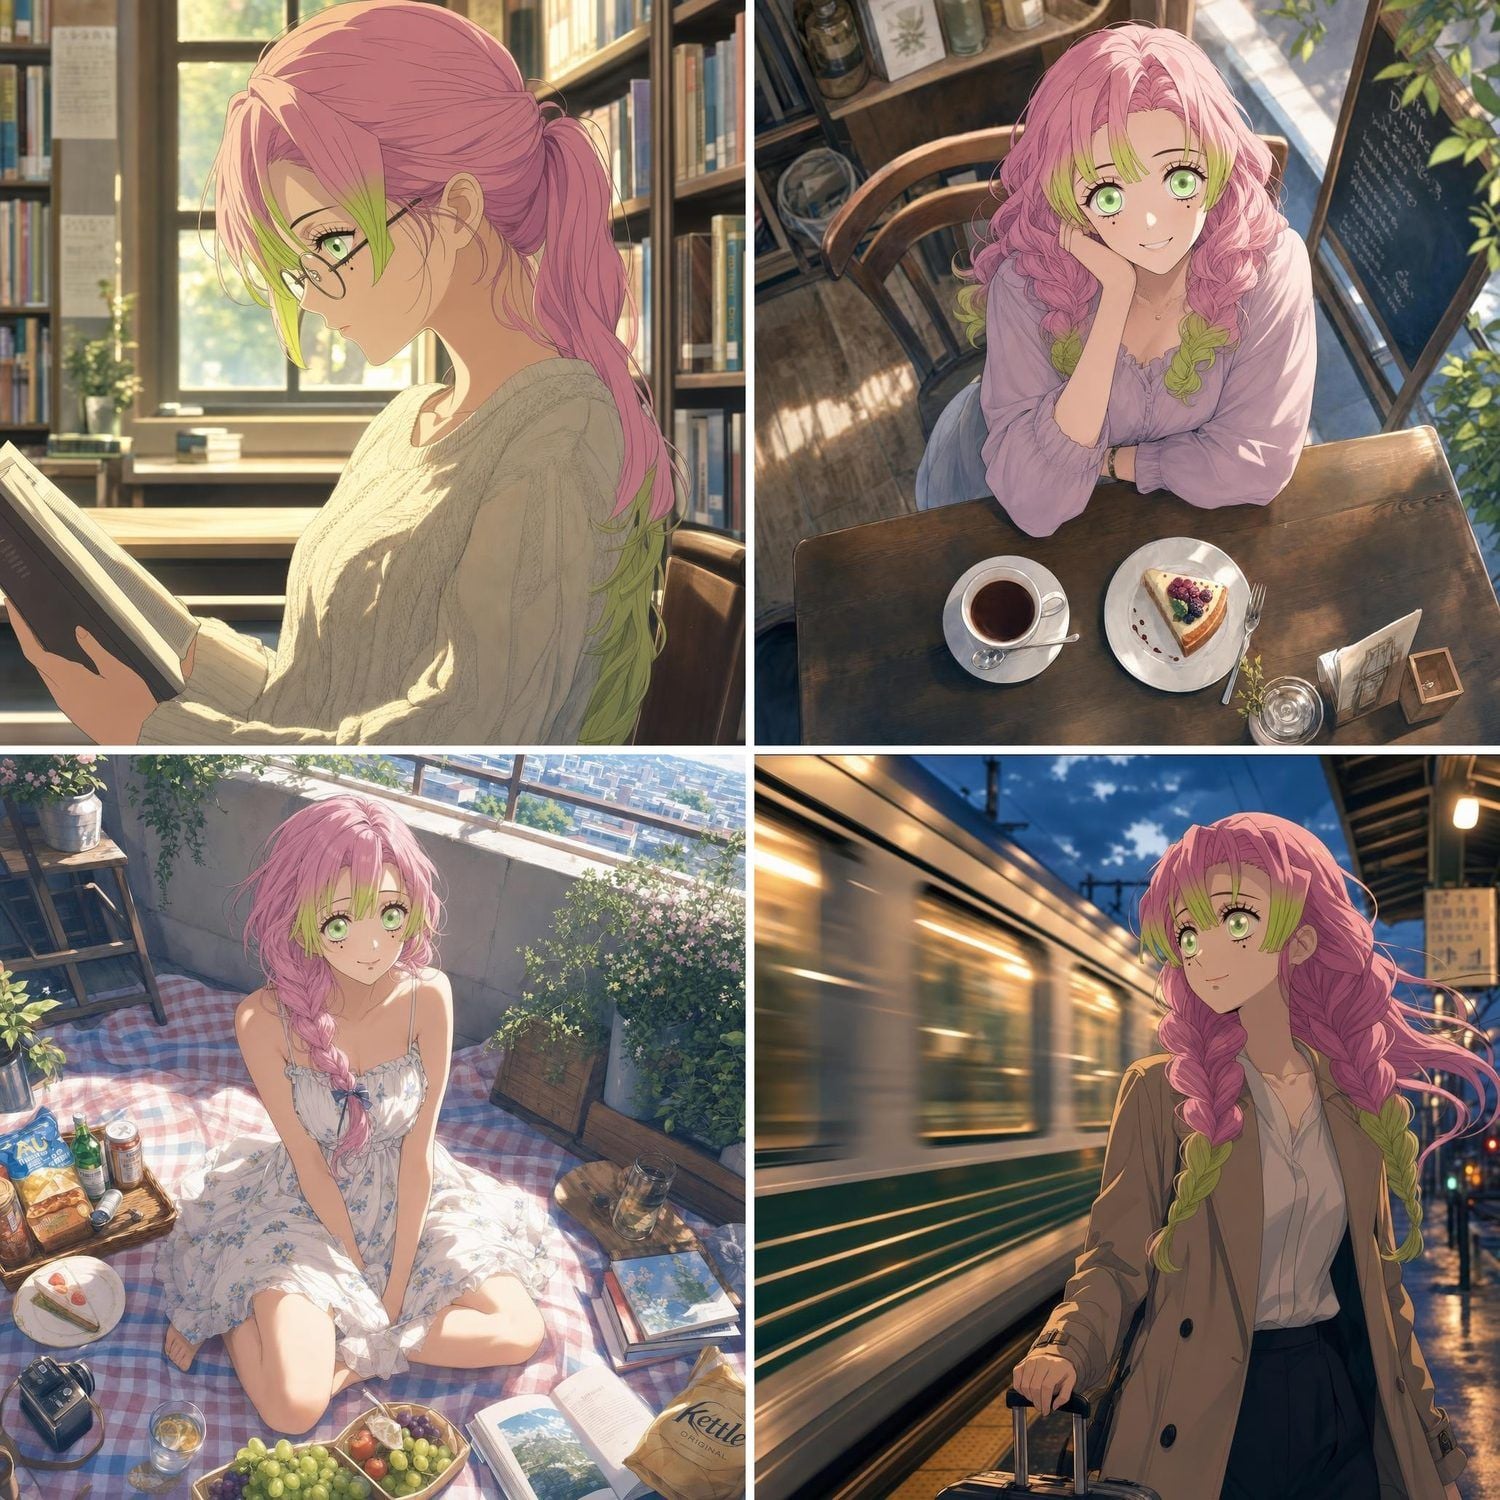 Step 2 result: all four faces replaced with the one reference character, scenes and lighting intact
Now do it again with a completely different face and scene set, which is the whole point of a repeatable pipeline rather than a one-off filter. Here is the second character's reference face:
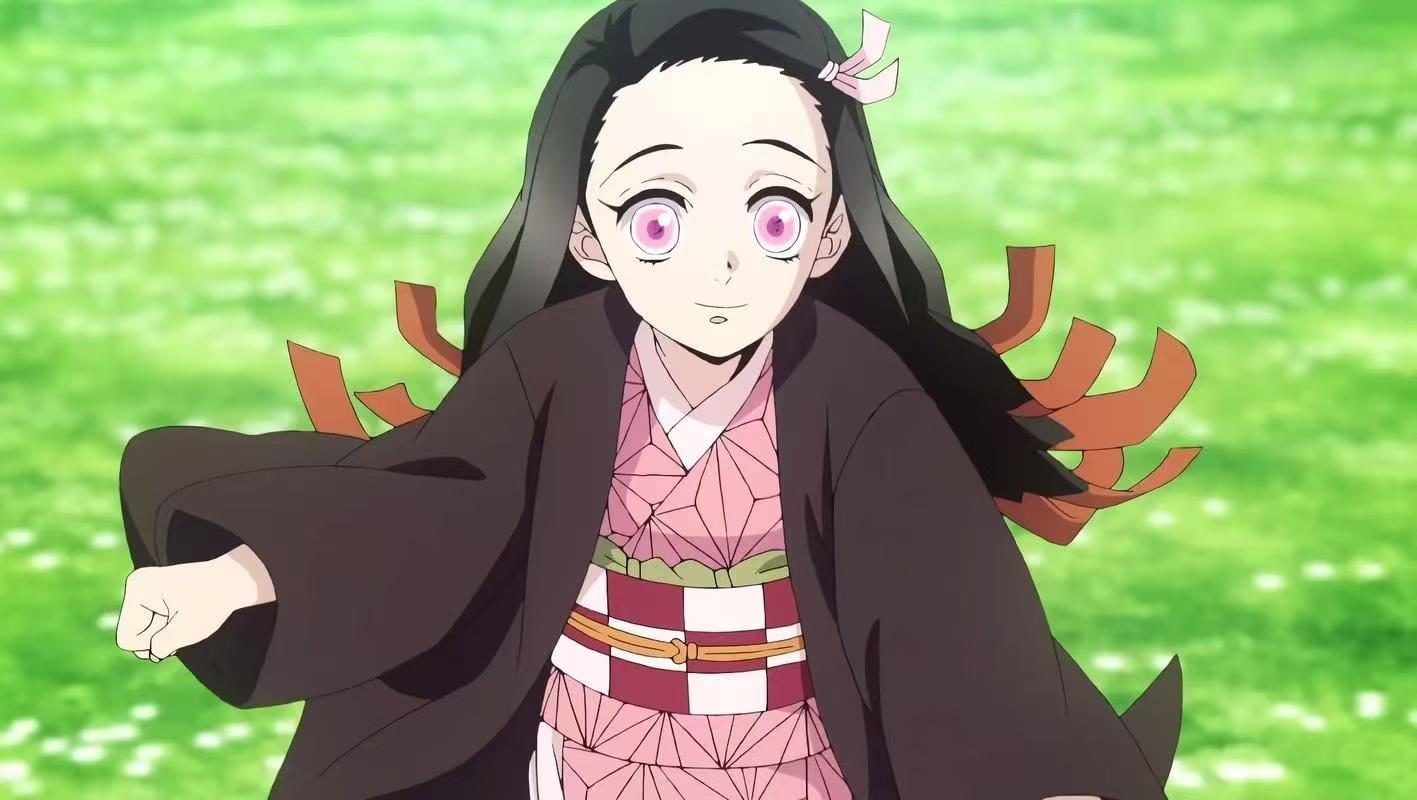 The second character's reference face: a dark-haired, pink-eyed anime portrait
Same starting move, a fresh grid of invented faces:
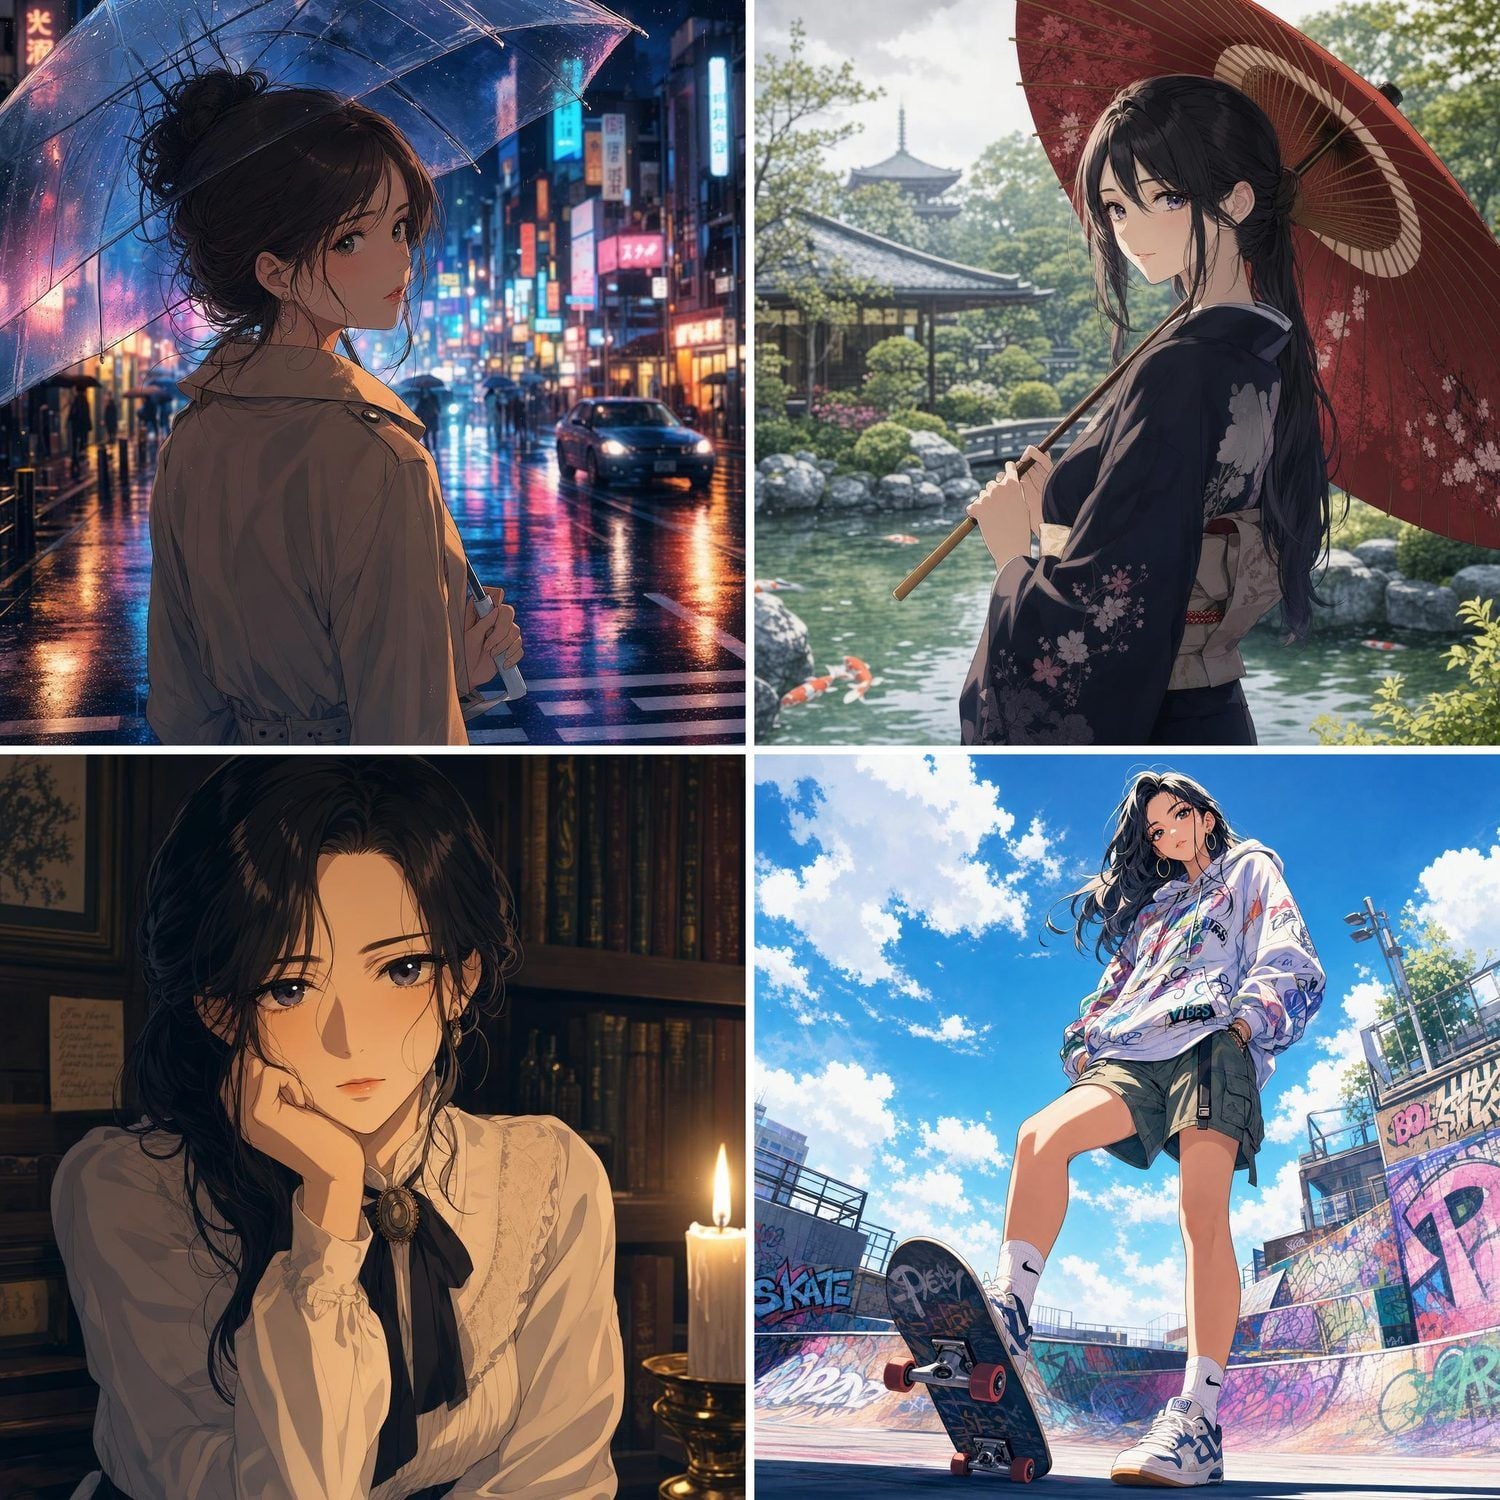 Step 1 grid: rainy street, garden parasol, candlelit study, skate park, four different faces
And after the swap, the second character holds across all four scenes just as cleanly:
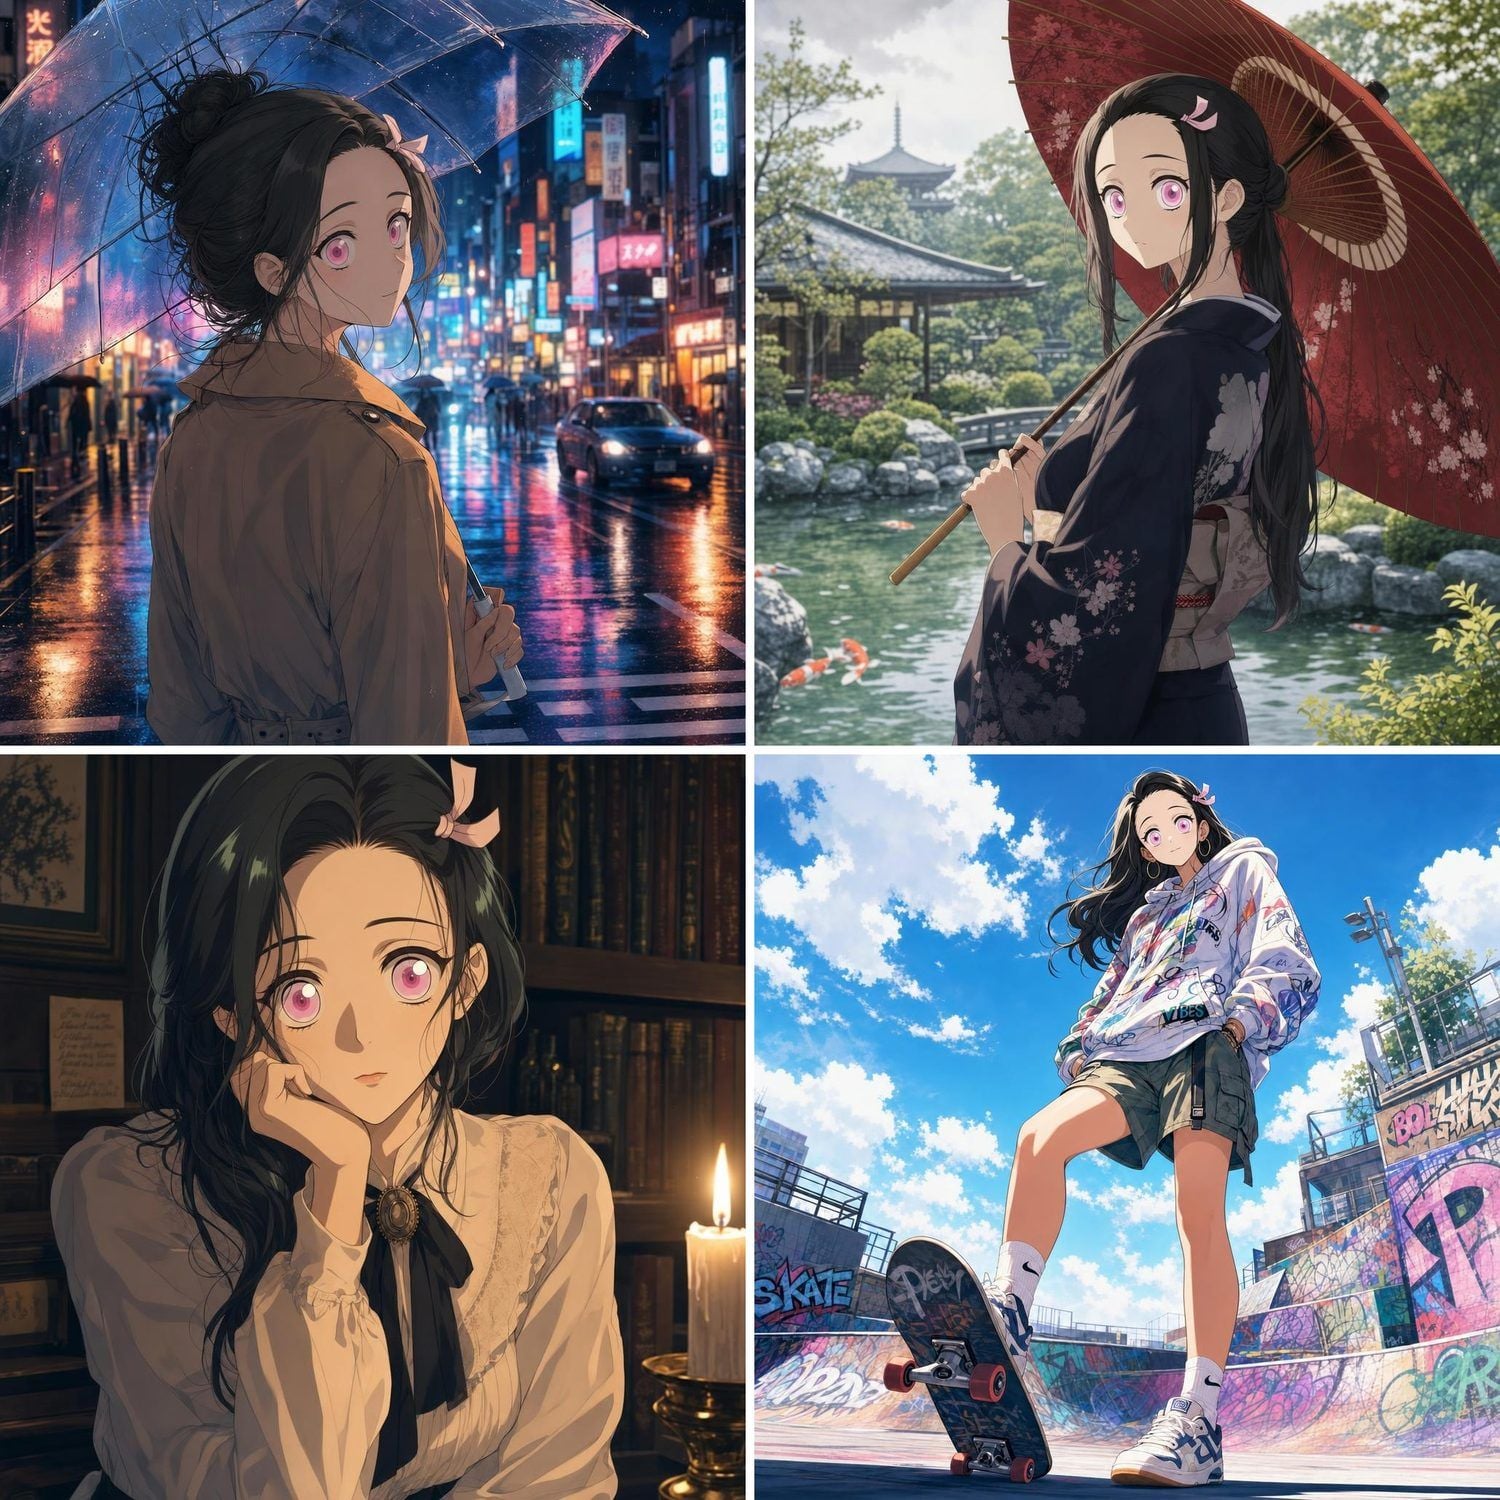 Step 2 result: the second character held consistent across all four scenes
It works on single scenes too. Here is a before and after in a flower field, same swap, same lighting respected:
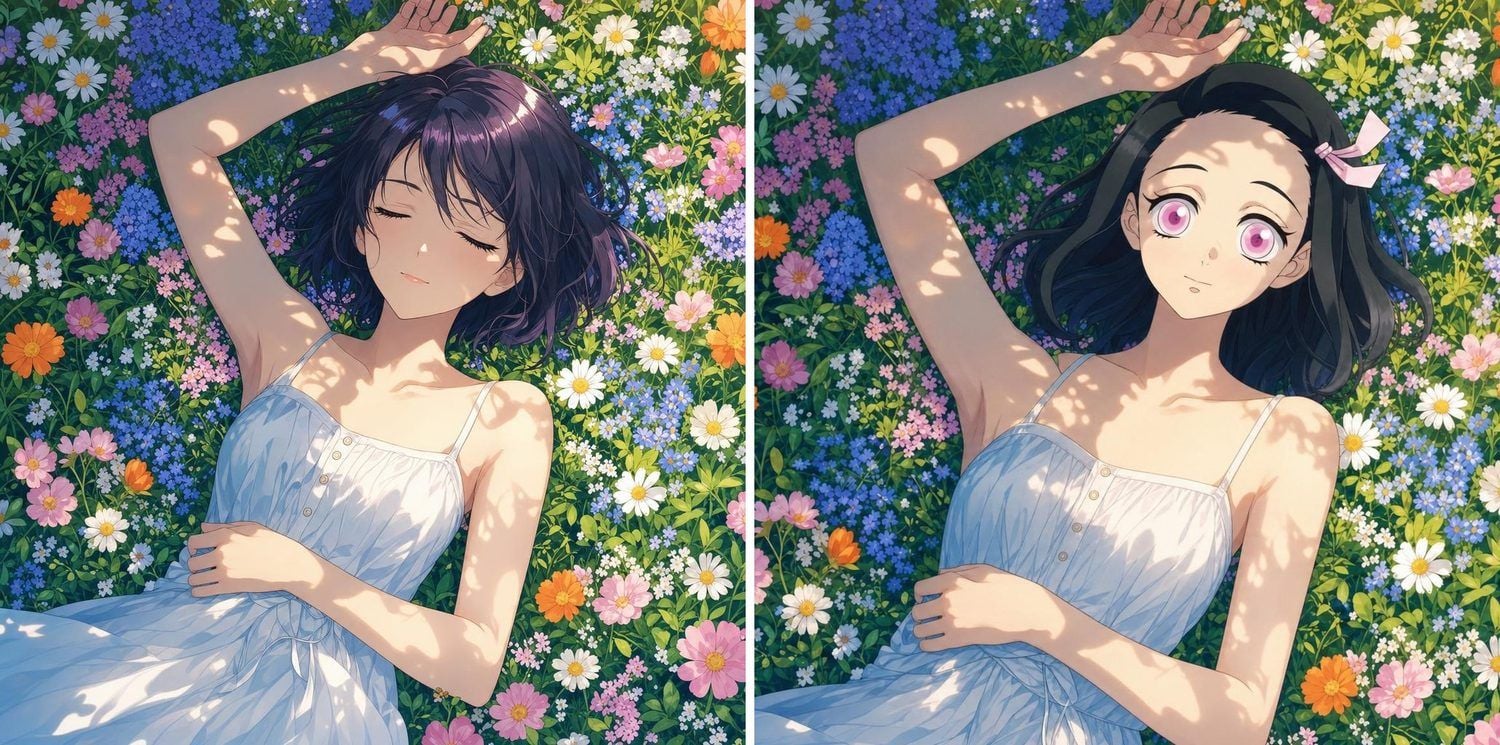 Single-scene before and after in a flower field: original face (left), swapped character face (right)
Then Step 3 again, and the second character comes to life the same way the first one did:
Kling V3 video result (animated GIF): the dark-haired, pink-eyed character animated
The grid format is doing real work here. It forces the model to prove consistency four times in one pass, and it shows drift immediately if something is off. Nail the grid and you have a character you can reuse forever.
What an Anime Face Swap Costs
Here is honest math for one finished, animated anime portrait, using the rates shown on the Atlas Cloud model pages as of July 2026.
| Item | Calls | Rate | Cost |
|---|---|---|---|
| Scene drafts (GPT Image 2, default) | 4 | $0.01 | $0.04 |
| Final scene (GPT Image 2, high, 2048x1152) | 1 | $0.17 | $0.18 |
| Face swaps (Nano Banana 2 Edit, 1K) | 3 | $0.08 | $0.24 |
| Final video (Kling V3 Turbo, 1080p) | 1 | $1.79 | $1.79 |
| Total | about $2.24 |
The image work is loose change. The video is roughly 80 percent of the bill, which tells you exactly where to be disciplined. Draft your motion at 720p or short durations near the $0.095 entry price, and only spend on the 1080p render once the still and the motion prompt are both right. If you just want stills, drop Step 3 and the whole thing lands under fifty cents.
Is Anime Face Swap Legal?
Short version: swapping your own face into an anime scene for fun sits in safe territory, but the moment you copy a specific studio's characters or sell the output, the ground gets soft.
The good news for personal use is that artistic style itself is not locked down. As IP attorney Evan Brown put it during the 2025 Ghibli-style wave, style "is not something that's expressly protected under copyright law" (TechCrunch, March 2025). What copyright does protect is specific expression, meaning named characters, exact designs, and actual frames from a show. Making yourself look like an anime character is very different from reproducing someone else's character.
There is also an artist-sentiment side worth respecting. Hayao Miyazaki's often-quoted line that AI animation is "an insult to life itself" was a reaction to a specific 2016 demo of a grotesque AI-generated creature, not a blanket verdict on all AI art (Anime News Network, December 2016). Worth knowing before you quote it, and worth keeping in mind about how strongly some creators feel.
Sensible ground rules:
- Keep it personal. A profile picture is a world away from selling prints or running ads.
- Swap faces you have the right to use: your own, or someone who said yes. Putting a real person into images without consent is a genuine harm, not a gray area, and platforms ban it.
- Do not recreate and monetize a specific copyrighted character. Building your own original character is both safer and more fun.
- Nothing explicit involving real people. That crosses into illegal territory in a growing number of places.
None of this is legal advice. The pattern is simple though: the style is the playground, specific characters and other people's faces are the fence.
Frequently Asked Questions
Why does my anime face swap look pasted onto the scene?
Lighting, almost every time. The edit model swapped the face but lit it with flat neutral light that ignores the scene. Add "keep the facial lighting and shadows consistent with Image 1" to your prompt, and pick a reference photo whose light direction roughly matches the target image.
Is there a free anime face swap?
Many phone apps advertise an anime face swap free tier, but free usually means watermarks, low resolution, and a single rushed pass that drifts on identity. The pay-per-image approach here is not free, but a full still costs pennies and you keep full resolution and control. For occasional swaps that math wins easily.
What is the best anime face swap app?
For one quick selfie, a dedicated anime face swap app on your phone is the fastest route. For results that hold a consistent face across scenes, keep high resolution, and can be animated into video, a browser-based anime face swap AI workflow with separate design, swap, and video models gives you far more control than any single app.
Can I do an anime face swap online without installing anything?
Yes. Because each model here runs in a browser playground, the entire anime face swap online flow needs no install and no code. You upload images, type prompts, and download results from the same tab.
Can I swap my own face into anime characters?
Yes, and it is the cleanest use case. Use your selfie as the reference face in Step 2. A front-facing, evenly lit, sharp photo where your face fills a good part of the frame gives the best result, and one great photo beats five mediocre ones.





