You know the feeling. You prompt an AI for a Disney-style portrait of yourself, and the result is gorgeous. The gown sparkles, the ice palace glows, the composition belongs on a movie poster. Then you look at the face. It's a lovely face. It's just not yours.
That gap is the whole problem with a disney face swap. Style is easy for modern image models. Identity is hard. Google's own engineers call keeping a character's appearance consistent across edits "a fundamental challenge in image generation" (Google Developers Blog, August 2025).
The fix is simpler than most tutorials make it sound: stop asking one model to do two jobs. This guide walks through a two-pass workflow, one model for the scene and one for the face, with two full before-and-after demos and the exact prompt line that keeps the lighting from falling apart.
Key takeaways
- One-pass generation fails because composition and identity are competing goals. Split them into two passes and both improve.
- Pass 1 uses GPT Image 2 to design the layout, outfits, and lighting. Ignore the face completely at this stage.
- Pass 2 uses Nano Banana 2 Edit with your reference photo to swap the face in. Add one line to the prompt: "Strictly preserve the same lighting."
- A complete four-panel poster project costs well under a dollar in API fees.
Why Most Disney Face Swap Attempts Stop Looking Like You
This is not a niche hobby. The Disney Pixar AI poster trend blew up in late 2023, when people flooded TikTok and Instagram with faux animated posters of their pets, kids, and themselves. It got so big that Microsoft temporarily blocked the word "Disney" in Bing Image Creator prompts (TechSpot, November 2023). A second wave hit in 2025, when ChatGPT users generated over 700 million images in a single week, driven largely by style-transformation trends (TechCrunch, April 2025). The trend has a comedy wing too. Search YouTube for "disney face swaps try not to laugh" and you'll scroll through endless compilations of swaps that crashed into the uncanny valley, which is exactly the failure this guide is built to help you avoid.
So why do most results still look like a stranger in your outfit?
Because a text prompt can describe a hairstyle, but it cannot describe the exact geometry of your face. When one model generates the scene and the face together, it invents a face that fits its training data, not your photo. Regenerate the image and the face drifts again. You can burn thirty attempts and never see yourself once.
Face swapping flips the order of operations. First you lock in a scene you love. Then a dedicated edit pass transplants your real face into it, using an actual photo as the reference instead of words. The scene stops changing, the identity comes from pixels rather than adjectives, and suddenly the result is repeatable.
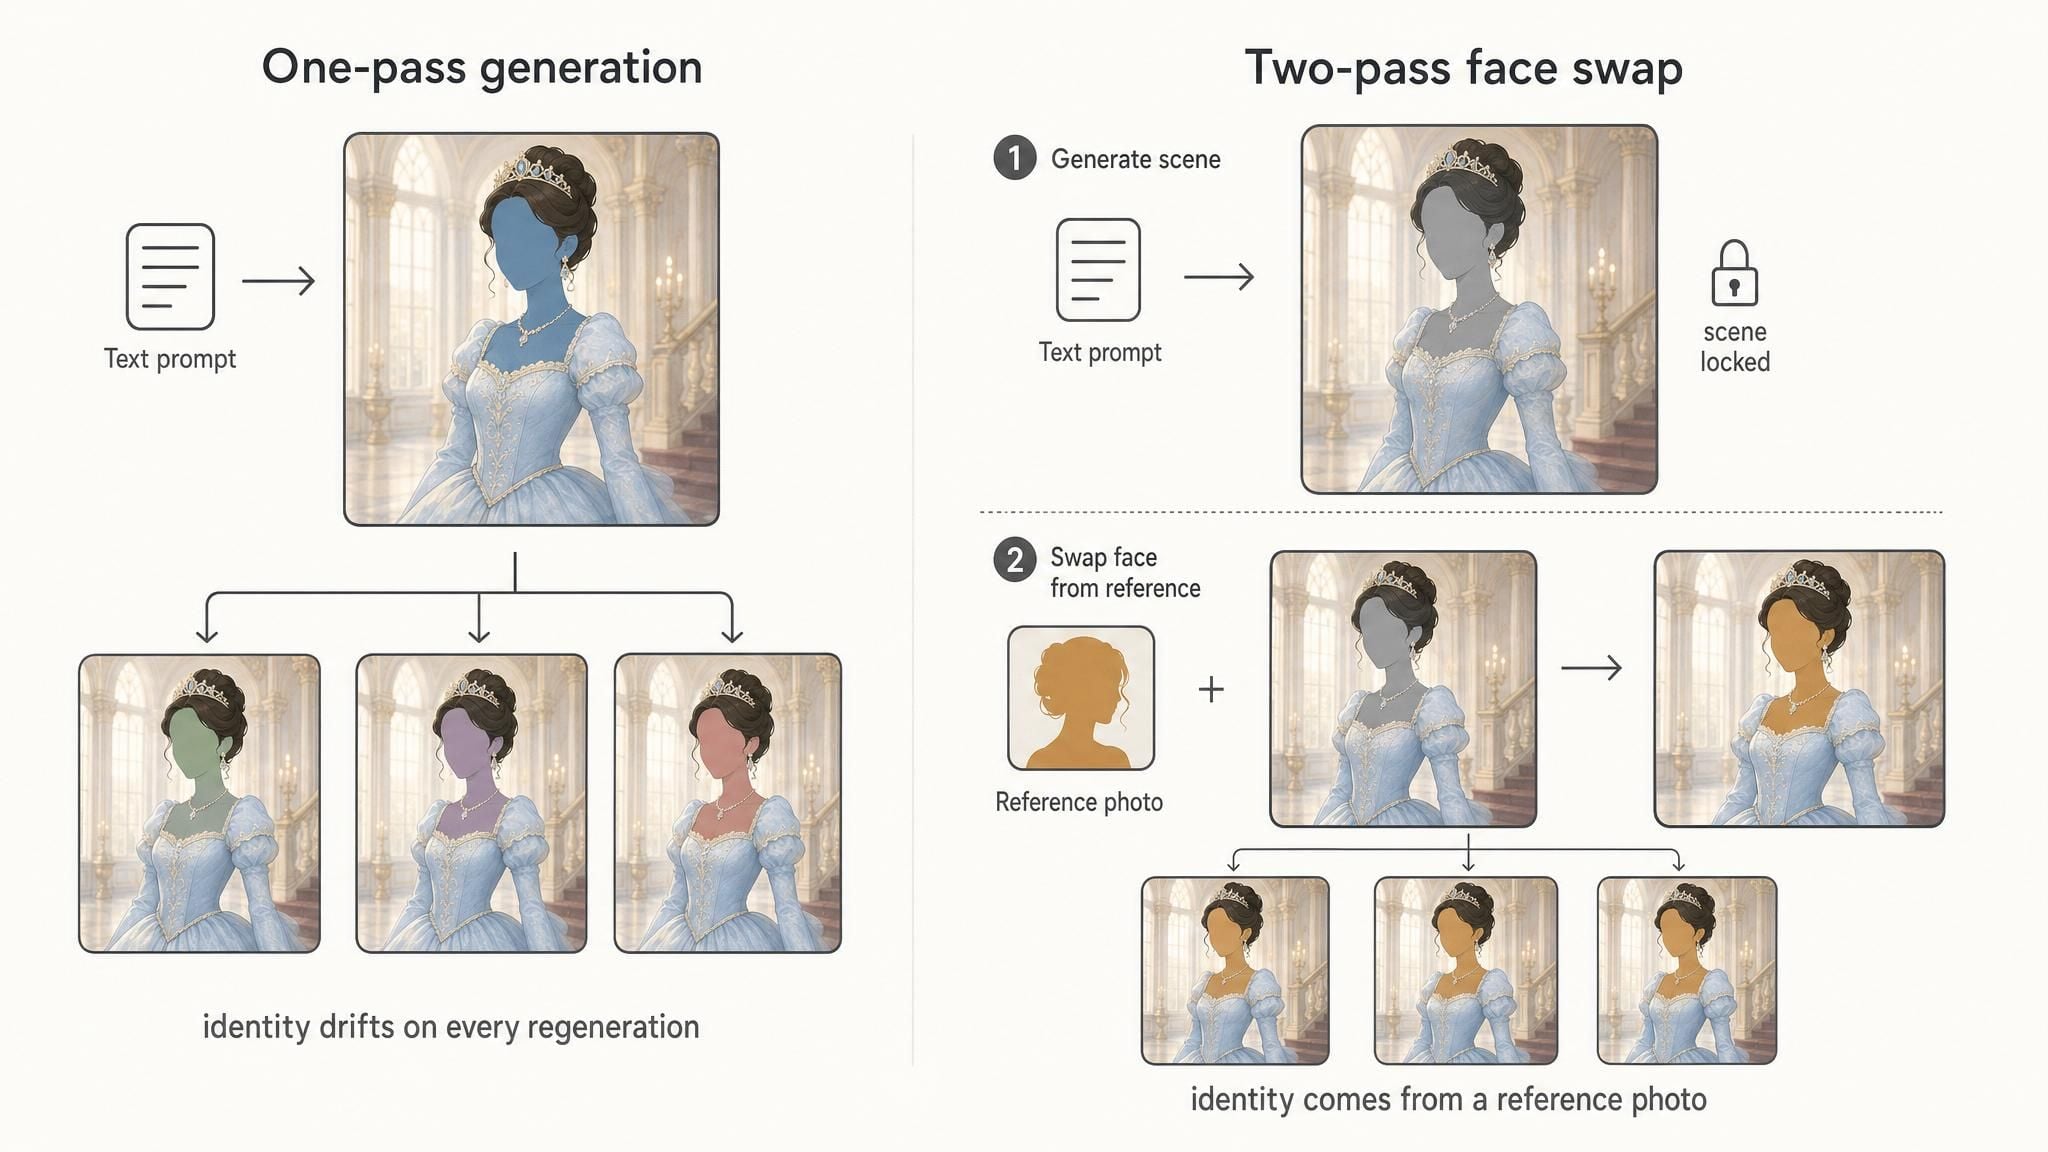
The Two-Pass Disney Face Swap Workflow at a Glance
The workflow uses two models, each doing the one thing it is best at.
| Pass | Model | Job | Price on Atlas Cloud (July 2026) |
|---|---|---|---|
| 1. Design | GPT Image 2 Text-to-Image | Composition, outfits, poses, lighting | From $0.009 per image |
| 2. Swap | Nano Banana 2 Edit | Replace faces using your reference photo | $0.08 (1K) / $0.12 (2K) / $0.16 (4K) per image |
GPT Image 2 is OpenAI's image model, and it is very good at following layout instructions: multi-panel grids, specific outfits per panel, text on posters. Nano Banana 2 is Google's image editing model, built for exactly the opposite skill. It takes reference images and keeps a subject consistent across edits, which is the core of any face swap.
Normally these live on two different platforms with two accounts and two billing pages. The reason this workflow stays painless is that both models sit in the same catalog on Atlas Cloud, a multimodal AI platform where every model page has a browser playground, so you can run both passes without writing code. Pass 1 runs on the GPT Image 2 text-to-image page, pass 2 on the Nano Banana 2 Edit page. One account, one credit balance, and an OpenAI-compatible API later if you want to automate batches.
A note on how those prices work, checked on the model pages in July 2026. GPT Image 2 bills by token, so the $0.009 figure is the estimate its model page shows at default settings, where $10 covers roughly 1,111 runs. Larger sizes and the high quality tier cost more per image. Nano Banana 2 Edit is flat per resolution: $0.08 at 1K, $0.12 at 2K, $0.16 at 4K. Neither model carries a promotional discount right now, so the listed price is the billed price. Either way, the asymmetry is the point: design iterations cost about a cent, so be picky in pass 1 and arrive at the swap pass with a scene already worth keeping.
Step 1: Let GPT Image 2 Design the Scene
Here is the counterintuitive part: in pass 1, the face does not matter at all. Do not describe your eyes, your nose, or your bone structure. Any face the model invents will be replaced in pass 2. Spend your entire prompt budget on the things that will survive: layout, wardrobe, pose, environment, and light.
A prompt in this shape produced the animated demo grid you'll see below:
A 2x2 grid poster, four panels, the same young woman in four fantasy kingdoms, 3D animation movie style. Panel 1: a fire kingdom, flowing ember gown, warm lava glow. Panel 2: a night aurora scene, black gown, cool green light. Panel 3: a spring meadow, flowers braided into her hair, soft daylight. Panel 4: an ice palace, crystal crown and scepter, blue rim light. Cinematic lighting in every panel.
Here is the click-by-click version in the browser playground:
- Open the GPT Image 2 Text-to-Image playground and sign in. The playground sits right on the page, with the prompt box and settings on one side and the output preview on the other.
- Paste your scene prompt into the prompt field.
- Set quality. There are three tiers, low, medium, and high. Use low or medium while you iterate on layout, and switch to high only for the final render, because billing is token based and the high tier costs more per image.
- Set size. Options run from 1024x1024 squares up to 4K (3840x2160). A square works well for 2x2 grids. Match the shape to where the poster will live.
- Hit Run, wait a few seconds, and judge only the composition and clothing. The faces will be replaced, so ignore them completely.
- Regenerate until the scene is right, then download the winner as a PNG. That file is your base image for pass 2.
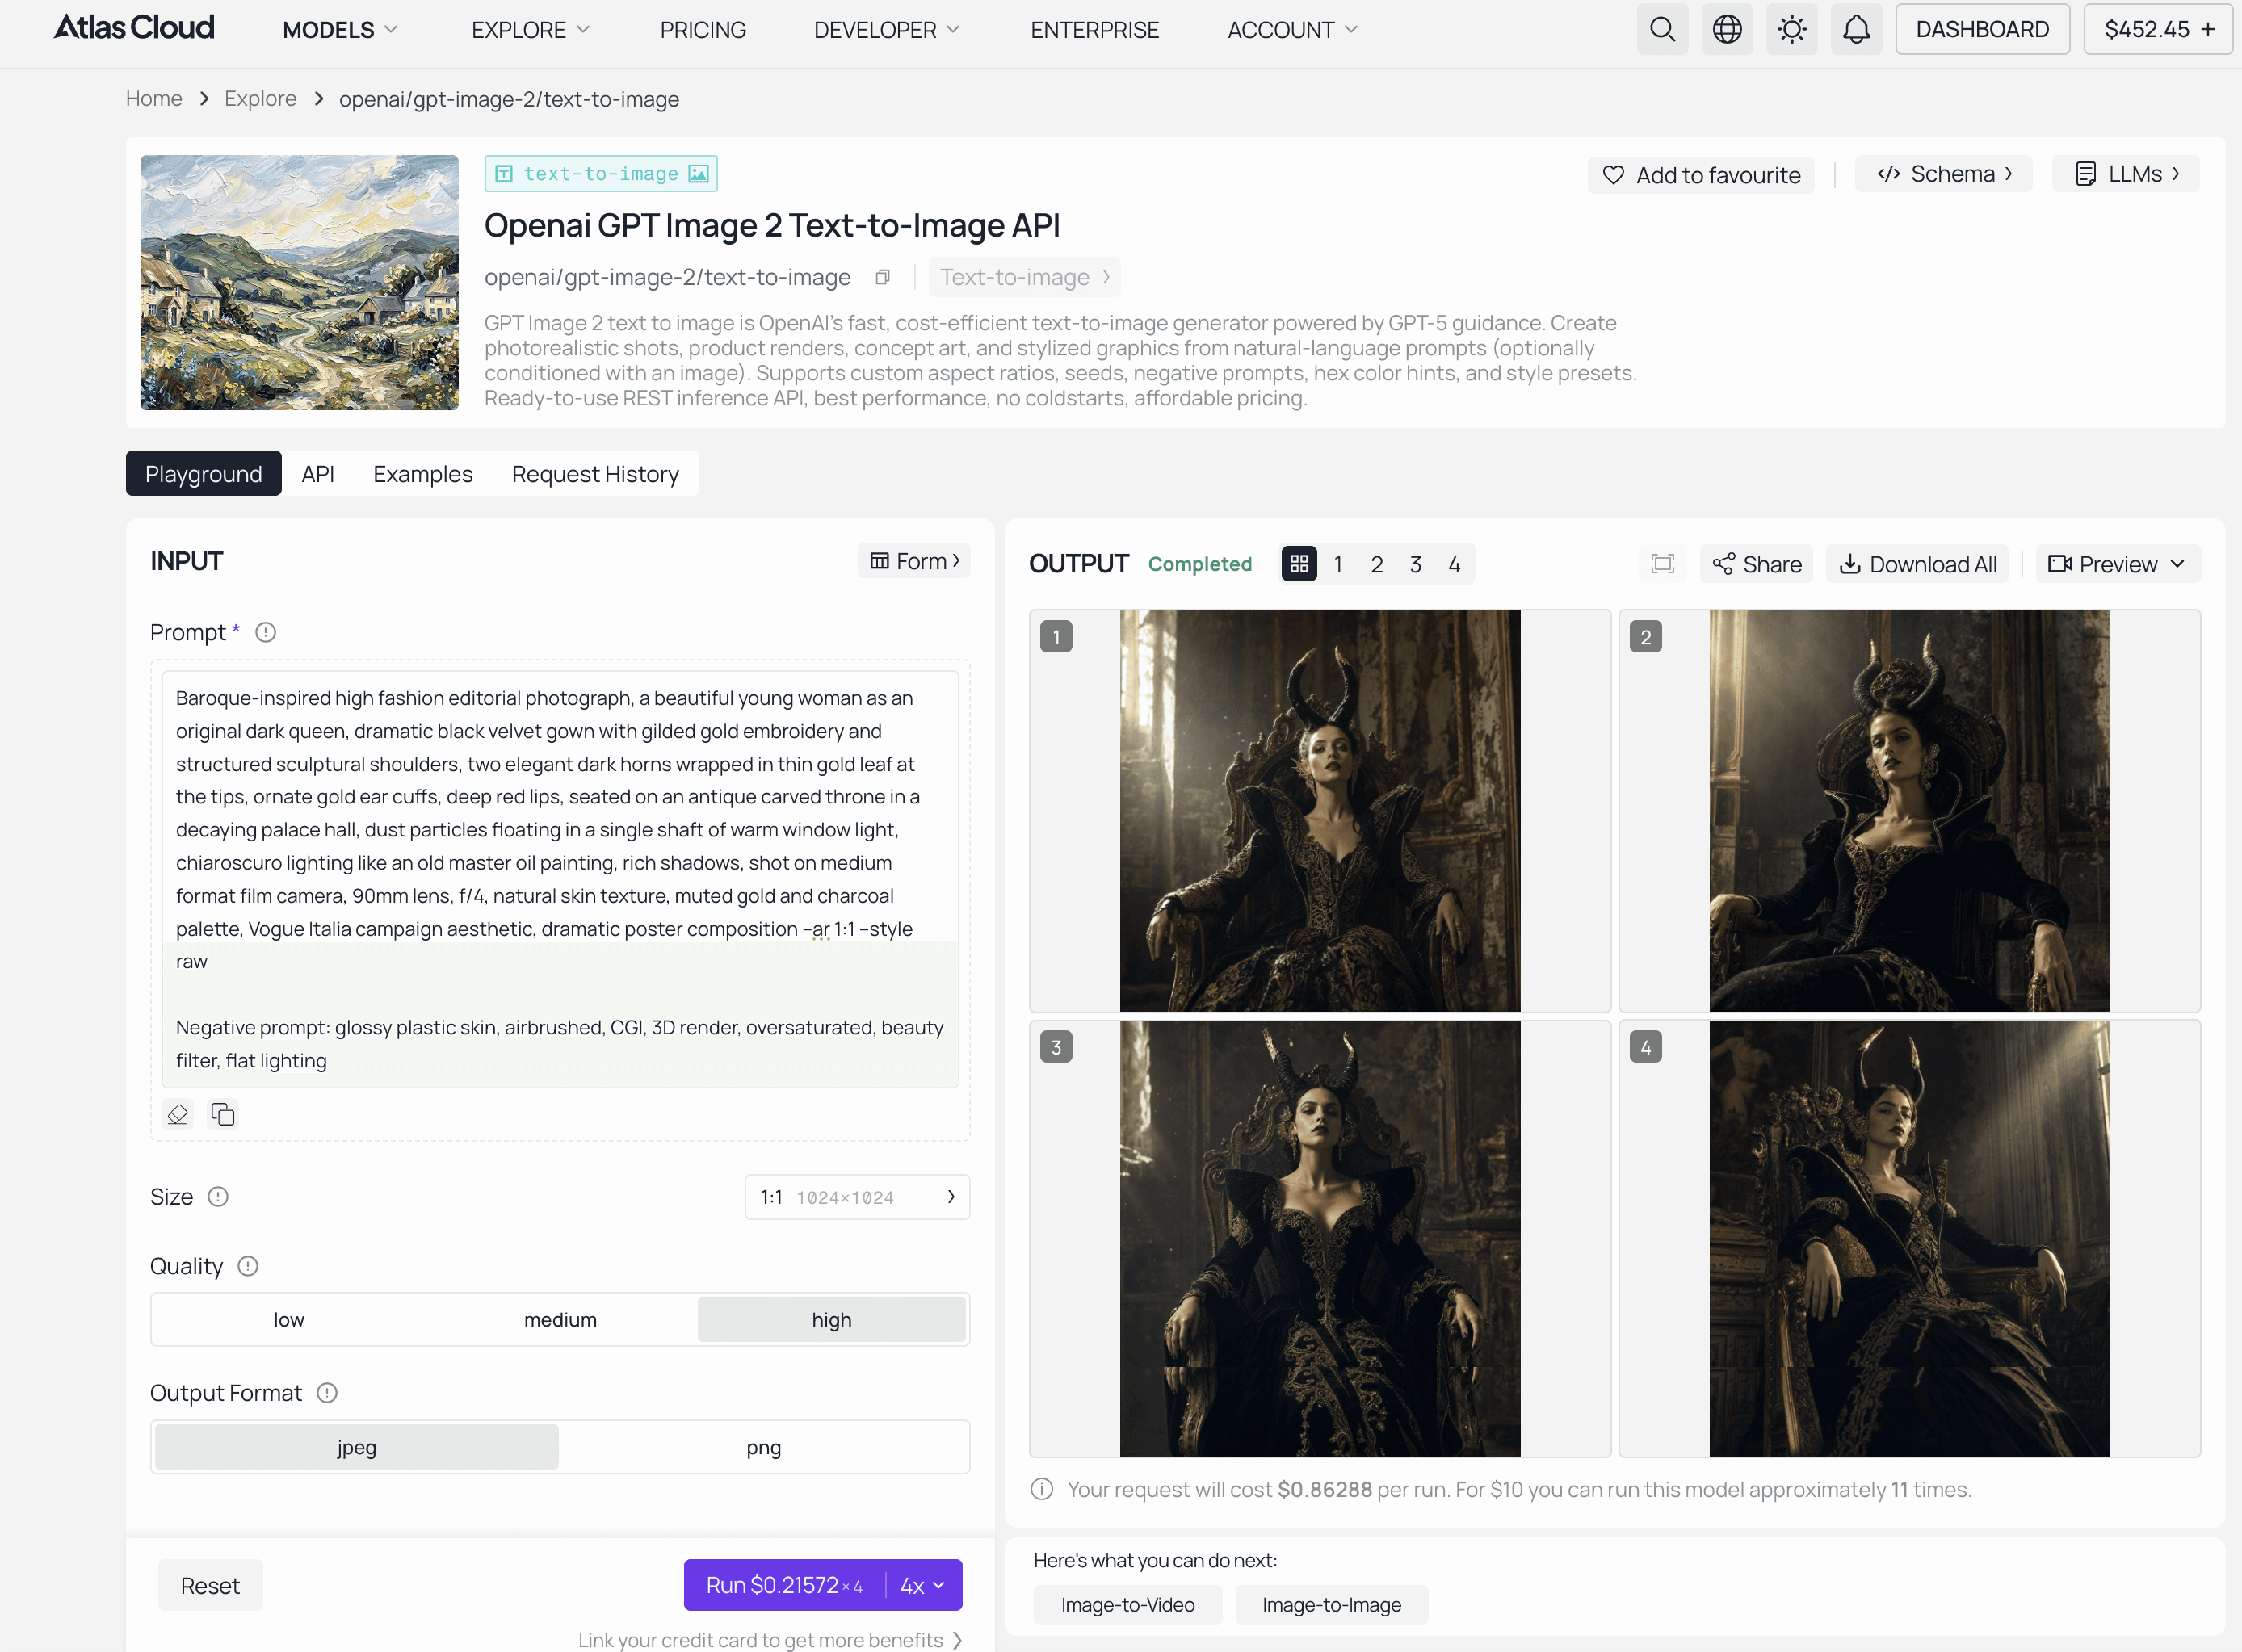 At the default estimate of $0.009 per image, ten drafts cost about nine cents. This is where cheap iteration genuinely changes behavior: you stop settling for "good enough" layouts.
One practical tip: ask for consistent lighting logic inside each panel now. Whatever light exists in this image is the light your swapped face will need to match later.
Step 2: Run the Face Swap With Nano Banana 2 Edit
Pass 2 takes two inputs: the scene from step 1 as the base image, and a clear photo of the face you want as the reference image. The model accepts up to 14 images per edit, but its own docs recommend fewer images for better stability, and one clean, front-facing portrait plus the base image is usually all you need.
The playground flow, step by step:
- Open the Nano Banana 2 Edit playground. In the images field, upload your base image from pass 1.
- Click + Add Item and upload the face reference photo as the second image.
- Write the edit prompt (the exact one we used is below). Be explicit about which image is the scene and which is the face source.
- Set aspect ratio to match your base image. A 2x2 grid from a square render means 1:1. If you leave it empty the model picks a default, which can crop your poster.
- Set resolution: 1K costs $0.08, 2K costs $0.12, 4K costs $0.16 per image. Use 1K for test swaps, then rerun the winning setup at 2K or 4K.
- Choose output format, PNG or JPEG, and hit Run. There is also a built-in Prompt Enhancer button if you want the model to polish your wording first.
- Download the result and compare it against the original panel by panel, especially around hairlines and jaw edges.
The prompt is short. The demos in this article used this exact structure:
Replace the face of the woman in every panel with the face from the reference image. Keep everything else unchanged. Strictly preserve the same lighting.
That last line is the single highest-value sentence in this whole workflow. Without it, edit models tend to re-light the new face with flat, neutral studio light, and the result reads as pasted on even when the geometry is perfect. With it, the lava panel keeps its warm glow on the new skin, the aurora panel keeps its cool green cast, and the swap becomes invisible.
Why Nano Banana 2 for this pass? Consistency under editing is the exact problem this model line was built to solve, and it has been battle-tested at absurd scale: Google reported more than 5 billion images generated with Nano Banana within its first two months (Google, October 2025). Pick your output resolution based on destination: 1K is fine for a phone wallpaper, 2K for social posts, 4K if you plan to print.
Disney Princess Face Swap Walkthrough: The Animated Grid
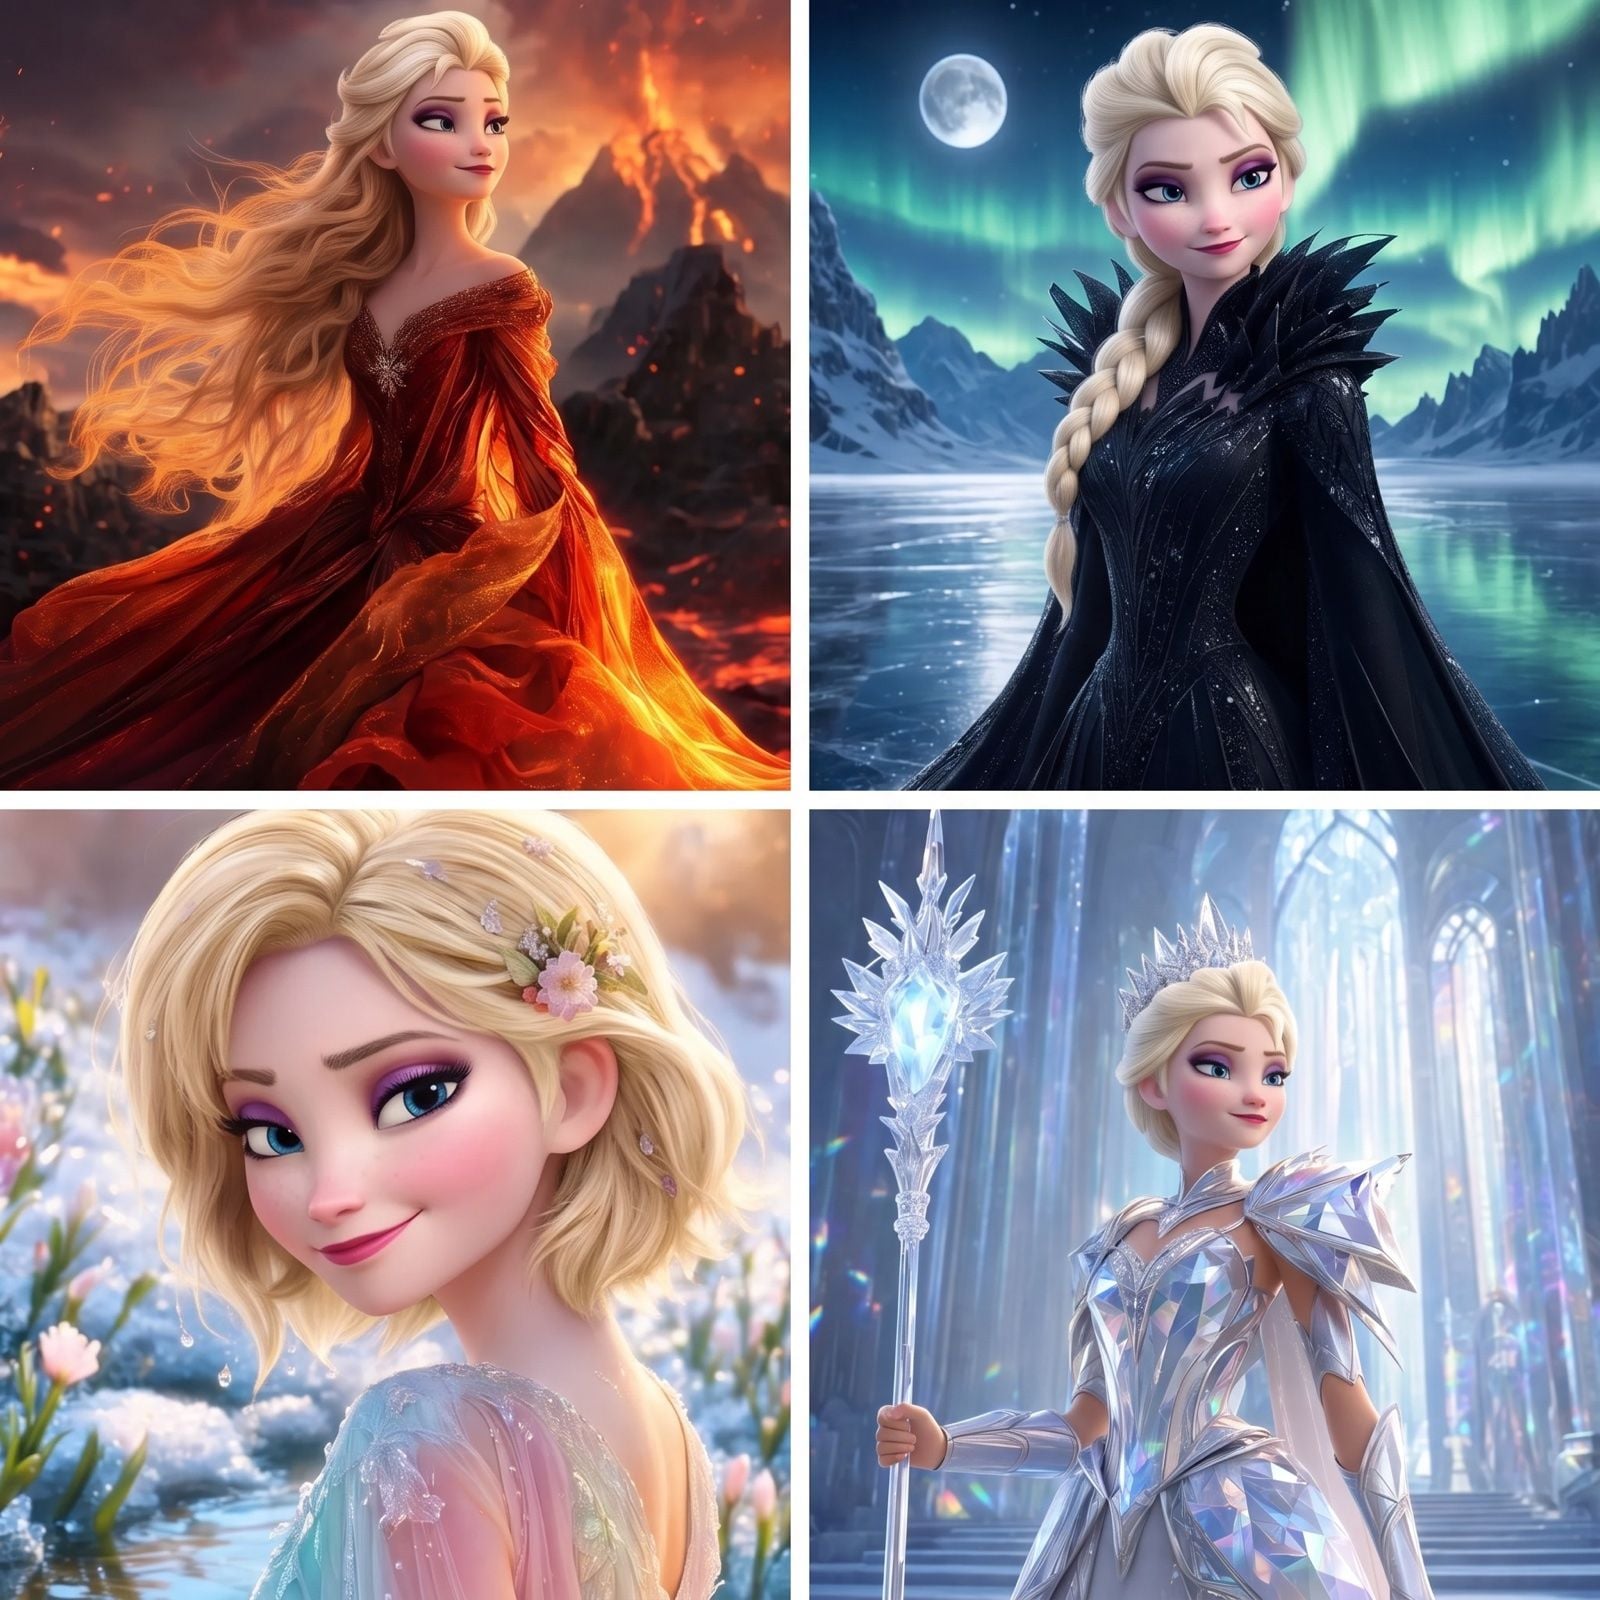
Time to see it work. The goal here: one four-panel animated poster, four different scenes, one consistent face.
The reference face is a classic 3D-animation ice queen portrait:
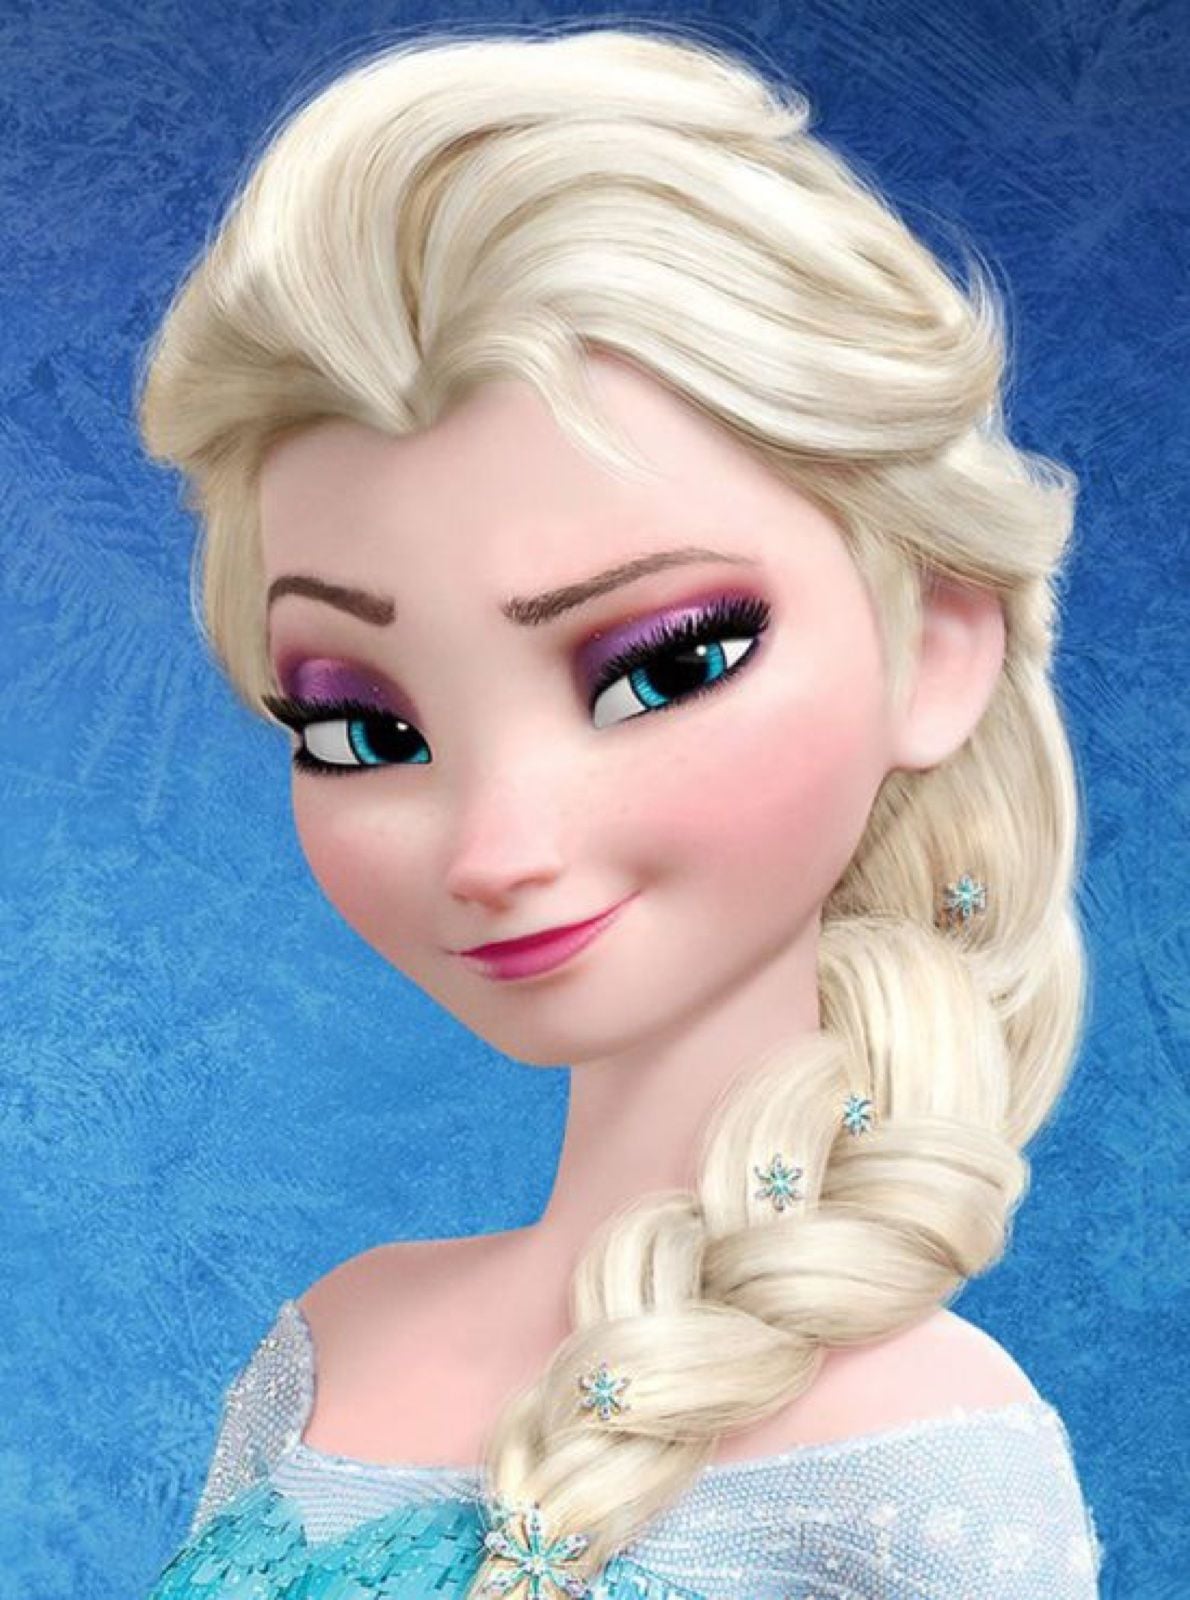 The reference face for pass 2: an ice queen portrait in 3D animation style
The base grid came out of GPT Image 2 in pass 1. Look closely: the four panels show four visibly different women. That's the identity drift problem in one image, and at this stage it is completely fine:
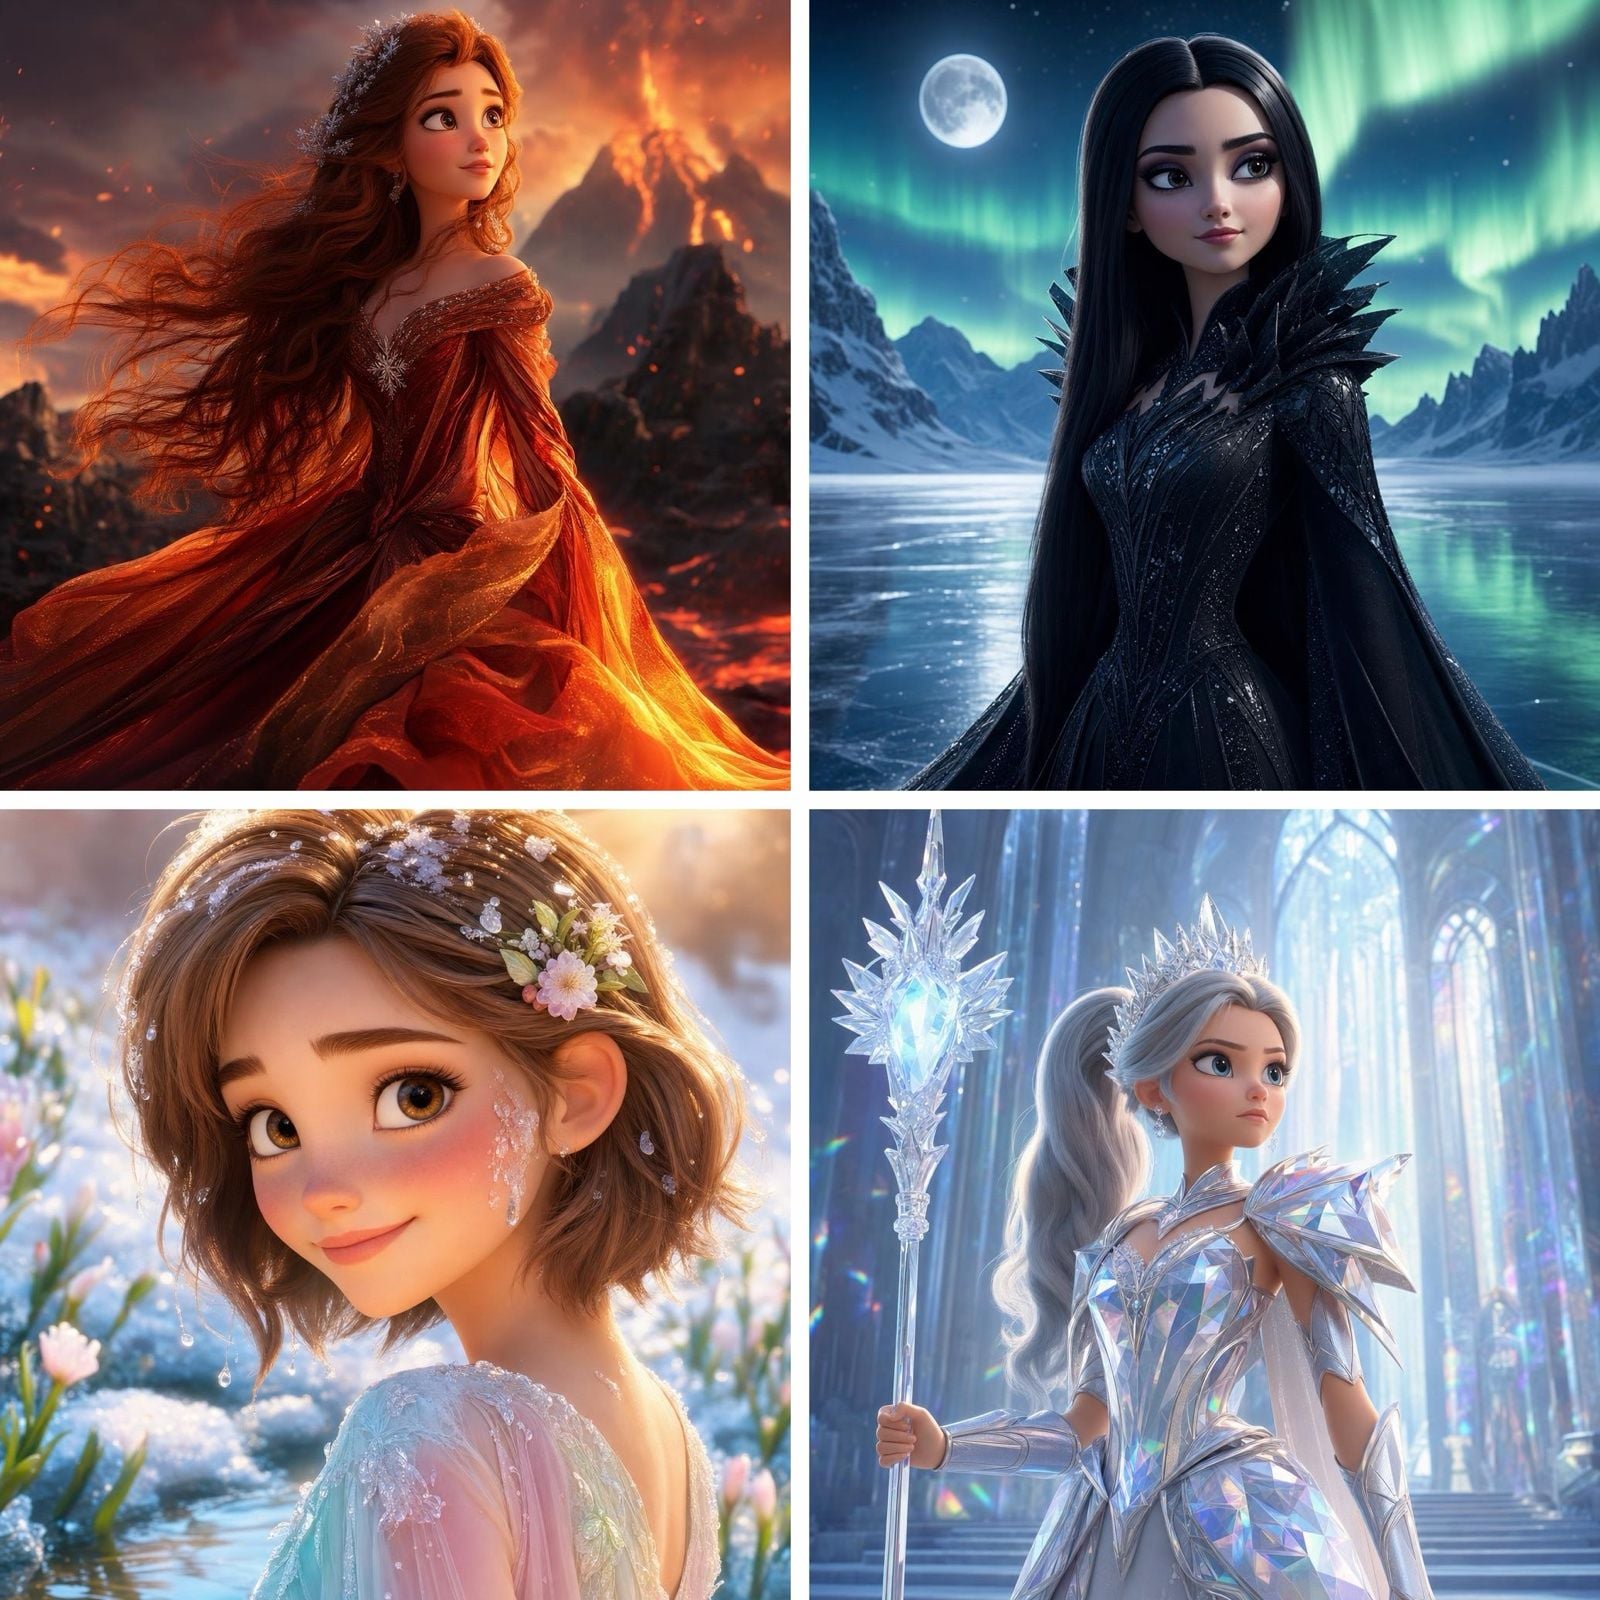 Pass 1 output: four panels, four different invented faces
Then one Nano Banana 2 Edit pass with the prompt from step 2:
 After pass 2: one consistent face across all four panels, lighting preserved
Check the lighting panel by panel. The fire scene keeps its ember warmth on the new face. The ice palace keeps its blue rim light. Four scenes, one recognizable person, one edit call. That is the entire pitch of the two-pass approach in a single before-and-after.
Disney Face Swaps Beyond Animation: The Photorealistic Editorial Grid
The same workflow holds up when you leave animation style entirely. Photorealism is the harder test, because human eyes are ruthless about skin texture and light direction on real faces.
This time the reference is a live-action dark fairy character portrait, horns and all:
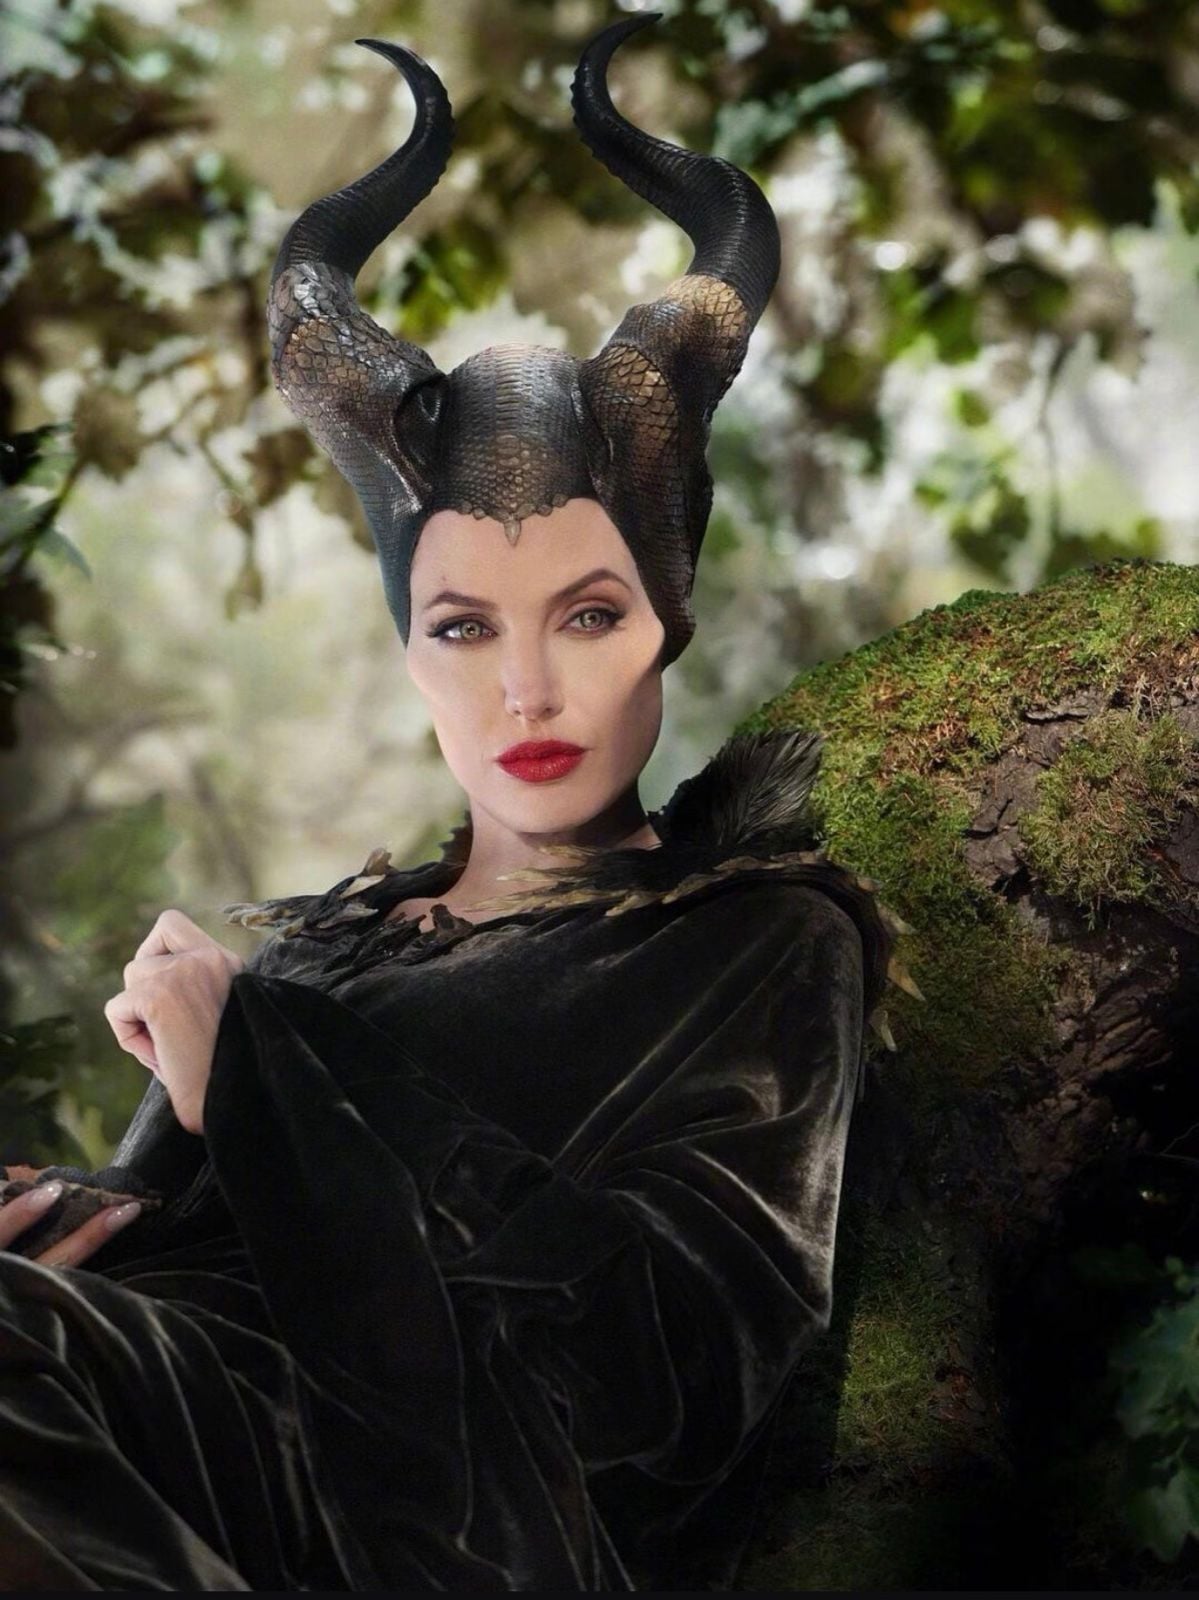 The reference face: a live-action dark fairy character portrait
Pass 1 produced a fashion-editorial four-panel grid, a "dark fairy queen reimagined in white" concept with four different couture looks and four different faces:
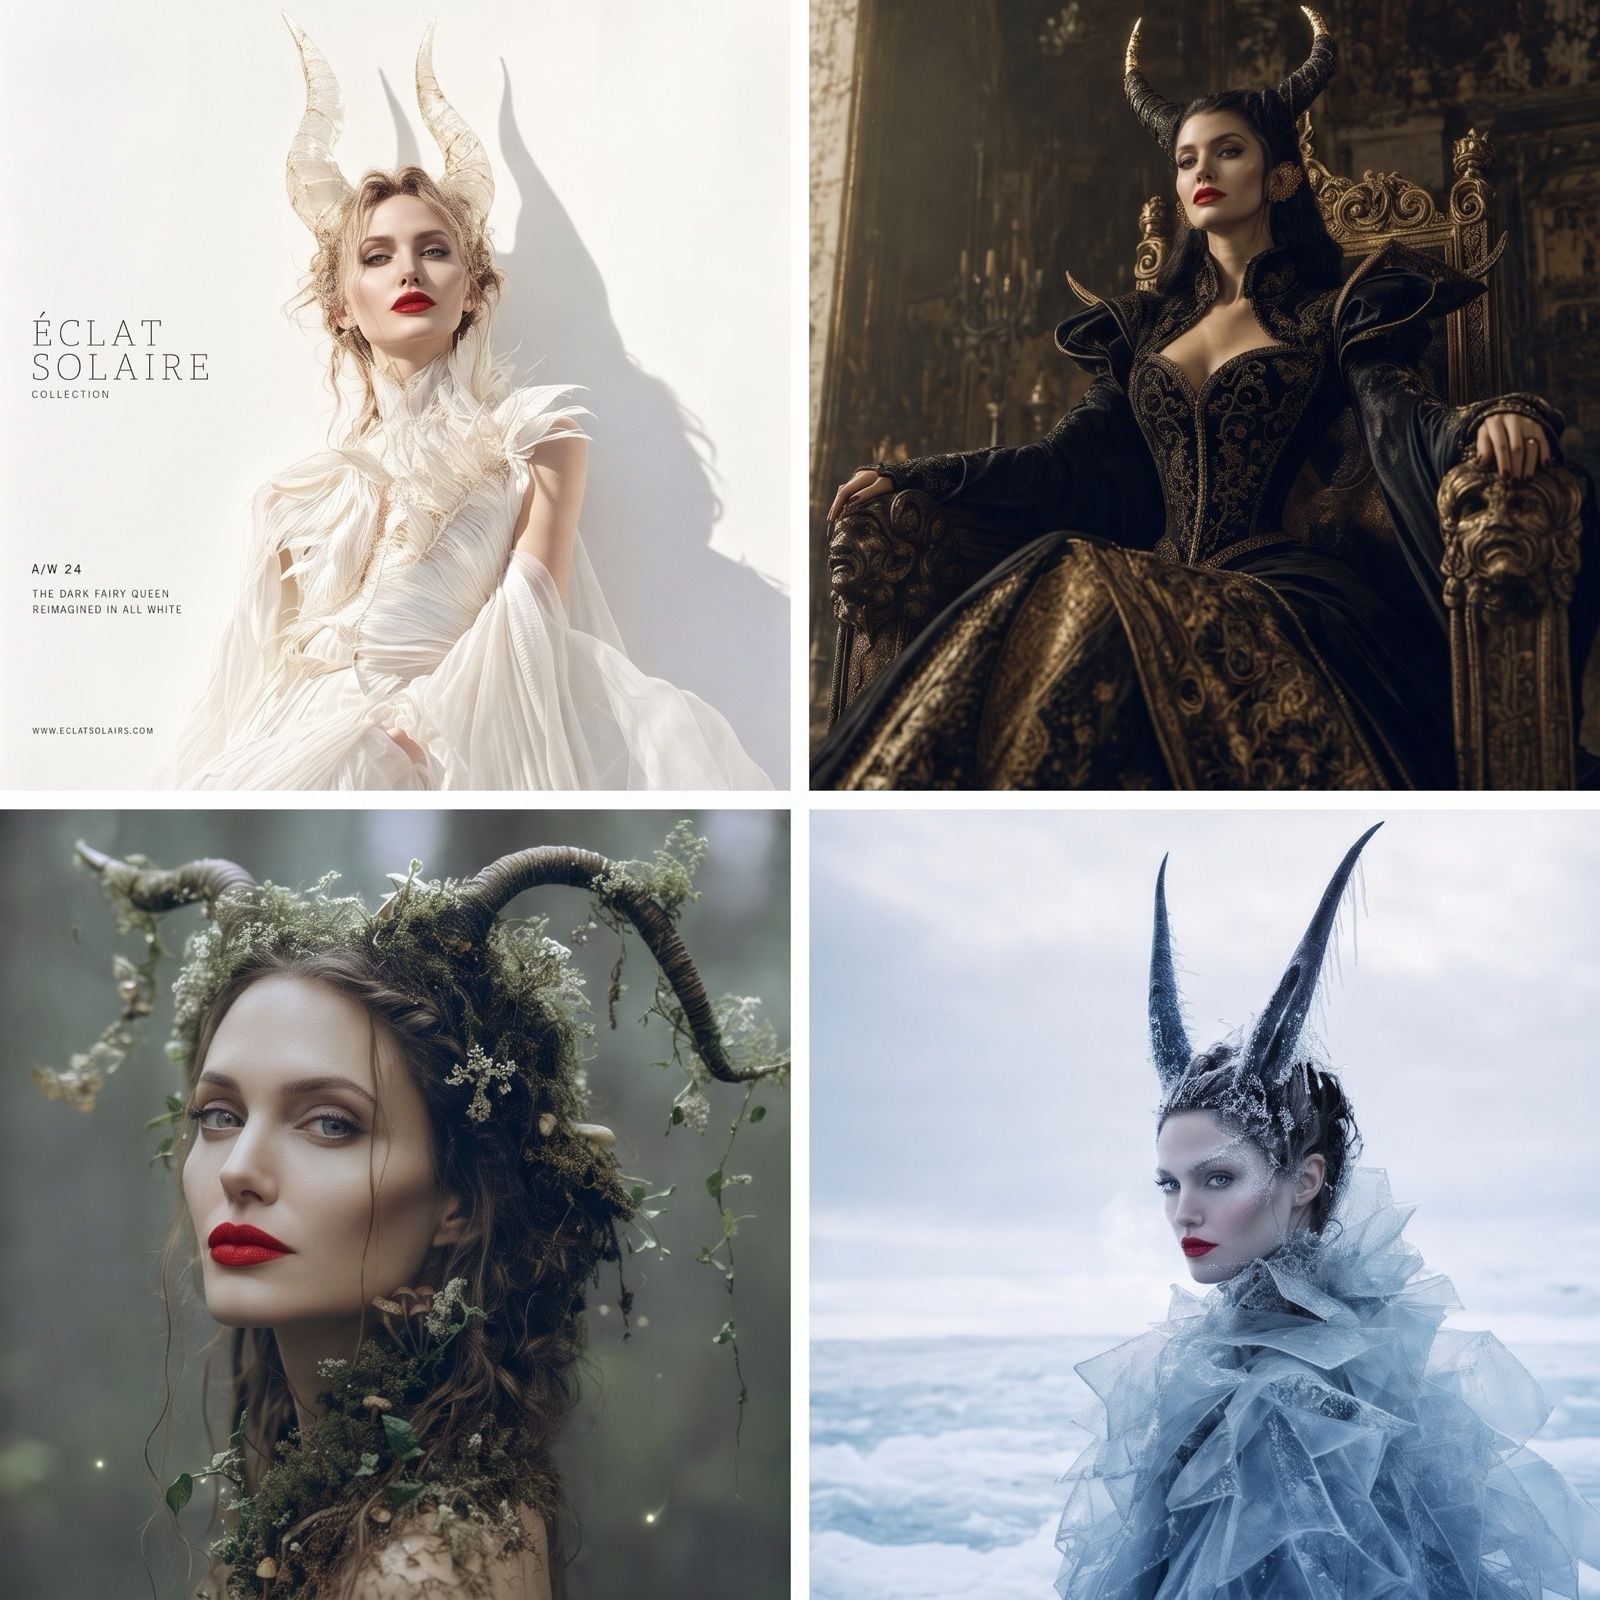 Pass 1 output: an editorial grid with four different model faces
After the swap pass, the same face carries all four looks:
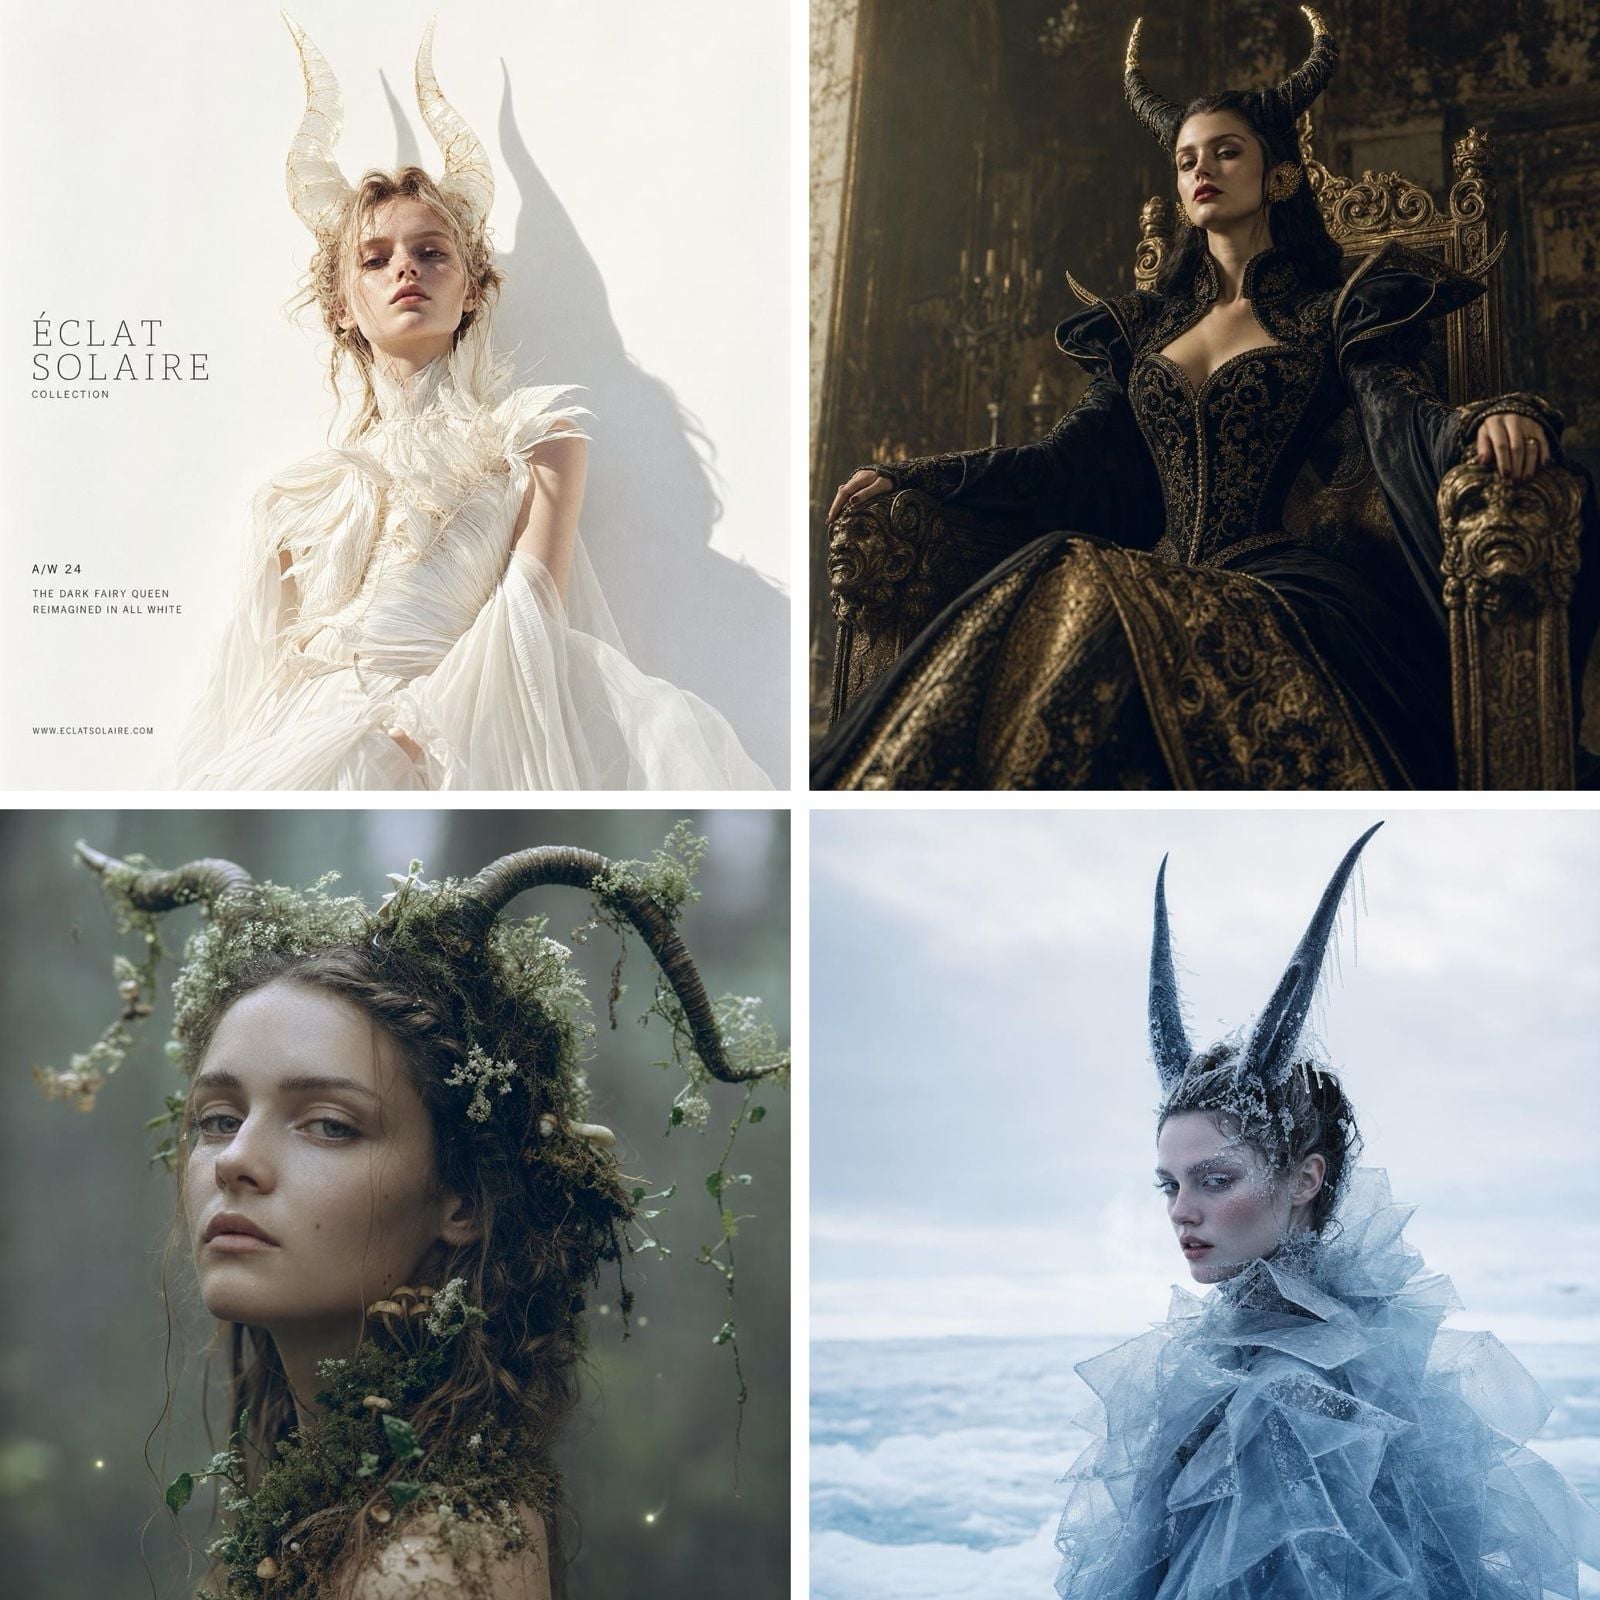 After pass 2: the same face carries all four looks
Two details worth stealing from this example. First, the grid format is doing real work: it forces the model to prove consistency four times in one image, which is exactly what a character sheet, a lookbook, or a set of matching profile pictures needs. Second, the editorial text and layout survived both passes untouched, because pass 2 was told to change nothing but the faces.
What a Full Disney Face Swap Project Costs
Here is the honest math for one finished four-panel poster, using the rates shown on the Atlas Cloud model pages as of July 2026:
| Item | Calls | Rate | Cost |
|---|---|---|---|
| Scene drafts (GPT Image 2, default settings) | 5 | $0.01 | $0.05 |
| Swap attempts (Nano Banana 2 Edit, 2K) | 3 | $0.12 | $0.36 |
| Total | about $0.41 |
Roughly forty cents, and that assumes you regenerate the swap three times to taste. Compare that with the subscription face swap apps this keyword usually surfaces, which typically gate decent resolution behind $10 to $30 monthly plans. Pay-per-image only wins if you swap occasionally, but that describes most people making birthday posters and profile pictures.
Two pricing footnotes worth knowing. Neither of these two models is running a discount as of July 2026, so what you see listed is what you pay. And if you want even cheaper swap iterations, the same catalog carries Nano Banana 2 Lite Edit at $0.04 per image, with a Developer variant currently discounted 30 percent, from $0.04 down to $0.028, also as of July 2026. The Lite tier is a reasonable drafting tool, though for final quality the demos here all used the full Nano Banana 2 Edit.
If a swap comes back with a mismatched face angle, don't re-roll blindly. The usual causes are fixable: a reference photo taken from a different angle than the target face, a reference with harsh shadows, or a base image where the face is too small in frame. A straight-on, evenly lit reference photo solves most failures on the first retry.
Is a Disney Face Swap Legal?
Short version: personal fan art is not where the legal fire is aimed, but Disney characters are still protected IP, and any commercial disney characters face swap is a genuinely bad idea.
The enforcement record is clear about who gets targeted. Disney and Universal sued Midjourney in June 2025, the first major-studio lawsuit against an AI company, calling it "a bottomless pit of plagiarism" and demanding copyright protections in the product itself (Georgetown Law, June 2025). A few months later, Character.AI removed Elsa, Mickey Mouse, and other Disney characters after receiving a cease-and-desist (TechCrunch, October 2025). Every documented action targets companies profiting from the characters, not individuals making posters of their dog.
That distinction suggests sensible ground rules rather than paranoia:
- Keep it personal. A family poster on your wall is a different world from selling prints on Etsy.
- Skip the logos and exact branding. The 2023 Bing controversy was partly about generated posters carrying the actual Disney logo.
- Only swap faces you have permission to use: yours, or someone who said yes. Swapping a celebrity or an ex into images without consent moves from copyright gray zone to genuine harm, and most platforms' terms prohibit it outright.
- Nothing explicit, ever. NSFW face swaps of real people are illegal in a growing number of jurisdictions, full stop.
None of this is legal advice, but the pattern is easy to follow: the style is the playground, the brand and other people's faces are the fence.
Frequently Asked Questions
Why does my disney face swap look pasted on?
Almost always lighting. The edit model replaced the face but re-lit it with neutral light that ignores the scene. Add "Strictly preserve the same lighting" to your edit prompt, and use a reference photo whose light direction roughly matches the target image.
Can I do a disney face swap in one model instead of two?
You can try, and for a single simple portrait it sometimes works. Multi-panel grids are where one-pass breaks down, because the model must invent your face four times and drifts each time. Separating scene design from the face edit is what makes results repeatable.
How many faces can I swap in one image?
Nano Banana 2 Edit accepts up to 14 reference images per call, so group scenes are workable. Name each swap explicitly in the prompt, for example "replace the woman on the left with reference 1, the man on the right with reference 2," and expect an extra retry or two compared with single-face swaps.
What reference photo works best for a disney face swap?
Front-facing, evenly lit, sharp, and with the face filling a good portion of the frame. Avoid sunglasses, heavy shadows, and extreme angles. One great photo beats five mediocre ones.
Is there a one-click disney face swap app?
Plenty exist, and a dedicated disney princess face swap app on your phone is the fastest route for a single quick selfie. The tradeoff is control. Most apps stamp a watermark, cap resolution behind a subscription, and still drift on identity because they run a single pass. If you search "face swap disney" hoping for instant magic, expect convenience over accuracy. The two-pass workflow here takes a few more minutes but hands you the scene, the resolution, and the likeness a phone app usually will not.
Is it legal to sell disney face swap images?
Selling images built on recognizable studio-owned characters invites exactly the enforcement described above, and print-on-demand platforms routinely take such listings down. Keep character-based swaps personal. If you want sellable work, design original characters in pass 1 instead.





