Image generator APIs are definitely not all the same. It pays to check them out before you start building. Here is a quick look at the six popular APIs available right now. This simple comparison will help you grab the right one for your own tech setup and save you some time.
| Model | Est. Speed | Cost / image | Best Use Case |
| GPT Image 2 | ~8–10s | $0.01 | Text rendering & complex layouts |
| Grok-3 Image | ~6–9s | ~$0.02-0.07 | Unfiltered creativity & Social trends |
| Flux | ~5–8s | ~$0.003-0.03 | Cinematic photorealism |
| Seedream v5.0 (Lite) | ~3–5s | ~$0.032 | High-volume content at scale |
| Nano Banana Pro | ~1–3s | ~$0.14-0.15 | Ultra-fast previews & batch tasks |
| Ideogram v3 | ~8–12s | ~$0.03-0.06 | Industry-leading typography |
Note: Speed figures are based on empirical production testing; prices are based on Atlas Cloud (except for Grok and Ideogram v3).
Key takeaway: Every task has a best model, thus there isn't only one. Before you write a single line of integration code, match the API to your output needs.
Phase 1: Choosing Your Engine — Intent Match
Picking an image generator API without considering your specific output type is like buying a sports car to tow a boat. Focus on the task, not just the engine. Your choice should hinge on three main points: how well it handles text in visuals, the balance between quick drafts and high quality, and the specific way the company charges you.
The "Text-in-Image" Problem
Most image APIs still stumble when the prompt contains readable text — think UI mockup labels, logo copy, or poster headlines. Letters blur, words jumble, and the result is unusable in any commercial context.
Ideogram v3 renders text with accuracy above 95% for standard prompts, while Midjourney still fails on multi-word strings roughly 40% of the time. Ideogram v3 reliably handles long strings, brand names, and complex layouts — making it the clear pick for any workflow involving signage, product packaging, or embedded copy.
If typography is not a priority, this constraint won't affect you. But if it is, choosing the wrong API here costs you more in post-production corrections than any subscription savings.
Photorealism vs. Speed: Matching Model to Moment
Not every generation needs studio-grade quality. The table below maps use case to the right model tier:
| Use Case | Recommended Tier | Example Models |
| Hero marketing visuals | High-fidelity | Flux 2 Pro, Imagen 4 Ultra |
| Real-time user-facing generation | Turbo / Lightning | Nano Banana 2, Z-Image Turbo (~1s) |
| Social media & content at scale | Mid-range | Seedream v5.0 Lite, Flux 2 Dev |
| Text-heavy design assets | Specialist | Ideogram v3, GPT Image 2 |
Flux 2 leads in photorealism and prompt adherence, while Imagen 4 dominates text rendering accuracy and generation speed. Speed-first models sacrifice some fidelity but are the only viable option when latency is part of the product experience.
Pricing Reality Check: It's No Longer Per-Image
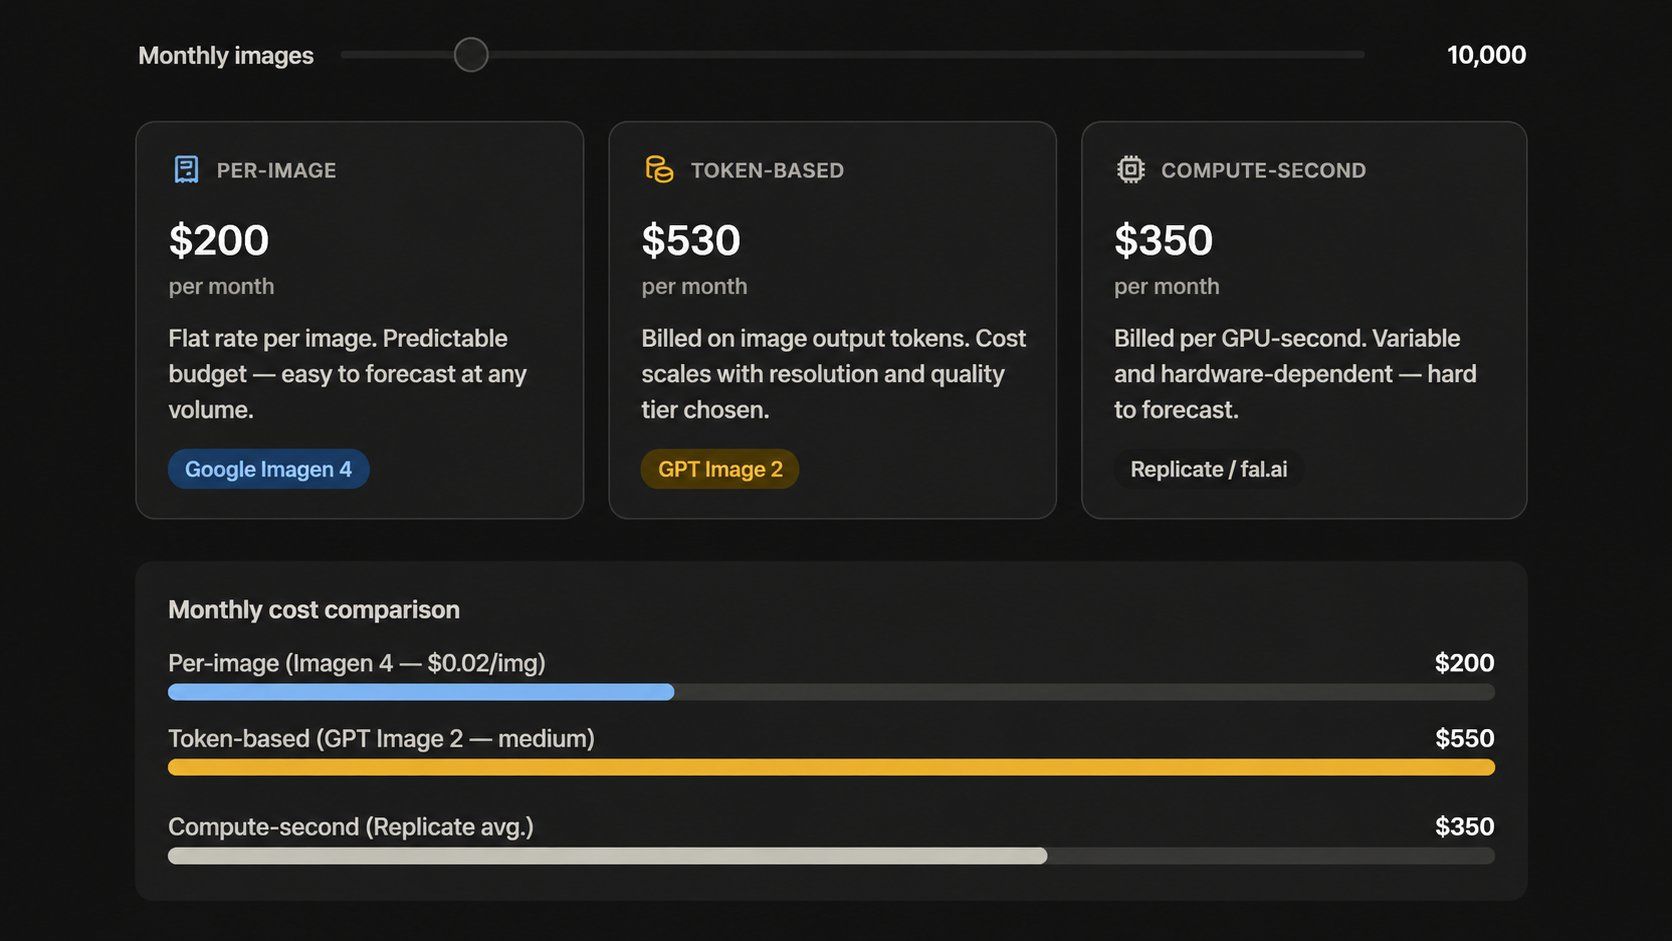
The "flat rate per image" model is fading. Today's leading APIs bill very differently from each other:
- Token-based (OpenAI):GPT Image 2 bills at $8.00 for every million input tokens and $30.00 for a million output tokens through the API. Web estimates usually vary because they aren't the official list prices.
- Per-image (Google Imagen): Google Imagen 4 costs between $0.02 and $0.06 for each picture. This model makes it much easier to plan a budget for high-volume projects.
- Per-second (Replicate): Replicate bills for the actual GPU time used per task. This works well for changing workloads, though it makes it tougher to predict your total monthly costs.
A team might thinks it's paying $0.05 per image but find the real cost is $0.11. This happens because of extra charges for resolution, quality levels, and edits. Always test your monthly workload in each company's pricing tool before you sign any contracts.
Phase 2: Technical Integration — The "Today" Factor
You can get your first image from an API in under 15 minutes. The basic setup is quite simple. Most developers only struggle with login permissions or managing the final data. Here's what to do, in order.
Environment Setup
Install the official SDK for your language of choice. Both options below give you everything needed for a standard image generation request.
Python
plaintext1pip install openai
Node.js
plaintext1npm install openai
Basic text-to-image generation doesn't require any other dependencies. If you want to work with binary data or save files, the tools are built in. Python uses the base64 module and Node uses the Buffer class. Both work right out of the box without any new installs.
The Authentication Standard: Beyond Bare API Keys
Pasting a raw API key directly into application code remains one of the most common — and avoidable — security mistakes. For any production deployment in 2026, follow these practices:
| Why It Matters | Practice |
| Keeps secrets out of source control | Store keys in environment variables |
| Centralizes rotation and access auditing | Use a secrets manager (AWS Secrets Manager, HashiCorp Vault) |
| Limits blast radius if a key is leaked | Scope keys to minimum required permissions |
| Reduces exposure window from undetected leaks | Rotate keys on a fixed schedule |
| Required when acting on behalf of end users, not just your own backend | Use OAuth2 for user-delegated flows |
OAuth2 becomes relevant specifically when your app generates images on behalf of individual users with their own provider accounts. For server-to-server calls using your own API key, a well-managed environment variable with regular rotation covers the majority of production use cases securely.
The Boilerplate Code
The following is a clean, working request to OpenAI's gpt-image-2 endpoint — copy-pasteable for both Python and Node.js.
Python
plaintext1import os 2import base64 3from openai import OpenAI 4 5client = OpenAI(api_key=os.environ["OPENAI_API_KEY"]) 6 7response = client.images.generate( 8 model="gpt-image-2", 9 prompt="A clean product shot of a ceramic coffee mug on a white marble surface, studio lighting", 10 size="1024x1024", 11 quality="medium", 12 n=1, 13) 14 15# Decode and save the image 16image_bytes = base64.b64decode(response.data[0].b64_json) 17with open("output.png", "wb") as f: 18 f.write(image_bytes) 19 20print("Image saved to output.png")
Node.js
plaintext1import OpenAI from "openai"; 2import fs from "fs"; 3 4const client = new OpenAI({ apiKey: process.env.OPENAI_API_KEY }); 5 6const response = await client.images.generate({ 7 model: "gpt-image-2", 8 prompt: "A clean product shot of a ceramic coffee mug on a white marble surface, studio lighting", 9 size: "1024x1024", 10 quality: "medium", 11 n: 1, 12}); 13 14// Decode and save the image 15const imageBuffer = Buffer.from(response.data[0].b64_json, "base64"); 16fs.writeFileSync("output.png", imageBuffer); 17 18console.log("Image saved to output.png");
Both code parts pull your API key from your system settings. They request for a standard 1024×1024 image and save the final file to your computer. When you are just testing things out, switch the quality setting to "low." This keeps your cost around $0.006 for each try while you work on getting your prompts right.
Phase 3: Solving 2026 Developer Pain Points
Getting the API working is only half the job. What separates a prototype from a production feature is how you handle weak prompts, unsafe inputs, and slow generation times. These three areas account for the majority of post-launch fixes teams face after integrating an image generator API.
Prompt Engineering vs. Prompt Enhancement
Users type short, vague inputs. APIs reward rich, detailed ones. The gap between the two directly affects output quality — and blaming the model often just masks a weak prompt.
Two approaches close that gap:
Native "Magic Prompt" features — Ideogram's API offers a built-in prompt enhancement toggle that rewrites simple inputs before generating. Pass magic_prompt_option: "ON" in your request and the API handles enrichment automatically. This is the lowest-effort approach and works well for consumer-facing apps where users shouldn't need to learn prompt syntax.
LLM gateway pattern — route the raw user input through an LLM call first, then pass the enriched result to the image API. This gives you precise control over the enhancement logic and works across any provider.
plaintext1from openai import OpenAI 2client = OpenAI() 3 4# Step 1: Enhance the prompt 5enhancement = client.chat.completions.create( 6 model="gpt-4.1-mini", 7 messages=[{ 8 "role": "user", 9 "content": f"Rewrite this image prompt with cinematic detail, lighting, and style: '{user_input}'" 10 }] 11) 12enhanced_prompt = enhancement.choices[0].message.content 13 14# Step 2: Generate the image 15image = client.images.generate( 16 model="gpt-image-2", 17 prompt=enhanced_prompt, 18 size="1024x1024", 19 quality="medium" 20)
The Safety Layer: Automated Content Moderation
Allowing users to generate arbitrary images without a moderation step is a liability. At minimum, implement two checkpoints:
| Layer | What It Catches | Tool |
| Input screening | Harmful text prompts before the API call | OpenAI Moderation API (free), Azure Content Safety |
| Output screening | Policy-violating images after generation | Google Cloud Vision SafeSearch, AWS Rekognition |
Most major image API providers also enforce their own server-side filters, but these should be treated as a last line of defense, not your only one. Build your own input-screening step so you can reject requests before spending generation credits on content that will be blocked anyway.
Asynchronous Handling: Use Webhooks, Not Polling
High-fidelity image generation can take 5–20 seconds. Making a user stare at a spinner during a synchronous request is both poor UX and a fragile architecture — if the connection drops mid-wait, the result is lost.
The right pattern is a webhook-driven async flow:
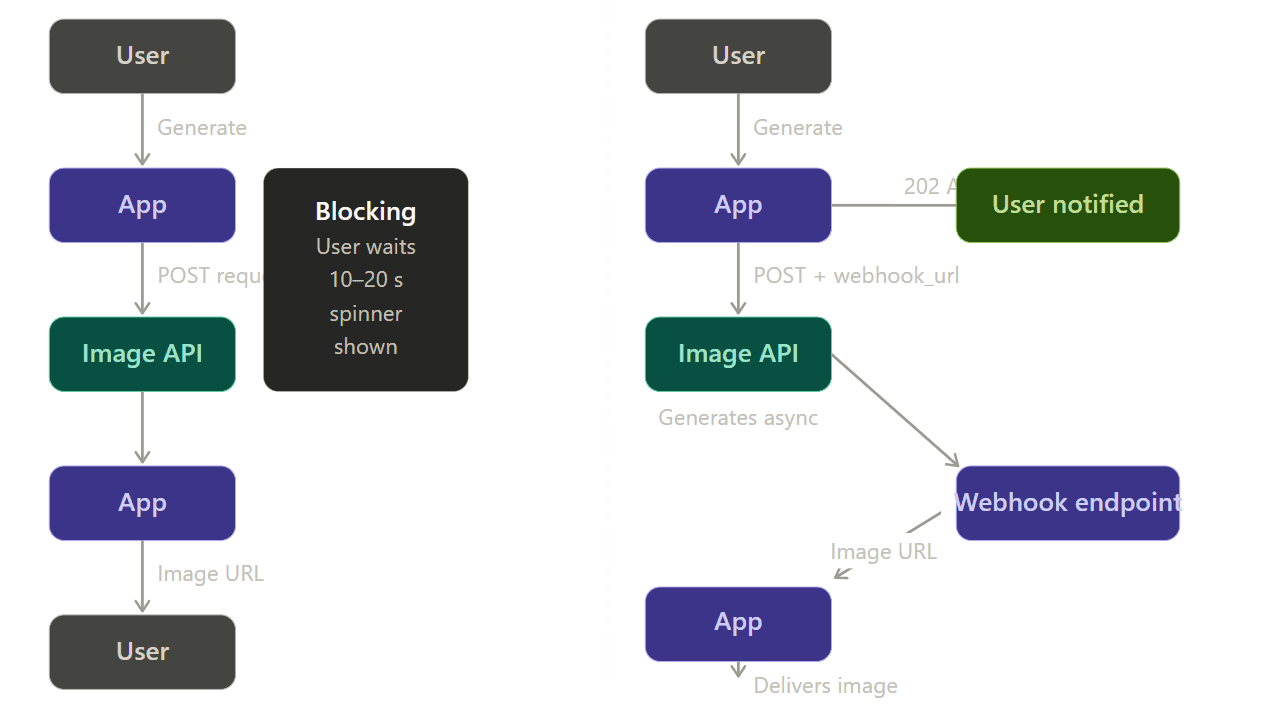
Your app gives the user with a job ID and a 202 Accepted status when it uses a webhook pattern. When the image service is finished, it sends the final file to your server while working in the background. This stops timed-out connections and lost data. On your site, just run a quick check against your own database to see if the job is done. You could also use a WebSocket to send the update instantly. Both ways are much safer than hoping a single web connection stays open for 15 seconds.
Advanced Optimization: Brand Consistency — The "Moat"
Any developer can wire up a basic text-to-image call in an afternoon. What competitors can't easily replicate is a visual system that produces images specific to your brand every time. LoRA customization and image-editing endpoints are where the image generator API goes from a commodity feature to a genuine product differentiator.
LoRA Integration: Teaching the API Your Style
LoRA is a clever way to tweak an AI model without starting over. You just train a tiny layer that sits on top of the main engine. This creates a small .safetensors file you can use with your image requests. It helps you keep a steady look every time. Use it to stick to your brand's specific art style, product vibes, or unique visual themes.
How the workflow looks in practice (Atlas Cloud + Flux):
Step 1 — Train the LoRA
plaintext1import { atlas } from "@atlas-cloud/sdk"; 2 3// Atlas Cloud leverages H100 clusters for rapid fine-tuning 4const training = await atlas.models.train({ 5 type: "lora", 6 base_model: "flux-dev", 7 dataset_url: "https://your-storage.com/brand-set.zip", 8 trigger_word: "brandstyle", 9 config: { 10 rank: 16, 11 learning_rate: 0.0001, 12 max_steps: 1200 13 } 14}); 15 16const loraId = training.id; // Use this ID in your generation calls
Step 2 — Generate with your Custom Style
plaintext1const generateResponse = await fetch("https://api.atlascloud.ai/api/v1/model/generateImage", { 2 method: "POST", 3 headers: { 4 "Authorization": `Bearer ${process.env.ATLAS_API_KEY}`, 5 "Content-Type": "application/json" 6 }, 7 body: JSON.stringify({ 8 model: "black-forest-labs/flux-dev-lora", // Specialized LoRA endpoint 9 prompt: "A product shot of a ceramic mug, brandstyle, studio lighting", 10 loras: [ 11 { 12 // Supports: <owner>/<model-name> (Hugging Face) or a direct HTTPS URL 13 path: "https://api.atlascloud.ai/weights/user-123/brandstyle.safetensors", 14 scale: 0.85 // The "influence" knob (0.0 to 1.5) 15 } 16 ], 17 size: "1024x1024", 18 num_inference_steps: 30, // Optimized for Flux-Dev 19 output_format: "png" 20 }) 21}); 22 23const { id: predictionId } = await generateResponse.json();
Training costs $2 per run (scaling linearly with steps), and trained LoRAs deploy immediately to generation endpoints with no additional infrastructure setup required.
Key parameters to tune:
| Parameter | Recommended Range | Effect |
| scale | 0.5 – 1.5 | Controls how strongly the style overrides the base model |
| steps | 800 – 1500 | More steps = stronger style capture, but risks overfitting |
| Training images | 15 – 30 images | Quality matters more than quantity — inconsistent examples produce inconsistent outputs. |
Image-to-Image and Inpainting: Editing, Not Just Generating
Moving from pure text-to-image to image-to-image capabilities unlocks an entirely different category of user features — letting people modify existing photos rather than generating from scratch.
The images.edit endpoint on GPT Image 2 accepts one or more reference images plus a prompt, and supports masked inpainting and outpainting — unmasked regions are preserved while the model applies changes only to the specified area.
Common use cases this unlocks for your app:
- Background replacement — swap product photo backgrounds at scale without a photo studio
- Object removal — let users clean up unwanted elements from uploaded images
- Outpainting — extend the canvas of an existing image to fit new aspect ratios
plaintext1import openai, base64, pathlib 2 3client = openai.OpenAI() 4 5image_bytes = pathlib.Path("product.png").read_bytes() 6mask_bytes = pathlib.Path("background-mask.png").read_bytes() 7 8result = client.images.edit( 9 model="gpt-image-2", 10 image=image_bytes, 11 mask=mask_bytes, 12 prompt="Replace the background with a clean white studio backdrop", 13 size="1024x1024", 14 quality="medium" 15) 16 17output = base64.b64decode(result.data[0].b64_json) 18pathlib.Path("edited.png").write_bytes(output)
The mask image is a grayscale PNG where white pixels indicate regions the model is free to regenerate and black pixels mark areas to preserve exactly. No separate inpainting pipeline is needed — the edit endpoint handles it in a single call.
Conclusion & Next Steps
Every section of this guide has pointed toward the same underlying truth: integrating an image generator API is no longer a research project — it's a routine engineering task. The tooling is mature, the documentation is solid, and the pricing has dropped to a point where even early-stage products can absorb generation costs without rounding errors becoming real problems. Ready to build? Start your first integration with the OpenAI GPT Image 2 API.
FAQ
Can I use AI-generated images for commercial products?
Yes—but you must understand the difference between owning a file and holding a copyright. OpenAI gives you total rights to your results for things like ads, products, and sales. In the real world, this means you can use the art for profit, but you cannot stop a rival from using the same image. To protect your brand, you should add your own human touch. Try editing the work, changing the layout, or using custom settings. These steps help you create a unique look for your business even if you do not have a legal copyright.
How do I handle "hallucinations" in text-heavy images?
Use a model built specifically for text rendering. Ideogram v3 renders text with accuracy above 95% for standard prompts, while general-purpose models still fail on multi-word strings at significant rates. For GPT Image 2, place any text that must appear exactly as written inside quotation marks within your prompt, and add an explicit instruction that it should appear once and only as written — this significantly reduces duplication and misspelling artifacts.
What is the cheapest way to scale to 10,000 users?
Route by task rather than committing to a single provider. A practical tiered approach:
| Volume / Use Case | Recommended Model | Estimated Cost |
| Drafts & previews | GPT Image 2 | ~$0.01 / image |
| Standard social & marketing | Seedream v5.0 Lite | ~$0.032 / image |
| High-fidelity hero assets | Flux or Imagen 4 Ultra | ~$0.003–$0.06 / image |
| Real-time / high-throughput | Z-Image Turbo | ~$0.01 / image |
Note: The prices are based on Atlas Cloud.
For high-volume developers, the pricing gap between the cheapest and most expensive options reaches a 33x spread — choosing the right API for each task type can save thousands of dollars monthly. Combine this routing strategy with async webhook handling and quality-tier selection based on the output's destination and cost scales predictably with your user base.


