API 호출 및 클라이언트 설정
Coding Plan API Key를 API에서 직접 호출하거나 Claude Code, OpenClaw, Cursor, Codex 등 주요 코딩 클라이언트에 연동하세요.
API 직접 호출
Coding Plan은 일반 Atlas Cloud API 키와 별도로 전용 API 키를 사용합니다.
- Base URL:
https://api.atlascloud.ai/v1 - API Key: 요금제 관리 → API 키 발급 에서 생성합니다.

요청 및 응답 형식은 OpenAI 호환 규격을 따릅니다. 전체 예제는 Model APIs 문서를 참고하세요.
클라이언트 설정
대부분의 코딩 도구(OpenClaw, Hermes, OpenCode, Cursor, Copilot 등)는 OpenAI 호환 엔드포인트를 사용합니다. Base URL:
https://api.atlascloud.ai/v1Claude Code는 Anthropic Messages 프로토콜을 사용하며 Base URL은 다음과 같습니다.
https://api.atlascloud.ai아래에 주요 도구별 설정 방법을 안내합니다.
Claude Code
환경 변수 설정
중요: 아래의
ANTHROPIC_AUTH_TOKEN을 Atlas Cloud 콘솔에서 발급받은 실제 API 키로 교체하세요.
설정 파일 위치:
- Windows:
%USERPROFILE%\.claude\settings.json - macOS / Linux:
~/.claude/settings.json
settings.json을 다음과 같이 수정하고 API 키와 모델 ID를 교체합니다.
{
  "env": {
    "ANTHROPIC_AUTH_TOKEN": "atlas-api-key",
    "ANTHROPIC_BASE_URL": "https://api.atlascloud.ai",
    "ANTHROPIC_MODEL": "zai-org/glm-5.1",
    "ANTHROPIC_DEFAULT_HAIKU_MODEL": "zai-org/glm-5.1",
    "ANTHROPIC_DEFAULT_SONNET_MODEL": "zai-org/glm-5.1",
    "CLAUDE_CODE_DISABLE_EXPERIMENTAL_BETAS": "1"
  }
}
OpenClaw
1. OpenClaw 온보딩 마법사
설치 후 터미널(SSH / CMD / Terminal)에서 다음 명령으로 설정 마법사를 실행합니다.
openclaw onboardYes → QuickStart → Custom Provider 순으로 선택한 뒤:

- API Base URL 입력:
https://api.atlascloud.ai/v1 - Atlas Cloud API 키 붙여넣기.
- 모델 ID 붙여넣기. 프로토콜은 OpenAI-compatible 선택.
- 연결 검증.
Verification successful이 표시되면 성공. - Endpoint ID와 표시 이름을 원하는 대로 설정.
2. 또는 설정 파일을 직접 편집
- macOS / Linux:
~/.claude/settings.json
{
  "baseUrl": "https://api.atlascloud.ai/v1",
  "apiKey": "your-atlas-key",
  "api": "openai-completions",
  "models": [
    {
      "id": "zai-org/glm-5.1",
      "name": "zai-org/glm-5.1",
      "contextWindow": 200000,
      "input": ["text"]
    }
  ]
}
Hermes
Hermes에서 사용자 지정 OpenAI 호환 Provider를 추가해 Atlas Cloud를 연결합니다:
-
Provider 목록에서 Custom endpoint (enter URL manually) 를 선택합니다.
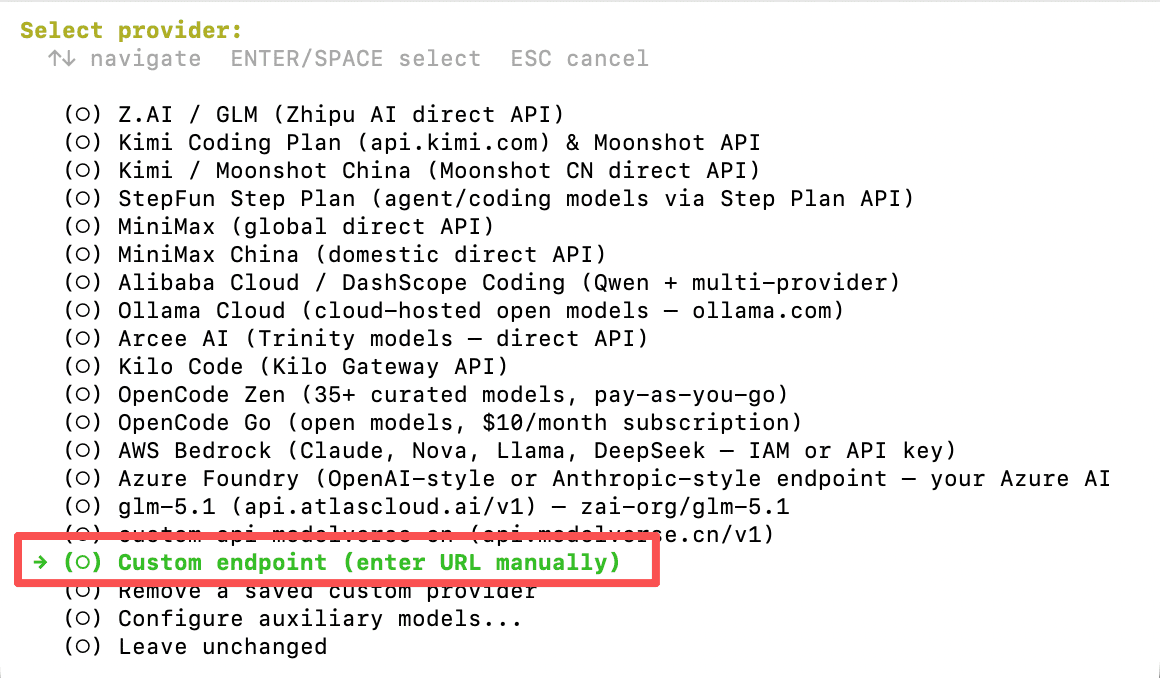
-
API base URL 에
https://api.atlascloud.ai/v1을 입력하고 API key 에 Coding Plan API Key를 붙여 넣으세요. 엔드포인트가 검증되면 사용 가능한 모델 목록이 나타납니다: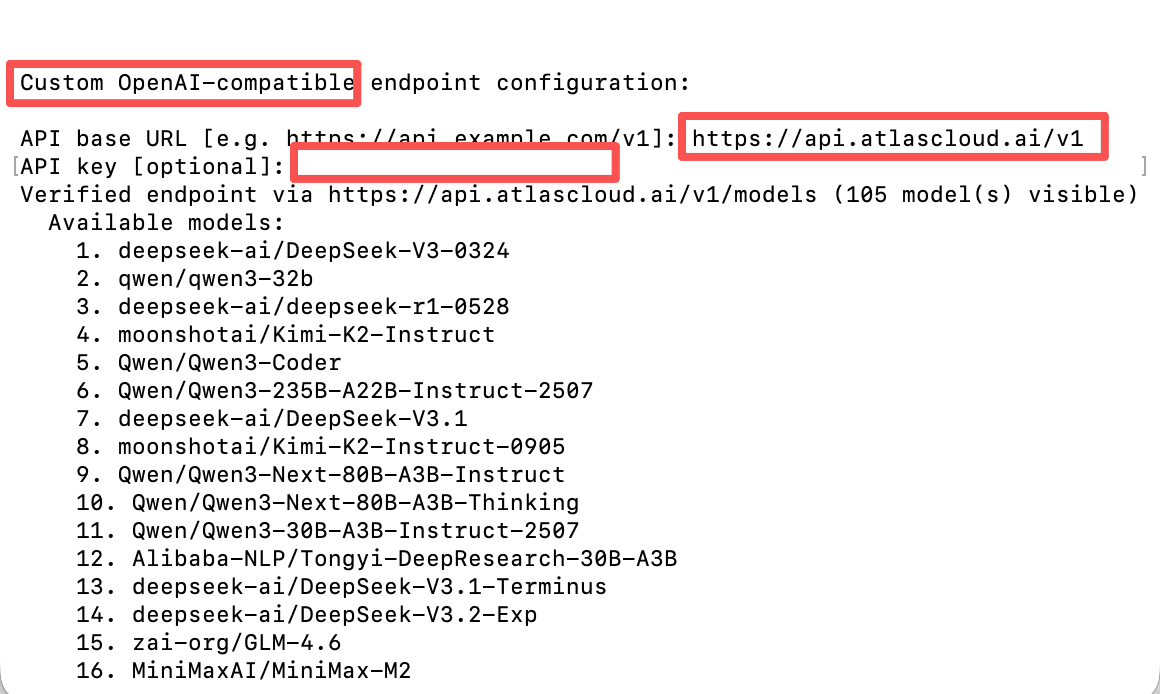
Trae
Trae에서 OpenAI 호환 커스텀 프로바이더를 추가하고 Atlas Cloud의 Base URL과 Coding Plan API 키를 입력합니다.

Cursor
Cursor → Settings → Models에서 OpenAI 호환 커스텀 모델을 추가하고 Base URL을 https://api.atlascloud.ai/v1로 설정합니다.

OpenCode
OpenCode 설정 파일 opencode.json을 엽니다.
- Linux:
~/.config/opencode/opencode.json - Windows:
%USERPROFILE%\.config\opencode\opencode.json
프로바이더 설정
{
  "$schema": "https://opencode.ai/config.json",
  "provider": {
    "atlascloud": {
      "npm": "@ai-sdk/openai-compatible",
      "name": "atlascloud",
      "options": {
        "baseURL": "https://api.atlascloud.ai/v1",
        "apiKey": "your-atlas-api-key"
      },
      "models": {
        "zai-org/glm-5.1": {
          "name": "glm-5.1"
        }
      }
    }
  }
}
Codex
1. 모델 프로바이더 등록
macOS / Linux에서 ~/.codex/config.toml을 생성·편집합니다.
model_provider = "atlas_coding_plan"
model = "zai-org/glm-5.1"

[model_providers.atlas_coding_plan]
name = "atlascloud"
base_url = "https://api.atlascloud.ai/v1"
wire_api = "chat"
requires_openai_auth = true
2. API 키 설정
~/.codex/auth.json을 생성·편집합니다.
{
  "OPENAI_API_KEY": "atlas-api-key"
}
atlas-api-key를 Atlas Cloud 콘솔에서 발급받은 실제 API 키로 교체하세요.
3. Codex 실행
codex업데이트 안내를 건너뛰면 바로 사용할 수 있습니다.
