使用DeepSeek Harness只需一個指令。三十秒後,你就在http://127.0.0.1:3080看到一個美麗但完全空白的介面,而且沒人告訴你下一步該做什麼。
README以內容稀少聞名。它所連結的Cordis論文談的是時空組合性(spatiotemporal composability)。而你只是想要它讀懂你的程式碼。
這份指南從那個空白畫面開始。沒錯,你會得到安裝指令,但真正花掉你一個下午的,是串接模型提供者這一步,而這一步中有三個預設值會悄悄破壞DeepSeek模型,並浪費你75%的上下文視窗。幾乎沒有人記錄這些。
重點摘要
npx @deepseek-ai/dsh web就是完整的安裝指令。唯一前提是Node.js版本需為^22.19.0或>=24.0.0。- DeepSeek Harness 是一個工具架(harness),不是模型。它不附帶任何憑證,因此除非你連接提供者,否則它什麼事也做不了。
- 任何與OpenAI相容的端點都能使用,包括DeepSeek官方API、閘道器(gateway),或是本機的Ollama伺服器。
- 當你新增自訂提供者時,Harness會根據你的基礎URL猜測思考方言(thinking dialect)。如果猜錯,
reasoning_content就會出錯。 - 手動宣告的模型預設使用262,144的上下文視窗,因此V4完整的1,048,576視窗會一直關閉,直到你另行指定。
終端機顯示綠色通過的測試,旁邊是發光的模組化工具架,說明如何安裝DeepSeek Harness。
你正在建構的內容,60秒版本
以下是在講任何理論之前的成果。一個空資料夾中有三個檔案,貼上一個提示詞,然後代理程式就會讀取程式碼、執行pytest、觀察兩個測試失敗、變更一個字元、然後重新執行直到測試套件全部通過。
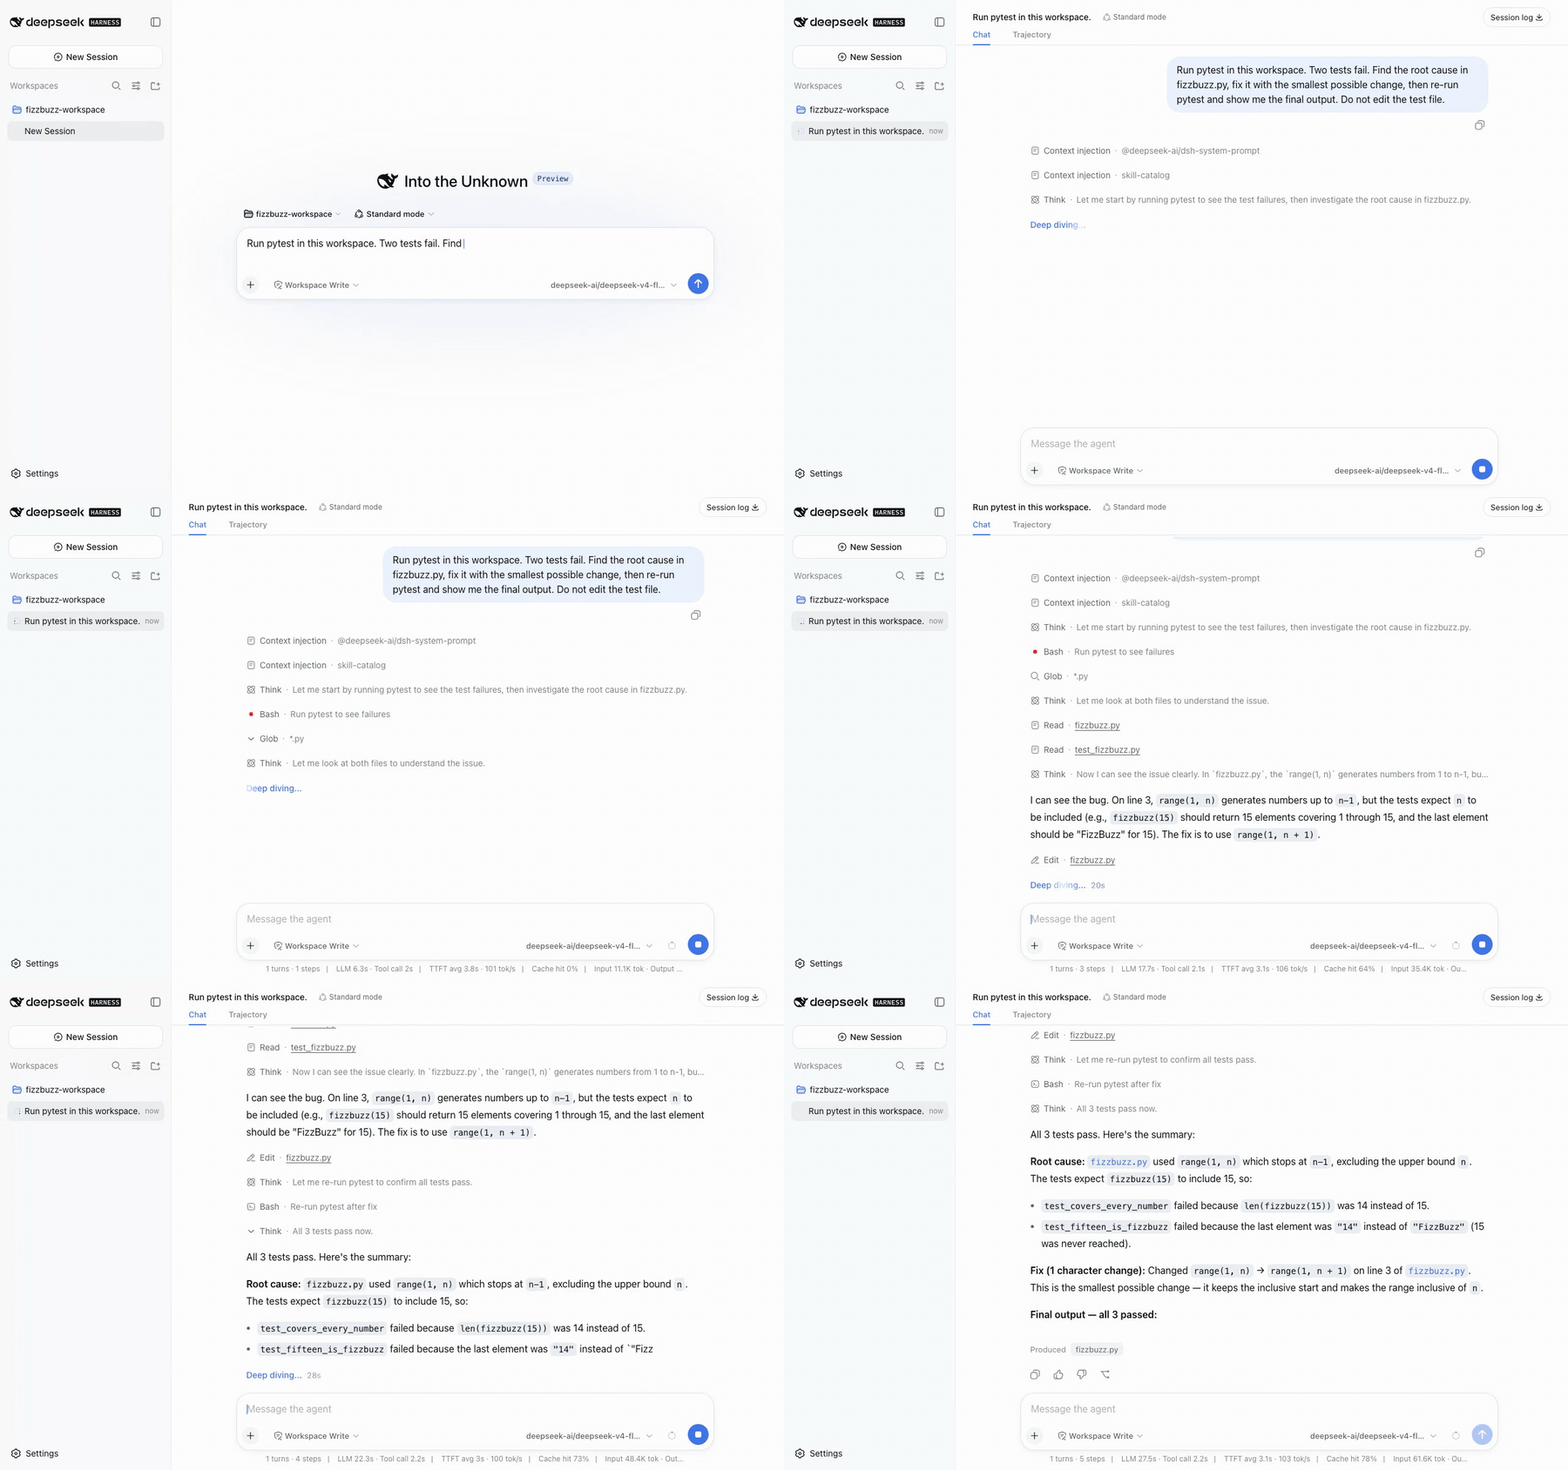
DeepSeek Harness 讀取 fizzbuzz.py、執行 pytest、修正差一錯誤並重新執行直到 3 個測試通過
完整循環:讀取、執行、診斷、修補、重新執行。每個步驟都會記錄在只能附加的(append-only)工作階段日誌中,你可以稍後重播。
這就是我們將在步驟 6 一起建立的示範。它刻意設計得夠小,可以在暫存目錄中重現,而且不依賴任何可能在下週變動的外部儲存庫。
為何大多數安裝 DeepSeek Harness 的嘗試都在第二步卡住
安裝本身確實微不足道。卡住發生在安裝之後,而這是一個設計決策,不是錯誤:DeepSeek Harness 不附帶任何金鑰、沒有預設提供者、也沒有捆綁模型。
DeepSeek 於 2026 年 8 月 13 日以 MIT 授權開源了這個專案,然後它就爆紅了。截至 2026 年 8 月 17 日,該儲存庫擁有 144,361 顆星和 14,689 個分支(GitHub,2026 年 8 月),這表示在同一週有非常多人看到了相同的空白畫面。
上線當週的 Hacker News 討論串捕捉到了兩極化的反應。人們喜歡它的透明度:模型看到的一切都記錄在只能附加的工作階段日誌中,一位評論者指出「美國的模型不會讓你看見這些」。抱怨也同樣一致。一位開發者寫道:「README 除了安裝說明之外幾乎是空的」,而 Cordis 論文則被評為像「字詞沙拉」(word salad)(Hacker News,2026 年 8 月)。
因此,實際阻礙人們的四件事都發生在安裝之後:
- Node 版本太舊,導致
npx在啟動前就失敗。 - 連接埠 3080 已被其他開發伺服器佔用。
- 自訂提供者回傳 401,或模型列表回傳空白。
- 模型連線成功,但推理輸出異常,或長檔案過早超出上下文視窗。
以下步驟 1 到 5 正是為了解決這四點。
在安裝 DeepSeek Harness 之前:挑選模型和金鑰
先回答:工具架本身是免費且本機的,但除非你提供一個 OpenAI 相容的基礎 URL、一個金鑰,以及至少一個模型 ID,否則它不會做任何有用的事。在安裝之前決定好這些,整個設定只需十分鐘。
所有操作都在瀏覽器分頁 127.0.0.1:3080 中進行。你有三條路線可選,三者都有效。
表 B:目前可與 DeepSeek Harness 搭配使用的模型存取選項
| 路線 | 基礎 URL | 每百萬 Token 價格 | 上下文 | 付款方式 | 最適合 |
|---|---|---|---|---|---|
| DeepSeek 官方 API | https://api.deepseek.com | V4-Flash 離峰時段輸入 $0.22 / 輸出 $0.66,尖峰時段輸入 $0.44 / 輸出 $1.32。快取命中從 $0.007 起 | 1M | 依地區而異 | 第一方行為、極便宜的快取命中 |
| OpenAI 相容閘道器(例如:Atlas Cloud) | https://api.atlascloud.ai/v1 | V4-Flash 輸入 $0.14 / 輸出 $0.28。V4-Pro 輸入 $1.68 / 輸出 $3.38 | 1,048,576 | 信用卡,無最低消費 | 固定費率,無尖峰時段附加費 |
| 本機 Ollama | http://localhost:11434/v1 | 無 Token 成本 | 視模型而定 | 無 | 私有程式碼、離線工作 |
在選擇之前有兩件事值得知道。DeepSeek 的第一方 API 已改為尖峰與離峰計費,尖峰時段為 UTC 時間 01:00 到 04:00 以及 06:00 到 10:00,離峰時段價格正好是尖峰時段的一半(DeepSeek API 文件,2026 年 8 月)。其快取命中的輸入價格極低,因此反覆讀取相同上下文的工作負載,在第一方 API 上可以非常便宜。
閘道器則以可預測性交換了這一點。Atlas Cloud 以固定費率(無尖峰附加費、無需訂閱)提供相同的 DeepSeek 模型,這是我在下方設定中使用的範例,因為它不需要區域性的付款方式。請根據你的情況選擇合適的路線;所有路線的設定格式都相同。
如何逐步安裝 DeepSeek Harness
有三種方法。選擇一種,然後按照步驟進行。
表 A:安裝方法比較
| 方法 | 時間 | 需要 | 升級 | 最適合 |
|---|---|---|---|---|
| npx | 一分鐘內 | Node 22.19+ 或 24+ | 重新執行 npx | 幾乎所有人 |
| 從原始碼 | 5 到 10 分鐘 | Node、pnpm、git | git pull 並重建 | 貢獻者、外掛作者 |
| 桌面版建置 | 約一分鐘 | 無 | 重新安裝 | 任何不想安裝 Node 的人 |
步驟 1:安裝 DeepSeek Harness 前檢查必要條件
最常見的失敗是 Node 版本看起來夠新,但實際不然。該儲存庫要求 ^22.19.0 || >=24.0.0。23.x 系列的任何修補版本都不符合資格。
bash1node -v # 必須是 22.x 的 >= 22.19.0,或 >= 24.0.0 2npm -v 3
如果 node -v 顯示 22.14 或 20.x,請先升級再繼續。只有當你打算從原始碼建置或編寫外掛時,才需要 pnpm:
bash1npm install -g pnpm 2
步驟 2:用一個指令安裝 DeepSeek Harness
這就是完整的安裝。它會一次下載並啟動網路設定檔(web profile)。
bash1npx @deepseek-ai/dsh web 2
開啟 http://127.0.0.1:3080。如果該連接埠已被佔用,啟動器會將它無法辨識的所有旗標直接傳遞給設定檔,因此你可以更改連接埠:
bash1npx @deepseek-ai/dsh web --port 8080 2
你得到的是一個空殼。沒有提供者、沒有模型、沒有金鑰。這是預期中的情況,也是大多數指南停下的地方。
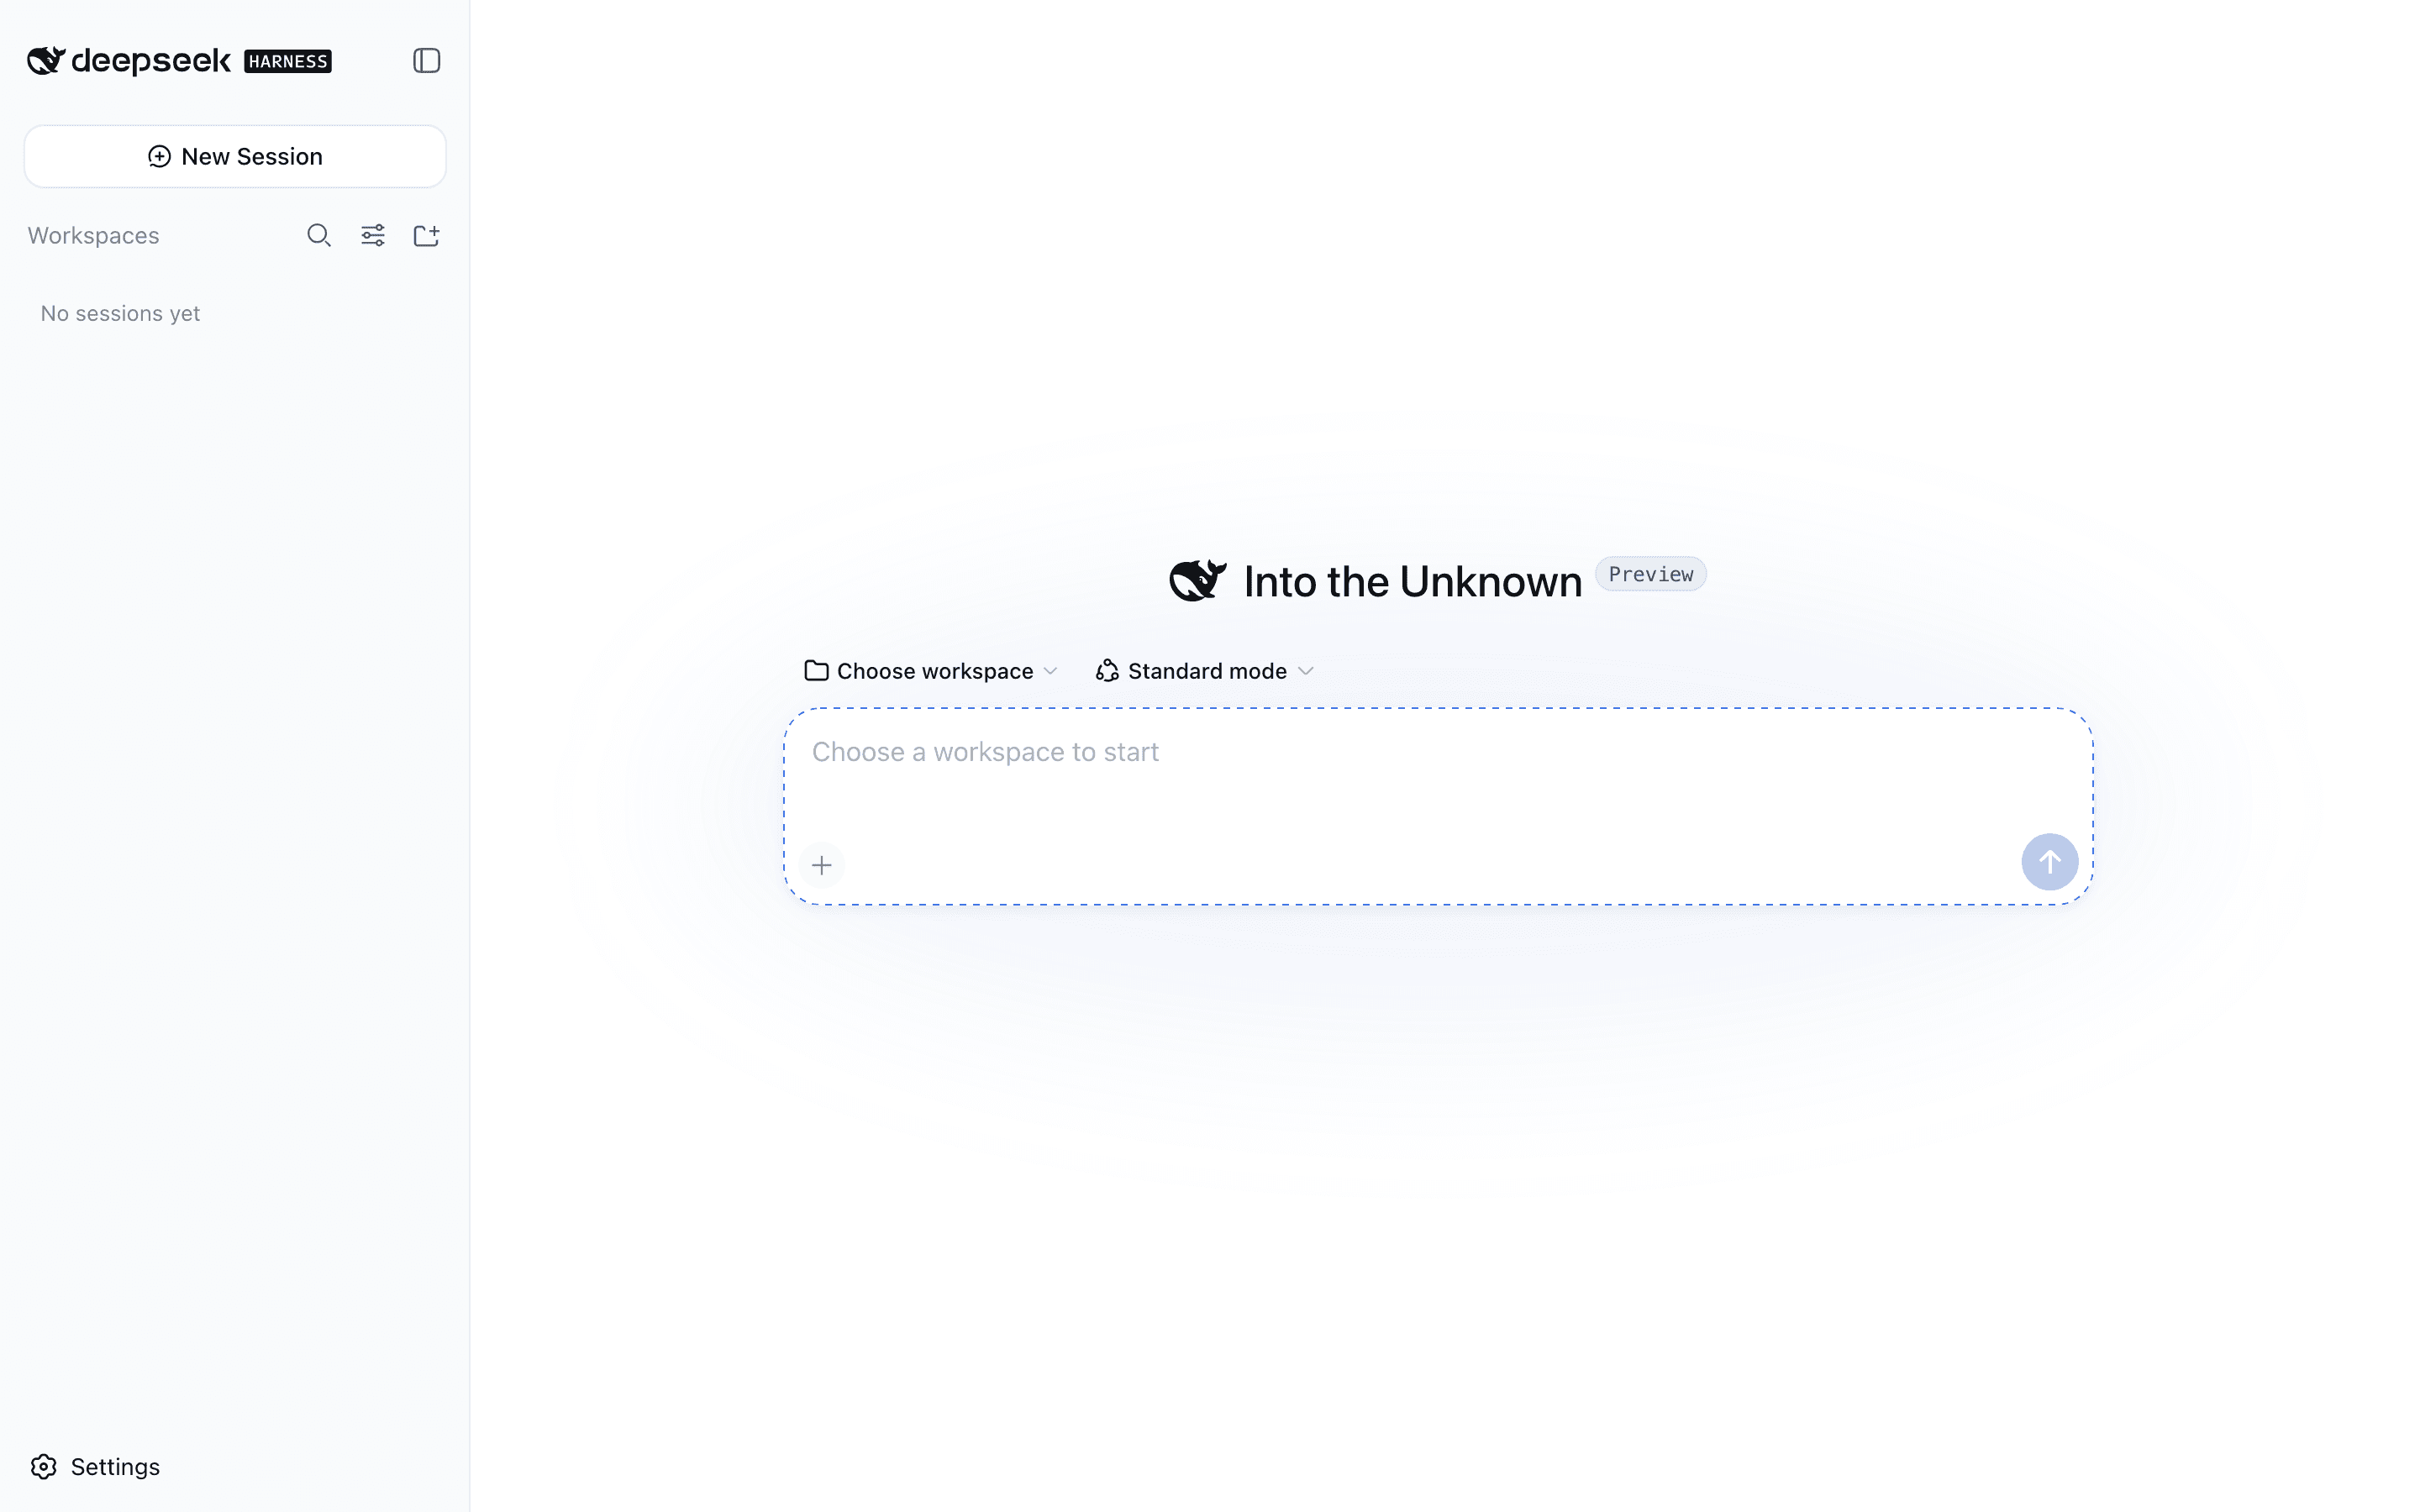
安裝後立即在 127.0.0.1:3080 看到的 DeepSeek Harness 網頁 UI,未配置任何提供者或模型。
安裝完成,但完全靜止。從這裡開始都是接線工作。
步驟 3:為 DeepSeek Harness 取得 API 金鑰
無論你從表 B 中選擇了哪條路線,你都需要一個金鑰和一個基礎 URL。對於第一方路線,請在 platform.deepseek.com 註冊並在那裡建立金鑰。計費選項因地區而異,因此在決定使用前,請確認你的付款方式有被支援。
對於本範例中使用的閘道路線,請在 Atlas Cloud 儀表板 的「API 金鑰」下建立金鑰,然後將其匯出,以便 Harness 可以讀取它,而不需要將它存放在設定檔案中:
bash1export ATLASCLOUD_API_KEY="sk-your-key-here" 2
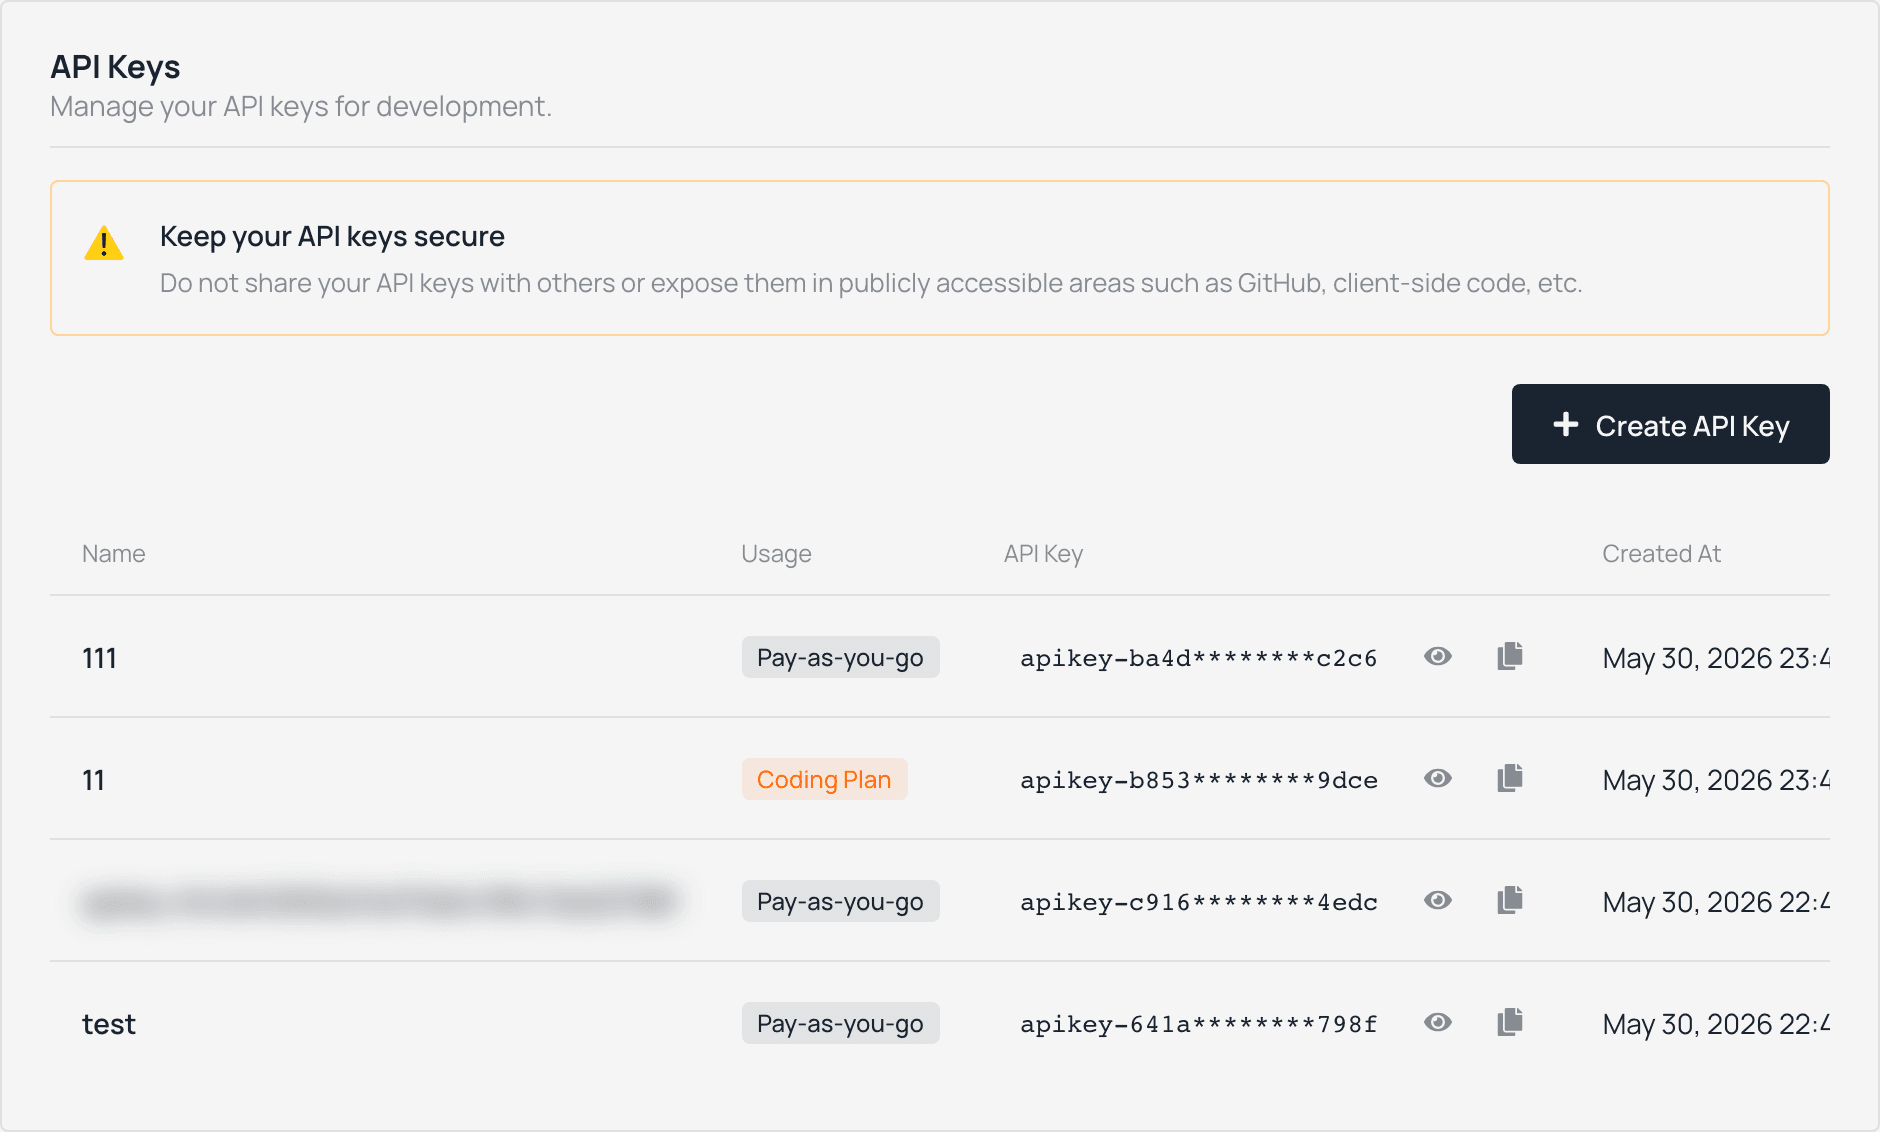
Atlas Cloud 儀表板的 API 金鑰頁面,顯示一個新建立的金鑰,部分遮蓋。
複製金鑰一次。離開頁面後就不會再顯示。
步驟 4:在 DeepSeek Harness 中新增模型提供者
在 UI 中,前往設定(Settings),然後選擇模型(Models),再按新增自訂提供者(Add a custom provider)。表單需要提供者 ID、顯示名稱、基礎 URL、API 協定、憑證,以及至少一個模型。
有一個警告值得重複:提供者 ID 是永久的。 它會被寫入請求、已儲存的工作階段、模型預設值和憑證參考中。如果你之後不喜歡它,唯一的選擇是建立一個新的提供者並刪除舊的。
| 欄位 | 輸入內容 |
|---|---|
| 提供者 ID | atlas(小寫,永久) |
| 顯示名稱 | Atlas Cloud |
| 基礎 URL | https://api.atlascloud.ai/v1 |
| API 協定 | openai-completions |
| API 金鑰 | 你的金鑰 |
| 模型 | 按擷取可用模型(Fetch available models),或手動輸入 deepseek-ai/deepseek-v4-flash |
如果擷取模型回傳 401,表示金鑰錯誤。如果回傳空列表,表示端點根本沒有公開模型索引,這無害:手動輸入模型 ID 並繼續即可。
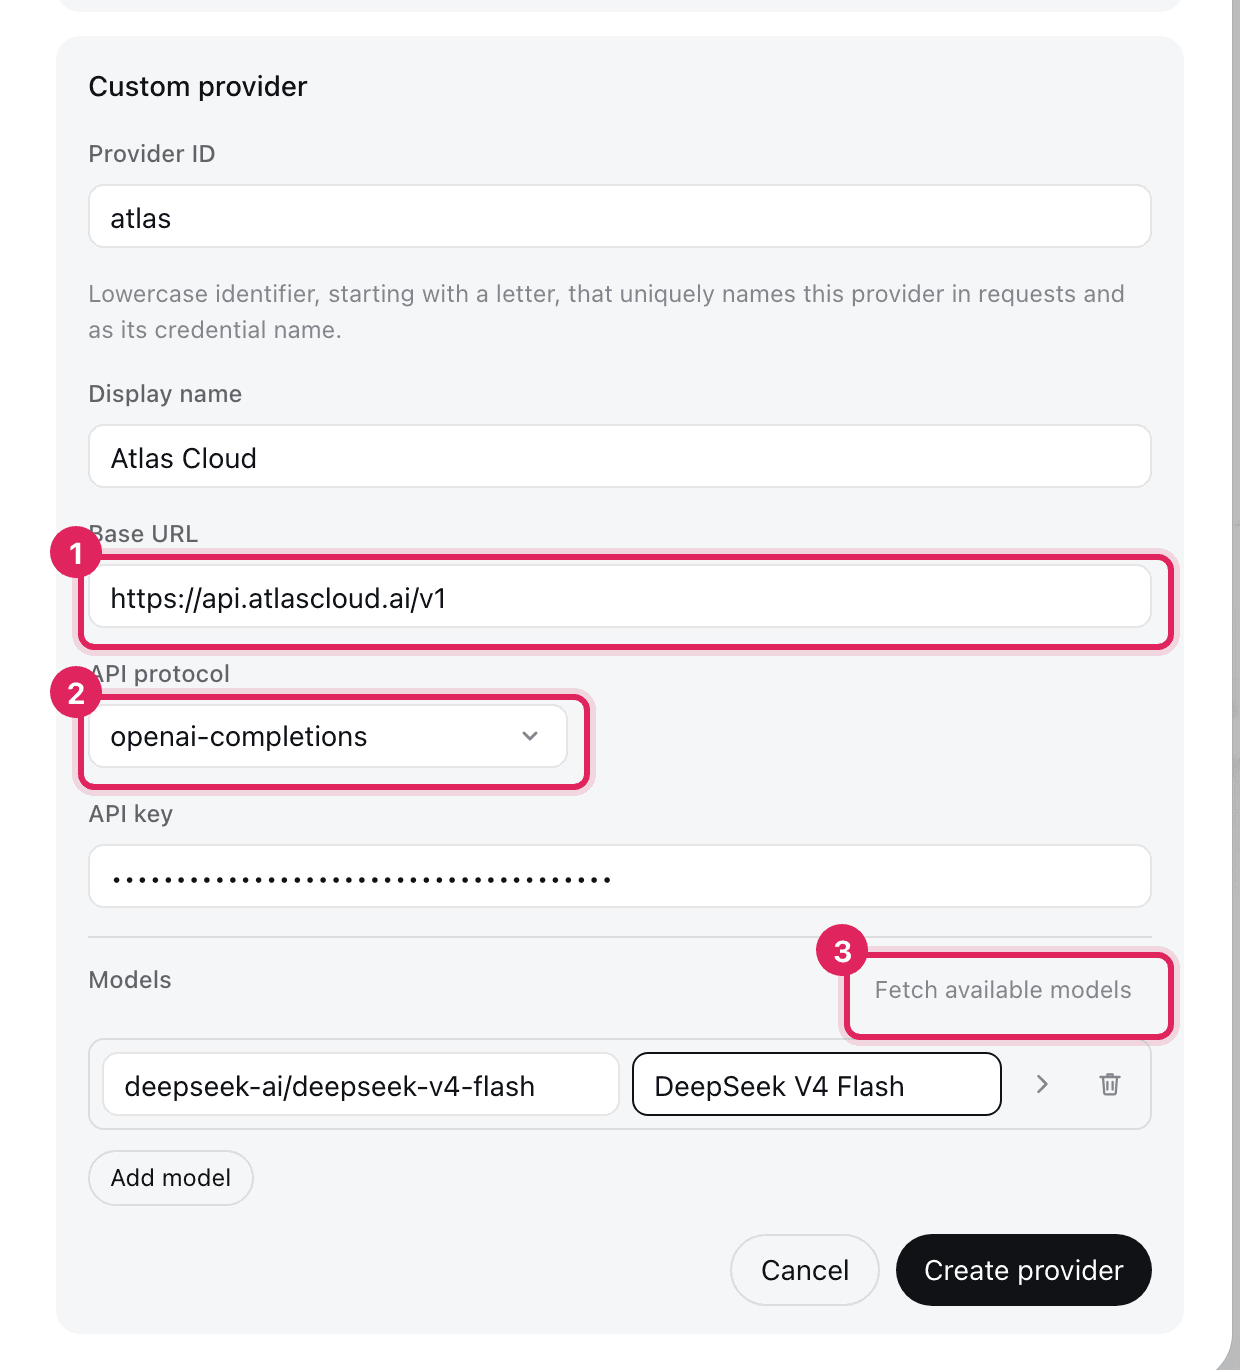
已填寫的「新增自訂提供者」表單,標記了基礎 URL、API 協定和擷取模型控制項。
決定下一步是否運作的三個欄位:基礎 URL、協定和模型列表。
步驟 5:三個會悄悄破壞 DeepSeek 模型的 DeepSeek Harness 預設值
這是其他安裝指南都沒有涵蓋的部分,也是你設定看起來已連線但行為異常的原因。
Harness 的 LLM 層會根據你的端點 URL 推斷要使用哪種思考方言。內部文件對後果直言不諱:「pi-ai 從端點 URL 猜測;私有閘道器的 URL 沒有任何資訊,因此 DeepSeek 方言的閘道器會被以 OpenAI 方言溝通,而無法修正。」白話來說,任何看起來不像是 DeepSeek 的基礎 URL 都會被當作 OpenAI 處理,導致 DeepSeek 的 reasoning_content 處理出錯。
第二和第三個陷阱是容量。你手動宣告的模型會回退到 262,144 的 defaultContextWindow 和 32,768 的 defaultMaxTokens。V4 支援 1,048,576 個 Token 的上下文,因此接受預設值會浪費四分之三的容量。
將這些寫入你的設定檔案:
yaml1# $DSH_HOME/settings.yaml (預設為 ~/.dsh/settings.yaml) 2llm-pi-ai: 3 providers: 4 atlas: 5 displayName: Atlas Cloud 6 api: openai-completions 7 baseURL: https://api.atlascloud.ai/v1 8 apiKeyEnv: ATLASCLOUD_API_KEY 9 compat: 10 thinkingFormat: deepseek # 1. 停止基於 URL 的猜測 11 defaultContextWindow: 1048576 # 2. 預設只有 262144 12 defaultMaxTokens: 32768 # 3. 為長輸出任務提高此值 13 models: 14 - id: deepseek-ai/deepseek-v4-flash 15 contextWindow: 1048576 16 - id: deepseek-ai/deepseek-v4-pro 17 contextWindow: 1048576 18
有三件事要記住。設定解析的順序是:模型優先,然後是路由,然後是已安裝的目錄條目,最後是從 URL 推導出的猜測,因此每個模型的值總是獲勝。compat 下的兩個開關,thinkingFormat 和 supportsReasoningEffort,只存在於 openai-completions 之下;將它們放在其他協定上會導致解析失敗。此外,這個轉接器刻意不涵蓋 Bedrock、Vertex、Azure 和 Codex,因為它們的認證流程需要的不只是一個金鑰、一個端點和標頭。
步驟 6:在 DeepSeek Harness 中執行你的第一個真實任務
現在是本文開頭的示範。建立一個空的資料夾,並加入三個檔案。
fizzbuzz.py,包含一個差一錯誤(off-by-one bug):
python1def fizzbuzz(n): 2 out = [] 3 for i in range(1, n): 4 if i % 15 == 0: 5 out.append("FizzBuzz") 6 elif i % 3 == 0: 7 out.append("Fizz") 8 elif i % 5 == 0: 9 out.append("Buzz") 10 else: 11 out.append(str(i)) 12 return out 13
test_fizzbuzz.py,其中兩個測試會失敗:
python1from fizzbuzz import fizzbuzz 2 3def test_starts_correctly(): 4 assert fizzbuzz(5)[:3] == ["1", "2", "Fizz"] 5 6def test_covers_every_number(): 7 assert len(fizzbuzz(15)) == 15 8 9def test_fifteen_is_fizzbuzz(): 10 assert fizzbuzz(15)[-1] == "FizzBuzz" 11
以及 requirements.txt:
text1pytest>=8.0 2
先手動執行測試套件是值得的,這樣你才知道代理程式要面對什麼:
text1.FF [100%] 2=================================== FAILURES =================================== 3___________________________ test_covers_every_number ___________________________ 4E AssertionError: assert 14 == 15 5___________________________ test_fifteen_is_fizzbuzz ___________________________ 6E AssertionError: assert '14' == 'FizzBuzz' 7=========================== short test summary info ============================ 82 failed, 1 passed in 0.01s 9
將代理程式模式設為標準(Standard),模型設為 deepseek-ai/deepseek-v4-flash,然後貼上這個提示詞:
在此工作區執行 pytest。有兩個測試失敗。找出 fizzbuzz.py 中的根本原因,用最小的變更來修正它,然後重新執行 pytest 並顯示最終輸出。請勿編輯測試檔案。
正確的修正是一個字元:range(1, n) 變成 range(1, n + 1),然後測試套件會顯示 3 passed。
現在,工具架與聊天視窗不同之處在於:每次執行都會記錄在只能附加的工作階段日誌中,而且你可以對它進行分叉(fork)。回到代理程式第一次讀取 fizzbuzz.py 的那個點,然後分支出第二個嘗試:
從你第一次讀取 fizzbuzz.py 的步驟分叉(Fork)此工作階段。這次將它改寫為基於字典的查詢,而不是修補 if-分支,然後再次執行 pytest。
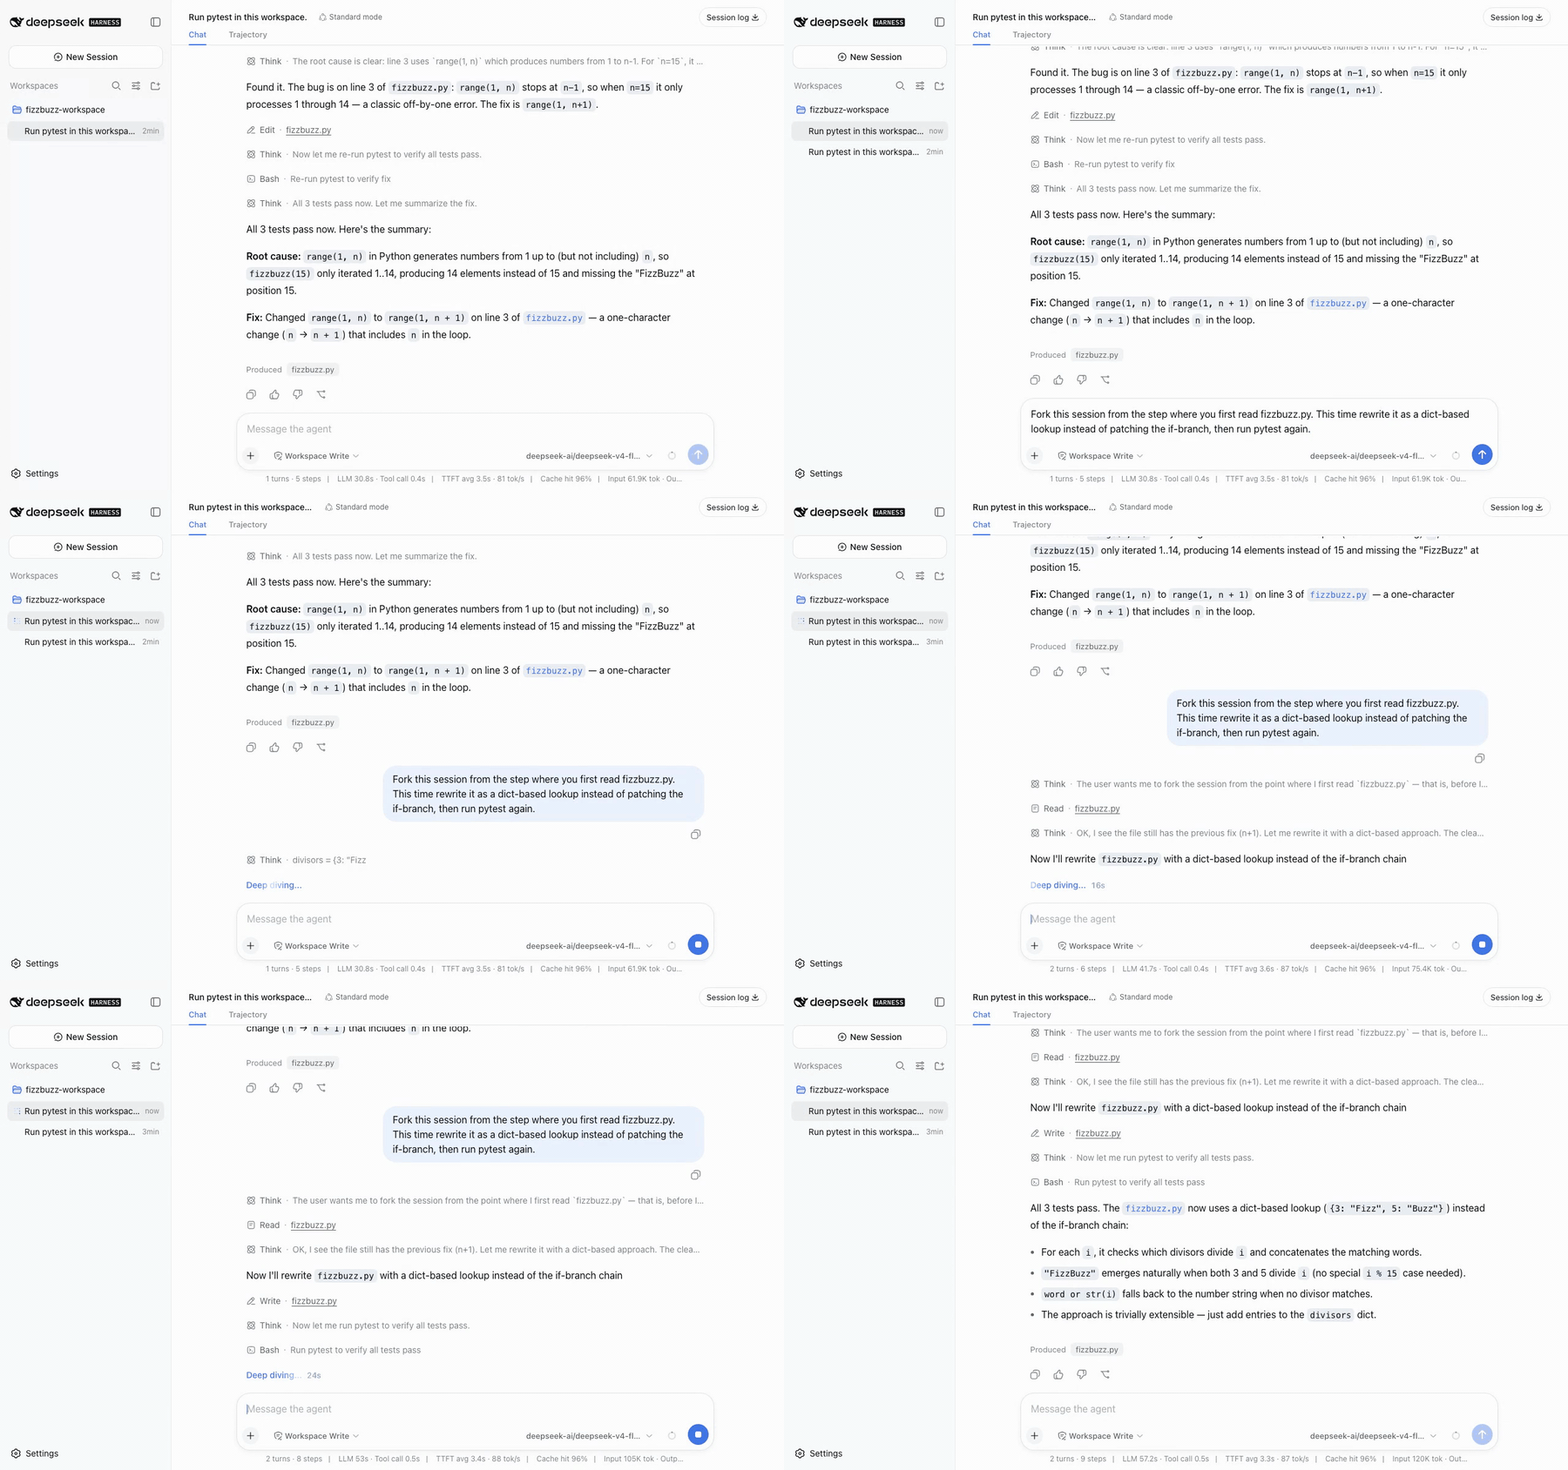
從 DeepSeek Harness 工作階段日誌分叉,以從相同起點產生第二個基於字典的實作。
一個起點,兩個分支。這就是上線當週那批人真正關心的功能。
步驟 7:為腳本和 CI 啟用無頭模式(Headless)
兩個設定檔(profile)會在首次使用時自行初始化:web 和 headless。你一直在使用 web,而 dsh web 只是 dsh --profile web 的別名。
無頭模式會執行一個全新的持久化工作階段、列印最終答案、然後結束,這正是 CI 工作所需要的形狀:
bash1dsh --profile headless "執行測試並修正任何失敗。報告差異(diff)。" 2
任何其他設定檔都必須透過 dsh plugin 來建立。設定檔存放在 $DSH_HOME/profiles/<name>,預設為 ~/.dsh/profiles/<name>。
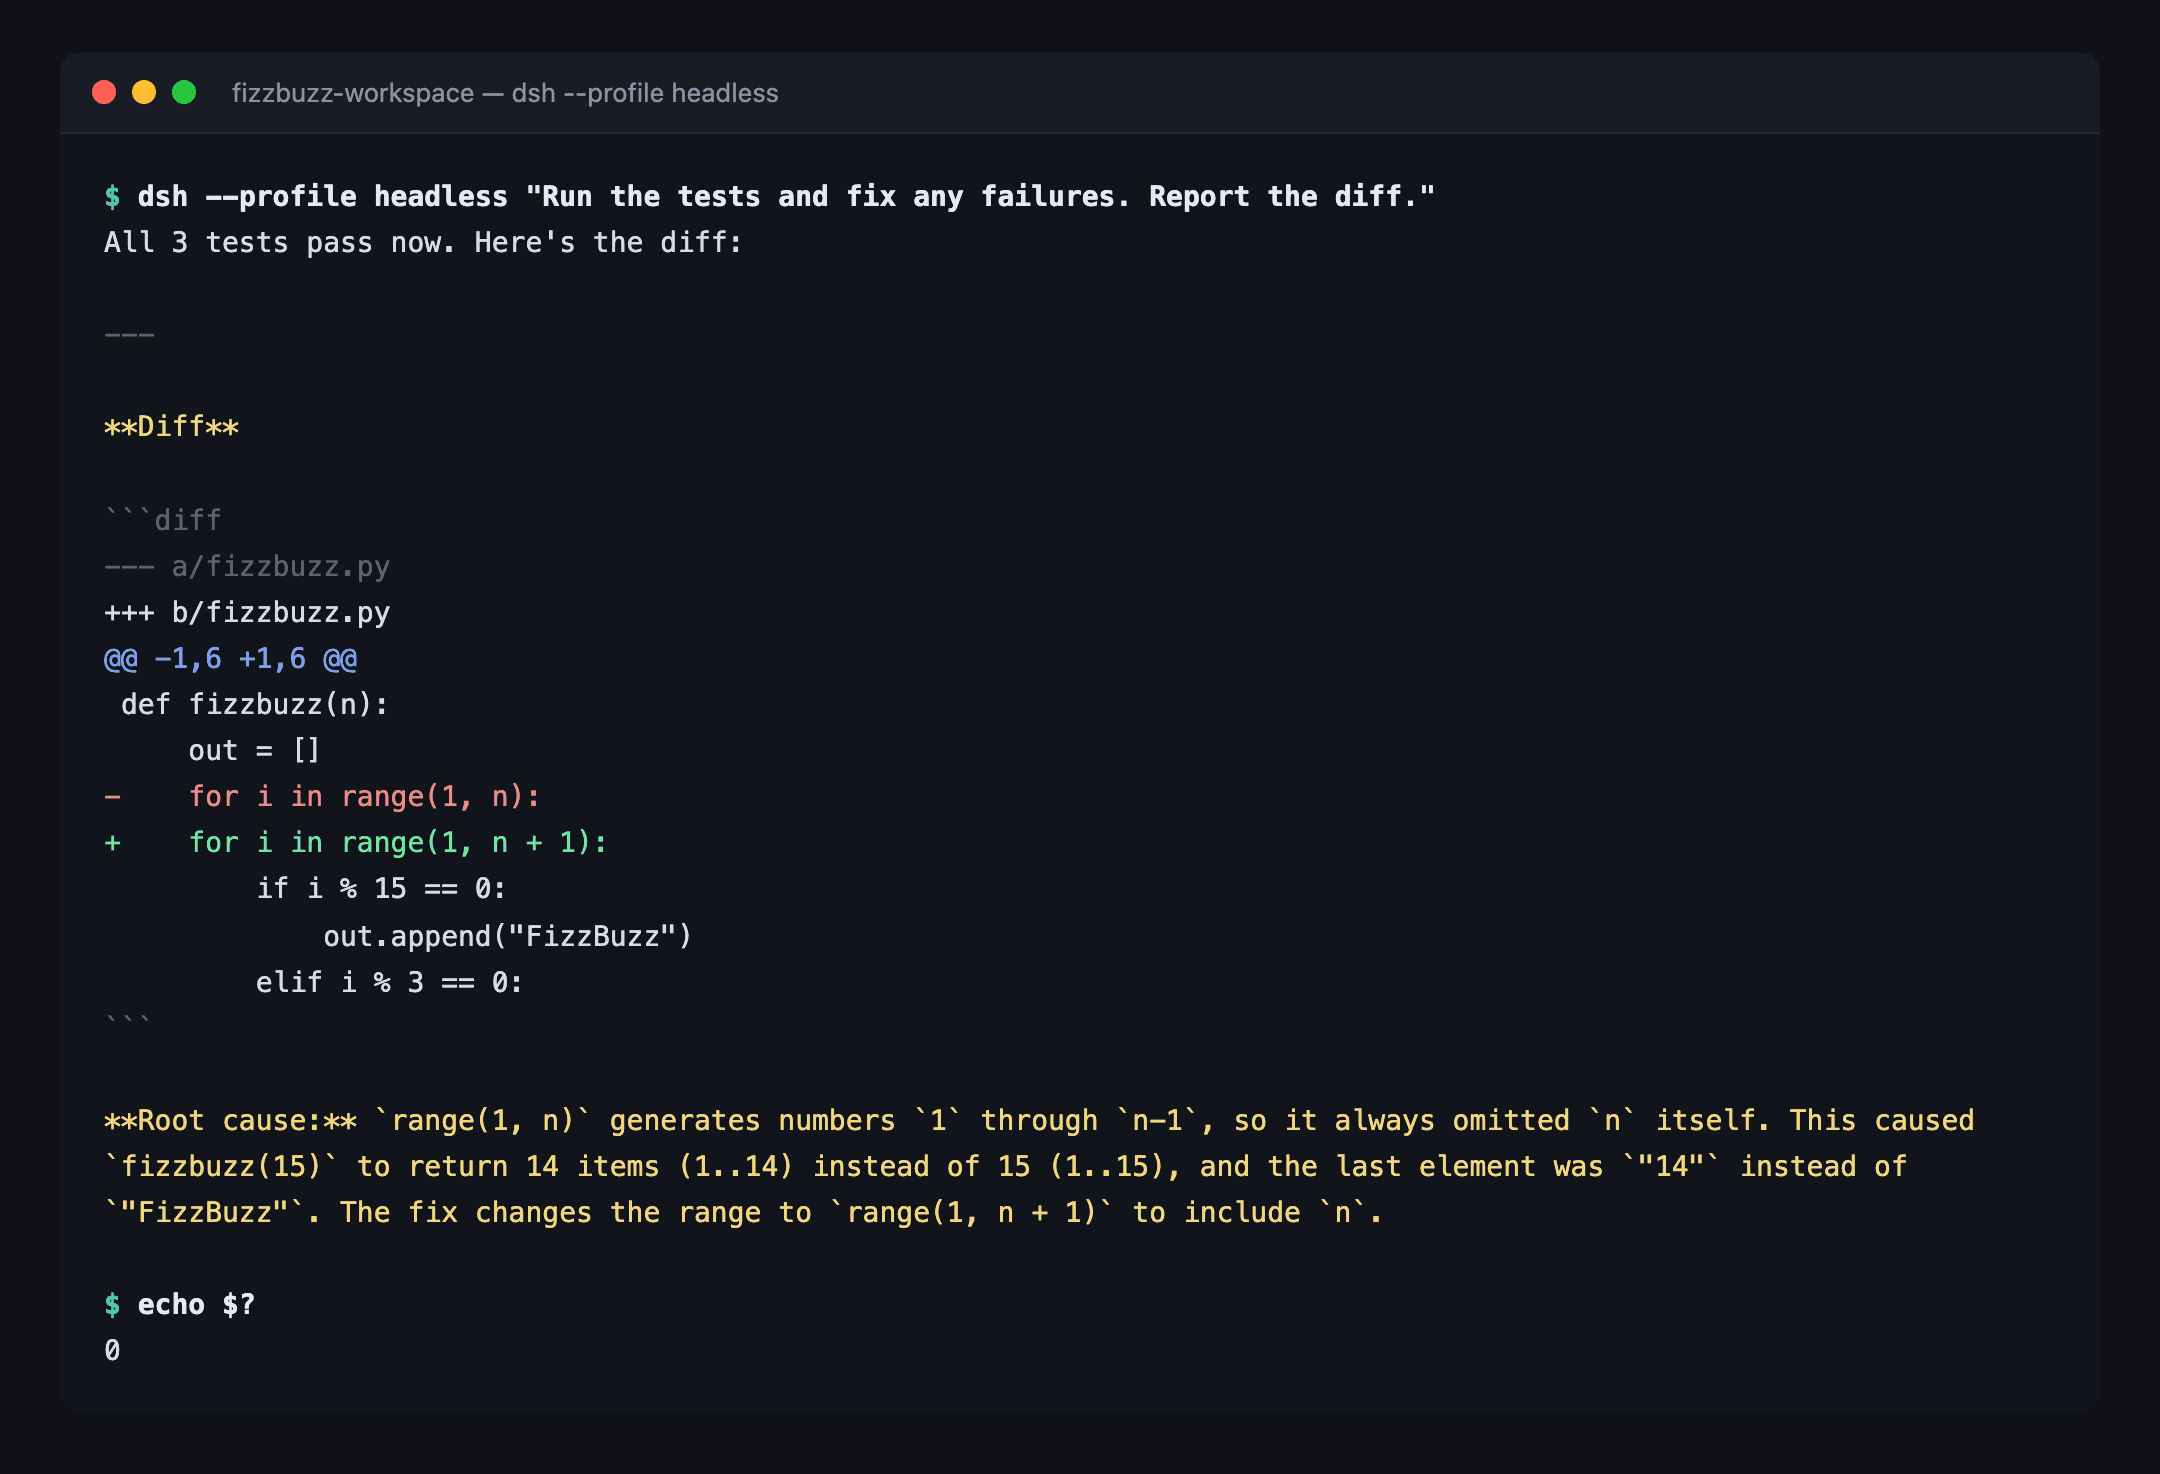
無頭 DeepSeek Harness 執行的終端機輸出,列印最終答案並結束。
無頭模式:一個工作階段、一個答案、你可以根據退出碼(exit code)進行分支。
其他安裝 DeepSeek Harness 的方法
npx 路線涵蓋了大多數人。以下三種方法也值得知道。
使用 pnpm 從原始碼安裝 DeepSeek Harness
如果你想閱讀程式碼、修補它,或針對它編寫外掛:
bash1git clone https://github.com/deepseek-ai/deepseek-harness 2cd deepseek-harness 3pnpm install 4pnpm run build 5pnpm dsh web 6
5 MB 桌面版建置
一個社群專案 hairyf/deepseek-harness-desktop 將 Harness 包裝在 Tauri 中,並提供大約 5 MB 的安裝程式,適用於 Windows、macOS 和 Linux,完全不需要設定 Node。這不是官方的 DeepSeek 發行版,因此請相應地對待它:在撰寫本文時,它大約有 400 顆星,並且是在 Harness 本身發布一天後建立的。
使用 Ollama 完全在本機執行 DeepSeek Harness
Ollama 提供了一個第一方整合。簡短版本是一個指令:
bash1ollama launch dsh 2
這會安裝並執行 Harness,並將 Ollama 接線進來,將其設定存放在 ~/.ollama/launch/dsh/settings.yaml(Ollama 文件,2026 年 8 月)。在你假設一切都在離線狀態之前,有一個需要注意的警告:內建的網路搜尋會自動啟用,需要 Ollama 雲端存取權限以及一個支援工具(tools)的模型。真正本機的模型會給你零 Token 成本,但代價是速度較慢,而且通常工具呼叫能力較弱。
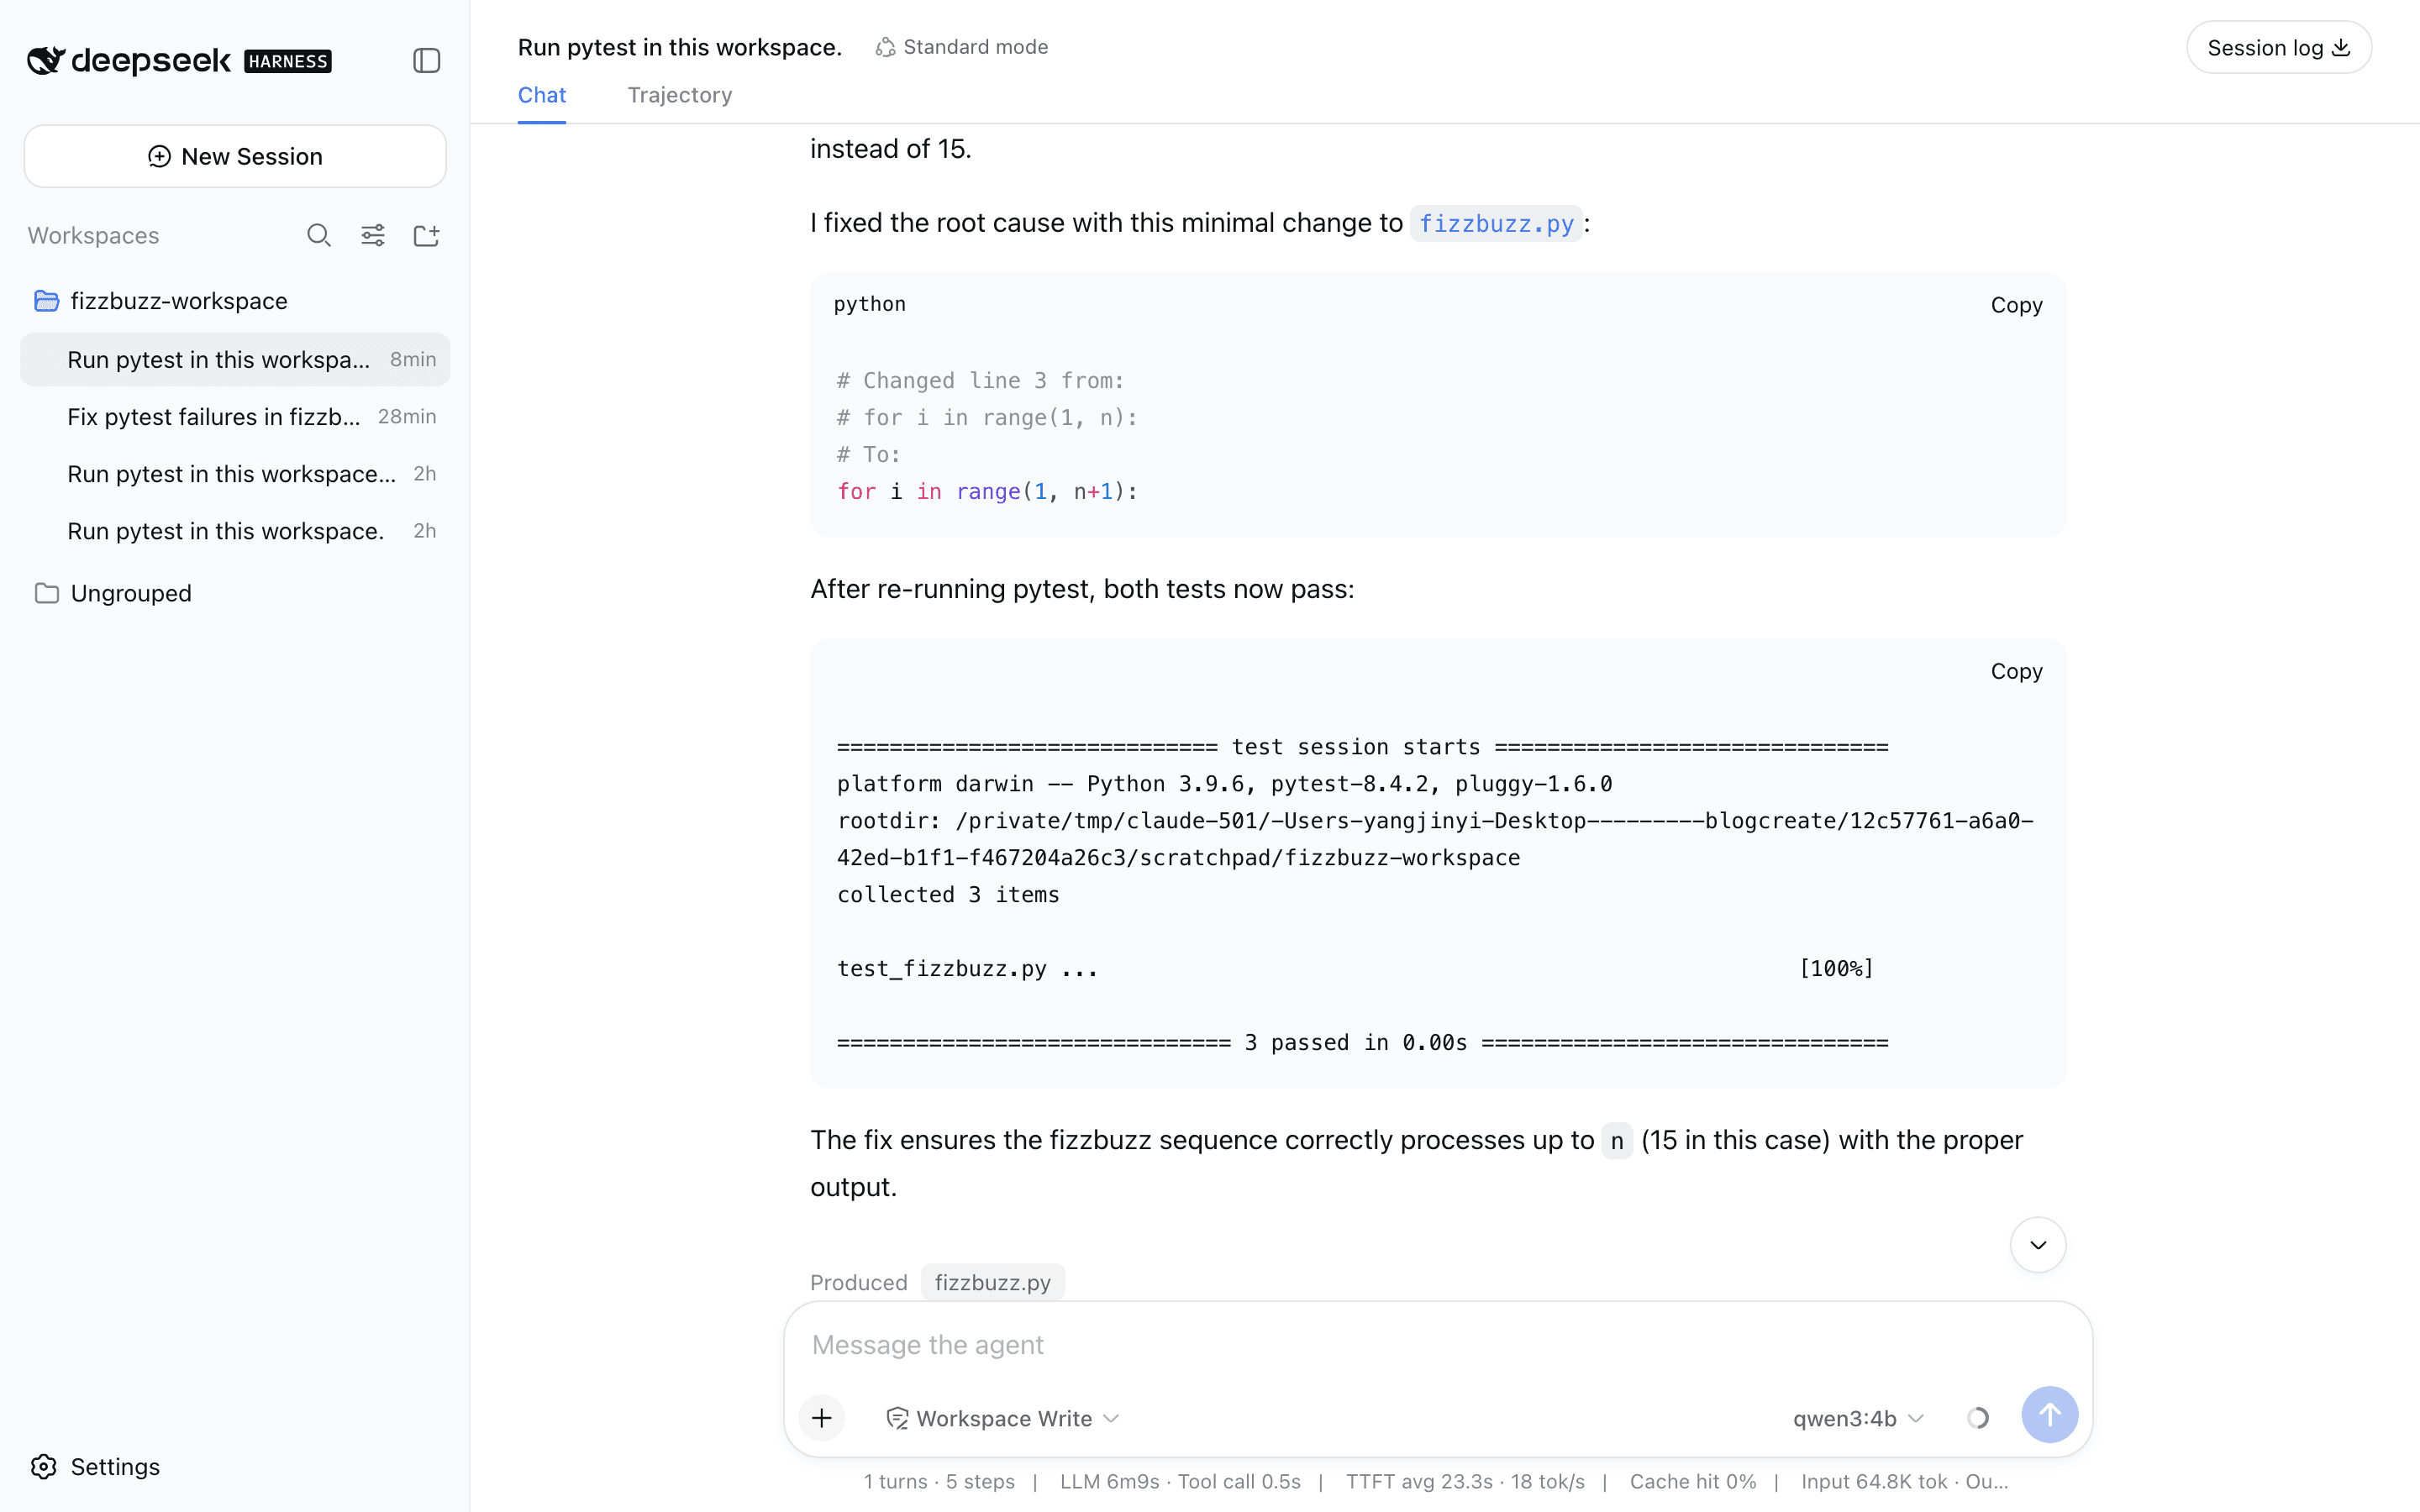
連接到本機 Ollama 伺服器的 DeepSeek Harness,執行相同的測試失敗任務。
相同任務,無網路往返,無按 Token 計費。
DeepSeek Harness 是免費的嗎?實際執行成本是多少?
先回答:軟體是免費的,採用 MIT 授權,包含商業用途。Token 不是免費的,除非你在本機執行模型。Harness 本身沒有任何計量、門檻或與 DeepSeek 帳戶綁定。
表 C:實際免費與不免費的項目
| 組件 | 免費? | 備註 |
|---|---|---|
| 工具架軟體 | 是 | MIT 授權,無需帳戶 |
| 經由 API 的模型 Token | 否 | 由提供模型的服務方按 Token 計費 |
| 經由本機 Ollama 的模型 Token | 是 | 代價是硬體和延遲 |
| 長上下文 | 視情況 | 按 Token 計費,因此 1M 視窗的成本取決於你填入的內容 |
一個實際例子,使用整數而不是特定執行數據。假設像步驟 6 這樣的除錯工作階段消耗了 200,000 個輸入 Token 和 20,000 個輸出 Token,這在代理程式讀取了一些檔案並反覆迭代後是合理的。以閘道器的固定費率輸入 $0.14 和輸出 $0.28 計算,該工作階段大約花費 3.4 美分。在第一方 API 的離峰時段、快取未命中情況下,大約是 5.7 美分,尖峰時段則約為 11 美分。如果你的大部分輸入都是快取命中,第一方 API 在輸入端會變得非常便宜,因為快取命中的輸入從每百萬 Token $0.007 起。
實際的槓桿,按影響程度排序:保持工作階段簡短,以避免上下文膨脹;將例行工作交給 Flash,將真正困難的任務留給 Pro;以及在基準測試風格的執行中使用最小(Minimal)模式,因為它只給模型兩個工具,並且沒有上下文壓縮。
在部署之前:DeepSeek Harness 授權與預覽風險
三件簡短的事,然後是常見問題。
授權是 MIT,因此商業使用沒問題。但該專案將自己標記為開發者預覽版,並以大寫字母聲明會有破壞相容性的變更。請鎖定一個版本,並且暫時不要將它整合到生產發布管線中。
你的憑證以純文字形式存放在你的機器上,位於 $DSH_HOME/.credentials.yaml,設定則存放在旁邊的 $DSH_HOME/settings.yaml,兩者預設都在 ~/.dsh。如果你的 Harness 主目錄最終落在儲存庫內,請將它加入 .gitignore:
text1.dsh/ 2
還有一件明顯但容易忘記的事:你的程式碼會傳送到你在步驟 4 中設定的任何端點。在將代理程式指向私有程式碼庫之前,請閱讀該提供者的資料條款。
常見問題
DeepSeek Harness 是免費的嗎?
工具架是免費的,採用 MIT 授權,無需帳戶或訂閱,你可以將其用於商業用途。模型 Token 則由你連接的提供者另行計費。將其指向本機 Ollama 模型會給你一個真正零 Token 成本的設定,代價是硬體和速度。
安裝 DeepSeek Harness 需要 DeepSeek API 金鑰嗎?
不需要。安裝和 DeepSeek 金鑰無關。npx @deepseek-ai/dsh web 在沒有任何憑證的情況下就能執行。你只在希望代理程式實際呼叫模型時才需要金鑰,而且它可以是任何 OpenAI 相容端點(包括本機伺服器)的金鑰。
DeepSeek Harness 可以執行 DeepSeek 以外的模型嗎?
可以。自訂提供者接受 openai-completions,並且轉接器涵蓋了可以用金鑰、端點和標頭來描述的協定。透過在 settings.yaml 的 providers: 下新增另一個區塊,並附上自己的 ID、基礎 URL 和模型,就可以加入第二個提供者。Bedrock、Vertex、Azure 和 Codex 刻意不在範圍內,因為它們的認證流程需要更多東西。
為什麼我的自訂提供者回傳 401 或「未知模型」?
401 幾乎總是表示金鑰錯誤,或沒有從 apiKeyEnv 中命名的環境變數讀取到金鑰。未知模型通常表示端點沒有公開模型索引,因此沒有擷取到任何東西:請改為手動輸入模型 ID。也請檢查提供者 ID 的拼寫,因為它不能重新命名,只能取代。
DeepSeek Harness 將我的 API 金鑰和設定存放在哪裡?
金鑰存放在 $DSH_HOME/.credentials.yaml,手動編寫的模型設定存放在 $DSH_HOME/settings.yaml,兩者都在 ~/.dsh 下,除非你覆寫了 DSH_HOME。工作階段存放在 $DSH_HOME/storages,設定檔存放在 $DSH_HOME/profiles/<name>。請將整個目錄排除在版本控制之外。
DeepSeek Harness 準備好投入生產環境了嗎?
根據其自身說法,還沒有。該專案以開發者預覽版的形式發布,並明確警告會有破壞相容性的變更,這對於一個僅有數日歷史的軟體來說是合理的描述。請將其用於本機開發和 CI 輔助,鎖定你測試過的版本,並在升級後重新閱讀提供者文件。
最後驗證時間:2026 年 8 月 17 日,針對 DeepSeek Harness 開發者預覽版。此專案設計上會包含破壞性變更,因此如果你建置中的欄位名稱與上述 YAML 不同,請先檢查官方提供者文件,再假設設定有誤。





