

You hold the ring up to the window and it glows. Then you take the photo. The gold turns gray, the diamond looks like glass, and your own phone shows up in the band. Jewelry is the hardest small product to shoot: it's tiny, it behaves like a mirror, and nobody scrolling past can tell how big it is.
This guide covers how to photograph jewelry at home, with a phone and a few household supplies. Each section fixes one jewelry problem: glare, reflections, focus on tiny details, and size. We also show how one clean phone shot becomes a finished hero image on Atlas Cloud, and which of those images Etsy will actually let you use.
Key Takeaways
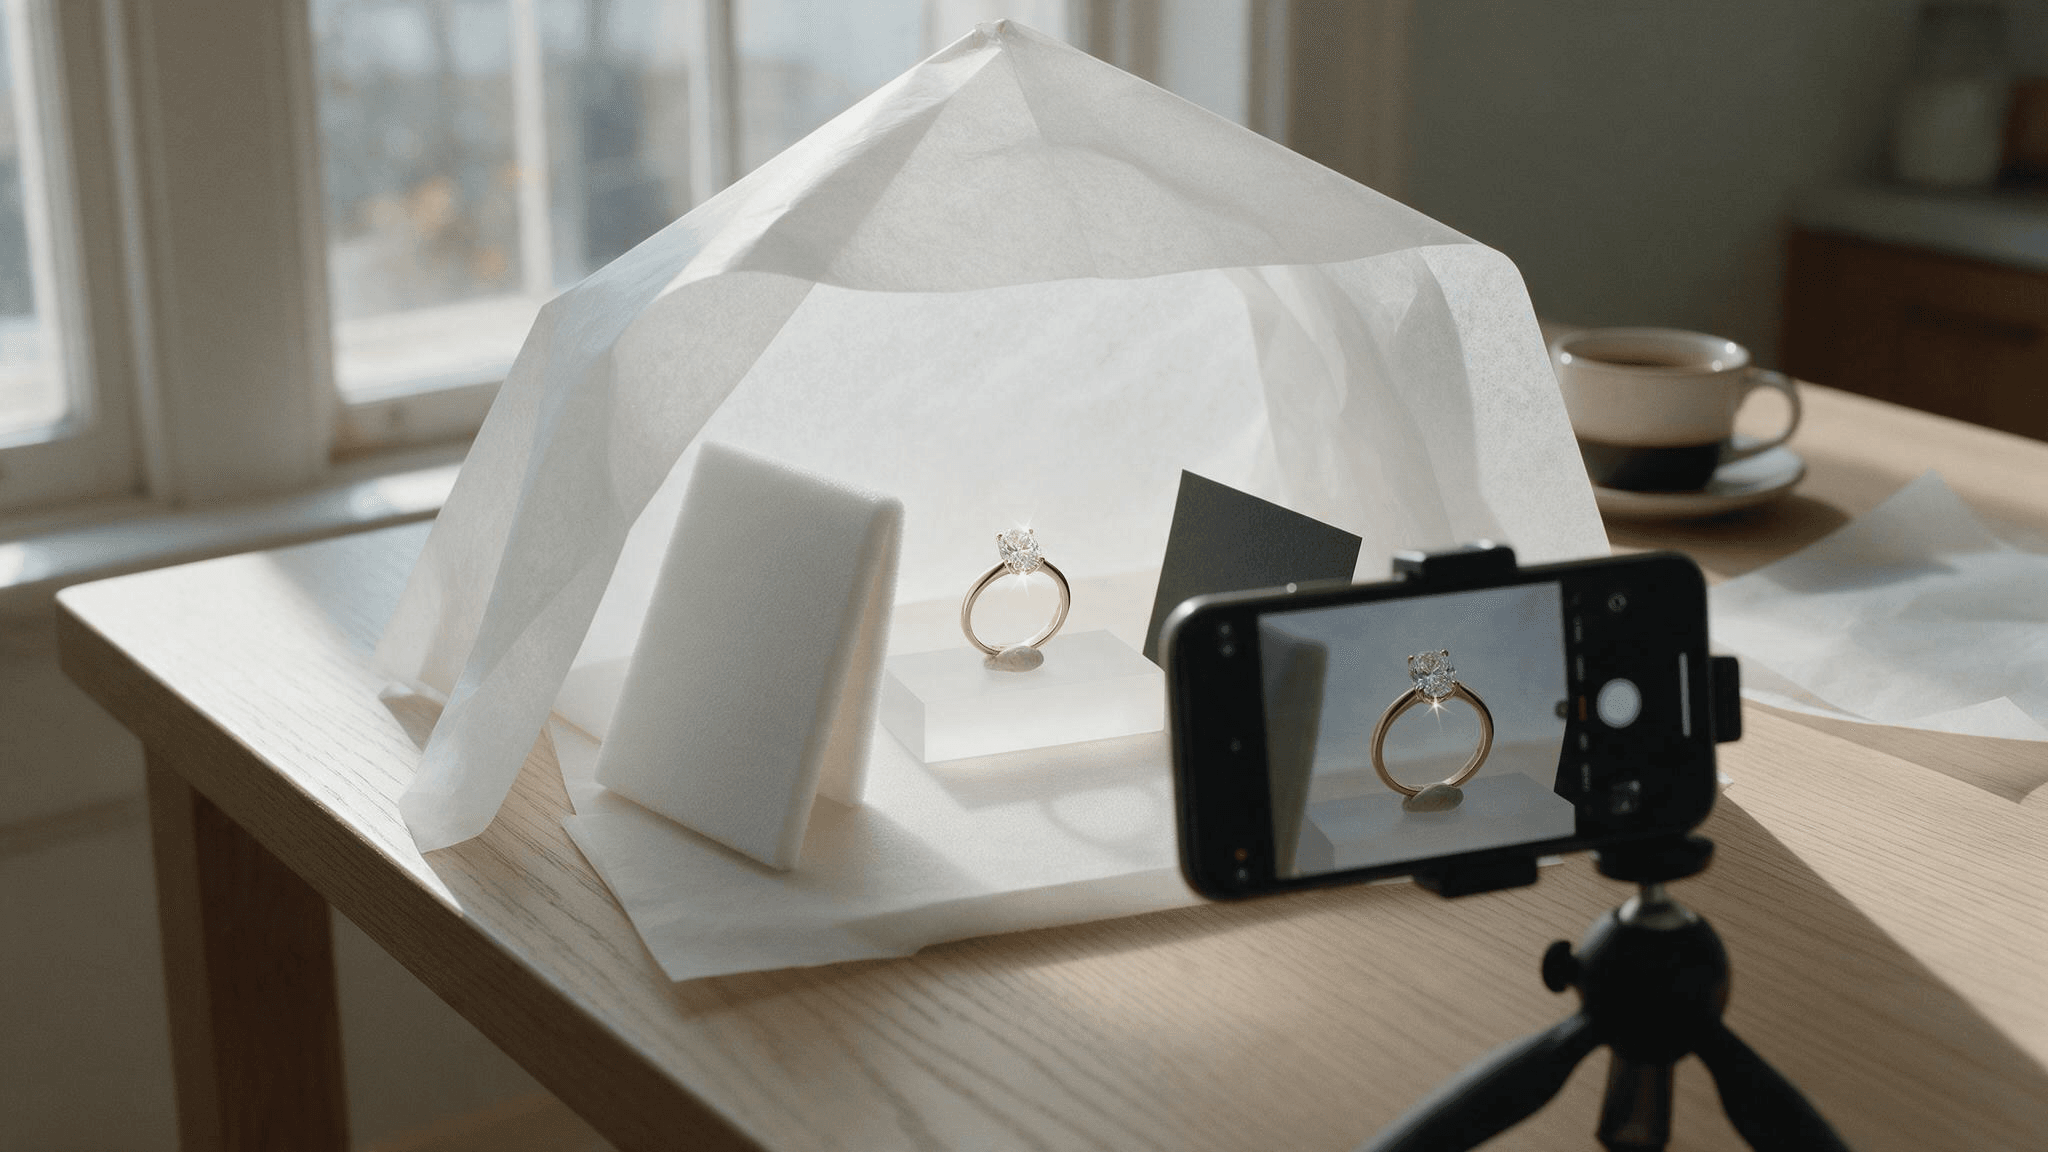
- Soft window light through tracing paper keeps metal clean, and one small point light brings out stone sparkle.
- Polished metal mirrors everything in front of it, so shoot through a hole in a white card.
- Use macro mode or 2x zoom for clasps and settings, then add one on-body shot so buyers see real size.
- Etsy asks for original photos of the actual piece and recommends at least 2,000 pixels on each side.
- One clean phone photo is enough for the Image ads workflow to build hero images and promo posters.
Jewelry Photography Shot List: What Buyers Need to See
In a shop, a buyer picks the piece up, turns it over and holds it against a finger. Online, each photo has to do one of those jobs. Six shots cover it, and only the last two can be built for you.
| Shot | What the buyer checks | Real photo or AI-built |
|---|---|---|
| Front view on a plain background | Shape, color and finish at a glance | Real photo, and the file you give an AI tool |
| Side or three-quarter view | Setting height, profile, band thickness | Real photo |
| Macro detail | Clasp, prongs, metal stamp, stone quality | Real photo |
| On the body | True size against a hand or neck | Real photo for the listing |
| Lifestyle scene | Mood, styling, gift appeal | AI-built from your real photo |
| Promo poster | A sale, a launch or a holiday push | AI-built from your real photo |
The first four are evidence. They need the real piece under real light, with nothing changed beyond exposure and color. The last two are marketing, and they can swallow whole afternoons in props, backdrops and reshoots. That's the part worth handing off.
AI Jewelry Photography: Turn One Phone Shot Into Hero Images
Scene and poster images eat a big share of a small jewelry brand's time. Each season brings new props, a new backdrop and often a model.
The Marketing Studio workflows on Atlas Cloud cover that step. Image ads takes one product photo and a short brief, then renders a product hero image, a product detail page or a promotional poster around your piece.
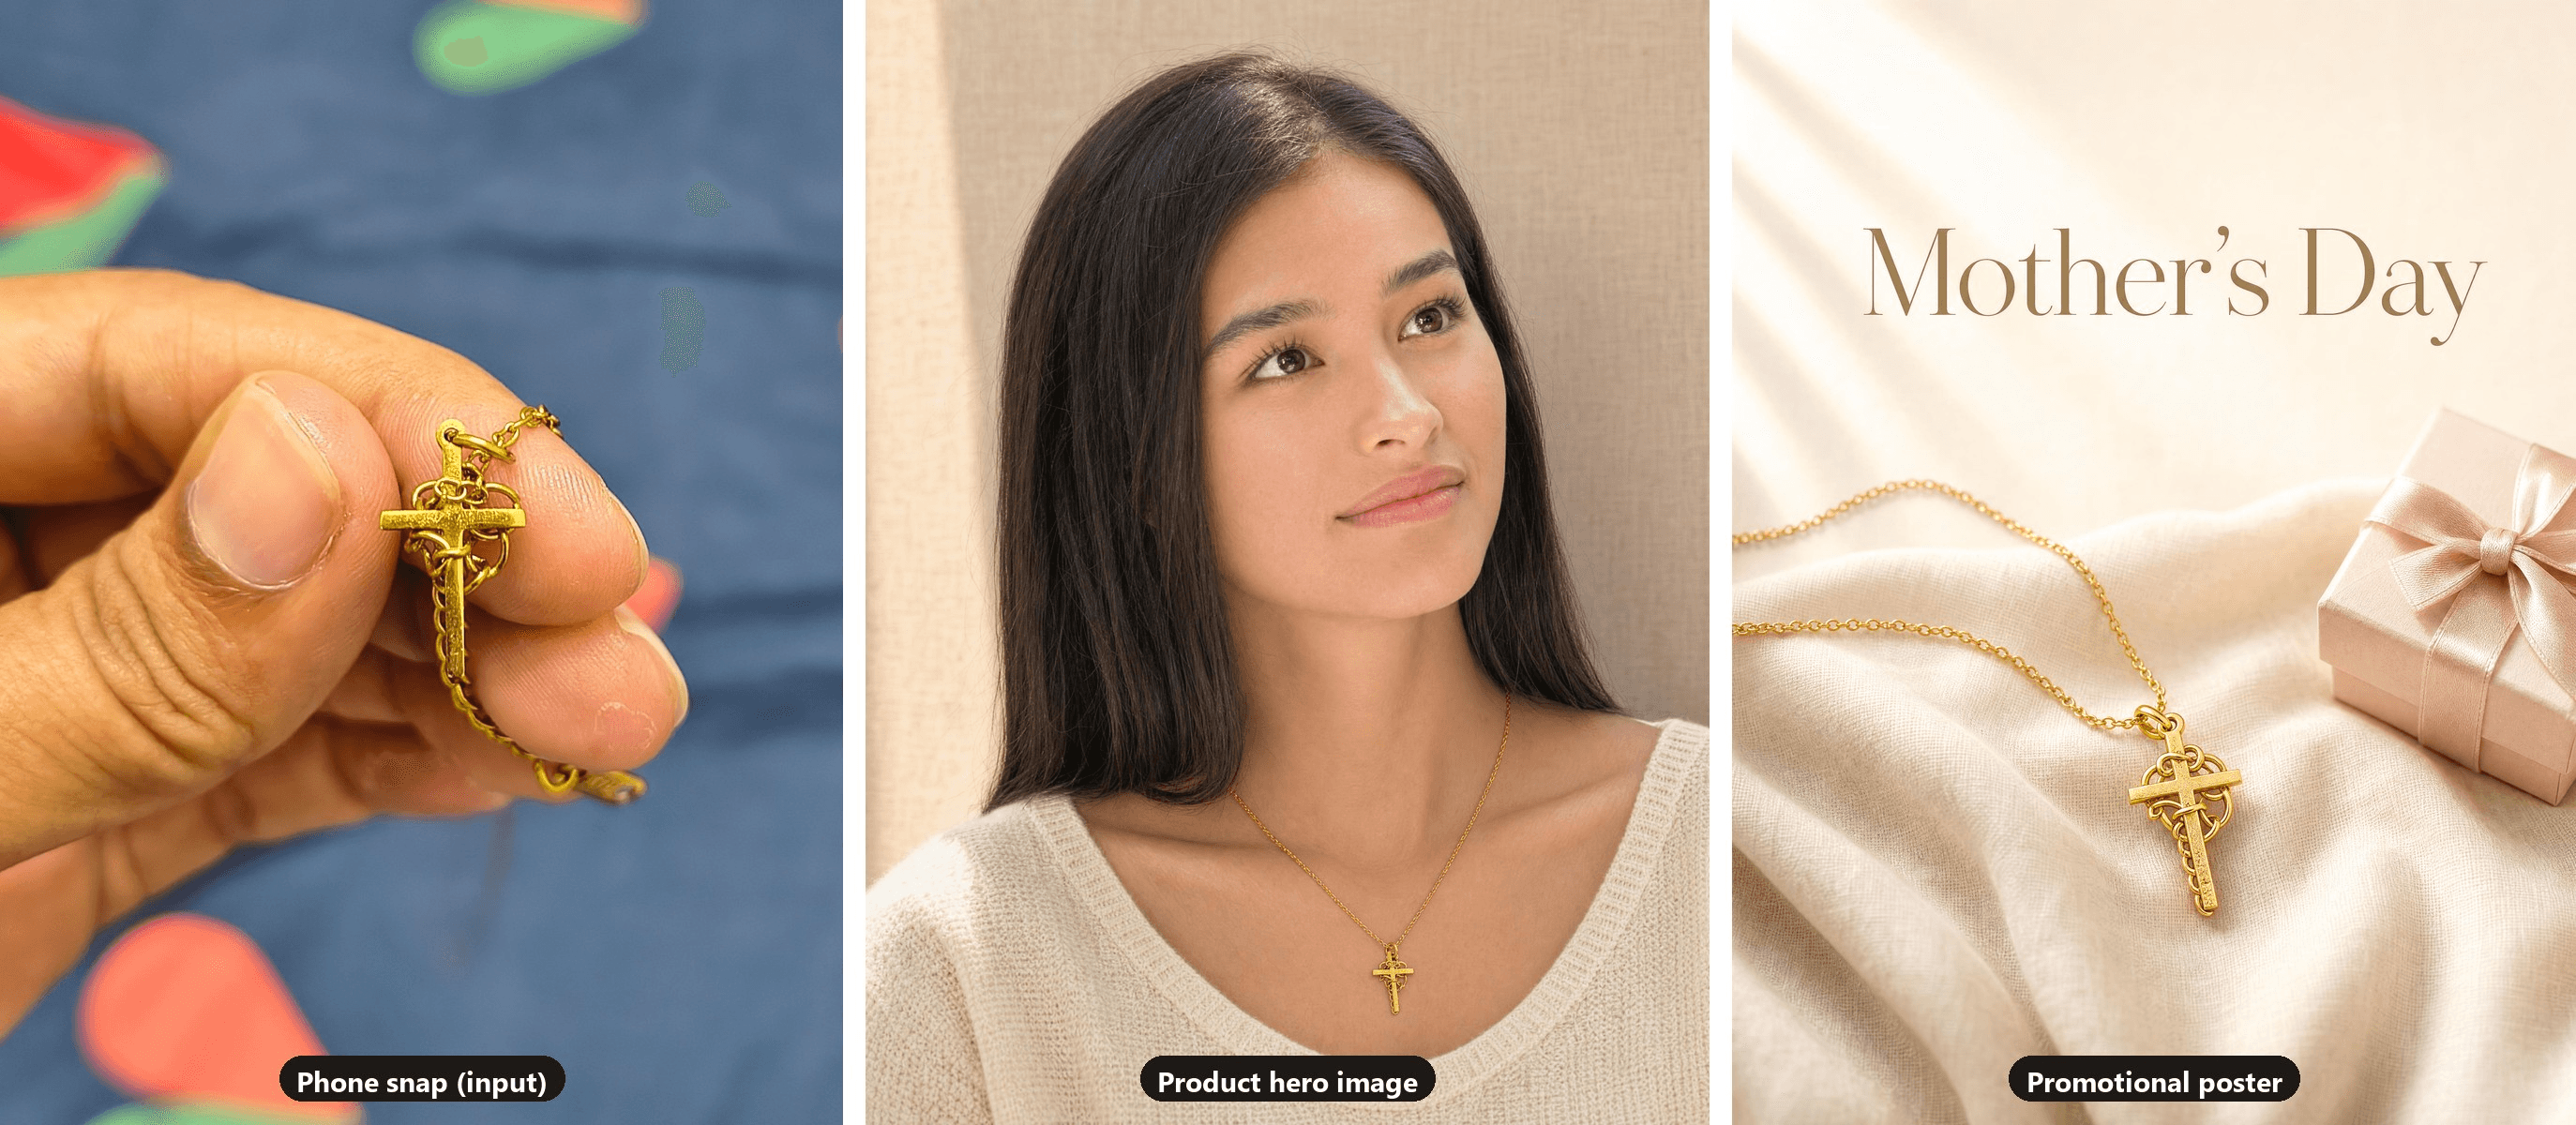
Input photo by Abigail on Unsplash; both outputs came from Image ads at 3:4 and 2K.
We started from the kind of photo plenty of sellers already have: a gold filigree cross pendant pinched between two fingers over a bedsheet, shot on a phone.
The hero image kept the cross and its scrollwork, put it on our model at the collarbone, and built the knit top and linen wall around her. The poster run used the same photo with no model. Here's the run, step by step.
- Upload the piece under Product image. One sharp photo is enough. The file limit is 10 MB.
- Write the brief in Prompt. Name the metal and stone, the mood and the surface. This is the brief we used for the hero image:
plaintext1Gold crucifix pendant on a fine gold chain, worn by the model at her collarbone. Soft late-afternoon window light, cream knit top, warm neutral background with a hint of linen texture. Calm, elegant, gift-ready mood. Keep the pendant's shape and gold finish exactly as in the product photo.
- Add a Model image if you want a specific person. We uploaded a portrait of our model. Leave it empty and the workflow creates a person only when the shot calls for one.
- Choose the Visual type. The options are Product hero image, Product detail page and Promotional poster. We ran Product hero image for the styled main shot, then Promotional poster on the same photo with a Mother's Day brief.
- Set the output under SETTINGS. Pick the ratio (1:1, 3:4, 4:3, 16:9 or 9:16), the resolution (1K, 2K or 4K) and up to four images per run. We used 3:4 at 2K.
- Click Run. The finished image appears under Output, with a Download button next to it.
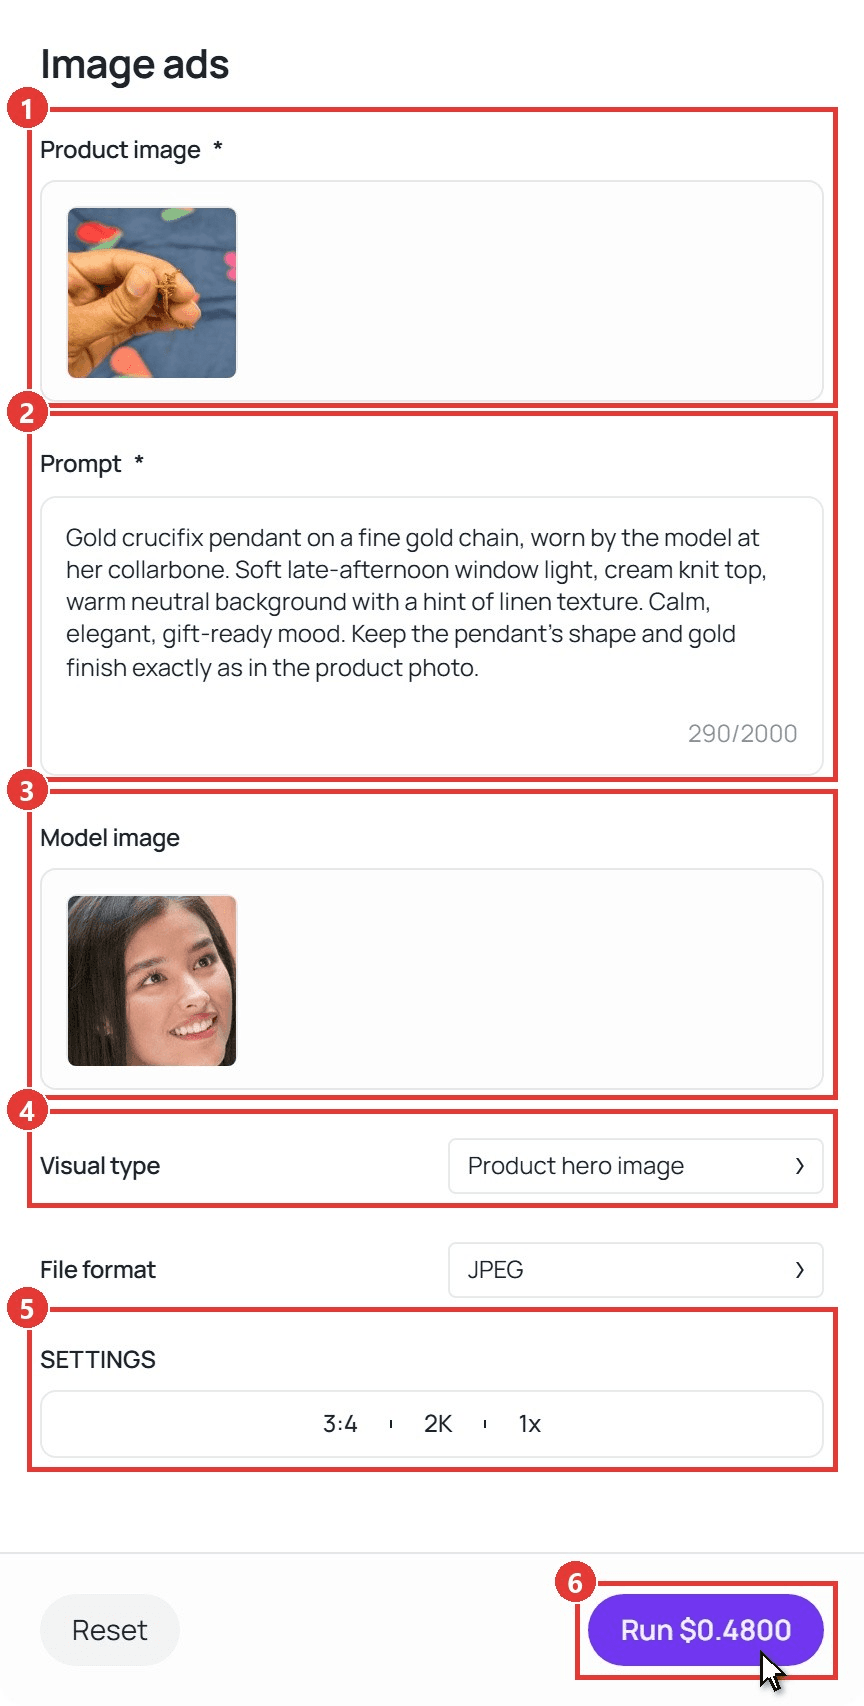
Image ads builds every scene from the photo you upload, so a clean input pays off in every output. The rest of this guide is about getting that one clean shot. Keep the generated scenes for your own store, ads and social posts. Etsy wants listing photos to be original shots of the real piece, which the Etsy section below covers.
Jewelry Photography Lighting: Soft Light for Metal, a Point Light for Sparkle
Metal and gemstones want opposite light. Polished gold and silver mirror the light source itself. A small, harsh source paints a hard white streak across the band and leaves the rest dark. A large, soft source paints a smooth gradient, which is what reads as "polished" on screen.
Faceted stones work the other way. Sparkle comes from small bright points bouncing between facets, and a big soft light flattens them. So the setup combines both: one broad diffused light for the metal and one tiny point light for the stone. GIA's gem photography guide recommends diffused light for the same reason.
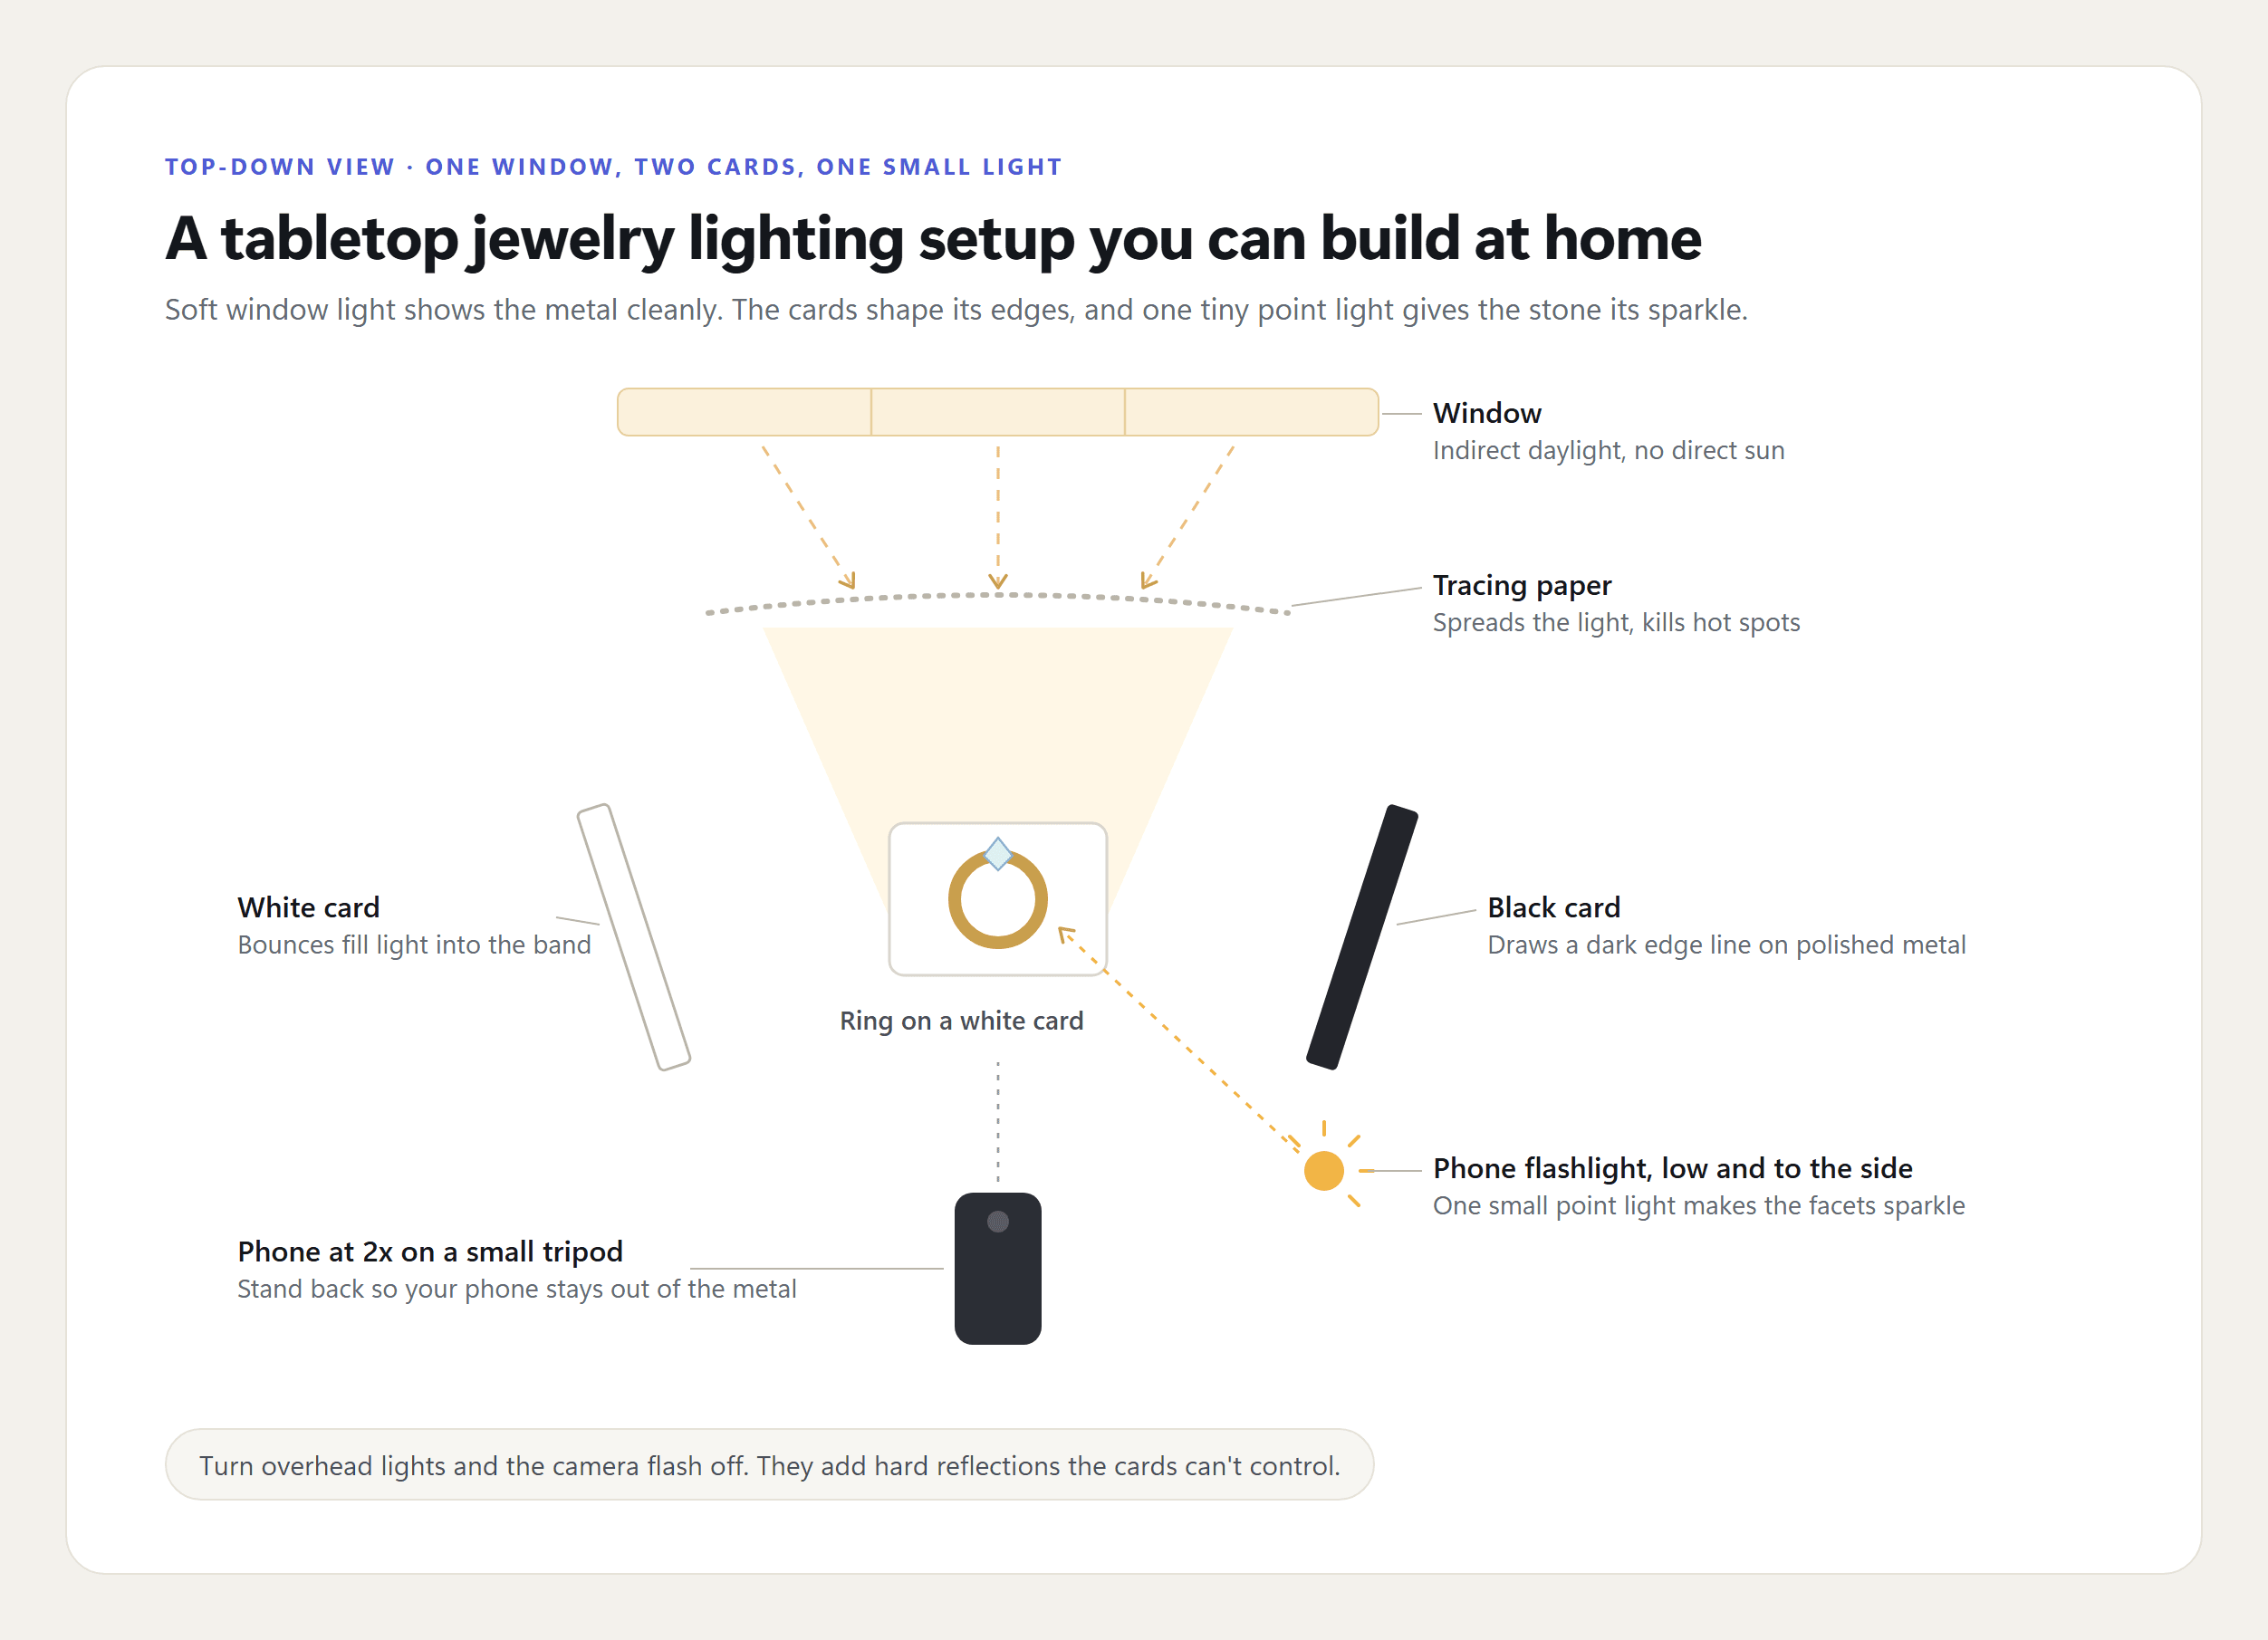
Here's how to build it on a kitchen table:
- Start at a window without direct sun. Overcast days and north-facing windows give the softest light.
- Tape tracing paper between the window and the piece. Baking parchment or a white shower curtain works too. It turns the window into one big, even source.
- Put a white card on the shadow side. It bounces fill light back into the band.
- Put a black card on the other side. Polished metal that sees only white looks flat and gray. A dark card adds the edge line that tells the eye "this is shiny".
- Add the point light last. Hold a second phone's flashlight low and off to one side, then move it slowly until the stone starts to flash.
Turn off the ceiling lights and the camera flash. Warm bulbs mixed with daylight leave the piece with two color casts, and flash adds a hot spot your cards can't control.
How to Photograph Jewelry Without Reflections
A polished ring is a curved mirror. Whatever faces it shows up in the photo: your phone, your hand, the ceiling light, the window frame. On a flat signet face or a bar pendant, you can often make out the whole outline of the phone.
The fix is to control what the piece can see. Cut a hole in a white card just big enough for the lens and shoot through it. Now the metal reflects a clean white surface with one small dark dot, which is easy to retouch or hide in the curve.
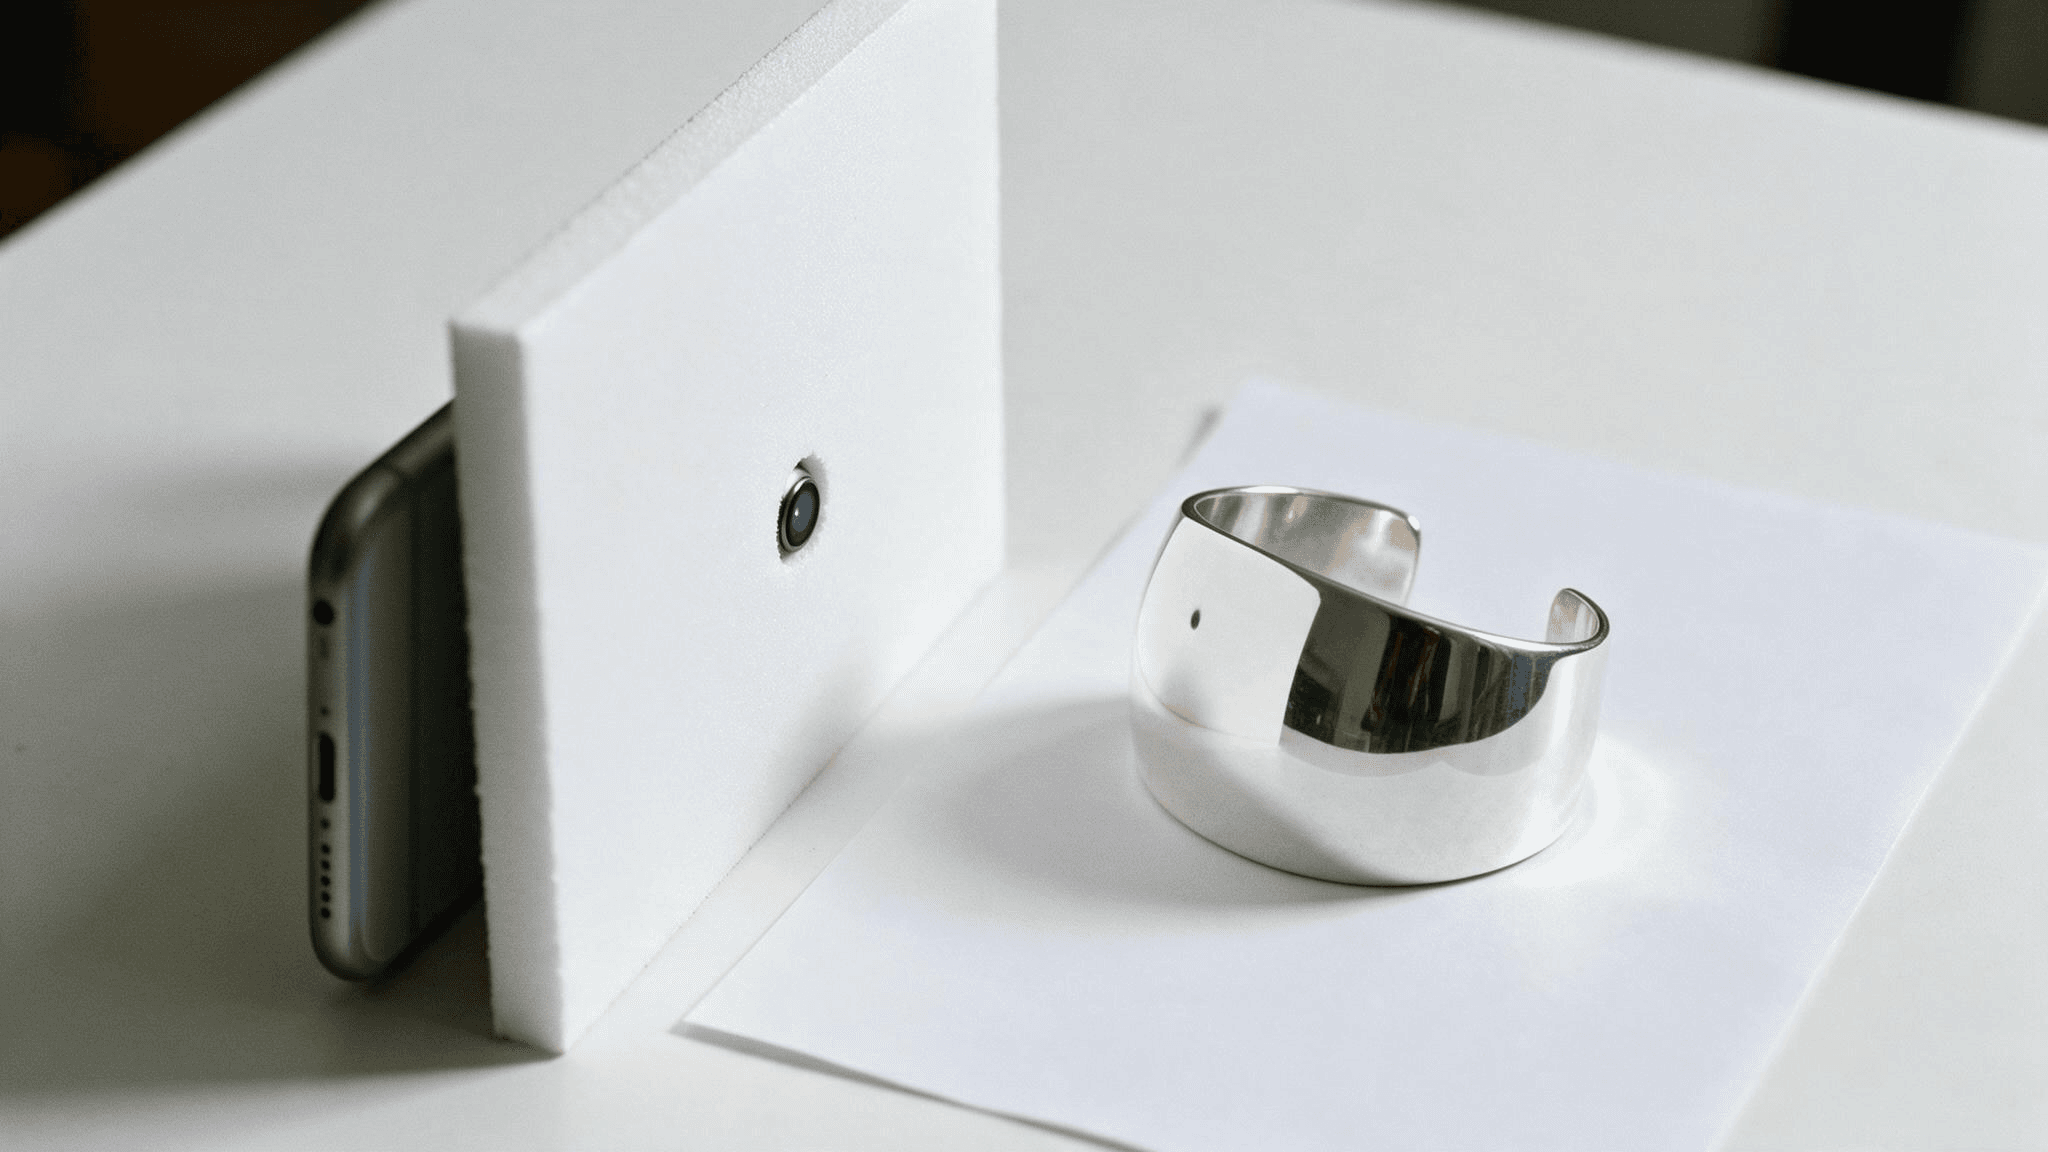
Three more habits keep reflections down:
- Zoom to 2x or 3x and step back. Your phone becomes a much smaller shape in the metal, and the longer lens keeps the piece's proportions closer to what the eye sees.
- Tilt flat faces a few degrees. A signet ring or bar pendant shot square-on mirrors the lens straight back. A slight angle sends the reflection off to the side.
- Clean the piece right before you shoot. Macro shots make fingerprints on polished metal impossible to miss. Wipe it with a microfiber cloth and handle it by the edges or with cotton gloves.
Phone Macro Mode for the Tiny Details Buyers Zoom Into
Buyers zoom in on the parts that prove quality: the clasp, the prongs, the 925 or 14K stamp, the inclusions in a stone. Those details sit a few millimeters across, so the phone has to focus far closer than it does for everyday shots.
Recent phones handle this with a macro mode. Apple says Macro mode focuses "as close as 2 centimeters," and on supported iPhone models the Camera app switches to the Ultra Wide camera to do it. Google's Macro Focus help page lists the Pixel 7 Pro, Pixel 8, Pixel 8 Pro, Pixel 9 and later.
| Phone | How to use it | Closest focus | Best for |
|---|---|---|---|
| iPhone with Macro mode | Move in close and Camera switches to macro on its own | As close as 2 cm, per Apple | Clasps, stamps, prong settings |
| Pixel with Macro Focus | Tap to focus up close; a flower icon appears when it's active | Not listed on Google's help page | Stone close-ups, engraving |
| Phone without macro | Shoot at 2x from about 10 to 15 cm, then crop | Depends on the model | Whole-piece detail shots |
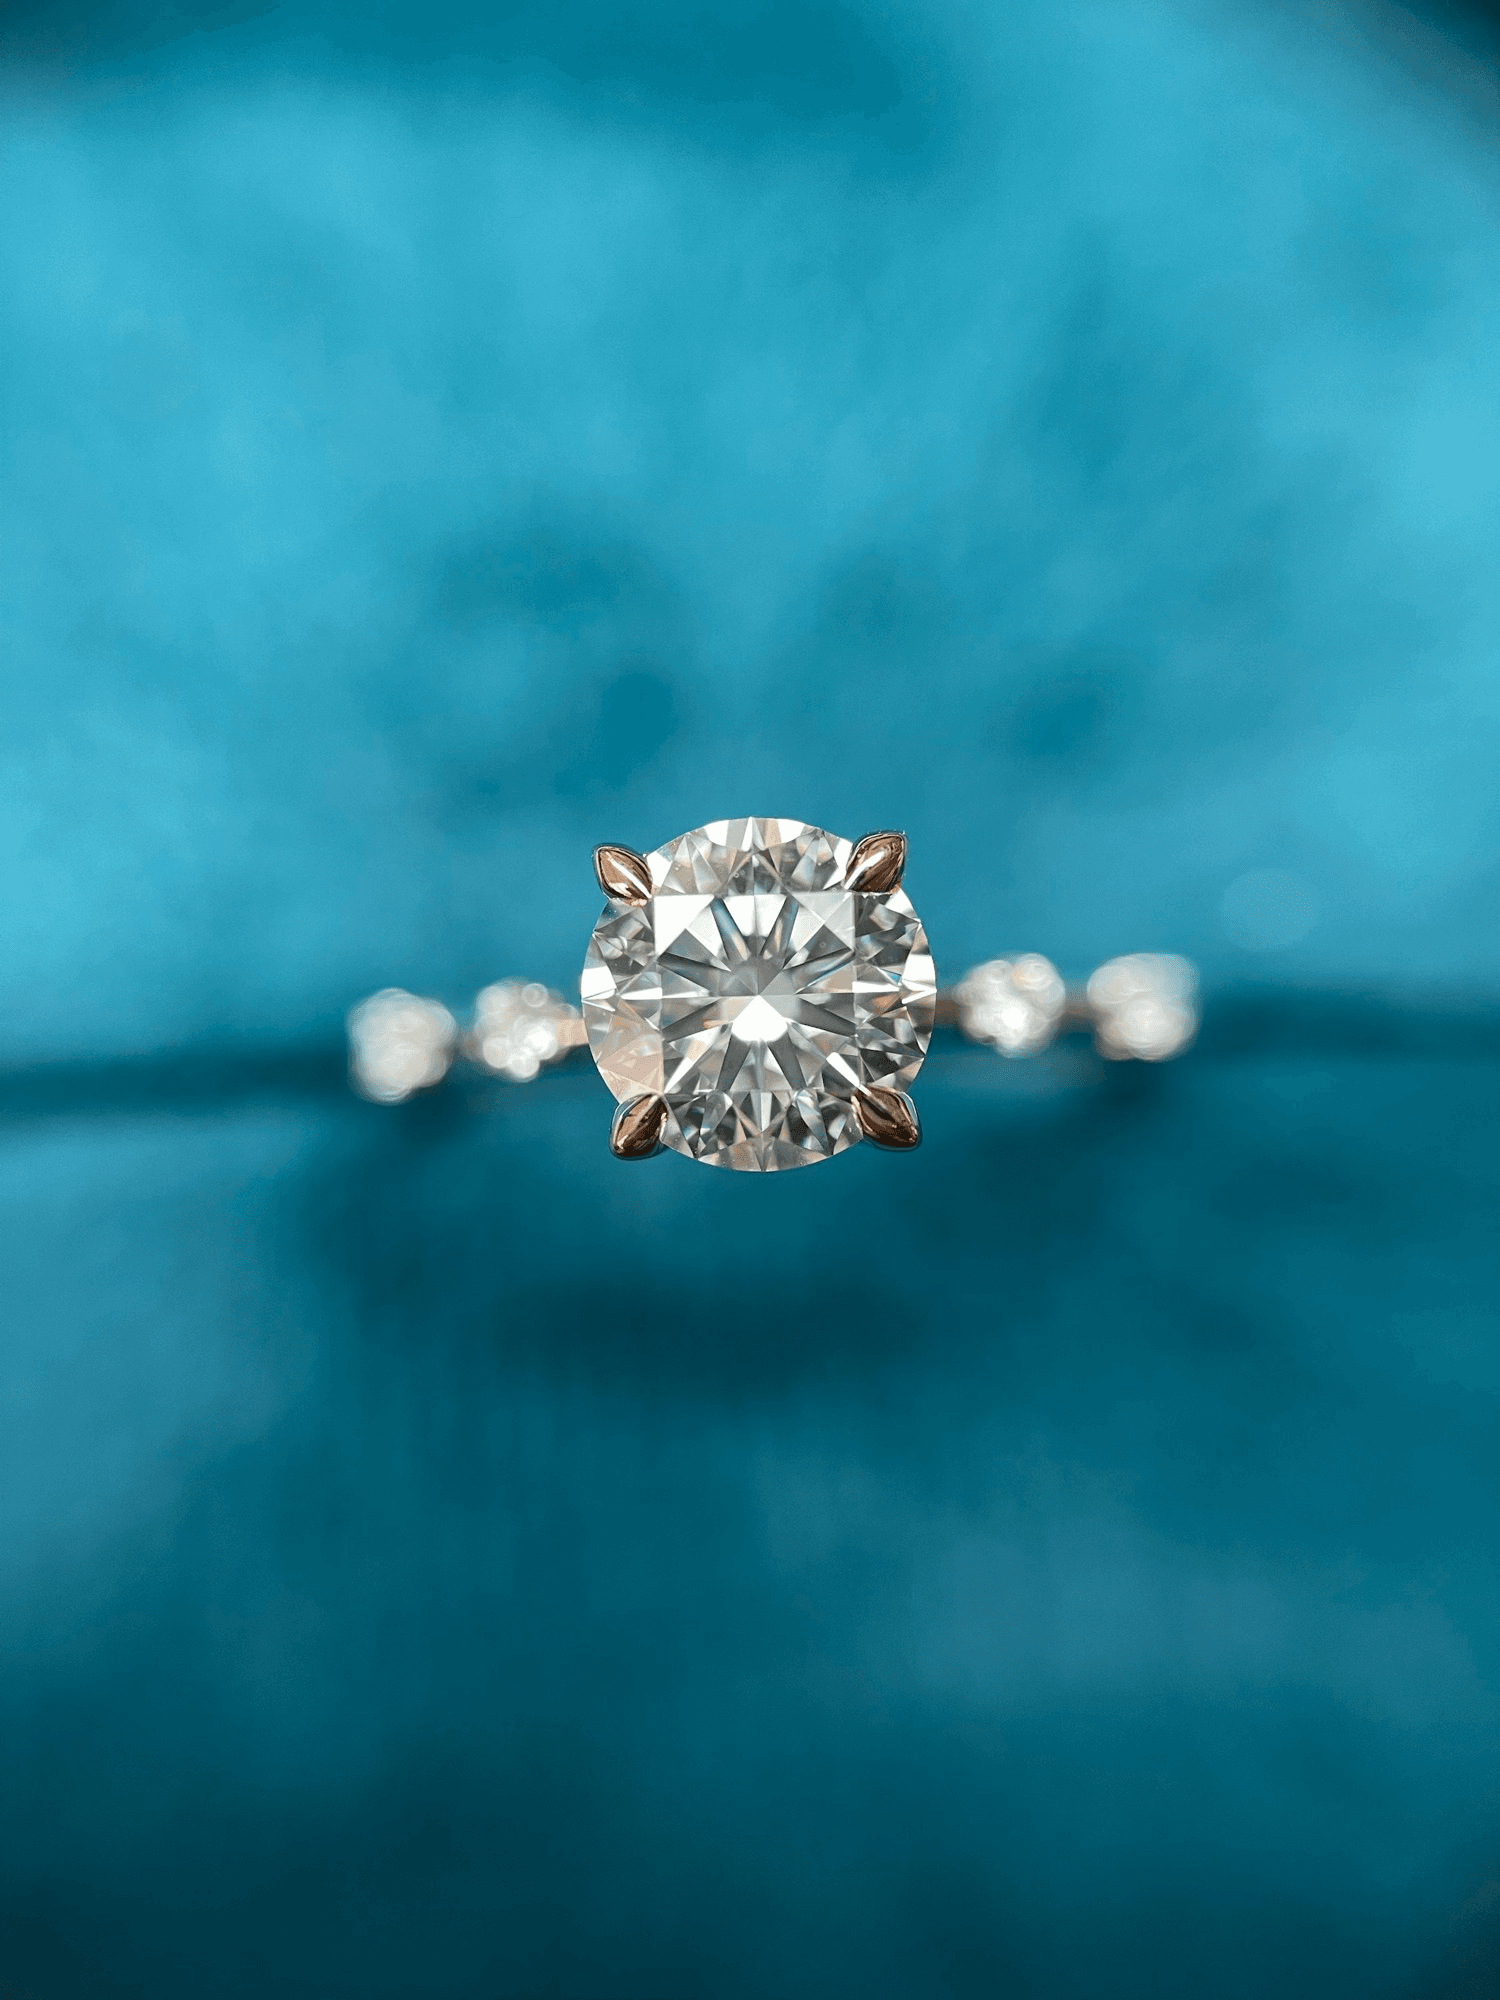
Shot on an iPhone 13 Pro. Photo by nirav navadia on Unsplash.
Two settings matter more than the lens. Press and hold on the piece to lock focus and exposure, so the phone stops hunting every time a hand moves. And skip Portrait mode for jewelry: its simulated blur can smear the edges of fine chains and prongs, which are the exact details you're trying to show.
Show Real Size in Every Jewelry Listing
A 7 mm stud and a 12 mm stud look the same on a white background. A product photo hides size by default, so every listing needs at least one frame with a reference the buyer already knows: a finger, a neck, an earlobe.
Put the exact measurements in the description too, because a photo shows proportion and the text confirms it.
How to Photograph Rings
Stand the ring upright with a pea-sized ball of museum putty hidden behind the shank. Turn it to a three-quarter angle so the center stone faces the lens and the side profile of the band shows. Then flip it and shoot the inside of the band in macro if there's a stamp or engraving.
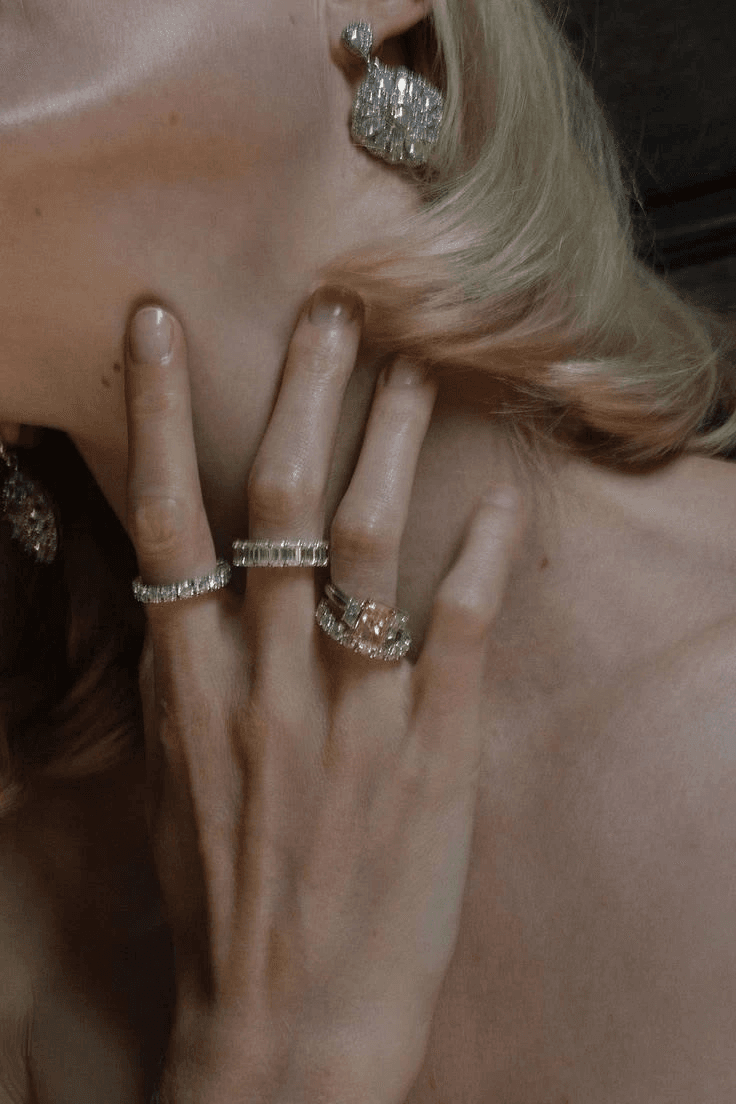
The on-hand shot does the size work. Use the ring finger, keep the hand relaxed with the back toward the camera, and shoot by the same window light. For stacking rings, show the full stack on one finger and the bands next to each other, so buyers can see how wide the combination sits.
How to Photograph Necklaces
Chains are hard to keep still and easy to tangle in the frame. For flat shots, shape the chain into a soft teardrop with the pendant at the bottom, and pin it to a foam board with sewing pins hidden under the links.
Lay the open clasp beside it, since buyers want to know whether it's a lobster clasp or a spring ring.
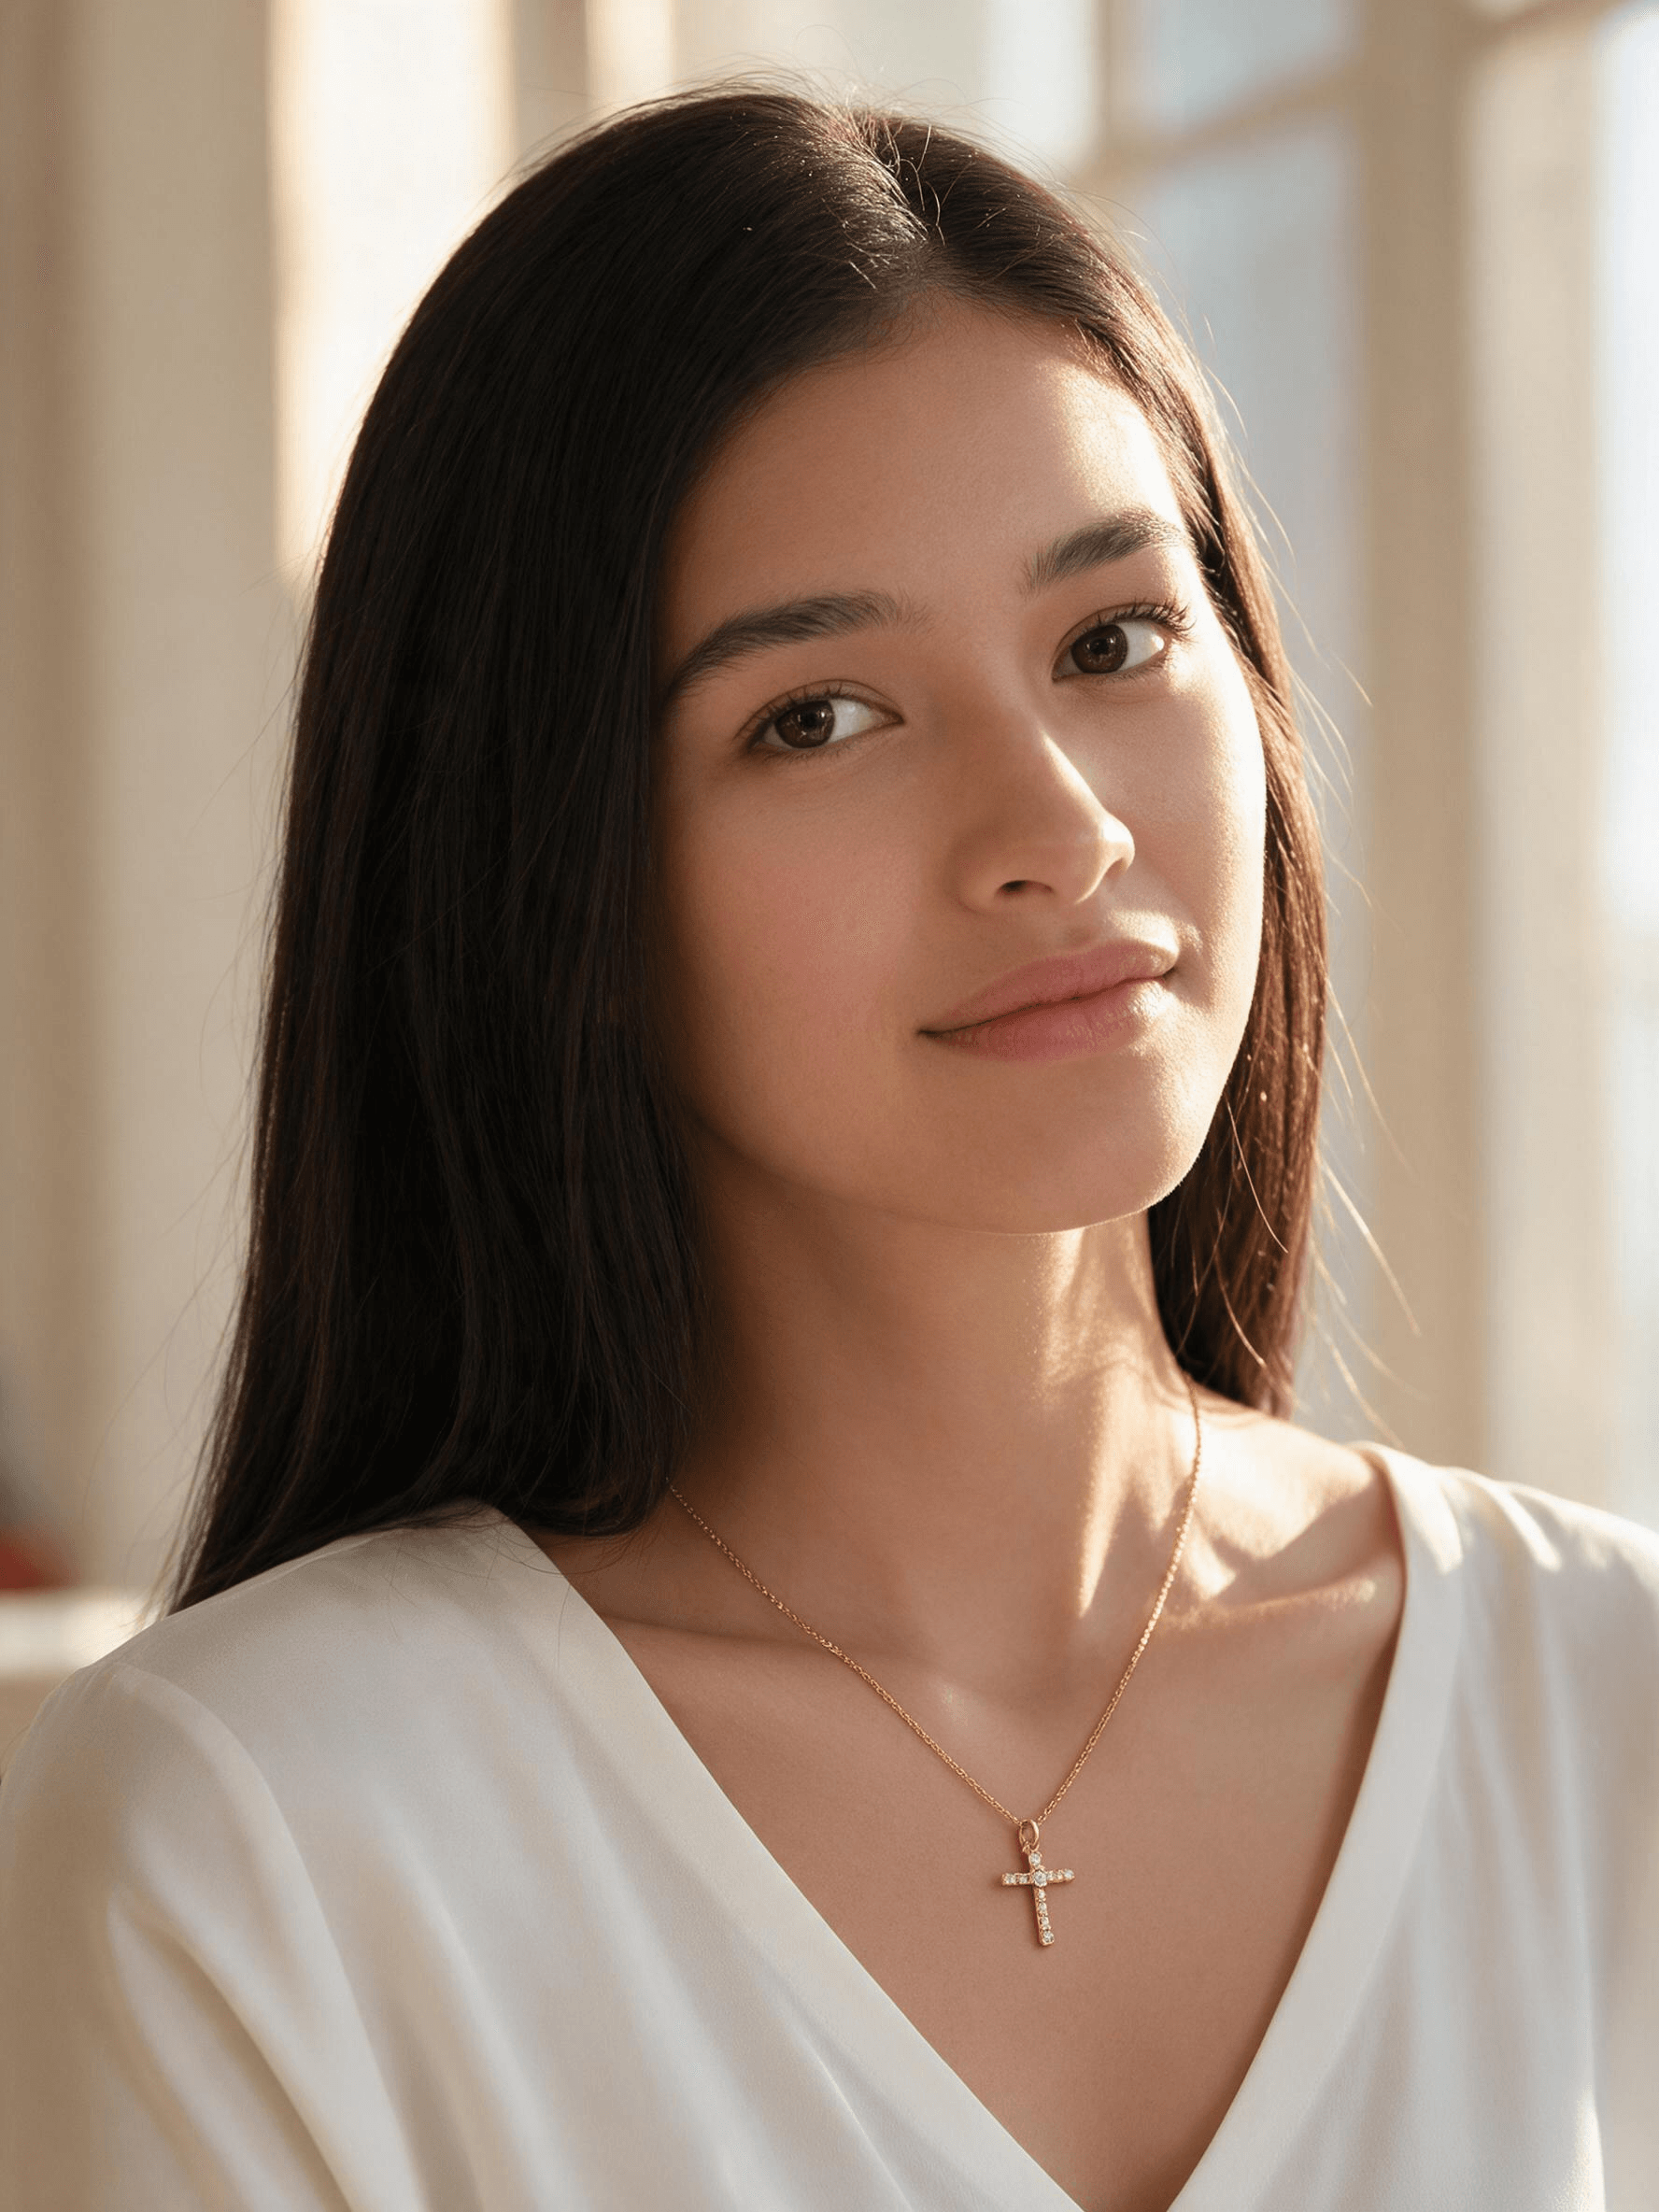
For size, put it on a neck. State the chain length in inches and show where that length lands on a real person, whether that's the collarbone or the middle of the chest. A bust form works when you shoot dozens of pieces, but a person shows the drape better.
How to Photograph Jewelry on a White Background
Phones meter for a middle gray, so a white backdrop comes out dull gray, and often blue. Tap the piece, then drag the exposure slider up until the background reads white. Stop before the brightest highlights on the metal turn into flat white blobs.
Color is the other half. A blue cast turns yellow gold pale and greenish. Warm room light turns white gold and silver yellow. In any editor, use the white balance or temperature tool and set it from the background, which should be neutral. Fix the background, not the piece: pushing saturation to rescue the gold makes it look like brass.
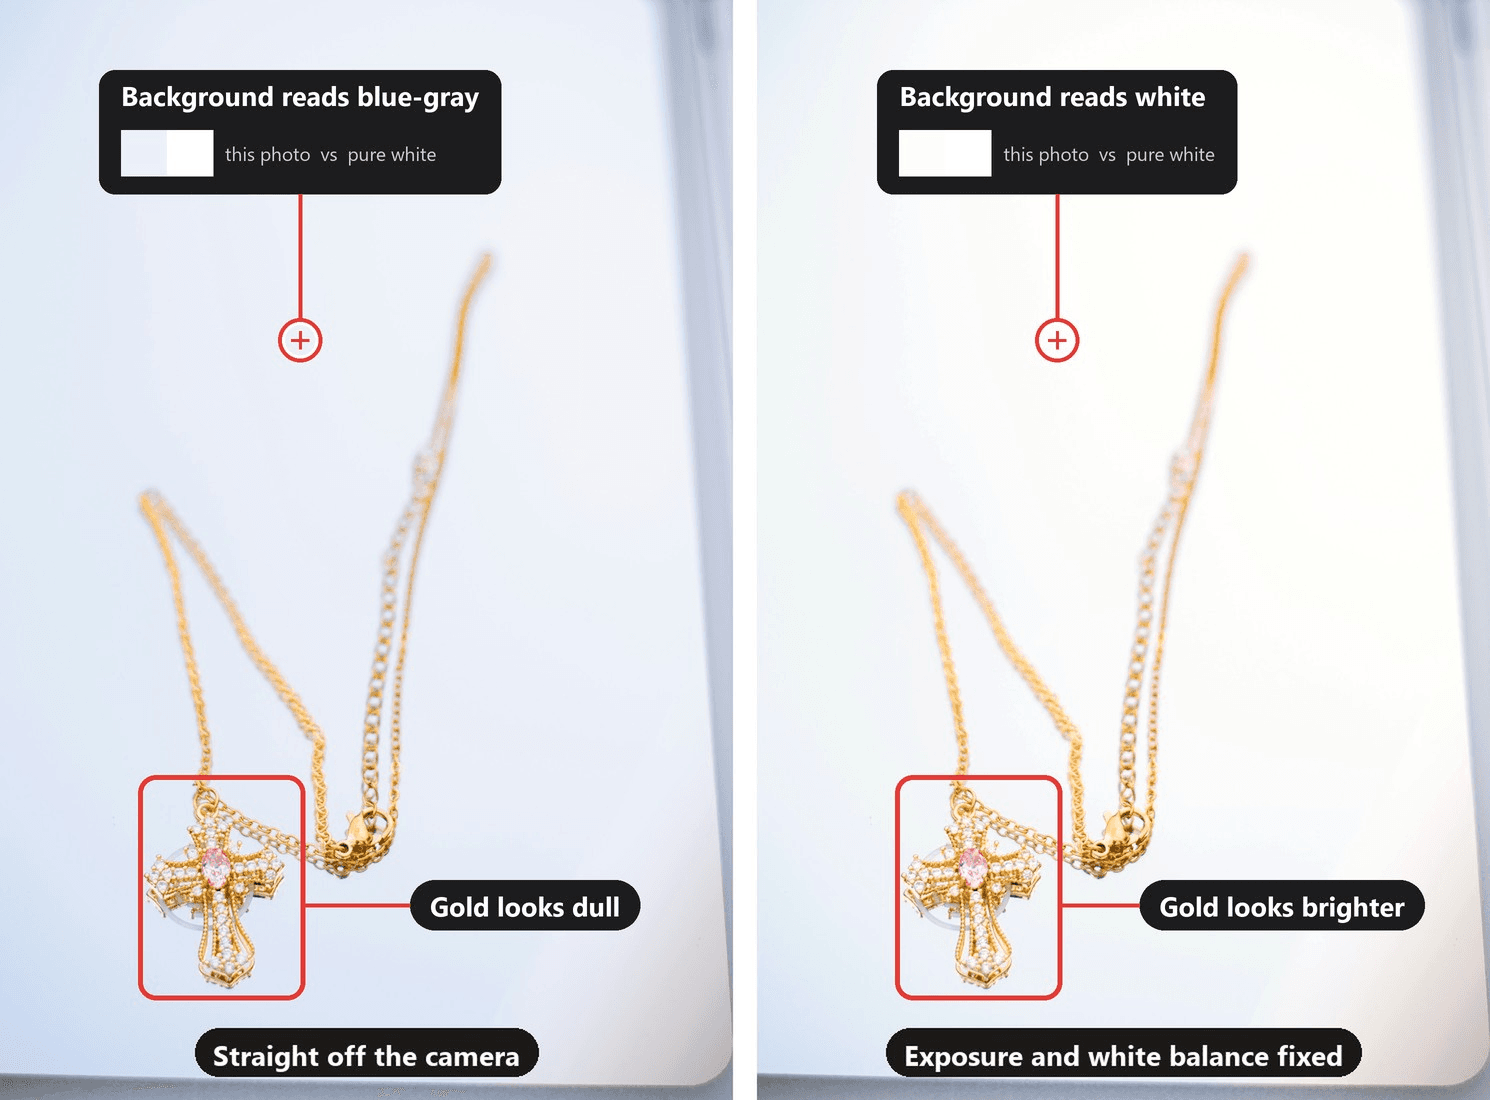
Original photo by César O'neill on Unsplash; the right half has only exposure and white balance changed.
If a marketplace wants a pure white background, cut the piece out after the color is right. Our white background guide explains why pure white can wash out light subjects, which includes silver and diamonds.
How to Take Product Photos for Etsy Jewelry Listings
Etsy has a specific rule about what goes in a listing. Its Listing Image Requirements, last updated July 9, 2024, require "original photos of the actual product buyers will receive, not renderings or stock photos."
The exceptions cover personalized items and items made with a production partner. For a handmade or sourced piece of jewelry, every photo in the listing should be a real shot of that piece.
The technical side is generous. Etsy's image best practices recommend photos at least 2,000 pixels wide and tall, and Etsy's listing help says each listing can hold up to 20 photos and 2 videos.
| Etsy rule | What Etsy says | What it means for jewelry |
|---|---|---|
| Original photos | "Original photos of the actual product buyers will receive" | Shoot the exact piece; no renders or supplier stock images |
| Photo size | At least 2,000 pixels in width and height, recommended | A 12-megapixel phone photo (4032 x 3024) clears this before cropping |
| First photo | At least 635 pixels "to avoid showing up lower in searches" | Crop with care so the first shot stays sharp and large |
| Photo and video count | Up to 20 photos and 2 videos per listing | Room for every shot on the list, plus a short clip |
Order matters more than count. Lead with the clean front view, since that's the image shoppers meet in search. Follow with the three-quarter view, the macro detail, the on-body shot and the packaging. Then add a short video of the piece turning in the light: sparkle is motion, and no still photo shows it as well.
FAQ
What background color works best for jewelry photos?
White or light gray for the first photo. It keeps the piece readable in small search thumbnails and makes your shop grid look consistent. Black velvet or slate makes diamonds and silver pop in scene shots, but it hides dark details like oxidized silver. Pick one main background for the whole shop and save textures like linen or stone for lifestyle images.
How do you keep gold jewelry from looking orange in photos?
Warm bulbs are one cause. The other is auto white balance, which can misjudge a frame filled with yellow metal. Leave a strip of white background in every shot so the camera has a neutral reference, or use a Pro mode that lets you set white balance by hand. Before posting, hold the piece next to the screen and compare.
How do you photograph earrings?
Always show the pair. Lay studs flat with the posts hidden behind them, one slightly offset so both stones read. Hang drops and hoops from a clear acrylic stand or a card with two pinholes so they fall naturally. Add one on-ear shot for scale and a macro of the post or hook, since buyers check the closure type.
Do you need a light box for jewelry photography?
Not to start. A window, tracing paper and two cards do the same job for free. A light box earns its place when you shoot many pieces a week and need identical light every time, or when you don't have a usable window. Choose one with room for a black card inside, because an all-white box can make polished metal look flat.
Can AI create jewelry photos without photographing the piece?
A text prompt can generate a ring or necklace from nothing, which helps with mockups, mood boards or a design you haven't made yet. It can't show the exact piece a buyer will receive, so sales images should start from a real photo. If you want the prompt-only route for concepts, our guide to AI product photography includes jewelry prompt templates.
Conclusion
Good jewelry photos come from controlling what the metal sees. Diffused window light and two cards handle the metal, one point light makes the stones flash, and a holed white card keeps your phone out of the shot. Macro mode and an on-body frame then answer what buyers want to know: is it well made, and how big is it?
Once you know how to photograph jewelry this way, one clean shot per piece is enough to start. Keep the real photos for your Etsy listing, and let a workflow like Image ads build the scenes and posters around that same shot for your store, ads and social feed.





