You followed the YouTube video. You installed ComfyUI, added the ReActor node, hit Queue Prompt, and got this instead of a face swap: fatal error C1083: Python.h: No such file or directory.
One user put it best in the ReActor repo, after insightface refused to build on Python 3.13: "ChatGPT and Claude didn't help either... I just got another error and fell into the fixing rabbit hole" (issue #166, 2025).
I've been in that rabbit hole. So this guide does both jobs honestly. First, the real ComfyUI face swap tutorial: the exact nodes, the exact settings, the traps, all of it. Then the escape hatch: the same swap, rebuilt in a browser tab, thirty seconds, no install, and it goes all the way to video.

A frustrated man at night in front of two monitors, one full of tangled ComfyUI node wires with a red error dialog, the other a wall of terminal errors
Key Takeaways
- ReActor is the default ComfyUI face swap node: free, open source, and reborn as an SFW-only project after the original repo got blocked (ComfyUI-ReActor, 2026).
- Its swap engine, inswapper_128, outputs faces at 128x128 pixels. That's why raw swaps look soft until you stack a face restore model on top.
- Video face swaps run frame by frame. One regression clocked 81 frames at 22 minutes on an RTX 4090 before it was fixed.
- A three-model cloud chain gets the same swap in about 30 seconds per image, plus a real video and GIF at the end, with zero installs.
- For the still-image swap on its own, Atlas Cloud's free AI face swap tool runs the same InSwapper 128 engine at no cost, with no usage cap and no watermark per its own FAQ.
The ComfyUI Face Swap Result We're Building Today
Look first, read later. Left is the original Condescending Wonka still, the 1971 Gene Wilder frame that became one of the most-used meme templates on the internet. Right is the same frame with a completely different face fused in. Same smirk, same top hat, same soft film grain, new person.
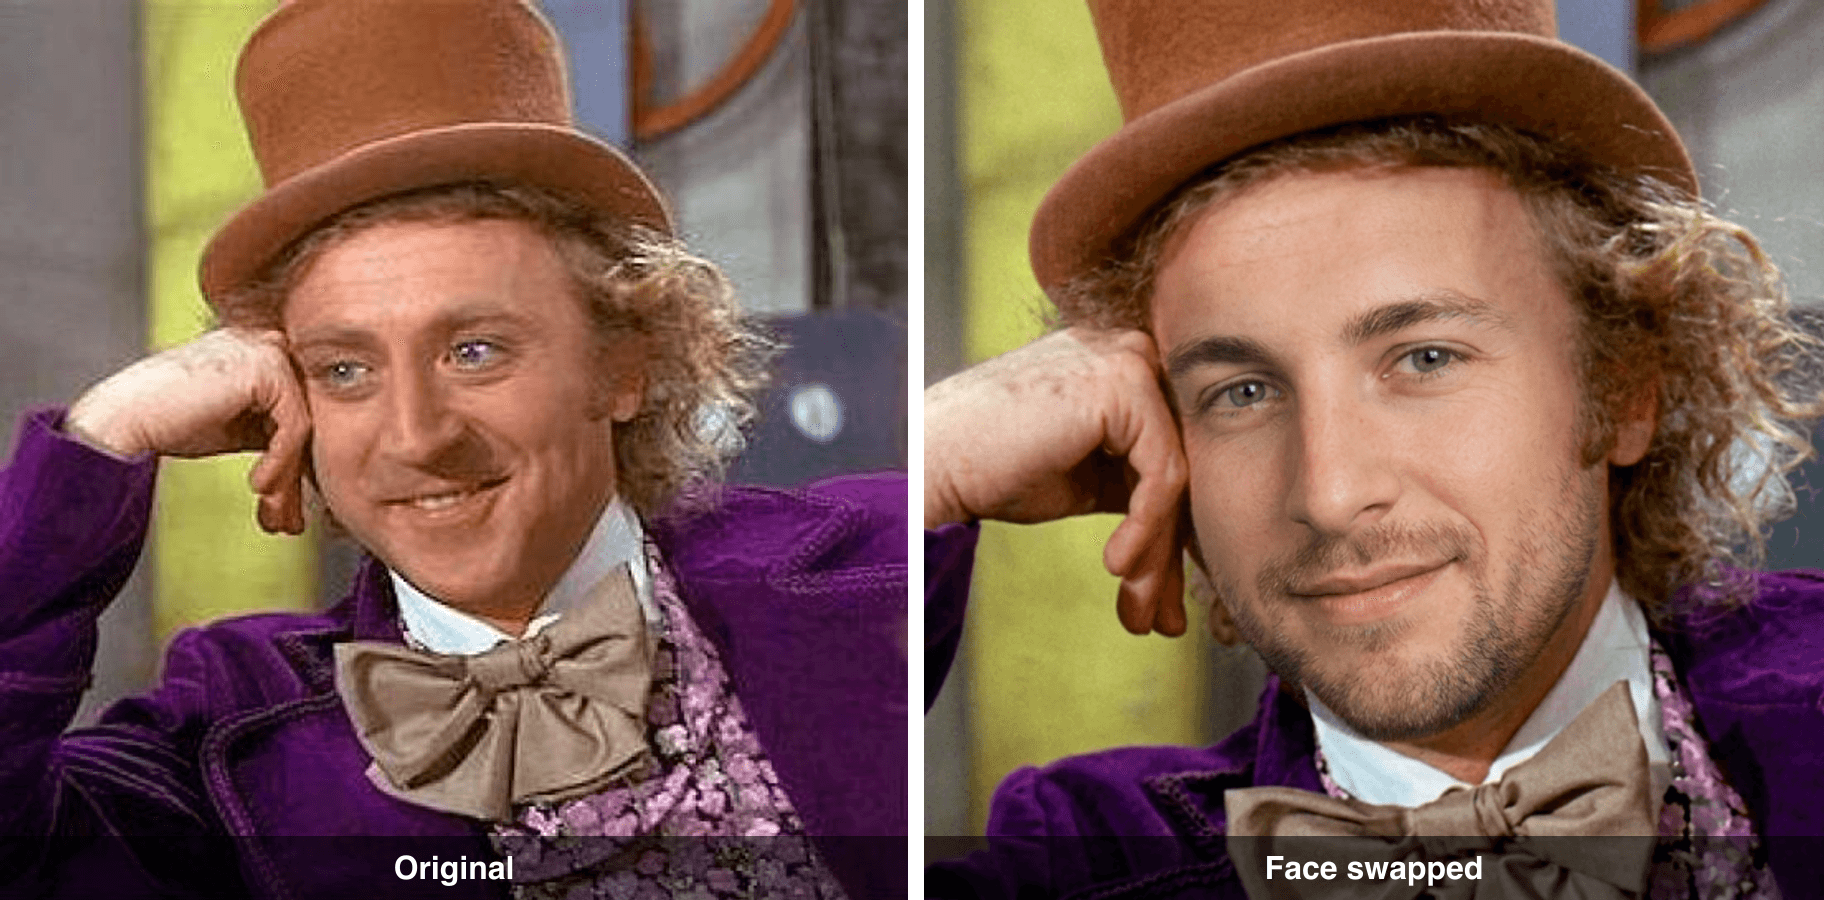
Side by side comparison: the original Condescending Wonka meme still on the left, the same frame with a new face fused in on the right
And because a smirk this smug deserves motion, here's the same swapped frame animated into a looping GIF:
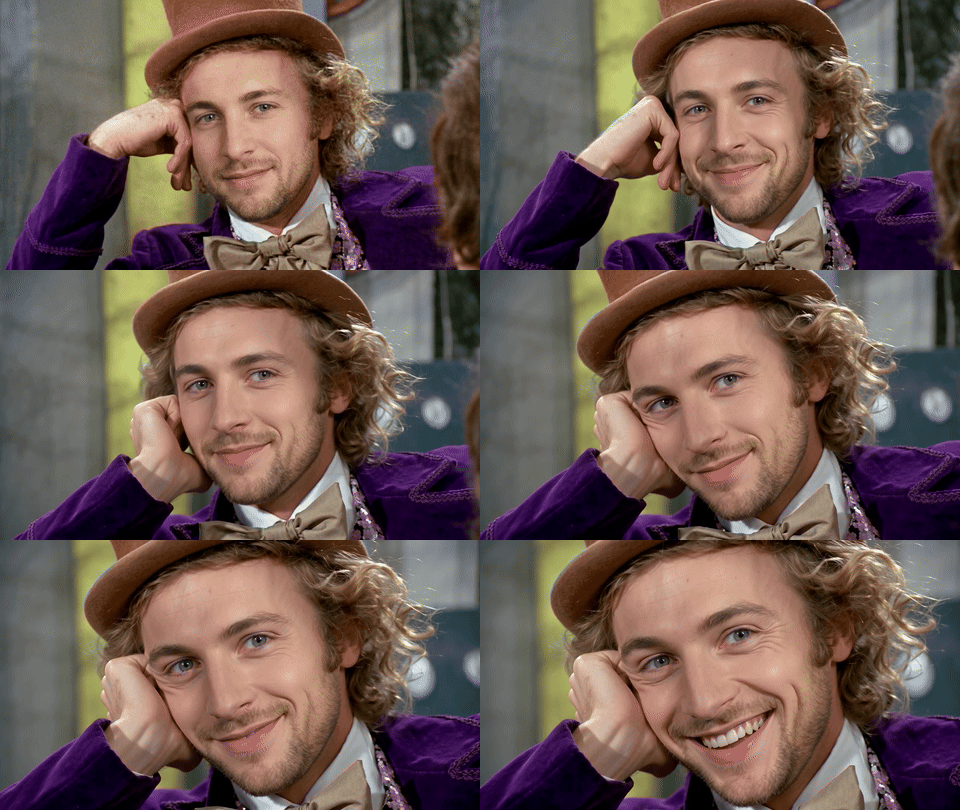
The face-swapped Wonka frame animated into a looping GIF, the smirk widening as the camera slowly pushes in
Both images above are reachable two ways. Path one is the classic ComfyUI face swap workflow with ReActor, which this tutorial covers node by node. Path two is a cloud chain I ran in one browser tab on Atlas Cloud, which took about thirty seconds per step. You'll get both, and you can decide how you value your evenings.
Why ComfyUI Face Swap Is Everywhere, and Why First Attempts Fail
ComfyUI earned its crown. The node-graph editor sits at around 123k GitHub stars in 2026, and "comfyui face swap" became a default search because the tool gives you total control: pick the swap model, pick the restore model, chain it into any pipeline you want.
The face swap part of that ecosystem has drama built in. The original ReActor repo was taken down from GitHub, then came back as ComfyUI-ReActor, a strictly SFW version with built-in nudity detection that refuses unsafe inputs. That's the version everyone installs today.
So why do so many first attempts end in tears? Four reasons come up over and over:
- The insightface build wall. ReActor depends on insightface, which compiles C++ at install time. Wrong Python version, and you get the Python.h error from the intro. Python 3.13 is a known offender; the library that powers half the internet's face swaps hasn't caught up with it.
- The 128-pixel face. The swap model is called inswapper_128 because 128x128 is literally its output resolution. Every raw swap looks slightly melted until a face restore model rebuilds the detail.
- Video is frame-by-frame pain. A face-swapped video is just hundreds of individual image swaps. One version regression made 81 frames take 1,341 seconds, about 22 minutes, on an RTX 4090 with 24GB of VRAM (issue #72, 2024). It was fixed, but the frame-by-frame math never goes away.
- No NVIDIA, no party. The acceleration stack assumes CUDA. On a Mac or an AMD card, the swap step mostly falls back to CPU, and everything above applies at a crueler multiple.
None of this means skip ComfyUI. It means go in with the right settings and honest expectations. Here they are.
The Classic ComfyUI Face Swap Workflow: ReActor Step by Step
This is the part most "tutorials" rush. Slow down here and your first swap works.
Installing ReActor for ComfyUI Face Swap
The clean path in 2026:
- Open ComfyUI Manager, search "ReActor", install ComfyUI-ReActor, restart.
- Download inswapper_128.onnx and drop it into ComfyUI\models\insightface.
- Face restore models (GPEN-BFR-512, CodeFormer, GFPGAN) live in ComfyUI\models\facerestore_models. The Manager can fetch these too.
- Good news: since version 0.7.0, the new ReActor core removed the old Visual Studio C++ Build Tools requirement that broke thousands of Windows installs.
- Bad news: stay off Python 3.13 for now. insightface 0.7.3 fails to compile against it. Stick with the Python that ships inside the ComfyUI portable build.
If the install finishes but ReActor nodes don't appear, check the console log at startup. Nine times out of ten it's a half-built insightface, and the fix is rerunning install.bat with the right Python, not reinstalling ComfyUI.
The ComfyUI Face Swap Workflow: Nodes and Settings That Matter
The minimal image workflow is four nodes:
Load Image (your target picture) + Load Image (the face you're swapping in) → ReActor Fast Face Swap → Save Image
If you're generating the target with Stable Diffusion in the same graph, route your VAE Decode output into ReActor's input_image instead of a Load Image node. Here's what the wiring looks like in practice, from Comflowy's excellent node-by-node guide (Comflowy, 2024):
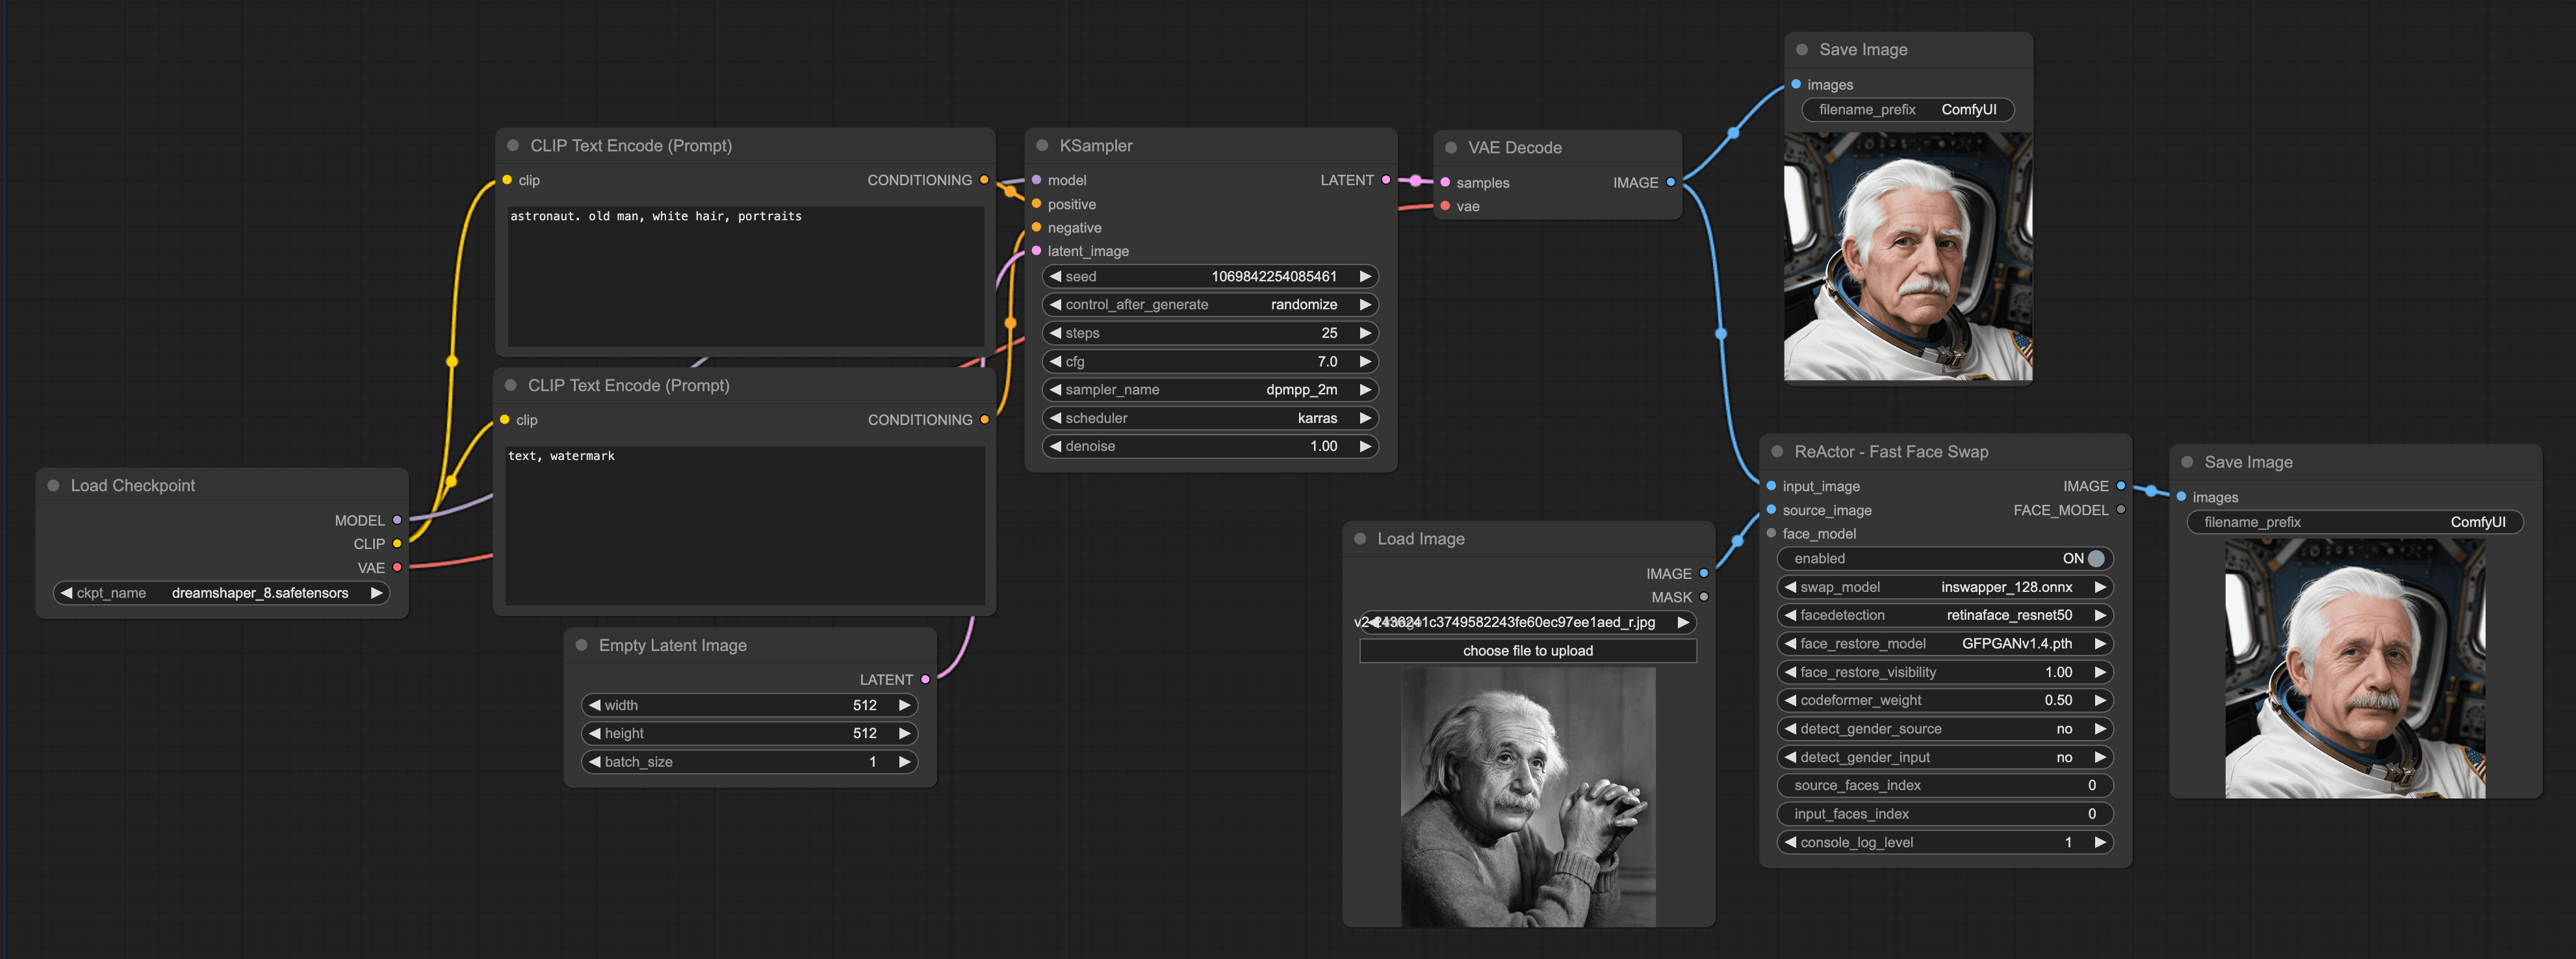
ComfyUI face swap workflow diagram showing Load Image nodes wired into the ReActor Fast Face Swap node and out to Save Image
The settings panel is where swaps go from melted to decent. My cheat sheet:
| ReActor setting | Recommended value | Why |
|---|---|---|
| swap_model | inswapper_128 | The only real option; it's the engine |
| facedetection | retinaface_resnet50 | Most accurate detector; smaller ones are faster but miss angled faces |
| face_restore_model | GPEN-BFR-512 | Rebuilds detail the 128px swap loses; CodeFormer is the alternative |
| face_restore_visibility | 0.7 to 0.8 | Full strength looks airbrushed; blend it back |
| codeformer_weight | 0.5 to 0.75 | Only if using CodeFormer; lower = more identity, higher = more cleanup |
| input_faces_index | 0 | Which face in the target to replace; count left to right for group shots |
Run that on a clear, front-facing source photo and you'll get a genuinely respectable comfyui face swap. Soft light, no sunglasses, no hair across the face. The source face quality matters more than any setting in the table.
ComfyUI ReActor Face Swap Video, the Honest Version
Yes, a comfyui reactor face swap video is possible, and this is where the hobby becomes a lifestyle. The standard chain:
VHS Load Video (Video Helper Suite splits your clip into frames) → ReActor Fast Face Swap (runs on every single frame) → optional RIFE interpolation (smooths motion) → Video Combine (stitches the frames back).
What the tutorials skip:
- The math is brutal. A 10-second clip at 24fps is 240 face swaps. Even at a healthy 1 to 2 seconds per frame, that's 4 to 8 minutes of GPU time per attempt, and you rarely nail it on attempt one.
- The face swims. ReActor treats every frame independently, so micro-differences between frames read as flicker. RIFE helps, but a comfyui face swap video rarely holds up under slow motion.
- VRAM spikes. Loading a few hundred frames plus detection plus restore models will find your memory ceiling fast.
It works. People post great results. But every one of those results is somebody's whole evening, and that's the context for what comes next.
Where Pica AI and Canva Face Swap Hit Walls
The natural reflex after a failed install is "fine, I'll use an app." The app tier trades your install pain for different walls.
Pica AI is the face swap app that shows up first in search. It's genuinely easy: upload, click, done. But the free tier stings. In my own test the credit counter sat at 4, Pica publishes no open pricing page as of this writing, and third-party reviews consistently report the same pair of limits: watermarked exports and capped resolution on free accounts. Its Trustpilot presence is a small pool of reviews with recurring complaints about billing confusion and support, and video swaps queue noticeably at peak hours. A watermark across the punchline is not a small defect on a meme. The watermark IS the punchline killer.
Canva face swap surprises people in the other direction: it isn't really Canva's. Face swapping in Canva comes from third-party apps in its marketplace, not a native feature. The popular FaceSwap app meters one free credit per day, and photo swaps are the ceiling; there's no serious canva face swap for video. Fine for a one-off slide deck gag, dead end for anything more.
So the app tier saves the install and charges you in watermarks, daily rations, and missing video. Which raises the obvious question: what if you keep ComfyUI's model-mixing freedom and drop everything else?
The Face Swap ComfyUI Workflow, Rebuilt in the Cloud
Here's the reframe that changed how I make these. The reason face swap comfyui setups are powerful is composability: one model per job, chained. That idea doesn't need your GPU. I rebuilt the whole chain from model playgrounds in one Atlas Cloud browser tab, pay-per-run, and each step finished while my coffee was still hot.
The division of labor:
| Job | Model | Why this one |
|---|---|---|
| Generate a source face | GPT Image 2 | Clean synthetic portraits, no real-person likeness headaches |
| Fuse the face into a meme or film still | Nano Banana 2 (edit) | Preserves grain, lighting, and the "it was always like this" look |
| High-fidelity portrait swaps | Seedream 5.0 Pro (edit) | Its polish is wrong for gritty memes but perfect for clean portraits |
| Animate the result | Seedance 2.0 Mini | Image-to-video, 5-second clips at 720p are plenty for a meme |
No installs, no insightface, no VRAM anxiety, and nothing here costs more than pocket change per run. The playgrounds are the metered lane; alongside them, the platform keeps an AI tools hub of free-to-run tools, including the free face swap this guide gets to right after the tutorial.
Cloud ComfyUI Face Swap Tutorial: From Movie Still to GIF
Now the reproducible part. Five steps, every prompt copy-pasteable, and I ran every screenshot below for real. Our target: put a new face into Condescending Wonka and set him in motion.
Step 1: Download the Original Meme, Never Recreate It
The single biggest mistake in AI meme work is asking a model to draw a lookalike of a famous frame. An AI recreation of Wonka is not Wonka. Readers clock the fake in half a second and the joke dies. Download the real template:
plaintext1curl -L -o wonka.jpg https://imgflip.com/s/meme/Creepy-Condescending-Wonka.jpg
That's the actual 1971 film still, complete with the soft grain and slightly faded color that make it read as "the meme" and not "a picture of a man in a hat." Those imperfections are the asset. Guard them through every following step.
Step 2: Generate the Source Face (GPT Image 2)
You can use your own selfie here: front-facing, even light, nothing covering the face. For a public blog I'd rather demo with a synthetic face, so I generated one in the GPT Image 2 playground. Settings: quality high, aspect ratio 1:1.
plaintext1Studio portrait photo of a cheerful man in his late 20s with short brown hair and light stubble, looking directly at the camera, neutral background, soft even lighting, photorealistic, head and shoulders framing.
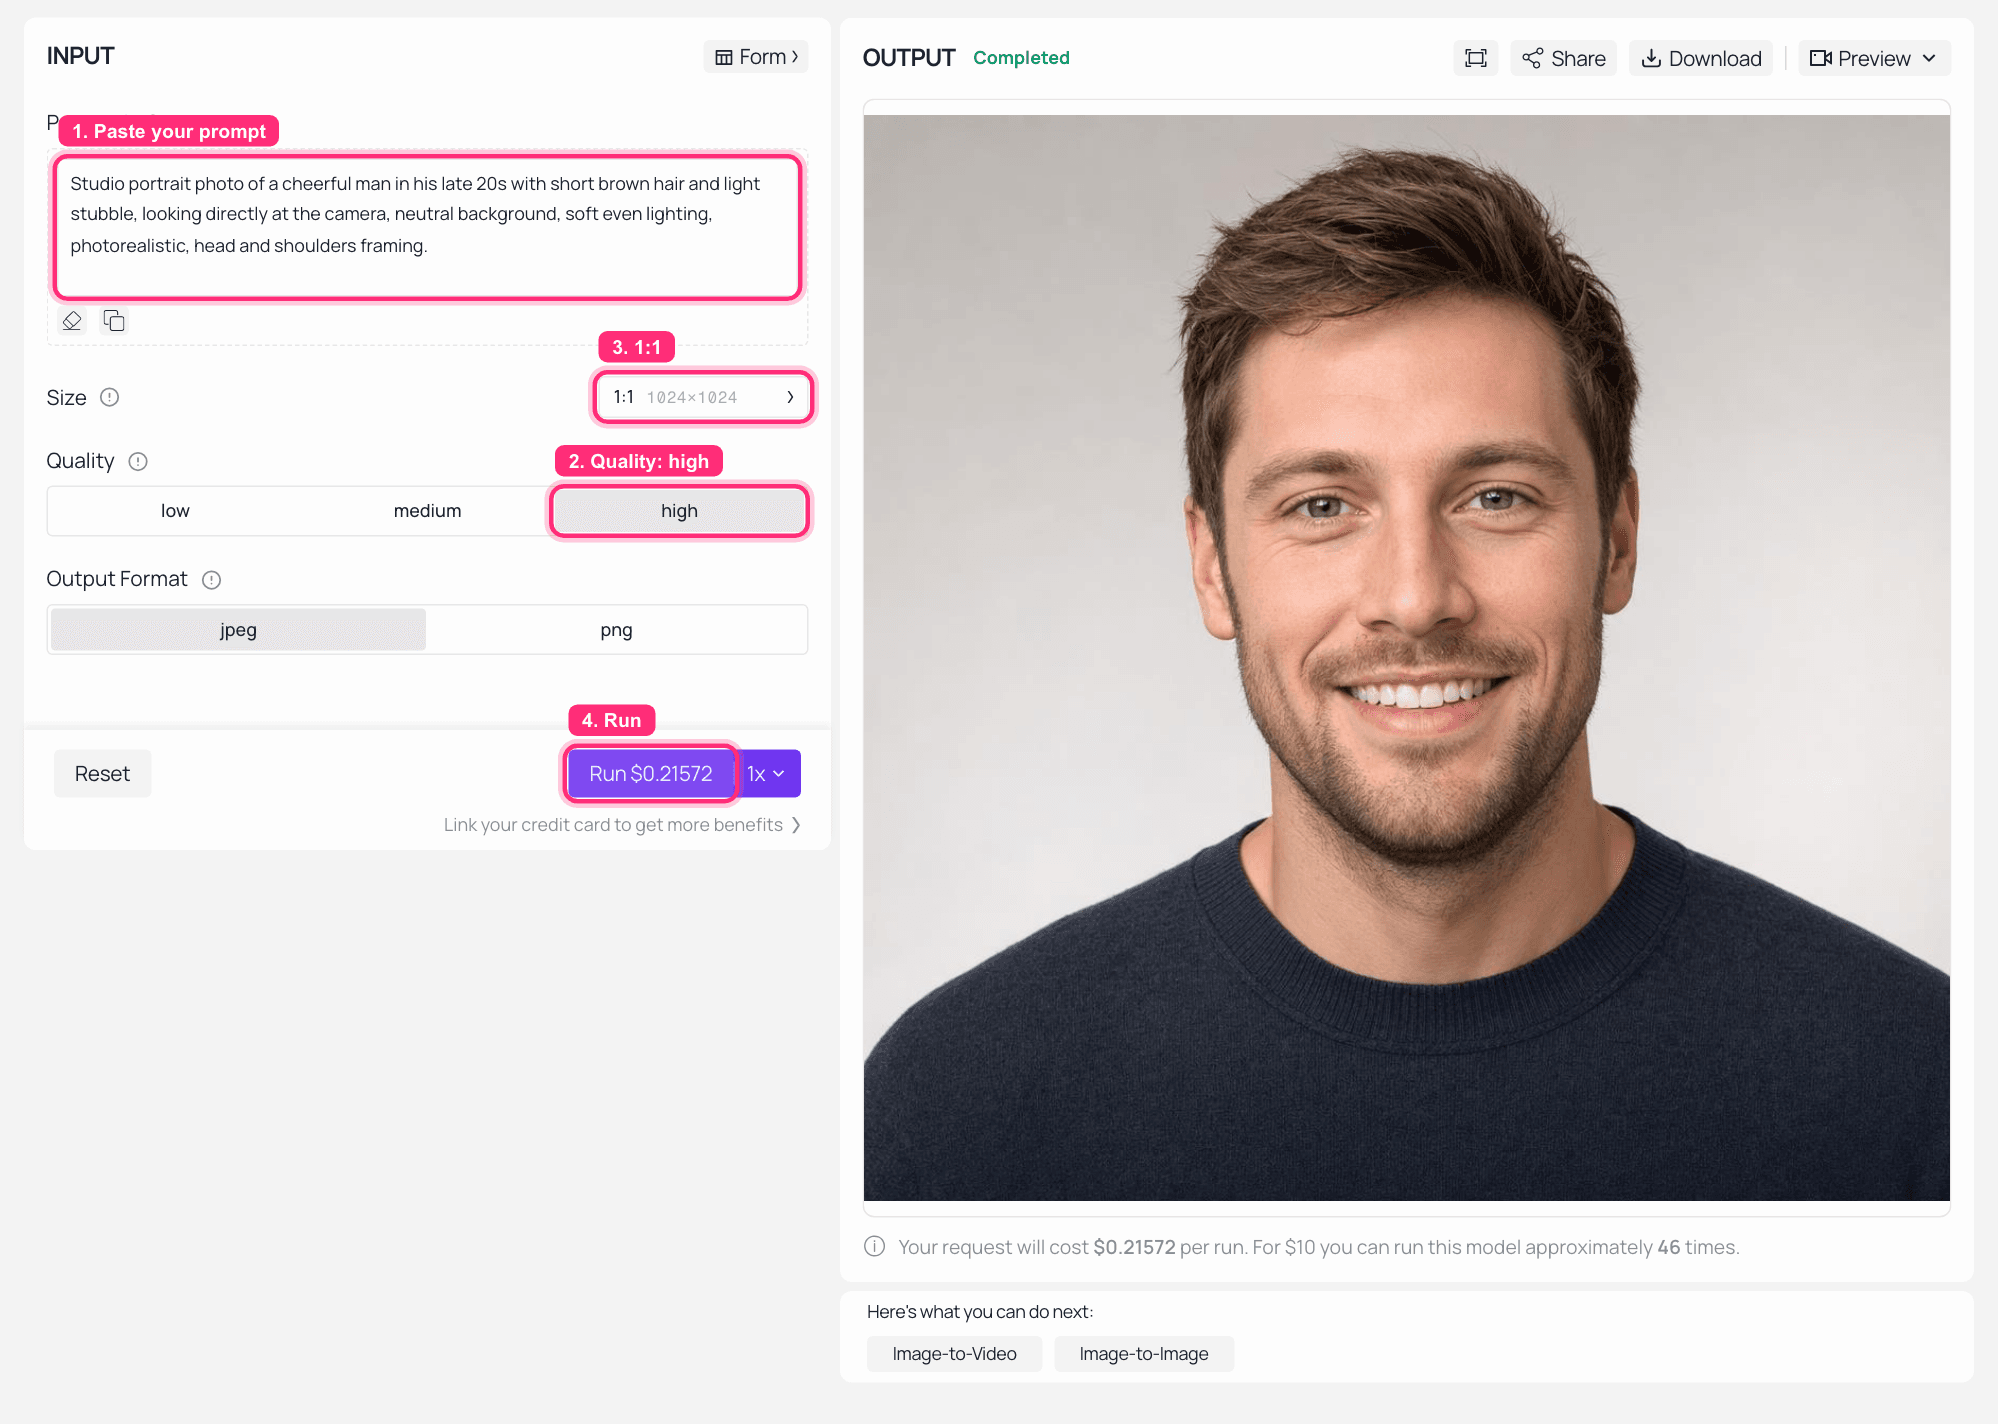
GPT Image 2 playground on Atlas Cloud with the portrait prompt filled in and the finished source face visible in the output panel
Here's the face we'll be carrying through the rest of the tutorial:

AI-generated studio portrait of a cheerful man in his late 20s with short brown hair and light stubble
Step 3: Fuse the Face Swap With Nano Banana 2 Edit
This is the step that separates fusion from the pasted-sticker look. Open the Nano Banana 2 edit playground, upload the Wonka still as image one and your source face as image two, set resolution to 1k, and paste:
plaintext1Replace Willy Wonka's face with the man's face from the second image, fully fused into the still. The face must stay recognizably human and look like the same person: keep his own eyes, eyebrows, nose and mouth. Give him the meme's exact condescending smirk, chin resting on his hand. Strictly preserve the original photo's composition, the purple jacket, the tan top hat, the bow tie, the soft 1971 film grain, colors and lighting. The new face must blend seamlessly into the original frame's texture. Do not sharpen, beautify, or upscale the rest of the image.
One face per run. If a template has two faces, run it twice rather than asking for both at once; edit models handle one identity transfer cleanly and start improvising with two.
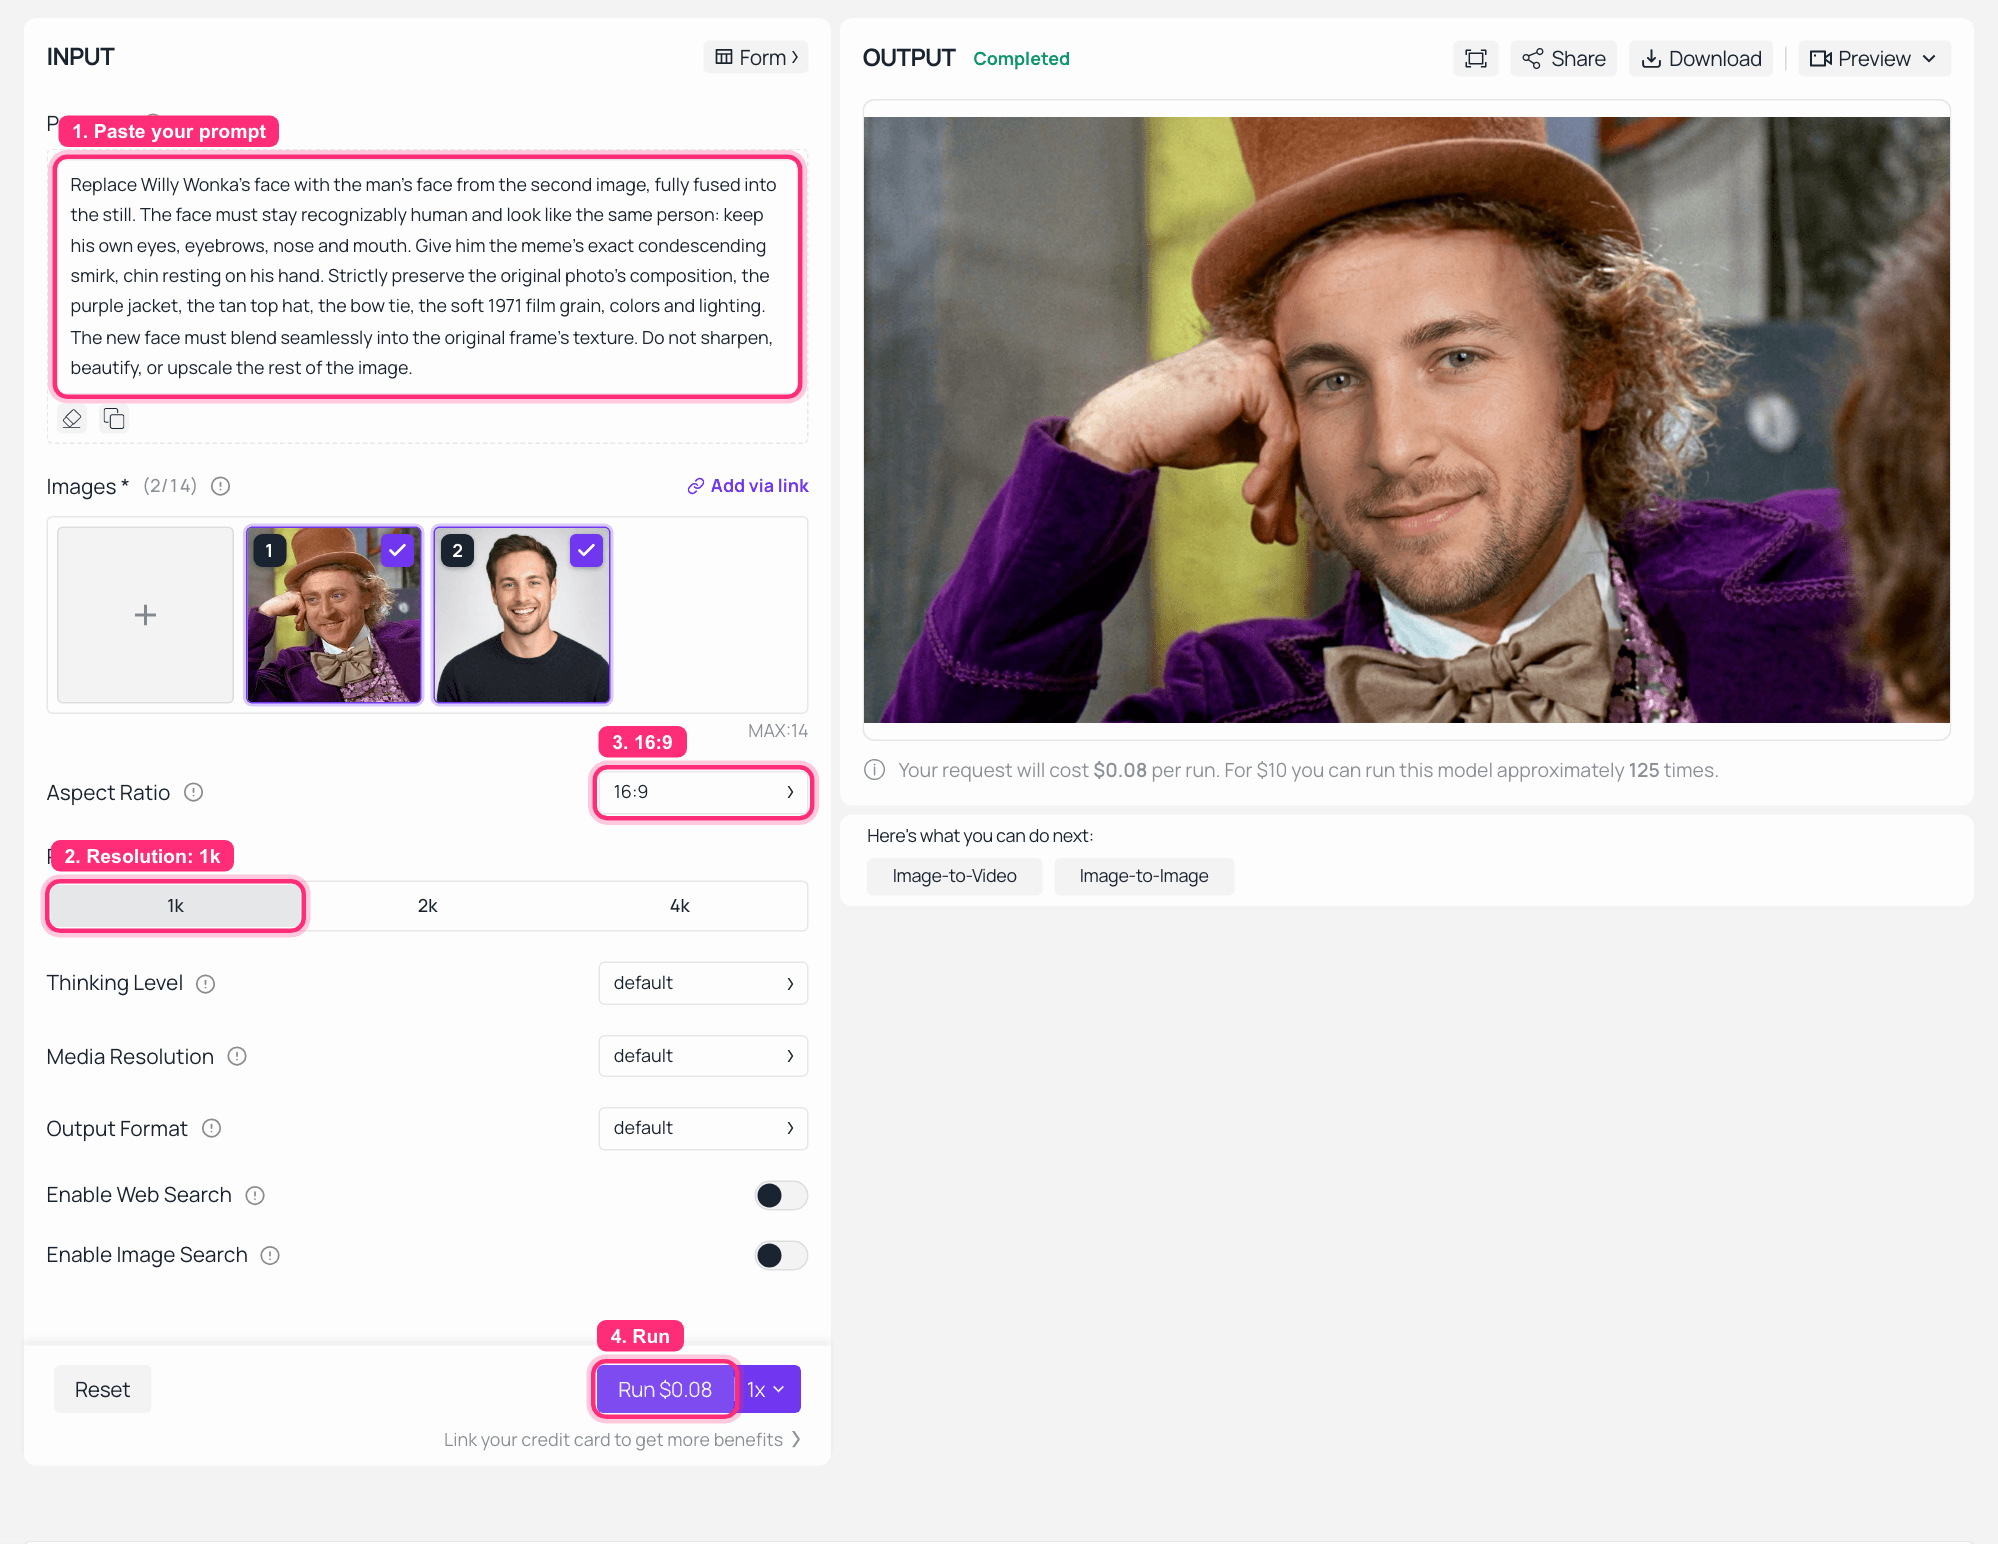
Nano Banana 2 edit playground on Atlas Cloud with the Wonka still and source face loaded and the fused result in the output panel
The output, full size. Note what survived: the grain, the hat shadow, the curly mop of hair, the smug chin-on-hand pose. That's the "always been him" effect no paste-on swap gets you:
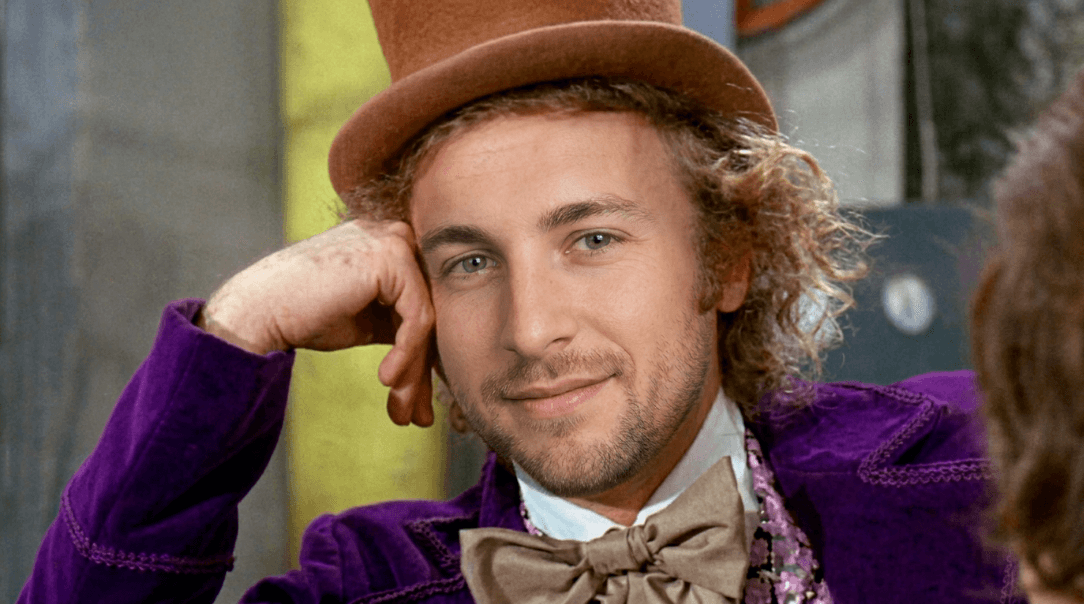
The Condescending Wonka meme with the new face fully fused in, grain and lighting intact
Step 4: Your ComfyUI Face Swap Video Moment, Without ComfyUI
Remember the 240-frames-per-clip math from the ReActor section? Here it's one run. Open the Seedance 2.0 Mini image-to-video playground, upload the fused Wonka frame, set 720p and 5 seconds, and paste:
plaintext1Vintage 1970s film look: the man in the top hat slowly leans further onto his hand as his condescending smirk widens, eyebrows rising slightly, slow gentle push-in on his face, soft film grain flickering, dreamy pastel background staying out of focus, no camera cuts.
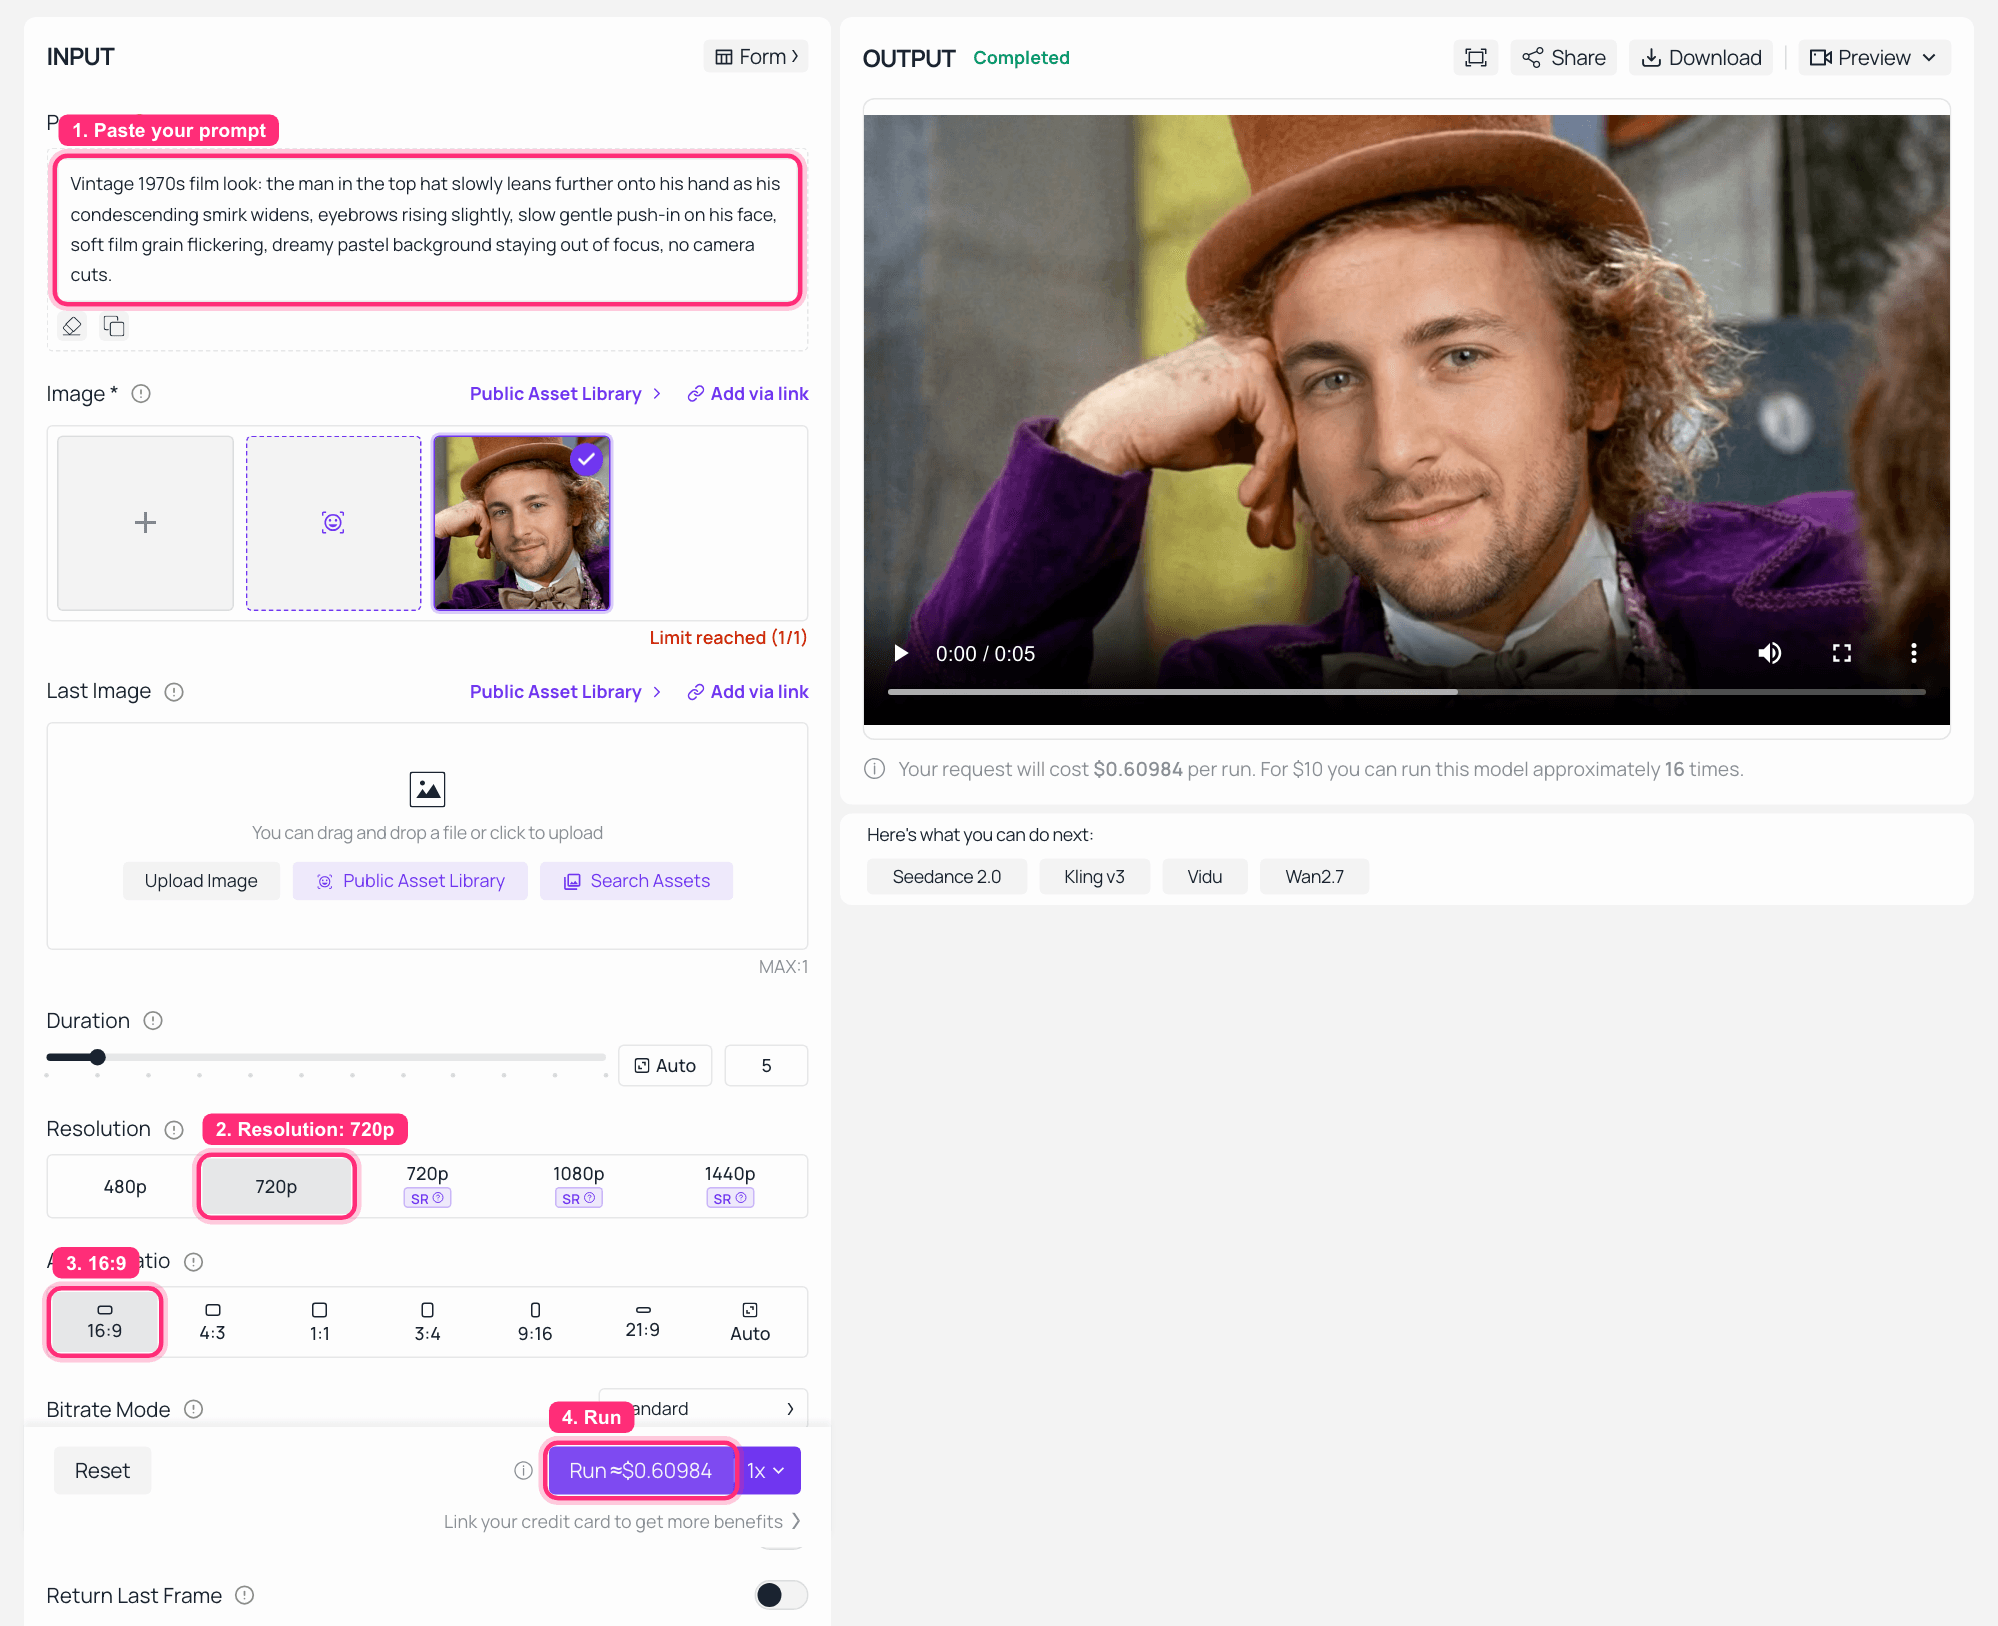
Seedance 2.0 Mini playground on Atlas Cloud with the fused Wonka frame loaded and the finished 5-second video in the output panel
The finished clip is the GIF you saw at the top of this article. Total time for this step: about a minute of queue, zero frames managed by hand, no face swimming because the video model animates one coherent image instead of restitching 120 independent swaps.
Step 5: Turn the MP4 Into a GIF
Honest limitation: the video playground outputs MP4, not GIF. The fix costs one prompt. Paste this into any LLM, ChatGPT works, or one of the open models like DeepSeek or Qwen on the Atlas Cloud LLM page:
plaintext1Write a single ffmpeg command that converts wonka.mp4 into a high-quality looping GIF: 480px wide, 12 fps, using palettegen and paletteuse in one filter_complex pass, infinite loop. Then explain each flag in one line.
You'll get back something like this, which is exactly what produced the GIF above:
plaintext1ffmpeg -i wonka.mp4 -filter_complex "[0:v]fps=12,scale=480:-1:flags=lanczos,split[a][b];[a]palettegen[p];[b][p]paletteuse" -loop 0 wonka.gif
That's the whole chain. Meme downloaded, face generated, fusion, motion, GIF. Five steps, one browser tab.
Face Swap Gandalf: You Shall Not Pass
Same recipe, different film. Grab the original still from https://i.imgflip.com/14xbe.jpg, keep the beard, the hat and the Moria gloom in your keep-list, and let the fusion prompt do its thing. A modern face glaring out of Gandalf's beard hits exactly the right note of wrong:

The You Shall Not Pass Gandalf scene with a new face fused in, beard, hat and dark Moria lighting untouched
Face Swap the Titanic Bow Scene
The "I'm flying" bow scene is the rare template that's both a movie classic and genuinely high resolution (the Imgflip copy at https://i.imgflip.com/4k0a6c.png is 1440x900). Two faces are visible, so respect the one-face-per-run rule: I swapped Jack and left Rose exactly as filmed.
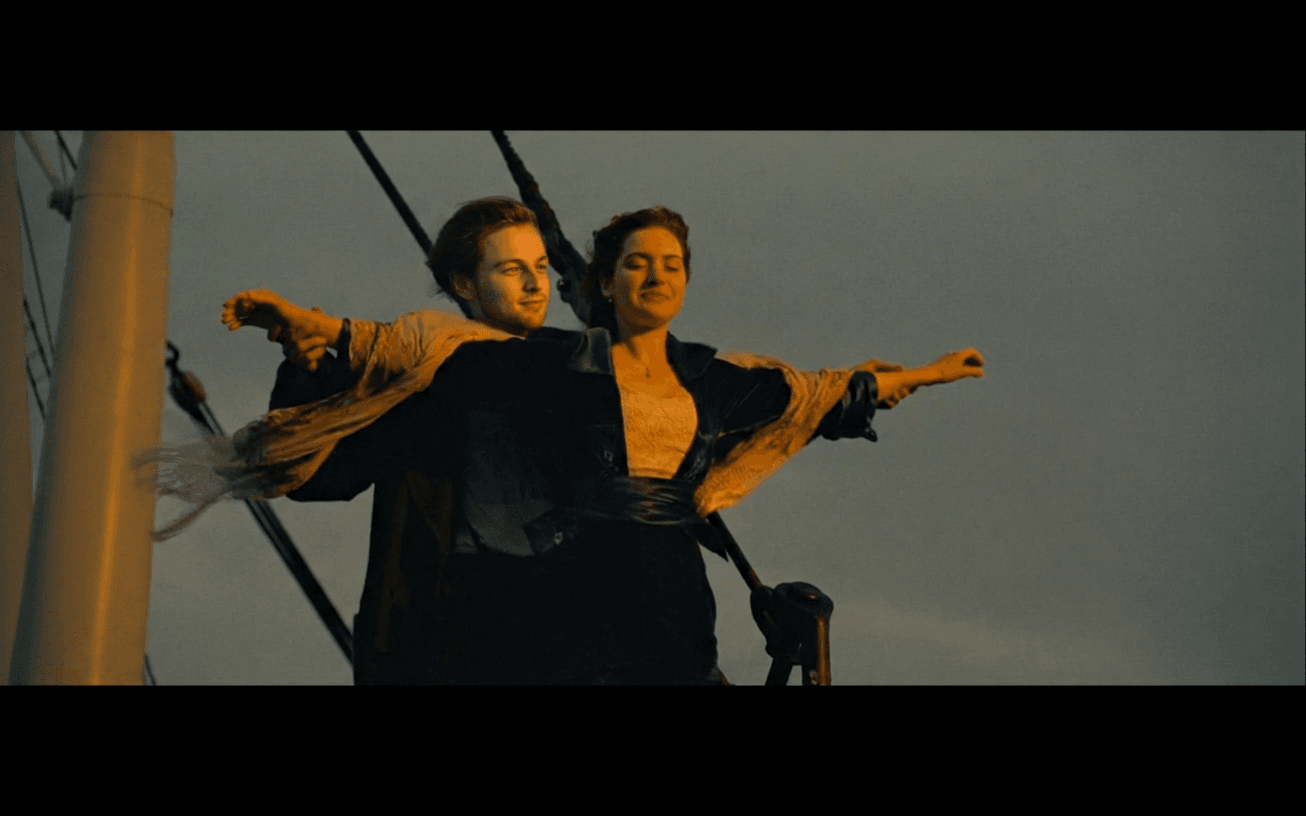
The Titanic bow scene with Jack's face swapped for the source face, sunset lighting and Rose unchanged
High-Fidelity Portrait Face Swaps, Where Seedream Fits
One model note from A/B testing: for meme and film-still fusion, stay with Nano Banana 2, because it preserves grain and imperfection, and "too clean" reads as fake. But flip the task to clean portraits, professional headshots, wedding photos, high-res character art, and that same polish becomes the point. There, Seedream 5.0 Pro edit is the stronger pick: it beautifies as it blends, which is a bug for Wonka and a feature for a portrait.
The Free Face Swap: InSwapper 128 Without the Install
One more route belongs in this guide, and it costs nothing. Atlas Cloud's free AI face swap tool is labeled right on the page as running InsightFace InSwapper 128. Read that name again: it's the same swap engine this tutorial had you download as inswapper_128.onnx, minus the insightface build, the Python 3.13 lockout, and the NVIDIA requirement. The tool's own FAQ answers the money question with a plain yes: free, no usage cap, no watermark.
The flow is the ReActor graph reduced to its two essential inputs: upload the target photo, upload the face, swap. The tool maps 468 facial points and a swap lands in about eight seconds. Instead of a settings panel you get two sliders, Blend and Feather: the first sets how strongly the new face takes, the second how softly its edges blend into the surrounding photo. Results download as PNG at the size of your target photo, up to 1280 pixels on the longest side.
To see it against the fusion route, rerun this article's own test pair: the wonka.jpg from Step 1 as the target, the GPT Image 2 portrait from Step 2 as the face. The two answers differ by design. Nano Banana 2 re-renders the frame so the new face inherits the 1971 grain; the InSwapper tool swaps the face region and keeps the rest of the still as it was, so widen Feather if the seam shows against the film texture.
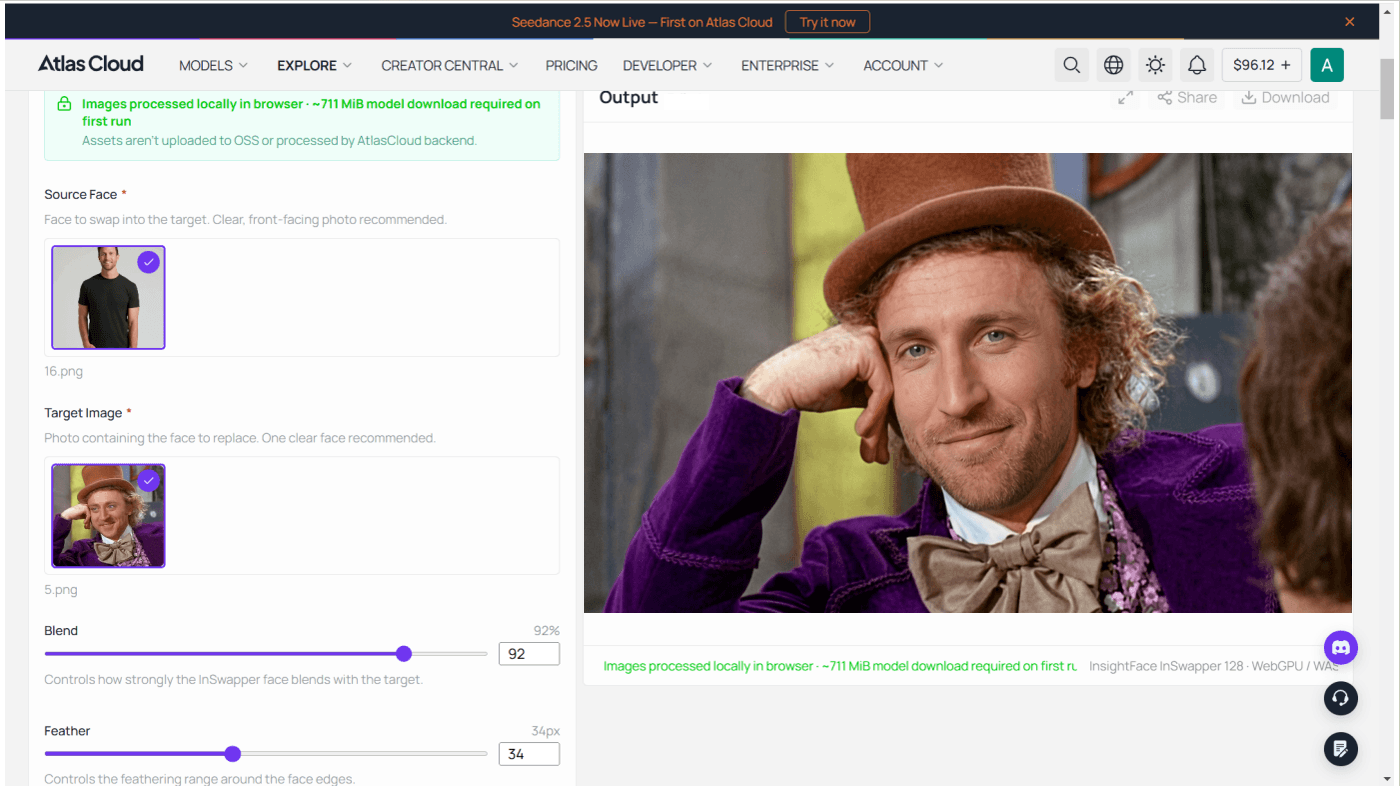
The boundaries, stated plainly: output tops out at 1280 pixels on the longest side, swaps run one photo at a time with no batch upload, and the first visit downloads about 711 MiB of model files before the first swap runs. It also stops at stills; for the video moment, hand its output to the Step 4 Seedance flow like any other frame.
What a ComfyUI Face Swap Actually Costs You
No subscription math, just the honest shapes of the three paths.
Local ComfyUI: the software is free, and that's the headline everyone repeats. The real bill is a 12GB-class NVIDIA card, an evening (or weekend) of setup, the electricity, and every future evening a dependency update breaks insightface again. If you already own the GPU and love the tinkering, that bill can be worth paying. Tinkering is a hobby, and hobbies are allowed to cost time.
Face swap apps: a subscription for the good tier, watermarks and daily credit rations on the free one, and video either missing or throttled. You're renting convenience with the meter always visible.
The cloud chain: pay-per-run pricing in the cents-per-image class, no idle subscription, and the video step billed only when you actually generate one. The whole Wonka pipeline above, face included, cost me less than a coffee, and I'd have paid that just to skip reading one more insightface stack trace.
A quick word on rules, because face swapping earns it: swap your own face or faces you have permission to use. Platforms restrict deepfakes of real people, and the fusion models will refuse some celebrity inputs outright. Public meme templates used for commentary, like everything in this tutorial, are the safe playground. Keep it funny, not fraudulent.
ComfyUI Face Swap FAQ
Is ComfyUI face swap free?
The software and the ReActor node are free and open source. The full setup isn't: you need roughly a 12GB NVIDIA GPU for comfortable use, plus the setup time. If you don't own the hardware, a pay-per-run cloud chain is cheaper than buying in.
Why does my ComfyUI ReActor face swap look blurry?
Because the swap model, inswapper_128, literally outputs the face at 128x128 pixels. Fix it in the ReActor node: set face_restore_model to GPEN-BFR-512 (or CodeFormer) and face_restore_visibility to 0.7 or 0.8. The restore pass rebuilds the detail the swapper can't produce.
Can ComfyUI ReActor do video face swap?
Yes. The standard comfyui reactor video face swap chain is VHS Load Video into ReActor into Video Combine, with optional RIFE interpolation for smoothness. Expect frame-by-frame processing times, some face flicker between frames, and heavy VRAM use on longer clips. Short clips are far more forgiving.
Does Canva have a real face swap?
Not natively. Canva's face swapping comes from third-party marketplace apps, the popular one metering one free credit per day, and it's photos only. For video face swaps you'll need a different tool entirely.
How do I turn a face swap video into a GIF?
Ask any LLM for an ffmpeg command using palettegen and paletteuse, which produce far cleaner colors than a naive conversion. The one-liner in Step 5 above converts any MP4 into a 480px, 12fps looping GIF you can post anywhere.
Is AI face swapping legal?
Swapping your own face, or a face you have explicit permission to use, is fine almost everywhere. Publishing swaps of real people without consent can violate platform rules and, in many places, the law. Meme templates and film stills used for commentary sit in long-standing fair-use territory, but don't use them commercially.





