If you've been searching for how to use the Grok AI image editing feature, here's the short answer: Grok Imagine lets you modify existing images, swap backgrounds, adjust colors, and blend up to three photos at once — all through simple natural language prompts. No design software required.
This feature is available to X Premium subscribers right inside the X app. You can also use the standalone Grok web app at grok.com or the Grok mobile app. The process is exactly the same on a desktop or a phone. Just open Grok, upload your image, and describe the changes you want using simple words.
This guide shows you how to use the tool step by step. Learn how to write prompts that actually work so you can edit images right away. No technical background is needed.
Who this is for:
- X Premium or X Premium+ subscribers
- Users of the standalone Grok app (web or mobile)
- Anyone wanting AI-powered image editing without complex tools
Let's get into it.
Understanding the Grok AI Image Editing Feature and Account Requirements
The Grok AI image generator runs on Aurora. This is xAI's own autoregressive model that handles both making and editing images. Most other tools use diffusion, but Aurora processes images token by token. This method gives the tool better consistency when you change specific parts of a photo.
Who Can Access It?
Access depends on where and how you're using Grok:
| Platform | Access Level Required |
| X (Twitter) app — public feed image generation | X Premium subscription (Basic, Premium, or Premium+) |
| Grok web app (grok.com) | Free Grok account (with usage limits) |
| Grok mobile app (iOS/Android) | Free Grok account (with usage limits) |
| Advanced editing & higher volume | X Premium+ or SuperGrok subscription |
Key Image Editing Limitations to Know
Before diving in, be aware of these image editing limitations:
- Free Grok app users get a capped number of image generations per day
- Explicit or policy-violating content is blocked across all tiers
- The multi-image blending feature (up to 3 photos) may require a paid tier depending on current rollout status
- Availability can vary by region
Checking your current subscription tier before starting saves frustration later.
Step-by-Step: Grok AI Image Editing Feature How to Use on X and Web
Whether you're working inside the X app or through the standalone Grok web interface, the core workflow for the Grok AI image editing feature how to use process follows the same logical sequence. Here's a complete walkthrough.
Step 1: Access Grok and Open the Image Editor
-
Navigate to grok.com or open the Grok mobile app (iOS/Android)
-
Look for the Grok icon in the X sidebar (if using X/Twitter) or the main chat interface on the web app
-
Click the image attachment icon to upload image — supported formats include JPEG, PNG, and WebP
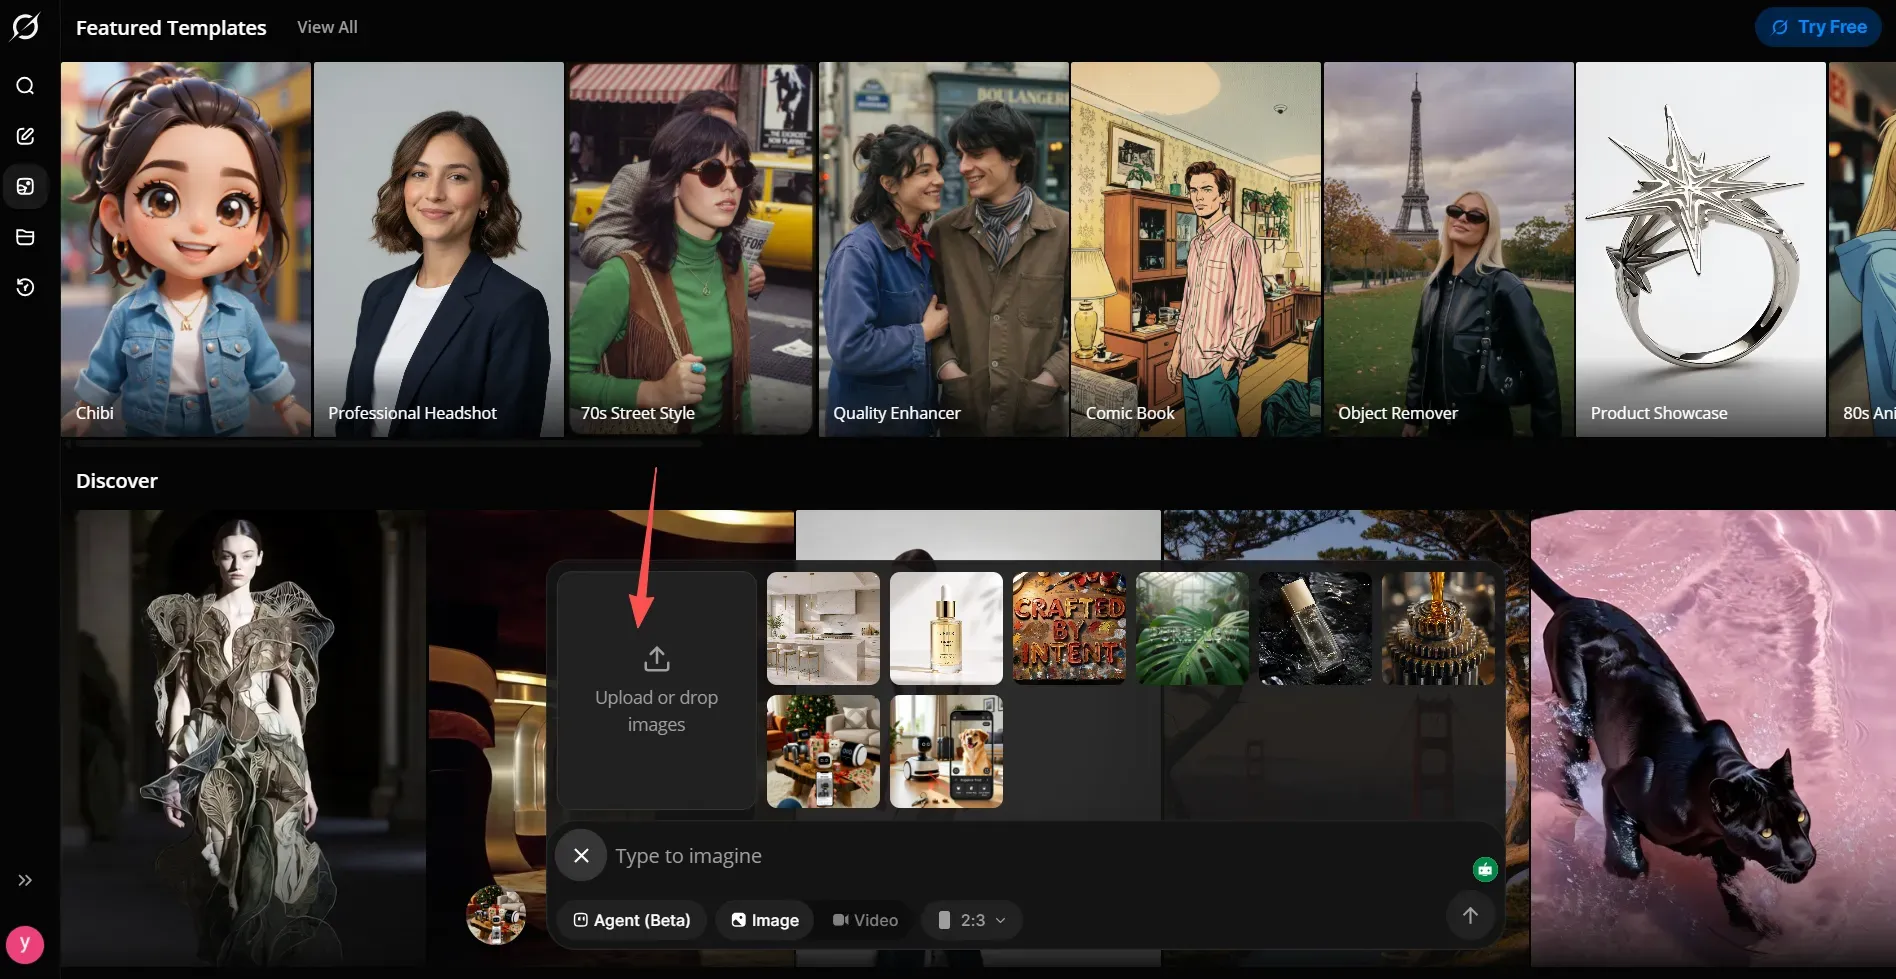
Step 2: Trigger Edit Mode
Once your image is uploaded, the interface activates edit mode automatically. You'll see the edit image button appear alongside your uploaded file. Click it to enter the editing canvas.
Step 3: Write Your Revision Prompt
This is where the real work happens. Type a clear, descriptive revision prompt in plain language — for example:
| Goal | Example Prompt |
| Change background | "Replace the background with a sunset over the ocean" |
| Adjust color tone | "Make the entire image warmer and more golden" |
| Add an object | "Add a red umbrella to the left side of the image" |
| Blend two images | "Merge <IMAGE_0> and <IMAGE_1> into one cohesive scene" |
Step 4: Generate and Refine
Hit Run and wait approximately 13 seconds for the result. If the output needs refinement, simply write another revision prompt — the model supports multi-turn iterative edits without starting over.
Advanced Techniques: How to Use Grok Multi-Image Editing and Blending
Grok's multi-image editing capabilities are where the tool genuinely stands apart from most consumer AI editors. Instead of working with a single source file, you can combine multiple photos — up to three — and instruct Grok to synthesize them into one coherent output using multimodal input prompting.
How Multi-Image Referencing Works
When uploading more than one image, Grok's Aurora engine identifies each source using placeholder syntax: <IMAGE_0>, <IMAGE_1>, and <IMAGE_2>. Your prompt then references these tags to direct how each photo contributes to the final result.
Example prompt:"Apply the painting style from <IMAGE_0> to the subject in <IMAGE_1>, and use the background from <IMAGE_2>."
This gives you granular compositional control without any manual masking or layer work.
Next, let's put this into practice. I will demonstrate using Atlas Cloud's Grok Image Edit API.
I will design a visualization that merges a Subject, a Style reference, and an Environment. Below are the three basic source images I generated, which serve as "raw materials" fed into Grok for processing.
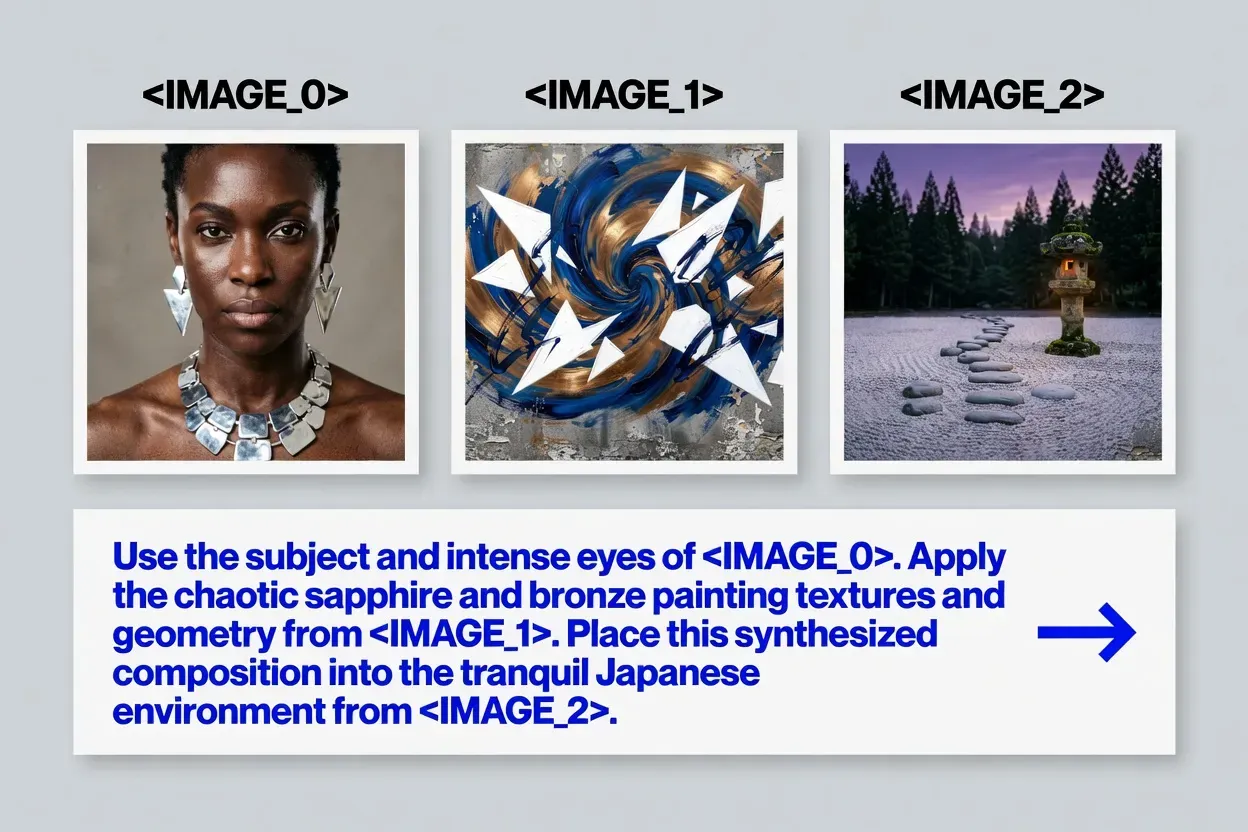
Next, these three images are fused together; while seamlessly integrating intricate textural details and an entirely new environmental background, the distinctive features and spirit of the woman in the original image are precisely preserved.
My prompt:
A striking portrait that synthesizes and blends the preceding elements. It features the powerful African woman seen in image_0.png, but her form is now defined by the chaotic sapphire blue, white geometric shapes, and warm metallic bronze textures from image_1.png. These textures flow across her skin and large silver geometric earrings, replacing the original lighting. Her eyes are still intense and identical to those in image_0.png. The entire synthesized figure is seamlessly integrated into the tranquil, twilight Japanese garden (image_2.png), standing behind the stone path and lantern. The abstract textures harmonize with the garden's moss and dusk light. The style is sophisticated multi-layer AI art, sharp and ethereal.
Note: Synthesize subject from <IMAGE_0>, texture style from <IMAGE_1>, and environment from <IMAGE_2>. Maintain the woman's facial identity perfectly. Apply abstract textures only to her skin and wardrobe. Retain the stone lantern and path from <IMAGE_2> but restrict them strictly to the lower-right foreground. Ensure the subject's chest and neck area are free of background stone elements."
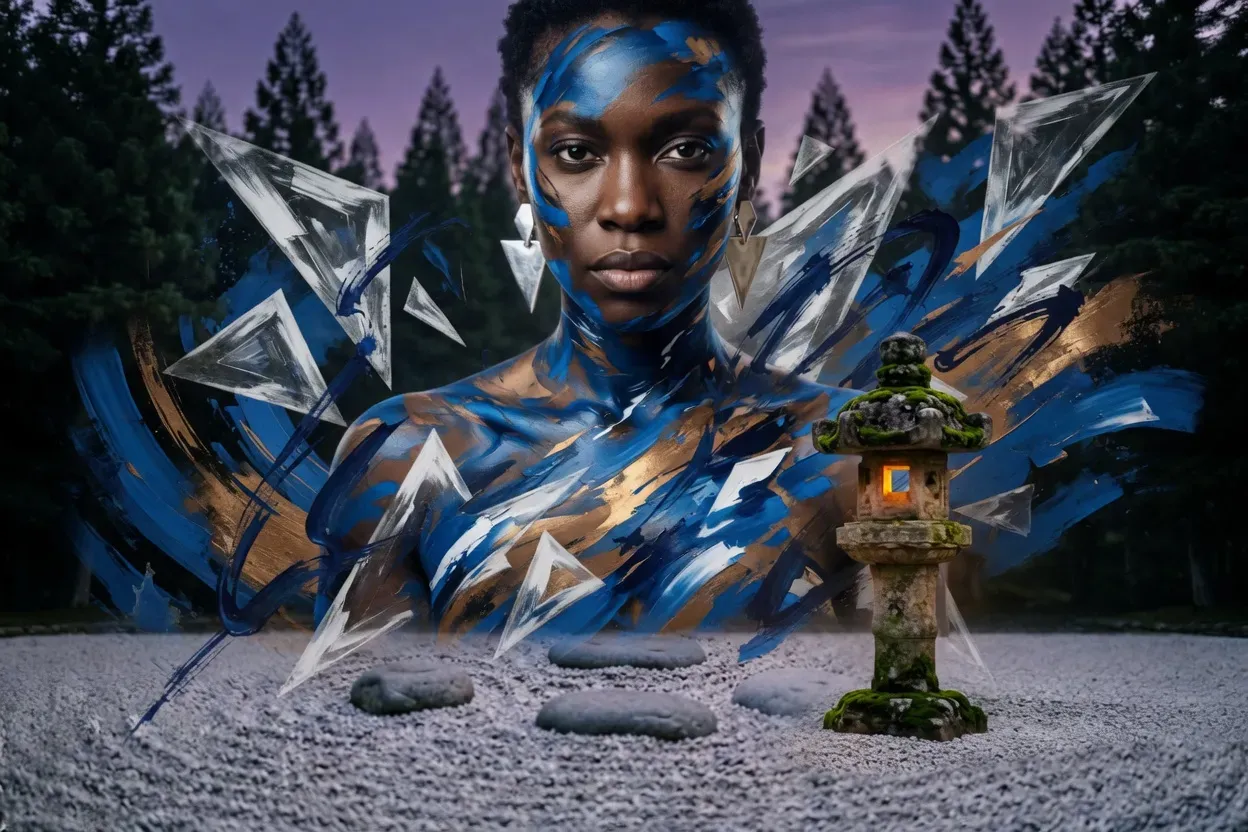
This practice proves Grok’s exceptional capacity to parse complex instruction hierarchies. By isolating references via <IMAGE_0>, <IMAGE_1>, and <IMAGE_2>, the Aurora engine seamlessly executes high-fidelity texture transfers while preserving identity and environmental composition.
Pro tips:
- Lock Down Positions: Use clear placement words like "keep flat on the ground" or "in the front right corner." This stops background objects from bleeding into your subject.
- Stick to standard formatting: Always use the exact <IMAGE_X> bracket style instead of file names. This helps the AI follow your instructions much better during long, step-by-step edits.</IMAGE_X>
Key Use Cases
| Technique | What It Does | Example Prompt |
| Style transfer | Applies the visual style of one photo to another | "Repaint <IMAGE_1> in the watercolor style of <IMAGE_0>" |
| Character reference consistency | Locks a character's appearance across new scenes | "Place the character from <IMAGE_0> into the environment in <IMAGE_1>" |
| Background swap with subject preservation | Keeps subject intact, replaces surroundings | "Keep the person from <IMAGE_0>, use the cityscape in <IMAGE_1> as background" |
| Wardrobe or texture transfer | Moves clothing or surface detail between references | "Dress the subject in <IMAGE_0> with the outfit shown in <IMAGE_1>" |
Tips for Better Multi-Image Results
- Be explicit about which image tag serves which role — Grok follows instruction hierarchy closely
- Use high-contrast reference images for style transfer to get more pronounced results
- For character reference consistency across multiple scenes, keep your character reference photo (<IMAGE_0>) consistent across all prompts in the same session
- Iterative refinement works well here — generate once, then adjust the prompt for a second pass
Programmatic Alternative: Developer's Guide to AI Image Editing APIs
For technical teams and enterprise creators, relying on a manual no-code interface or a mobile app isn't always efficient. If your workflow requires batch processing, dynamic asset creation, or product integration, you can access the core editing engine programmatically.
The system operates via a streamlined API integration hosted on Atlas Cloud, exposing the exact same multimodal editing capabilities to your code.
Token Creation & Authentication
Start by logging into your cloud developer platform to set up your credentials. Generate an API access key for routing pathway. This key must be included in your backend request headers to authorize secure connections.
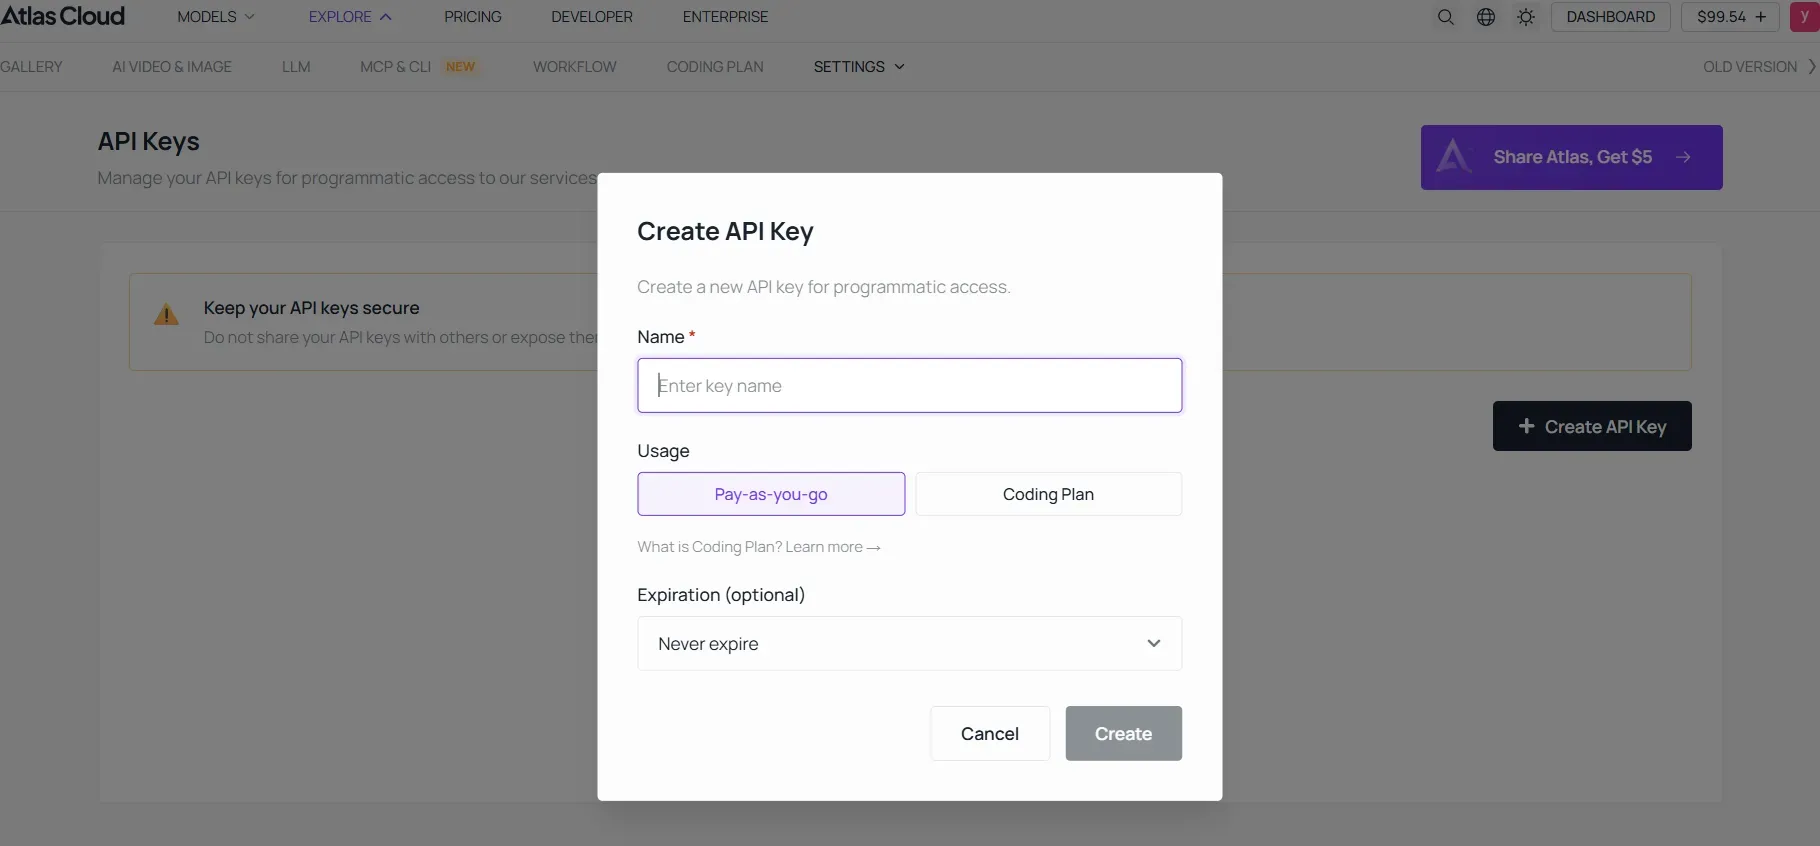
HTTP Headers
plaintext1import os 2 3API_KEY = os.environ.get("ATLASCLOUD_API_KEY") 4headers = { 5 "Content-Type": "application/json", 6 "Authorization": f"Bearer {API_KEY}" 7}
Preparing Reference Media
Ensure all your target assets are programmatically accessible. The endpoint ingests image data via standard public URLs or raw Base64 string encoding. If your goal is advanced editing—like character consistency or texture transfer—have your reference files indexed before compiling the code.
Mapping the Multimodal Payload
When constructing the body of your JSON POST request, assign your source images to specific array indexes. This aligns perfectly with the model's placeholder syntax:
- image_0: "https://your-server.com/main-subject.jpg"
- image_1: "https://your-server.com/style-texture.jpg"
Sending Instructions and Exporting
Feed your natural-language editing instructions directly into the prompt variable, explicitly utilizing the placeholders, e.g., "Keep the person from <IMAGE_0> but swap the background with the environment from <IMAGE_1>". Select your preferred resolution (1K Standard vs. 2K Quality) and deploy.
Request Body example:
plaintext1{ 2 "model": "xai/grok-imagine-image-quality/edit", 3 "prompt": "your prompt", 4 "image_urls": [ 5 "image_0", 6 "image_1", 7 "image_2" 8 ], 9 "num_images": 1, 10 "resolution": "1k", 11 "aspect_ratio": "3:2", 12 "enable_base64_output": false 13}
Writing Winning Prompts for Grok AI Image Editing
The quality of your Grok image editing prompts directly determines the output. Vague instructions produce generic results; specific, structured commands give the Aurora model clear parameters to work with. Here's how to build prompts that actually deliver.
The Prompt Formula
A strong prompt follows this structure:
[Action] + [Subject/Area] + [Style or Mood] + [Lighting] + [Texture or Spatial Detail]
For example: "Change the sky to a dramatic storm scene. Use a realistic style with soft, low-angle light. Add thick cloud details across the top third of the picture."
Each extra detail reduces guessing for the AI. This makes your final image much more accurate.
Weak vs. Strong Prompt Comparison
| Element | Weak Prompt | Strong Prompt |
| Background change | "Change the background" | "Replace background with a misty Japanese forest, soft morning light filtering through cedar trees" |
| Color adjustment | "Make it warmer" | "Shift the entire image to golden hour tones, warm amber highlights, deep shadow contrast" |
| Photorealistic style | "Make it look real" | "Photorealistic style, sharp focus, 85mm lens depth of field, natural skin texture" |
| Object removal | "Remove the car" | "Remove the red car on the left and fill with matching cobblestone pavement texture" |
Example:
Weak Prompt: A dramatic stormy backdrop behind a landscape, simple style, daylight.
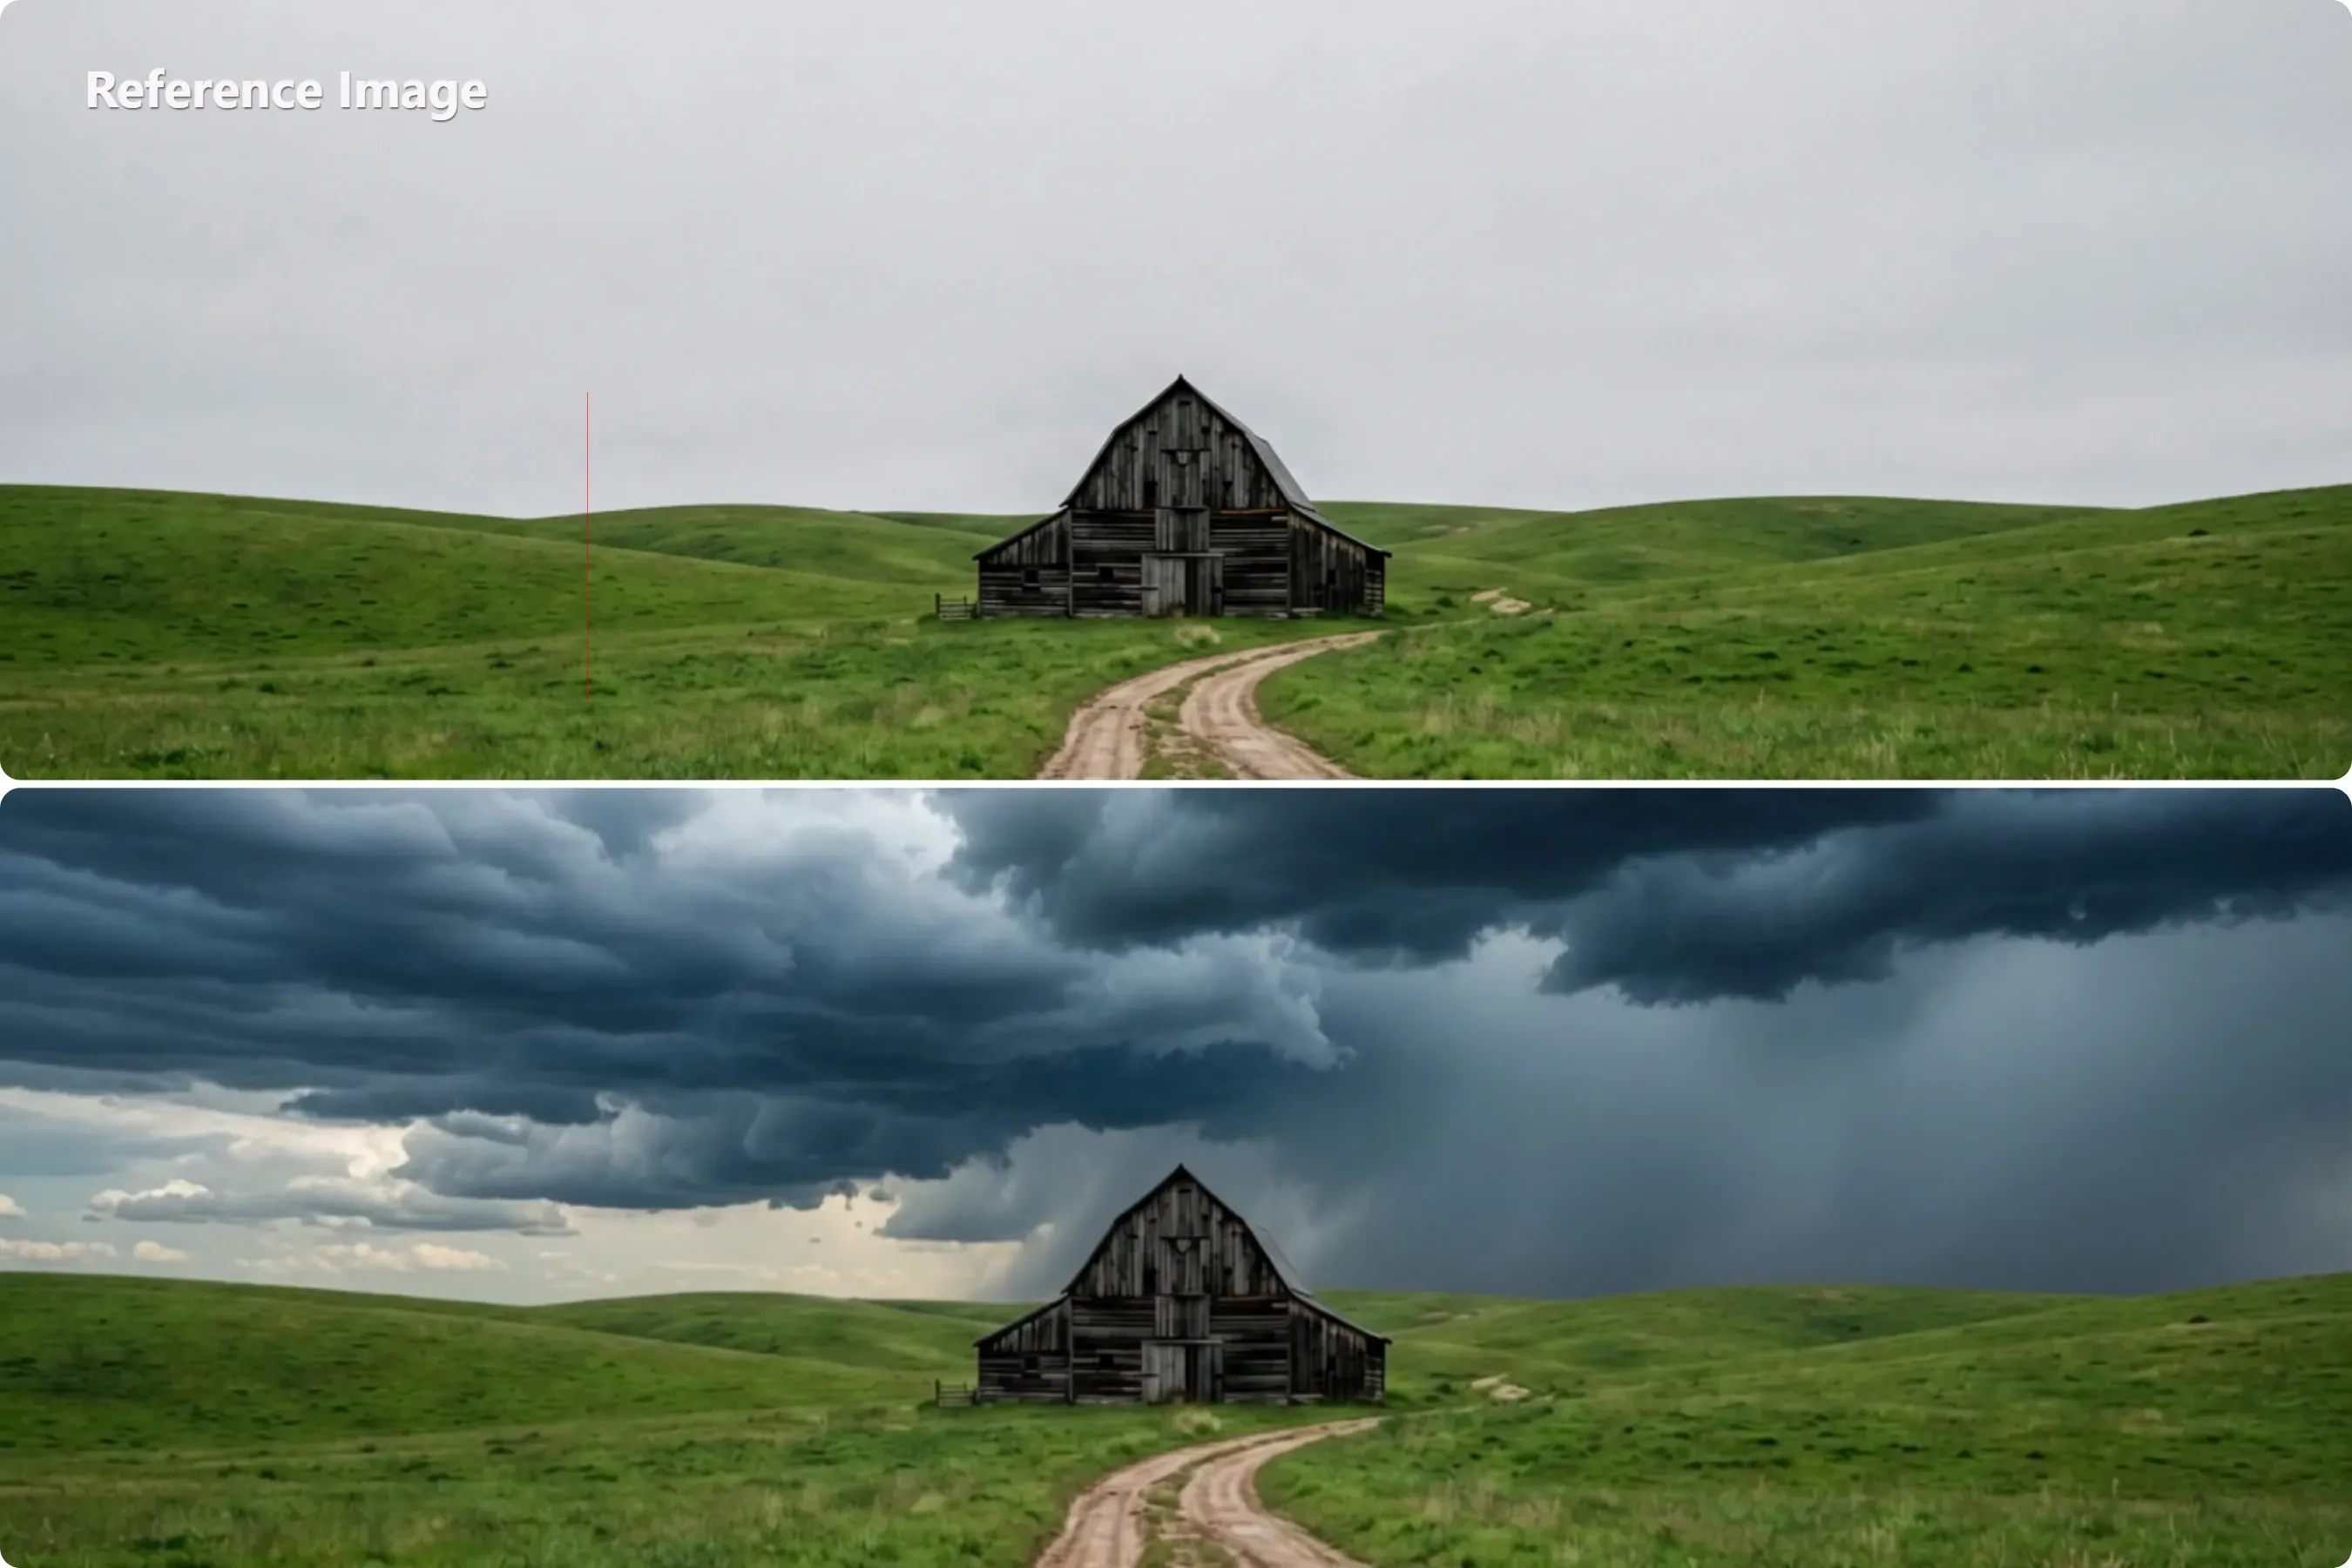
Strong prompt: A wide-angle, lifelike landscape photograph features a dramatic, stormy sky. Low, soft light cuts through the atmosphere across the scene. Thick, dark clouds layer heavily across the top third of the frame. These clouds cast realistic shadows on the ground below. The entire image is hyper-detailed with sharp focus.
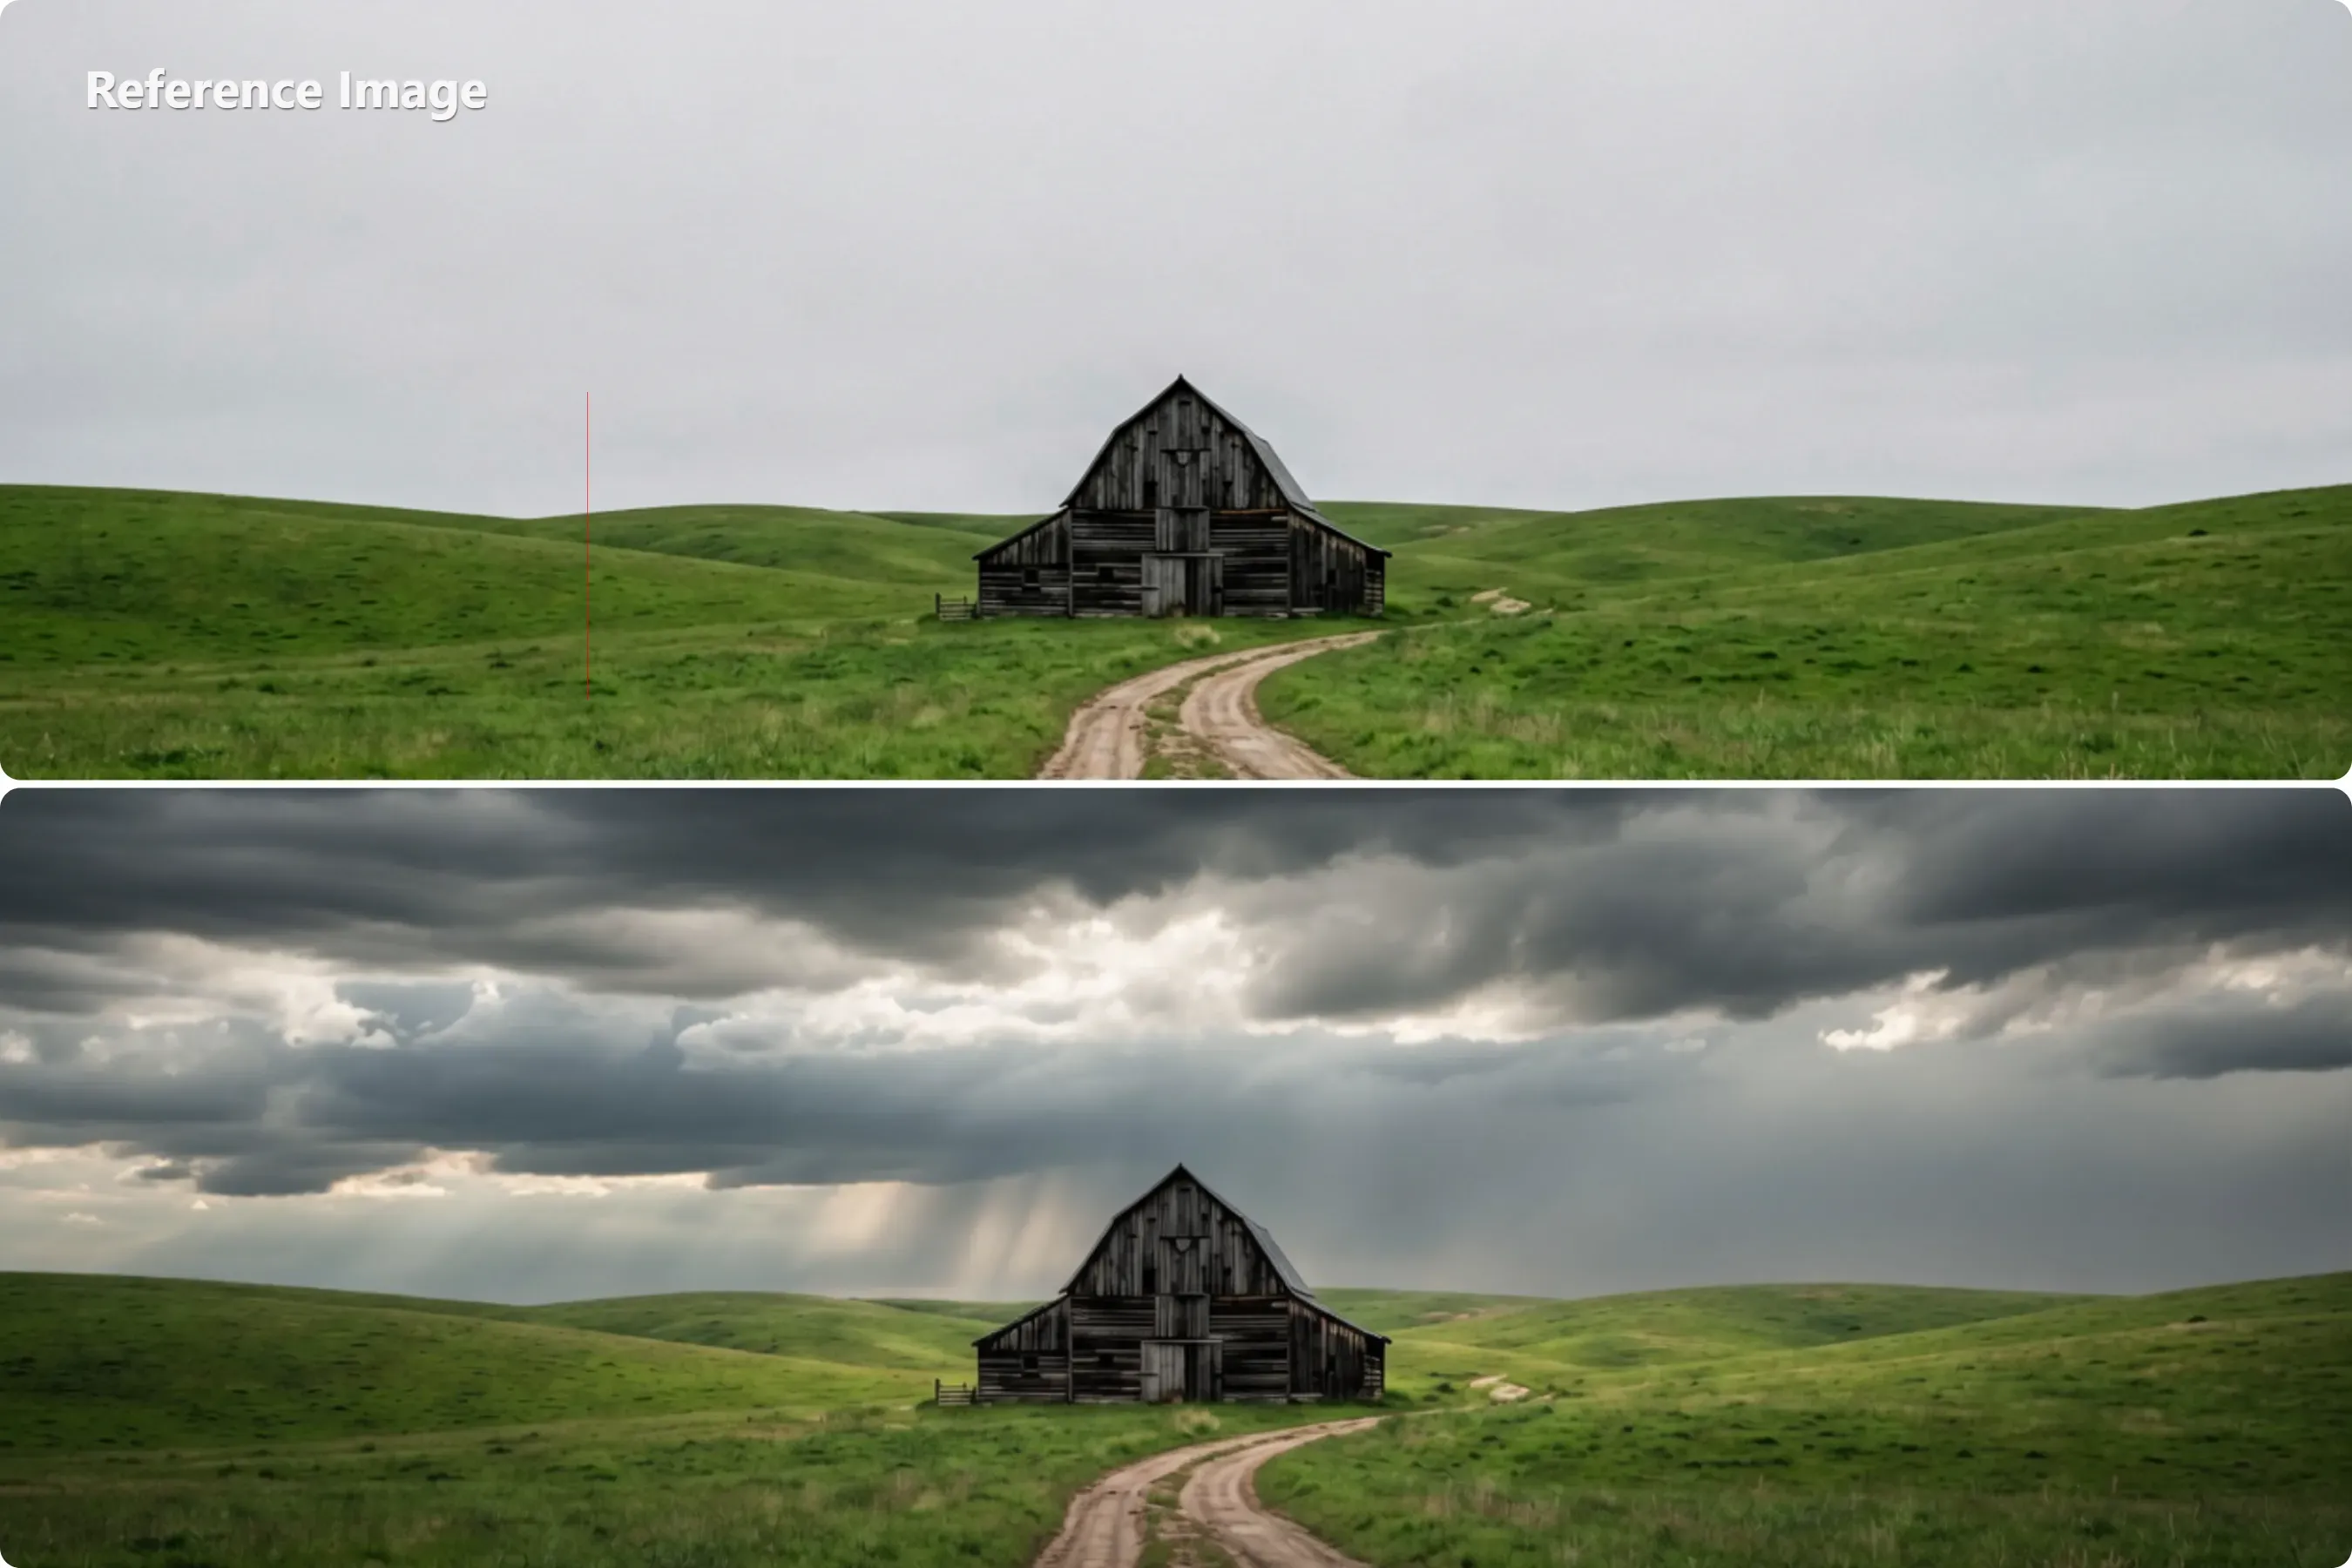
Compared to images generated by weak prompts, it naturally blends highlights and shadows to produce coherent, realistic editing effects—rather than mere background replacements.
Using Iterative Editing Variables
Iterative editing variables allow you to refine without rebuilding. After your first generation, adjust one variable at a time — lighting first, then texture, then mood — rather than rewriting the entire prompt. This isolates what changed and gives you predictable, directional improvements.
For in-painting text commands targeting specific regions, always name the spatial location explicitly: "upper-left corner," "foreground subject," "mid-ground horizon line." This anchors the model's attention to exactly where you want the edit applied.
Troubleshooting Grok AI Image Editing Limits and Image Quality Specs
Before scaling your workflow, it helps to know exactly what Grok can and can't produce — technically and policy-wise. Here's a consolidated breakdown.
Output Resolution and Aspect Ratio Options
Grok's Aurora engine outputs at two resolution tiers:
| Setting | Dimensions | Best For |
| 1K Standard | Up to 1024×1024 px | Social posts, quick mockups |
| 1K — 4:3 aspect ratio | 1024×768 pixels | Landscape photography edits |
| 2K Quality | Up to 2048×2048 px | Print, commercial, high-detail work |
The system supports 13 aspect ratios spanning 2:1 to 1:2, covering portrait, square, and widescreen formats. Output formats include JPEG, PNG, and WebP — with alpha channel transparency available on PNG and WebP exports.
Watermarking
All images generated or edited through Grok carry a GROK watermark or embedded C2PA metadata credentials, identifying them as AI-produced content. This watermark is currently non-removable and will appear on exports regardless of subscription tier.
Safety Guardrails and Deepfake Restrictions
Grok enforces strict deepfake safety restrictions across all account levels. The following content categories are blocked:
- Realistic face-swaps onto real, identifiable individuals
- Non-consensual intimate imagery of any kind
- Manipulated media designed to spread misinformation
Prompts triggering these filters are rejected outright, with no partial output returned.
Outpainting and the AI Image Expander Gap
Grok currently lacks a native AI image expander or outpainting tool. If you need to extend canvas boundaries beyond the original image edges, you'll need a dedicated outpainting tool such as Adobe Firefly or Stability AI before bringing the result back into Grok for further editing.
Data Privacy Note
Uploaded images may be used to improve xAI's models unless you opt out via account privacy settings. Review xAI's privacy policy before uploading sensitive or proprietary visuals.
Grok AI Image Editing Feature vs. Competitors: Is It Worth It?
When weighing Grok Imagine vs other AI models, the honest answer is: it depends on your priority. Here's how it compares across the criteria that matter most.
Head-to-Head Comparison
| Feature | Grok Imagine | ChatGPT Image 2 | Midjourney V7 |
| Natural language editing | ✅ Yes | ✅ Yes | ⚠️ Limited |
| Multi-image blending | ✅ Yes | ✅ Yes | ❌ No |
| Image-to-video generation | ✅ Native pipeline | ❌ Not native | ❌ Not native |
| In-image text rendering | ⚠️ Competitive | ✅ Best-in-class | ⚠️ Moderate |
| Artistic stylization | ⚠️ Good | ⚠️ Good | ✅ Best-in-class |
| Integrated editing workflow | ✅ Single platform | ⚠️ Partial | ❌ Requires export |
| Outpainting | ❌ Not supported | ✅ Yes | ✅ Yes |
Where Grok Wins
The most compelling case for Grok is its integrated editing workflow. You can edit a still image and push it directly into image-to-video generation — all without leaving the platform. That pipeline currently ranks #1 on the Artificial Analysis Image-to-Video Arena, which is a meaningful advantage for content creators working at speed.
xAI playground speed is another genuine differentiator. With roughly 4-second text-to-image and 13-second edit latency, iteration cycles stay short — especially useful during multi-turn refinement sessions.
Where Competitors Still Lead
ChatGPT's GPT Image 2 holds a clear edge on in-image text accuracy and outpainting. Midjourney remains the benchmark for illustrative and artistic aesthetics. If either of those is your primary use case, those tools are still the better choice.
The Bottom Line
For users who want one platform covering editing, generation, and video — Grok delivers a coherent, fast, and increasingly competitive integrated editing workflow that eliminates the tool-switching overhead most creators deal with daily.





