A still try-on image can look convincing until the model turns. The back seam, sleeve length, buttons, and print must still belong to the same garment. To make a gemini omni 1.2 flash virtual try on video, start with a permitted photo of one adult model and clear front and back photos of one real garment. Assign each image a role in the prompt, request a short front-to-back turn, then inspect the finished clip at several points before using it in a listing or ad. The video can illustrate a look; it cannot establish a customer's actual size or fit.
Key takeaways
- Use one model photo and both sides of one garment for a clip you can inspect against source images.
- Ask for a deliberate turn that exposes the details a buyer needs to see.
- Check identity, garment construction, and motion before editing or publishing.
What Can Gemini Omni 1.2 Flash Show in a Virtual Try-On Video?
Google introduced Gemini Omni 1.2 Flash on November 5, 2026, with video generation and editing from 3 to 15 seconds. Its release example combines one model photo with front and back photos of three outfits in a 15-second sequence with turns and match cuts. That is a Google demonstration, not an independent test of every fabric, size, or product photo ( Google announcement, November 2026 ).
Google's official try-on demo shows one model reference and three outfits. It is a vendor example, not an independent garment test.
For a product team, the useful question is narrower than whether the model can produce a pleasing fashion clip. Can a buyer recognize the same item from the first frame to the back view? A stable face alone does not settle that question. A jacket may gain a button or lose a vent during a turn while the clip still looks smooth at normal speed.
Start with one garment per generation. A multi-outfit sequence spends its 15 seconds on transitions and offers less time to inspect each item. One garment lets you reserve a front view, a three-quarter view, and a back view for the same SKU. Once that clip passes review, you can plan a multi-look edit for a campaign where exact item inspection is less important.
Which Photos Do You Need Before Generating?
The model photo
Use a clear, full-body photo of an adult model whose likeness you have permission to use in generated commercial content. Keep the subject visible from head to shoes if the garment's length matters. A side-cropped portrait gives the model less evidence about body proportions and makes a full-body turn harder to judge. Choose a neutral pose that does not hide the waist, sleeves, or lower hem.
For a series, reuse the same approved model photo. This reduces one source of variation between garments, although the generated identity still needs a check in every clip. Record the source file, usage rights, and any limits on synthetic alterations. The model's consent to a photo shoot does not automatically answer whether a video derived from that photo is covered by the same agreement.
Front and back garment views
Photograph the actual item you intend to advertise. Keep color, lighting, and scale comparable across the front and back views. Lay-flat or mannequin shots can show construction clearly; a model shot can help convey drape. If a label, lining, or fastening is important to a claim, make it legible in an additional reference photo. Do not ask the model to invent the unseen back of a product from a single front image.
Before uploading, note the details that cannot change: collar shape, button count and spacing, pocket position, cuff treatment, print placement, hem length, back vent, and any belt or hood. This list becomes a practical acceptance standard rather than a longer prompt full of vague praise.
A reference checklist
| File | Role in the generation | What to verify in the output |
|---|---|---|
model-front.jpg | Identity and body reference | Face, hair, skin tone, and broad proportions remain recognizable. |
garment-front.jpg | Front construction and color | Neckline, fasteners, print, pockets, and hem match. |
garment-back.jpg | Back construction | Seams, vent, hood or collar, print continuation, and length match. |
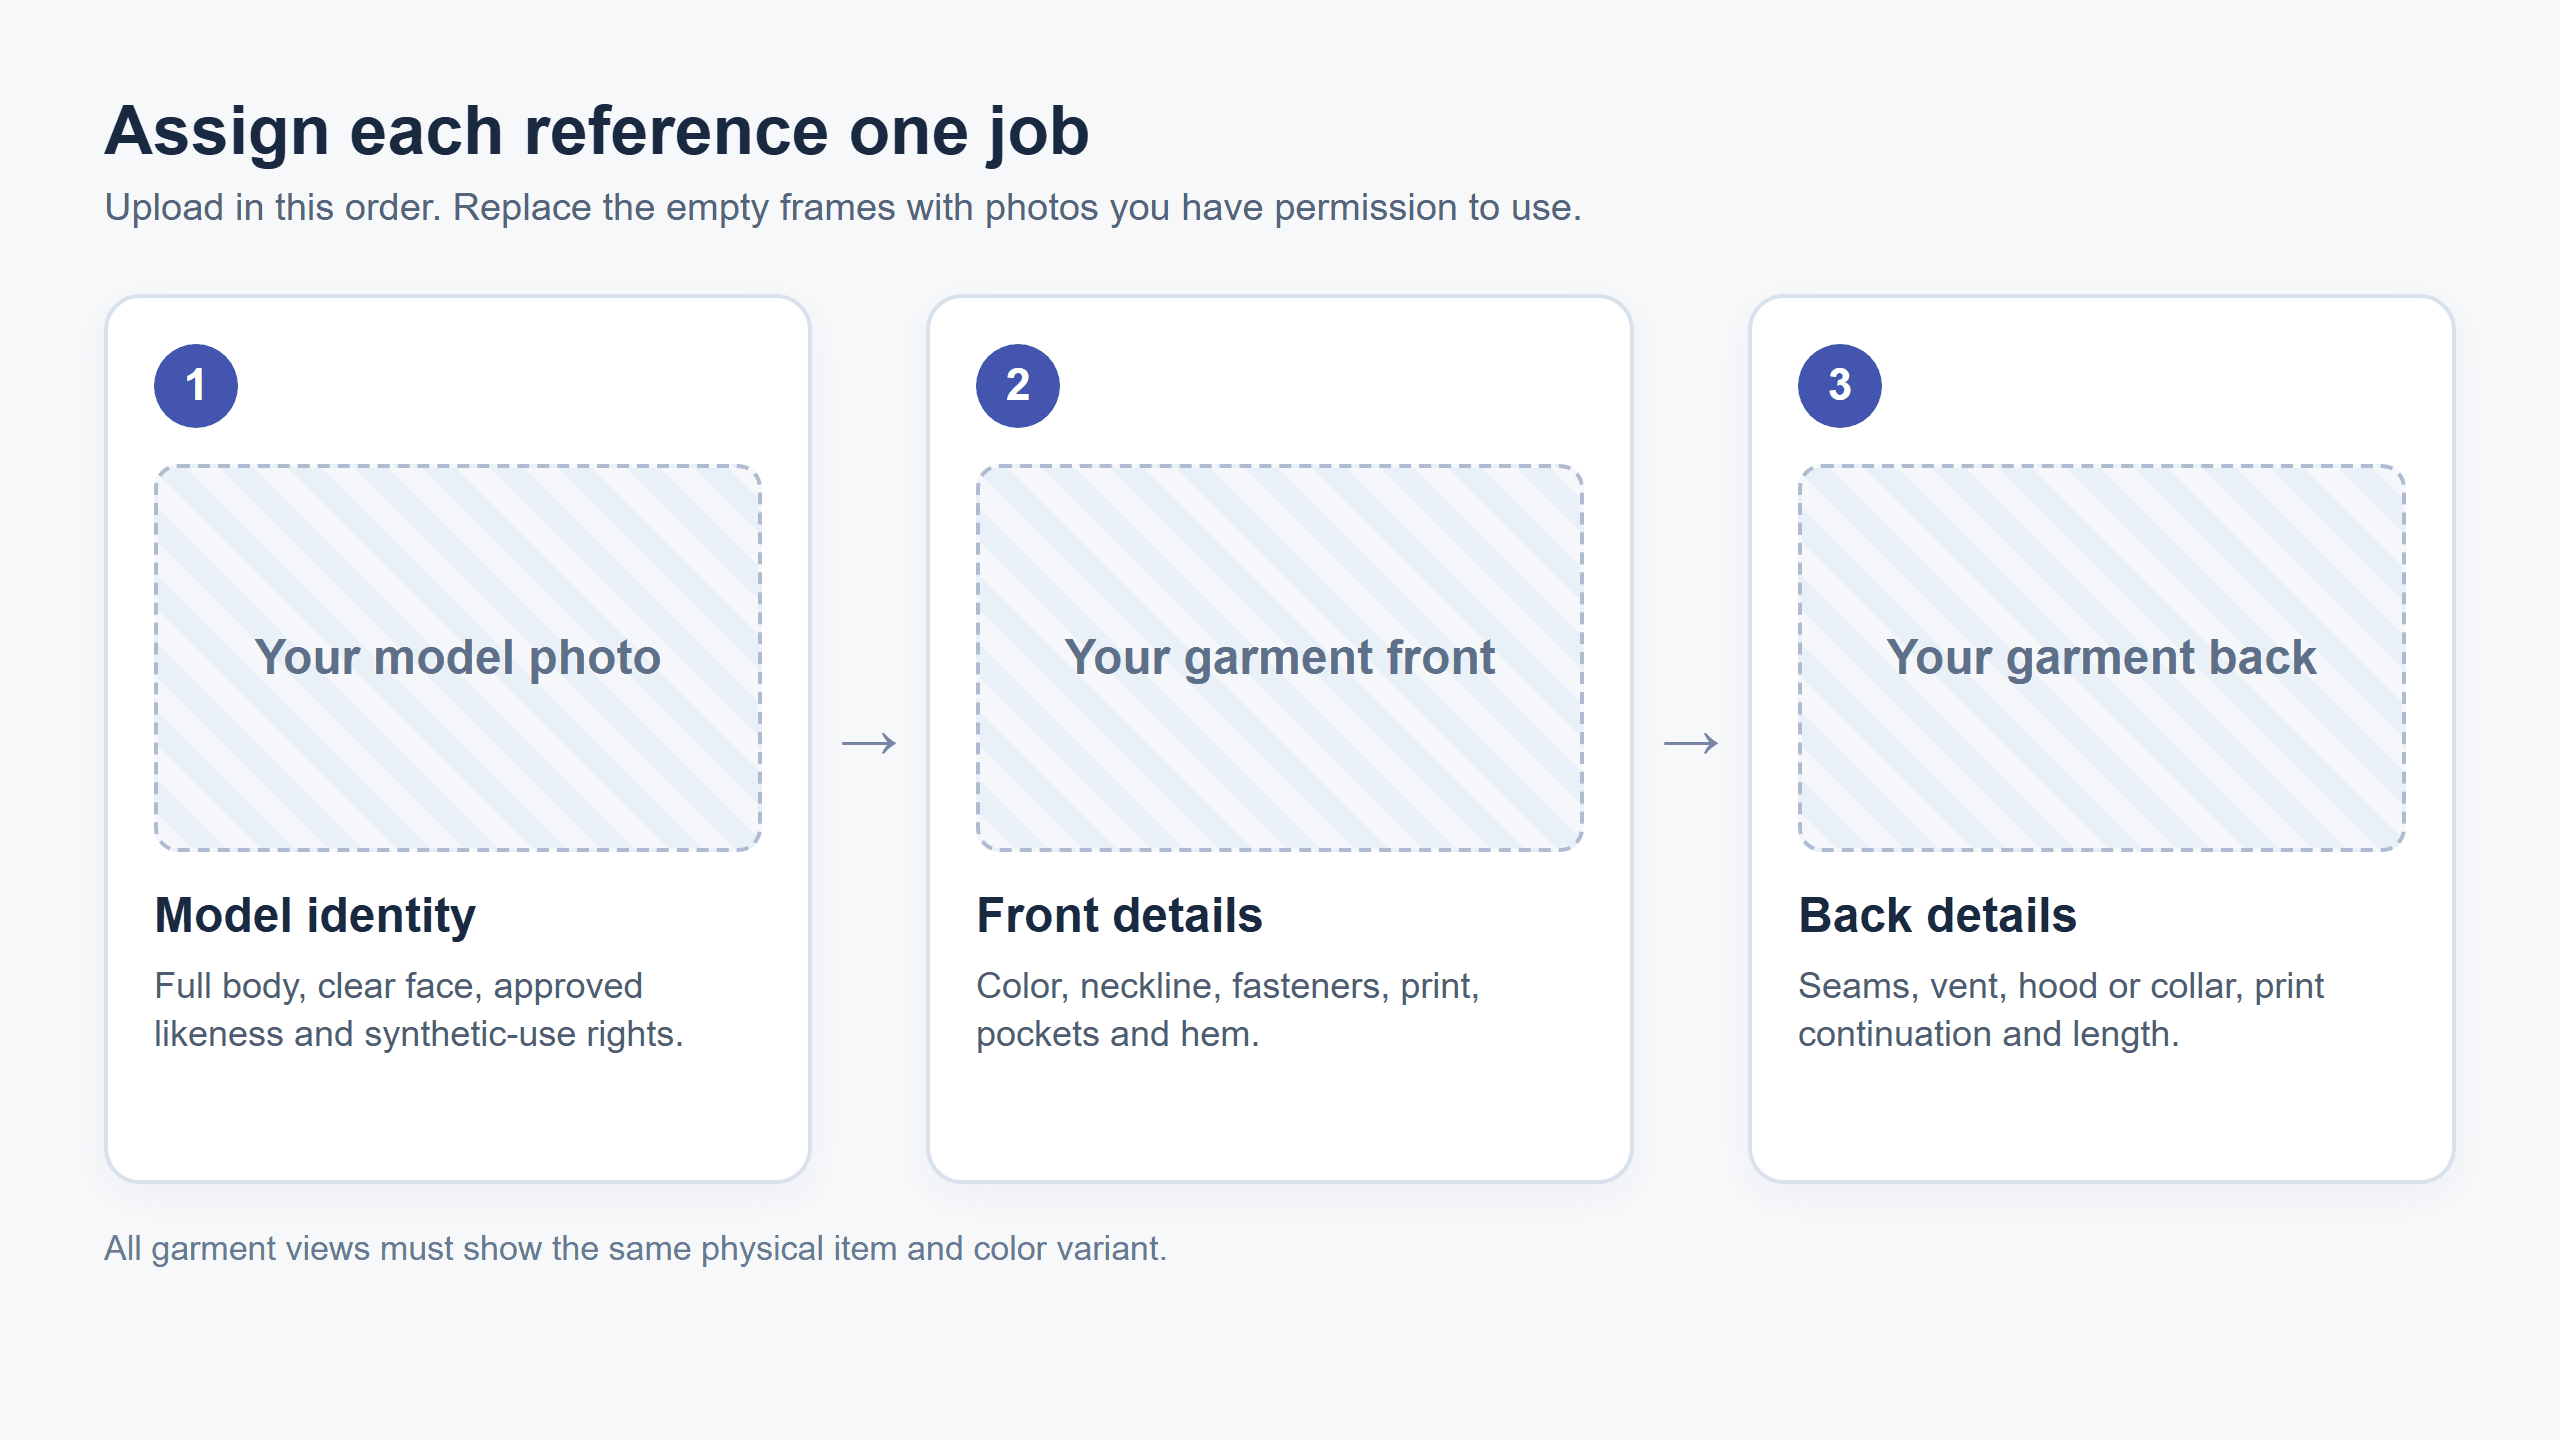 Use this three-part assignment before writing a prompt; the card is a preparation guide and contains no claimed test output.
The photos should come from the same garment variant. A front photo of a navy sample and a back photo of a black sample introduce a conflict the prompt cannot resolve reliably. If you sell several colors, make a separate source set and review for each color.
How to Make a Gemini Omni 1.2 Flash Try-On Video
Upload and label the references
On Atlas Cloud, open the Gemini Omni 1.2 Flash Reference-to-Video page. Add the approved model photo first, the blazer front second, and the blazer back third. This route lists 1 to 10 reference images, a 3 to 15 second duration control, 9:16 and 16:9 aspect ratios, and 360p, 720p, 1080p, and 4K output options. The 1080p and 4K options are upscaled from native frames, so they cannot restore a button or print that was generated incorrectly at source.
Keep the image order fixed when copying the prompt. Image one is the person; images two and three are the same blazer from different sides. If you reorder the files, change the prompt's image numbers as well. Do not mix in photos of the cardigan or coat during this single-item run.
Paste the prompt and choose settings
Choose 8 seconds and 9:16 for an initial vertical product clip. Choose 1080p if you need that delivery size, then check the live quote for those exact settings before running. You can draft at 720p to test composition, but a final delivery should still be reviewed at its final resolution.
Paste the following prompt:
plaintext1Create an eight-second virtual try-on product video using the first reference image for the same adult model and the second and third reference images for the front and back of the same blazer. Keep the model's face, body proportions, hairstyle and skin tone consistent. Preserve the blazer's exact color, lapels, buttons, sleeve length and back construction. Start with a full-body front view, move to a natural three-quarter walking view, then show a clear back view as the model turns. Use a neutral studio background and even soft lighting. Keep the garment recognizable in every shot. No text, logos, extra garments or additional people.
The requested camera path is short on purpose. It gives the front, a moving angle, and the back distinct jobs. If the source has no visible back photo, a convincing back view is still an invention. If the result cuts away just as the model turns, it has not fulfilled the product brief even if the rest of the clip is clean.
Review the completed clip
After a run completes, download its file and check what was actually delivered: duration, orientation, resolution, and the product details. Save the raw result before making an edit. Review at normal speed first to see whether the movement reads naturally, then pause at the start, the three-quarter angle, the back view, and the end. Compare each paused frame with the relevant source photo.
A useful result needs a visible turn, not a slow push toward a nearly static subject. Smooth motion is relevant only if the item remains identifiable while it moves. If the face changes or the blazer becomes a different cut, start again from the original photos rather than treating a polished render as a pass.
3 Gemini Omni 1.2 Flash Virtual Try-On Videos
These are the three generated clips supplied for this article. Each combined reference image shows the inputs in upload order, and the GIF beneath it shows the delivered output. The clips illustrate appearance and motion; they do not establish physical fit or unseen garment construction.
Three outfits on the same woman
The four references are one full-body model photo and three clothing images: a pink printed maxi dress, a red plaid shirt with a denim skirt, and a pink striped top. The 15-second output changes looks at about five-second intervals. In the sampled frames, the same short-haired model appears across the cuts. The final look uses white leggings and sneakers specified in the prompt rather than shown in the clothing reference.
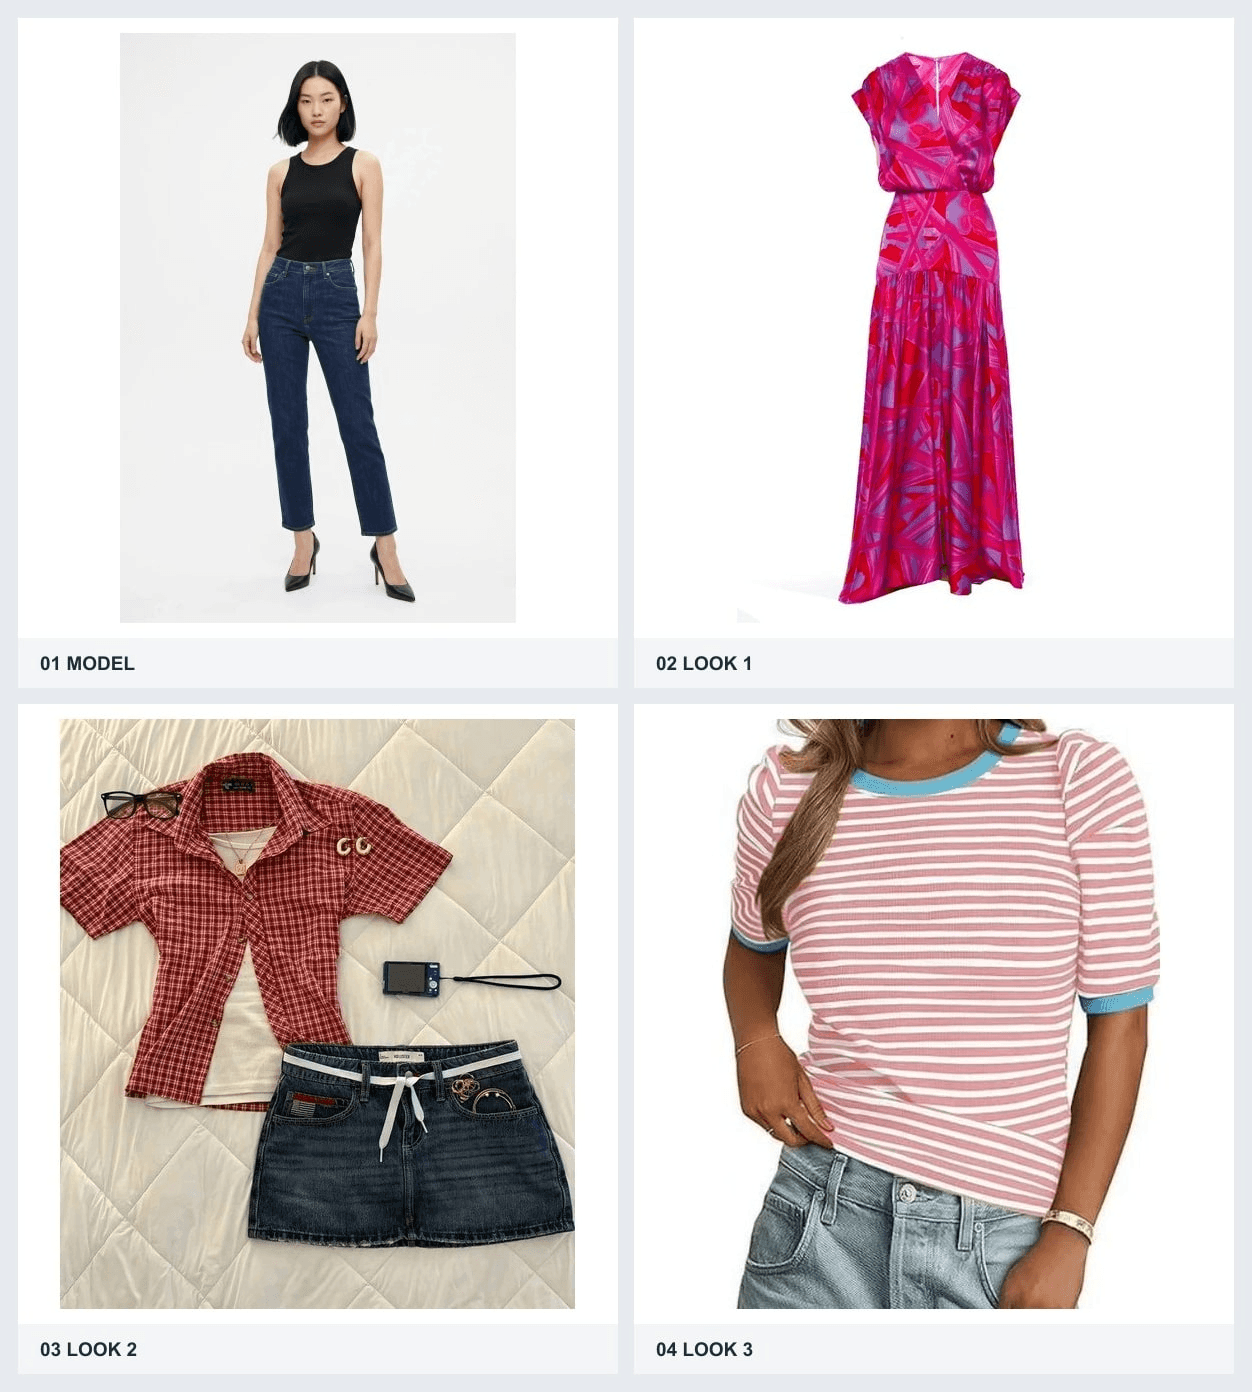
Input references in upload order: model, printed dress, plaid-and-denim set, striped top.
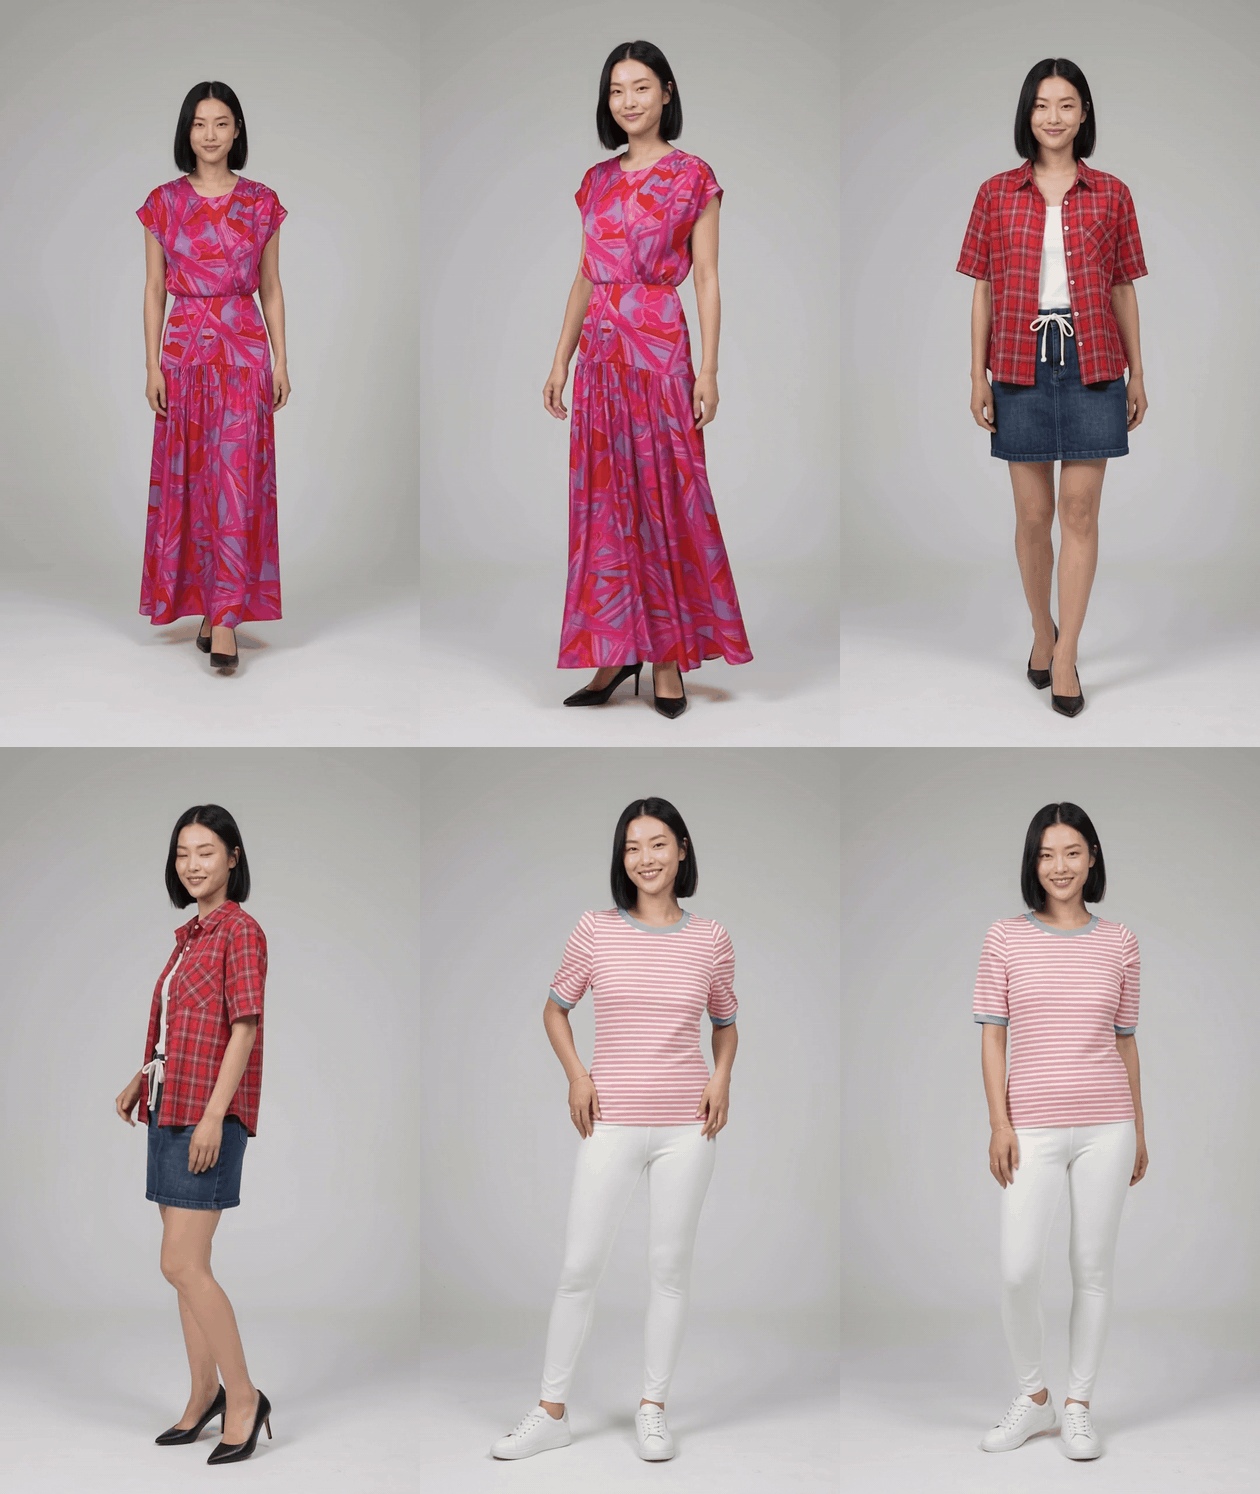
Generated 15-second output: three looks on one model, separated by outfit changes.
This is useful for checking whether the person's appearance survives a rapid outfit sequence. It does not show verified back construction for any of the three garments, so it should not be treated as exact product evidence.
Five outerwear pieces on the same man
The six references are one model photo plus a red varsity jacket, olive tiger bomber, beige trench coat, charcoal cardigan, and navy peacoat. The 15-second output shows five short looks on the same man, with the gray T-shirt, dark trousers, and studio background carried across the changes.
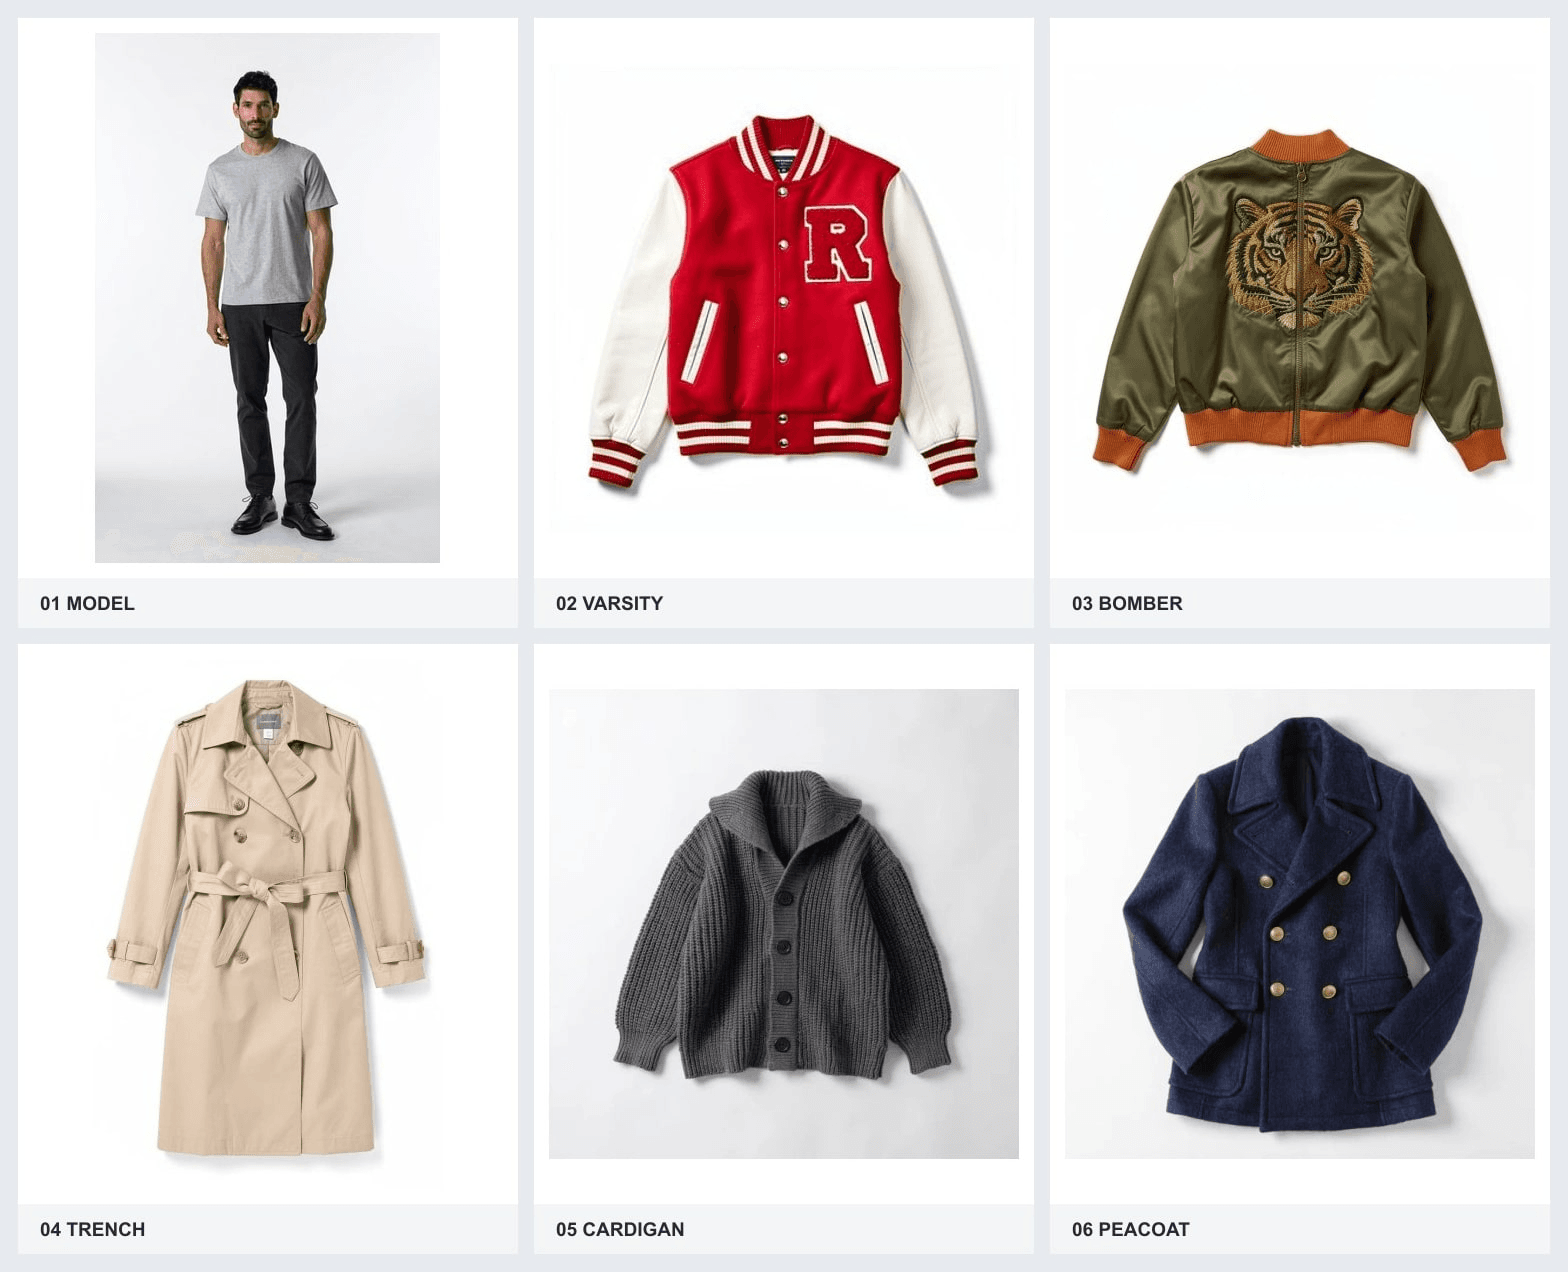
Input references in upload order: model, varsity jacket, bomber, trench coat, cardigan, peacoat.
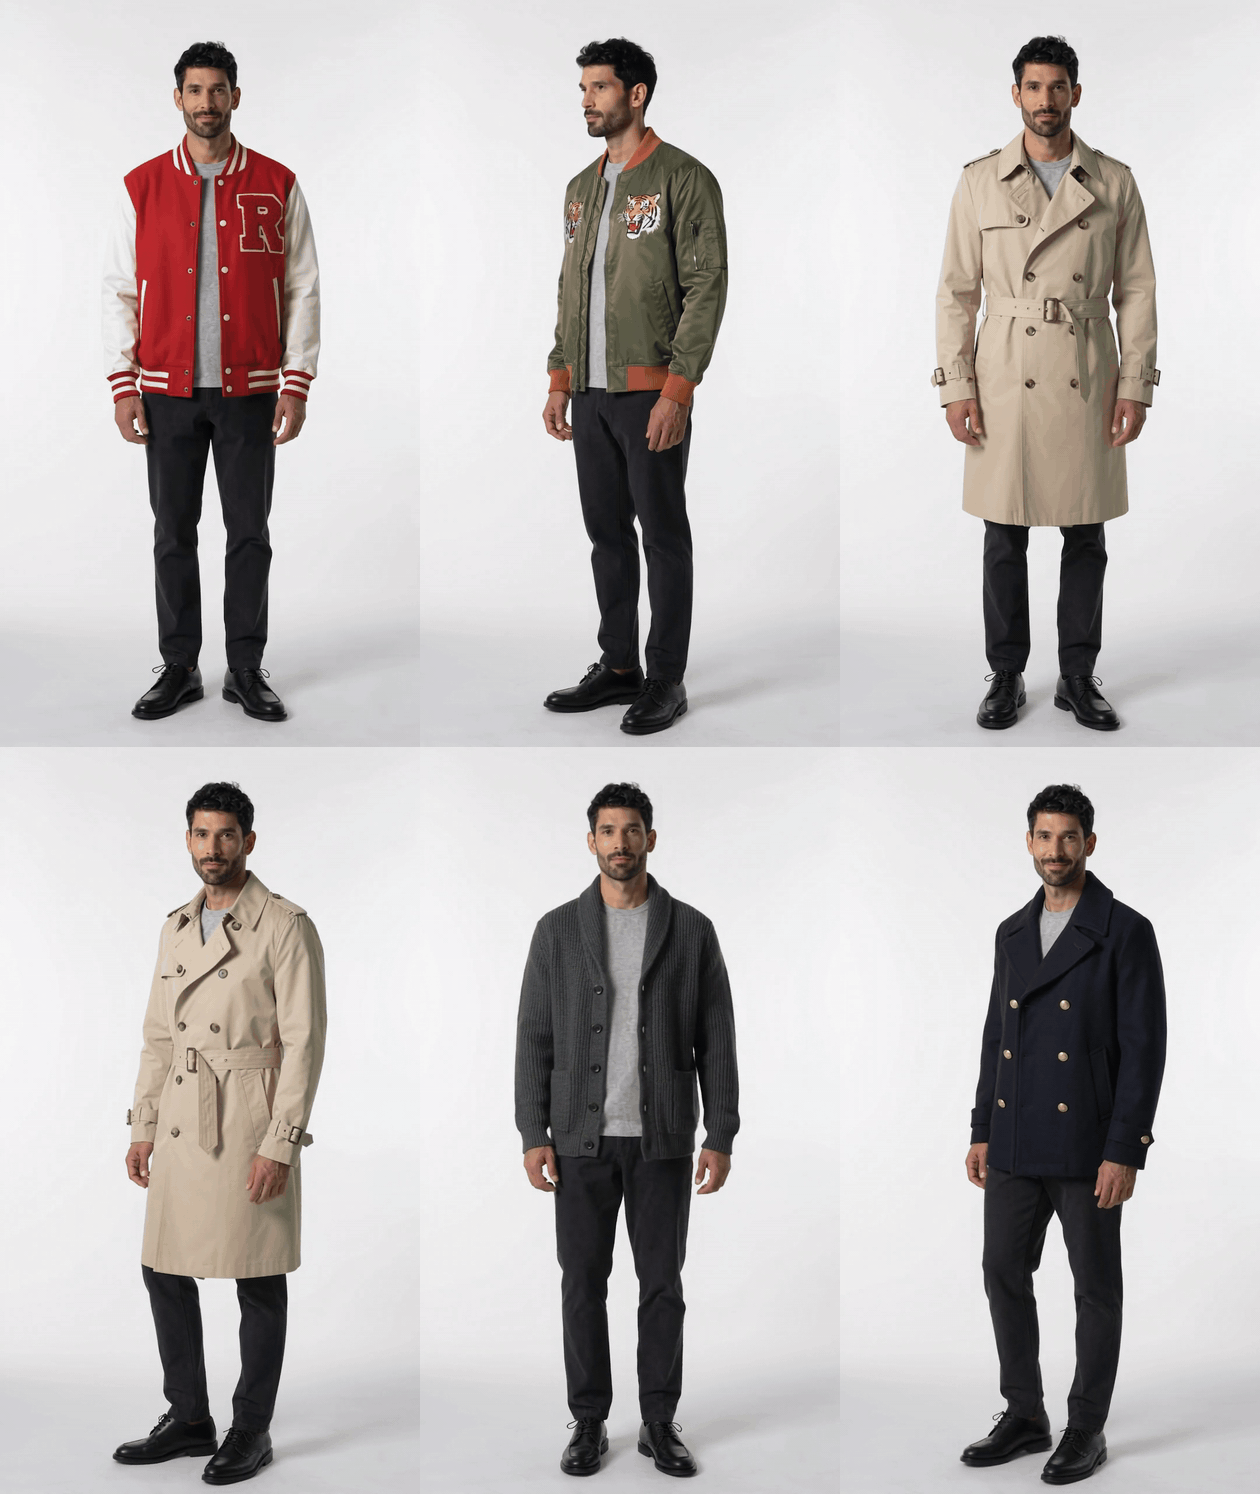
Generated 15-second output: five outerwear changes on one model.
The garment comparison catches visible drift: the red varsity jacket is worn open although the prompt asked for it buttoned, and the reference bomber has one centered tiger head while the generated look shows two smaller tiger motifs. Those differences matter if the clip is meant to depict the exact item being sold.
A champagne-gold gown with scene and jewelry references
The four references assign separate roles to the woman, a champagne-gold gown, an ornate opera foyer, and long drop earrings. The delivered clip is about 10 seconds, although the prompt requested 15. It shows the woman in a metallic gown taking a small turn inside a generated interior inspired by the scene photo.
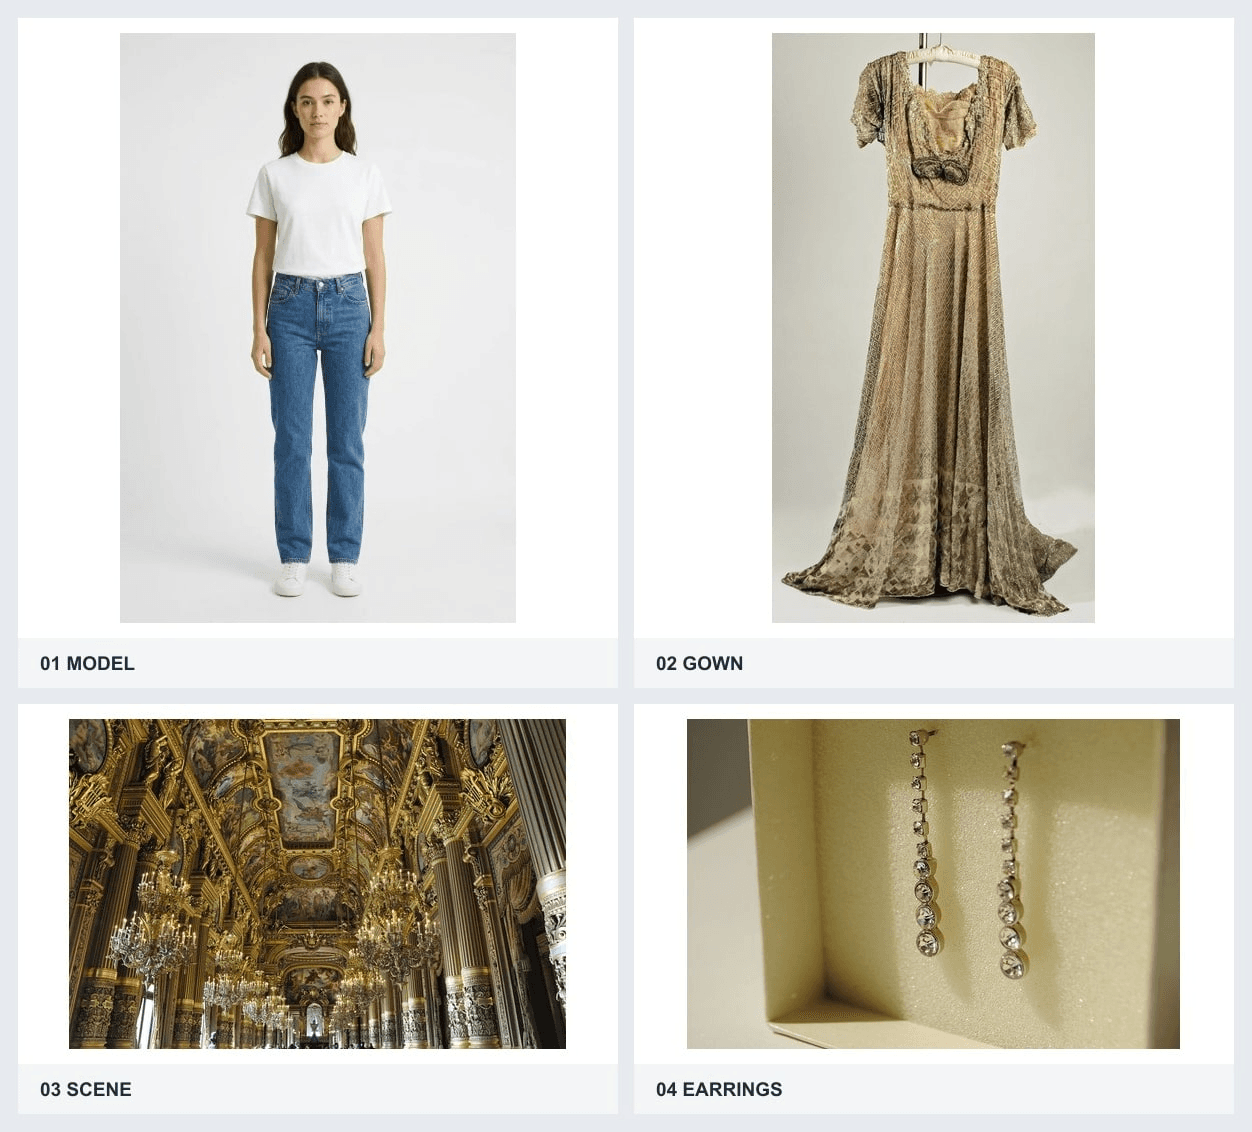
Input references in upload order: model, gown, scene, earrings.
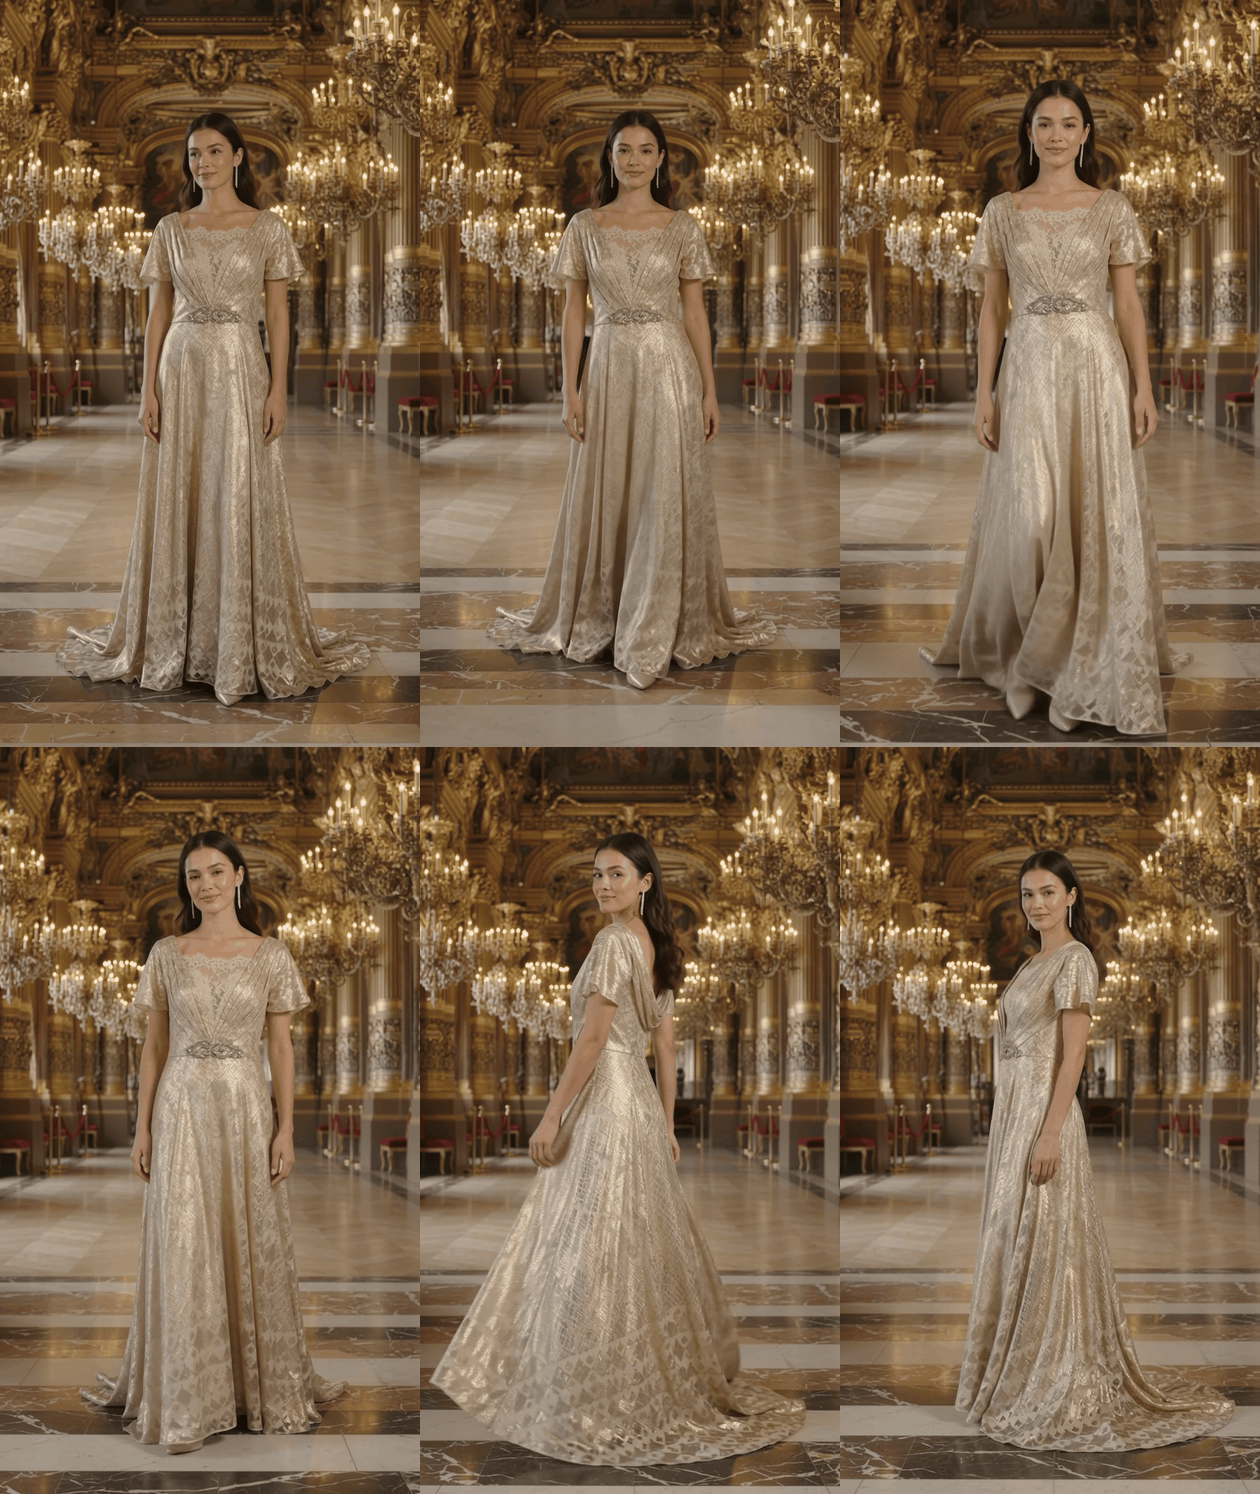
Generated 10-second output: an evening look with a scene and jewelry reference.
The moving hem and side view help judge whether the overall silhouette stays readable. The generated foyer and dress remain visual interpretations of the references; the clip does not verify the garment's physical fabric, exact construction, or the real location.
How Do You Check and Fix Garment Drift?
A frame-by-frame acceptance checklist
Pause the delivered clip at four points and compare it with the source set. Do not score only the first frame; the turn is where a plausible static try-on can stop matching the item. Keep the clip at full size while checking fine details, and ask a second reviewer to inspect the garment without first hearing which flaw you expect.
| Checkpoint | Person | Garment | Motion and view |
|---|---|---|---|
| Opening front | Face and proportions match the approved photo | Color, collar, fasteners, print, and hem match the front photo | Full item is visible. |
| Three-quarter turn | Face and hands remain coherent | Sleeves, side seam, pattern, and pockets remain attached | Turn looks natural, with no hidden jump. |
| Back view | Hair and body remain consistent | Back seams, vent, hood or collar, and length match the back photo | Camera actually shows the back. |
| Closing view | Identity remains stable | No new garment features or color shift | Clip ends without a morph or abrupt cut. |
A clip can pass for a social teaser and still fail as product evidence. A buyer deciding whether the back has a vent needs a clear, source-matched back view. Keep the review standard tied to what the placement promises. If the video suggests an accurate try-on or true fit, visual plausibility is insufficient evidence.
When to edit or regenerate
Use a targeted edit only when the main identity, body shape, camera path, and garment are already usable. A misplaced lapel edge or button layout may be a reasonable edit candidate. The Gemini Omni 1.2 Flash Video Edit page takes a publicly accessible MP4 source of 3 to 15 seconds and can accept garment reference images. The edited output keeps the source duration.
plaintext1Correct only the blazer's lapels and button layout to match the supplied front and back garment references throughout the source video. Keep the same model identity, body proportions, performance, camera movement, timing, lighting, background and all other garment details unchanged.
An edit is another generated output, so rerun the full four-point check. If the model's identity changes, the cut becomes a different product, or the back was never shown, regenerate from the original references and simplify the shot. A local patch cannot reliably repair a brief that never captured the required view. Google describes conversational editing as a capability; any particular repair still needs a visual review ( Google Cloud product note, November 2026 ).
What Do 15 Seconds and Resolution Mean for a Product Clip?
The 15-second ceiling is an upper limit, not a target every product should fill. An 8-second single-item clip can give roughly a short front hold, a moving three-quarter view, and a back reveal. A 12 to 15-second clip can add steps or a return to front, but every added beat gives the generator another opportunity to alter the garment. Specify the necessary views before choosing duration.
Choose 9:16 for a vertical social placement and 16:9 when a horizontal product display needs the garment and its surroundings in frame. Leave space around the hem and sleeves. If the chosen crop hides the parts you need to verify, change the framing request or the aspect ratio before spending on a higher resolution.
Atlas Cloud lists 360p as a draft option, 720p as the default, and 1080p or 4K as upscaled outputs for this route. Google similarly recommends drafting at 360p or 720p and upscaling selected clips. Upscaling can help delivery dimensions, but it does not prove that the generated weave, print, or seam matches the physical item. Check construction at source size, then check the final encoded file for artifacts and crop changes.
Where Can You Run It, and What Does It Cost?
Google lists its Gemini API and Google Cloud channels, alongside staged availability in its own apps. Atlas Cloud exposes separate Reference-to-Video and Video Edit routes through the model pages linked in the workflow above. Pick the route based on whether you have still references to generate a new clip or an existing MP4 with a limited defect to edit.
| Route | Relevant input | Duration | Price context verified November 2026 |
|---|---|---|---|
| Google platform | Images, prompt, and supported reference media | 3 to 15 seconds | Google states $0.07 per second for 720p on its platform. |
| Atlas Cloud Reference-to-Video | Prompt and 1 to 10 reference images | 3 to 15 seconds | Model page lists a discounted starting rate of $0.023 per second, from a $0.028 standard base rate. |
| Atlas Cloud Video Edit | Public MP4 URL, prompt, and optional reference images | Source length, 3 to 15 seconds | Model page lists a discounted starting rate of $0.023 per second, from a $0.028 standard base rate. |
The Atlas figures are starting rates, not a quote for the 1080p vertical setting in this guide. The Atlas Cloud model catalog lists the family; select the exact route and settings and read the live quote before submitting. Do not multiply a starting rate by 8 or 12 and present the result as the final bill. Google's $0.07 figure belongs to Google's 720p platform price, not Atlas Cloud.
The practical cost of a usable clip also includes retries, manual review, and a possible edit. A team comparing routes should budget for an approval process, not assume its first render will pass. Keep the source photos and review log together so a second attempt can change one variable at a time.
When Is a Try-On Video Ready to Publish?
Publish only after a reviewer can identify the same person and item in the source photos and throughout the clip. Check that you have rights to use the model's likeness and the product photos for generated commercial media. Keep the item name and claims faithful to the actual SKU, including the back and details that buyers may use to decide.
Label the asset as a generated visualization where its placement could otherwise imply documentary footage. Avoid claims that it measures fit, sizing, stretch, or drape on a customer's body. The pixels can suggest styling and movement; they cannot establish how the physical garment fits a particular person. If a product claim depends on a real seam, pocket, or closure, compare that feature with the physical product or approved product photography before publication.
Use three outcomes for the review log: publish when every required view and detail passes, revise when a small isolated defect has a plausible edit path, and reject when identity or core garment construction changes. Apply the same standard to each new color and garment. For a gemini omni 1.2 flash virtual try on video, the next useful step is to assemble one authorized three-photo source set, run the short single-item brief, and record the four checkpoints before planning a larger campaign.
Frequently Asked Questions
Can I use one garment photo instead of front and back views?
You can submit a single image, but the model has no direct evidence for the unseen back. If a back turn matters to the listing, supply a real back photo. Otherwise, constrain the shot to views the photo supports and avoid claims about rear construction.
Can I reuse the same model photo for several garments?
Yes, if your rights cover each generated use. Keep the model source fixed while swapping each garment's own front and back images. Review identity and proportions in every result; reuse of an input does not guarantee identical output.
Does the generated clip include audio?
The model supports native audio, but sound is usually irrelevant to a garment-detail check. Review the actual file if your placement expects sound. A silent GIF of a short clip cannot carry audio, so keep the original video separately if audio matters to your campaign.
Can a virtual try-on video prove sizing or fit?
No. A generated visual is a styling illustration, not a measurement of how a specific garment fits a specific customer. Publish accurate size charts, garment measurements, and real product information alongside it.


