The ChatGPT Image 2.5 sketch feature fixes this spatial translation gap by letting you draw on images in ChatGPT using a built-in visual annotation tool.
Instead of relying purely on text descriptions, you can activate the editing canvas directly using the at sketch shortcut or visual tool menu. This interface combines vector brush strokes with text instructions to isolate local edits without altering untouched background pixels.
Key Takeway
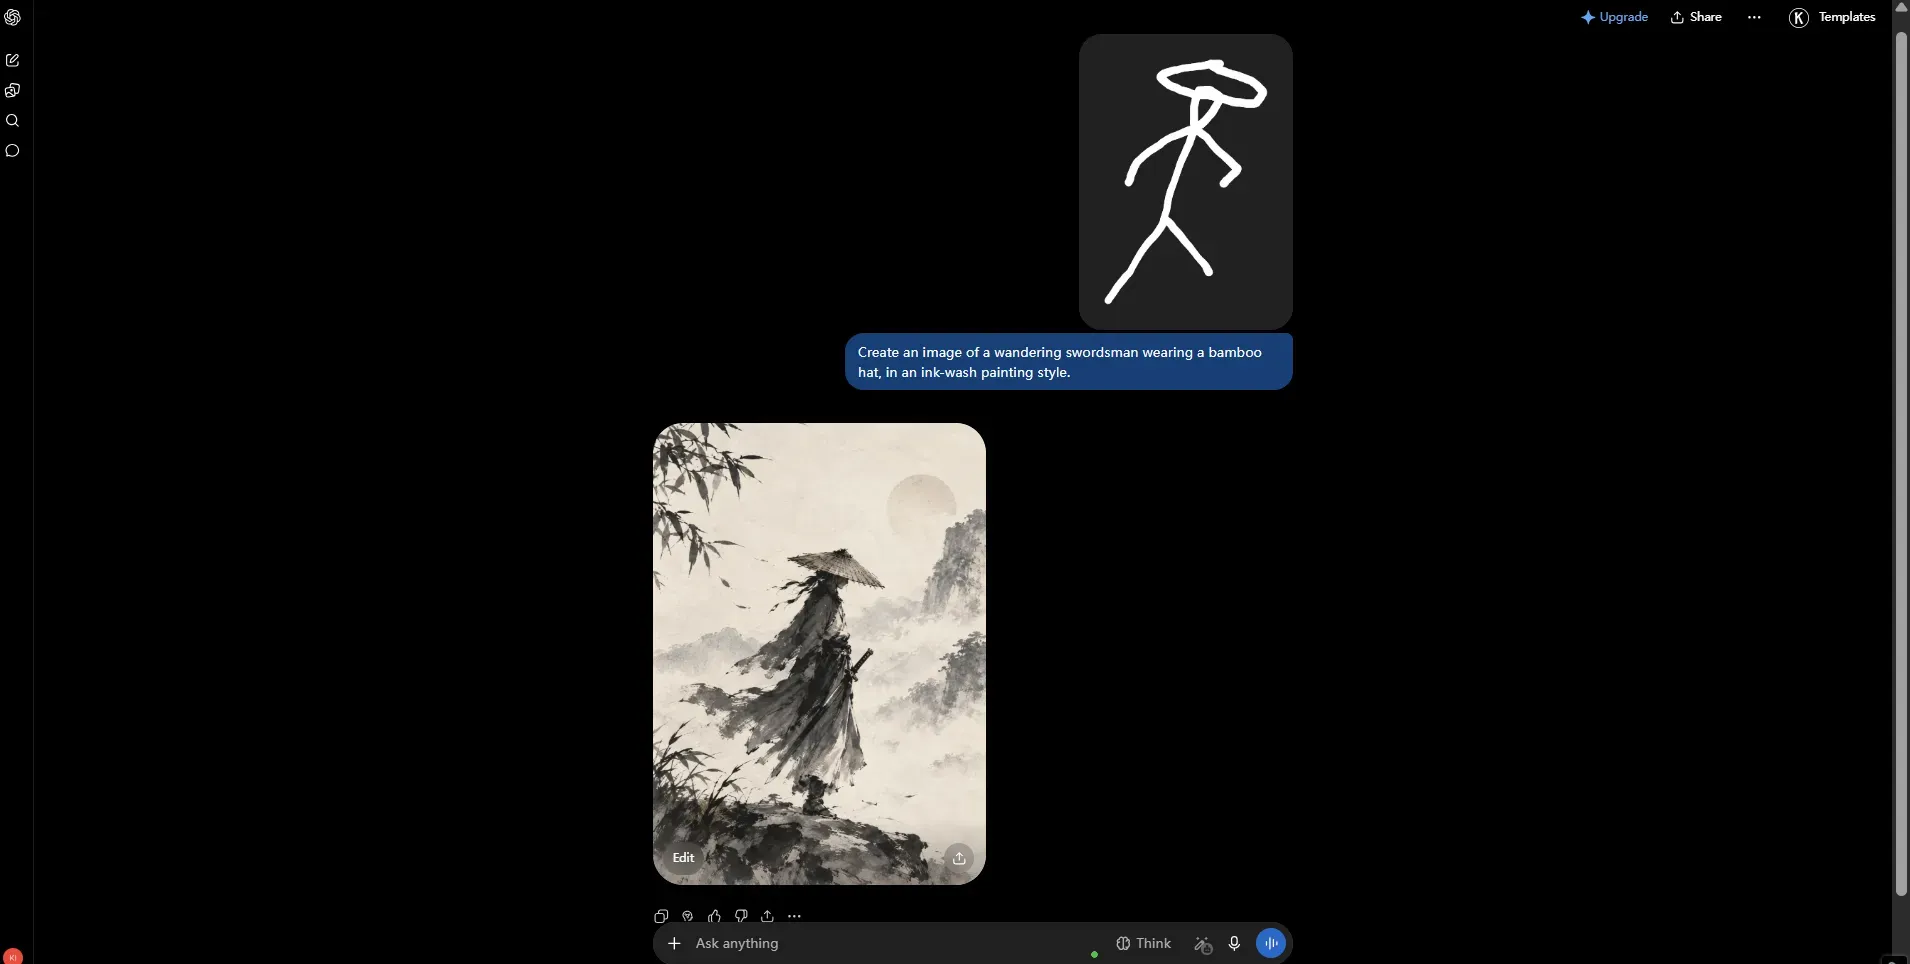
- Activate Canvas Trigger the at sketch shortcut or select the pencil icon on any generated asset.
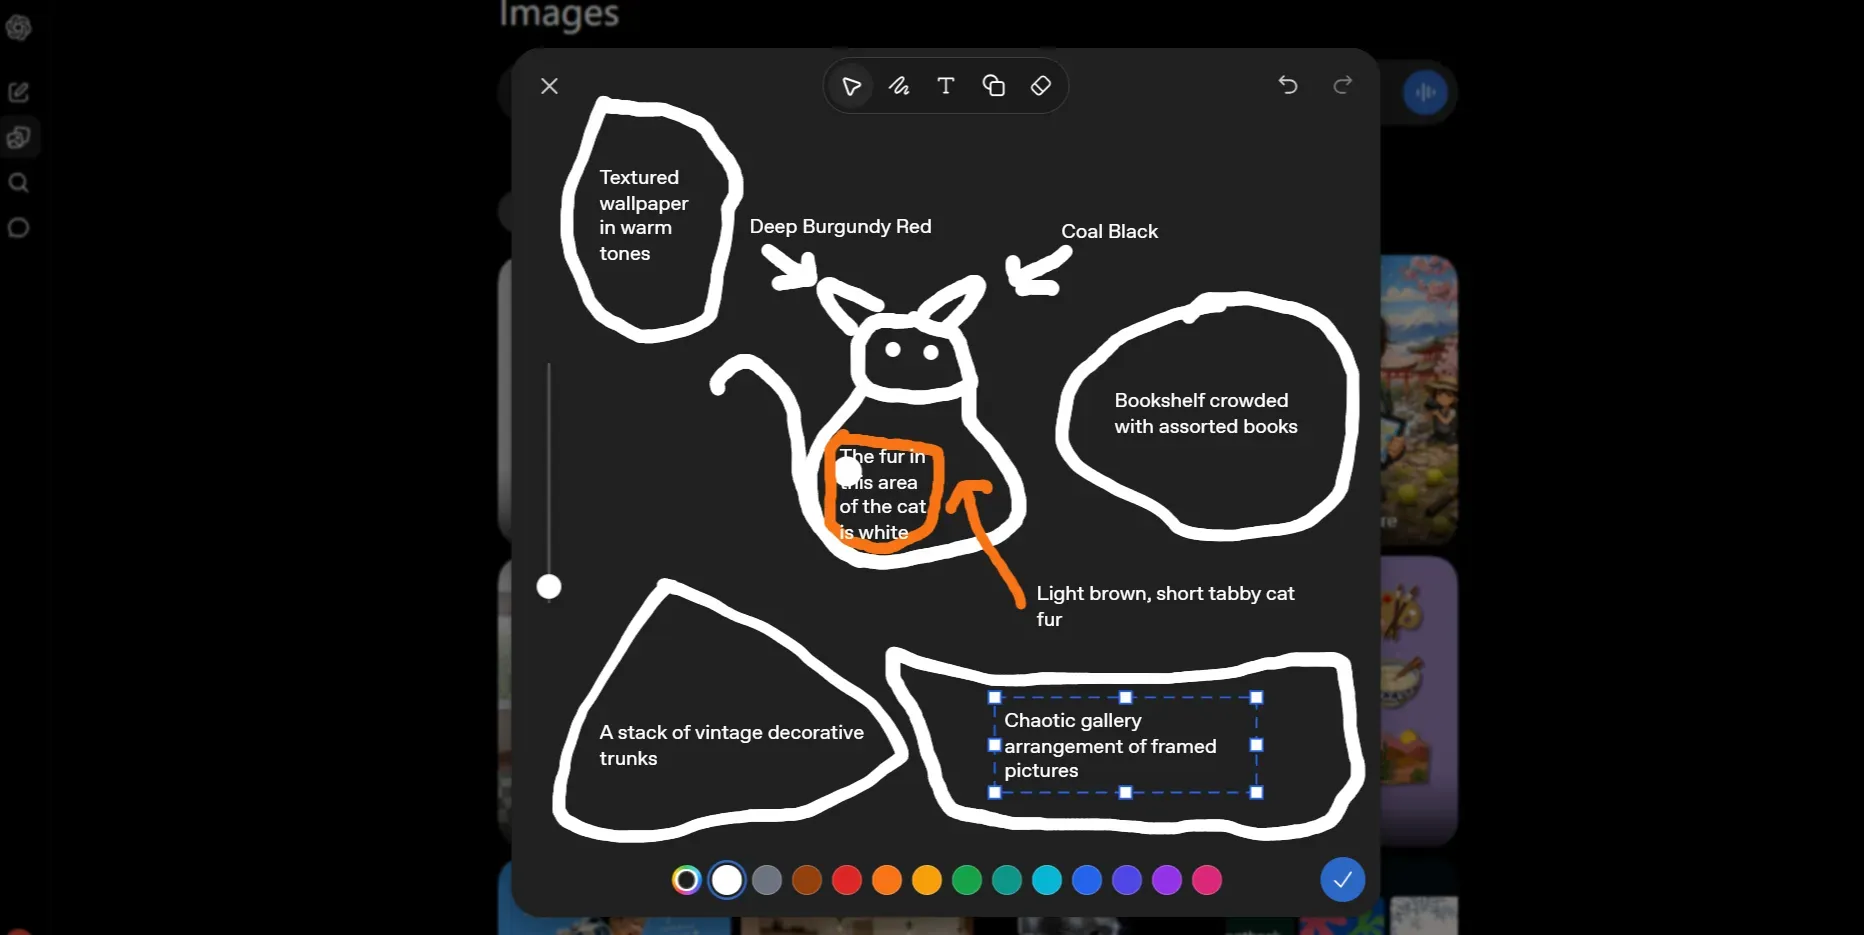
- Outline Scope Stroke direct vector lines or bounding boxes around your target edit zone.
- Prompt Scoped Edits Detail exact visual replacements while explicitly naming protected elements.
- Review and Rollback Check edge joins for stroke bleeding and revert to the master copy immediately if details drift.
Recent upgrades in the ChatGPT Image 2.5 architecture eliminate spatial guesswork by pairing shape geometry directly with regional prompts. This reusable canvas workflow improves multi-edit consistency, reducing discarded generations while giving creators exact visual layout control.
Understanding ChatGPT Image 2.5 Sketch vs Comment Edit Controls
A common headache in generative AI image editing occurs when you ask to move an object left, but the model redesigns the entire scene instead. OpenAI ChatGPT Images 2.5 editing mechanisms were updated with distinct localized tools to solve visual drift. However, mixing up these tools leads to unexpected prompt failures.
Vector Strokes vs Coordinate Pins
Understanding the mechanics of a sketch vs comment edit comes down to input spatial precision.
A pinpoint comment edit places a single coordinate pin on an existing image. This works best when dropping a written text note onto a localized zone, such as swapping text copy on a package label or changing a shirt color. It acts as a semantic marker, telling the model to adjust properties within that exact zone.
In contrast, a ChatGPT Image 2.5 sketch edit uses freehand vector strokes, color masks, and shape outlines to control geometry. By drawing directly on the canvas, you provide explicit spatial layout control. Instead of describing complex relative positions in words, your drawing shows the model exact boundaries, directional paths, and object shapes before generating pixels.
Feature Comparison Across Canvas Tools
| Feature Attribute | Sketch Tool | Comment Tool | Select Tool |
| Input Type | Freehand vector strokes and line shapes | Single-point coordinate pin with text note | Highlighted area mask via brush slider |
| Primary Use Case | Spatial layout control, new shapes, wireframes | Text updates, label swaps, localized color changes | Bounded object removal or item replacement |
| Spatial Guidance | Explicit visual geometry and directional boundaries | Point location with natural language scope | Bounded regional mask without drawing shapes |
| Model Constraints | Stroke color can bleed if prompt lacks boundaries | Pin location does not create a hard pixel lock | Edits can occasionally spill beyond mask edges |
Choosing the right visual annotation tool ensures your ChatGPT image sketch edit preserves surrounding elements without unwanted style restarts.
How to Access and Operate the ChatGPT Sketch Interface Across Devices
Fumbling through nested menus while an image idea sits in your head wastes time. Many users type lengthy descriptions to modify an asset simply because they do not know how to access ChatGPT sketch controls directly on their screen. Opening the interactive canvas requires only a few taps or a single keyboard trigger.
| Platform | Primary Access Path | Shortcut Trigger | Input Hardware |
| Web Browser | Full-screen preview to Markup toolbar menu | Type @sketch in prompt box | Mouse, trackpad, stylus tablet |
| Desktop App | Top toolbar Markup icon | Direct button or @sketch command | Mouse, trackpad, drawing tablet |
| Mobile App | Image view to pencil icon tray | Touch tap menu selection | Finger, capacitive stylus |
Access Methods Across Web Desktop and Mobile App
Opening the sketch tool canvas varies slightly depending on your operating system and platform.
On Web browsers and the desktop application:
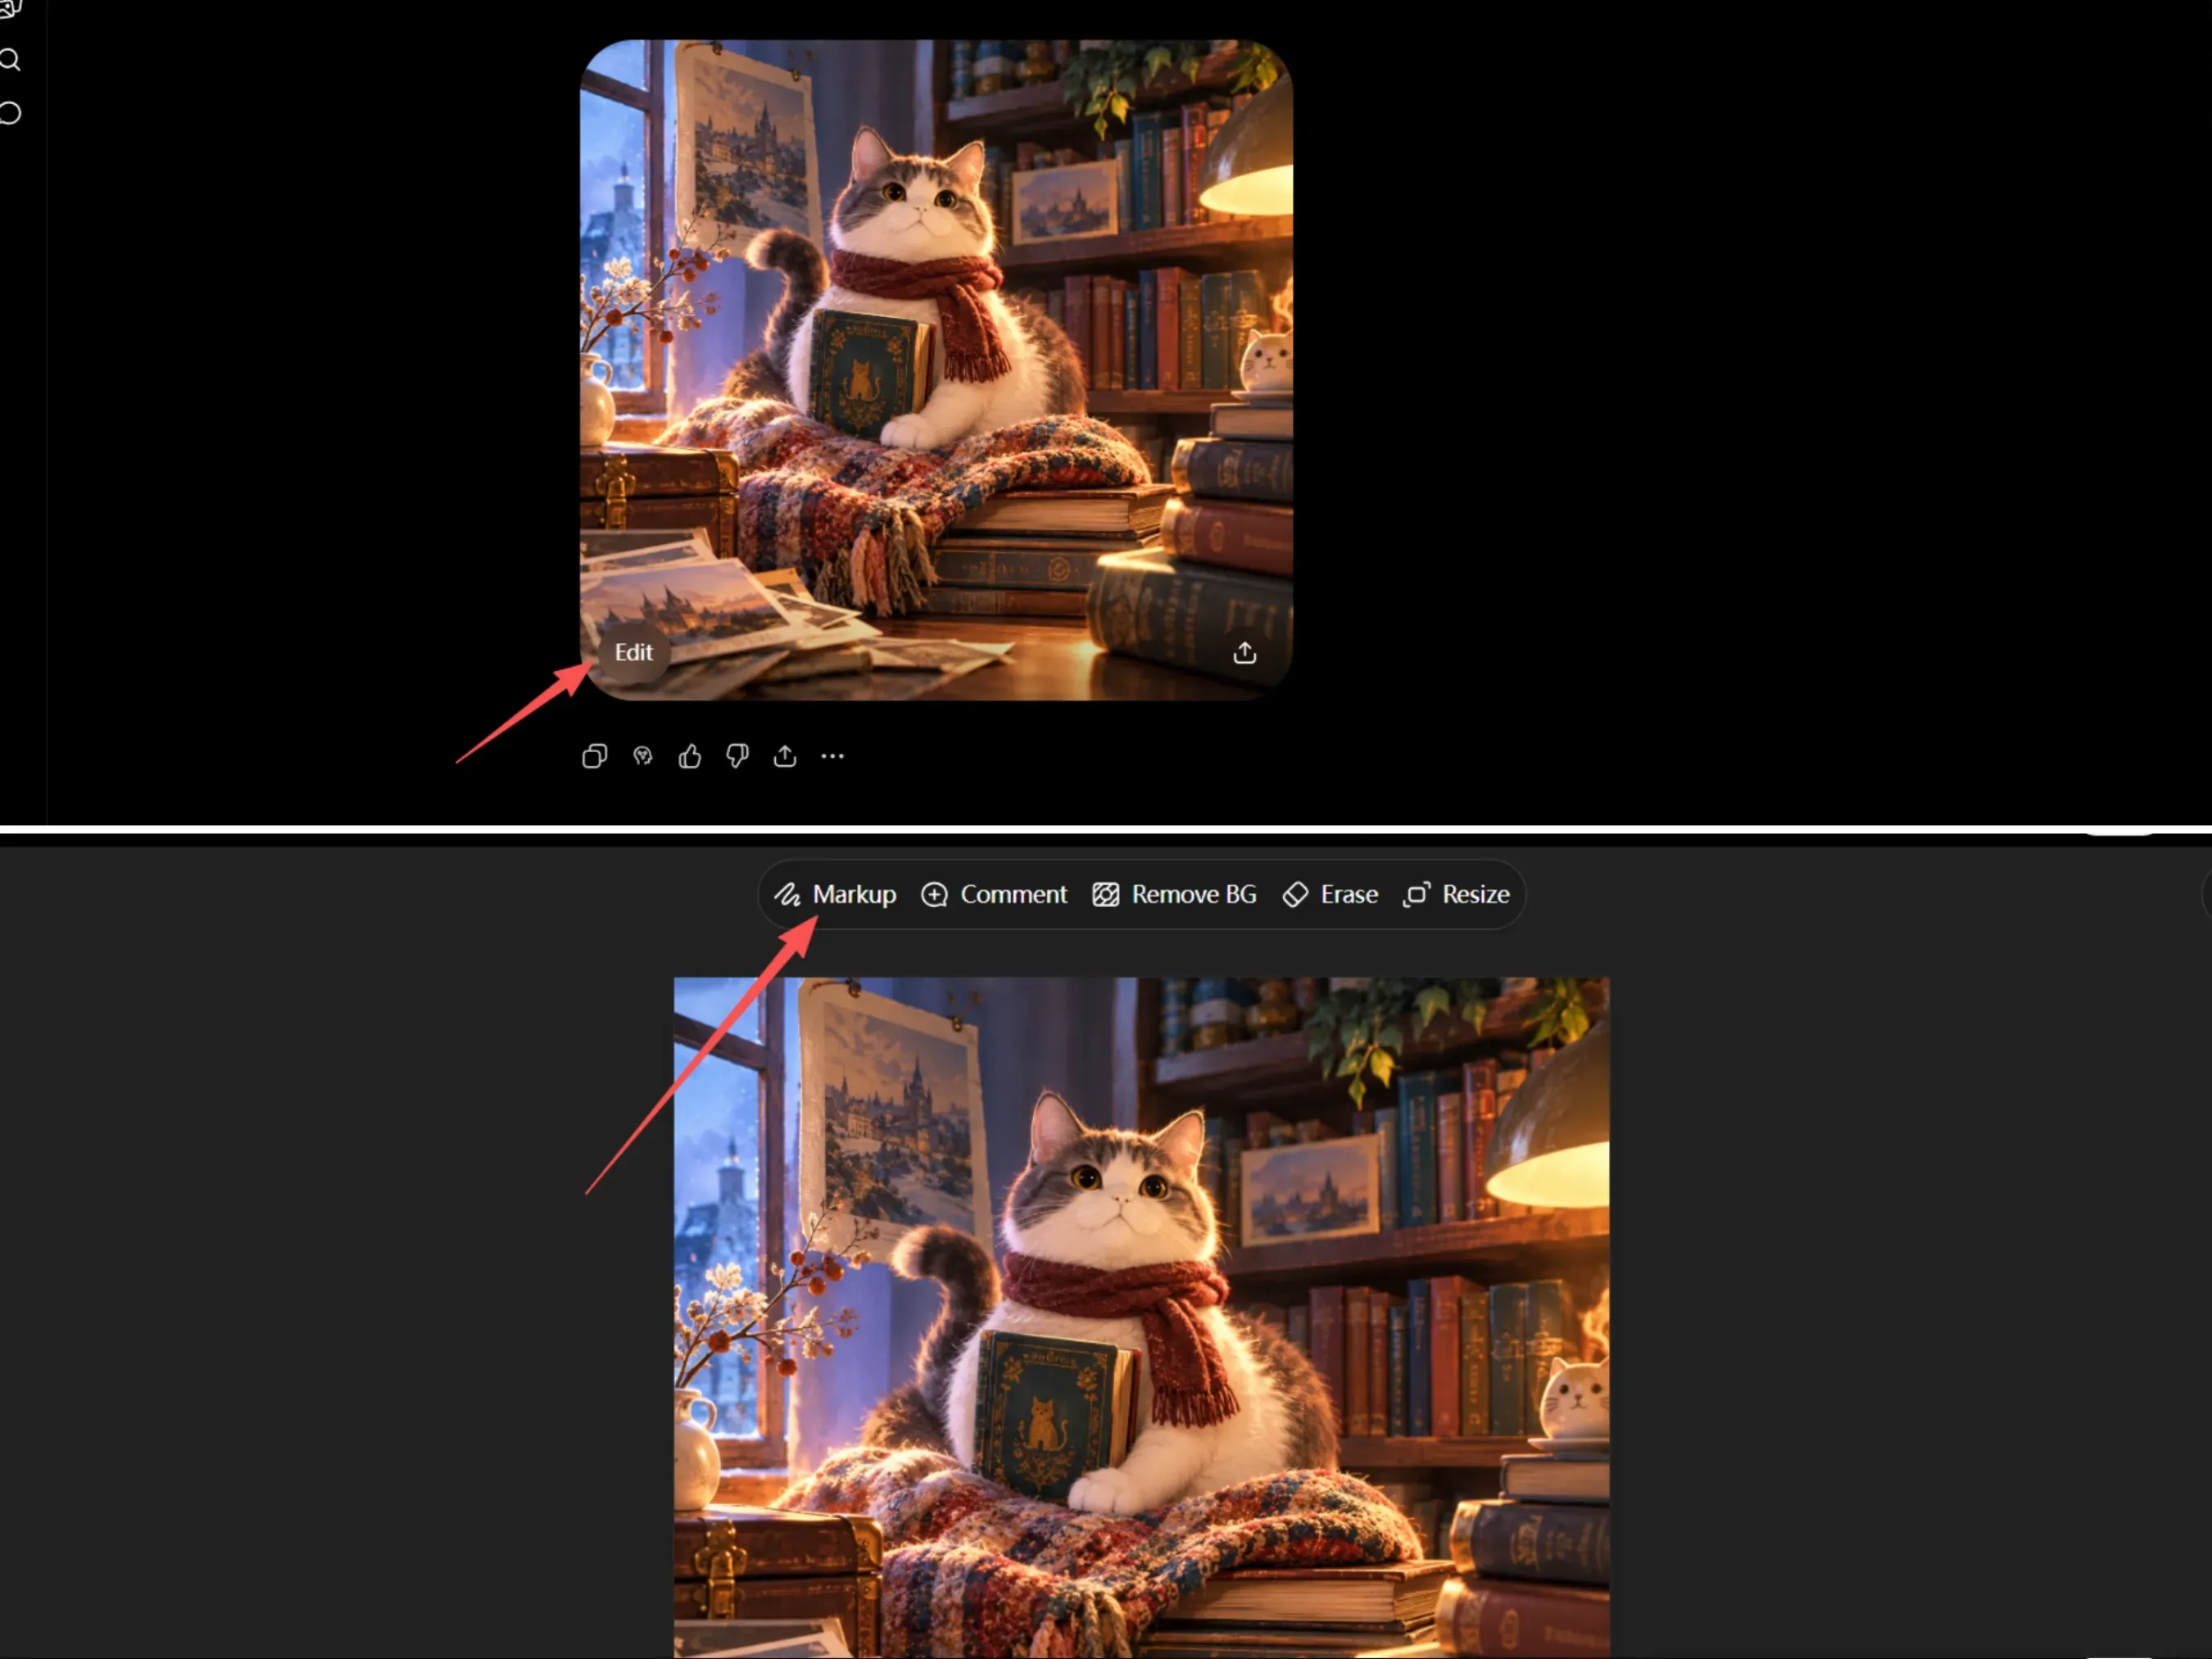
- Click any generated or uploaded image to open full-screen preview mode.
- Select the Edit button located in the top control bar.
- Choose Markup from the toolbar options to load the drawing interface.
Alternatively, type the at sketch shortcut directly in your prompt text box while referencing an active image generation to launch the editing canvas immediately.
On iOS and Android mobile apps:
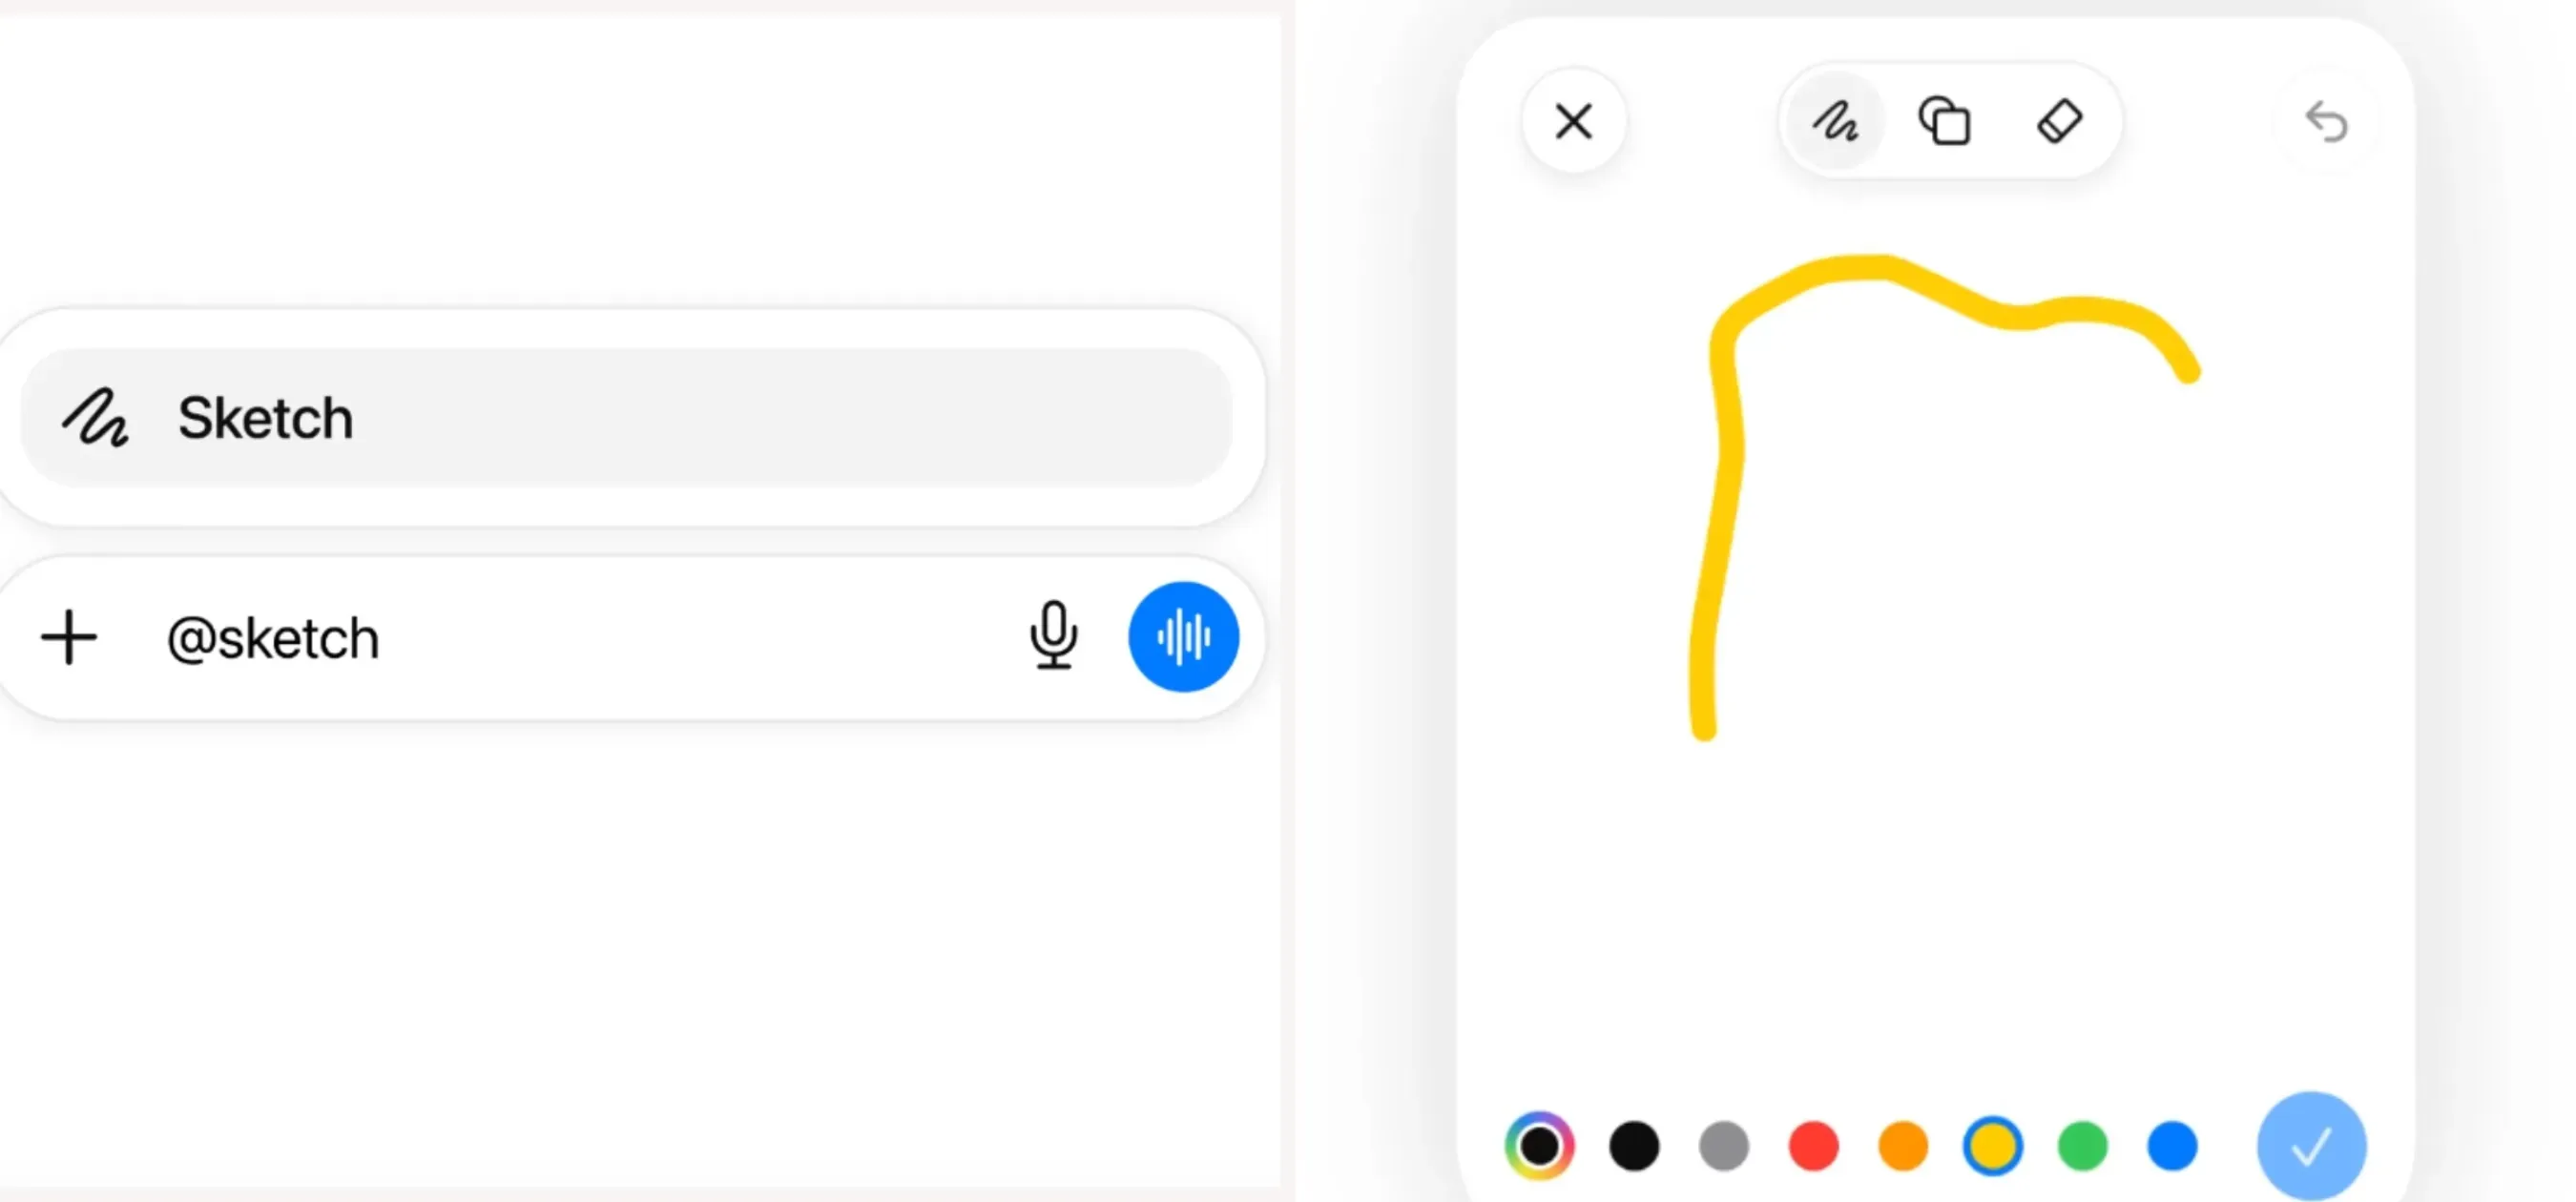
To launch a new Sketch drawing canvas:
- Type
@in the chat message box and select Sketch from the menu options. - Draw your vector composition using touch or a mobile stylus.
- Tap the checkmark (✓) to confirm your drawing, then add your scoped prompt text before sending.
To edit an existing generated image:
- Tap the image thumbnail to open full-screen mode.
- Select Select from the bottom image controls to highlight target edit areas with the brush slider, or tap Comment to place a precise coordinate pin.
Core Drawing Tools and Canvas Control Mechanics
The canvas workspace provides essential brush tools designed to guide AI spatial generation without requiring external image editors.
- Line Weight Slider: Adjusts stroke thickness from fine lines 1px to 3px for precise borders to thick markers 10px+ for fill areas.
- Opacity Adjuster: Controls stroke transparency. Hard borders are defined by solid 100% opacity, and semi-transparent overlays are indicated by 50% opacity.
- Color Palette Picker: Provides primary preset colors and custom hex selection. Choosing high-contrast stroke colors like neon green or vivid magenta helps the visual parser distinguish drawn lines from underlying image details.
- Eraser Tool: Removes specific stroke vectors without resetting the whole drawing canvas.
- Shape Templates: Inserts precise geometric bounding boxes, circles, and directional arrows to draw on images in ChatGPT cleanly.
Mastering these controls across ChatGPT desktop and mobile sketch interfaces keeps your edits fast and structurally accurate.
The Reusable 4 Step Canvas Workflow for Sketch Guided Image Editing
Stacking five consecutive image edits often turns a crisp product shot into a blurry, distorted mess. When every small prompt adjustment shifts light angles, alters hand poses, or mutates background textures, localized repairs stall out completely. Executing a clean sketch to image workflow requires a disciplined operational sequence that locks down base pixels before applying visual brush marks.
Step 1 Master Generation or Upload
Establish one approved base image before drawing a single vector line. Generating or uploading a high-resolution 16:9 or 1:1 master asset gives the vision parser a stable structural foundation. Save this source file under a clear version title like master-v1.png rather than relying on temporary session history.
Step 2 Strategic Stroke Placement
Open the canvas workspace and place high-contrast stroke marks across your target edit zone. Select neon green, cyan, or bright magenta brush colors that stand out clearly against surrounding pixels. Usage thicker 10px strokes to outline fill areas or tiny 2px strokes for precise border pathways, depending on intent. Draw clear bounding boxes for object additions or directional arrows for position shifts, keeping marks strictly inside open areas.
Step 3 Scoped Prompt Execution
Pair your visual drawing with a structured text instruction. To prevent accidental drift during a ChatGPT image sketch edit, apply a scoped prompt template that explicitly separates target locations, requested changes, and protected elements.
plaintext1Only modify the marked area indicated by the drawn sketch lines. 2[Action]: Add a sleek black coffee grinder inside the drawn bounding box. 3[Style]: Match the soft morning window lighting, shallow depth of field, and photorealistic texture of the main scene. 4[Preserve]: Keep the ceramic mug, wooden countertop, background kitchen tile, shadows, camera angle, and unmarked details untouched. Make no other changes.
Step 4 Quality Inspection and Rollback
Local selection boundaries are not hard pixel masks, meaning edits can occasionally spill into adjacent areas. Run a thorough five-point QA pass before accepting any generated result.
| Inspection Area | Verification Focus | Rollback Trigger |
| Subject Identity | Face, product shape, logo geometry | Facial drift or altered brand shapes |
| Edge Joins | Stroke bleeding, contact shadows | Floating objects or discolored stroke lines |
| Background Lines | Horizon lines, tile grid alignment | Warped perspective or broken seams |
| Lighting Direction | Shadow softness, reflection highlights | Conflicting light angles or missing shadows |
| Text Preservation | Typography alignment, character spelling | Garbled letters or reflowed margins |
If any inspection point fails, do not stack a secondary sketch command on top of the damaged result. Reverting immediately to your approved master image prevents cascading visual errors and keeps your step by step ChatGPT image sketch process predictable across complex creative projects. Adopting this reusable canvas workflow provides a reliable framework for executing localized visual edits without sacrificing original image quality.
Practical Case Studies for Product Design Architecture and Artwork
Designers often waste hours writing paragraph-long prompts trying to describe a sofa's exact angled placement, only to receive an AI generation where the furniture clips through a wall. Relying on text alone forces the model to guess spatial relationships, resulting in high revision rates.
Architectural Wireframe to Photorealistic Interior Render
Converting a crude 2D floorplan into a realistic room visualization requires precise spatial boundaries. When executing wireframe to image rendering, upload your two-dimensional blueprint sketch to the canvas workspace. Use high-contrast stroke lines to outline structural walls, door frames, and window placements.
- Trace primary room boundaries: Mark outer wall limits using solid high-contrast brush lines.
- Annotate furniture placements: Draw rectangular bounding boxes over sofas, tables, and TV units.
- Define spatial vectors: Draw directional arrows to indicate sunlight entry angles and room entrances.
Pairing your drawn layout with specific material and lighting prompts turns 2D floorplans into accurate 3D renders while preserving exact room proportions.
Practical application:
Prompt example:
Only modify the marked blueprint into a photorealistic 3D interior design render based on the drawn layout paths.
[Architecture] Convert the traced 2D walls into 3D interior walls, and turn the top window into a floor-to-ceiling glass sliding door.
[Furniture] Place a cream-white modern fabric sofa inside the right sofa box, a natural oak rectangular coffee table inside the center box, and a sleek dark wood floating TV console with a wall-mounted TV inside the left box.
[Lighting] Soft morning sunlight streaming from the top window following the drawn arrow angle, casting soft shadows across the wooden floor.
[Style] Minimalist Scandinavian interior design, light oak herringbone flooring, neutral plaster walls, crisp texture, photorealistic architecture rendering. Preserve exact spatial proportions from the 2D layout.
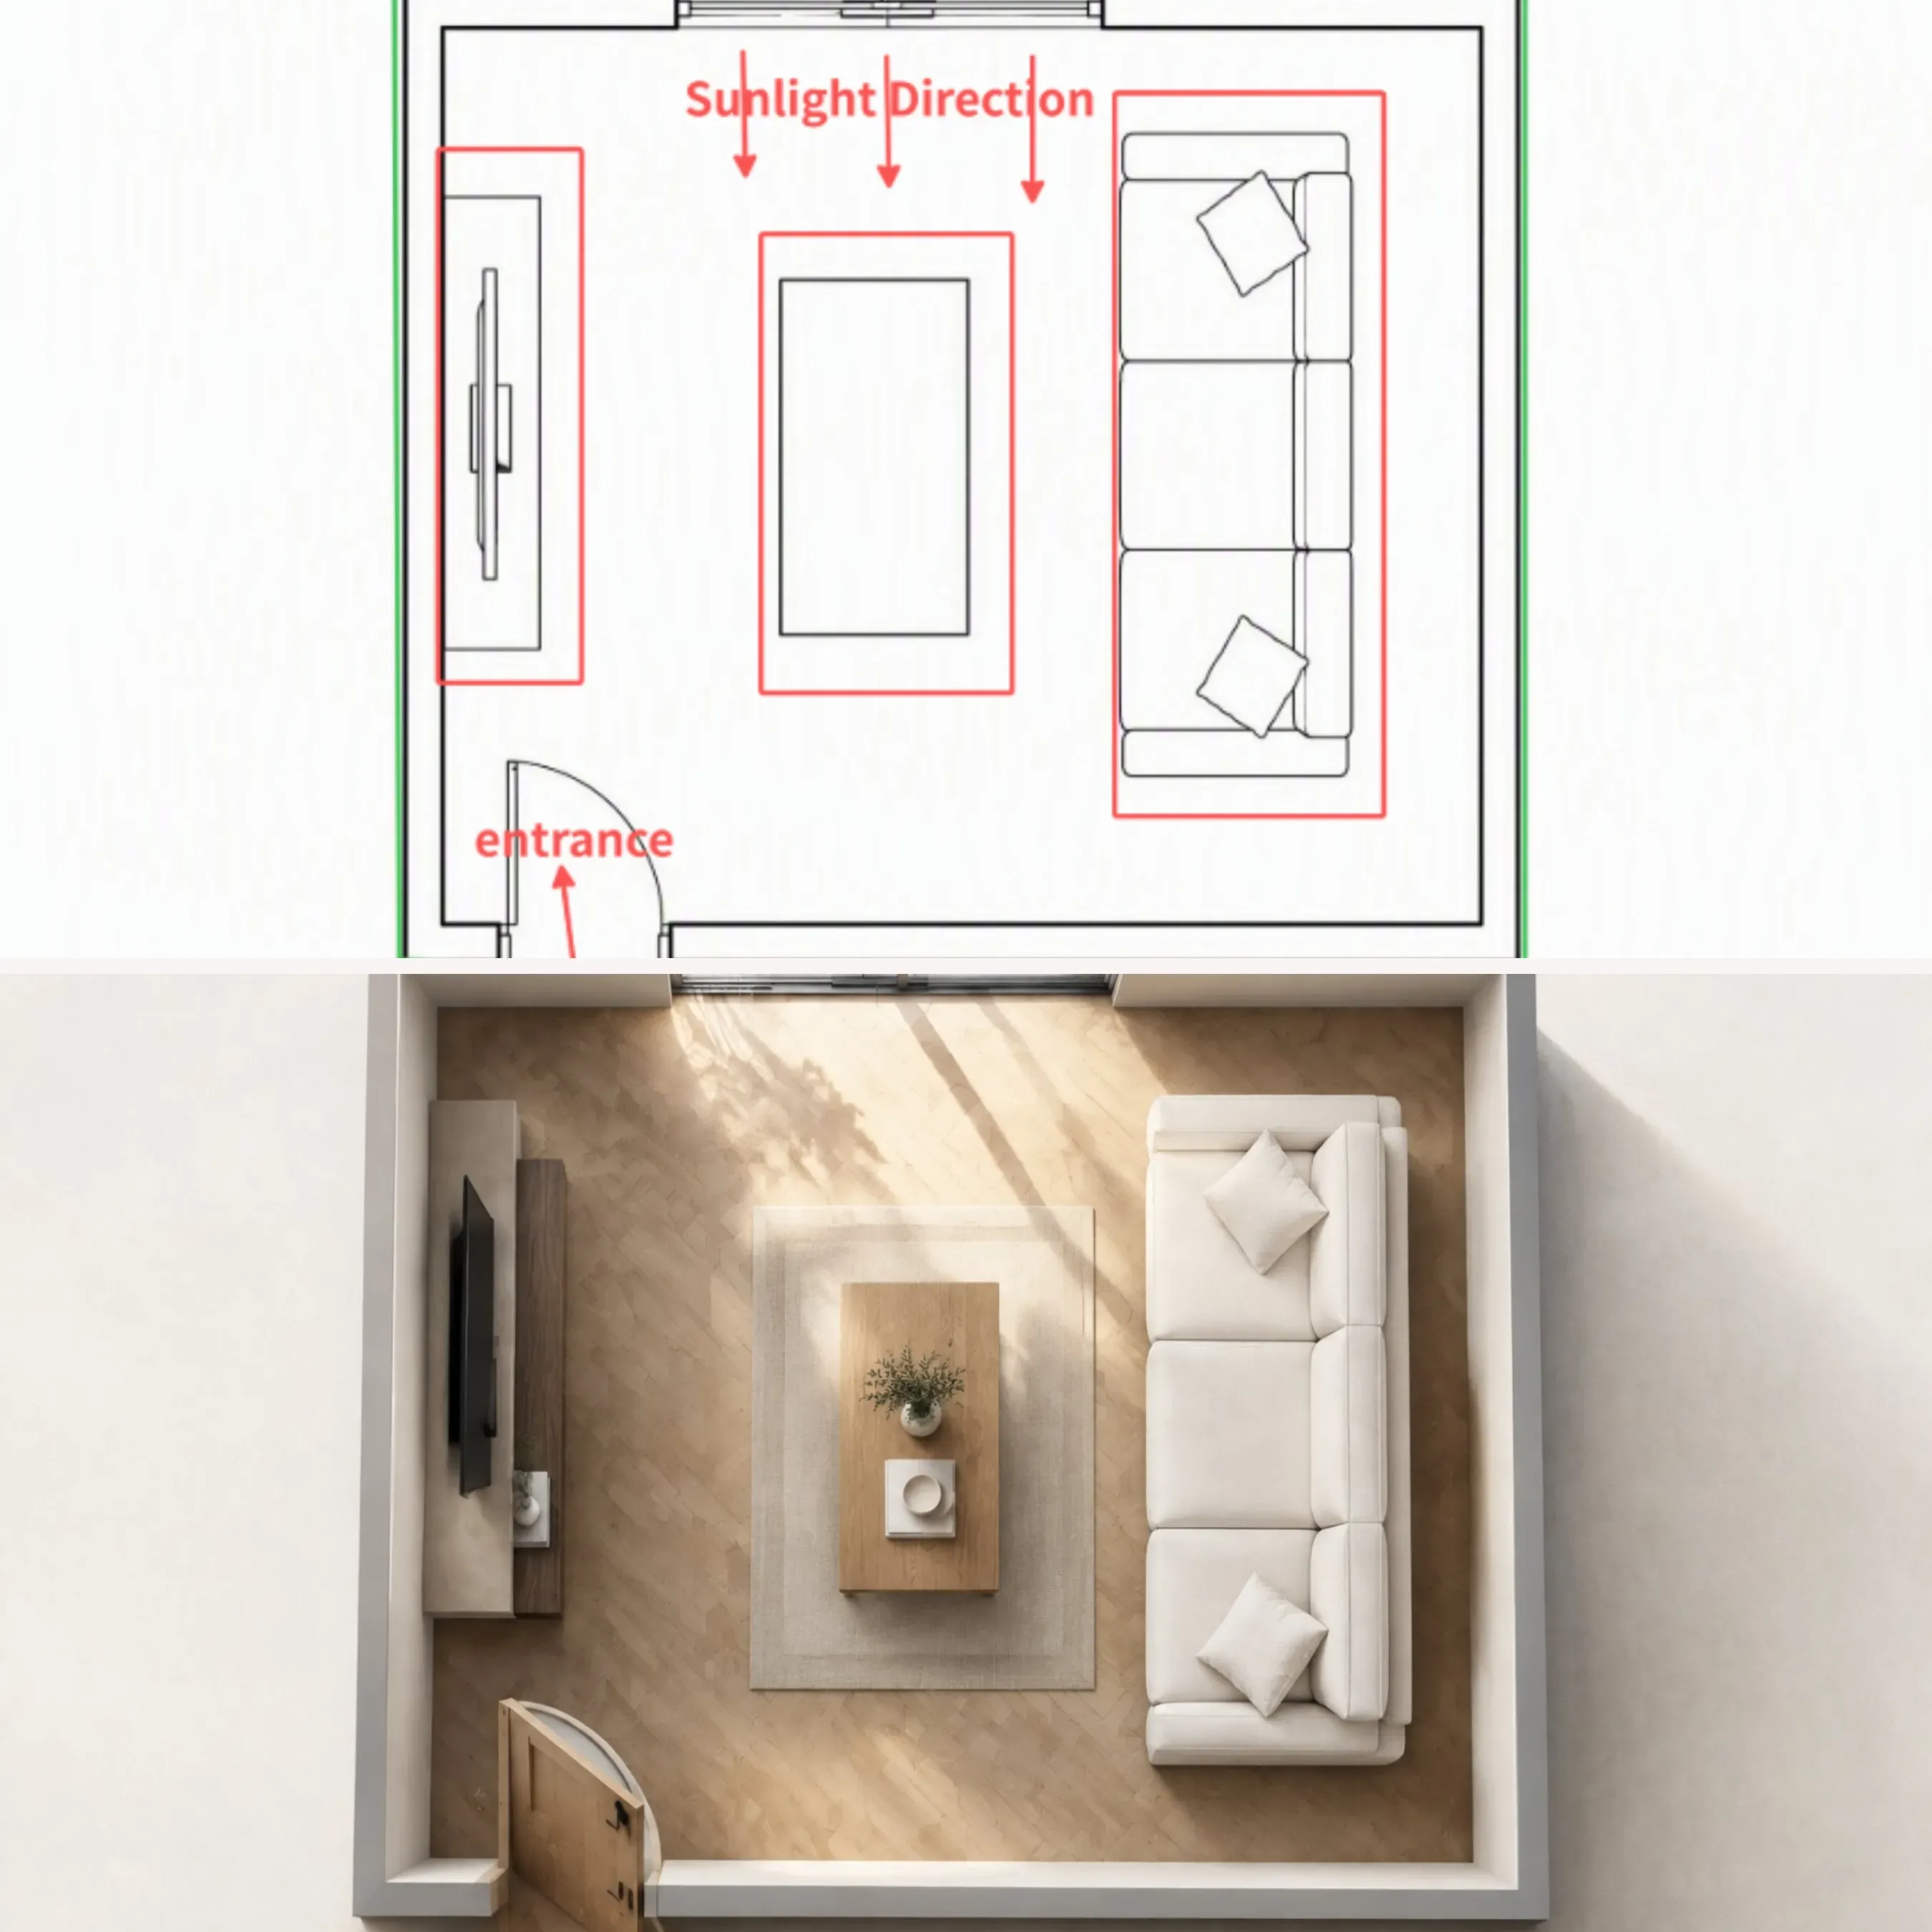
A 2D blueprint wireframe into a photorealistic 3D interior render using ChatGPT Image 2.5 sketch controls
This structured approach transforms a basic product sketch to AI render output while retaining exact architectural proportions.
Spatial Addition Workflow for Product Photography
Placing a new product into an existing commercial photo without ruining approved lighting or subject framing requires an exact spatial addition workflow. Open an approved lifestyle photo inside the ChatGPT visual annotation tool and draw a targeted bounding box over an empty surface area.
- Visual Input: High-contrast neon outline covering the exact placement zone.
- Prompt Instruction: Insert a brushed stainless steel espresso machine inside the drawn box.
- Preservation Constraints: Protect background wall textures, ambient window light, hand positions, and facial details of nearby models.
Drawing directly on the canvas forces the model to respect scene perspective and scale, preventing global restarts or altered background details.
Practical application:
Prompt example:
Only modify the marked area inside the drawn bounding box.
[Action] Insert a compact brushed stainless steel espresso machine inside the drawn box.
[Style] Match the ambient morning window lighting, shallow depth of field, and photorealistic countertop reflections of the original scene.
[Preserve] Keep background wall tiles, ceramic mug, lighting angles, and unmarked countertop surface completely untouched. Make no global scene changes.
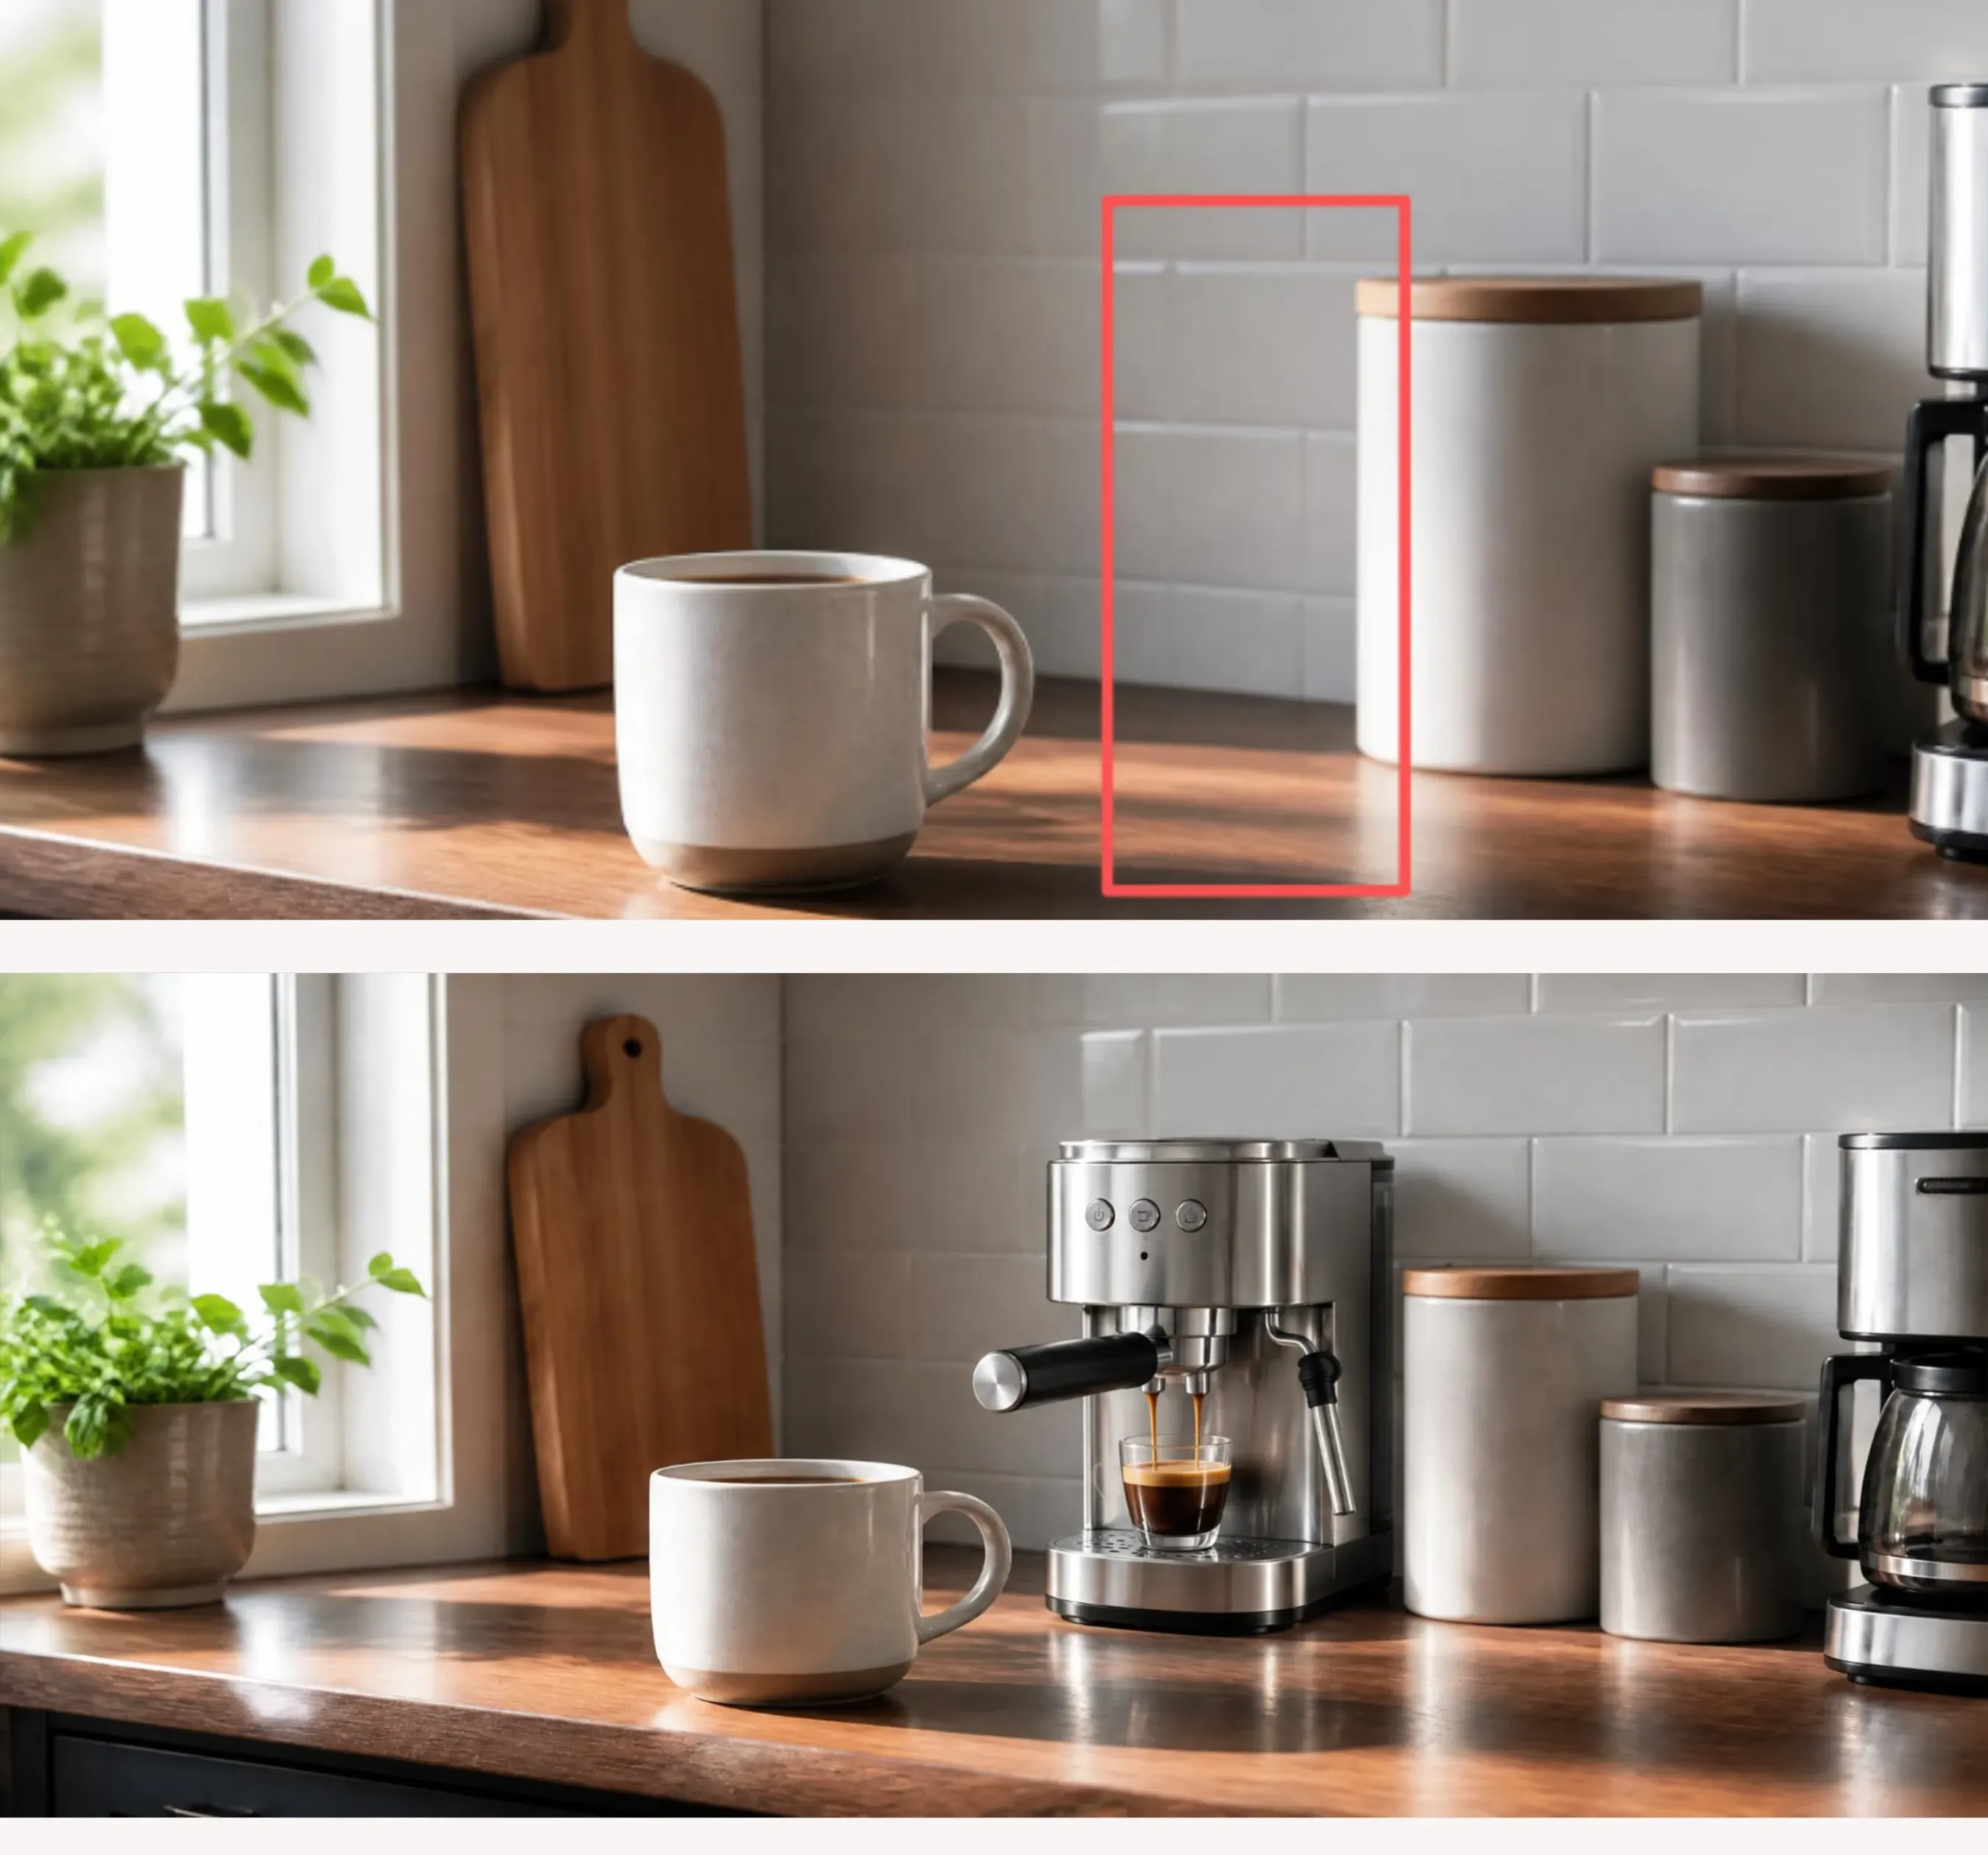
Demonstration of using a Markup bounding box to insert a new product seamlessly into an existing commercial photo without altering surrounding elements.
Fashion Silhouette and Pose Adjustments
Modifying garment cuts or model postures in fashion photography usually degrades fabric texture. By choosing to draw on images in ChatGPT, apparel designers can sketch revised sleeve lengths, hemline cuts, or arm positions directly over model photographs.
| Case Study Application | Canvas Input Method | Primary Workflow Objective | Preserved Image Elements |
| Architectural Visualization | Blueprint tracing lines | Convert 2D layout to 3D room render | Scale, wall placement, spatial ratios |
| E-Commerce Placement | Bounding box outline | Add new item via spatial addition workflow | Background lighting, facial features, hands |
| Apparel Line Editing | Contour line drawing | Modify sleeve length and garment silhouette | Fabric grain, lighting angles, background |
Sketching stroke paths along body contours forces the model to bind new apparel renders to existing body geometry, keeping studio lighting and fabric weave intact.
Practical application:
Prompt example:
Only modify the garment cut following the drawn contour lines.
[Apparel Edit] Extend the white short sleeves into long tailored sleeves following the drawn vector paths. Match the weave texture and fabric weight of the original t-shirt.
[Preserve] Keep model facial features, pose, trousers, studio background, and soft light highlights completely untouched. Make zero global alterations.
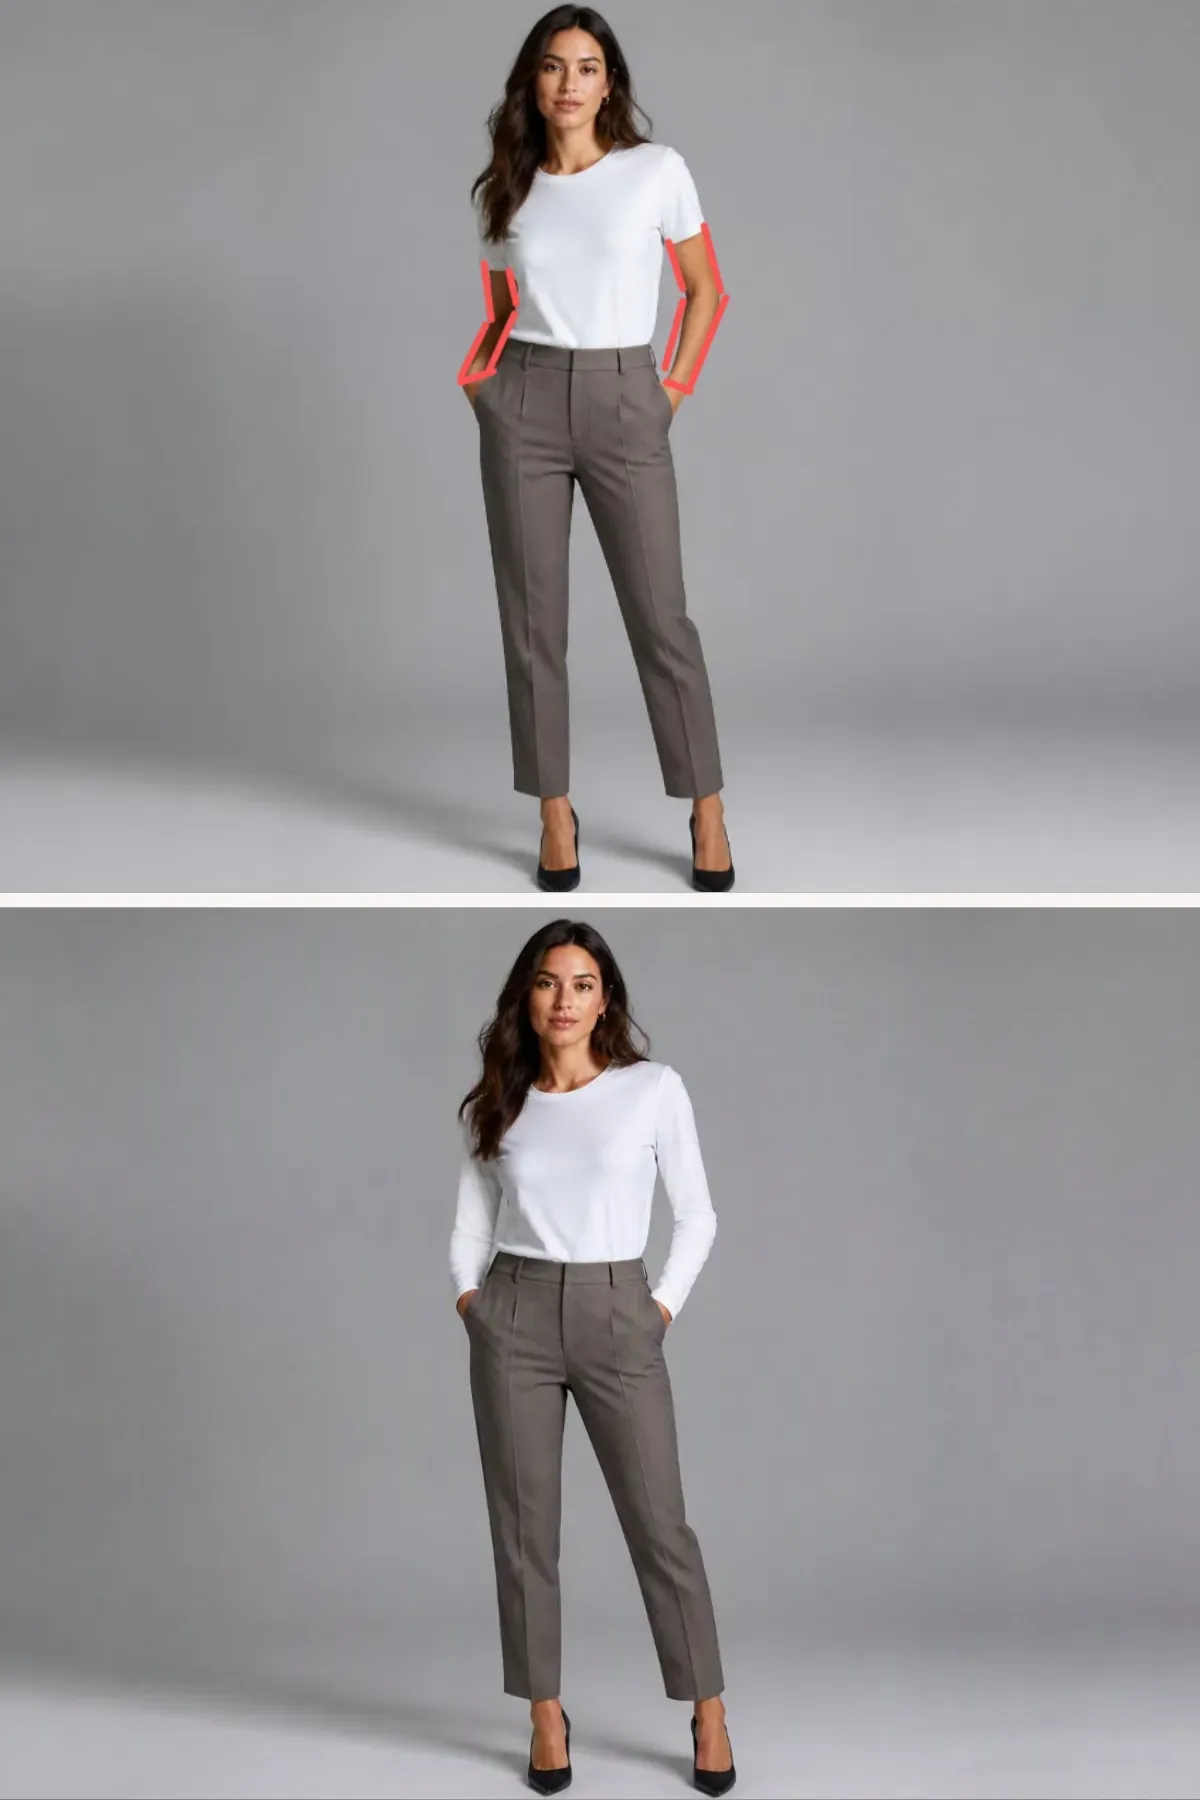
Demonstration of tracing garment boundaries with Markup contour lines to alter sleeve lengths and silhouettes while locking fabric texture and studio lighting.
Edge Cases Failure Recovery and Precision Fine Tuning Techniques
Drawing a bright neon-green line to mark an item placement only to end up with a green-tinted sofa and visible brush artifacts baked into your final render is frustrating. These visual glitches happen when the model mistakes your structural annotation strokes for actual scene elements rather than temporary spatial guides.
Primary Causes of Visual Artifacts and Spatial Drift
During precision image editing, three technical edge cases ruin localized visual edits:
- Stroke Bleeding: Occurs when thick or high-saturation brush marks leak stroke pigment directly into the newly generated surface texture.
- Over-Drawn Ambiguity: Results from drawing too many overlapping sketch lines, which causes the vision parser to hallucinate unwanted clutter instead of clean boundaries.
- Literal Stroke Rendering: Happens when directional arrows or bounding boxes are rendered as physical props, such as floating neon tubes or plastic wires.
Executing effective ChatGPT sketch failure recovery relies on adjusting brush parameters before submitting your run. Applying strict line opacity control by lowering stroke transparency to 40% or using a thin 1px border stroke prevents unwanted pigment transfer while maintaining clear spatial limits for the ChatGPT Image 2.5 sketch engine.
Diagnostic Troubleshooting Matrix for Canvas Edits
| Failure Mode | Visual Symptom | Technical Fix | Ideal Tool Fallback |
| Stroke Bleeding | Line color leaks into new object textures | Lower stroke thickness to 1px and adjust line opacity control to 40% | Re-draw with neutral grey stroke |
| Spatial Hallucination | Drawn arrows render as physical scene props | Delete directional arrows and use simple rectangular bounding boxes | Switch to coordinate comment pin |
| Boundary Spilling | Edits alter adjacent background pixels | Add explicit detail preservation clauses inside the prompt text | Highlight area with Select mask |
| Geometry Distortion | Skewed perspective or warped object angles | Align brush strokes directly with primary background perspective grid lines | Re-upload clean master base image |
Knowing When to Pivot to Alternative Canvas Controls
When a complex sketch attempt fails twice, stacking additional brush strokes only adds canvas noise. Drawing inputs guide spatial probability rather than hard pixel locks. If your revision requires swapping micro-text on a label or changing a small color tint without altering object geometry, wipe the drawing layer completely. Transitioning from visual brush lines to a single coordinate pin provides a cleaner path for sketch artifact removal, keeping your generation runs targeted and accurate.





