Hand-drawing a 16-frame character animation matrix historically required over 20 hours of manual effort. Demonstrating how quickly this pipeline evolves, developers can now generate production-ready MiniMax H3 game sprites and compile standard MiniMax H3 sprite atlases from a single static image in under three minutes.
To streamline your game asset animation pipeline, this overview details the entire transformation sequence from source PNGs to responsive game engine state machines:
| Step | Pipeline Phase | Core Toolchain | Output Deliverable |
| 1 | Reference Setup | Photoshop / Midjourney | High-contrast static PNG |
| 2 | Motion Synthesis | MiniMax H3 (API / Open Weights) | 24 FPS MP4 video clip |
| 3 | Frame Extraction | FFmpeg + rembg CLI | Transparent PNG keyframes |
| 4 | Atlas Compilation | TexturePacker / Python CLI | Packed MiniMax H3 sprite atlas + JSON |
| 5 | Engine Integration | Unity Animator / Godot 4 | Playable state machine |
By decoupling video synthesis from sprite packing, developers generate custom AI game sprites without temporal jitter. Isolating 8 to 12 keyframes from H3 video passes produces lightweight H3 game assets ready for instant engine mapping.
Technical Prerequisites for MiniMax H3 Game Asset Generation
Establishing a production-ready MiniMax H3 asset pipeline requires balancing raw GPU compute infrastructure with an automated CLI post-processing toolchain.
Infrastructure: Cloud API vs. Local Open Weights
Running out of video memory mid-pass turns local AI asset creation into a severe development bottleneck. Self-hosting the 33-billion parameter MiniMax H3 open weights (which integrate a 32B text encoder alongside dual video and audio VAEs) requires downloading over 70 GB of model checkpoints and demands enterprise-grade GPU VRAM (48 GB+) to execute a native 768p local pipeline. For developers without multi-GPU workstations, hosted serverless API endpoints generate native 24 FPS video passes at roughly $0.14 per second of runtime, providing a far more cost-effective route for rapid asset iteration.
Software Stack and Conversion Toolchain
Building a reliable game asset build system requires four specialized software layers:
| Pipeline Stage | Recommended Tool | Technical Function |
| Motion Generation | ComfyUI / Hosted API | Synthesizes character motion loops and synced audio from a static input image |
| Keyframe Demuxing | FFmpeg CLI | Strips audio and extracts keyframes at target game frame rates (12 FPS to 24 FPS) |
| Alpha Isolation | rembg CLI (RMBG-1.4) | Strips background pixels to output transparent PNG keyframes |
| Atlas Packing | TexturePacker / Python CLI | Packs raw PNG frames into a standardized AI sprite sheet layout |
Executing FFmpeg extraction scripts directly into rembg headless filters eliminates manual background masking. Combining these automated CLI utilities prevents sprite boundary artifacts, ensuring generated H3 game assets maintain sharp edges when imported into Unity or Godot engine state machines.
Preparing Base Character Images for Motion Consistency
Feeding a character with soft ambient occlusion and complex volumetric shadows into image-to-video models frequently causes limbs to warp, dissolve, or change color across keyframes. In real-world game asset pipelines, complex volumetric shading increases frame-to-frame pixel variance by over 40% compared to flat-shaded vector art, resulting in severe temporal jitter when generating sprite sequences.
Key Source Image Specifications
To establish a stable base sprite reference for an image to game sprite AI pipeline, the input source image must meet precise structural and resolution criteria:
| Parameter | Recommended Standard | Technical Purpose |
| Canvas Dimensions | 512x512 or 768x768 PNG | Aligns with MiniMax H3 native latent dimensions to prevent spatial scaling distortion |
| Aspect Ratio | 1:1 Square Framing | Maintains equal spatial padding around limbs during extreme sword swings or run cycles |
| Background Fill | Solid green (#00FF00) or magenta (#FF00FF) | Enables fast, automated alpha channel extraction with minimal edge fringe artifacts |
| Silhouette Boundary | Closed vector contours with high contrast | Prevents the AI model from accidentally blending background noise into character geometry |
Flat Shading vs. Volumetric Rendering
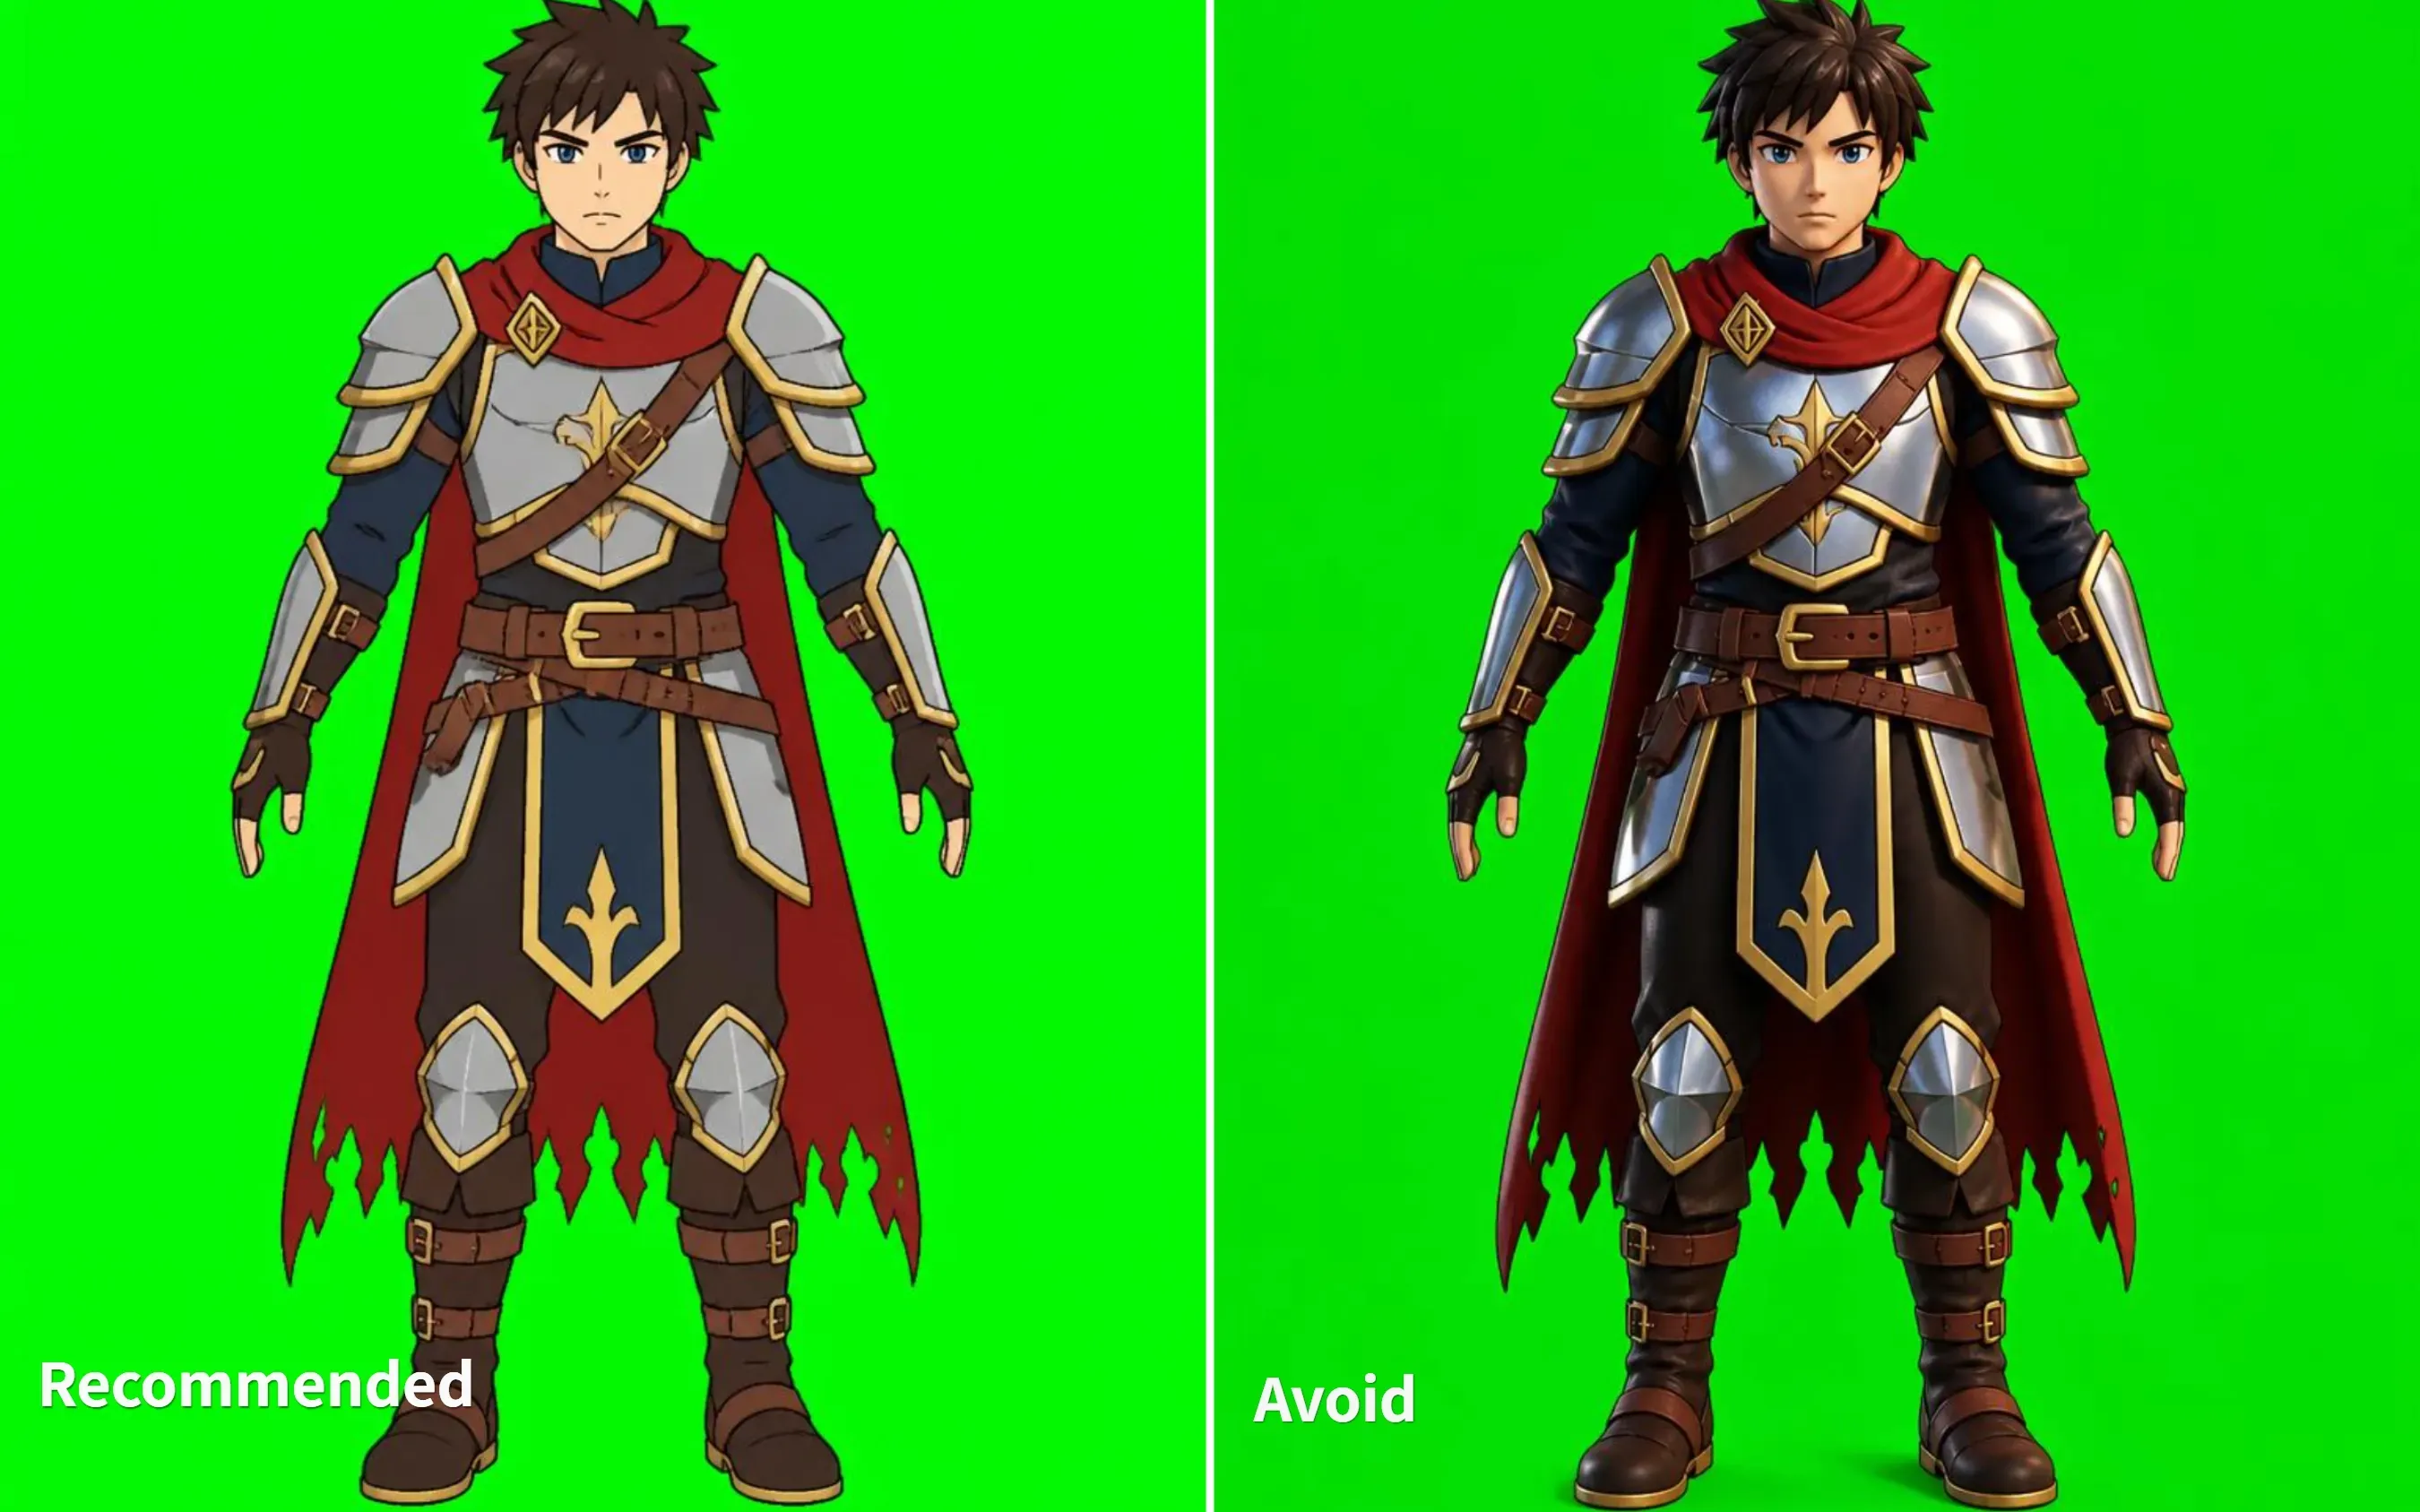
Achieving long-term character motion consistency within a 2D game animation AI workflow relies on how surface lighting is structured in the initial frame:
- Flat-Shaded and Cel-Shaded 2D Art: Solid color blocks provide clear, unambiguous feature boundaries. This allows the video model to track joint positions, clothing folds, and limb extensions across 60 FPS output passes without introducing unwanted color shifts.
- Volumetric Shading and Soft Gradients: Complex lighting and soft shadows introduce frame-to-frame pixel variance. As the diffusion model recalculates surface lighting across frames, highlights and shadow patches drift across the character's body, creating visible temporal flicker.
To maximize keyframe stability, supply orthographic character concepts in a neutral A-pose or T-pose with clean line art. Isolating character silhouettes on high-contrast backgrounds before running the diffusion step ensures that MiniMax H3 focuses GPU compute strictly on skeletal motion rather than environmental reconstruction.
Generating Animation Cycles via MiniMax H3 Image to Video
With the base character reference established, converting static 2D sprites into temporal movement loops requires deterministic API parameters and explicit camera constraints. Setting up these boundary conditions prevents spatial distortion before executing motion prompts.
Camera Locking and Generation Parameters
Default video model behaviors frequently ruin sprite sheets by inserting dramatic camera dollies and background pans. Balancing resolution targets—such as evaluating MiniMax H3 2K vs 768p for keyframe pixel density—alongside explicit negative camera instructions ensures consistent spatial stability across generated animation loops.
To prevent perspective distortion when generating H3 game sprites, configure your API request or generation parameters using these target settings:
| Parameter Key | Optimal Value | Engineering Purpose |
| Generation Mode | First-Frame Image-to-Video (case-I2VA) | Locks initial character pose and color space |
| Camera Constraint | "Locked off, static orthographic view, zero camera motion" | Suppresses default automatic zooming and panning |
| Target Output | 24 FPS @ 768p / 2K | Provides sufficient temporal density for keyframe sampling |
| Duration | 5s to 8s (Integer) | Generates 120 to 192 total frames for loop selection |
| Audio Flag | non_diegetic_music: N/A | Disables background sound synthesis to optimize compute |
Structured Prompt Templates for Movement Loops
To maintain consistency across a MiniMax H3 sprite atlas, write prompts using MiniMax H3's three-block timeline format. Assigning explicit timestamps ensures the model executes precise movement cycles without drifting off-model.
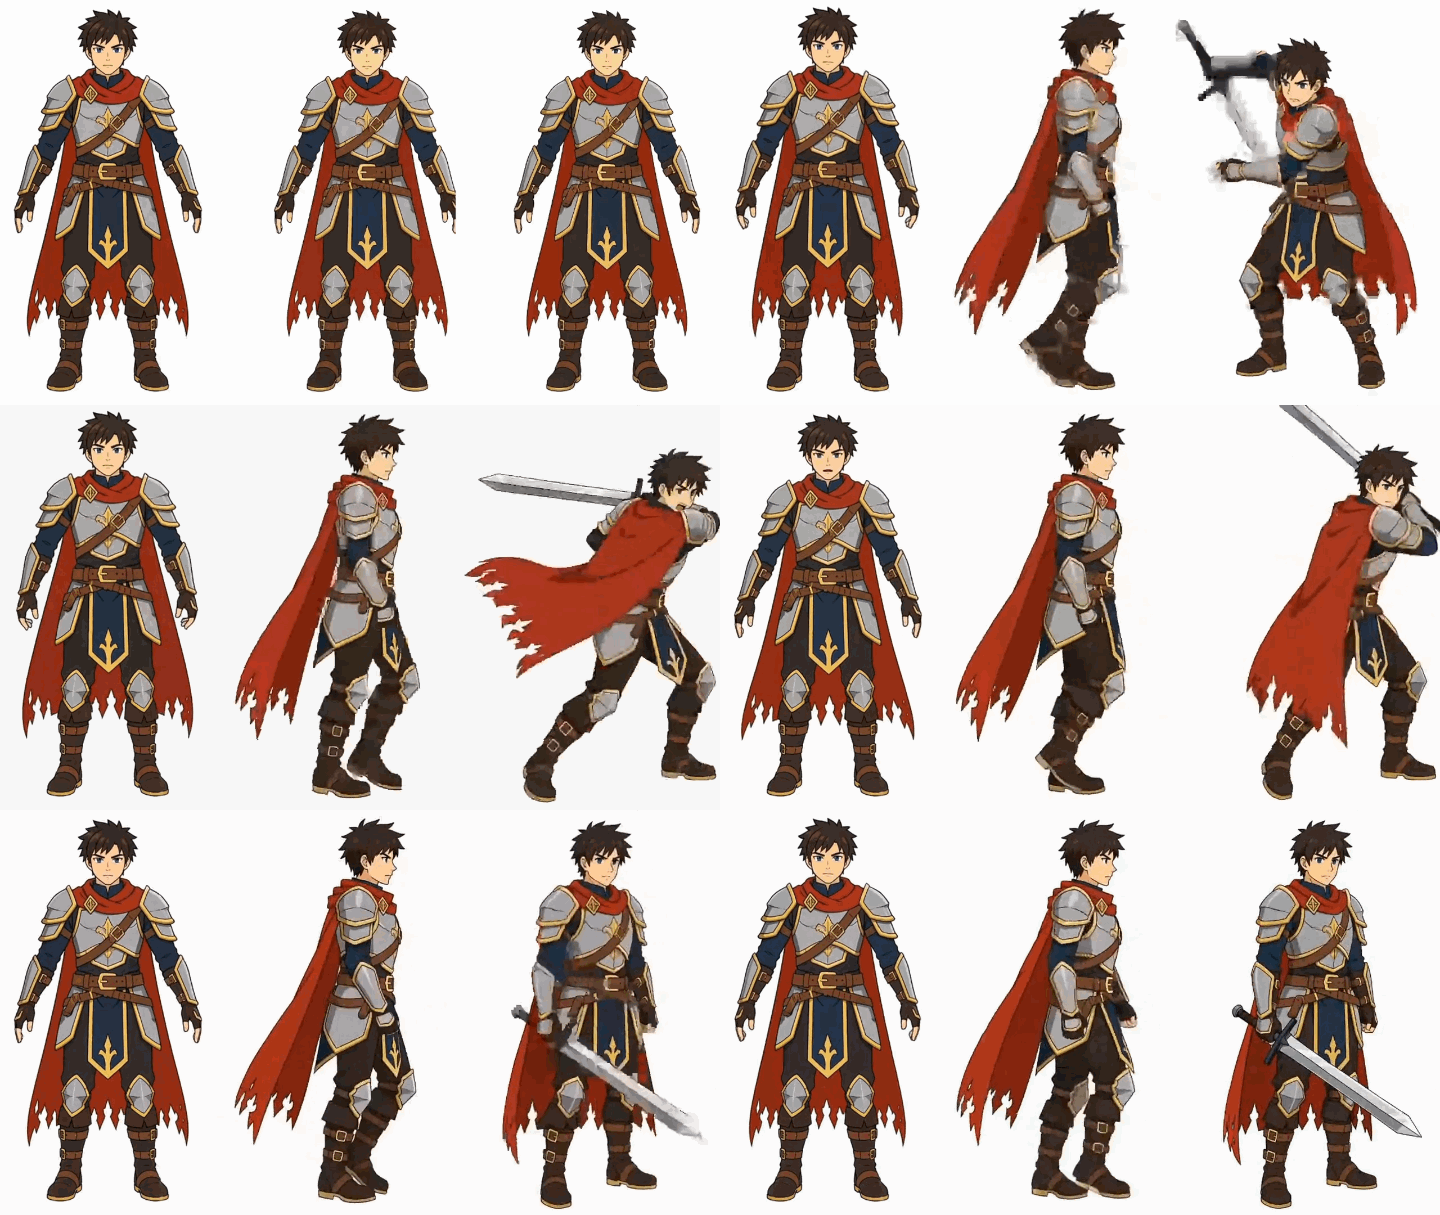
Note: The video animation cycles above were generated using the MiniMax H3 Image-to-Video API via Atlas Cloud, costing approximately $0.10 per second.
Idle Cycle
plaintext1[References] @image1 is the first frame character reference. 2[Core idea] 2D side-scrolling character idle loop, orthographic view, flat background. 3[Process] [0s-4s] Character performs a subtle breathing loop, chest rising and falling rhythmically, feet planted, locked off static camera, no cuts.
Walk and Run Cycles
plaintext1[References] @image1 is the first frame character reference. 2[Core idea] 2D side-scrolling walking animation loop, side profile. 3[Process] [0s-5s] Character walks forward in place on a treadmill axis, complete stride cycle, locked off static camera, fixed perspective, zero background pan.
Action Cycles (Attack & Jump)
plaintext1[References] @image1 is the first frame character reference. 2[Core idea] 2D action animation sequence. 3[Process] [0s-2s] Character wind-up stance; [2s-4s] Melee sword slash action; [4s-5s] Return to neutral stance. Static camera, locked orthographic view.
Applying structured prompts to MiniMax H3 image to video game assets guarantees clean character motion, laying the foundation for seamless MiniMax H3 character animation extraction.
Extracting Keyframes and Removing Sprite Backgrounds
Transforming raw AI video passes into production-ready sprite sheets requires a structured post-processing pipeline that bridges frame extraction, neural background matting, and texture padding.
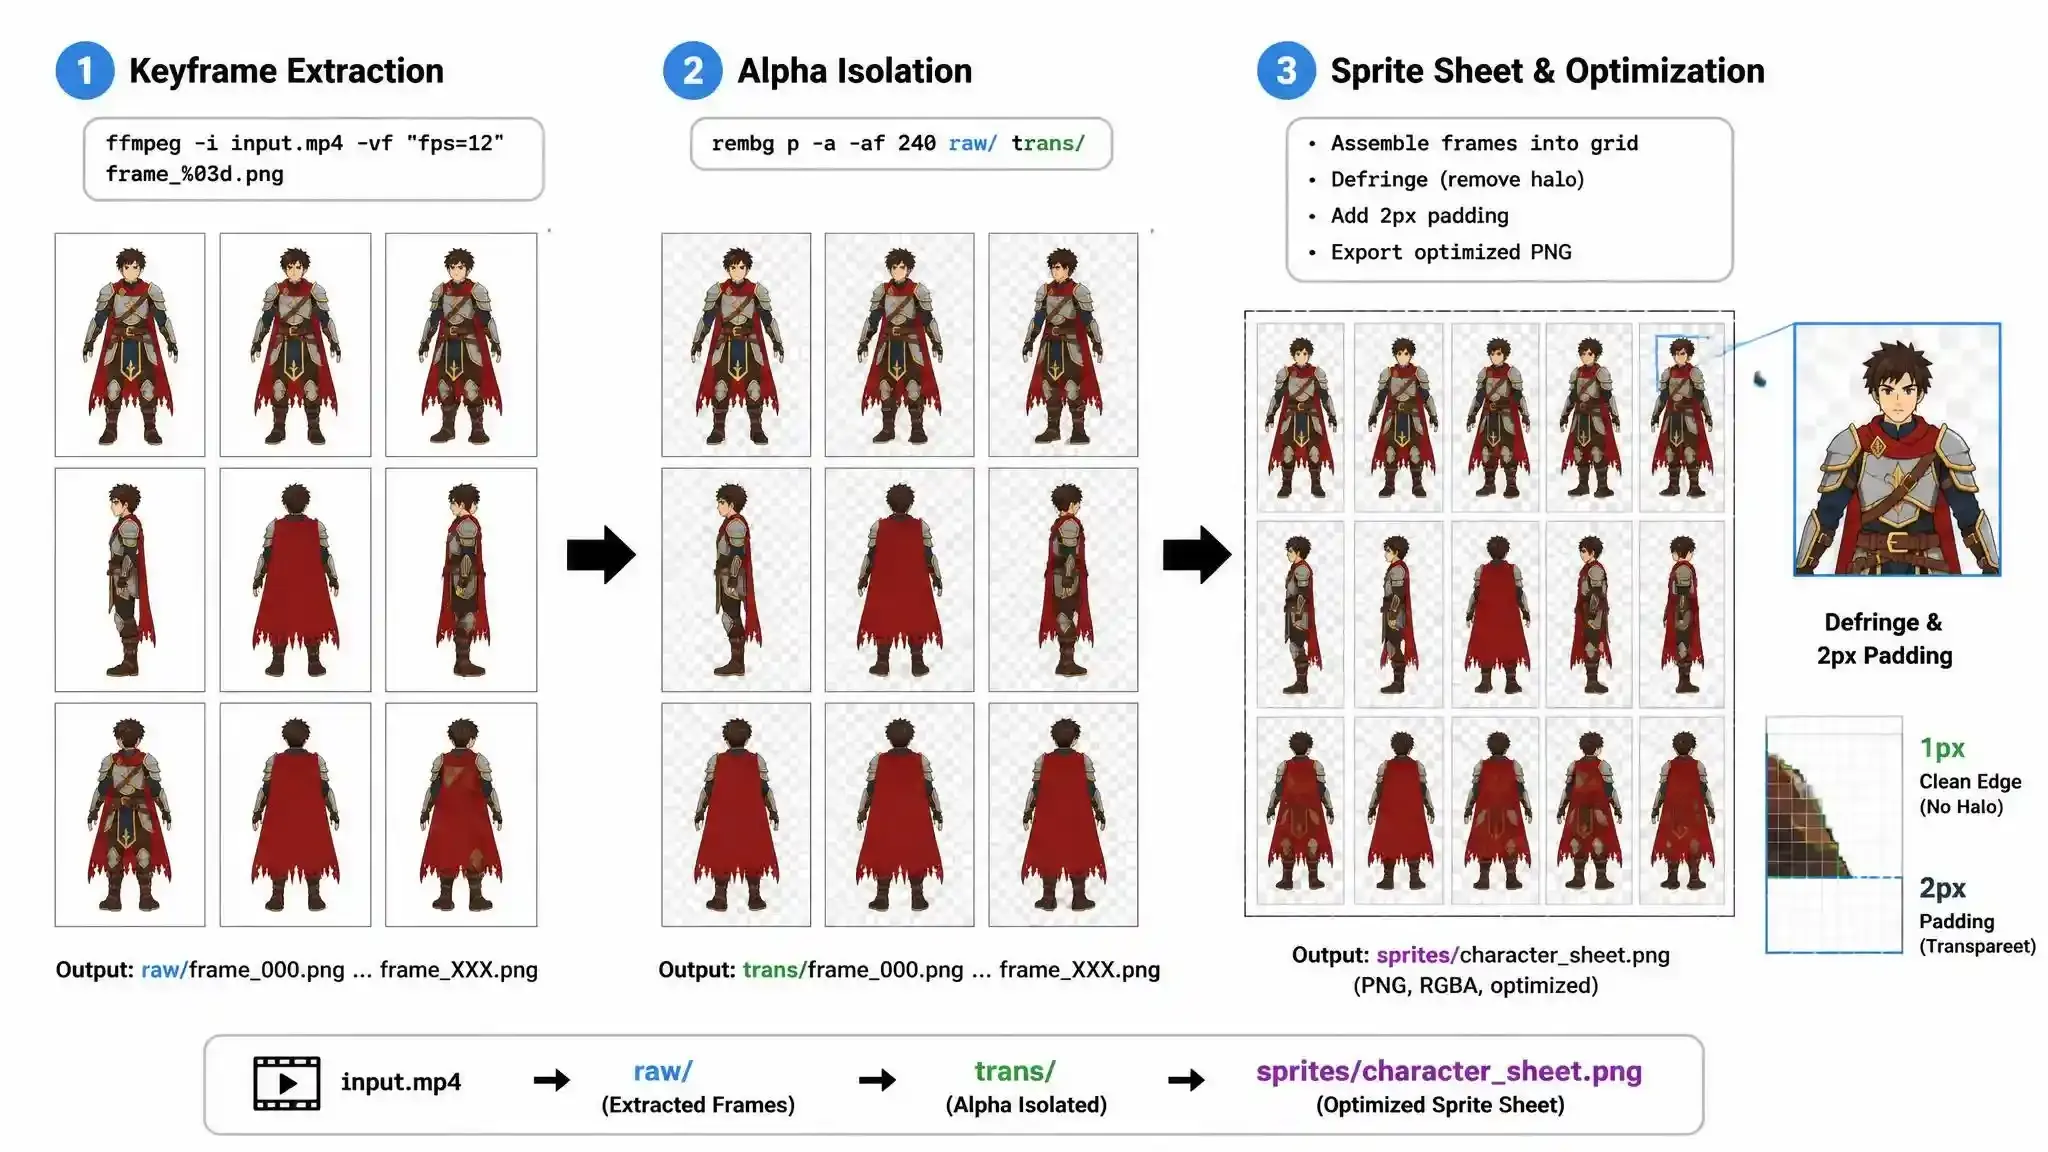
Keyframe Extraction via FFmpeg
Extracting 60 individual frames from a 5-second video clip manually takes over 30 minutes, and standard color-keying tools often leave ugly green halos around sprite borders. Converting a 24 FPS MiniMax H3 video pass into a playable game loop requires automated frame rate extraction to sample essential movement states without inflating memory usage.
For 2D side-scrollers, an 8 to 12-frame sequence at 12 FPS balances visual quality and texture budgets. Run this FFmpeg command to isolate keyframes:
plaintext1# Sample video to 12 FPS keyframe PNG sequence 2ffmpeg -i input_walk.mp4 -vf "fps=12" raw_frame_%03d.png
| Extraction Target | Sampling Rate | Extracted Frames (5s Video) | Target Game State |
| Idle Loop | 8 FPS | 40 Frames (Select 8) | Background ambient NPCs |
| Walk / Run Cycle | 12 FPS | 60 Frames (Select 12) | Primary player locomotion |
| Action / Attack | 24 FPS | 120 Frames (Select 16) | Frame-accurate hitboxes |
Automated Alpha Channel Isolation and Edge Defringing
After keyframe demuxing, isolating a clean transparent sprite background requires neural matte models like RMBG-1.4 through the rembg Python interface.
Standard color chroma keys strip semi-transparent pixels on character outlines, creating severe aliasing when rendered over dynamic engine backgrounds. Activating alpha matting flags during background removal retains fine edge details while scrubbing background bleed:
plaintext1# Batch process frames with alpha matting and edge erosion 2rembg p -a -af 240 raw_frames/ transparent_frames/
To ensure high-fidelity outputs before feeding keyframes into an AI sprite sheet generator, complete these three critical post-processing steps:
- Edge Defringing: Apply a 1-pixel color erosion on the alpha channel mask to eradicate background matte spill.
- Silhouette Bounding: Crop uniform transparent pixels surrounding each frame character to standardize anchor pivot positions.
- Safety Border Padding: Enforce a 2-pixel transparent padding around cropped frame boundaries, preventing adjacent texture sampling artifacts in web and mobile game engines.
Packing Extracted Frames into Standard Sprite Atlases
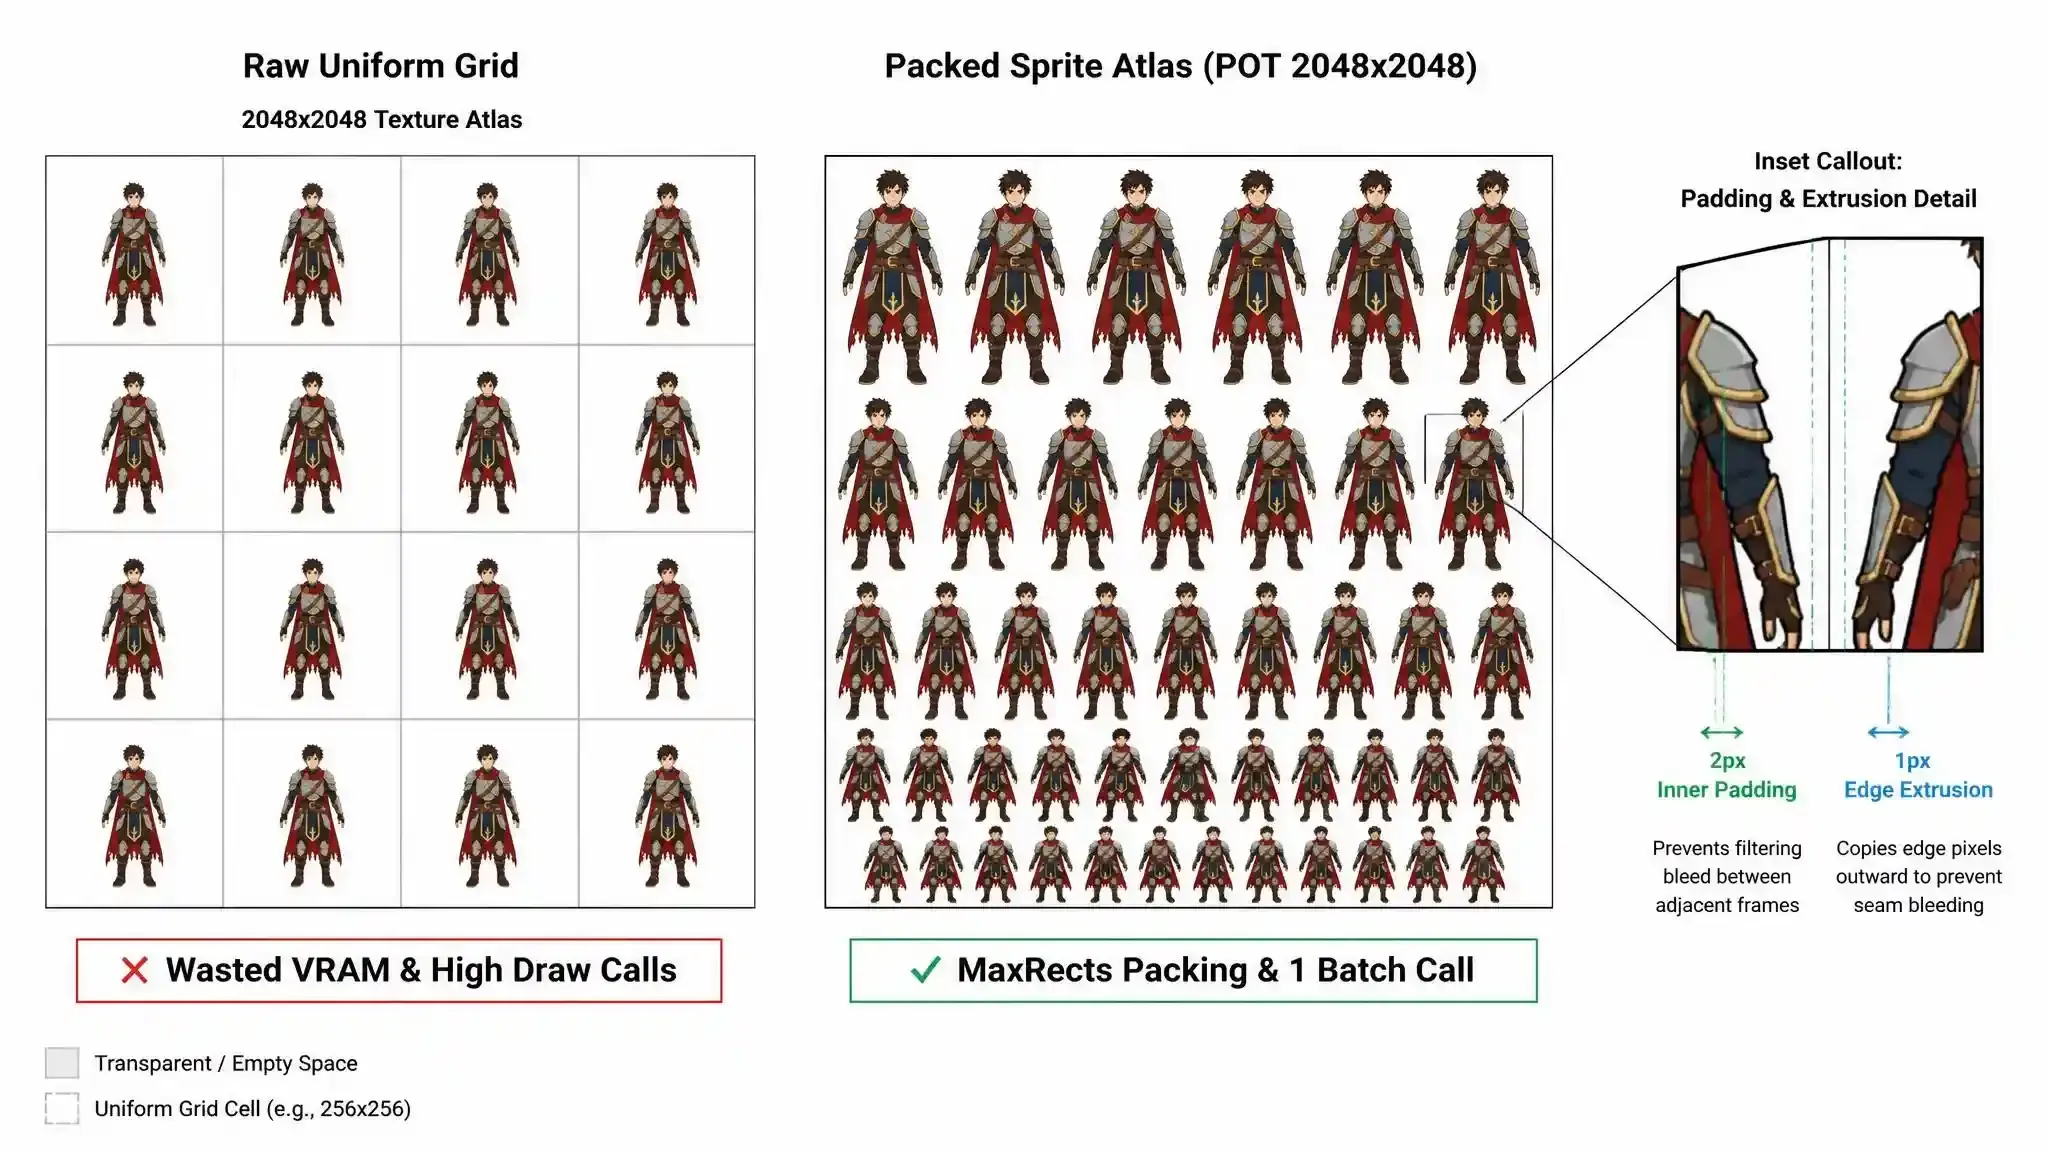
Raw Sequence Grids vs. Packed Sprite Atlases
Loading 60 individual PNG keyframes directly into a game scene forces GPUs to execute 60 distinct draw calls, stalling rendering pipelines on mobile and web platforms. While raw uniform grids force every frame into fixed square dimensions regardless of content, an optimized packed texture consolidates tight frame bounding boxes into a single texture map.
| Atlas Parameter | Raw Uniform Sequence Grid | Packed Sprite Atlas (TexturePacker) |
| GPU Draw Calls | 1 call per individual frame | 1 batch call per entire atlas sheet |
| VRAM Footprint | High (stores empty padding space) | Minimal (trims outer transparent pixels) |
| Layout Flexibility | Fixed column and row indexes | Dynamic algorithm packing (MaxRects) |
| Parsing Requirements | Manual pixel offset math | Automated via sprite atlas metadata |
Texture Bleeding Prevention and Power-of-Two Sizing
Keep atlas dimensions to Power-of-Two sizes (e.g., 2048x2048) for compatibility with ASTC and ETC2 texture compression.
When game engines downsample textures during runtime camera zooms, adjacent frame pixels bleed into neighbor borders. To achieve robust texture bleeding prevention, configure your packing tool with a 2px to 4px inner border padding alongside a 1px edge extrusion rule:
plaintext1# Command line TexturePacker compilation for Phaser / Unity JSON 2TexturePacker --format phaser --sheet player_atlas.png --data player_atlas.json \ 3 --max-size 2048 --size-constraints POT --padding 2 --extrude 1 transparent_frames/
Generating Sprite Atlas Metadata for Engine Parsing
A TexturePacker sprite sheet export relies on accompanying JSON or XML manifest files. This metadata defines exact UV coordinate rectangles, trimmed pixel offsets, and pivot anchor points for every frame state.
Executing this step produces two synchronized core deliverables:
- Packed Atlas Texture (
player_atlas.png): A single 2048x2048 composite image file housing all character action sequences. - Atlas Manifest (
player_atlas.json): A JSON Hash or Array mapping frame identifiers (likewalk_001.png) to pixel coordinates(x, y, w, h)and source anchor origin values.
Applying structured grid layout optimization ensures your engine parses individual animation keyframes seamlessly, setting up clean state machine transitions without manual slicing.
Implementing the Playable Character State Machine
Bridging packed texture atlases with game engine runtime controllers requires a structured Finite State Machine to drive animation state transitions based on velocity parameters and input triggers.
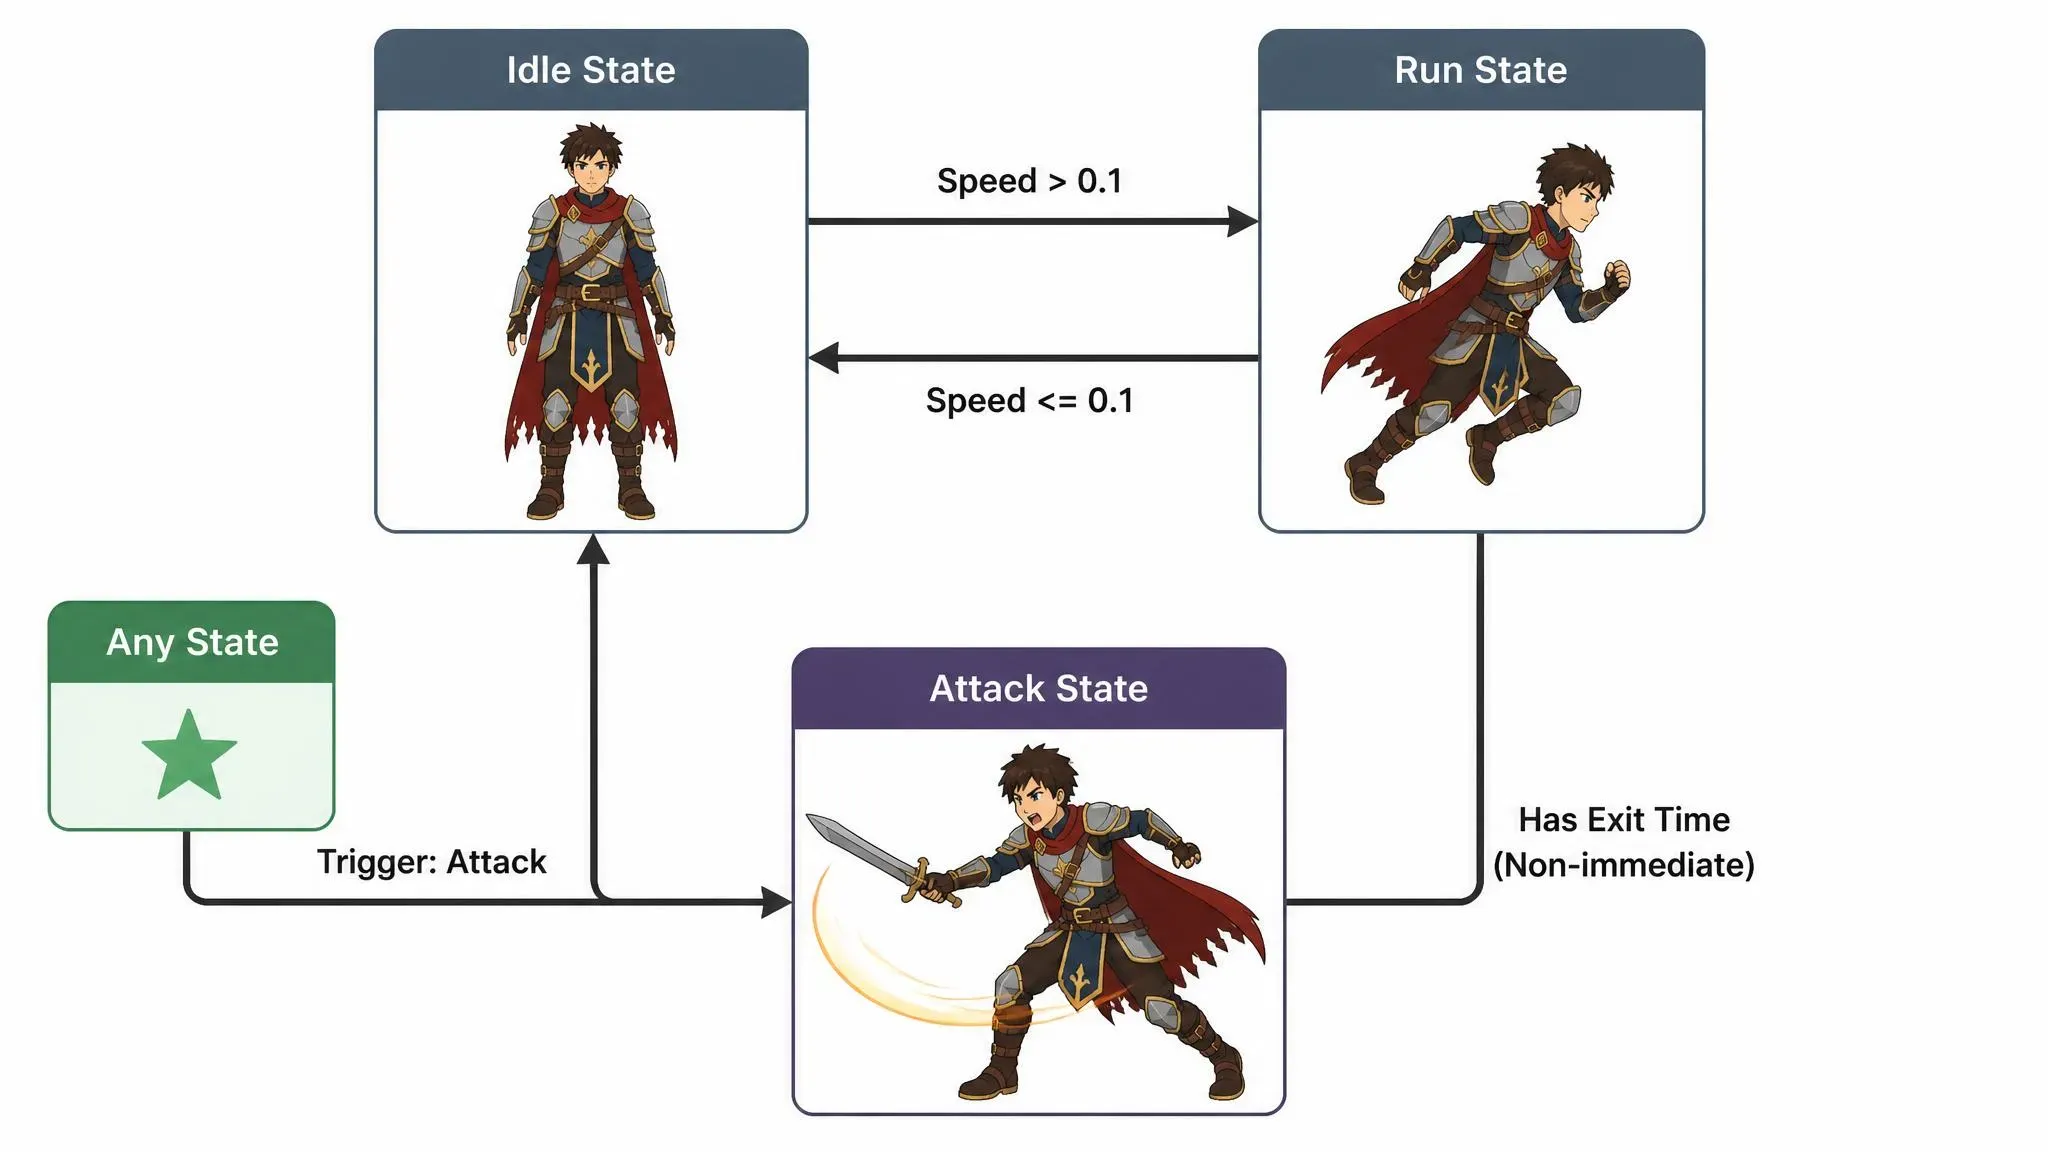
Engine Setup and Atlas Importing
Wiring packed textures into engine controllers often results in state transitions skipping keyframes or snapping back to frame zero mid-motion. Connecting exported JSON metadata to a character state machine requires configuring sprite slice pivot origins correctly before linking input event listeners to animation clips. Importing raw frame sequences without mapping anchor positions causes sprite jittering whenever character dimensions change across frames.
| Engine Platform | Metadata Import Method | Animation Controller Component | Primary Motion Triggers |
| Unity 2D | TexturePacker Importer Plugin | Animator (AnimatorController) | Float (Speed), Trigger (Attack) |
| Godot 4 Engine | JSON Array / SpriteFrames Asset | AnimationTree (AnimationNodeStateMachine) | travel("run"), travel("attack") |
Engine State Machine Scripts: Unity C# and Godot GDScript
Unity C# State Controller
When deploying a Unity AI sprite atlas, attach a C# controller script to manipulate parameter variables inside the Animator component based on real-time character movement velocity and user inputs:
plaintext1using UnityEngine; 2 3public class PlayerStateController : MonoBehaviour { 4 private Animator animator; 5 private Rigidbody2D rb2d; 6 7 void Awake() { 8 animator = GetComponent<Animator>(); 9 rb2d = GetComponent<Rigidbody2D>(); 10 } 11 12 void Update() { 13 float movementSpeed = Mathf.Abs(rb2d.linearVelocity.x); 14 animator.SetFloat("Speed", movementSpeed); 15 16 if (Input.GetButtonDown("Fire1")) { 17 animator.SetTrigger("Attack"); 18 } 19 } 20}
Godot 4 GDScript State Controller
For native Godot sprite sheet integration, reference the AnimationTree node directly in GDScript to trigger state machine transitions across target animation nodes without writing tedious conditional state logic:
plaintext1extends CharacterBody2D 2 3@onready var anim_tree: AnimationTree = $AnimationTree 4@onready var playback = anim_tree["parameters/playback"] 5 6func _physics_process(_delta: float) -> void: 7 if Input.is_action_just_pressed("attack"): 8 playback.travel("attack") 9 return 10 11 if velocity.length() > 0.1: 12 playback.travel("run") 13 else: 14 playback.travel("idle") 15 move_and_slide()
Eliminating Frame Desync in the Game Asset Animation Pipeline
A complete game asset animation pipeline requires configuring state transition rules to handle one-shot actions like weapon swings or damage reactions. Enabling Has Exit Time on attack clips in Unity or setting transition conditions to non-immediate modes in Godot prevents rapid input spamming from interrupting keyframes prematurely. This keeps your sprite atlas state machine synchronized during heavy gameplay action.
Troubleshooting Temporal Jitter and AI Artifacts in Game Sprites
Raw generative video passes frequently introduce frame-to-frame inconsistencies that require systematic diagnosis before applying targeted cleanup protocols.
Diagnosing Generative Failure Modes
Watching a character's arm sprout extra fingers or seeing its torso shrink by 15% across frames 4 through 8 ruins an otherwise playable animation loop. Unfiltered neural video generations regularly produce spatial noise, color drift, and flickering silhouettes that break in-game collision boundaries.
Systematic errors in neural video outputs stem from temporal autoencoder limitations and unconstrained latent sampling. Identifying these failure modes isolates specific workflow fixes:
| Artifact Type | Visual Symptom | Root Cause | Targeted Fix |
| Temporal Flickering | Rapid luminance and detail shifts | Unconstrained latent noise across frames | Post-process optical flow smoothing |
| Scaling Drift | Character grows or shrinks in frame | Missing spatial anchor references | Bounding-box normalization script |
| Palette Bleed | Color shifts across identical armor parts | Variable lighting recalculations | Index-color palette locking in Aseprite |
| Limb Distortion | Extra appendages or blurred hands | Excessive motion intensity setting | Edge-guided control constraint pass |
Remediation Protocols for Production Assets
Executing targeted AI sprite cleanup transforms raw generative outputs into game-ready keyframes without forcing expensive complete re-renders.
Bounding-Box Normalization
Execute a Python script using OpenCV to calculate character pixel mass centroids across extracted frames. Scaling each sprite frame relative to a fixed ground-plane anchor point delivers a reliable temporal jitter fix for walking and running cycles.
Indexed Palette Locking
Import raw keyframe outputs into pixel editing software like Aseprite or process them via ImageMagick CLI using a fixed 16-color or 32-color target palette. Forcing global color quantization removes color shade variations synthesized during video frame generation.
Keyframe Masking and Edge Clamping
When cleaning up AI game sprites, isolated limb deformities can be repaired by copying clean arms or weapons from adjacent frames in the sequence. Enforcing a strict 50% alpha mask threshold removes semi-transparent edge noise, preventing stray floating pixels from rendering in game engine viewports.
Implementing these corrective post-processing passes achieves strict frame consistency optimization, giving developers complete control over generative asset pipelines.





