Ask AI for a summary
A cliffside observatory can look dramatic and still fail as a game location. If its door opens over a drop and its amber windows glow without a plausible source, an environment artist has little to build from. MiniMax H3 Image Fantasy Scene Design works best when you begin with a place that could exist: recognizable geology, a supported structure, a route people could walk, and light with a cause. This guide turns that brief into 3 copyable fantasy scene prompts, then shows how to inspect and revise the results.
Key takeaways
- Anchor fantasy architecture in geography, access, scale, and a reason for its location.
- Use the 3 prompts to test navigation, environmental story, and focal point.
- Review the first image at thumbnail size and full size before changing one constraint at a time.
- Eight published MiniMax H3 Image fantasy scene examples show different ways to inspect scene structure.
What MiniMax H3 Image Does for Fantasy Scene Design
MiniMax H3 Image was released on November 11, 2026 as a still-image model for text-to-image generation, reference-based generation, and image editing. It can produce an environment concept frame from a scene brief. (Source: MiniMax release announcement, November 2026.)
The model accepts up to 16 reference images. Its official model card lists 5472 × 3072 pixels as a common 16:9 output size, about 16 megapixels. A web interface may expose a simpler 4K setting; choose 4K and 16:9 there, then check the exported file. The card also says uploaded editing images map to <Picture 1>, <Picture 2>, and so on in upload order, and that a separate negative_prompt field is unsupported. (Source: MiniMax H3 Image model card, November 2026.)
Those are capacity limits, not proof that a particular fantasy scene is spatially sound. A high-resolution concept image remains a flat image. It will not give a level designer editable geometry, measured walkable surfaces, or a lighting rig. Use it to agree on silhouette, materials, mood, and route intent, then translate the approved concept into the tools your game or illustration pipeline uses.
The official model card includes static environment concepts, among them a forest theater and frozen ships. The eight published images below are MiniMax H3 Image results, not images generated from the prompts in this guide.
Eight Published MiniMax H3 Image Fantasy Scene Cases
Cases 01-04: terrain, scale, ice, and a dungeon focal point
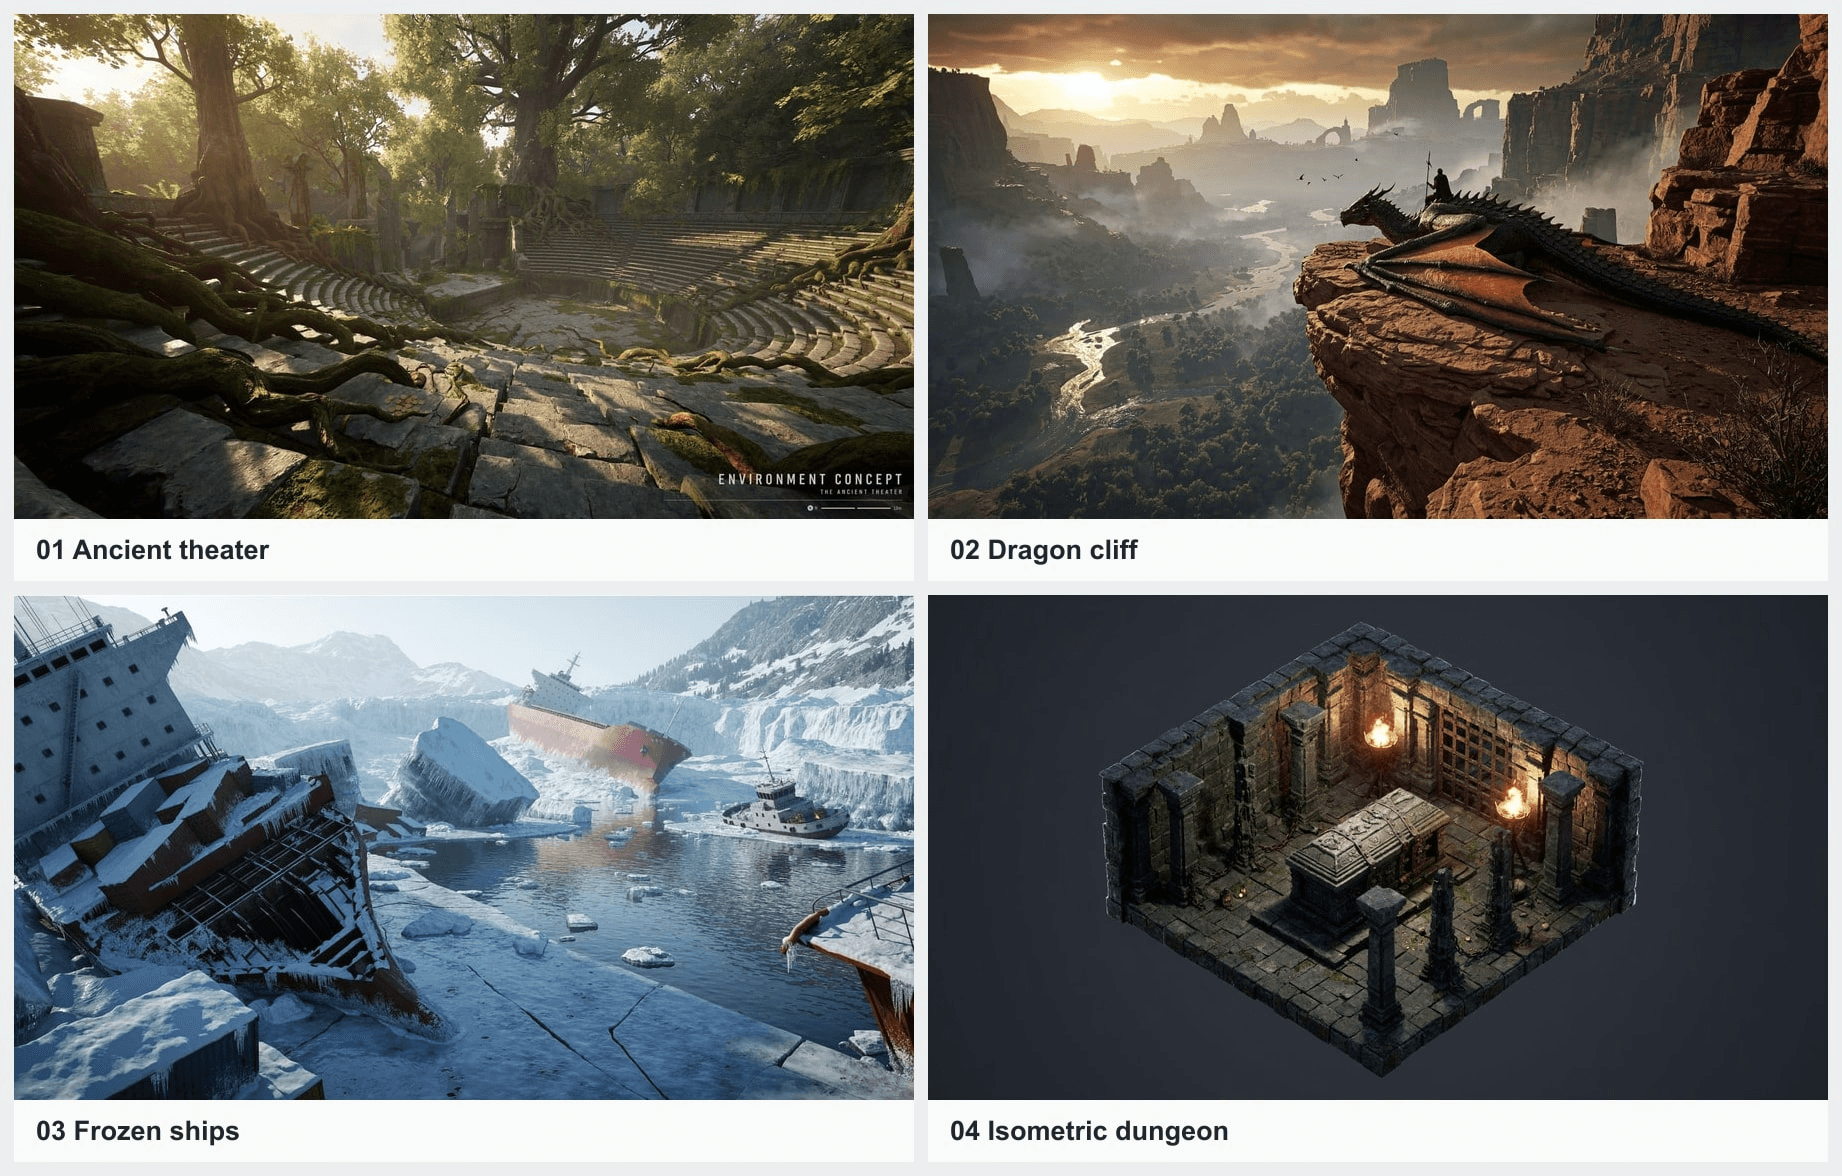
01 Ancient theater. Weathered stone seats curve around an open stage beneath large tree roots. MiniMax H3 Image keeps the semicircular rows readable even where roots cross the foreground, so the building still looks like a usable theater rather than an indistinct ruin. Sunlight through the canopy separates the upper aisle, stage, and surrounding trees into distinct depth layers. That detail gives an environment artist both a focal space and a clear sense of how the forest has grown around it. Source: MiniMax showcase.
02 Dragon cliff. A dragon and rider rest on a broad red-rock ledge above a winding canyon. The rider is small beside the dragon, and both are dwarfed by the layered cliffs beyond them; MiniMax H3 Image uses those nested scale cues to make the drop feel immense. The dragon's folded wing and body sit against the rock instead of floating over the landscape. Warm foreground stone and hazy distant formations also give the canyon a legible path into depth. Source: MiniMax showcase.
03 Frozen ships. Broken ice and open water surround several tilted ships in a mountain inlet. The nearest hull is lodged against snow and ice, while a second ship leans in the distance, giving the scene more than one point of contact to inspect. MiniMax H3 Image distinguishes dark water, pale ice, rust-colored steel, and snowy shore without losing the larger harbor layout. Those material boundaries make the stranded vessels' situation clear before the viewer studies any individual ship. Source: MiniMax showcase.
04 Isometric dungeon. An isometric stone chamber centers a sarcophagus between two fire basins. The floor tiles, walls, and columns follow a consistent angled view, which makes the small room easy to read as a game location. MiniMax H3 Image also keeps the two flames close to the central object, so their light reinforces the sarcophagus as the focal point. The gate at the back adds a possible next route without crowding the chamber with extra objects. Source: DrSadek_ via AI Primer.
Cases 05-06: crystal ruins and a forest creature
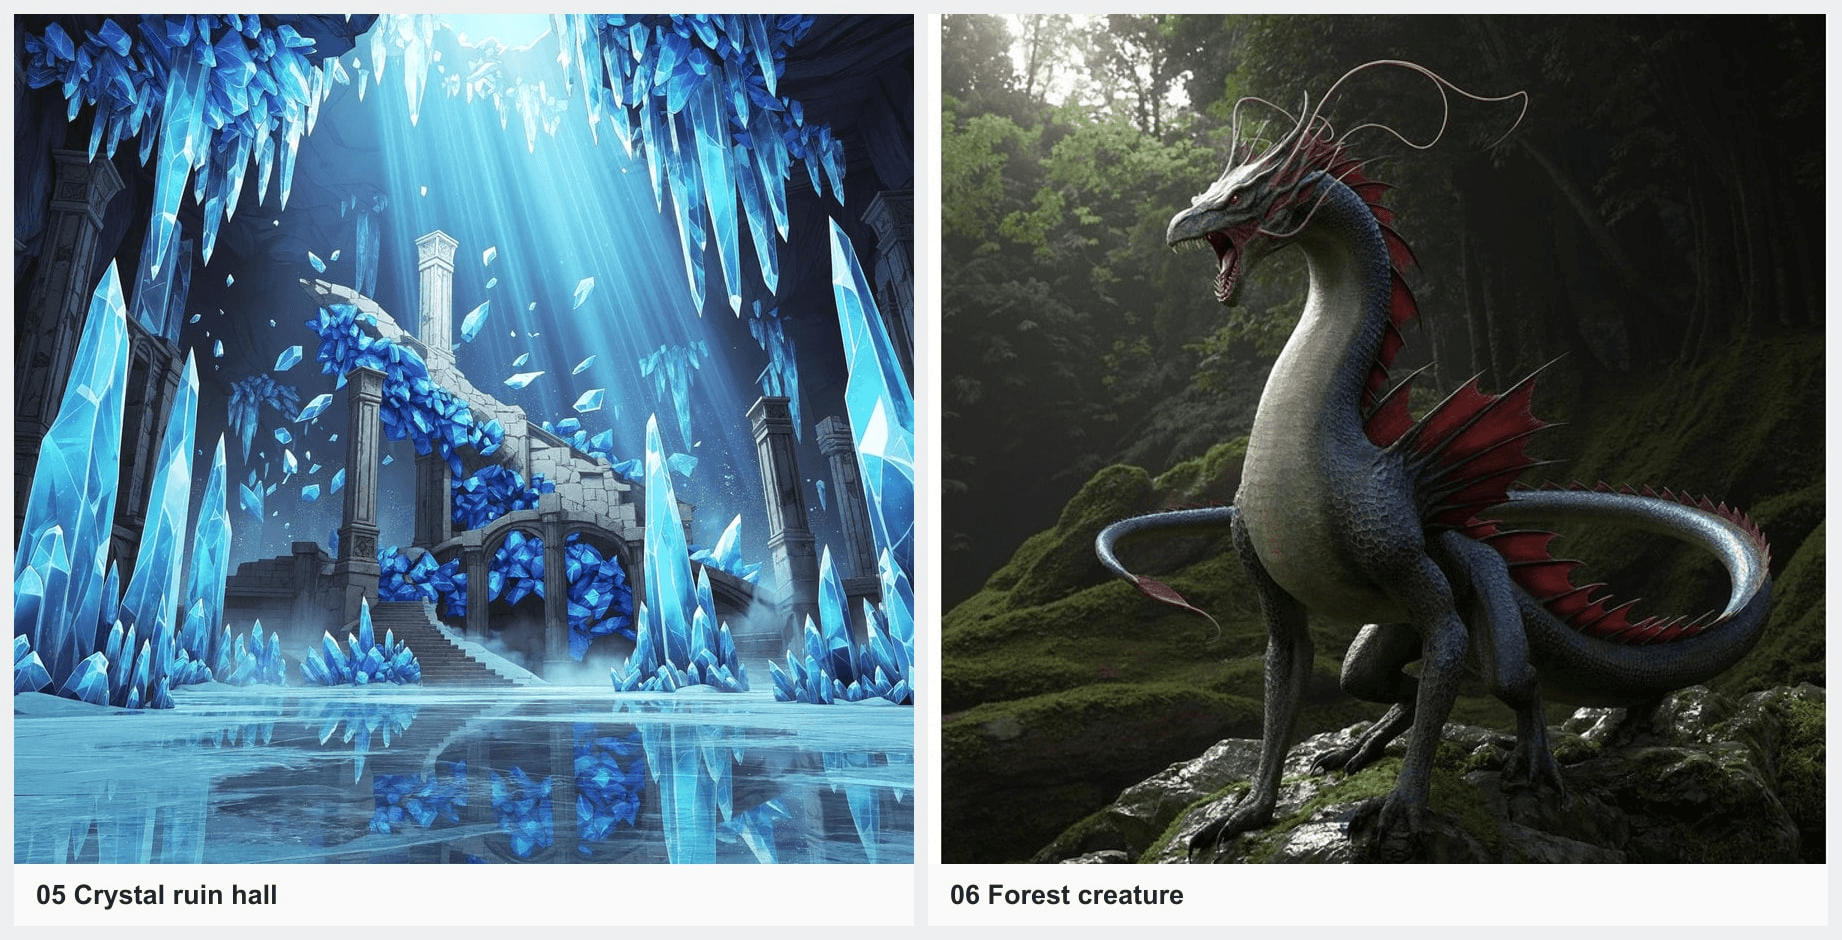
05 Crystal ruin hall. Blue crystals hang from the ceiling and rise around a ruined stone hall. The stairway remains visible between the crystal clusters, leading the eye toward the broken arch rather than disappearing into the glow. MiniMax H3 Image gives the scene several linked light cues: rays enter from above, blue edges catch that light, and the smooth floor carries a reflection forward. The contrast between angular crystals and worn masonry makes the hall's main materials immediately distinguishable. Source: TechieSA's MiniMax H3 Image post.
06 Forest creature. A long-necked creature stands on moss-covered rocks in a dense woodland. Its pale neck, thin horns, red fins, and curled tail form a distinctive silhouette against the darker trees. The feet meet the uneven rock, giving the creature a visible place to stand instead of treating it as a cutout. This MiniMax H3 Image result shows how creature design can retain small anatomical details while still belonging to a specific habitat. Source: MiniMax model card.
Cases 07-08: a ruined duel and a waterfall palace
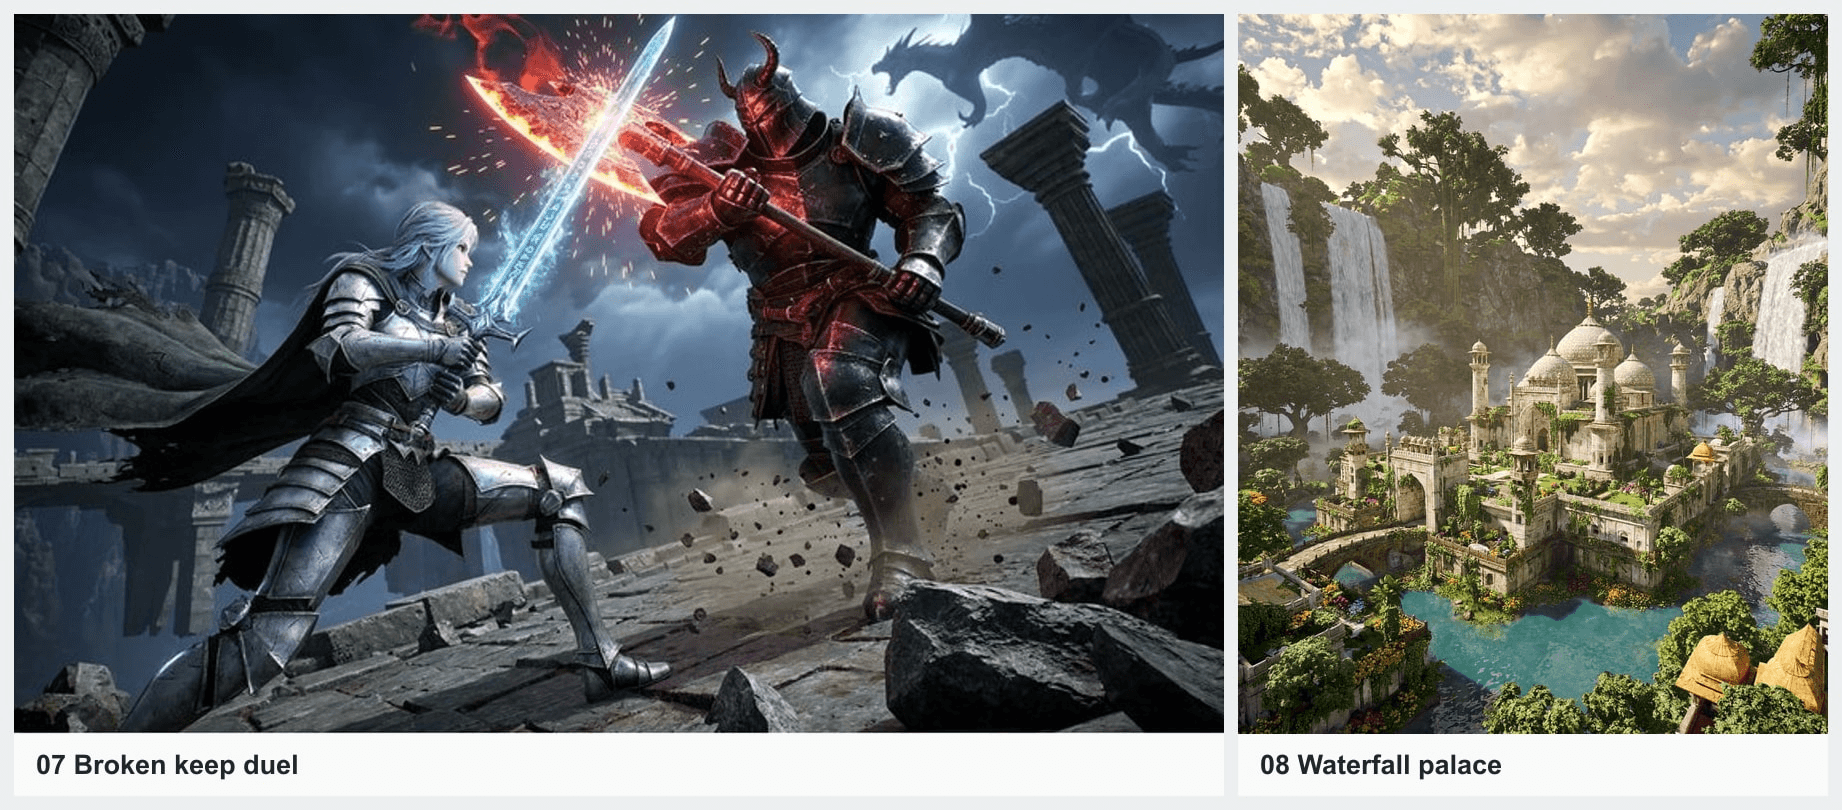
07 Broken keep duel. A silver-armored fighter meets a darker opponent on a sloping stone floor among broken columns. Their blue and red weapons cross at the center, giving the action an immediate point of focus even though sparks and debris fill the frame. MiniMax H3 Image keeps both fighters' stances visible, so the exchange has a readable direction and distance. The fractured masonry and tilted ground make the ruined keep part of the encounter rather than a flat backdrop. Source: MiniMax model card.
08 Waterfall palace. White domes and terraced walls sit between high waterfalls above turquoise water. Bridges link the palace to the riverbanks, while smaller balconies and towers step down toward the pool, making the large complex feel connected across several levels. MiniMax H3 Image holds the palace's repeated architectural forms together without letting the surrounding cliffs and trees overwhelm them. The falling water and bright river also give the viewer an immediate reference for the building's height and placement. Source: Sania's MiniMax H3 Image post.
Start With a Place That Could Exist
Geography, access, and scale
Begin the scene brief with a landform you could explain to another artist. For the observatory, choose a coastal basalt cliff shaped by repeated layers and erosion. Put the circular building on a broad ledge rather than balancing it on a thin rock spike. Let a switchback path climb from a landing to the door. The traveler on that path establishes whether the building, stairs, and entrance share a plausible scale.
Make the camera position part of the brief. A wide three-quarter view from a neighboring headland reveals both the building and the route. A frontal close view might make the windows attractive while hiding the path's connection to the entrance. If the location is meant for a game, the player should be able to recognize the approach from a small thumbnail before inspecting masonry detail.
Light needs geography too. At dawn, a cool sky and sea can provide ambient illumination while amber windows signal activity inside. Pick a single direction for the low sun. On a later rainy edit, the puddles and shadows should change with that direction. A scene with several attractive but contradictory light sources will be harder to use as a coherent location reference.
| Brief item | Decision for the observatory | Failure sign |
|---|---|---|
| Ground | Layered basalt cliff and broad building ledge | Foundations appear to float |
| Access | Landing, switchback path, visible entrance | Path ends at a wall or cliff edge |
| Scale | One traveler on the path | Door and person disagree in size |
| Camera | Wide three-quarter view from a headland | Route disappears behind the building |
| Light and story | Cool dawn, warm occupied windows | Shadows conflict or windows lack context |
Give the scene a reason to be there
An observatory on a cliff should gain something from the site: a clear horizon for watching ships or stars, a sheltered landing for supplies, and enough elevation to keep its instruments above sea spray. The path then becomes part of the story rather than an arbitrary line painted onto the rock. One repaired handrail or fresh cargo crate can suggest current use without turning the image into a crowded narrative illustration.
Write a five-item brief before prompting: landform, purpose, access, scale cue, and light source. Add one story trace only after those decisions are clear. This sequence keeps the fantasy premise while giving the model fewer chances to improvise mutually incompatible details. It also gives your team a useful review language: “the path misses the entrance” is actionable; “make it feel more real” is not.
Three MiniMax H3 Image Fantasy Scene Prompts
Each prompt below is an independent still-image request for MiniMax H3 Image. Select 16:9 and the highest suitable image setting. The model card's 5472 × 3072 size is a target for deployments that expose exact dimensions; on a web app that only offers 4K, use its 4K option. Save each original before requesting revisions.
1. A cliffside observatory with a readable route
This first prompt tests whether a spectacular building can also function as a destination. The camera must reveal a continuous route from the sea-level landing to the entrance. The traveler provides a scale check, while the stone ledge and foundations show how the structure meets the cliff.
plaintext1Create a 16:9 fantasy environment concept image for a game location. A circular stone observatory is built into a real-looking basalt cliff above a cold turquoise sea. Show the entire building, the cliff face supporting it, and one narrow but clearly walkable switchback path leading from a small landing at sea level to its entrance. A single traveler on the path establishes scale. The observatory has warm amber windows at dawn; the sky and sea provide cool blue ambient light. Use one coherent light direction, believable stone foundations, and a wide three-quarter camera view from a nearby headland. Keep the path, entrance, and main silhouette readable at thumbnail size. No labels, interface, or text.
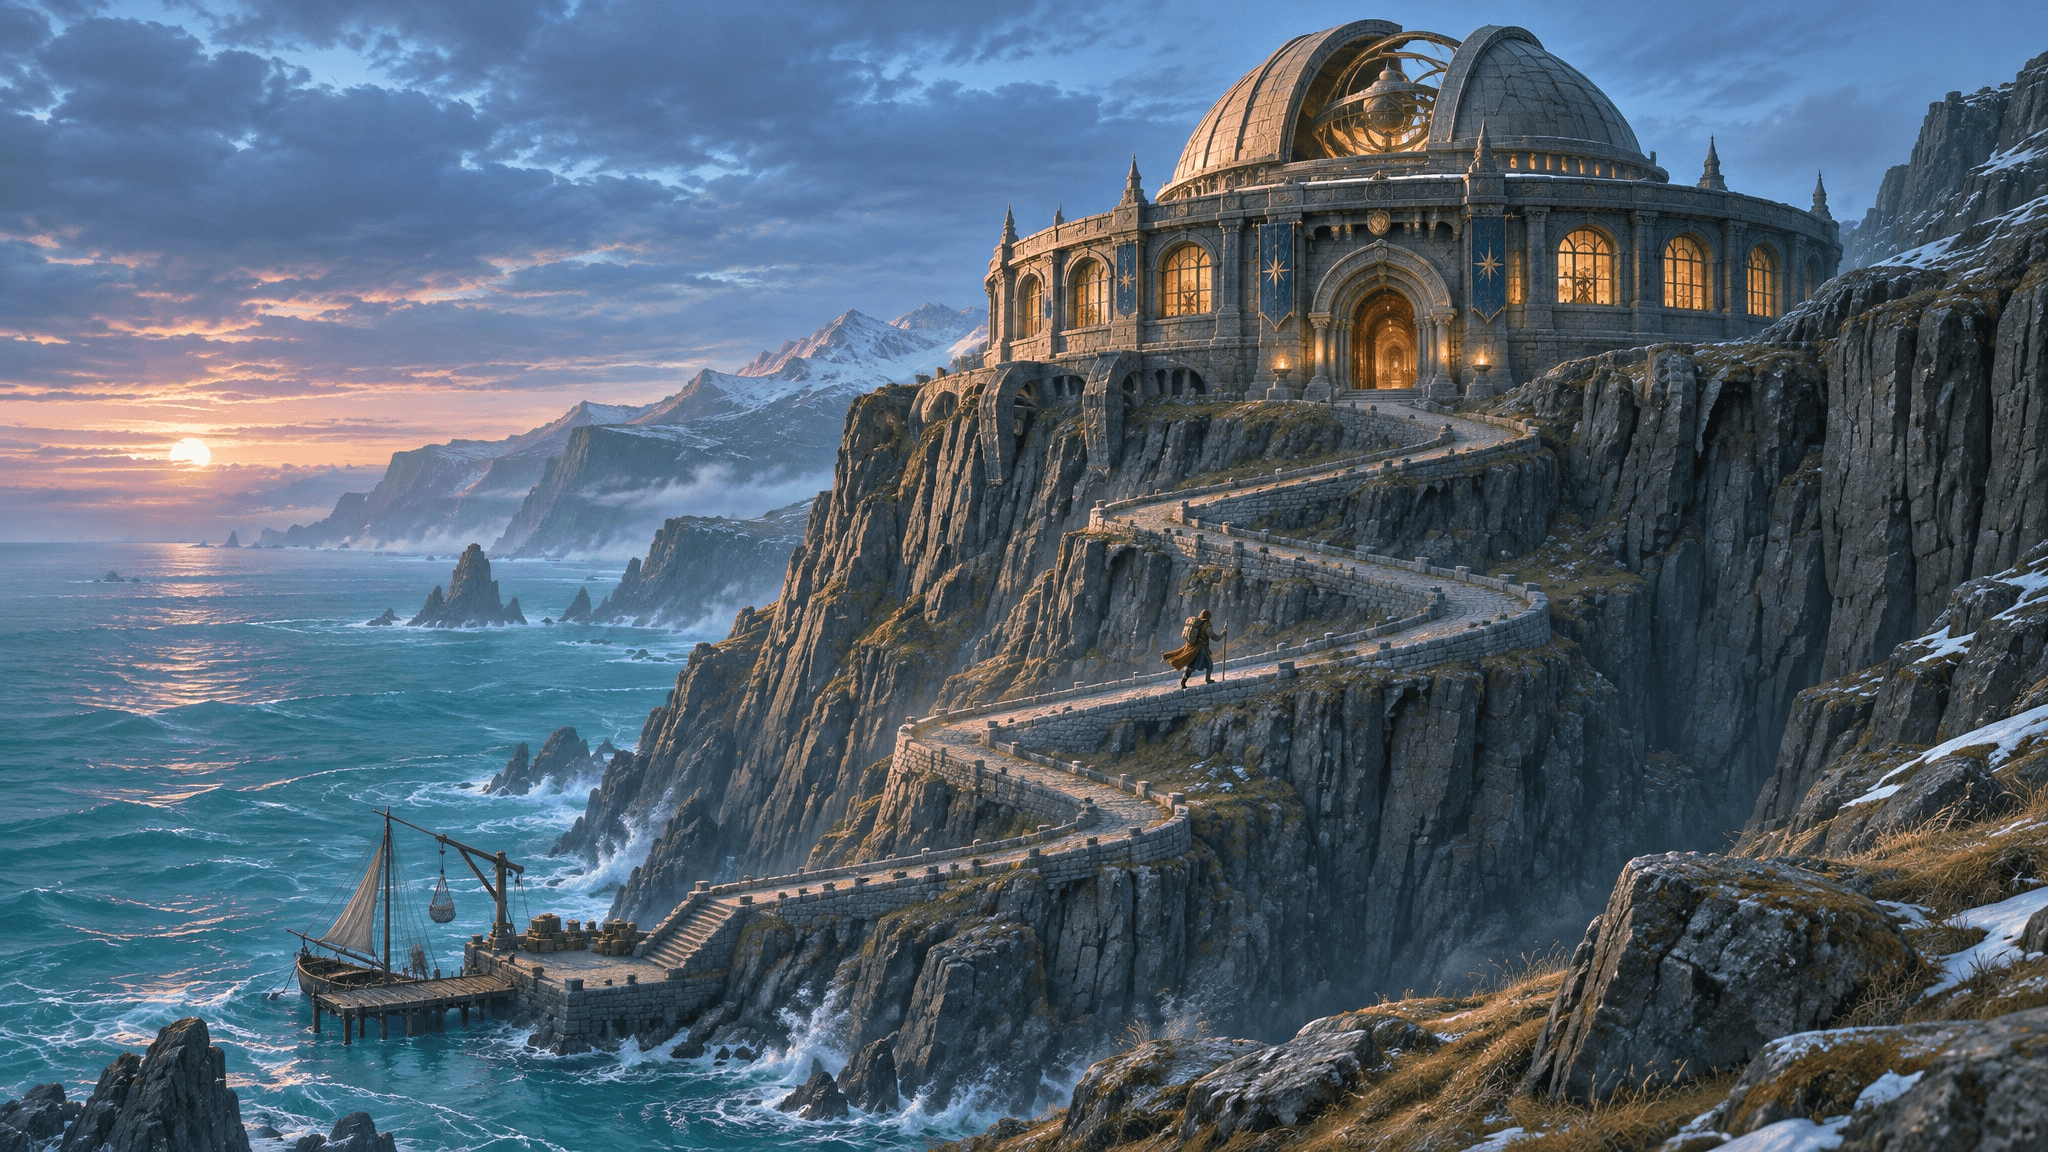
MiniMax H3 Image result for the observatory brief. The landing, traveler, path, and entrance are visible in one frame.
Trace the path with your finger. If it ends below the door, revise only its connection: “Join the final path segment visibly to the entrance at the same elevation.” If the foundations float, correct the contact between masonry and ledge before changing weather or style. A visually striking frame that fails either check is still a useful diagnostic draft.
2. A forest theater shaped by weather and time
The theater tests environmental storytelling. Damp woodland affects where moss and roots appear, while the seating, stage, and upper aisle must remain readable. The repaired seats and fallen banner imply different periods of use without adding a crowd or inventing a battle.
plaintext1Create a 16:9 fantasy environment concept image of an abandoned open-air theater in a temperate forest. Base the architecture on weathered limestone amphitheaters and the vegetation on a real damp woodland: roots follow cracks, moss grows on shaded stone, and rainwater collects in the lowest seating rows. A fallen stage banner and a few repaired wooden seats suggest people left and later returned; do not add crowds or a battle. View from the upper aisle toward the stage so the seating geometry and one safe route down remain clear. Overcast daylight enters from the open roof, with consistent soft shadows. Cinematic environment concept art, restrained color palette, no labels or text.
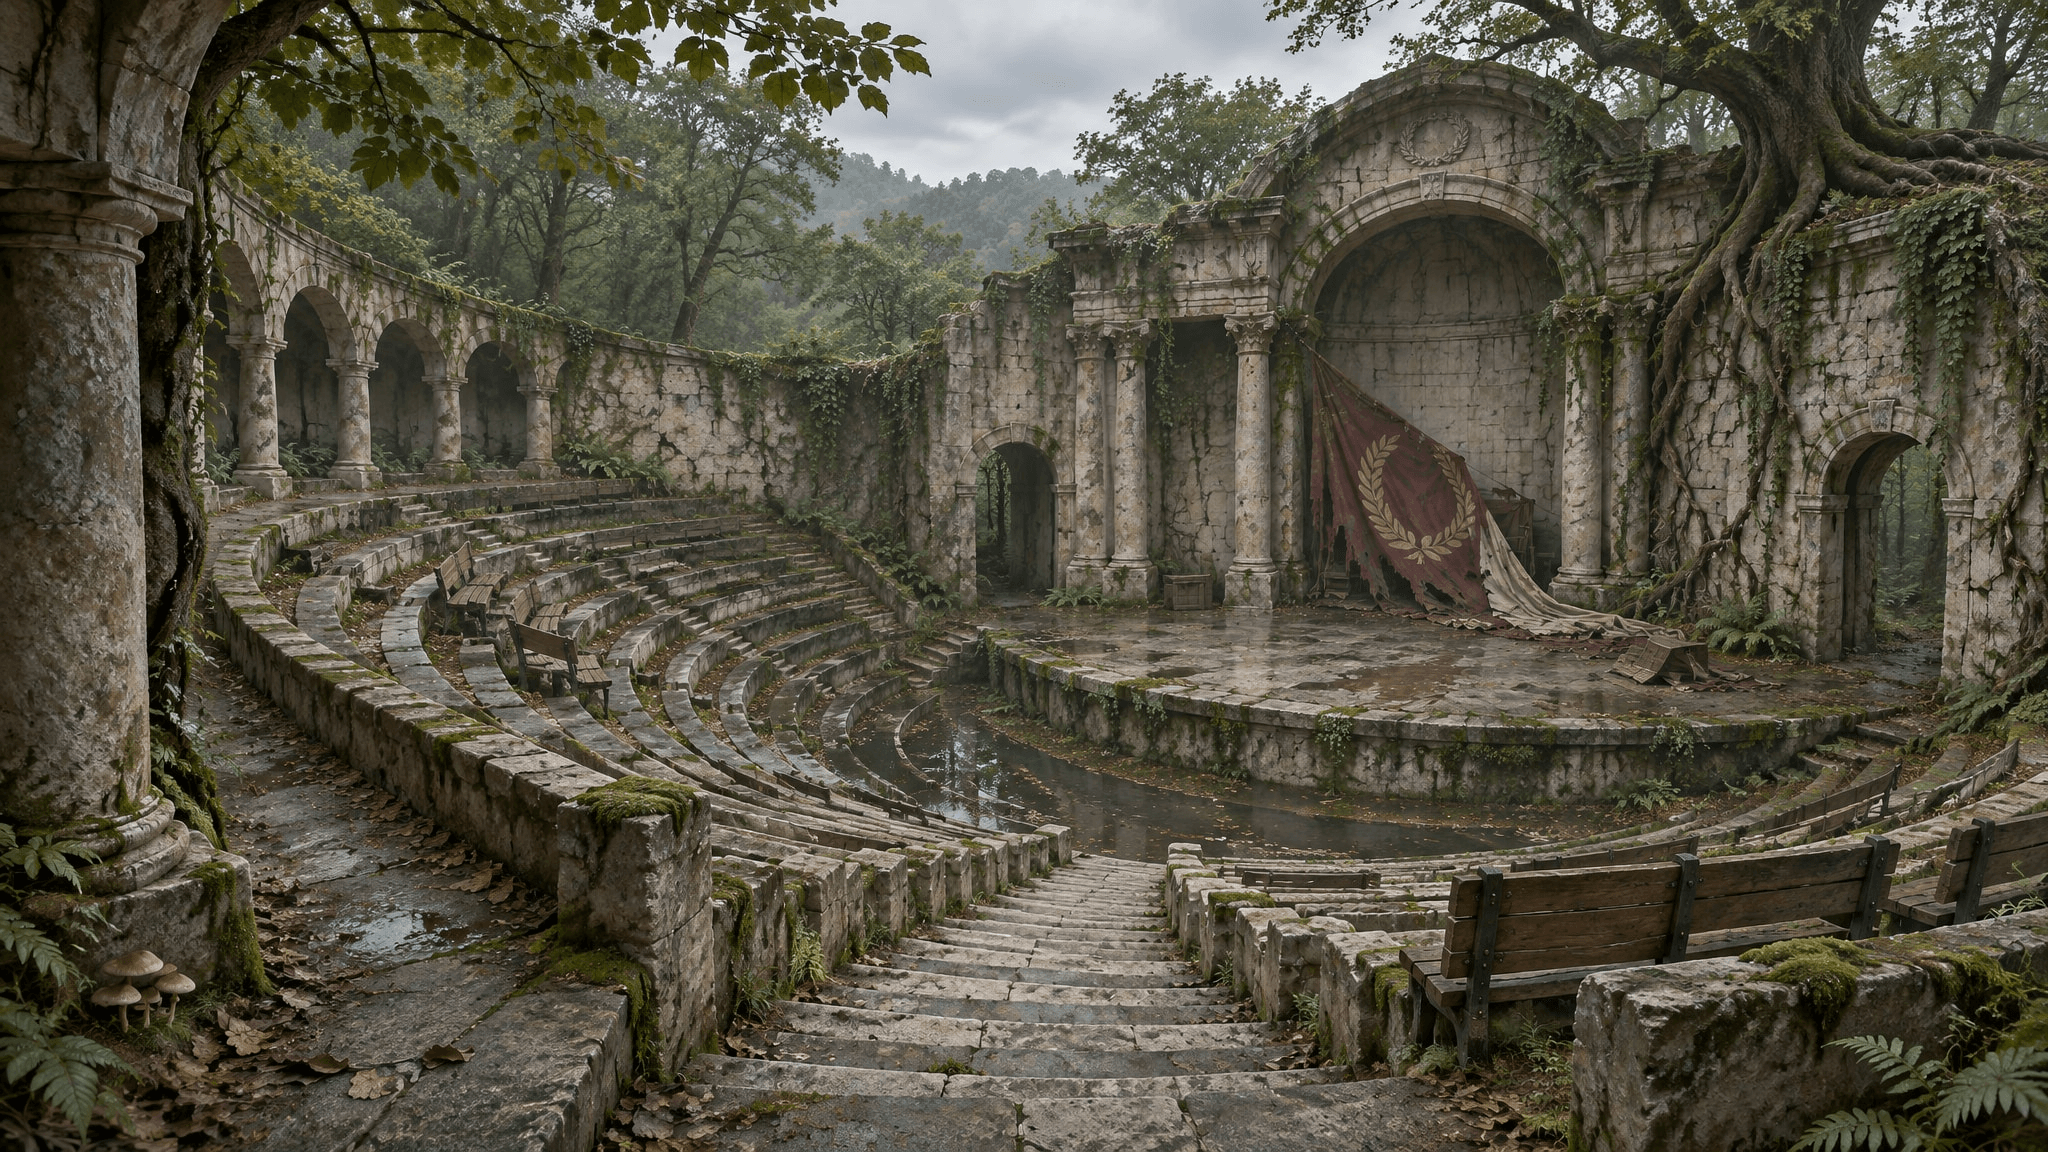
MiniMax H3 Image result for the forest-theater brief. The upper aisle, stage, wet rows, and fallen banner give the scene a readable layout and history.
Look first at the route down and the stage boundary, then at the vegetation. Moss on every sunlit surface would weaken the weather logic; roots crossing a clear aisle may erase the circulation the design needs. If the image becomes a wall of foliage, revise the aisle visibility rather than adding more descriptive adjectives.
3. An icebound harbor with a clear focal point
This scene tests visual hierarchy and physical contact. The warehouse, rescue path, nearer ship, breakwater, and ice should read as a single usable harbor. A line of warm lanterns gives the eye one destination inside a broad blue-twilight image.
plaintext1Create a 16:9 fantasy environment concept image of a harbor trapped in sea ice after a sudden winter storm. Ground the scene in recognizable fishing-harbor structures: a stone breakwater, mooring posts, a small warehouse, and two ships held by uneven ice. Make a lantern-lit rescue path from the warehouse to the nearer ship the single focal line. Show one small human figure on that path for scale. The ice presses against the hulls and harbor wall without impossible floating structures. Use a wide eye-level view, blue twilight, one warm lantern color, and consistent reflections. Avoid extra creatures, unrelated landmarks, captions, and text.
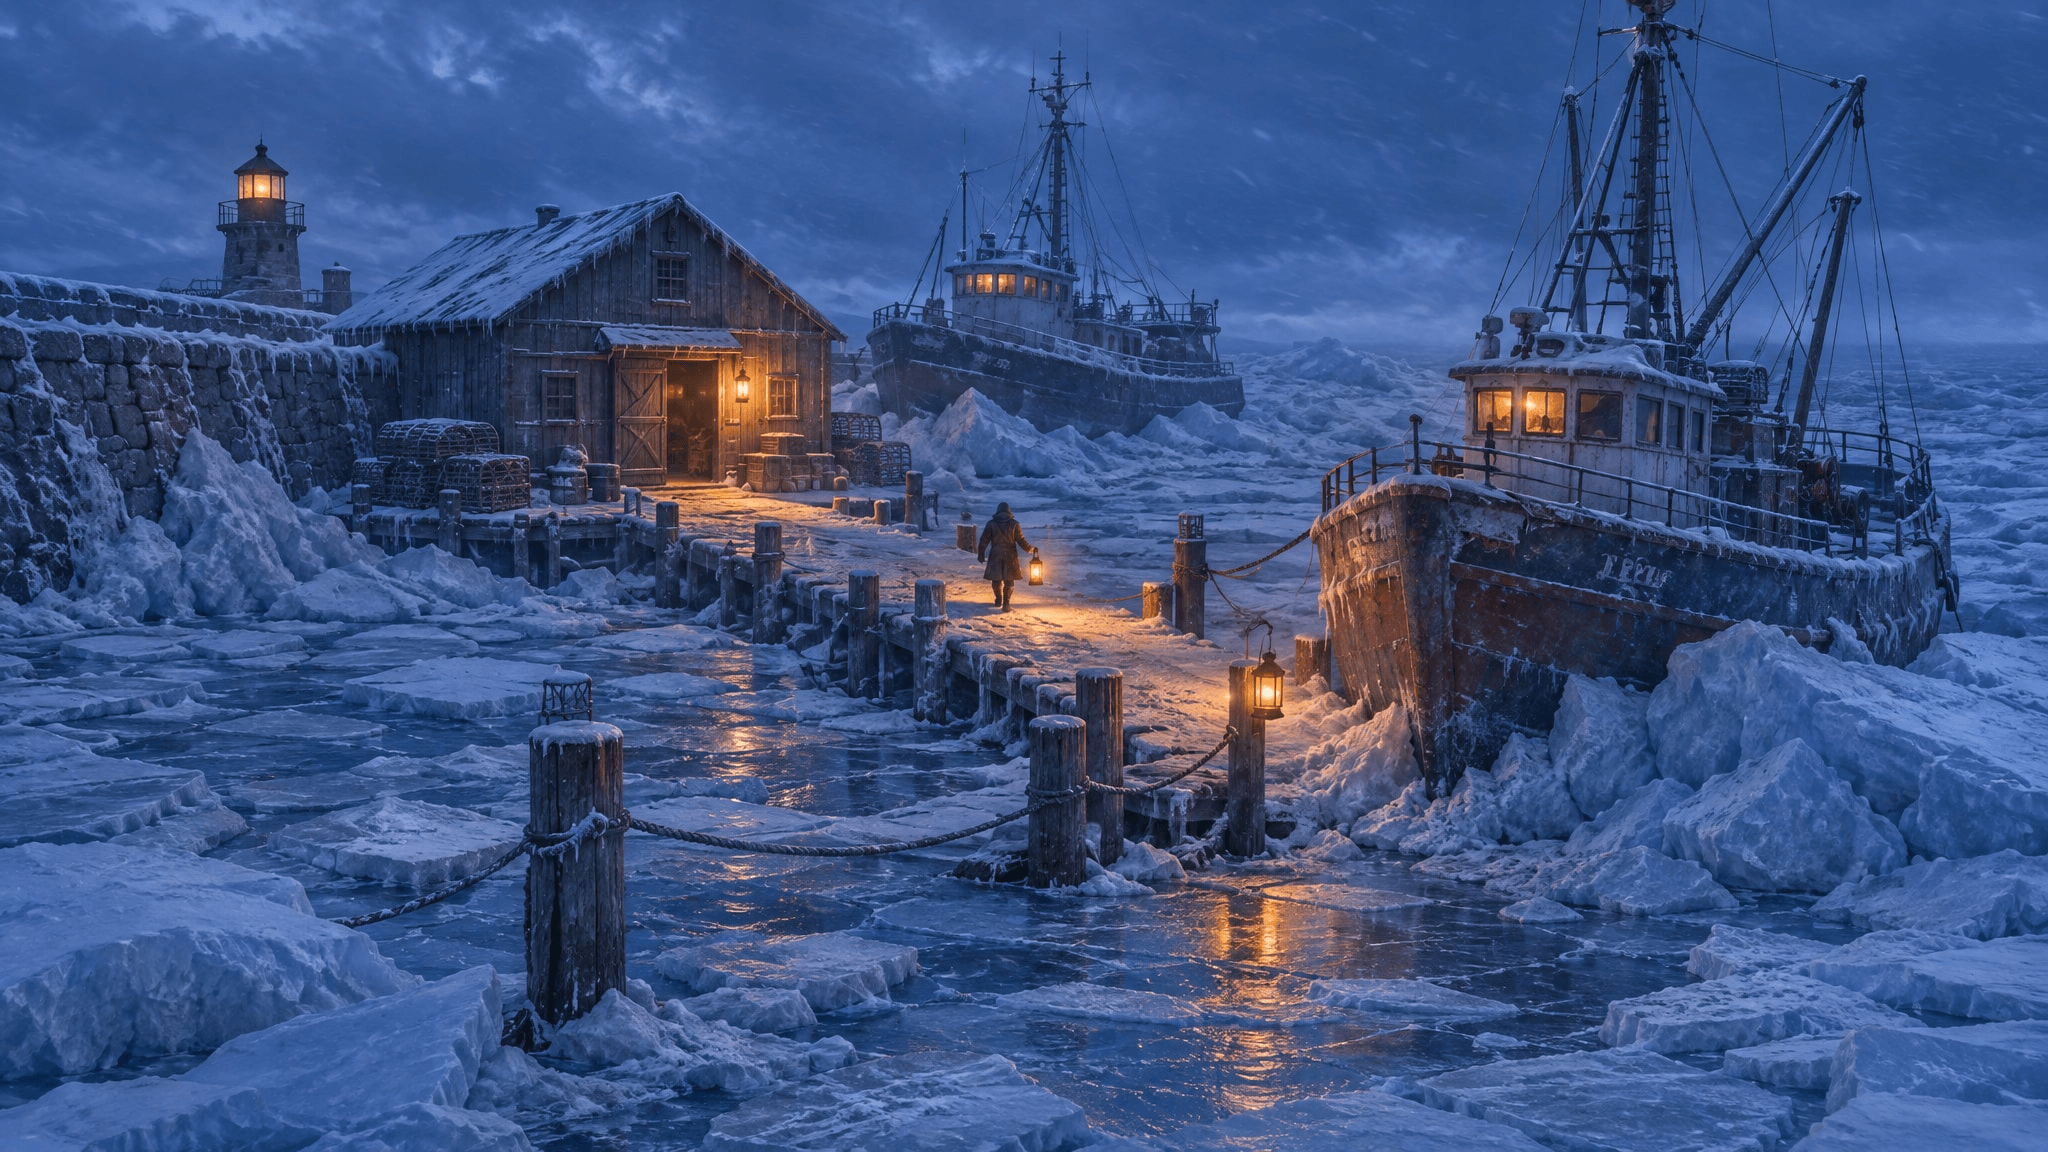
MiniMax H3 Image result for the icebound-harbor brief. Lanterns lead from the warehouse toward the nearer ship across the frozen quay.
Start the review at the warehouse and follow the lanterns to the nearer ship. If they lead out of frame, the image has lost its intended task. Then inspect the ice where it meets the hulls and wall. Revise that contact area before adding surface detail. The goal is a clear location concept, not a claim that the model has simulated ice physics.
Use References Without Losing the Scene
Assign one job to each reference
Use a reference when words alone leave an important decision ambiguous. For the observatory edit, the first generated observatory image is the essential reference: it defines the camera angle, path, entrance, traveler, and circular silhouette. If your team owns a basalt texture study or an architectural sketch, add it only when you can state its separate job. “Use Picture 2 for stone texture only” is more useful than uploading a mood board and hoping the model chooses the right element.
The 16-image limit does not mean you should fill every slot. More inputs can create competing instructions. Begin with the one image whose layout you need to preserve, and add another only if a specific mismatch remains. Record the upload order because the model card maps those images to numbered picture references.
Change one constraint at a time
Save the original observatory frame. Upload it as <Picture 1>, keep the same 16:9 aspect ratio, and use this edit instruction. On a web interface, select 4K if that is the highest relevant option. The instruction places all prohibitions in the main prompt, consistent with the model card's parameter rules.
plaintext1Edit <Picture 1> into the same cliffside observatory scene after a passing rainstorm. Preserve the observatory's circular silhouette, exact position on the basalt cliff, entrance, switchback path, sea-level landing, camera angle, and traveler. Change only the weather and its visible effects: wet stone, a few shallow puddles along the path, clearing clouds, and sunlight breaking through from camera left. Update reflections and shadows to match that new light direction. Do not add buildings, move the path, or change the traveler's clothing.
Compare original and edit side by side at the same display size. Check the door and path junction first, then the position of the traveler and main building. Only after those pass should you judge the new clouds, puddles, and shadows. If a structural element drifts, return to the saved original for another focused edit. Repeatedly editing a drifted version makes it harder to tell which instruction caused the change.
This is a proposed MiniMax H3 Image edit procedure, not an edit performed for this article.
Review the Result Like an Environment Designer
Review at two sizes. At thumbnail size, ask whether the silhouette, entry, and intended focal line survive. At full size, inspect contacts: stone against cliff, roots against joints, ice against hull. A large file may reveal more texture, but it cannot repair an unclear route or contradictory scale. Decide what must be fixed before you request another render.
| Review item | Where to look | Change only this next time |
|---|---|---|
| Terrain contact | Foundations, roots, ice edges | Specify the exact contact surface |
| Walkable route | Landing to door, upper aisle, rescue line | Reconnect the broken segment |
| Human scale | Traveler against door, path, and ship | Set one believable scale cue |
| Unified light | Windows, sky, lanterns, shadows | Name one direction and source |
| Story detail | Handrail, banner, repaired seats | Keep one trace that supports the setting |
Mark each row “pass” or “revise” and note the evidence in a few words. For example: “revise, final stair lands below entrance” is enough to guide the next prompt. If multiple rows fail, choose the one that changes the scene's structure most. A coherent route matters more to an environment handoff than decorative detail.
Keep the three tasks distinct during review. The observatory succeeds when access and support are legible. The theater succeeds when weathering tells time without hiding circulation. The harbor succeeds when one rescue route connects its key spaces. These are design judgments a team can discuss.
Where to Create It and What to Check Before Paying
For the MiniMax H3 Image prompts and reference edit, check the Atlas Cloud model catalog for current availability. If MiniMax H3 Image is listed, select its still-image route for the three new scenes and its image-edit route for the reference revision, where offered. If it is not listed, use a deployment supported by MiniMax. Confirm the image settings and current price before starting; listings and promotions can change.
For MiniMax H3 Image Fantasy Scene Design, choose one of the 3 briefs, render one frame in a MiniMax H3 Image deployment, and run the five-row review before changing the prompt. Preserve the original so every later edit has a stable reference.
Frequently Asked Questions
Can I use my own sketches as MiniMax H3 Image references?
Yes. The model supports reference-based generation and editing. Upload a sketch with a clear job, such as preserving the building silhouette or path layout, and name its picture number in the prompt. Check your deployment's upload controls and keep a copy of the original sketch.
Will a 4K output fix inconsistent scene geometry?
No. More pixels can expose detail, but a route that misses the door or a floating foundation still needs a better brief or a focused revision. Review the large output and a thumbnail before treating it as an environment handoff.
Can I animate a finished MiniMax H3 Image scene later?
Yes. Export the still as a starting frame for a separate animation workflow. Motion needs its own instructions, settings, and review. The scene-design checks here help establish a clear starting image.
How do I keep a location consistent across revisions?
Save the first approved frame and use it as the primary reference for each edit. Name the elements that must stay fixed, such as the camera, entrance, path, and major silhouette, then request one visible change at a time. Compare each new result with the saved original rather than with the last imperfect edit.
Can I use a MiniMax H3 Image scene directly as a playable game level?
No. It is a still concept image, so the team must build the geometry, walkable paths, materials, and lighting in its game tools. Use the image to agree on composition and location intent, then verify dimensions and navigation during the actual level build.