

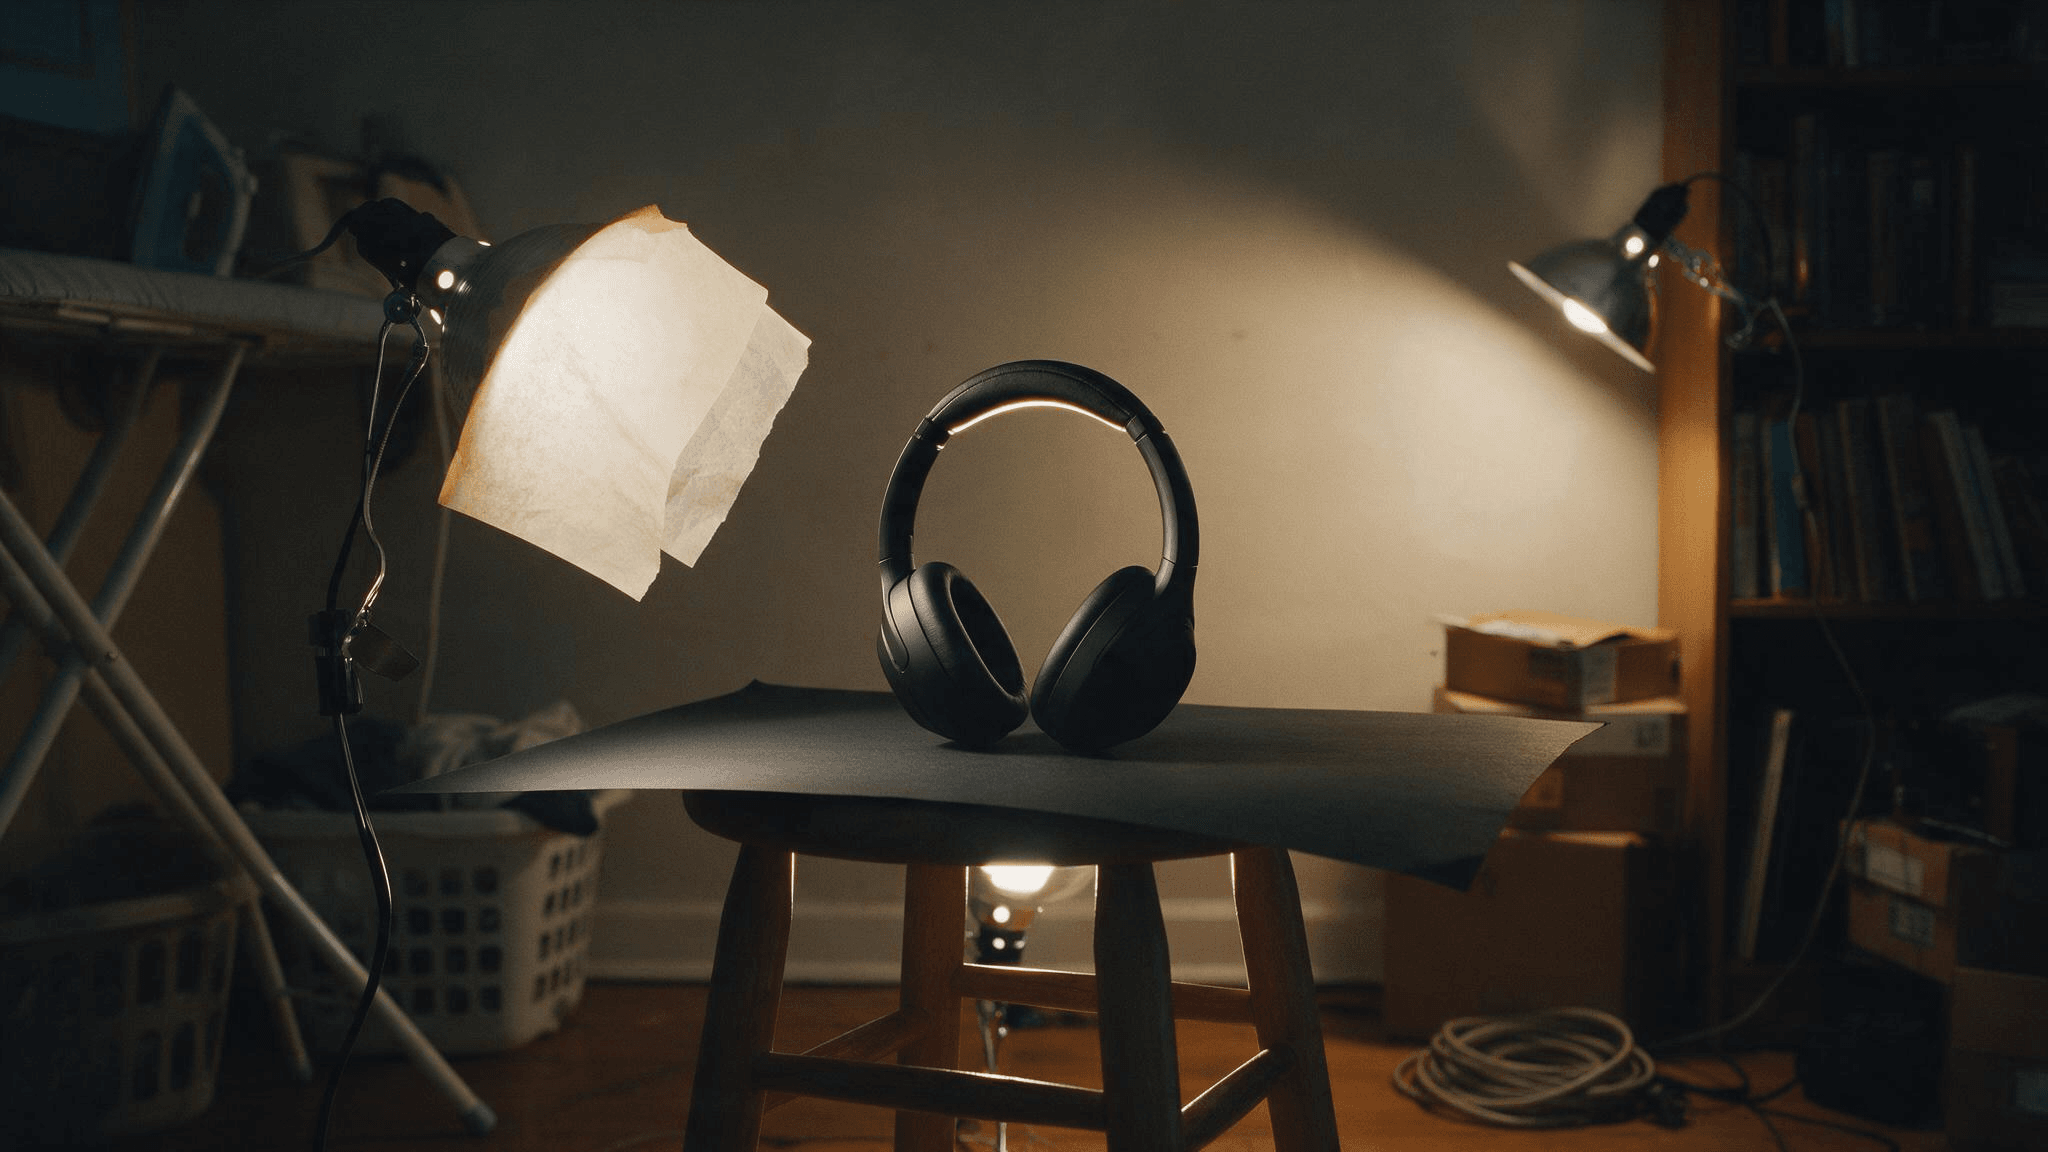
You put the headphones on the counter, switch on every lamp in the room and take the shot. On screen they come out as a black blob on a gray slab, and the stitched leather that sells them looks like plastic. The phone is fine. The light just has no job.
Product photography lighting comes down to three choices: how big the light is, where it sits, and what bounces it back. This guide builds a setup one lamp at a time. Each step gets a top-down diagram and an AI-rendered photo of the same pair of headphones, so you can see what a light adds before you buy it.
Key Takeaways
- Light size compared with the product decides softness, so a diffused lamp close in beats a bare bulb.
- Start with one key light at 45 degrees and a white bounce card opposite before buying a second lamp.
- A third light either rims a dark product against black or pushes a white backdrop to pure white.
- Glass shows at its edges: light it from behind for dark outlines on white, or bright ones on black.
- Without any lights, the Image ads workflow turns one phone photo and a written lighting brief into a studio-lit hero image.
What Is the Best Lighting for Product Photography at Home?
The best lighting for product photography is light you can repeat tomorrow at the same brightness and the same color. Three properties decide whether you can.
- Size sets softness. A source that is large compared with the product wraps around it, so shadows fade out gradually. A bare bulb is a tiny source and throws hard, sharp-edged shadows. A diffuser in front of the bulb makes the source bigger. So does moving it closer.
- Distance sets brightness. Light falls off with the square of distance. Double the distance from lamp to product and the product gets a quarter of the light. Move a lamp from 60 cm to 85 cm and you lose half. The two-light setup below uses exactly that to set its ratio without a dimmer.
- Color has to match. Home bulbs are sold by color temperature. The US Department of Energy lists warm bulbs at 2,700K, and ENERGY STAR's 2020 bulb buying guide puts daylight bulbs at 5,000K and up. Mix the two and white balance can correct only one of them.
Color rendering matters too. CRI scores how faithfully a bulb shows colors, on a scale that tops out at 100. ENERGY STAR's bulb specification, retired at the end of 2024, only asked for 80, so for products whose color has to match the listing, check the box and pick 90 or higher.
Here is how the usual light sources compare on those points:
| Light source | Preview before the shot | Color from shot to shot | Works with a phone camera | Best fit |
|---|---|---|---|---|
| Window light | What you see is what you get | Shifts with clouds and time of day | Yes | A few matte products shot in one sitting |
| Household LED bulb in a lamp | What you see is what you get | Steady; color accuracy varies by bulb | Yes | A first DIY setup for small products |
| LED panel or COB light with a softbox | What you see is what you get | Steady, with adjustable brightness | Yes | Catalogs that need identical shots week after week |
| Studio strobe | Only through a built-in modeling lamp | Very steady | Usually not; it needs a camera that can trigger it | Large products and frozen liquid splashes |
If a window is all you have, natural light product photography works for one product at a time. Our phone product photo guide covers where to put the table. Everything below uses continuous lamps, because a phone shows you their effect live.
Get Studio Lighting for Product Photography Without Buying Lights
Sometimes the whole job is one hero image for a listing or an ad. Atlas Cloud runs a set of Marketing Studio workflows for this kind of job, and Image ads is the one for product shots. You upload a phone photo of the product, describe the light the way you would brief a photographer, and it returns a studio-lit hero image.
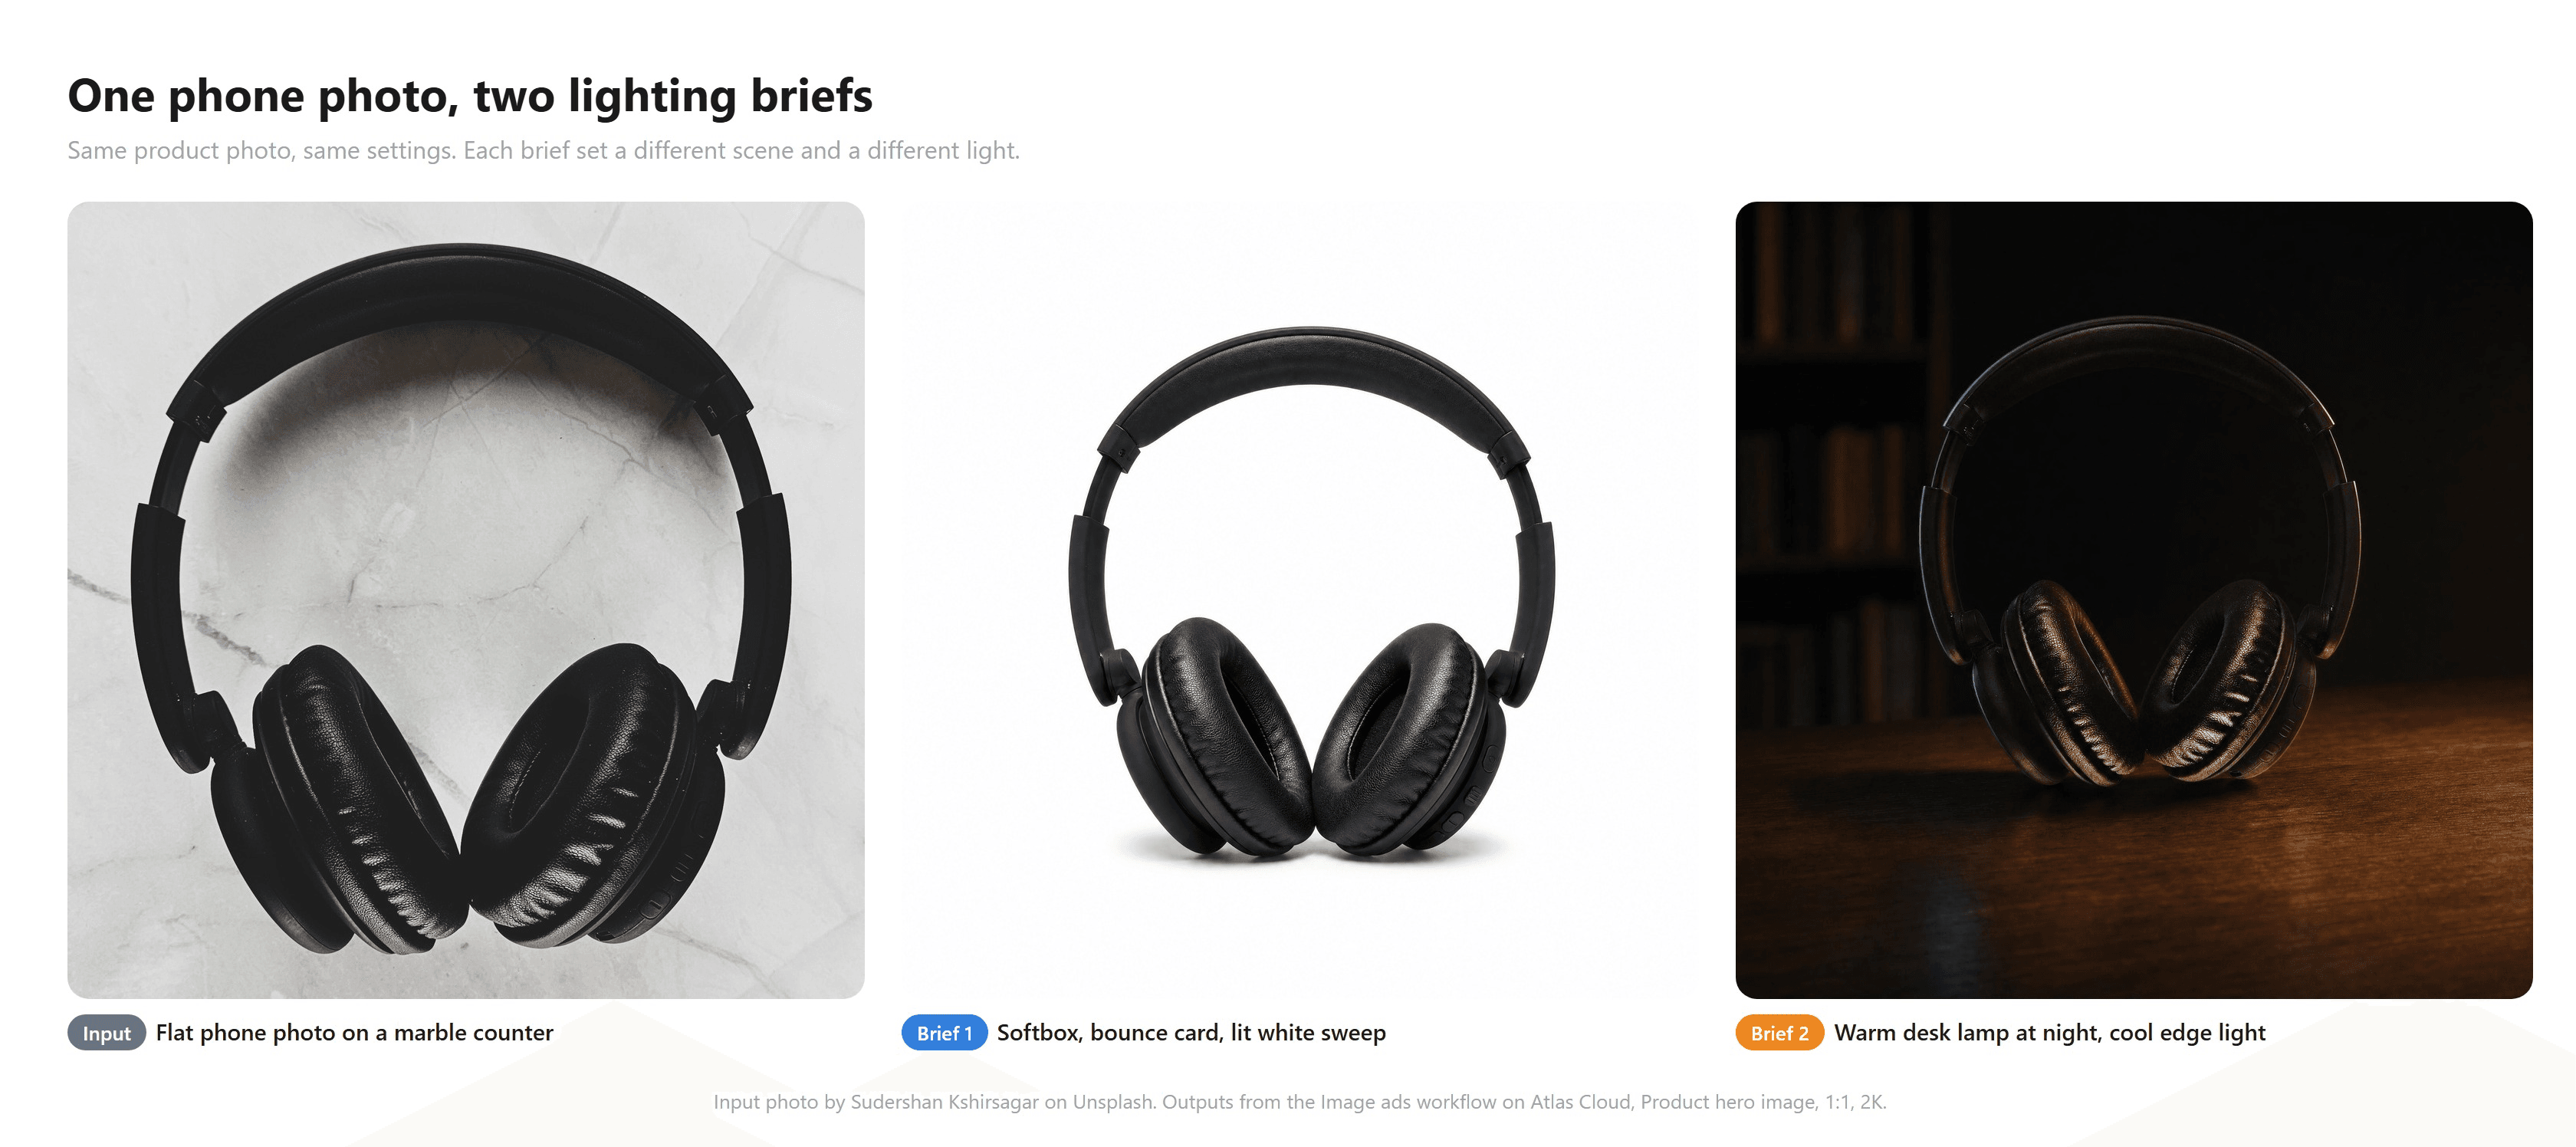
The phone photo on the left is the input for both results. The headphones lie flat on a marble counter in even, shapeless light, so they read as one black shape.
The middle image came from a brief describing a softbox at 45 degrees, a bounce card and a lit white sweep. The right one came from a brief describing a warm desk lamp at night with a faint cool edge light behind. The photo and settings stayed the same in both runs, and only the brief changed.
Write a Product Photography Lighting Brief in Image ads
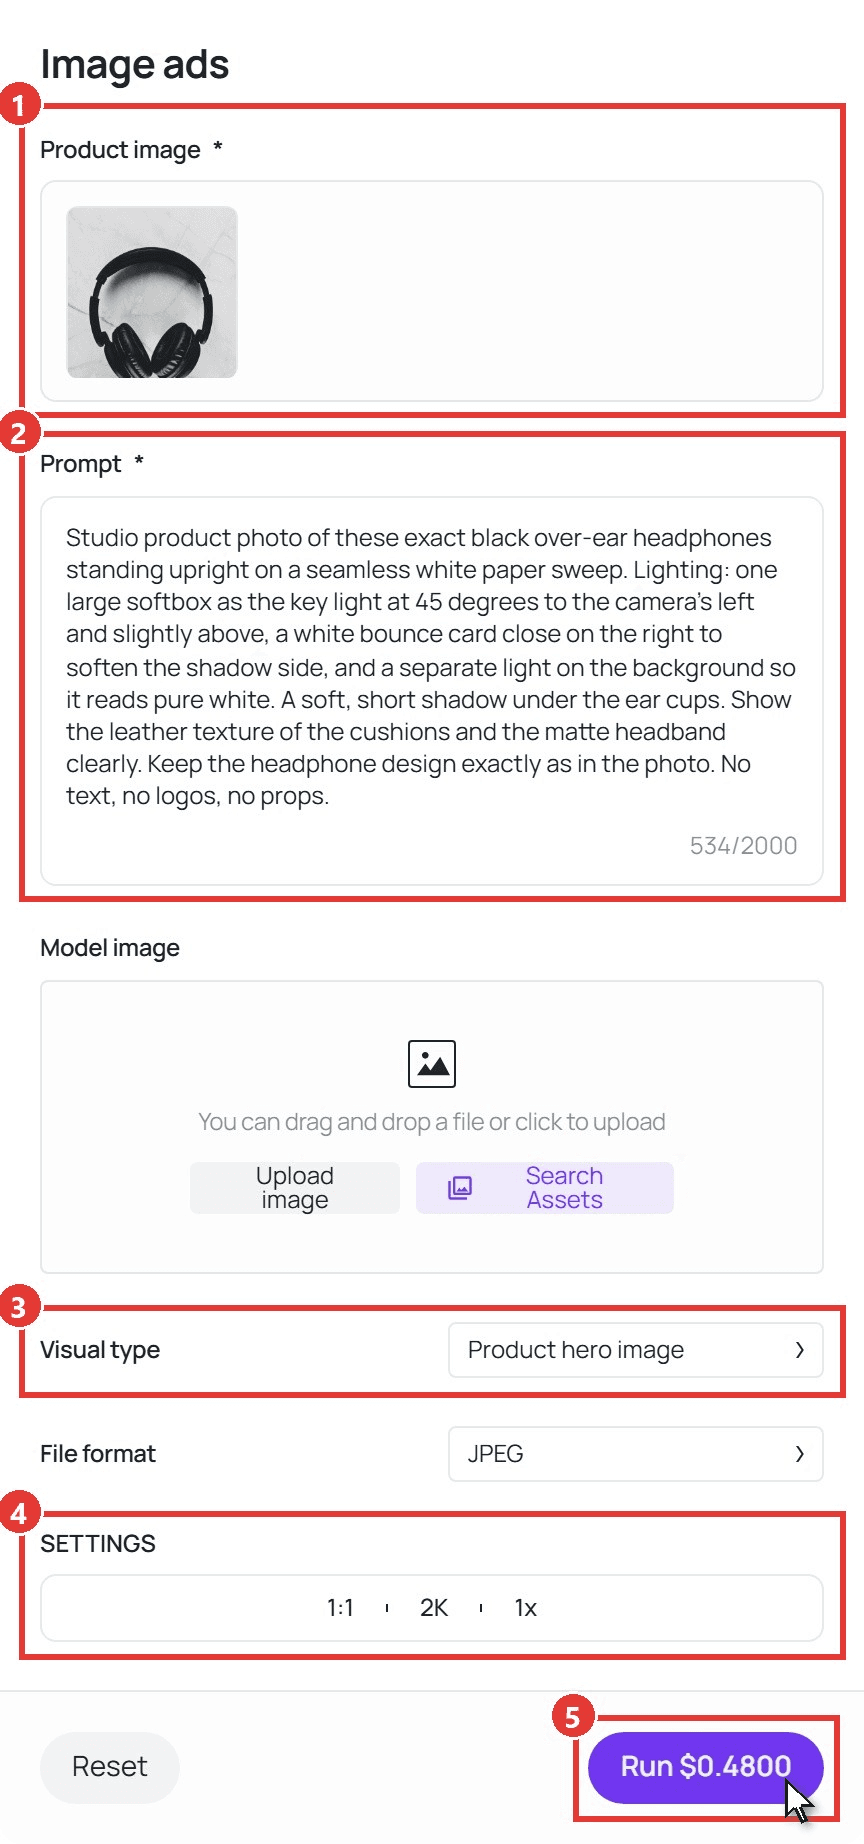
- Product image. Upload one sharp photo of the product. Flat light is fine here, because the shape and details are what carry over.
- Prompt. Name the backdrop, then say where the key light sits, what softens the shadow side, and what happens to the background. Finish with a line asking it to keep the design exactly as in the photo.
- Visual type. Pick Product hero image.
- SETTINGS. We used 1:1, 2K and one image.
- Run. The button shows the cost of the run before you click it.
This is the brief behind the white-studio result above. Swap the light descriptions for the setups in the next section and the output follows them.
plaintext1Studio product photo of these exact black over-ear headphones standing upright on a seamless white paper sweep. Lighting: one large softbox as the key light at 45 degrees to the camera's left and slightly above, a white bounce card close on the right to soften the shadow side, and a separate light on the background so it reads pure white. A soft, short shadow under the ear cups. Show the leather texture of the cushions and the matte headband clearly. Keep the headphone design exactly as in the photo. No text, no logos, no props.
If you would rather build that light for real, the next section does it one lamp at a time.
Product Photography Lighting Setup Built One Light at a Time
Each setup below adds one light to the one before it, and you can stop as soon as the photo looks right. All of them assume lamps of the same model, so you can set ratios by distance alone.
One-Light DIY Product Photography Lighting With a Bounce Card
DIY product photography lighting starts with one desk or clamp lamp and a daylight LED bulb. Tape baking parchment or a frosted plastic file folder over the front so the lamp becomes a broader, softer source. Put it at 45 degrees to the camera's left, a little above the product and about 60 cm away. A white foam board on the opposite side, 20 to 30 cm from the product, is the bounce card.
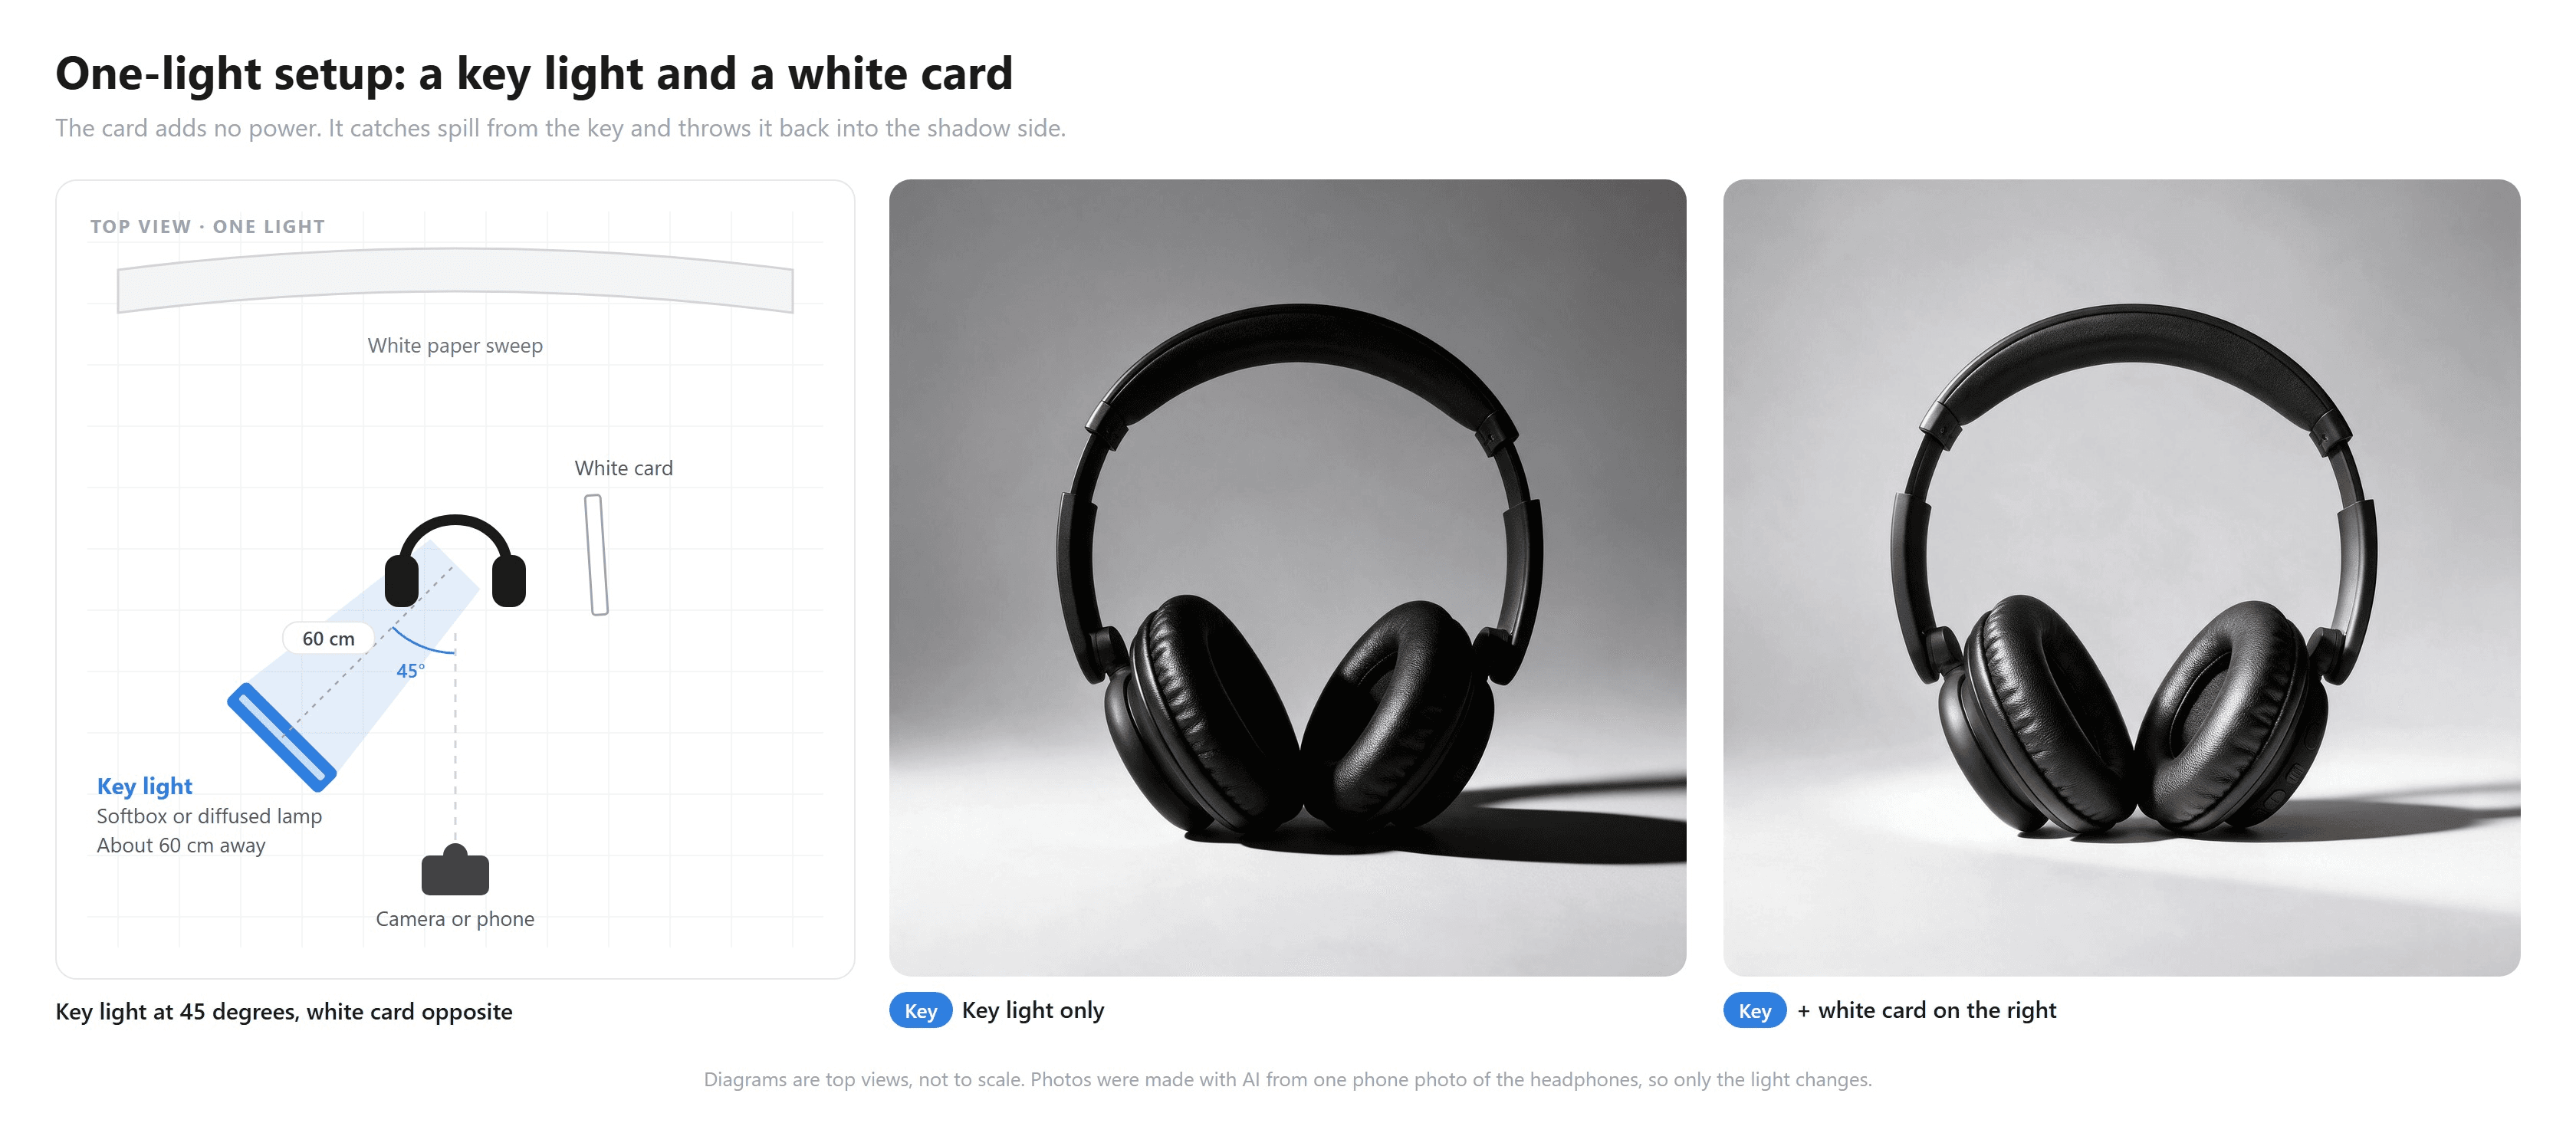
With the key alone, the right half of the headphones drops into black and a hard shadow runs across the backdrop. Adding the card brings back the leather on the shadow side without adding a second shadow. A card can only return light that the key sends its way, so move it closer if the effect is too weak.
The backdrop stays gray in both frames. It sits farther from the lamp than the product does, so by the inverse square rule it gets much less light. One lamp can't light both, which is the problem the third light solves.
Two-Light Product Photography Setup That Controls Shadow Depth
A second lamp on the camera's right works as a fill light. Its brightness relative to the key is the lighting ratio. At 2:1 the shadow side sits one stop darker than the lit side and keeps its detail, a safe default for store listings. At 4:1 it sits two stops darker and the product looks moodier.
With two identical lamps you don't need a dimmer. Put the fill 1.4 times farther away than the key and it delivers half the light, which gives 2:1. Put it twice as far away and it delivers a quarter, which gives 4:1. With the key at 60 cm, that's about 85 cm for 2:1 and 120 cm for 4:1.
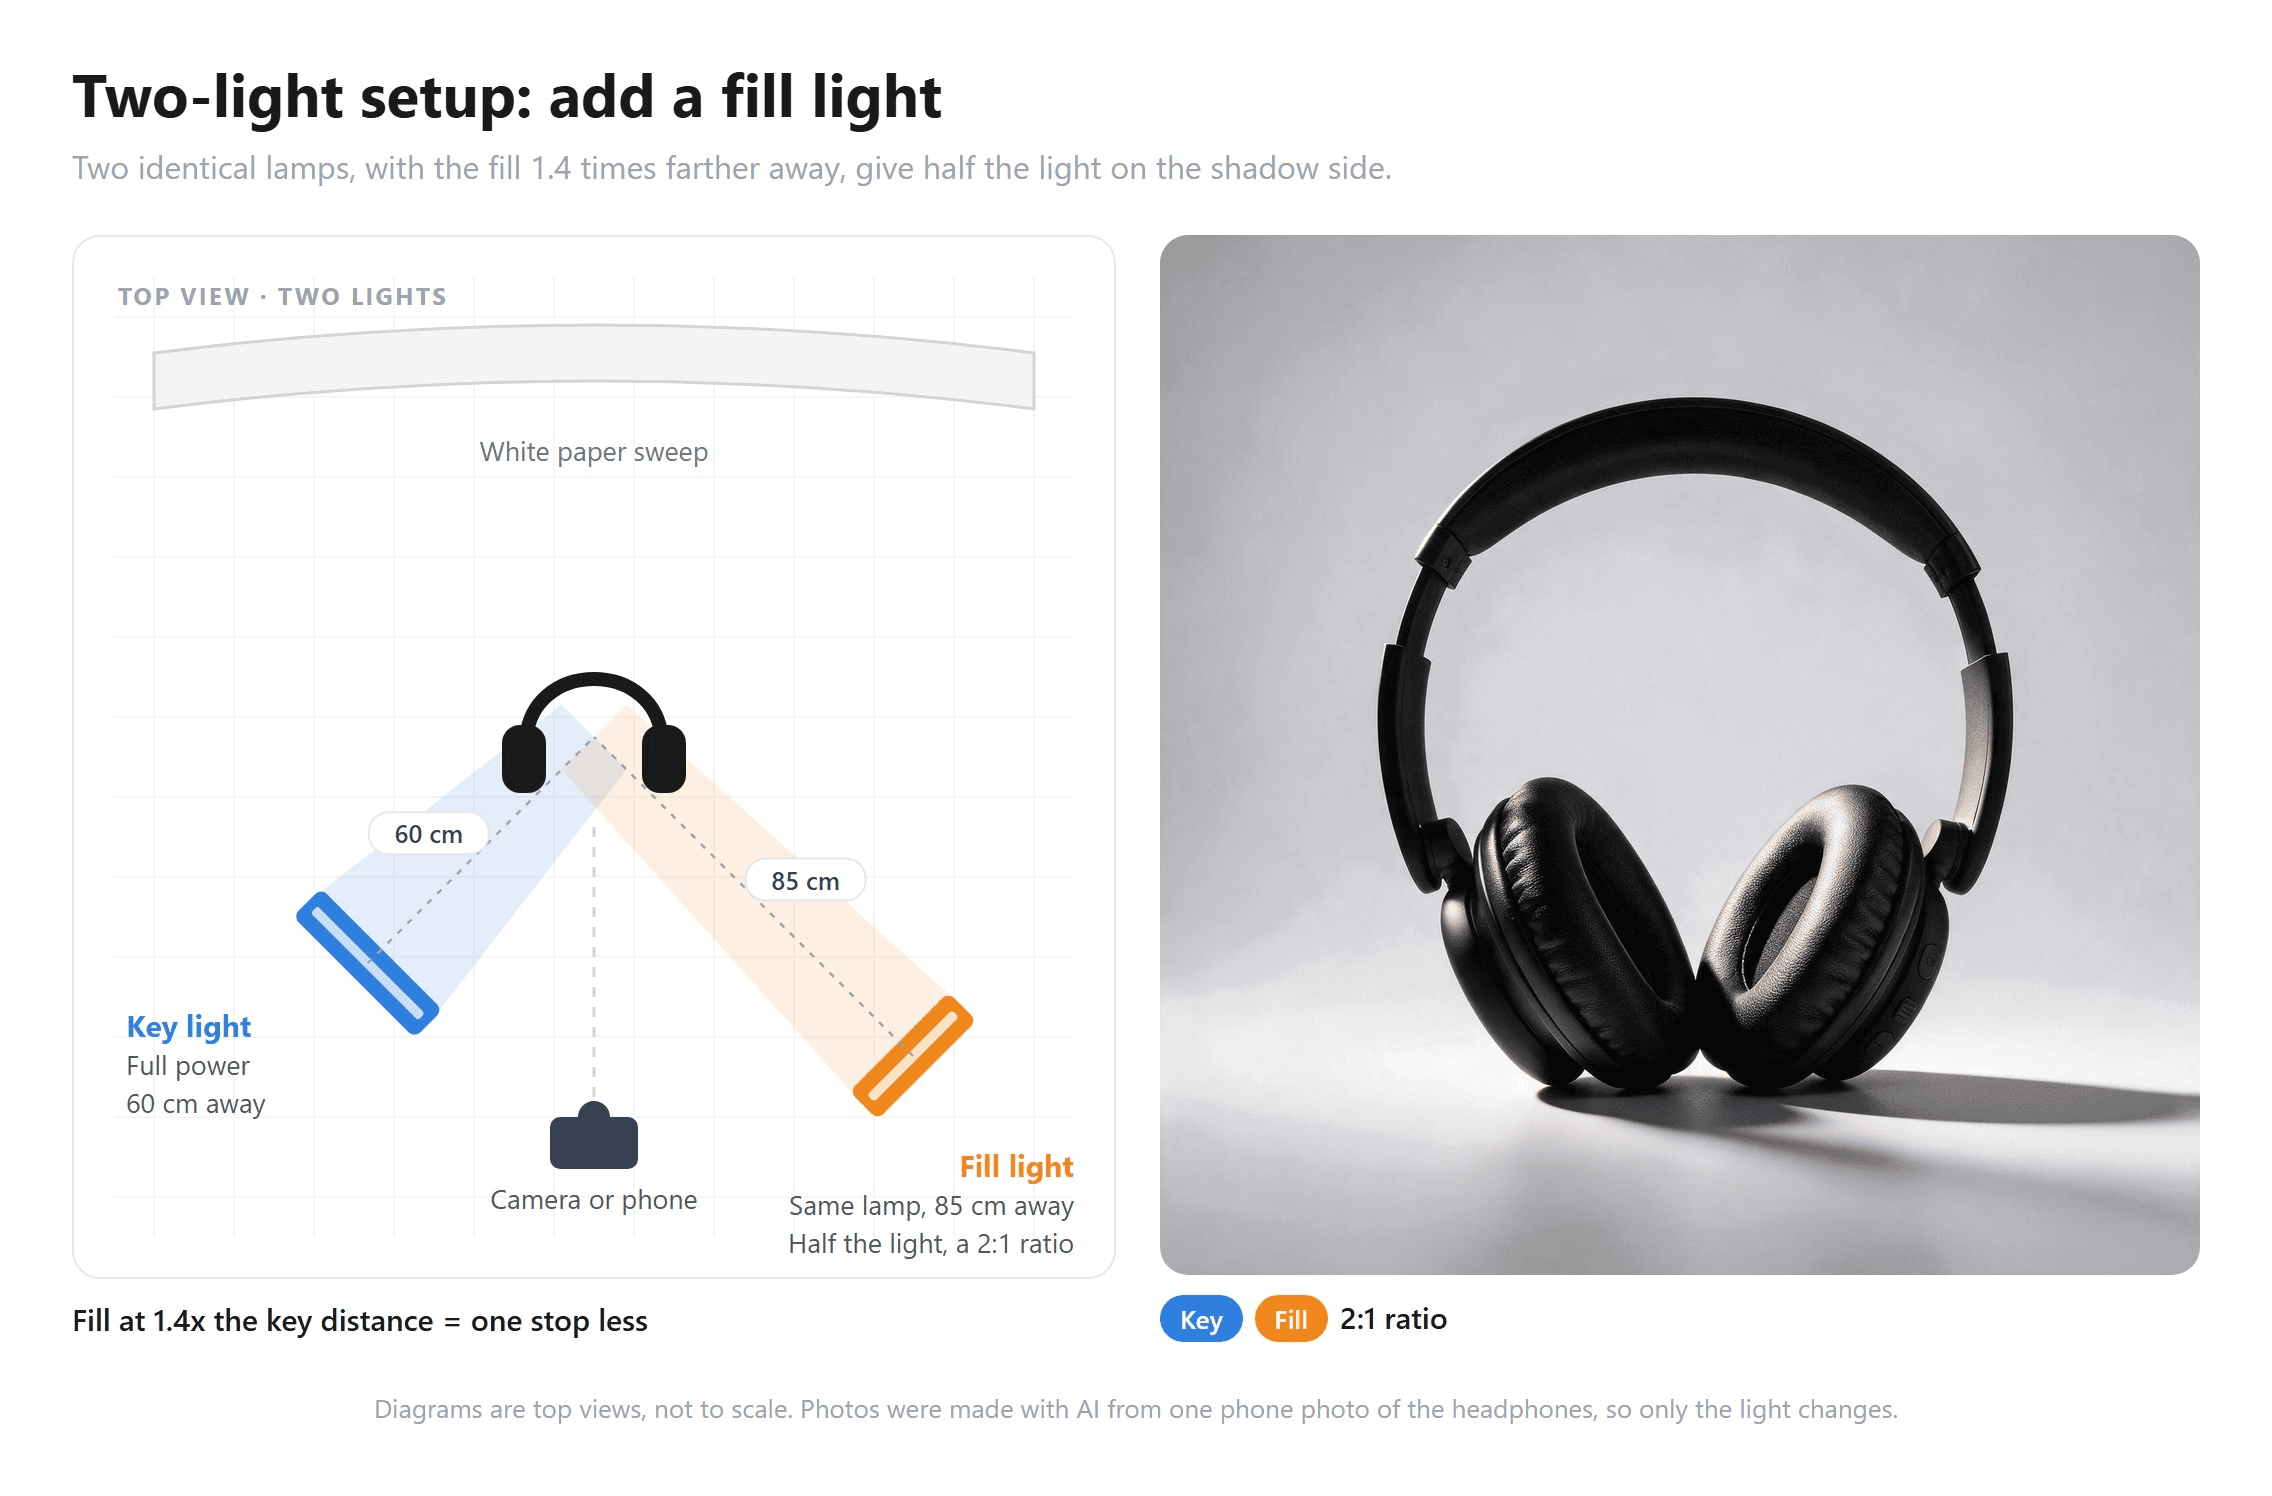
Keep the fill as soft as the key and no higher than it. A fill that is too strong, or placed high on the opposite side, throws a second shadow onto the backdrop, and two shadows are the fastest tell of a home setup.
Three-Light Product Photography Setup That Separates the Product From the Background
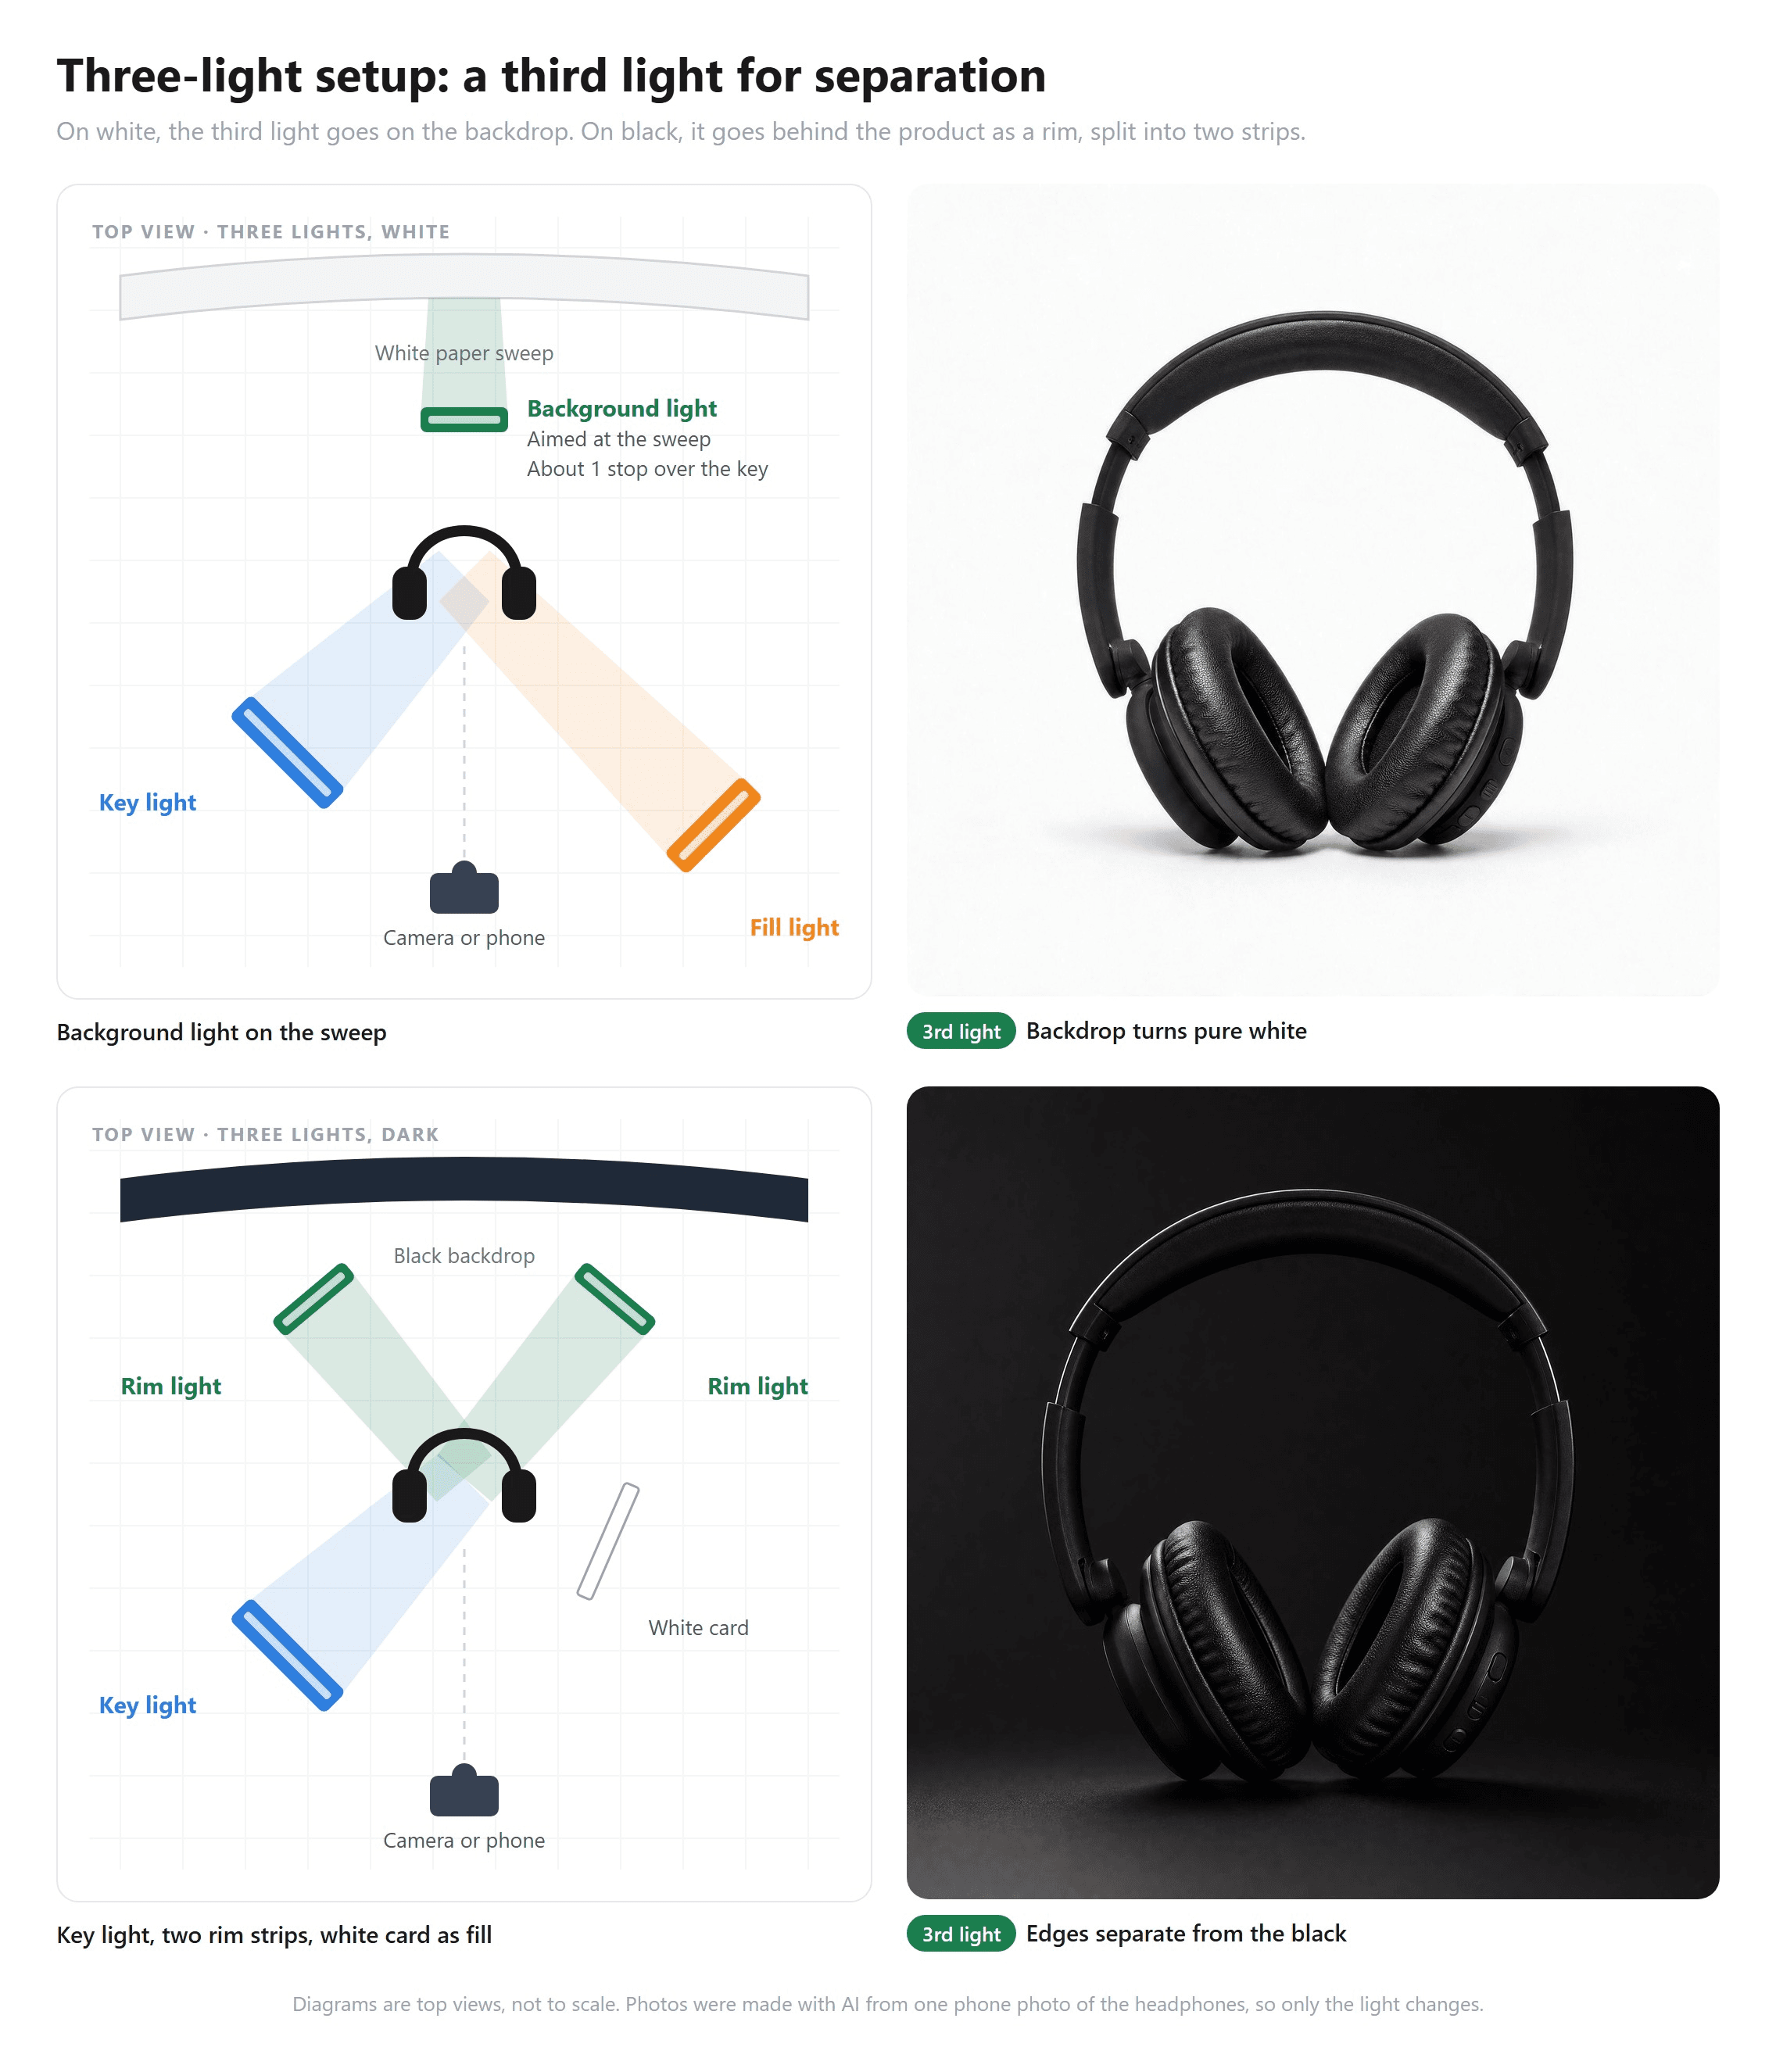
The third light's job depends on the backdrop.
On a white sweep it goes on the background. Aim a lamp at the paper behind the product and set it about one stop brighter than the key, so the sweep records as pure white while the product's exposure stays where it was. Keep the product about a meter in front of the sweep so the glow doesn't wrap around its back edges.
If the images are for an Amazon main slot, the background has to hit pure white, as our Amazon image requirements guide explains.
On a black backdrop it becomes a rim light, set behind the product and aimed at its edges. Without it, a black product on black loses its outline where it meets the backdrop. For an outline on both sides, split the rim into two narrow strips, one behind each side, and let a white card take over the fill so you still run three lamps. Angle the strips so they can't shine into the lens.
Product Photography Lighting for Reflective Products
A glossy surface doesn't show light. It shows the light source, like a mirror would. A small bare bulb becomes a hot white dot on a glossy case, and a tall strip softbox becomes one clean gradient stripe down its side.
So with shiny products you choose what the surface reflects, then place it where the camera can see that reflection. For small polished metal, our guide to photographing jewelry shows the card tricks for rings and pendants.
Clear glass is harder, because the camera mostly sees through it. Glass shows up through its edges, and Light: Science and Magic (Hunter, Biver, Fuqua and Reid, sixth edition, 2021) names the two ways to draw them, in its chapter on glass: bright-field and dark-field lighting.
- Bright field. Light a white panel behind the glass. The edges bend light from the darker room around them into the lens, so they read as dark lines on white. Black cards just outside the frame on each side make those lines stronger.
- Dark field. Put a black card directly behind the glass and a light on each side behind it. Now the edges catch the light and read as bright lines on black.
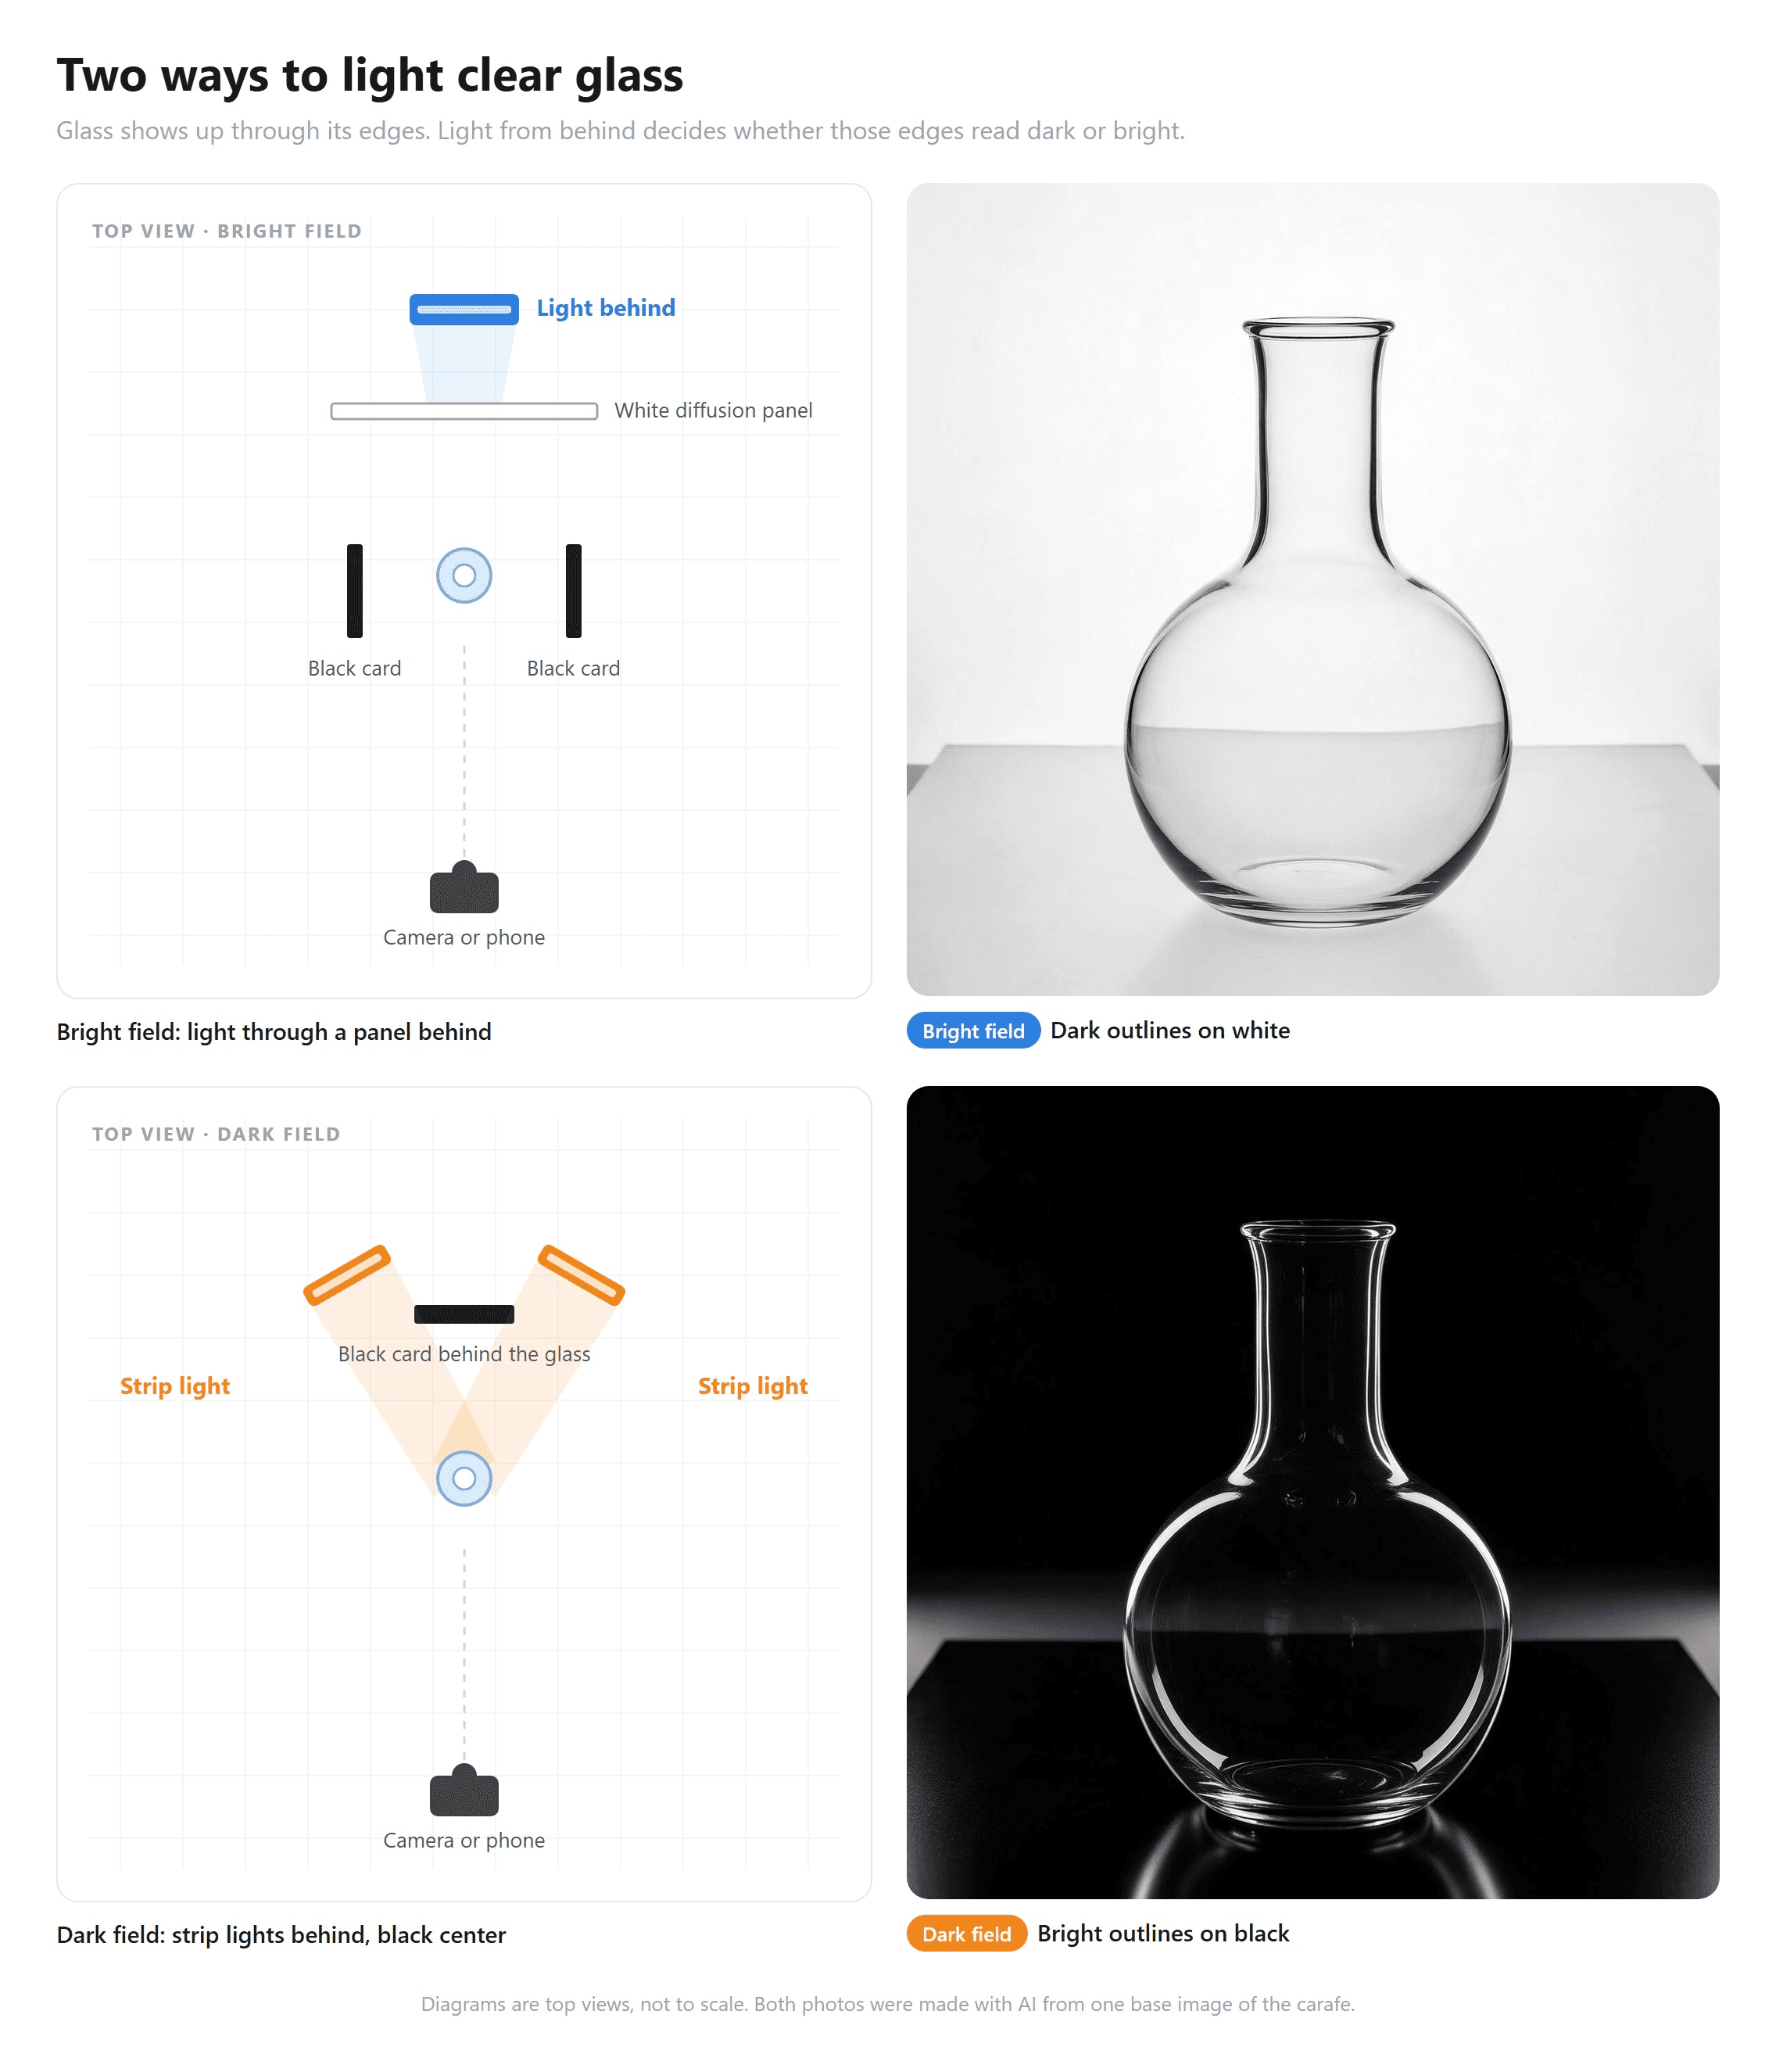
Pick the field by the backdrop the listing needs. Bright field suits white store backgrounds. Dark field suits ads and premium drinks, where the bright outline does the selling.
Fix These Product Photography Lighting Problems Before You Reshoot
When a shot looks wrong, find the symptom here before you reshoot. Setting up lighting for product photography in a hurry causes several of these, and most of the fixes need no new gear.
| What you see | Likely cause | Fix |
|---|---|---|
| One side of the product looks orange and the other blue | Bulbs of two color temperatures, or daylight leaking in from a window | Fit matching bulbs, switch off the rest and close the curtains |
| One end of a long product is brighter than the other | The key is so close that the near end gets far more light than the far end | Move the key farther back and enlarge the diffuser to keep it soft |
| Grainy or soft photos | Too little light, so the phone raises ISO or slows the shutter | Move the lamps closer, or brace the phone on a stand |
| A hot white spot on a glossy surface | A small, bare source reflected in the product | Turn the product a few degrees so the reflection slides off its face |
| A dark product melts into a dark background | No light on its edges | With no lamp to spare, stand a white card behind and to one side |
| Bands of light and dark across a photo or video | LED flicker caught by the sensor's line-by-line exposure | Shoot a five-second test, then change the shutter speed or the lamp |
Sony's flicker support page explains that last row. LED lighting can flicker hundreds or thousands of times per second, and a sensor exposes its top and bottom at slightly different moments, so the swings in brightness land as bands. The fix Sony describes is matching the shutter speed to the flicker cycle.
FAQ
Can You Use a Ring Light for Product Photography?
Yes, for small matte items, makeup flat lays and review videos where a face is in frame. A ring light sits around the lens, so it lights the product straight on and flattens its shape. On glossy products it also shows up as a bright ring in the surface. Use it off to one side as a key, or keep it for video.
How Do You Light White Products on a White Background?
Give the sweep its own light, as in the three-light setup above, so the paper goes white without pushing the product's exposure. Light the product from the side so its edges keep a soft shadow. Gray cards just outside the frame on both sides then draw a faint outline so it doesn't dissolve into the paper.
How Do You Light Black Products So They Don't Disappear?
Black surfaces show shape only through reflections, so the light has to be large and close. A big softbox near the product lays a broad, soft highlight across it, which is where texture appears. Expose so the darkest areas sit at dark gray, where stitching and grain still show.
Do Product Photography Lights Work for Product Videos Too?
Continuous lights do; strobes don't, because they only fire for an instant. Video also needs the light to cover the whole range the product moves through, so use bigger, softer sources and keep them farther back than you would for a still.
Conclusion
That black blob on a gray counter had a simple cause: one undirected light doing everything. Give each lamp one job and the leather comes back. Glass follows the same logic, except the light doing the job sits behind it.
Start with one lamp and a card, and add a light only when the photo shows a problem that light fixes. When you need the studio look before you own a single lamp, write the setup as a brief and let Image ads render it. Either way, write down the distances that worked. Product photography lighting earns its keep when next week's photos match this week's.





