The patterned teapot gets larger, yet the background barely changes. You asked for a cinematic orbit, but the clip gives you little evidence that the camera moved around anything.
To direct Seedance 2.5 Flash cinematic camera movement, describe the starting view, camera path, subject action, and final composition. Then inspect the changing background, overlapping objects, and visible sides of the subject. Those changes help distinguish a new viewpoint from a zoom or a spinning product.
The six prompts below turn that method into shots for products, interiors, and moving subjects. Each includes a specific acceptance check and a first revision if the shot misses its purpose. The workflow keeps the model, settings, and review method consistent so you can make useful decisions between takes.
Key takeaways
- Choose what the shot reveals before choosing its movement.
- Describe camera movement, subject movement, and framing separately.
- Seedance 2.5 Flash currently supports native output up to 720p.
- Review motion and continuity across the whole clip; a strong still frame cannot establish either.
- Break complex continuous paths into timed phases and allow for retries.
Each example below includes an eight-second GIF of the supplied generated take. The prompts describe the intended route; compare it with the visible result. P6 retains its original 12-second brief, but its supplied take is eight seconds.
What Seedance 2.5 Flash Can Control in a Camera Shot
Camera Direction Is a Prompt, Not a Guaranteed Path
A useful shot description separates four decisions. Framing determines how much of the subject appears. Camera angle determines where you look from. Camera movement describes how that viewpoint changes. Subject action describes what the person or object does while the camera moves.
Decide which part of the brief can vary. You might accept a 70-degree orbit that clearly reveals the handle, yet reject a 90-degree move that changes its shape. For a shot that must match another scene, the end position may matter more. This priority order helps you choose between imperfect takes without moving the goalposts after generation.
For a teapot shot, “medium close-up” sets the framing, “at body height” sets the angle, “sweep from front-left to rear-right” sets the path, and “stands motionless” fixes the subject. These instructions have different jobs. Packing them into “dynamic cinematic product shot” leaves those decisions open.
Treat the path as an intention you must inspect. The Seedance 2.5 Flash text-to-video parameter list on Atlas Cloud has no separate camera trajectory field. You describe the route in natural language rather than entering coordinates or moving a virtual camera on a timeline. Precise wording helps define the target; it does not establish that a generated clip reached it.
The Output Limits That Matter Before You Start
Seedance 2.5 Flash supports native output at 480p and 720p, as listed in the Seedance 2.5 Flash text-to-video specifications on Atlas Cloud. Seedance 2.5 Text-to-Video has separate resolution options. Check the complete model name whenever you read a tutorial or watch a sample; a Seedance 2.5 Text-to-Video demonstration does not establish how Seedance 2.5 Flash will behave.
The Seedance 2.5 Flash text-to-video schema on Atlas Cloud lists durations from 4 to 30 seconds, several aspect ratios, an audio switch, and MP4 or MOV output. This guide uses 16:9, 720p, MP4, and audio off, with five 8-second routes and a 12-second four-angle follow. Each route changes viewpoint in timed phases without repeating its opening angle.
A useful boundary is whether you need a plausible camera move or a precisely repeatable trajectory. For an editorial insert, you may accept a slightly different endpoint. For a shot that must line up with a live-action plate, that variation may be unacceptable. Write the tolerance into your acceptance criteria before you run.
If your client requires native 1080p, settle that requirement before developing a sequence around Seedance 2.5 Flash. A delivery constraint can change your model choice even when a camera test looks usable.
Choose a Camera Move That Reveals Something
Orbit, Truck, Crane, and Follow: What Changes in the Frame?
Give every move a reason. An orbit can reveal a handle or the side of a package. A truck across a table can establish depth between the foreground, product, and room. A crane can expose a surface that a counter initially hides. A follow shot can hold a moving person in a readable composition.
Write down the information the viewer should gain by the end. For the patisserie example, “reveal the cake tier tops and preparation area behind the counter” gives you a concrete destination. “Make the bakery cinematic” gives you no comparable test.
Consider the difference between showing a teapot's sculpted form and placing a watch within a workshop. An orbit makes the teapot's changing silhouette the subject of attention. A straight slider pass keeps the watch as an anchor while a nearby caliper and distant window establish depth. Both can work for a product insert, but they answer different questions for the viewer.
Scene design matters here. A plain object against a blank wall offers few clues about camera position. Place recognizable features at different distances: a napkin near the lens, a relief-pattern teapot in the middle, and window frames behind it. Those features give you something to compare as the viewpoint changes.
| Shot | Purpose | Camera path | Suitable task | Evidence to inspect |
|---|---|---|---|---|
| P1: Sweeping orbit | Reveal sculpted form | Front-left to right profile to high rear-right | Relief-pattern teapot | Floral relief stays attached as the spout and handle overlap changes |
| P2: Straight slider | Reveal openwork and depth | Left oblique through frontal to right oblique | Skeleton watch | Bridge openings, case corners, and layered parallax remain coherent |
| P3: Crane and boom | Reveal hidden top surfaces | Low front to elevated view to high diagonal | Patisserie centerpiece | Tier tops emerge; ribbons and chocolate arches retain their connections |
| P4: Diagonal retreat | Connect openwork detail to architecture | Close rail detail to full helix to low wide view | Spiral staircase | Treads, handrail, and mezzanine stay connected |
| P5: Overtake tracking | Inspect a moving product from several sides | Front-left to profile to rear-left as the cyclist passes | Patterned road bicycle | Frame triangles and jersey panels stay coherent through pedaling |
| P6: Descending follow | Inspect a moving outfit through height changes | High rear to right profile to low front to high frontal | Technical running outfit | Garment panels and vest connections persist across four angles |
Camera Movement vs Subject Movement vs Zoom
Zoom changes the field of view from a camera position. Moving the camera changes the viewpoint, which can alter perspective, parallax, and what one object hides behind another. A dolly zoom combines translation and focal-length changes; it is an additional effect you do not need for these first tests.
A rotating teapot can reveal its handle while the room remains fixed. That alone does not demonstrate an orbit. Watch both the product and its surroundings, including where the teapot meets the table.
Likewise, uniform sideways displacement across a flat-looking scene is weak evidence of a truck. Look for relative movement among depth layers. No single clue proves physically consistent motion, but several agreeing clues make your review more useful.
Write the Camera Path Before Adding More Adjectives
A Copyable Structure for Camera Movement Prompts
Use this editorial template:
Subject and action + environment + starting composition + camera path + ending composition + continuity requirements.
Name the camera move, describe its physical route in plain language, and assign times to changes in viewpoint. This editorial template keeps those decisions in a readable shot brief. It is a writing aid rather than a separate camera-control feature in Seedance 2.5 Flash.
Keep the environment concrete enough to inspect. “Warm café” describes mood. “A folded napkin near the table edge and tall windows behind the teapot” also supplies depth references. Add appearance details after the path makes sense.
Here is P0, the deliberately vague comparison prompt. It uses the same scene description as P1, with a general camera request.
P0 comparison settings: 720p, 16:9, 8 seconds, MP4, audio off.
plaintext1An ivory porcelain teapot stands motionless on a dark oak café table. It has a scalloped hexagonal body, raised cobalt-blue peony vines wrapping around its facets, a long S-curved spout, a pierced double-loop handle, and a fitted lid with a blue lotus finial. A folded linen napkin sits near the front edge of the table, with tall café windows in the background. Warm morning window light, realistic glazed porcelain, clearly readable relief patterns and silhouette. Cinematic camera movement, immersive atmosphere. One continuous shot.
Define the Start, Path, End, and Continuity
P1 below replaces that vague camera request with three timed viewpoints, a sweeping arc, and a final height change. The subject remains stationary. Those details make the output easier to evaluate even if the model interprets some of them loosely.
A start and finish also help expose conflicting instructions. P2 keeps a watch framed by panning while translating along a straight rail. Its distance and apparent size vary naturally. Adding a constant-distance requirement would imply an arc and conflict with that straight route.
For the comparison, identify landmarks before watching: the two handle openings, one cobalt peony, a napkin corner, and a vertical window frame. Check those same features at the beginning, middle, and end of each take. If the scenes differ substantially, compare how well each output meets its own path brief rather than treating different layouts as evidence of better camera control.
Keep that limitation in your notes. Matched scene descriptions make a practical prompt comparison, not a pixel-matched controlled experiment. A single favorable result cannot tell you which prompt has a higher success rate.
Generate and Inspect Your First Shot on Atlas Cloud
Set Up a 720p Text-to-Video Run
Use Atlas Cloud as the operating environment for this workflow. Open the Seedance 2.5 Flash text-to-video playground and check the complete model name before submitting.
The distinction matters because a familiar family name can hide a different variant or input mode. This exercise starts from text, with no uploaded reference image. You do not need to generate a starting image first.
| Field | First-shot setting |
|---|---|
| Model ID | bytedance/seedance-2.5-flash/text-to-video |
| Resolution | 720p |
| Aspect ratio | 16:9 |
| Duration | 8 seconds for P1 |
| Output format | MP4 |
| Generate audio | Off |
| Inputs | Text only |
| Seed | No seed field assumed; none is listed in the Seedance 2.5 Flash text-to-video schema on Atlas Cloud |
Follow this sequence:
- Select the settings above, then check the values that remain visible after each selection.
- Paste the complete P1 prompt from the product section.
- Inspect any displayed quote for this configuration before pressing Run.
- Submit once and wait for the actual completed state. Keep the job identifier if the interface provides one.
- Download the original output and save the prompt, settings, submission time, and completion time alongside it.
- Check the downloaded file's duration and dimensions before evaluating the shot.
Typing “8 seconds” into the prompt does not set the duration control. The form and the exported file need to agree with your notes. If a selection reverts or the output differs, record what actually happened.
Review the Whole Clip Before Choosing a Take
A useful Seedance 2.5 Flash cinematic camera movement test keeps the settings fixed while the shot brief changes. For each saved take, write one sentence describing what the camera actually appears to do. Use observations such as “moves right while the rider stays centered” rather than repeating the requested movement name. That sentence often exposes the gap between the brief and the clip.
Watch the original once at normal speed to judge the overall move. Watch it again for geometry and continuity. Use paused frames to investigate a problem you saw in motion.
For P1, follow the double-loop handle, a raised peony, the teapot's base on the table, and the window frames. A changing handle opening or sliding floral relief can mimic a new angle. A drifting contact point can suggest the product moved. A background that changes independently can make the whole scene feel unstable.
Keep the original download even when you publish a GIF. The GIF is useful for seeing the route inline, while the source file lets you examine fine edges and individual frames without confusing conversion artifacts with generation defects. Record any playback or conversion issue separately from a camera-path failure.
Record path execution, subject geometry, and continuity separately. A take might follow the intended arc yet deform the teapot. Mark that distinction so your next revision addresses the actual failure.
6 Camera Prompts for Products, Locations, and Moving Subjects
These shot briefs use patterned surfaces, open structures, and asymmetric details to make deformation easier to spot. Each camera route reaches a new view every two to three seconds. The six routes cover a tabletop orbit, a straight slider pass, a crane rise, an architectural retreat, an overtaking cyclist, and a descending runner follow. Their wording describes intended motion, not reviewed results.
Keep the key details large enough to inspect at 720p. Use crisp, controlled motion with natural acceleration between phases, readable edges, and no prolonged opening hold. Avoid heavy motion blur, slow motion, repeated viewpoints, and a clip spent only pushing in. Newly visible surfaces may appear as the camera moves; existing patterns and structural connections must remain attached to the same physical parts.
Product Shots: Sculpted Porcelain and an Openwork Timepiece
P1: Relief-pattern teapot, sweeping orbit. Settings: 720p, 16:9, 8 seconds, MP4, audio off.
plaintext1An ivory porcelain teapot stands motionless on a dark oak café table. It has a scalloped hexagonal body, raised cobalt-blue peony vines wrapping around its facets, a long S-curved spout, a pierced double-loop handle, and a fitted lid with a blue lotus finial. A folded linen napkin sits near the front edge of the table, with tall café windows in the background. Warm morning window light, realistic glazed porcelain, clearly readable relief patterns and silhouette. 2 3Create one continuous 8-second product shot. The teapot stays fixed relative to the table and napkin; only the camera moves. Keep the whole spout, handle, and lid inside the frame. Use a fixed focal length and a brisk, smooth camera move starting immediately. 4 50-2 seconds: Start at body height in a front-left three-quarter view, with the spout prominent. Sweep toward the front, showing how the raised flower vines cross the hexagonal facets. 62-5 seconds: Continue around the same side of the teapot toward its right profile, reaching roughly 135 degrees of total travel. Reveal the open spaces in the double-loop handle while the windows shift behind it. 75-8 seconds: Continue to roughly 180 degrees of total travel and lift to a high rear-right three-quarter view. Finish with the scalloped lid, lotus finial, handle attachment points, and rear floral relief visible together. 8 9Preserve the spout curvature, both handle openings, facet edges, lid fit, and the placement of every visible blue flower. Maintain a stable base-to-table contact point. No turntable rotation, cuts, pauses, reverse sweep, or return to the opening view. Keep the porcelain detail sharp enough to follow throughout the move.
Follow one large peony and its connecting vine as the camera passes the facet edge. The two handle openings, spout-to-body joint, and lid seam provide separate geometry checks. Their changing overlap should agree with the shifting window perspective.
If the teapot rotates, reinforce its fixed relationship to the napkin. If the relief slides across the porcelain, identify that flower explicitly in the next prompt revision. Inspect it before and after partial occlusion; a new viewing angle should not redraw its petals.

P1 inspection target: front-left, right-profile, and high rear-right views; stable floral relief, spout, lid, and two handle openings.
P2: Skeleton watch, straight slider pass. Settings: 720p, 16:9, 8 seconds, MP4, audio off.
plaintext1A stationary skeleton wristwatch is mounted upright on a narrow dark display stand on a walnut workbench. The watch has an octagonal brushed-steel bezel, four exposed corner screws, three broad curved bridges over visible gears, a ridged crown on its right side, and an articulated bracelet with alternating polished and engraved chevron links. The mechanism and hands are stopped for this inspection shot. An open brass caliper lies in the near foreground; a gridded workshop window stands several meters behind. Soft neutral side lighting makes the engraved links and open spaces readable without flashing reflections. 2 3Create one continuous 8-second shot at watch-face height with a fixed focal length. Translate the camera along one straight left-to-right slider path in front of the display. Gently pan to retain the watch in frame; allow its apparent size to change naturally as the distance changes. Keep the full bezel and several bracelet links visible. 4 50-2 seconds: Begin from an oblique left three-quarter angle that exposes the left case thickness and layered bracelet joints. Start translating immediately. 62-5 seconds: Pass across the frontal dial view. The three curved bridges and four bezel screws become clearly separated; the nearby caliper shifts faster than the distant window grid. 75-8 seconds: Continue along the same straight rail to an oblique right three-quarter view, revealing the crown and the right case flank. Finish slightly past the watch centerline without reversing. 8 9Keep the bezel octagonal, all four screws attached to their original corners, and every bridge, gear, crown ridge, and chevron engraving fixed to its own part. Preserve connected bracelet joints. No object rotation, orbit, digital zoom, cuts, or slow hold. Use brisk, controlled translation with readable detail throughout.
This pass uses a straight rail rather than P1's curved route. The left case thickness, frontal bridge layout, and right crown should become readable in sequence. The foreground caliper and rear window supply independent parallax evidence.
Check the large bridge openings and bracelet joints rather than relying only on tiny gear teeth. If the camera loops around the watch, restate the straight rail and its endpoints. A single frontal view with sliding engravings fails the geometry check even if the background moves.
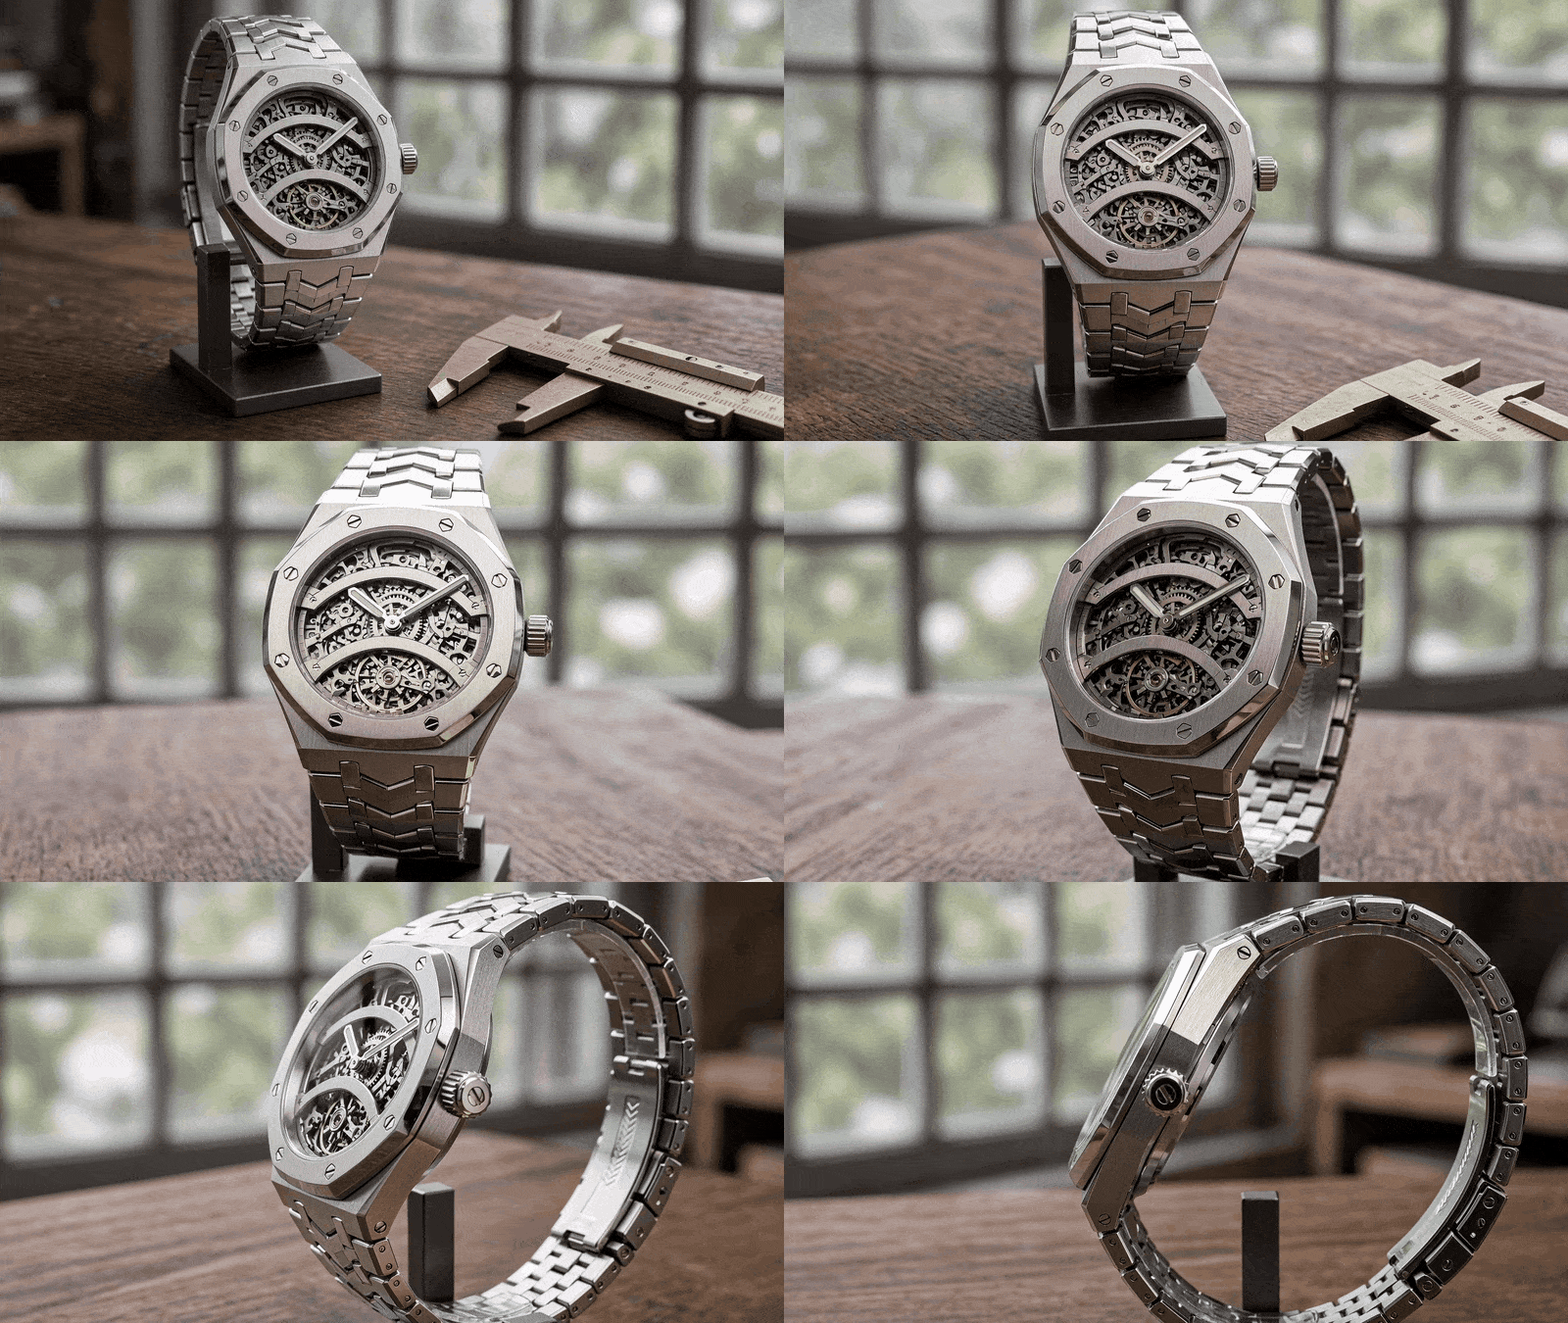
P2 inspection target: left flank, frontal openwork, and right crown; stable octagonal bezel, bridge openings, bracelet links, and layered parallax.
Location Reveals: Layered Patisserie and a Spiral Staircase
P3: Patisserie centerpiece, crane-and-boom reveal. Settings: 720p, 16:9, 8 seconds, MP4, audio off.
plaintext1An empty neighborhood patisserie in warm morning light. A three-tier hexagonal celebration cake stands on a carved wooden counter. Each tier carries broad emerald-and-ivory interlaced icing ribbons; six open chocolate arches surround the middle tier, and a fan of curled chocolate leaves crowns the top. Behind it are arched bread shelves, a tiled preparation counter, and a geometric mosaic floor. Realistic pastry materials, clearly separated arches, straight shelves, and coherent room depth. 2 3Create one continuous 8-second crane shot with a fixed focal length. Keep the entire cake visible and its tiers large enough to inspect. Move immediately with a brisk, smooth rise rather than a prolonged tilt from one position. 4 50-2 seconds: Start just below counter height from the cake's front, showing the stacked hexagonal edges and open chocolate arches against the shelves. 62-5 seconds: Lift the camera above the cake while tilting down to keep it framed. Reveal the previously hidden top surfaces of the tiers and the preparation counter behind them. 75-8 seconds: Boom diagonally right while completing the rise into a steep high three-quarter view. Reveal the spacing between the chocolate leaves, the rear cake edges, and the mosaic aisle behind the counter. 8 9The cake and furnishings stay stationary. Preserve all three tiers, all six chocolate arches and their attachment points, the interlaced ribbon pattern, and the carved counter edge. Reveal hidden surfaces by changing position. No cuts, orbit around the cake, zoom-only move, collapsing tiers, or regenerated icing patterns. Maintain readable detail through the height change.
The front silhouette, exposed tier tops, and high diagonal view each reveal different structure. Trace an icing ribbon around a corner and check that an arch keeps the same two attachment points as the viewpoint rises. The floor behind the counter must emerge through changing occlusion.
If the result only tilts down, make the vertical displacement explicit: lift from below counter height to above the cake before booming right. If an arch merges with another, reduce its occlusion in the staging while retaining the three tiers and patterned surface.
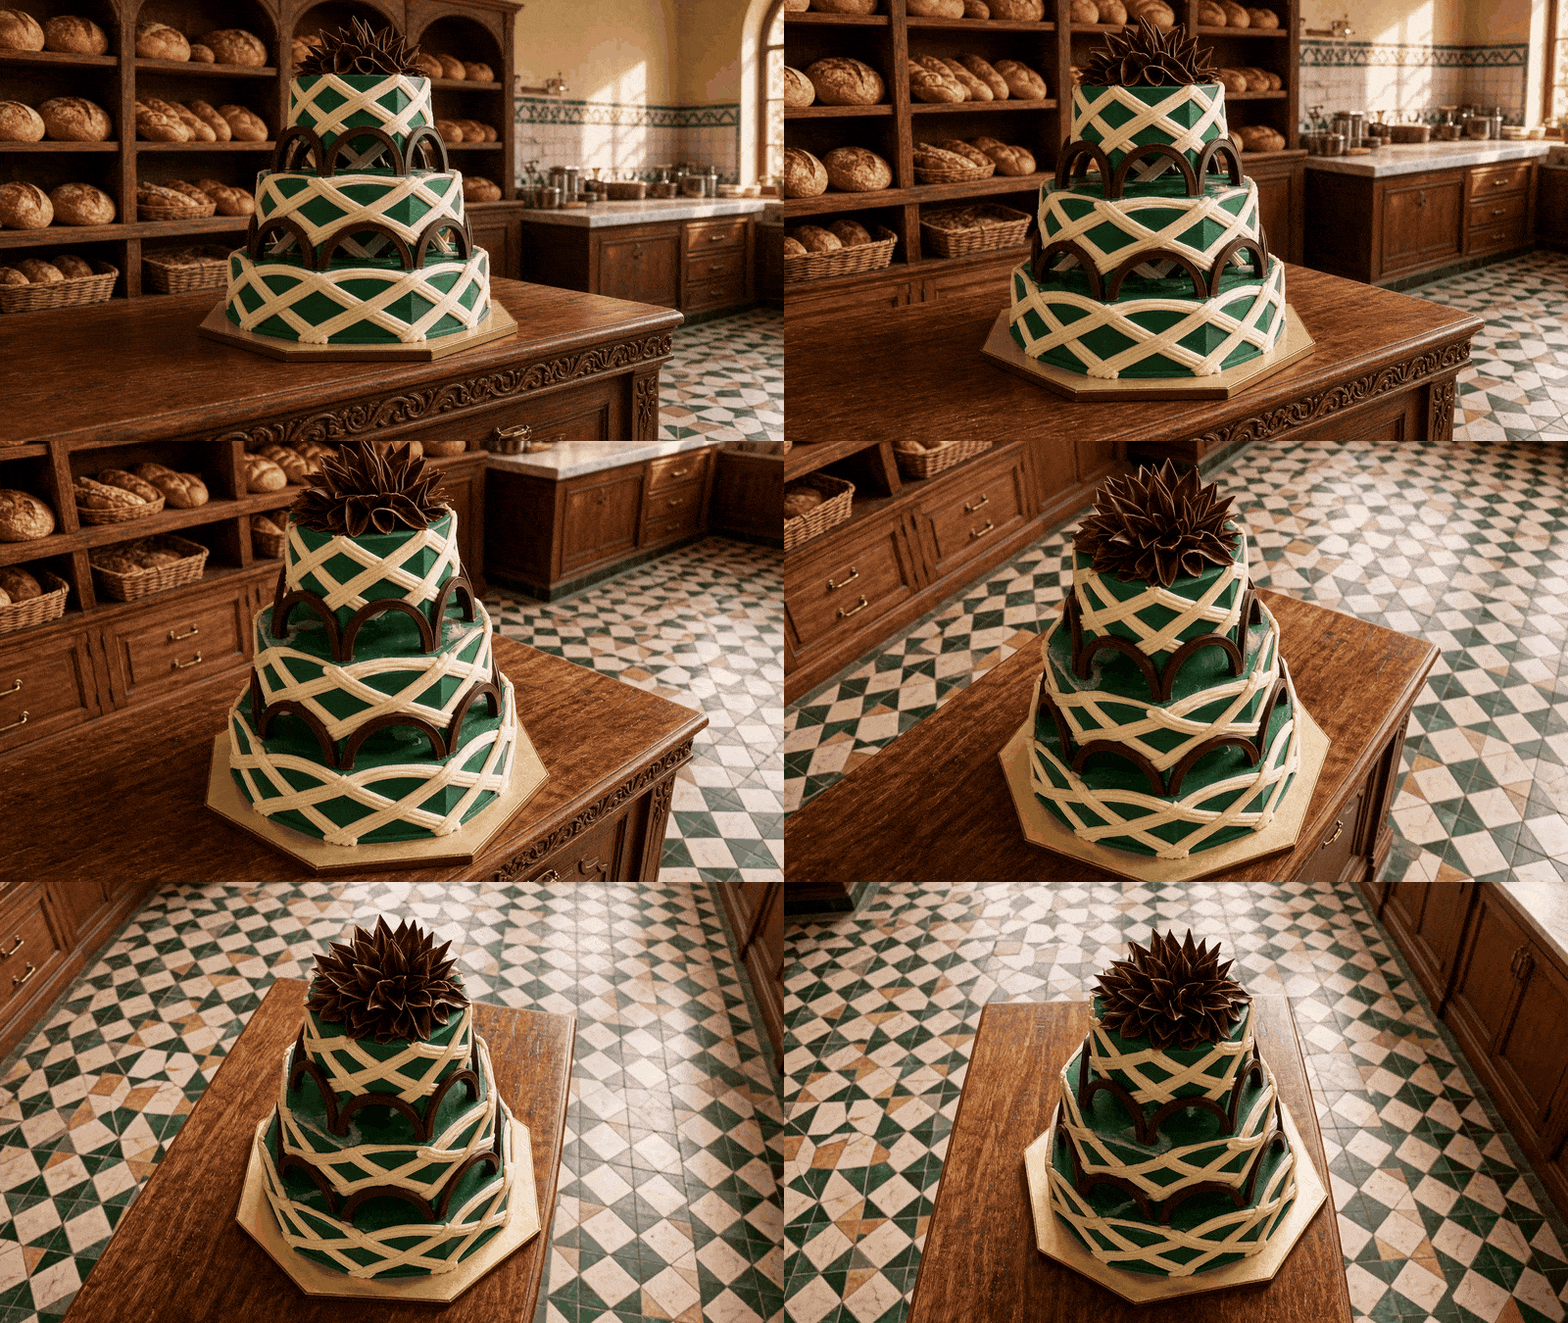
P3 inspection target: front silhouette, newly exposed tier tops, and high diagonal room view; stable ribbon paths, six arches, and counter geometry.
P4: Spiral staircase, diagonal retreat and low finish. Settings: 720p, 16:9, 8 seconds, MP4, audio off.
plaintext1An empty sunlit gallery atrium contains a freestanding spiral staircase with wedge-shaped oak treads around a dark steel central column. A continuous brass handrail follows the helix, supported by large repeating open diamond balusters. The staircase leads to a curved mezzanine with scalloped plaster edges. A patterned terrazzo floor and tall rectangular windows give fixed depth references. Realistic architecture, crisp structural joints, warm daylight. 2 3Create one continuous 8-second architectural shot using a fixed focal length and a brisk, controlled camera route. The camera travels through the open atrium outside the staircase footprint, never through the treads, handrail, or central column. 4 50-2 seconds: Begin near the outside of the lowest stair at handrail height in an oblique view. Frame several complete diamond openings, the first wedge treads, and part of the central column. 62-5 seconds: Travel backward-left across the open floor, revealing the staircase's full helical silhouette and its connection to the mezzanine. The near balusters separate from the distant window edges as their overlap changes. 75-8 seconds: Continue the diagonal retreat while lowering the camera toward knee height and tilting upward. Finish in a low wide view that reveals the tread undersides and the curve of the mezzanine above. 8 9Keep the helix pitch, tread connections, diamond openings, continuous handrail, and mezzanine attachment unchanged. Apparent scale decreases naturally during the retreat; physical dimensions stay stable. No cuts, focal-length zoom, repeated angle, reverse travel, bending column, or stairs appearing from nowhere.
This route starts with an openwork detail and finishes beneath the larger structure. It differs from P3's upward reveal: the camera retreats and lowers, exposing the undersides of the treads. Diamond openings and the rail-to-mezzanine joint make structural drift visible.
If the result merely widens the frame, specify that the camera passes backward-left beyond the first baluster so its overlap with the central column changes. Check that the handrail remains continuous through partially hidden sections instead of reconnecting to a different tread.
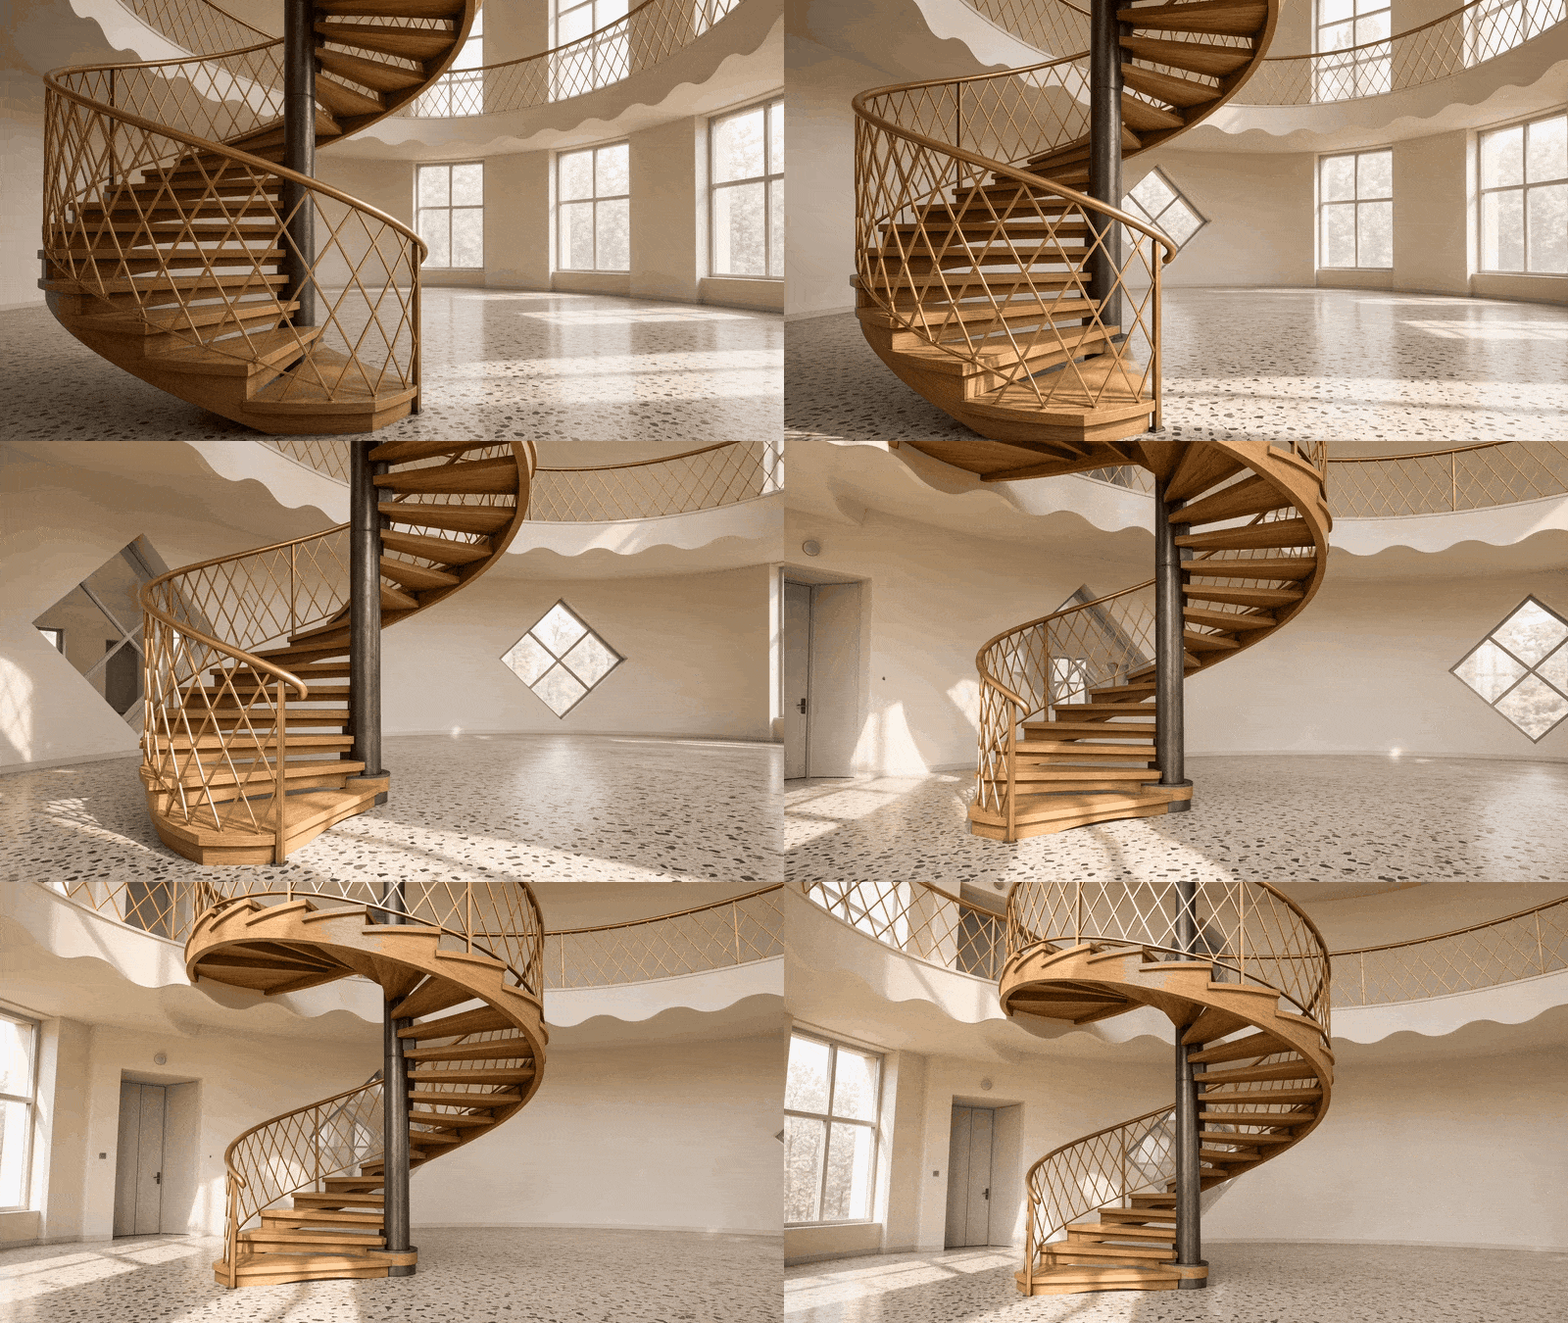
P4 inspection target: open diamond detail, full helix, and low view of tread undersides; continuous handrail and stable stair connections.
Moving Subjects: An Overtaking Bicycle and a Descending Runner Follow
P5: Patterned road bicycle, front-to-rear tracking. Settings: 720p, 16:9, 8 seconds, MP4, audio off.
plaintext1An adult cyclist rides steadily along a wide, empty riverside path. The rider wears a fitted teal jersey with broad asymmetric cream zigzag panels. The road bicycle has an angular red frame with an open triangular main frame, a clearly visible rear triangle, curved drop handlebars, deep-section rims with bold white curved graphics, and two bottle cages. A low railing borders the river; trees stand farther away. Warm late-afternoon light, realistic anatomy and mechanical connections, clean readable surface patterns. 2 3Create one continuous 8-second tracking shot from the cyclist's left side, using a fixed focal length. Keep the full bicycle and rider inside the frame. The cyclist rides at a constant pace while the camera varies its forward speed to let the bicycle overtake it. Keep enough lateral clearance for each changing view. 4 50-2 seconds: Track from a low front-left three-quarter position, showing the front fork, drop bars, and front rim graphic as the cyclist approaches alongside. 62-5 seconds: Move slightly slower than the cyclist so they draw level with the camera. Reach a full left-side profile, with both frame triangles, bottle cages, and natural pedaling clearly visible. 75-8 seconds: Let the cyclist move ahead, reaching a rear-left three-quarter view; then match speed to hold that final angle. Reveal the seat stays and rear wheel while railing posts pass faster than the distant trees. 8 9Keep the frame tubes, fork, drop bars, bottle cages, and jersey panels attached to the same parts. Rim graphics rotate with their wheels; they do not remain fixed on screen. Preserve natural leg articulation, connected pedals, and round wheels. No cuts, slow motion, stationary side view for the whole clip, camera crossing through the rider, or return to the first angle. Use crisp motion with enough shutter clarity to inspect the frame.
The rider's overtake creates front, side, and rear views without copying the stationary product orbit. Follow the two frame triangles and the jersey's large zigzag panels. Distinguish expected wheel rotation and fabric folds from a rim changing shape or a panel migrating across the torso.
If the rider leaves frame, increase lateral clearance and clarify when the camera resumes matching speed. If the frame breaks during pedaling, simplify the rider's action while keeping the three viewpoint phases; inspect the crank and rear triangle through the middle of the take.
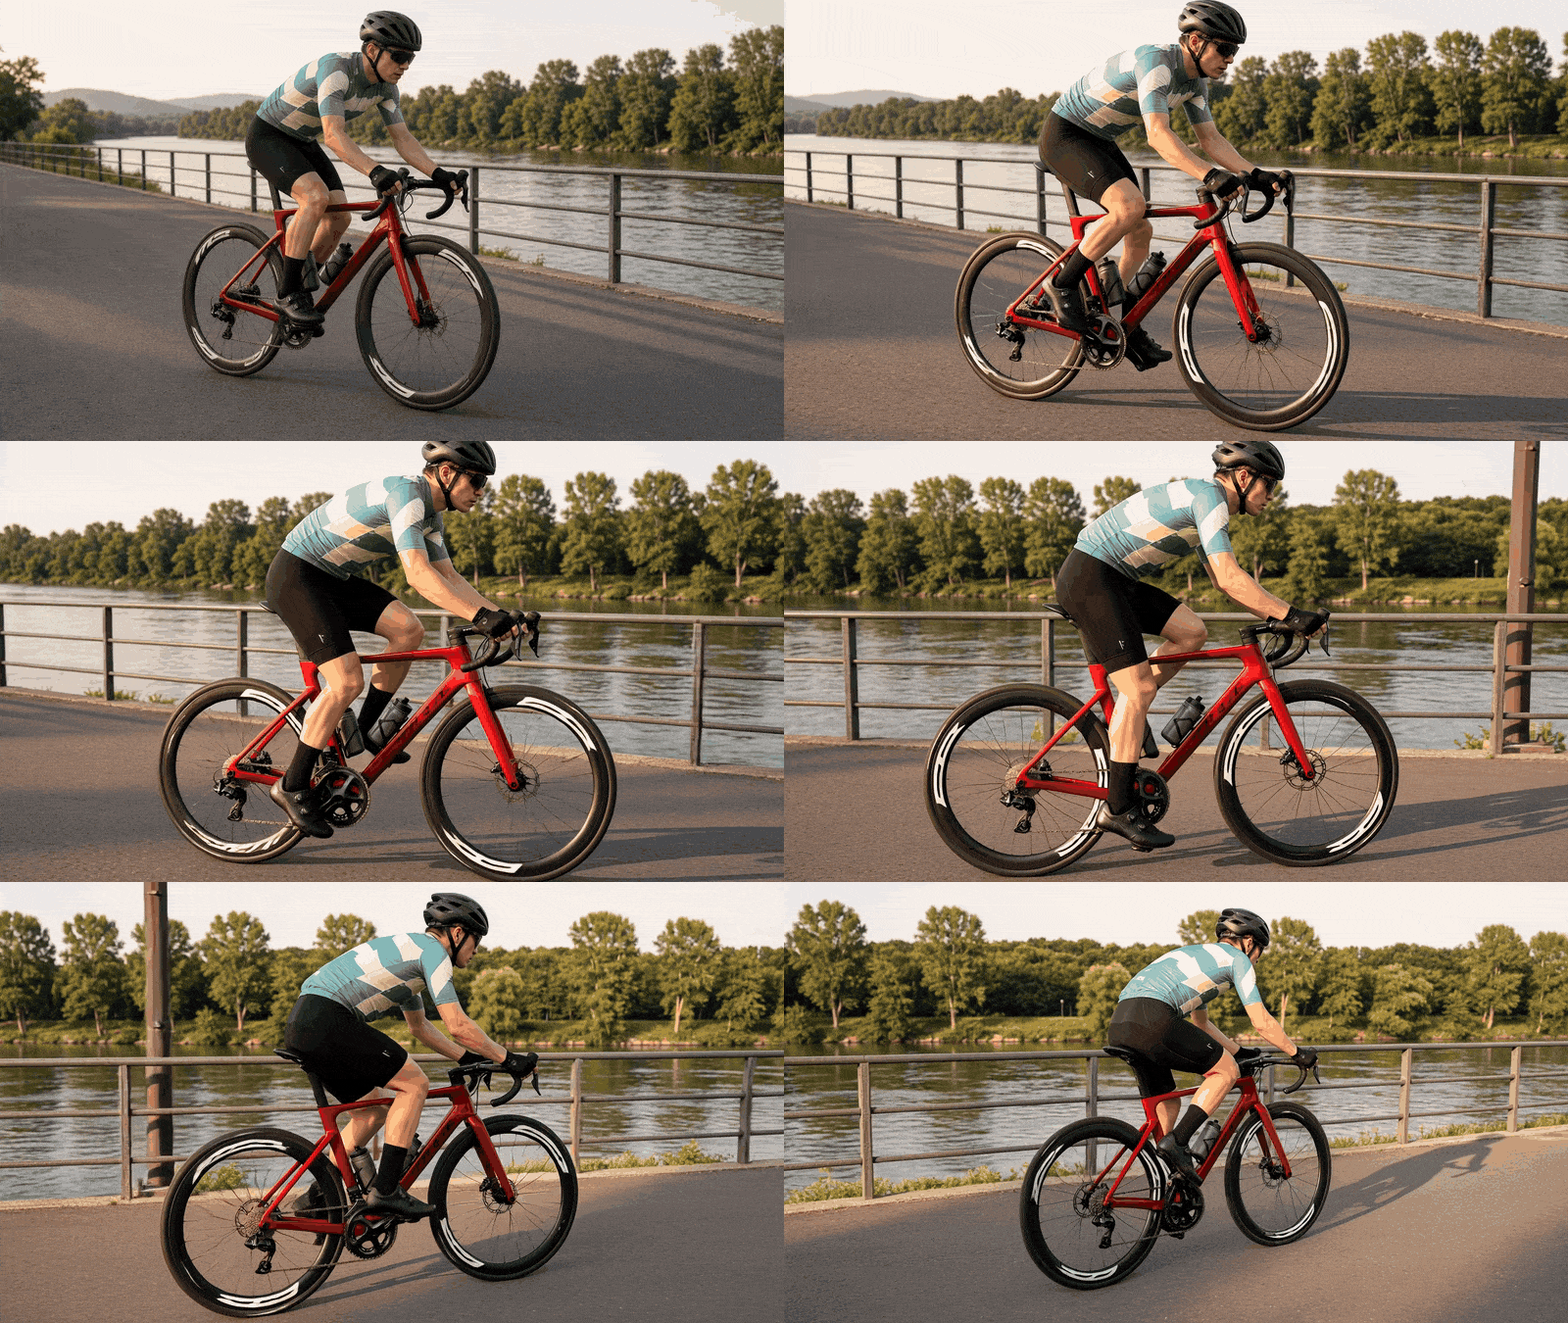
P5 inspection target: low front-left, side profile, and rear-left views; stable frame triangles, handlebar shape, jersey panels, and wheel geometry.
P6: Technical running outfit, descending four-angle follow. Brief settings: 720p, 16:9, 12 seconds, MP4, audio off.
plaintext1An adult runner in a technical trail-running outfit jogs steadily along a wide, empty stone-paved path through an open sculpture garden. The fitted jacket has large rust-orange and charcoal interlocking chevron panels, a diagonal cream zipper, and one asymmetric chest pocket. A close-fitting hydration vest has two front flasks and crossed rear straps. The shoes have sculpted split heels and bold contrasting side panels. Low curved stone benches, patterned paving, and distant trees create clear depth layers. Soft late-afternoon light, realistic anatomy and fabric movement, no loose flapping accessories. 2 3Create one continuous 12-second stabilized camera take with a fixed focal length. Use a decisive new angle every three seconds, smooth transitions, and a steady jogging pace. Keep the full runner visible and the outfit details large enough to read. The camera uses open space above and beside the path, avoiding benches and the runner. 4 50-3 seconds: Start in a steep high rear three-quarter follow, showing the crossed vest straps and the path ahead. Descend immediately toward shoulder height while keeping the runner centered. 63-6 seconds: Sweep outward to the runner's right side and descend to hip height, reaching a full side profile that exposes the diagonal jacket seams and sculpted shoe heels during natural strides. 76-9 seconds: Accelerate forward along a wide arc outside the running line to reach a low front-right three-quarter view. Reveal the two front flasks, diagonal zipper, and asymmetric chest pocket while continuing to track. 89-12 seconds: Move farther ahead and rise to a high frontal three-quarter view, looking back toward the approaching runner and the garden receding behind. Finish on this new composition without returning overhead or behind. 9 10Preserve the jacket panel boundaries, zipper direction, pocket placement, vest strap connections, both flasks, shoe construction, and the same runner throughout. Fabric flexes with the body but patterns remain sewn to their original panels. No cuts, teleports, repeated angle, body warping, slow motion, or extended hold. Maintain clear travel direction and readable detail during every transition.
This descending route begins above and behind, moves to the right-side profile, overtakes into a low front angle, and ends ahead at a higher angle. P5 stays near bicycle height while the cyclist overtakes; P6 changes height and lets the camera overtake the runner. The two action examples therefore test different routes.
Inspect the crossed rear straps before they leave view, then the front flask count and diagonal zipper as those surfaces appear. The jacket panels may fold and become foreshortened, but their boundaries should not detach or change sides. The sculpted shoe heels should remain recognizable through repeated strides.
Review transitions around 3, 6, and 9 seconds. A sudden viewpoint jump breaks the one-take requirement even if each individual angle looks coherent. If the route fails, first simplify the descent while retaining the sequence of rear, side, and front views. Time ranges define the intended pace; inspect the actual output rather than assuming exact timing.
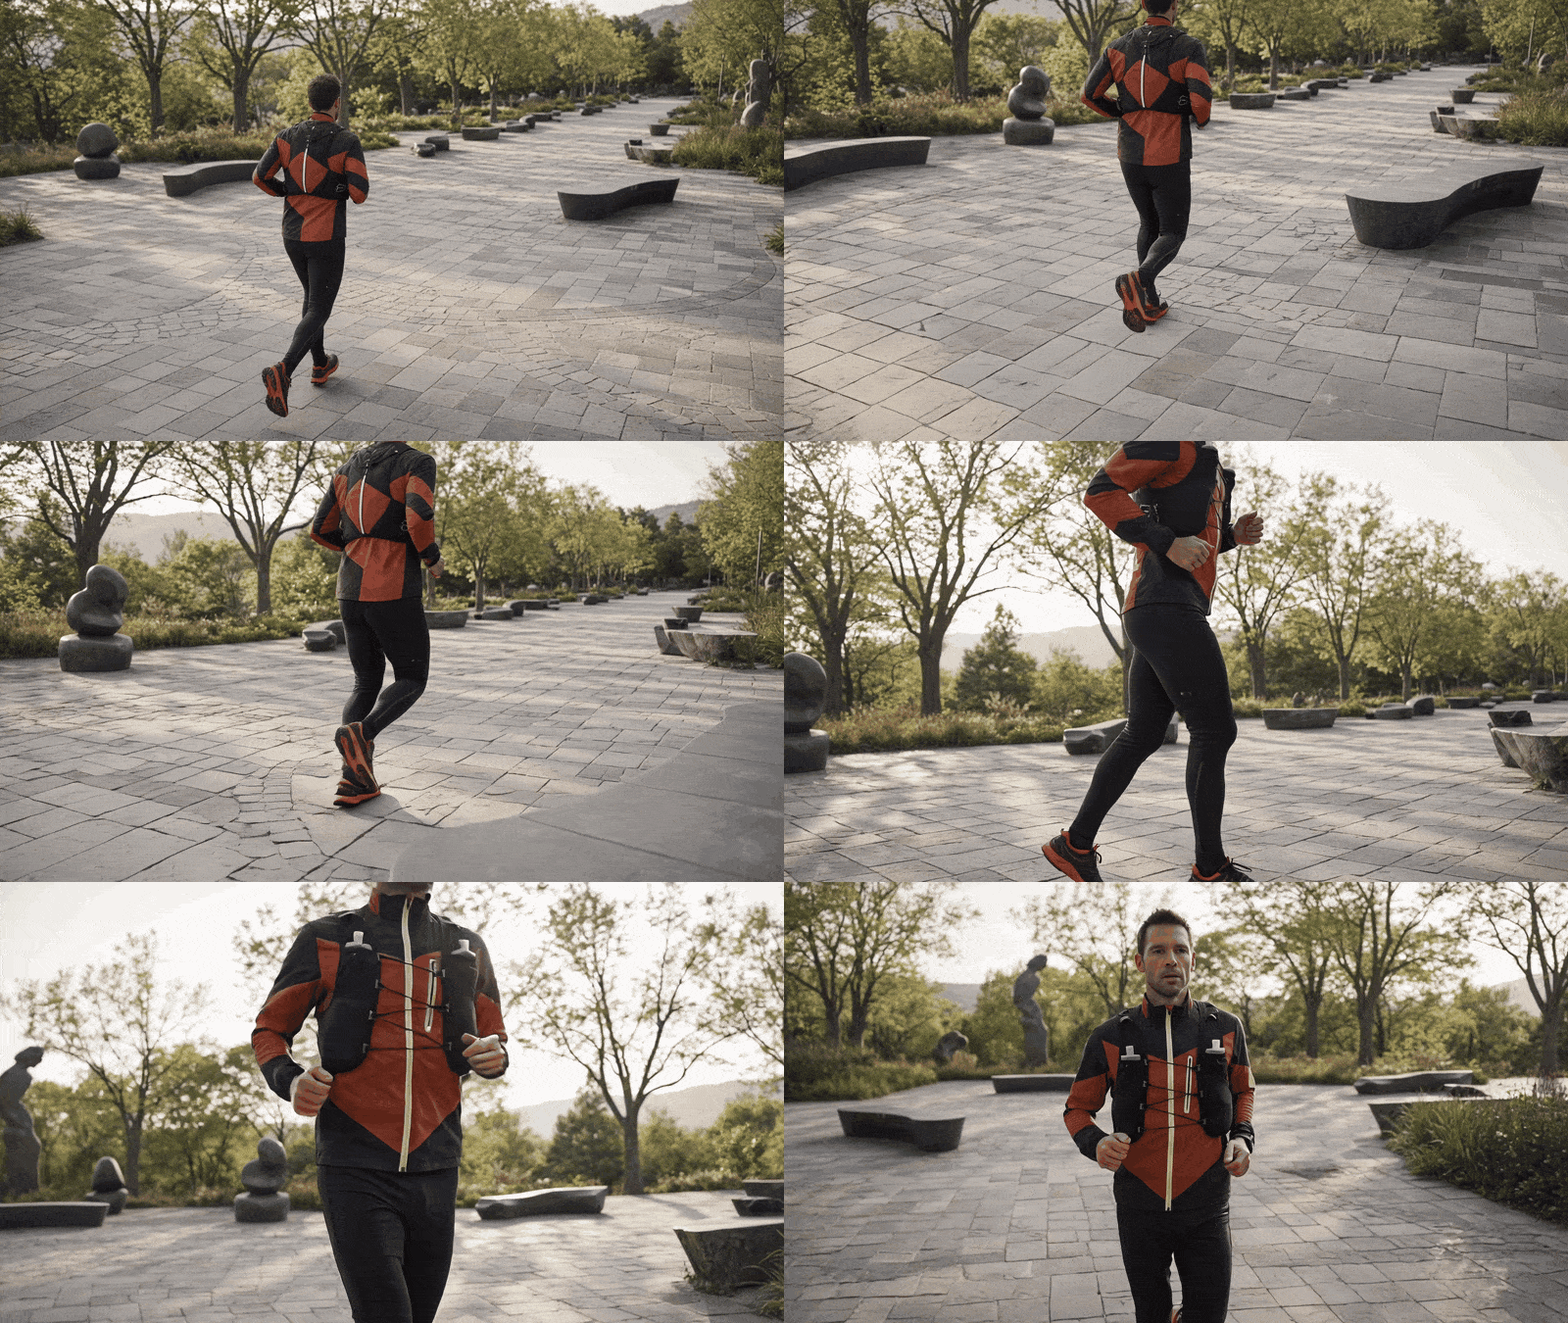
P6 supplied take: eight seconds, compared with the 12-second brief above. Inspect the rear-to-front transition, garment panels, vest connections, flasks, shoe construction, and any loss of full-body framing. The GIF preserves the complete supplied clip.
Fix 5 Camera Movement Failures Before You Rerun
When the Camera Zooms, the Subject Spins, or the Scene Warps
Inspect the symptom before rewriting the prompt. If the scene looks closer but depth relationships stay unchanged, examine the path instruction. If the product reveals another side while its surroundings stay fixed, examine subject motion. If shelves bend during a reveal, examine geometry and occlusion.
When a route fails, remove a conflicting instruction before adding more camera terms. For example, a straight slider path and a constant camera-to-subject distance imply different routes. Resolve that conflict, then review a fresh take against the same landmarks.
| Symptom | Check first | Change one instruction next |
|---|---|---|
| Frame only enlarges | Does the prompt describe a new camera position and depth references? | Add a physical destination and foreground/background relationship |
| Product rotates | Is the product explicitly fixed within the scene? | State that the product remains fixed relative to nearby objects |
| Background stretches or objects deform | Is the route large or heavily occluded? | Shorten the route or remove one occluding object |
| Unexpected cut | Does the timeline demand too many events? | Remove one phase and retain the continuous-shot requirement |
| Subject leaves frame or timing slips | Are tracking speed and ending composition clear? | Simplify subject action, then specify its framing relationship |
Change One Instruction, Then Check Again
Keep an exact prompt revision beside each output. “Changed orbit” is too vague to reconstruct. Save the original sentence and its replacement, with the settings and result. Review the same landmarks in both clips.
Use three practical outcomes: usable for the intended purpose, partly follows the path but needs revision, or misses the path. Add a separate geometry note. This prevents a take with convincing motion and a broken bicycle from disappearing into an undifferentiated “pass.”
For a small evaluation, you could run P0 through P6 three times each: 21 outputs and 180 seconds of requested video. That is a proposed test design, not a claim that these runs occurred. Report the actual sample size if you perform it, and retain unsuccessful takes.
Set your acceptance threshold around the clip's use. A brief background insert may tolerate a small endpoint variation; a clear product demonstration may depend on the handle staying intact throughout. Name that requirement before selecting a take. Changing the definition of success after seeing the outputs makes your record less useful for the next shot.
A single changed instruction makes comparisons easier to interpret, though uncontrolled generation still limits causal conclusions. Continue until you can identify a usable take or explain which requirement remains unresolved. Repeatedly adding adjectives gives you neither.
When Seedance 2.5 Flash Is Enough, and When the Delivery Needs More
Check Resolution Before Committing to a Final Render
Evaluate Seedance 2.5 Flash for camera blocking, short previews, and work where 720p meets the delivery specification. For native 1080p, check the Seedance 2.5 Text-to-Video specifications before committing.
Regeneration on a different variant can change composition and motion. Upscaling an existing take preserves its frame sequence while processing its appearance, but cannot make that take a native higher-resolution generation.
| Delivery requirement | Resolution decision | Accept regeneration? | Fields to check |
|---|---|---|---|
| Camera previsualization | 720p may meet the task | Usually part of exploration | Duration, ratio, variant |
| Finished 720p clip | Check the delivery specification | Only if the take needs revision | Actual dimensions, format |
| Native 1080p delivery | Evaluate a supporting variant | Required if starting again from text | Native resolution, input mode |
| More editing or extension | Match the next workflow | Decide whether the approved take must stay | Accepted inputs, format, editing support |
Budget for Usable Takes, Not Just Generated Seconds
Check the current model directory and pricing and the quote for your chosen configuration. A catalog starting rate does not establish the bill for every resolution, duration, and audio setting. Offers can also expire.
Agree on a retry limit before a production session. If a shot needs a specific final angle, count only takes that reach it with acceptable geometry. If you only need a brief sense of movement, a wider range may qualify. The acceptance rule determines the denominator, so two teams can report different usable-shot costs from identical spending.
Calculate cost per usable shot as actual spend for a test group divided by the number of takes that meet your acceptance criteria. If none qualifies, report the spend with zero usable takes. Test-environment credits do not establish a production bill.
For Seedance 2.5 Flash cinematic camera movement, choose one prompt, run it on the same model page, and judge the complete take against its path and continuity checks.
Frequently Asked Questions
How Do I Keep Patterns and Complex Shapes Consistent Across Camera Angles?
Choose visible features that are easy to follow: a large flower crossing a porcelain facet, an open watch bridge, or a jacket panel meeting a seam. State which parts remain fixed and which can move naturally. Keep those details large in frame and avoid hiding them all at once. With Seedance 2.5 Flash, review the intermediate frames as well as the opening and ending views. A changing perspective can compress a pattern visually, but a flower should not slide across the surface or a structural opening reconnect to a different part. Reject or revise a take when that happens.
How Can I Get Faster Camera Changes Without Repeating the Same View?
Give each phase a different destination and a short time range. For an eight-second shot, use 0-2 seconds for the opening move, 2-5 seconds for the second angle, and 5-8 seconds for the final angle. Ask for movement immediately, a continuous route, and a new ending composition. Keep the travel distance plausible so the camera has time to reach each position. For Seedance 2.5 Flash, describe that route directly instead of relying on “dynamic” or “cinematic.” Check the generated clip for an opening hold, a reversed sweep, or a return to the first angle.
Can I Reuse a Seedance 2.5 Flash Camera Prompt for a Vertical Video?
You can reuse the movement idea, but rewrite the framing. A side-on bicycle that fits comfortably across a wide frame may be cropped in 9:16. Specify how much of the rider stays visible, leave space in the travel direction, and reconsider the ending view. Then check background references again. Switching the ratio alone does not resolve those composition choices.
Will Seedance 2.5 Flash Reproduce the Exact Same Camera Path?
Treat each output as a new take. Generation variability, model updates, and setting changes can affect the route. The Seedance 2.5 Flash text-to-video schema on Atlas Cloud does not list a seed control, so this workflow assumes no fixed seed. Save the original file and its complete settings when you approve a shot. Keeping the prompt preserves your brief, not an exact reproduction guarantee.
Do Lens Names and Camera Brands Make the Movement More Accurate?
Lens descriptions can communicate an intended look or perspective, but they do not define a camera route. Prioritize the starting position, travel direction, subject relationship, and destination. Add lens language when it serves a visible purpose, such as requesting a fixed focal length during a pullback. A camera brand name supplies no missing instruction about where the viewpoint should go.