在大多數濾鏡應用程式中,只要點一下「寸頭」按鈕,就會得到一個隨機的頭髮長度。它不會告訴你,你的頭型搭配露出頭皮的 #1 推剪(3mm)、較濃密的 #3 刷剪(10mm),還是 #4 頂部搭配太陽穴處低漸層,哪一種看起來更好。
一般濾鏡會忽略頭型。使用 AI 換髮型工具,你可以透過提示詞控制剪髮。設定你的推剪號數、漸層位置與髮際線修整,然後在預約之前先檢視生成的造型。
為什麼一般寸頭濾鏡無法呈現推剪長度與漸層線
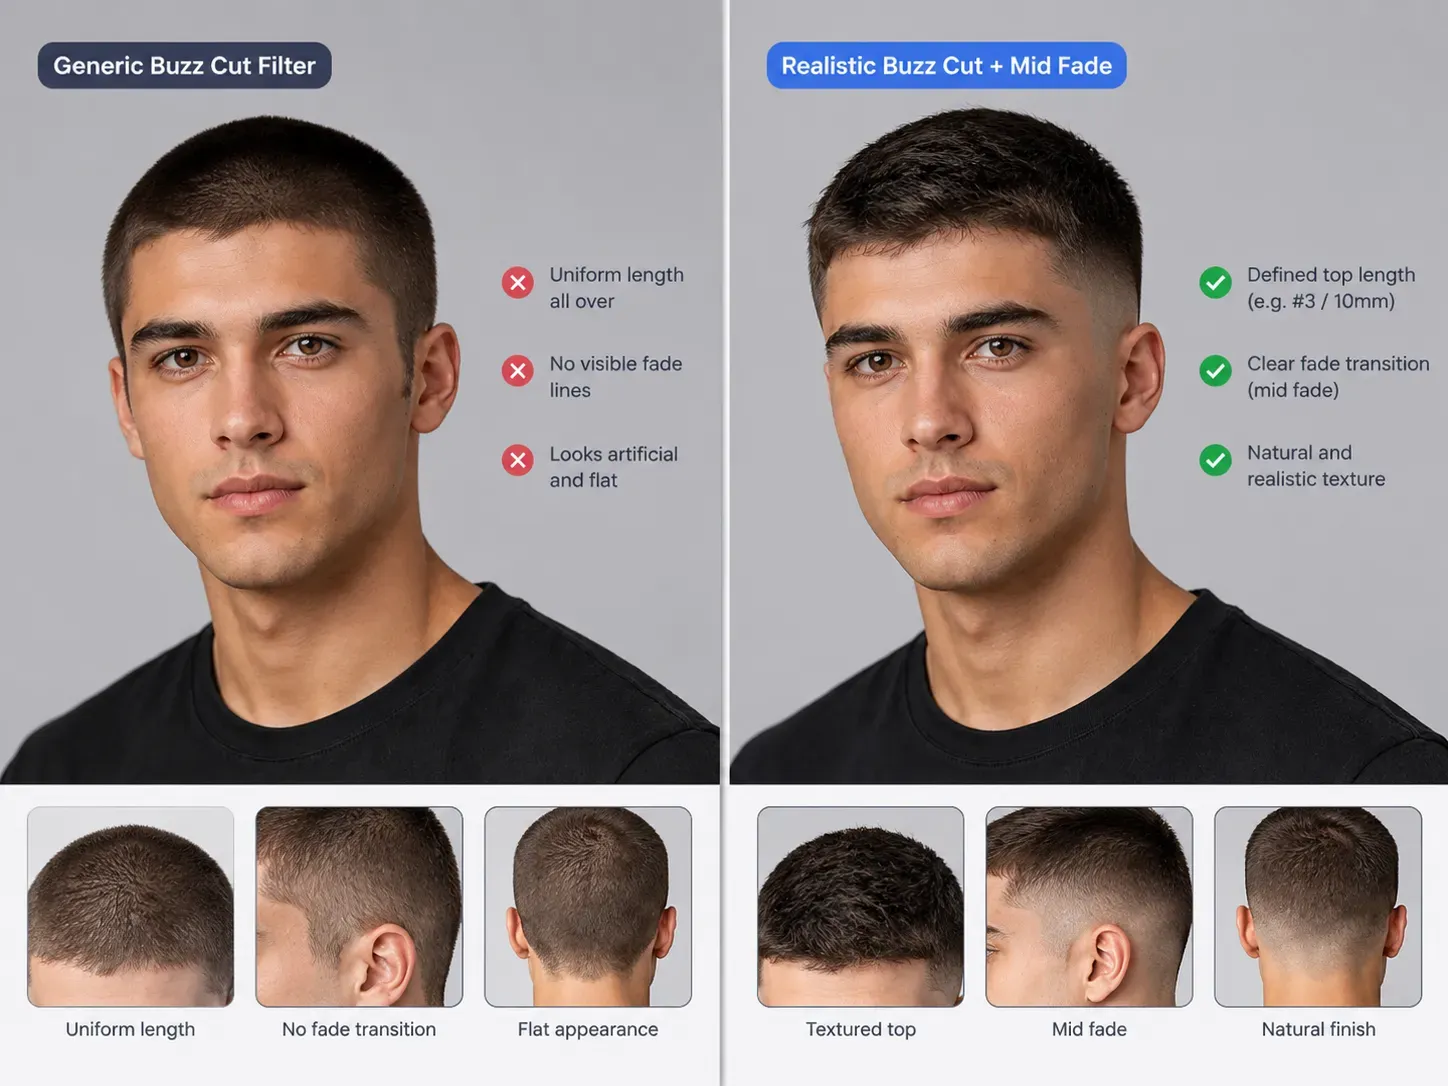
大多數在 "buzz cut filter" 搜尋結果中排名靠前的工具,可分為三種技術類型。只有其中一種能讓你指定頂部與兩側實際上應該多短:
| 濾鏡類型 | 代表性工具 | 如何編輯你的頭髮 | 推剪號數與漸層控制 | 最佳使用情境 |
| 即時 AR 相機鏡頭 | TikTok 與 Snapchat 寸頭特效 | 使用即時頭部追蹤與虛擬頭髮疊加來模擬較短的頭髮 | 多為固定,對推剪長度或漸層位置幾乎沒有控制 | 快速髮型預覽與反應影片 |
| 預設式 AI 工具 | YouCam 預設模式、Media.io、AILabTools | 套用預設髮型,或從上傳的照片生成預先定義的短髮造型 | 取決於可用的預設;部分提供漸層變化,但細節自訂有限 | 快速比較常見的寸頭造型 |
| 提示詞驅動的 AI 編輯器 | Atlas Cloud 免費 AI 換髮型工具、Fotor 自訂提示詞 | 使用文字指令,從上傳的照片生成自訂髮型 | 可解讀推剪號數、近似頭髮長度、漸層樣式、髮際線修整與髮色 | 在去找理髮師之前測試特定的剪髮組合 |
TikTok 與 Snapchat 的 AR 鏡頭通常是在你現有的頭髮上疊加一頂帽子,而非取代它。對於濃密、捲曲或長髮的人來說,這會讓你的頭看起來不自然地寬。
網頁版濾鏡在靜態照片上效果較好,但一般寸頭工具往往忽略推剪長度與漸層的差異。#1 極短剃剪看起來與搭配中漸層的 #4 寸頭截然不同。若想呈現完全剃光的光頭,請改用光頭濾鏡。
將推剪號數與漸層樣式轉換成 AI 提示詞
單純的「寸頭」提示詞預設為均勻的 #2 或 #3 長度。若要預覽特定造型,請定義三個細節:頂部推剪尺寸、兩側漸層高度與髮際線形狀。
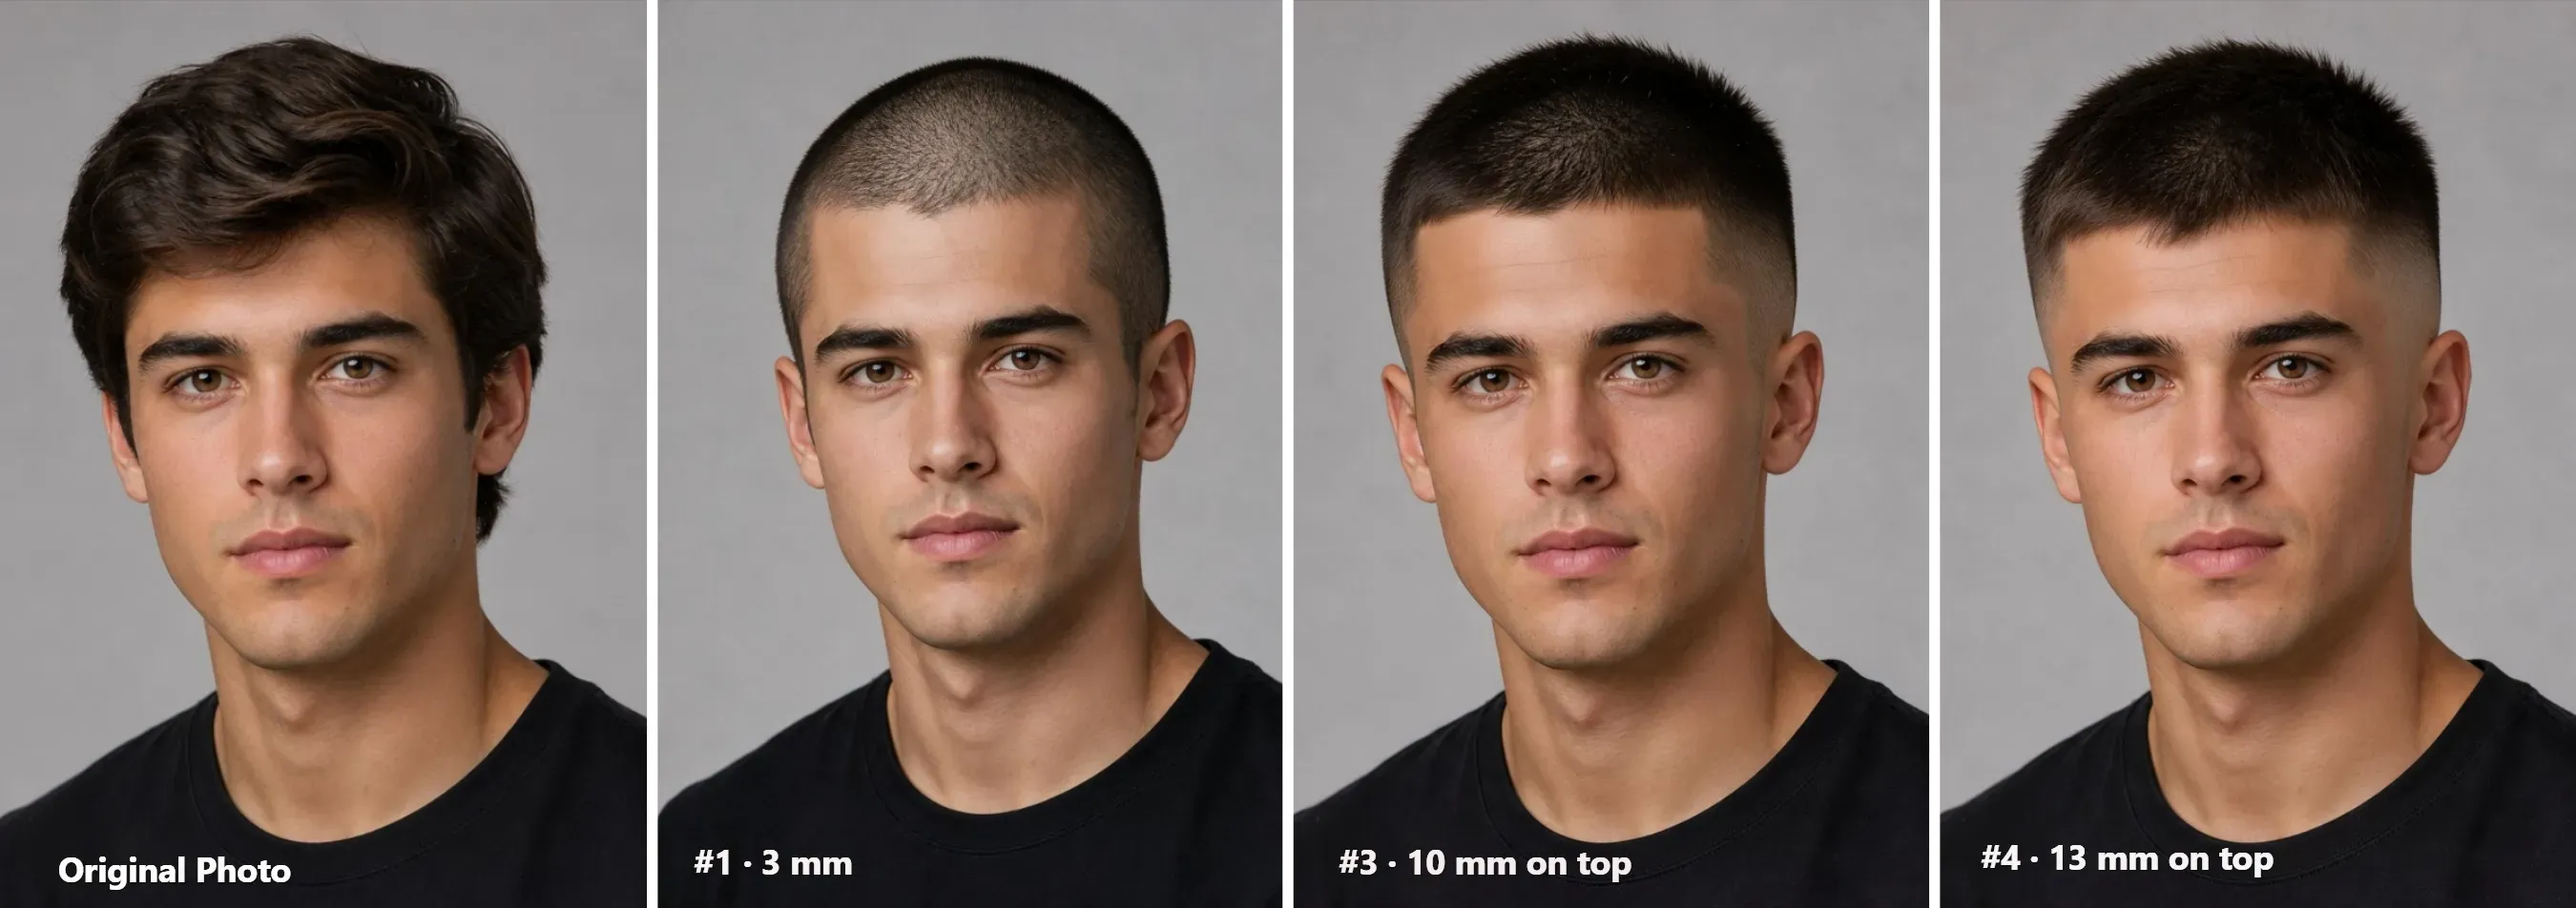
頂部推剪長度與頭皮可見度
影像模型不理解毫米。請直接在提示詞中描述頭皮覆蓋程度:
- #0 至 #1 推剪(1.5mm 至 3mm):貼近的短鬍渣,頭皮清楚可見。這種剪法會去除所有頭髮厚度,並勾勒出原始的頭型。
- #2 推剪(6mm):紮實的深色鬍渣。皮膚完全隱藏。頭髮平貼頭部。
- #3 至 #4 推剪(10mm 至 13mm):短而濃密、紋理可見的短髮。可遮蓋頭頂的扁塌處,並與漸層兩側形成對比。
- 3-2-1 法則:頂部使用 #3,兩側上方混合 #2,邊緣漸縮至 #1。這能避免頭部看起來圓滾滾的。
兩側漸層與髮際線
單一號數的寸頭整體長度一致。漸層則讓兩側比頂部更短:
- 高光頭漸層:在太陽穴高度剃到露出皮膚。去除最多兩側頭髮。
- 中垂漸層:在耳後向後方彎曲。在太陽穴周圍留下深色鬍渣。
- 低漸縮:僅修整鬢角與頸線。保留兩側完整的頭髮密度。
- 修整 vs. 自然:提示「俐落的剃刀修整線」以獲得方正邊緣。提示「自然髮際線」以保留你自己的前額邊緣。
AI 換髮型工具的可直接複製提示詞參考表
將以下任一提示詞直接貼到免費 AI 換髮型工具的「Hair request」欄位,或其他 AI 影像編輯工具 中:
#1 極短剃剪:非常短
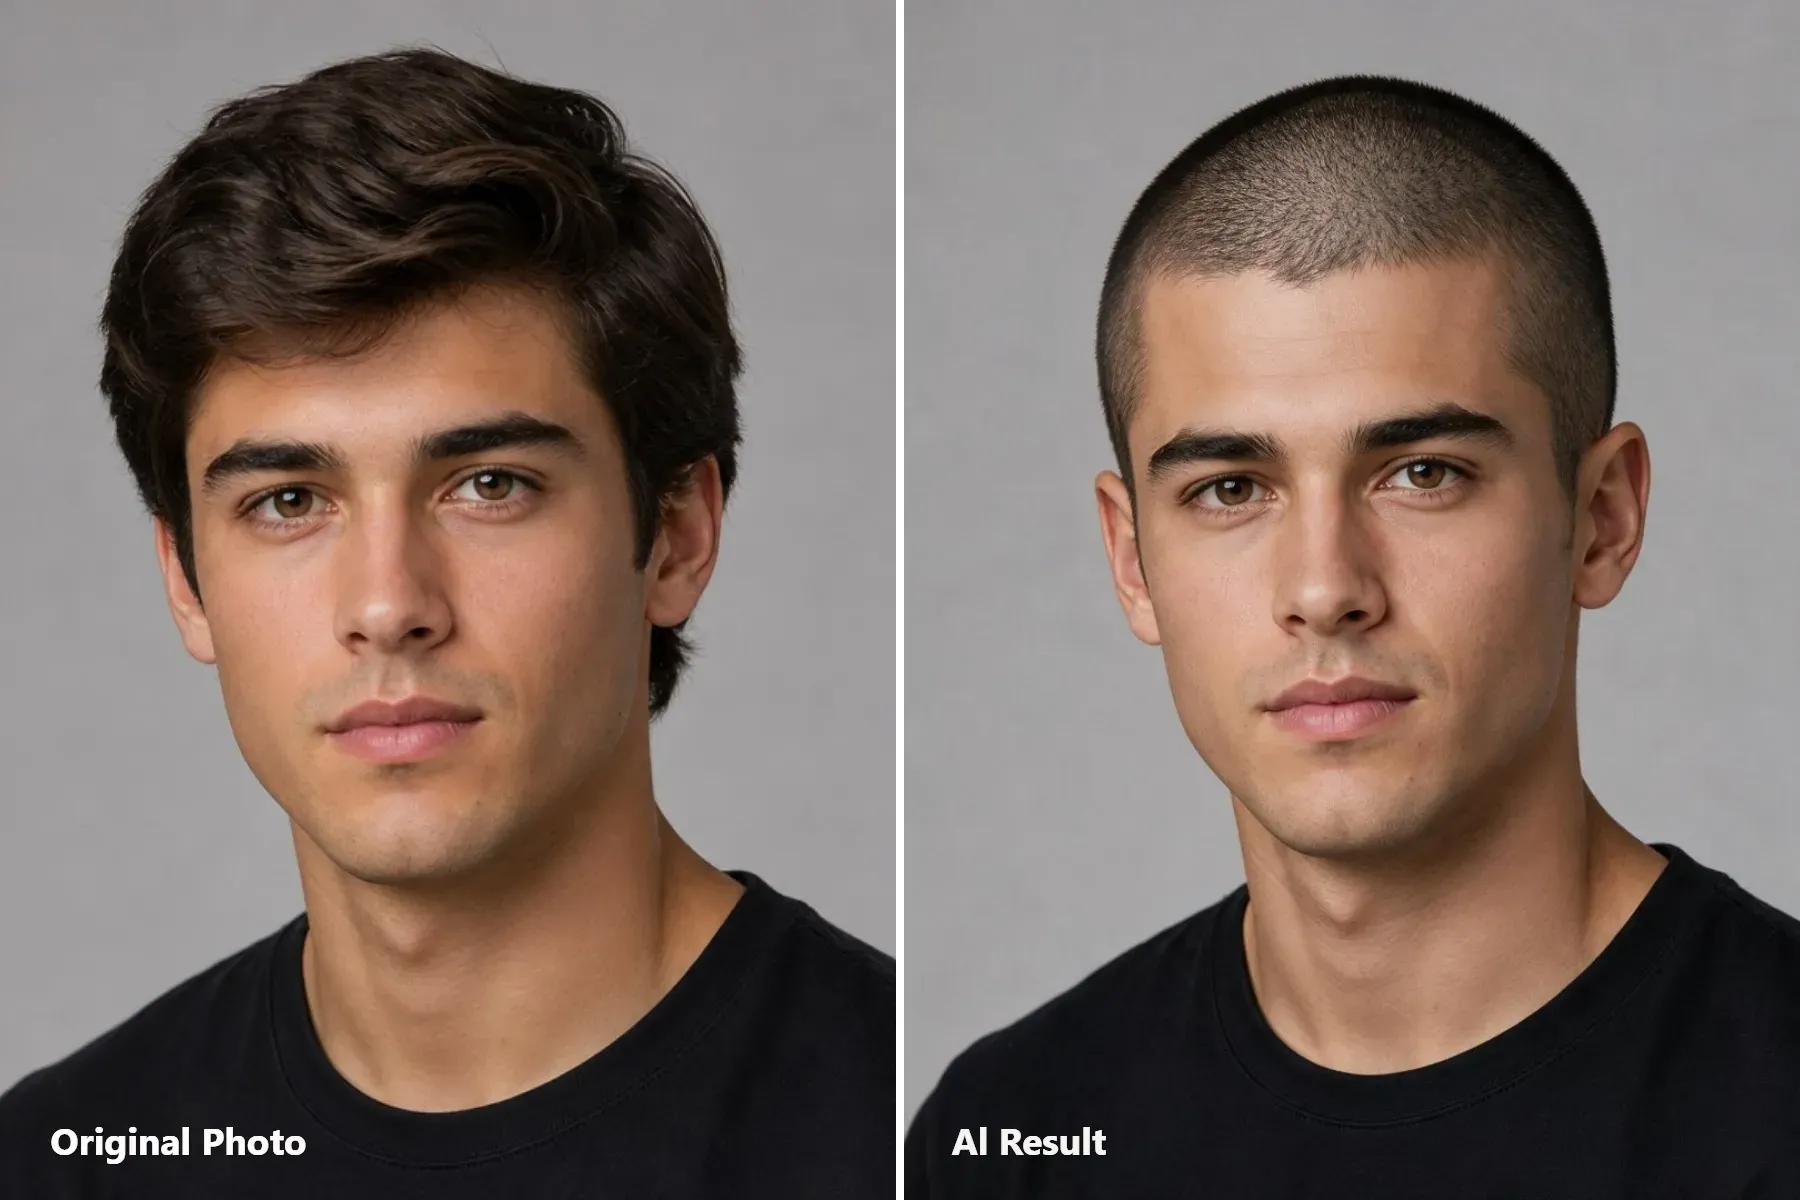
推剪長度: #1 · 3 mm
剪髮造型: 頂部與兩側均為一致短長度,帶有細微的頭皮可見度。
最適合的臉型: 鵝蛋臉、輪廓分明的下顎線,以及髮際線後退者。
可直接複製的提示詞:
plaintext1Change the hairstyle to a uniform #1 guard buzz cut, approximately 3mm long, across the entire head, including the top, sides, and back. Keep the hair very short with clearly visible fine stubble texture and slight scalp visibility between the hairs. Maintain an even length throughout, with no fade, taper, or extra length on top. Preserve the person's original hairline shape and natural hairline edges. Keep the face, facial features, ears, skin tone, lighting, and background unchanged.
#2 寸頭 + 低漸縮:經典款
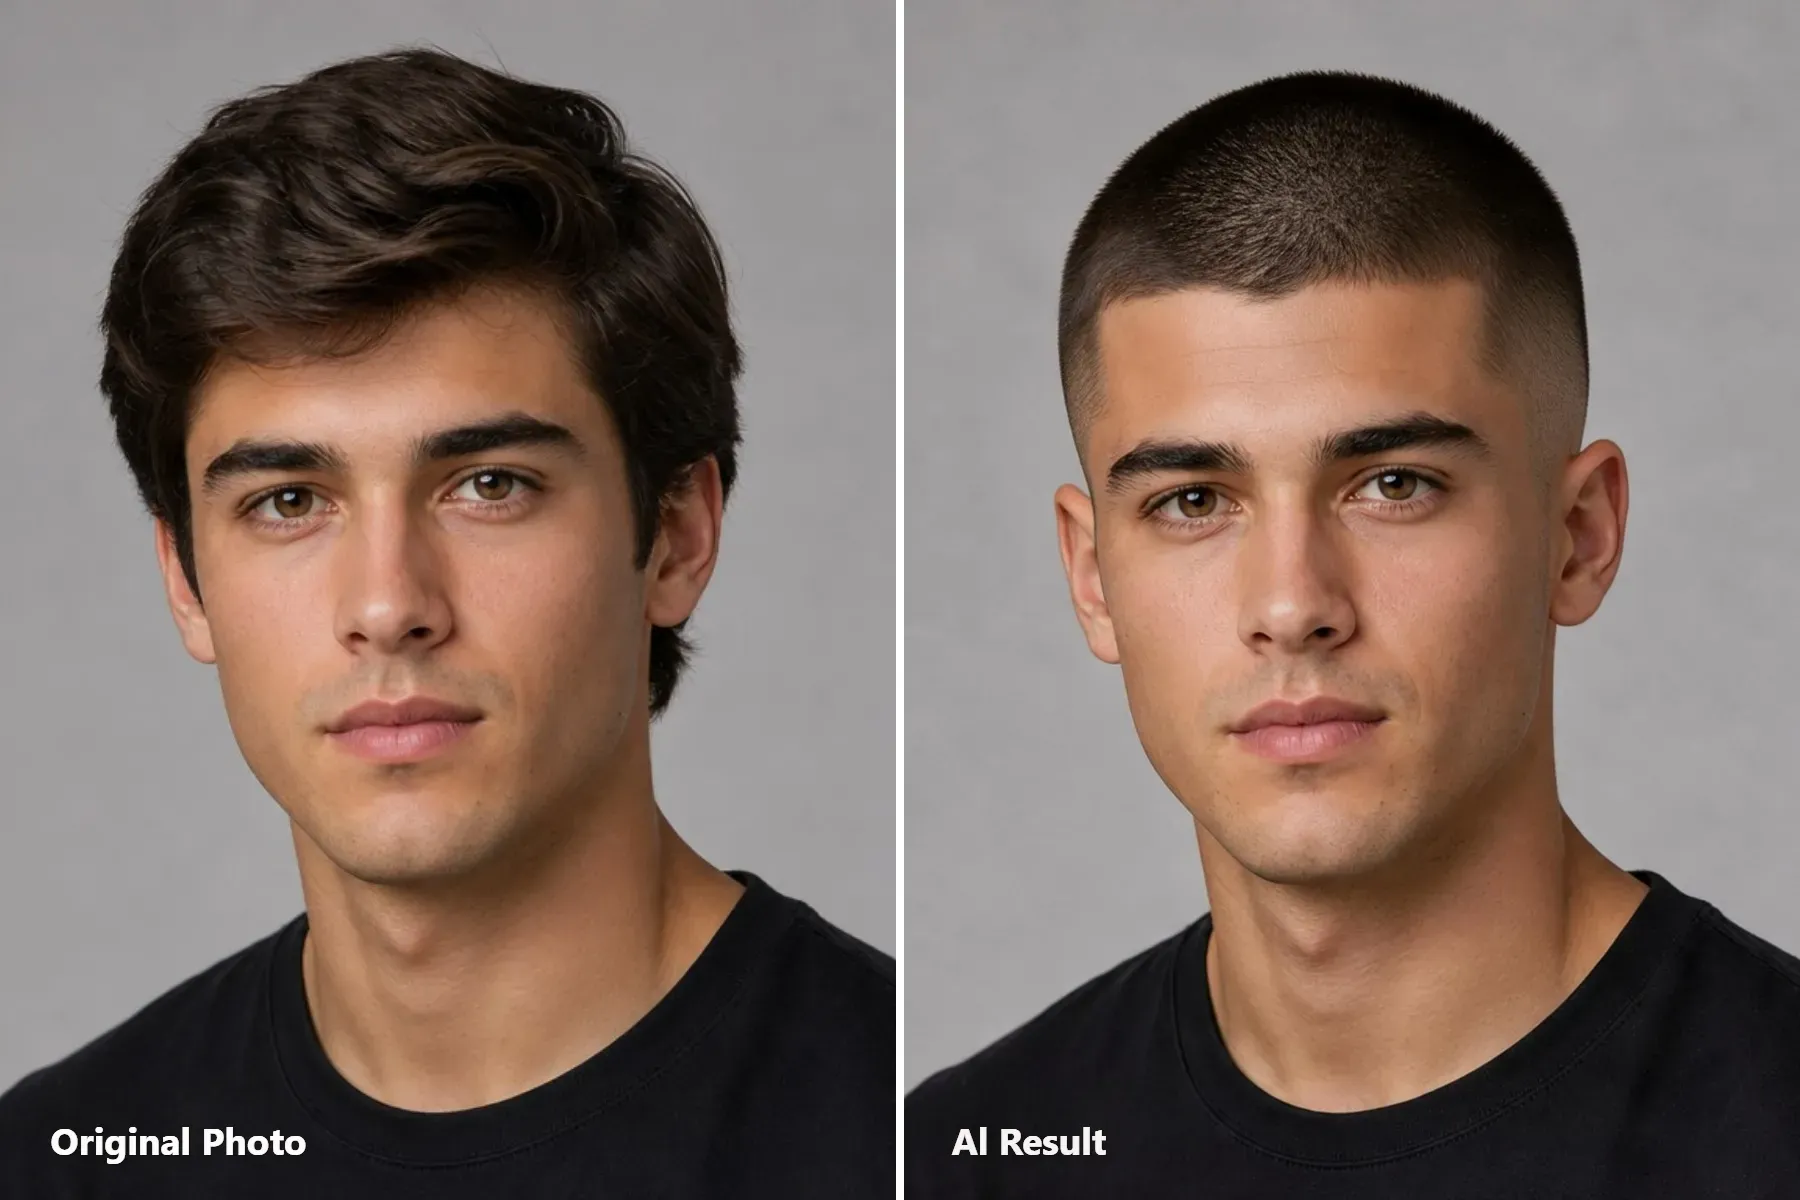
推剪長度: 頂部 #2 · 6 mm
剪髮造型: 短而均勻的頂部,在太陽穴與鬢角周圍逐漸低漸縮。
最適合的臉型: 長臉、長橢圓臉與心形臉。
可直接複製的提示詞:
plaintext1Change the hairstyle to a neat #2 guard buzz cut, approximately 6mm long, with an even length across the entire top. Add a subtle low taper fade starting just above the sideburns and around the temples, gradually blending the shorter hair into the longer hair above. Include a clean, natural taper around the neckline at the back. Keep the taper low and understated, without extending it high up the sides or creating a dramatic skin fade. Preserve the person's original hairline shape and natural contours. Keep the face, facial features, ears, skin tone, lighting, and background unchanged.
#3 刷剪寸頭 + 中垂漸層:層次感
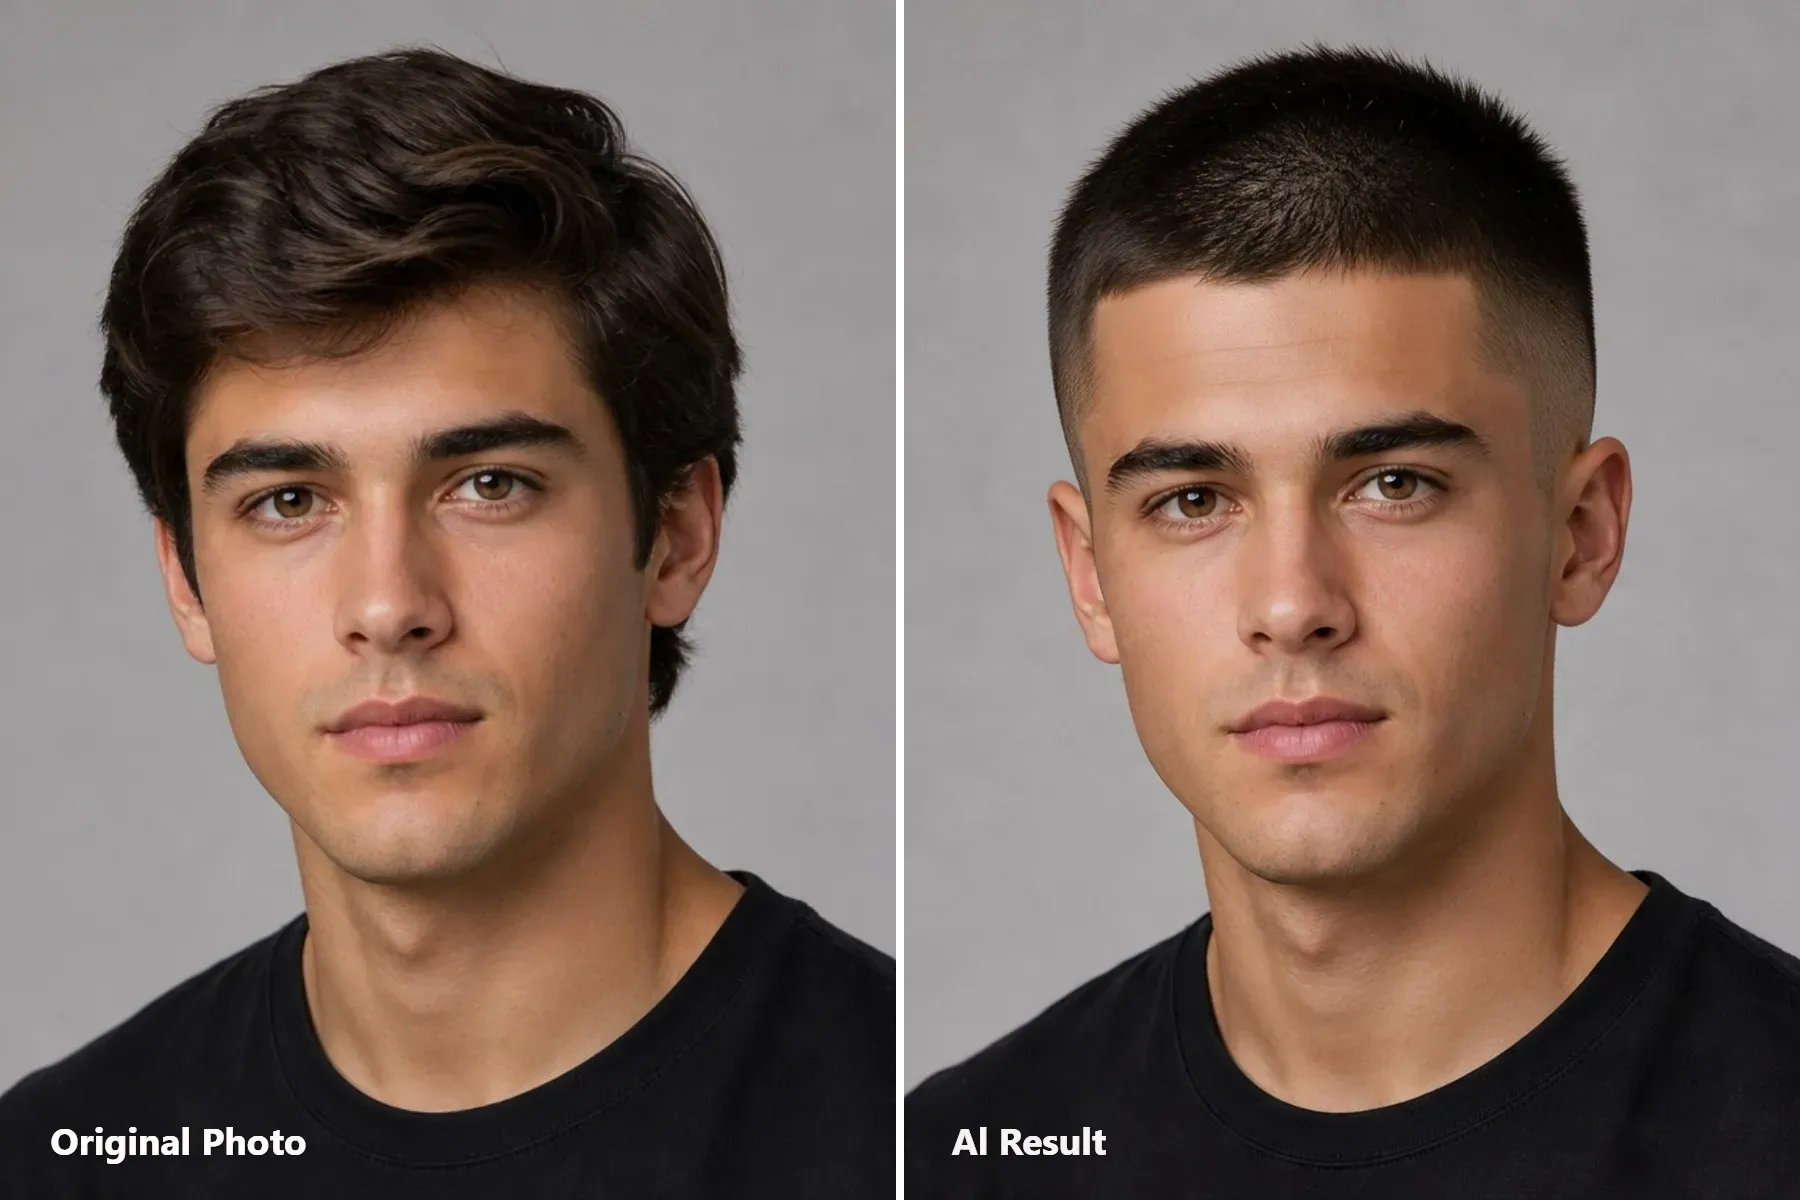
推剪長度: 頂部 #3 · 10 mm
剪髮造型: 略帶層次感的頂部,搭配在耳後彎曲的中垂漸層。
最適合的臉型: 大多數臉型;最安全、最適合初次嘗試的寸頭。
可直接複製的提示詞:
plaintext1Change the hairstyle to a #3 guard brush buzz cut, approximately 10mm long across the top. Keep the top short and evenly trimmed, with subtle natural hair texture and a slightly brushed-up finish rather than a long or voluminous style. Add a mid drop fade that starts around the temples and gradually blends shorter toward the sides and back, following a curved shape that drops naturally behind the ears and tapers toward the neckline. Create a clean but natural temple line-up without making the hairline look overly sharp or artificial. Preserve the person's original hairline shape and contours. Keep the face, facial features, ears, skin tone, lighting, and background unchanged.
#4 寸頭 + 高光頭漸層:大膽款
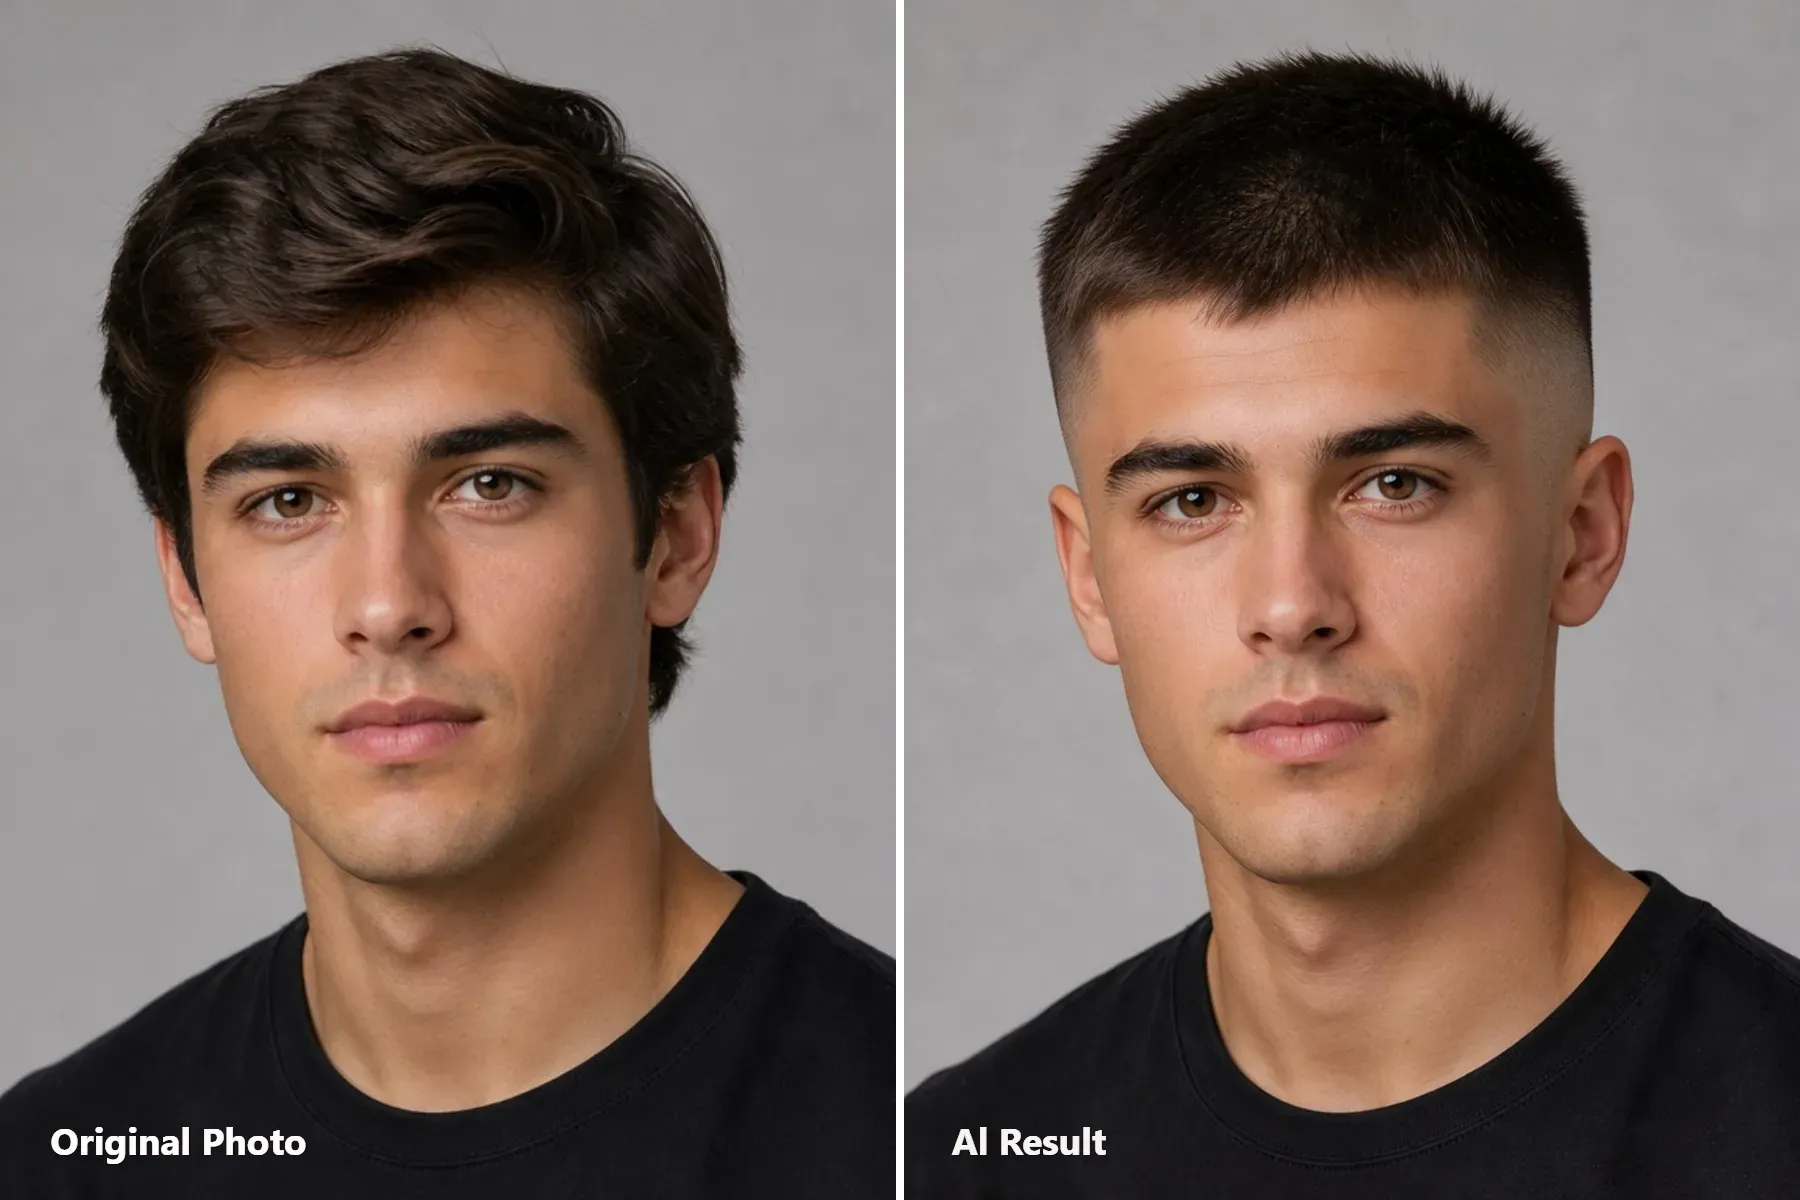
推剪長度: 頂部 #4 · 13 mm
剪髮造型: 較豐厚的頂部,搭配從兩側逐漸漸縮至露出皮膚的高漸層。
最適合的臉型: 圓臉或臉頰較飽滿,需要縱向拉長感者。
可直接複製的提示詞:
plaintext1Change the hairstyle to a #4 guard cut with approximately 13mm (1.3cm) of hair remaining on the entire top. The top must have clearly visible hair length, with individual short strands extending naturally from the scalp. Keep the hair slightly raised and textured rather than flat, tightly cropped, or reduced to fine stubble. Maintain a consistent 13mm length across the top without adding excessive volume or creating a long hairstyle. 2Create a distinct high skin fade on both sides and the back. The fade should begin high above the temples, transitioning smoothly from the longer top hair through progressively shorter lengths to completely bare skin around the lower sides and back. Preserve the original forehead hairline shape, with clean natural edges around the temples. Keep the face, facial features, ears, skin tone, lighting, and background unchanged.
白金色漂染 #2 寸頭:時尚前衛
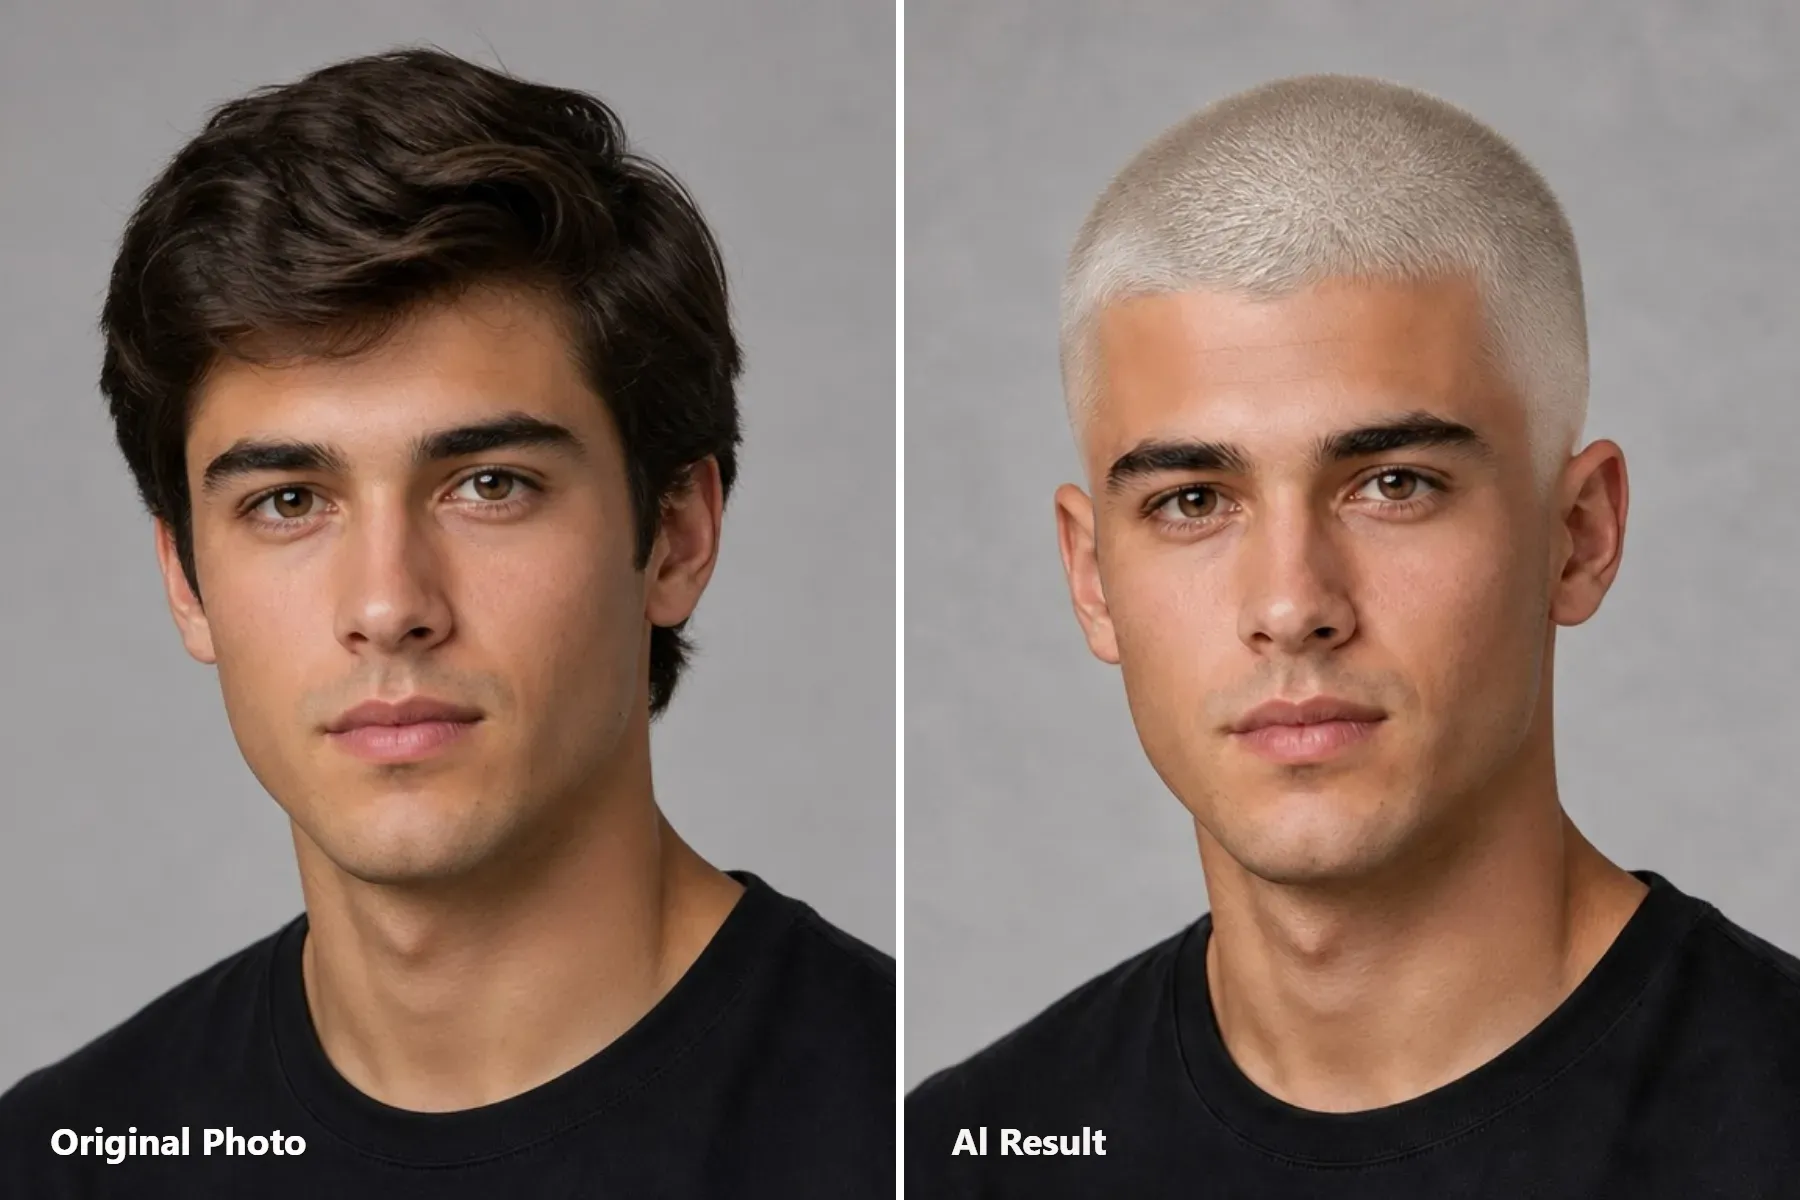
推剪長度: #2 · 6 mm
剪髮造型: 均勻短寸頭,搭配冷冽白金色調。
最適合的臉型: 適合男女的高時尚對比造型。
可直接複製的提示詞:
plaintext1Change the hairstyle to a uniform #2 guard buzz cut, approximately 6mm long across the entire head, including the top, sides, and back. Keep the hair evenly trimmed with clearly visible short hair strands and natural buzz-cut texture. Dye all the hair an icy platinum blonde with a cool, pale blonde tone, avoiding silver-gray or pure white coloring. Ensure the platinum color covers the hair evenly without changing the scalp or skin tone. Preserve the original hairline shape and natural contours. Keep the face, facial features, eyebrows, ears, skin tone, lighting, and background unchanged.
如何使用 Atlas Cloud AI 換髮型工具在你的照片上測試寸頭
這款免費 AI 換髮型工具只會編輯你的頭髮。它會鎖定你的臉、膚色與背景光源。使用 Google、GitHub 或電子郵件登入,即可生成並下載無浮水印的成品。
使用以下步驟,從正面與側面角度測試推剪與漸層:
步驟 1:準備並上傳正面自拍或 45 度角照片
輸入照片決定預覽成敗。由於寸頭會去除所有頭髮厚度,工具必須能看到你的耳朵與頭型,才能正確放置剪髮效果:
- 將長髮綁起或用水壓平。兩側的厚度會扭曲最終的剪髮輪廓。
- 完全露出額頭與耳朵。不要戴帽子、連帽或留瀏海。
- 在均勻光線下拍兩張:一張正對鏡頭的正面角度以呈現修整線,或一張 45 度角以呈現側面漸層。
步驟 2:上傳照片並輸入髮型提示詞
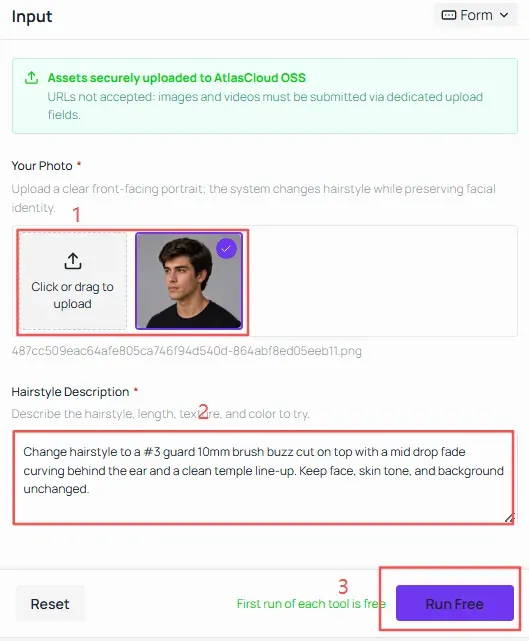
先從中等長度開始,再測試極短剃剪。在 Hair request 欄位中,先貼上這個提示詞:
plaintext1Change hairstyle to a #3 guard 10mm brush buzz cut on top with a mid drop fade curving behind the ear and a clean temple line-up. Keep face, skin tone, and background unchanged.
點擊「Run free」。儲存結果影像後,保留同一張上傳的自拍照,只替換提示詞欄位中的推剪號數與漸層高度,例如將 #3 guard 10mm brush buzz cut 改為 #1 guard 3mm buzz cut all over。將兩張輸出並排比較,即可看出你的頭型搭配深色頂部密度,還是貼近的均勻短剃,哪一種更顯均衡。
步驟 3:用鬍鬚漸縮或漂染髮色測試下半臉的平衡感
去除頂部頭髮會立即將視覺重量下移到你的下顎線、顴骨與眉毛。在關閉分頁之前,執行一個變化提示詞,測試下半臉的框型或髮色如何改變整體剪髮效果:
測試寸頭與鬍鬚融合:
plaintext1Change hair to a #2 guard 6mm buzz cut on top with a low skin fade at the temples that blends smoothly into a neatly trimmed short boxed beard. Keep eyes, nose, skin tone, and background unchanged.
測試女性或長髮人像的柔和或漂染寸頭:
plaintext1Change hair to a soft #3 guard buzz cut dyed warm platinum blonde following the natural feminine hairline contour, no harsh razor line-up. Keep face, eyebrows, earrings, and lighting unchanged.
選用步驟 4:用 Seedance 2.5 將靜態預覽變成轉頭檢查
將你的測試變成短影片,看看剪髮在動態下的樣子。在 Seedance 2.5 中,將你的原始照片上傳為第一幀,並將寸頭成品作為最後一幀。它會生成一段 5 秒的短片,展示自然的轉頭與前後對比轉場。
為什麼你的 AI 寸頭預覽看起來不對,以及如何修正
當 AI 剃到貼近的鬍渣時,不均勻的陰影與傾斜的角度會扭曲你的頭型。將你的不良成品對照下方的修正方式:
| 預覽問題 | 可能原因 | 如何修正 |
| 頭型寬大、圓凸 | 濃密或蓬鬆的兩側頭髮扭曲頭部輪廓。 | 將長髮綁起、壓平蓬鬆的兩側,並指定「follow the natural skull contour」。 |
| 額頭出現深色帶狀或模糊區塊 | 瀏海或強烈陰影遮蔽了自然髮際線。 | 使用均勻光線,並將瀏海撥離額頭。 |
| 漸層看起來像均勻寸頭 | 正對鏡頭的照片會遮住太陽穴與耳上區域。 | 使用 30–45° 的三分之四側面照片,並指定想要的漸層高度。 |
| #1 看起來像光頭,或 #4 看起來太長 | 含糊的長度描述讓模型混淆。 | 同時指定推剪長度與質感:「3mm stubble with slight scalp visibility」或「13mm dense brush texture」。 |
| 脖子或肩膀上出現散落頭髮 | 長髮垂落在編輯區域之外。 | 拍照前將頭髮綁起或塞進衣服裡。 |
最大的改善來自於你在拍照前如何處理濃密或長髮。試著直接在 AI 換髮型工具中替換你的輸入照片,或將修正語句加入你現有的提示詞中。
準備好嘗試新造型了嗎?上傳你的照片,測試不同的寸頭長度與漸層,在下一次去找理髮師之前,看看哪種造型最適合你!


