You scrub back through the clip and there it is: the one moment worth keeping, and it looks like it was filmed through a wet window. Before you drop it into the first tool that promises to sharpen it, pause on a different question. Which kind of blur is this?
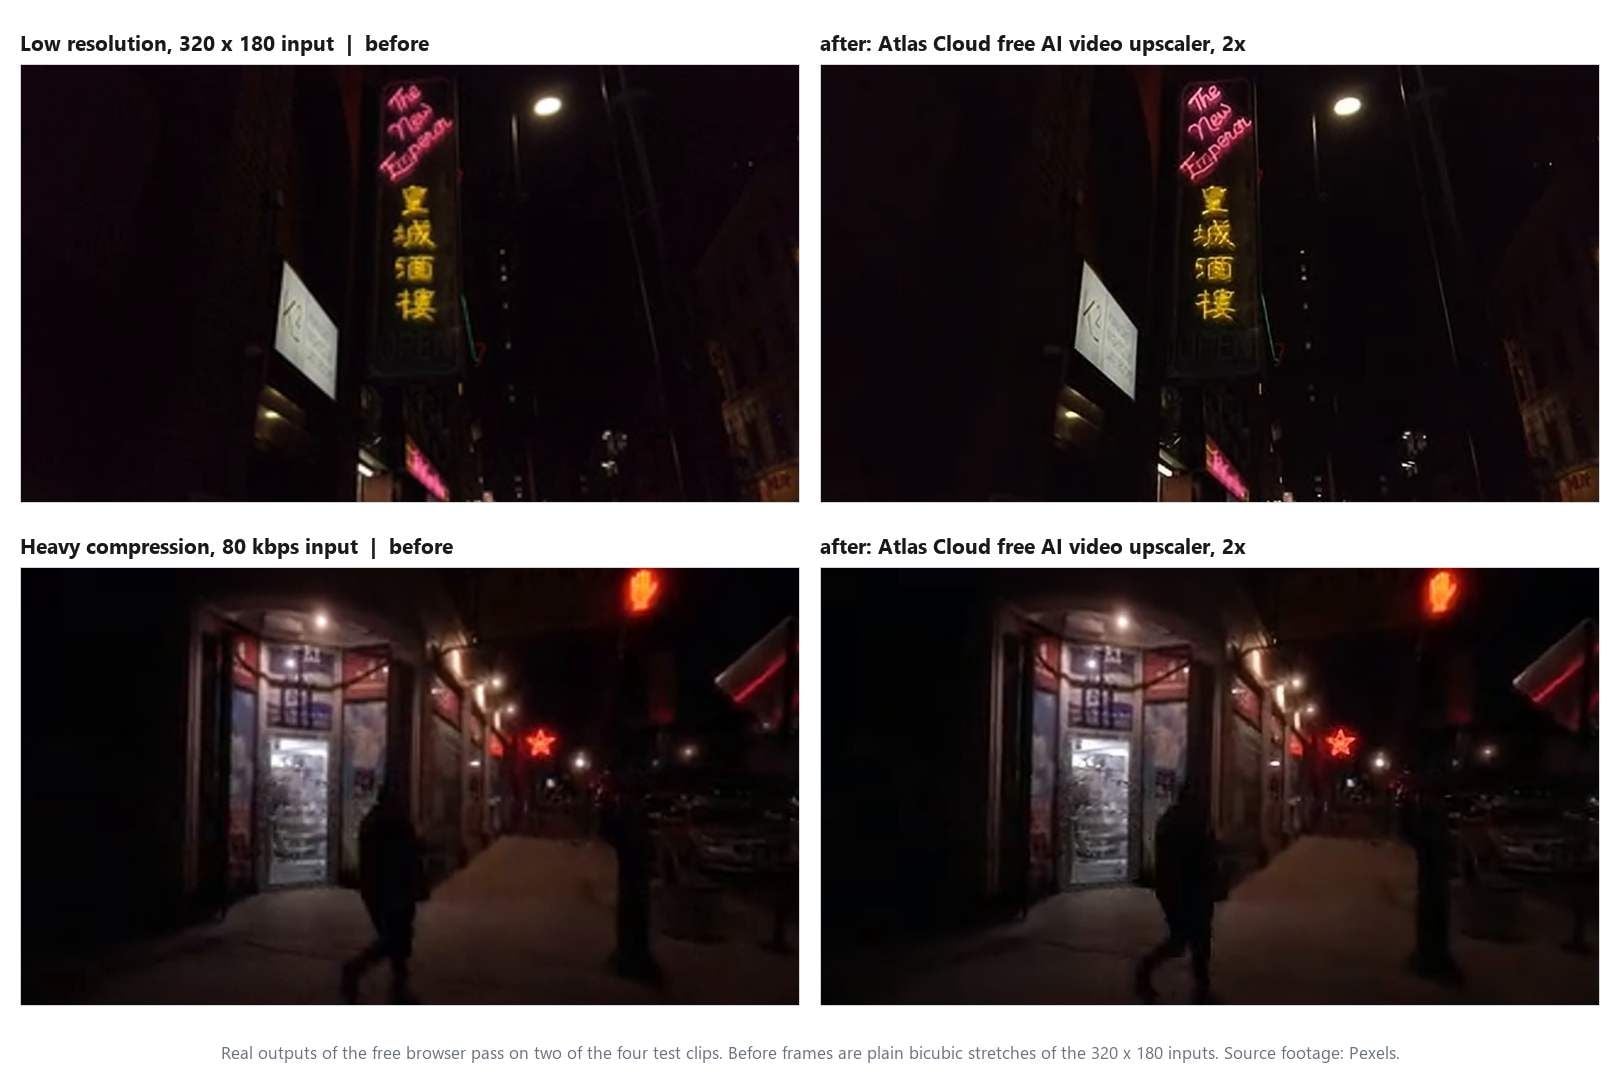
That question settles most of how to make a blurry video clear. Some blur is missing pixels, and an AI upscaler can put plausible ones back. Some blur is a smear the sensor recorded, and sharpening can only outline it. So we took one free AI upscaler and fed it four short clips, one per cause, to see the difference on screen rather than describe it. Below: how to tell the four apart, the free fix, what it did to each clip, and where to go when the footage is longer than a few seconds.
Key Takeaways
- Blur has four common causes: too few pixels, compression, camera shake and missed focus. AI upscaling is built for the first two.
- The free AI video upscaler from Atlas Cloud runs a 2x pass on a short clip inside your browser, with no upload and no watermark.
- For a 1080p or 2K file from longer footage, the cloud video upscaler model takes clips up to 53 seconds at 1080p.
- A resolution converter spreads the pixels you already have across a bigger frame. An AI upscaler predicts new ones. Put one frame through both and the gap is plain.
- Motion blur and out-of-focus footage need a steadier or better focused shot. Sharpening outlines the smear, it does not remove it.
Why Is Your Video Blurry? Four Causes You Can Tell Apart Before You Fix It
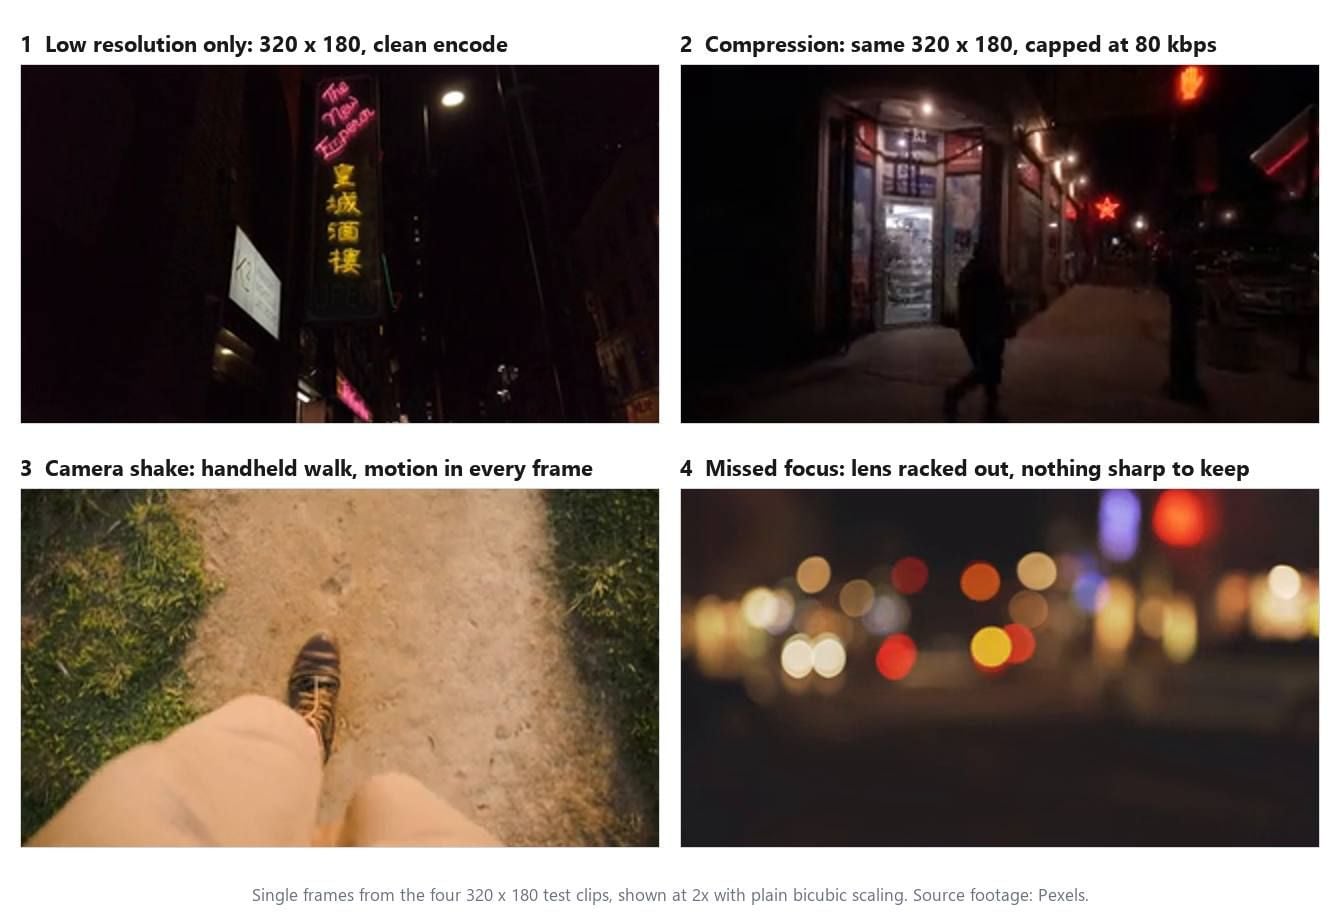
Pause the video on a frame with some detail in it, a face, a sign, a line of text, and look at how the softness behaves. Each cause leaves a different fingerprint, and the fingerprint tells you whether an AI pass is worth your time.
| What you see on a paused frame | Likely cause | Does AI upscaling help? |
|---|---|---|
| Everything is evenly soft, edges look like small staircases, the file says 480p or lower | Low resolution | Yes, this is its home ground |
| Blocky patches in dark areas and skies, buzzing halos around edges, worse during motion, better when the shot is still | Compression | Partly: it smooths the blocks, it cannot restore what the encoder threw away |
| Sharp when the camera rests, streaked in the direction of movement when it moves, edges doubled | Camera shake, motion blur | No, it sharpens the edges of the streak |
| One plane is soft while another is crisp, point lights turn into discs, the softness never changes with motion | Missed focus | No, there is no detail on the sensor to recover |
The first two are pixel problems. The frame is a grid of numbers, and either the grid is too small or the numbers were rounded off to save space. A super resolution model is typically trained on exactly that gap: it has seen many sharp frames and their small or compressed versions, and it learned what edges and textures usually look like when they are restored.
The free tool we test below describes its own pass as "sharpening edges and pulling out detail that a simple resize would blur", which is a fair one-line summary of the category.
The last two are optical problems. When the camera shook or the lens missed, the sensor recorded a smear, and the smear is now the data. A sharpening filter raises contrast where the pixel values already change, so it makes the boundary of the smear crisper. It has nothing to say about what was inside it.
For photos we drew the same line between an enhancer and an upscaler in photo enhancer vs upscaler. Video adds a time axis, which is why camera shake earns a row of its own here: a still can be blurred by shake once, but a clip is blurred by it on every frame the camera was moving.
Fix Blurry Video in Your Browser With a Free AI Video Sharpener
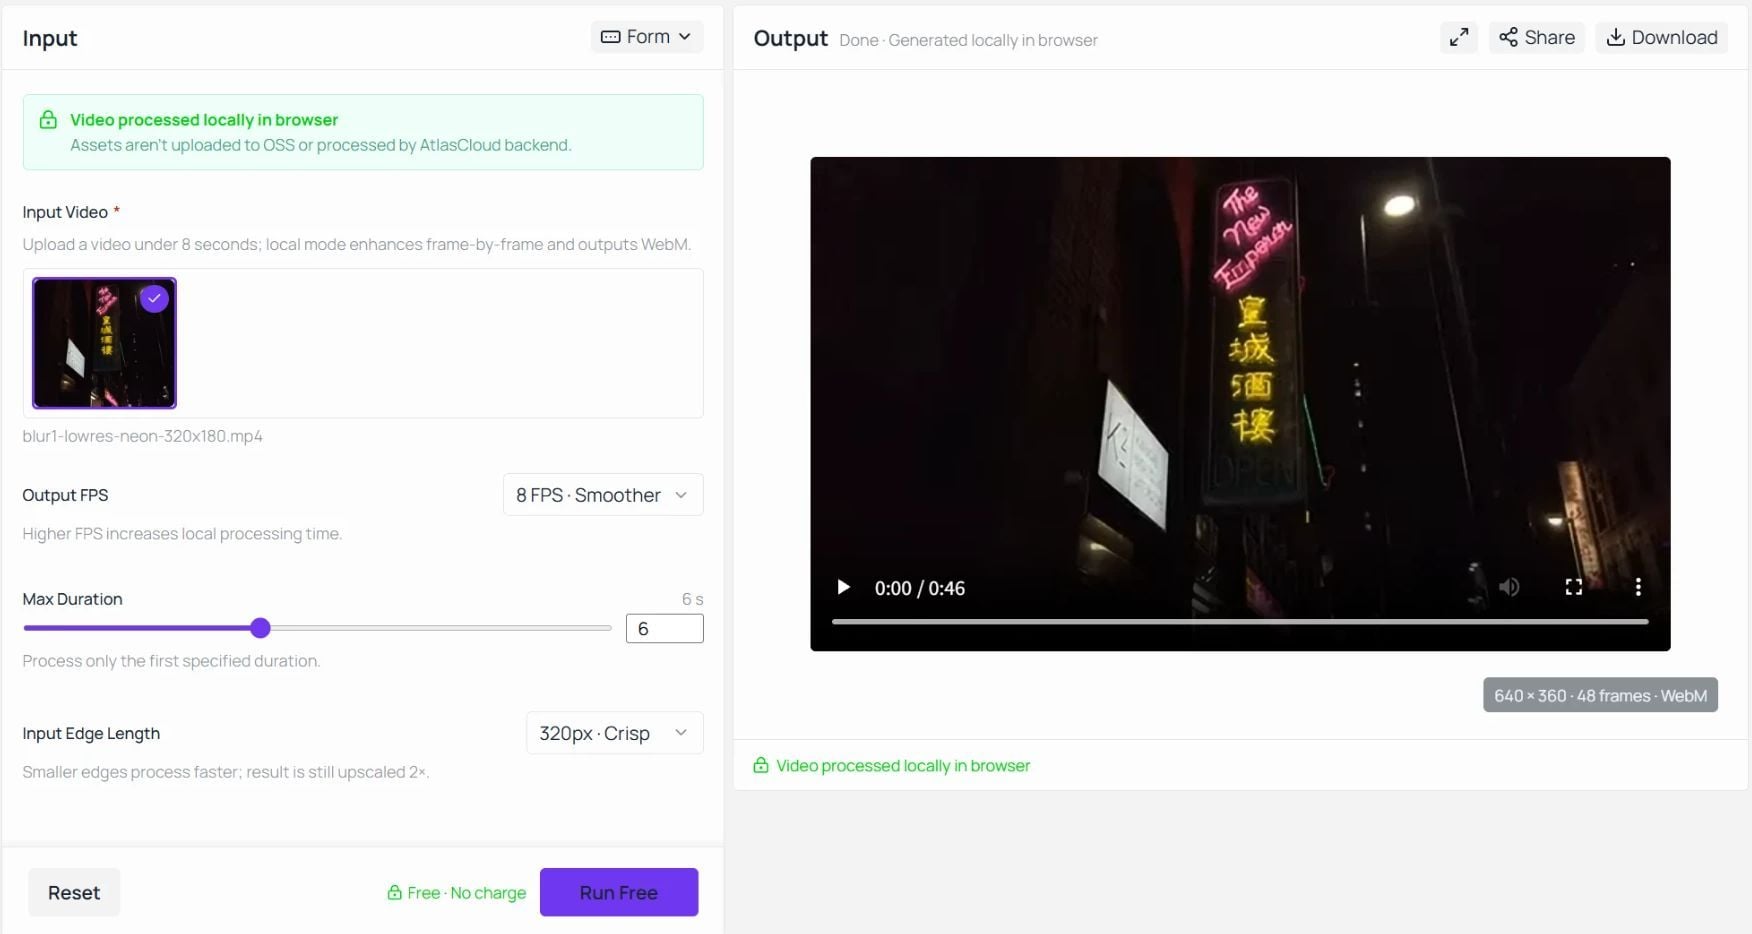
If your clip sits in the top two rows of that table, the fix is one short upload and costs nothing. Drop a short clip onto the page, press the button labelled Run Free, and a WebM at twice the working size comes back from your own machine, with nothing stamped on it. The clip below is one of our test runs with input and output playing side by side, and the screenshot after it shows the controls that produced it.
Atlas Cloud runs this video sharpener as one of its free AI tools, a small group of browser utilities that also covers image upscaling and background removal.
The free AI video upscaler downloads a super resolution model into your tab on the first run, caches it, and then processes every frame with WebGPU on your own graphics hardware. The page states the consequence plainly: assets are not uploaded to its storage or processed by its backend. A family video never leaves the laptop.
Here is the whole procedure:
- Upload a short clip. The form asks for a video under 8 seconds. Any format your browser can play works, so an MP4 off a phone is fine.
- Set the three controls. Output FPS offers 4, 6 or 8 frames per second and defaults to 6. Input Edge Length offers 192, 256 or 320 pixels and defaults to 256, the setting labelled Balanced. Max Duration is a slider that defaults to 6 seconds and processes only that first stretch. For the most detail, pick 320 and 8.
- Run and check the output. Press Run Free. The first run pauses while the model downloads, later runs start at once. When it finishes, the Output panel plays the result and shows its size and frame count under the player: 640 by 360 and 48 frames for our 6 second clips.
- Download. The file is a WebM with no watermark, no account and no cap on how many clips you run.
Two of those numbers define what this tool is for. The working edge tops out at 320 pixels, and the field's own note says smaller edges process faster while the result is still 2x, so the resize to the working edge happens before the model runs. Our test run bears that out: a 320 by 180 clip came back 640 pixels wide. That makes it a sharpening pass for clips up to 320 pixels on the long edge, an old phone video, a game capture, a clip headed for a group chat.
Output FPS sets how many frames per second the model processes, 4, 6 or 8, so a slow pan, a talking head or a clip you want a clean frame grab from is the natural fit. For a full HD frame or a longer clip, the same company runs a hosted model, covered two sections down.
What the AI Video Sharpener Fixed on Four Kinds of Blur
We wanted the test to isolate the cause, so every clip went in at the same size and through the same settings. Each one is a stock clip from Pexels, cut to 6 seconds or less, stripped of audio and scaled down to 320 by 180, which matches the tool's largest working edge so the 2x pass is a real enlargement rather than a resize back to where it started. Same three settings for all four: 8 frames per second, 6 seconds, 320 pixel edge.
The four inputs:
- Low resolution only. A 1080p clip of a neon restaurant sign, downscaled with a clean encode. The only thing wrong with it is pixel count.
- Compression. A 4K clip of a night street, downscaled to the same 320 by 180 and then re-encoded with the bitrate capped at 80 kilobits per second. That is the block-and-smear look you get from a clip forwarded through a chat app three times.
- Camera shake. A handheld point-of-view walk, feet and path in frame. The camera moves on every frame, so the ground texture is smeared in the direction of travel.
- Missed focus. A street at night filmed with the lens racked out of focus. Every light is a disc, nothing in the frame is sharp.
The compression clip was made with one line, and the same line will recreate the look on any footage you want to practise on:
Bash1ffmpeg -i source.mp4 -an -vf "scale=320:180" -c:v libx264 -b:v 80k -maxrate 80k -bufsize 40k pixelated.mp4
Low Resolution Video to High Resolution: The Case Where 2x Shows
This is the clip the model was built for, and it is where the before and after should be most visible: neon lettering with hard edges, small English and Chinese characters, a white karaoke sign beside it. A 320 by 180 frame gives the model very little, so watch the strokes of the pink script and the edges of the Chinese characters. The figure below puts the input, a plain resize and the AI output side by side, same frame, one second in.
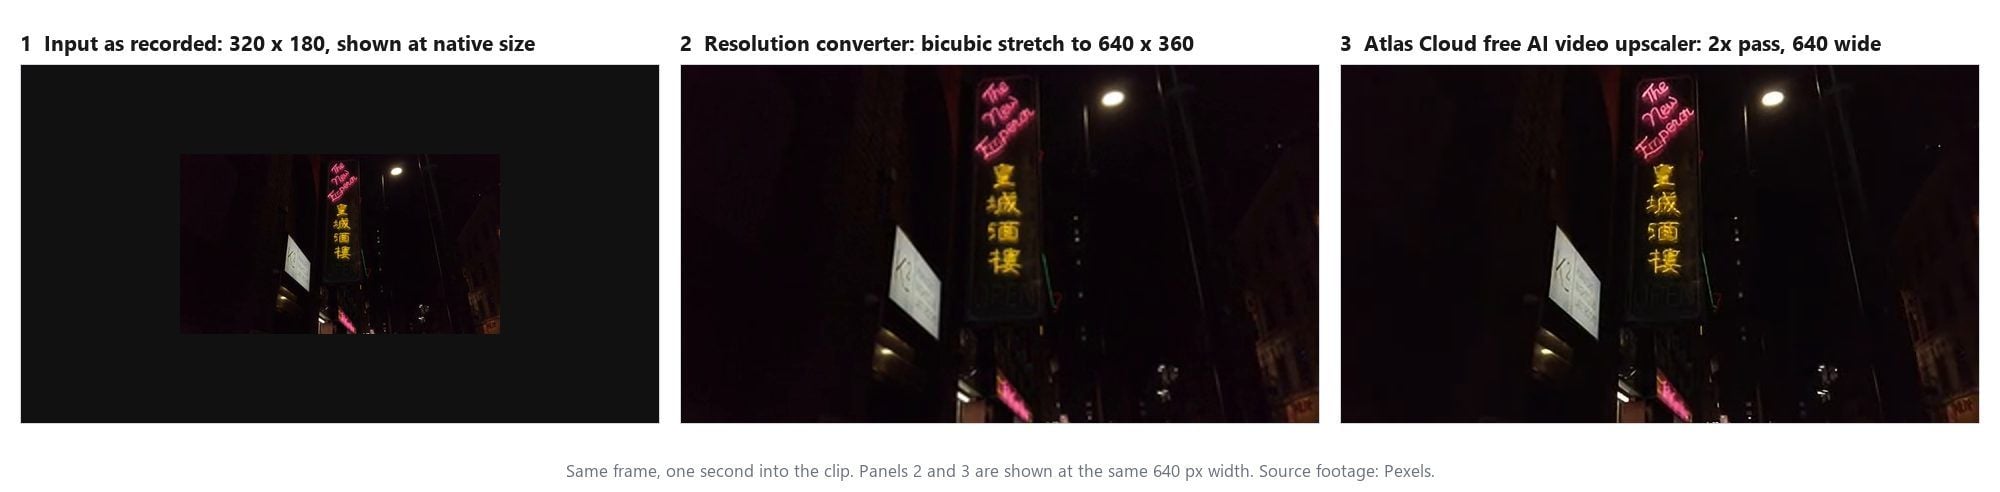
The middle panel matters as much as the third. A resolution converter, the kind of site that lets you pick 720p or 1080p from a dropdown, does what that panel shows: it spreads the pixels you already have across a bigger grid and blends the gaps. The frame gets larger. It does not get sharper, because nothing new was added. The third panel is the model's guess at what the larger frame should contain, and the guess is the whole point of the exercise.
On this frame the guess lands where it should. The pink script comes back as single clean strokes instead of a soft band, the edges of the yellow characters tighten, and the small lamps on the pole separate into distinct points. The model sharpened what the source hinted at and invented no lettering of its own, which is the behaviour you want from a pass like this.
Fix Pixelated Video: Compression Blocks Soften, Lost Detail Stays Lost
Pixelation is compression you can see. At 80 kilobits per second the encoder kept the bright storefront and the traffic light and rounded the dark sidewalk into flat squares. Those squares have hard edges, and a super resolution model treats an edge as an edge, so the pass has two jobs here: soften the block boundaries and keep the edges that are real.
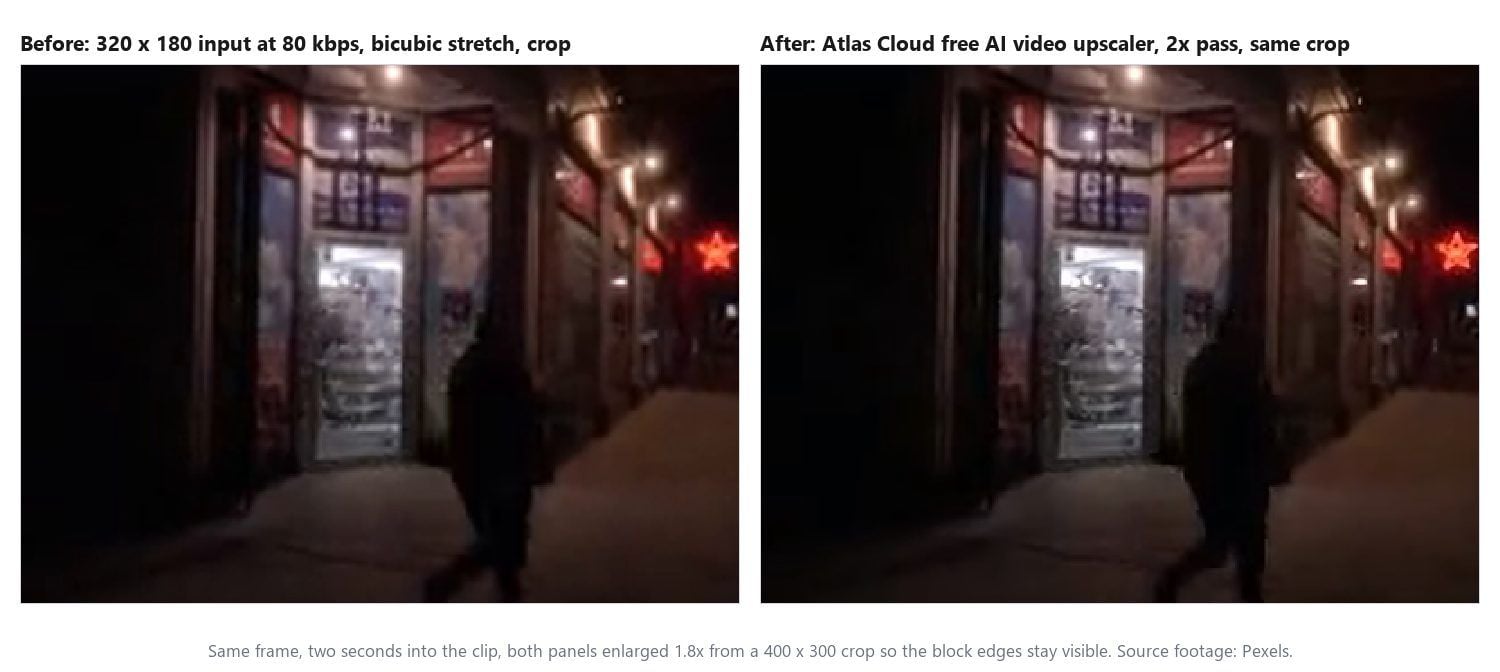
In the run, the sidewalk's tiles melt into an even surface, the door frame and the red star sign get clean outlines, and the posters in the window turn from squares into smooth patches. What the encoder deleted is not in the file for any model to read, which is a property of the forwarded copy rather than of the pass.
Which points to the fix that works better than upscaling for this cause: go back for a better copy. A clip that arrived through a messaging app has usually been re-encoded on the way. The original on the sender's phone, or the file sent as a document instead of as a video, carries the detail the forwarded copy lost. Upscale that. Upscaling the forwarded copy locks the blocks in at twice the size.
Motion Blur or Missed Focus: Why Sharper Is Still Not Clear
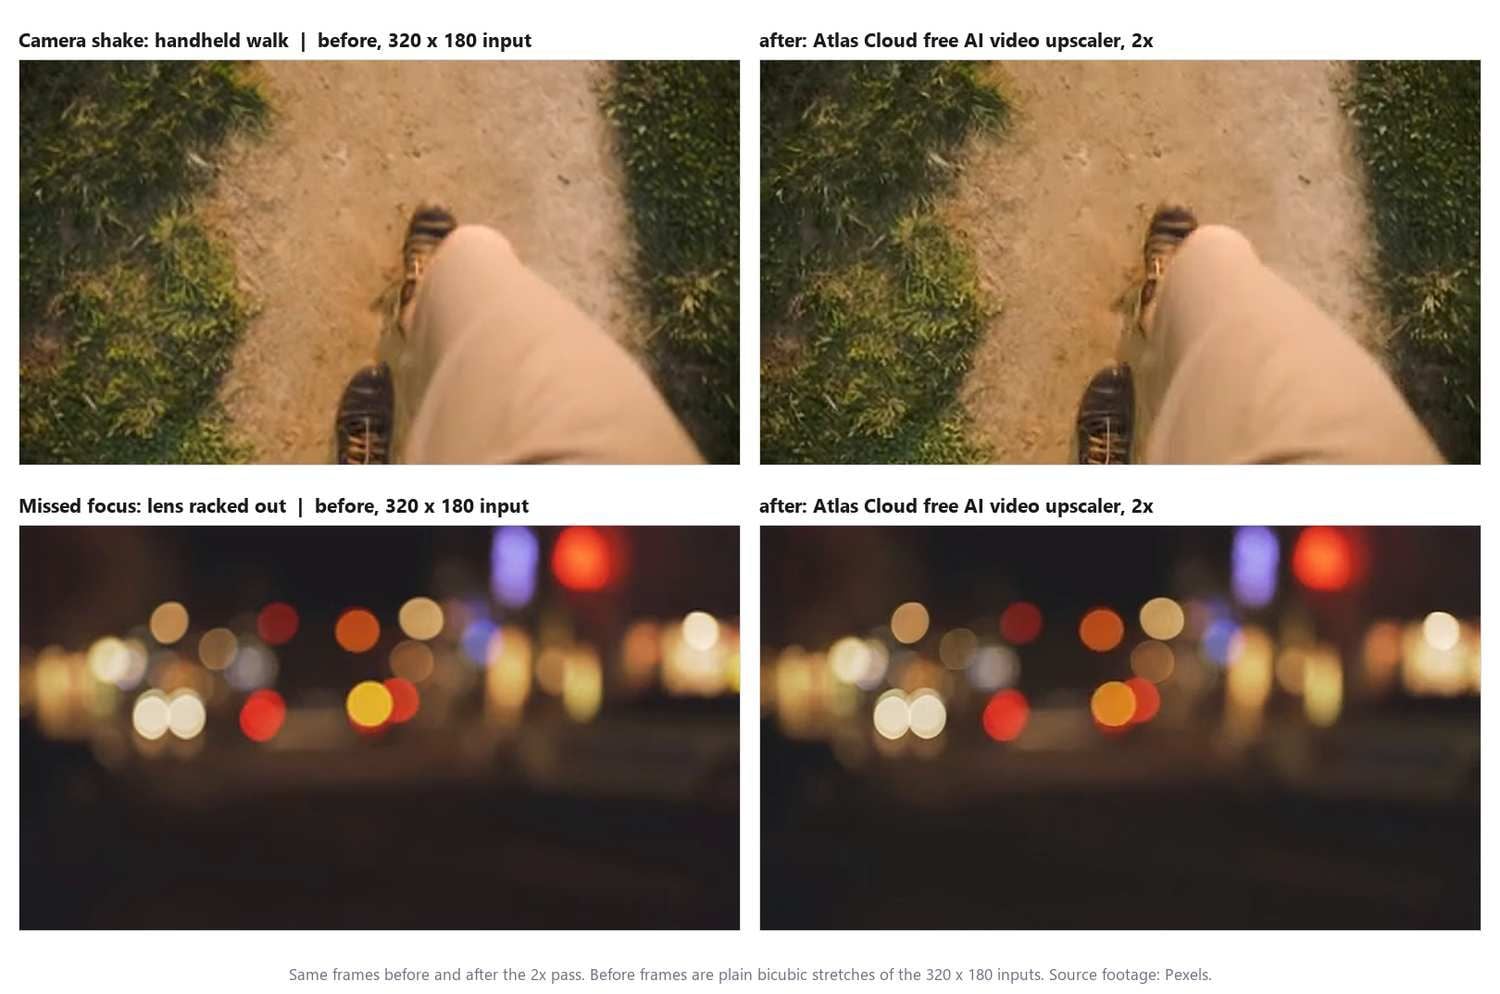
The last two clips test the claim in the title. In the handheld walk, the path is smeared on every frame because the camera was moving while the shutter was open. In the out-of-focus street, every point light has spread into a disc. Neither frame contains a sharp version of itself anywhere, so the model has no detail to pull out. What it can do is tighten the edge of each smear and each disc, and that is what the figure shows: the stripes on the shoe and the hem of the trousers get a firmer outline, the rims of the light discs sharpen, and the blur inside both stays where the camera put it.
Adobe's experience with stills is a useful reference point here. Photoshop shipped a Shake Reduction filter that, in Adobe's own Shake Reduction documentation, "can reduce blurring resulting from several types of camera motion; including linear motion, arc-shaped motion, rotational motion, and zigzag motion", and the same page says it "works best with decently lit still camera images having low noise".
Adobe announced the filter's removal with the April release of Photoshop 23.3, saying the technology was not compatible with newer development platforms. Even at its best it was a still image tool with narrow conditions. For video, a stabilizer steadies the frame from one moment to the next. It does not unblur the frame itself.
So the fix for these two rows is on the shooting side. Lock focus before you roll and tap the subject if the phone lets you. For movement, hold the phone with both hands, brace an elbow, or turn on the camera's stabilization mode, which usually trades a little field of view for a steadier frame. If the clip already exists and matters, cropping in on the part that stayed sharpest often reads better than a sharpened smear.
Four clips, one pass each, summed up:
| Clip | Cause | What the 2x pass changed | Where the rest of the fix lives |
|---|---|---|---|
| Neon sign, 320 by 180 | Low resolution | Clean single strokes, tighter character edges, lamps resolve into points | Nothing left to do |
| Night street, 80 kbps | Compression | Block boundaries smooth out, real edges stay crisp | A cleaner copy of the source |
| Handheld walk | Camera shake | Firmer outlines on the shoe and the path | A stabilizer, or a steadier next take |
| Defocused street | Missed focus | Sharper rims on every light disc | Refocus and reshoot |
How to Increase Video Resolution to 1080p or 2K Without a Desktop App
The browser tool answers the question for a short, small clip. A 40 second clip that needs to land at 1080p is a different job, and Atlas Cloud runs a separate hosted model for it.
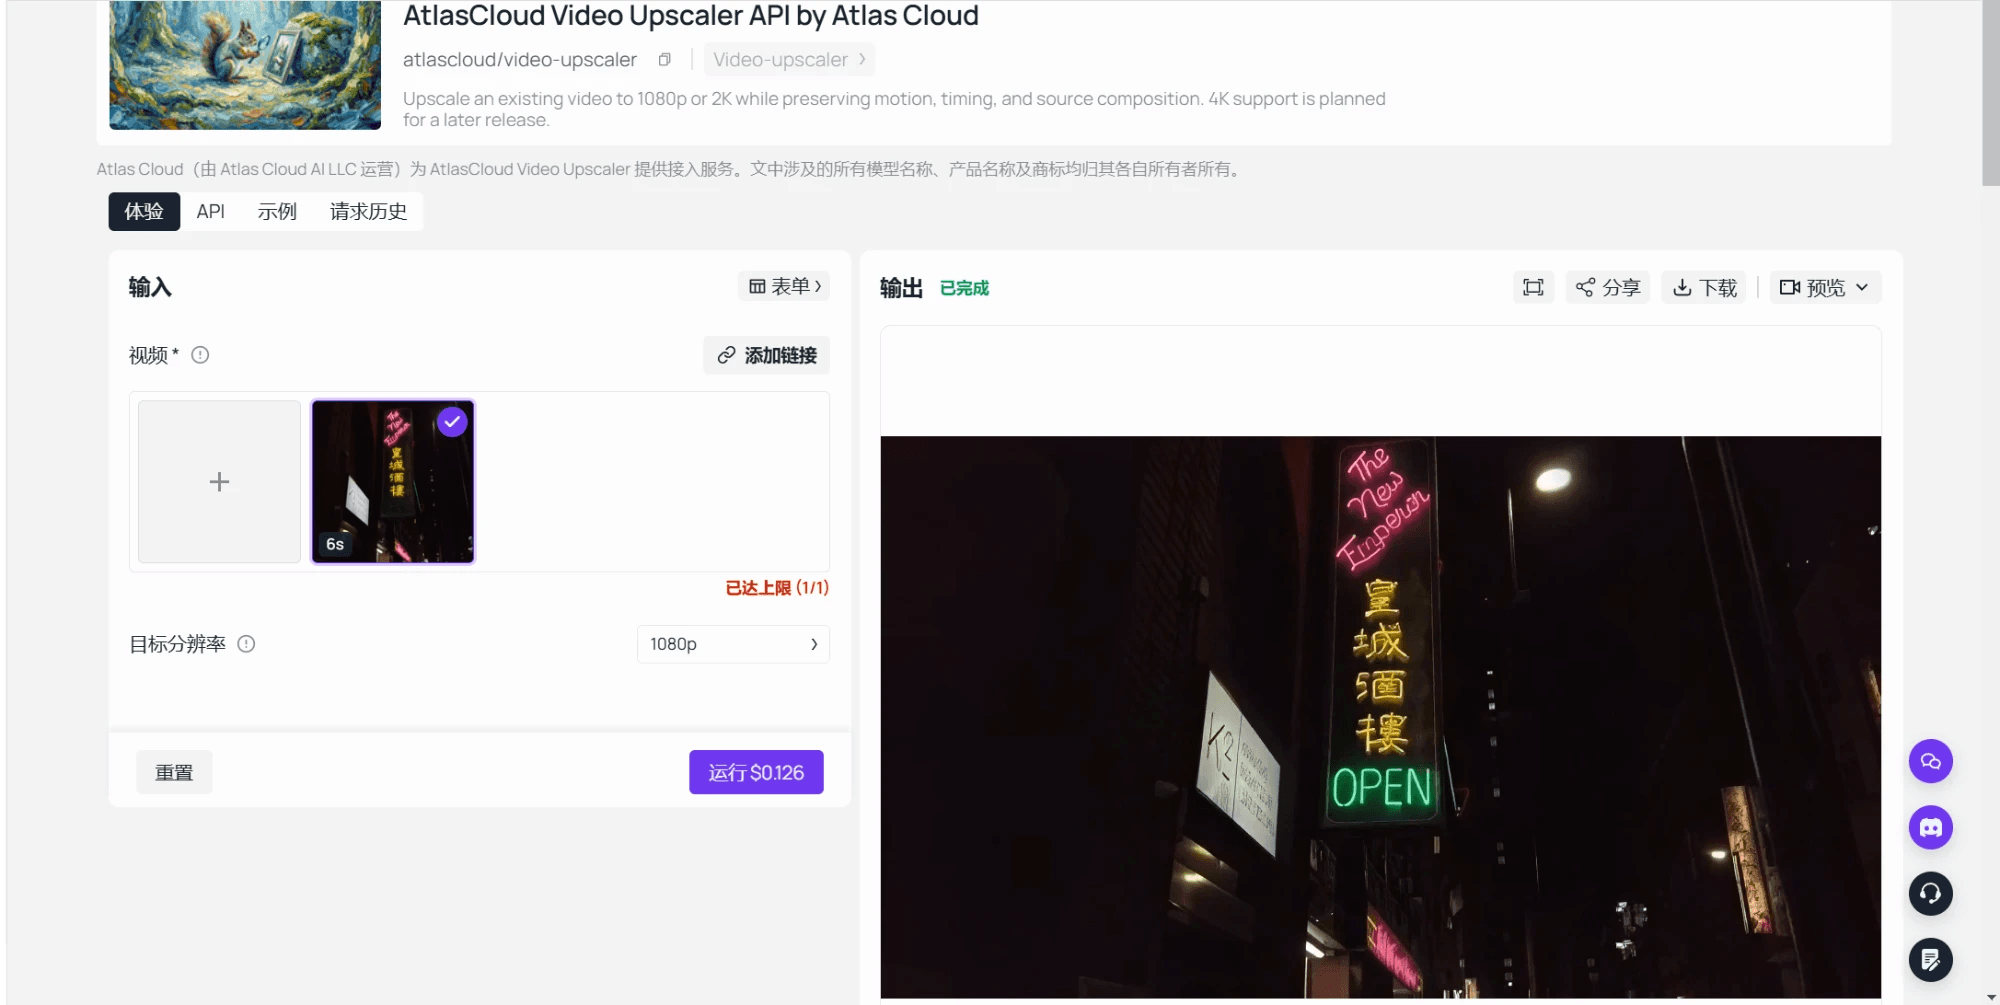
The video upscaler model in the Atlas Cloud playground takes a clip and a target resolution and returns a playable video at that size. Its documentation defines two output tiers:
| Target | Pixel tier | Longest input | Most input frames | Input frame rate |
|---|---|---|---|---|
| 1080p | 1920 by 1080 | 53 seconds | 1,590 | 30 fps or lower |
| 2K | 2560 by 1440 | 23 seconds | 690 | 30 fps or lower |
The server reads the clip's metadata before it does anything else, and a clip over the duration, frame rate or frame count limit for the tier you picked is rejected rather than trimmed. The workflow keeps the source frame rate, so there is no interpolation and no change of speed. The same documentation lists 4K as planned for a later release, so as of this writing 2K is the ceiling and we do not promise anything above it.
Upscale Video to 1080p in the Atlas Cloud Playground
The playground route needs an account and a balance, and then it is four moves:
- Open the model page linked above and sign in. The playground form has two fields that matter, the video input and a target resolution selector.
- Provide the clip. The input is a video link, and the playground's upload control turns a local file into one.
- Pick 1080p or 2K. Check the clip against the table first, since a 30 second clip is fine at 1080p and over the limit at 2K.
- Run, then download the result from the output panel once the run finishes.
Because the hosted model is the same idea as the browser tool at a larger size, the browser run is a free rehearsal for it. If the 2x pass on a 6 second sample of your footage looks right, the same footage will behave the same way at 1080p. If the sample came back as a sharper smear, the hosted run will too, and you have saved yourself the cost of finding out.
Keep the Clear Video Clear: Export Settings That Survive the Upload
An upscaled clip can go blurry again in the last ten seconds of the job, when a platform re-encodes it. YouTube's own playback quality page puts the first rule in one sentence: "If the video was recorded in standard definition, it won't be available in high definition." A source that reaches YouTube at 480p is served at 480p or below, whatever the viewer selects, and that is the case an upscale exists to prevent.
The second rule is bitrate. YouTube's recommended upload settings list the video bitrate it wants for each resolution in standard dynamic range:
| Resolution | Standard frame rate (24, 25, 30) | High frame rate (48, 50, 60) |
|---|---|---|
| 720p | 5 Mbps | 7.5 Mbps |
| 1080p | 8 Mbps | 12 Mbps |
| 1440p (2K) | 16 Mbps | 24 Mbps |
| 2160p (4K) | 35 to 45 Mbps | 53 to 68 Mbps |
The catch is that an upscaled file usually has to be exported once more before upload, and the export inherits the source's bitrate unless you change it. A clip upscaled to 1080p and exported at, say, the 2 Mbps its 480p original carried will be re-compressed into the same blocks you just paid to remove. Set the export to the row for its new resolution, and keep the frame rate of the source.
The browser tool hands you a WebM. Editors generally open it as is, and if a platform or app insists on MP4, this converts it at the 1080p rate from the table without touching the frames:
Bash1ffmpeg -i upscaled.webm -c:v libx264 -b:v 8M -maxrate 8M -bufsize 16M -pix_fmt yuv420p upscaled-1080p.mp4
One more habit that protects the result: send the file, not a preview of it. Messaging apps and social inboxes often re-encode video to save bandwidth, which is the look the 80 kbps clip in our test imitates. When a clip has to travel, share a link to the file or attach it as a document, and keep the upscaled master where you can find it.
Frequently Asked Questions
Is a video resolution converter the same as an AI video upscaler?
No. A converter re-encodes the clip at a new frame size and fills the extra pixels by blending their neighbours, so the frame gets bigger and stays as soft as it was. An AI upscaler runs each frame through a model that predicts the missing detail. Several sites labelled video clearer are a third thing again: brightness, contrast and sharpness sliders that change the look of the pixels without adding any. If a tool never asks for a target resolution, it is adjusting, not upscaling.
Can I upscale video to 1080p for free?
Not with the browser tool. It is scoped to clips up to 320 pixels on the long edge and doubles them, so a 1080p frame is the hosted model's job.
The hosted video upscaler model produces 1080p and 2K and bills per second of input: $0.018 per second for 1080p and $0.024 per second for 2K, rounded up to whole seconds with a 5 second minimum, so a 6 second clip at 1080p costs about $0.11 and a 30 second clip about $0.54. Those figures come from the model's own documentation as of September 2026 with no discount applied.
Does a video sharpener fix blurry video from camera shake?
It sharpens the outline of the blur, which can make a shaky clip look slightly crisper at a glance and no clearer when you pause it. Shake is a smear recorded while the camera moved, so the frame has no sharp version of itself to recover. A stabilizer in your editor reduces the bounce between frames, and shooting in brighter light or at a faster shutter shortens the smear on the next take.
How do I fix pixelated video sent through a messaging app?
Ask for the original first. A quick tell: a one minute clip that arrived as a few megabytes has been re-encoded on the way, and the copy on the sender's phone does not have those blocks. Some apps skip the re-encode when the clip is sent as a file or document instead of as an inline video. If the forwarded copy is all that exists, the 2x pass softens the blocks and the detail the encoder removed stays removed.
Why does my video turn blurry after uploading?
Major platforms re-encode uploads, and the resolution and bitrate of your file set the ceiling for what viewers can get. A 480p upload stays 480p, and a 1080p upload exported at a low bitrate arrives with fresh compression blocks. One check after the upload finishes processing: open the quality menu on the player. If the tier you upscaled to is missing, the file that arrived was smaller than that, and the export settings are where to look.
Can AI make a 240p video look like 4K?
No. The hosted model in this guide stops at 2K, with 4K listed by its documentation as planned rather than available, and the arithmetic explains why that ceiling is sensible. A 240p frame holds roughly one eightieth of the pixels of a 4K frame, so nearly all of a 4K output would be invention. A 2x pass to 480p, or a 1080p run for a clip that matters, is the range where the model is filling gaps rather than painting a new picture.
Conclusion
The tool matters less than the diagnosis. Pause the clip, look at how the blur behaves, and you know within a few seconds whether you are short on pixels, looking at compression, or looking at a smear the camera recorded. The first two answer to a super resolution model, and a free browser pass on a short clip shows you how well before you spend anything. The last two answer to a steadier hand and a locked focus, and no amount of sharpening changes that.
That is the honest version of how to make a blurry video clear: match the fix to the cause, run the free pass as a rehearsal, take the longer footage to the hosted model when the rehearsal looks right, and export at a bitrate that keeps the result on the way to wherever it is going.





