大多数滤镜应用,点击一个"寸头"按钮,你只能得到一个任意的头发长度。它不会告诉你,你的头型配露出头皮的 #1 号卡尺(3mm)、更浓密的 #3 号刷式寸头(10mm),还是顶部 #4 号配太阳穴低压渐变,哪一种更好看。
通用滤镜会忽略头型。AI Hairstyle Changer 让你通过提示词来控制发型。设定好卡尺号、渐变位置和发际线边缘,在预约理发师之前先预览生成的发型效果。
为什么通用寸头滤镜会忽略卡尺长度和渐变线
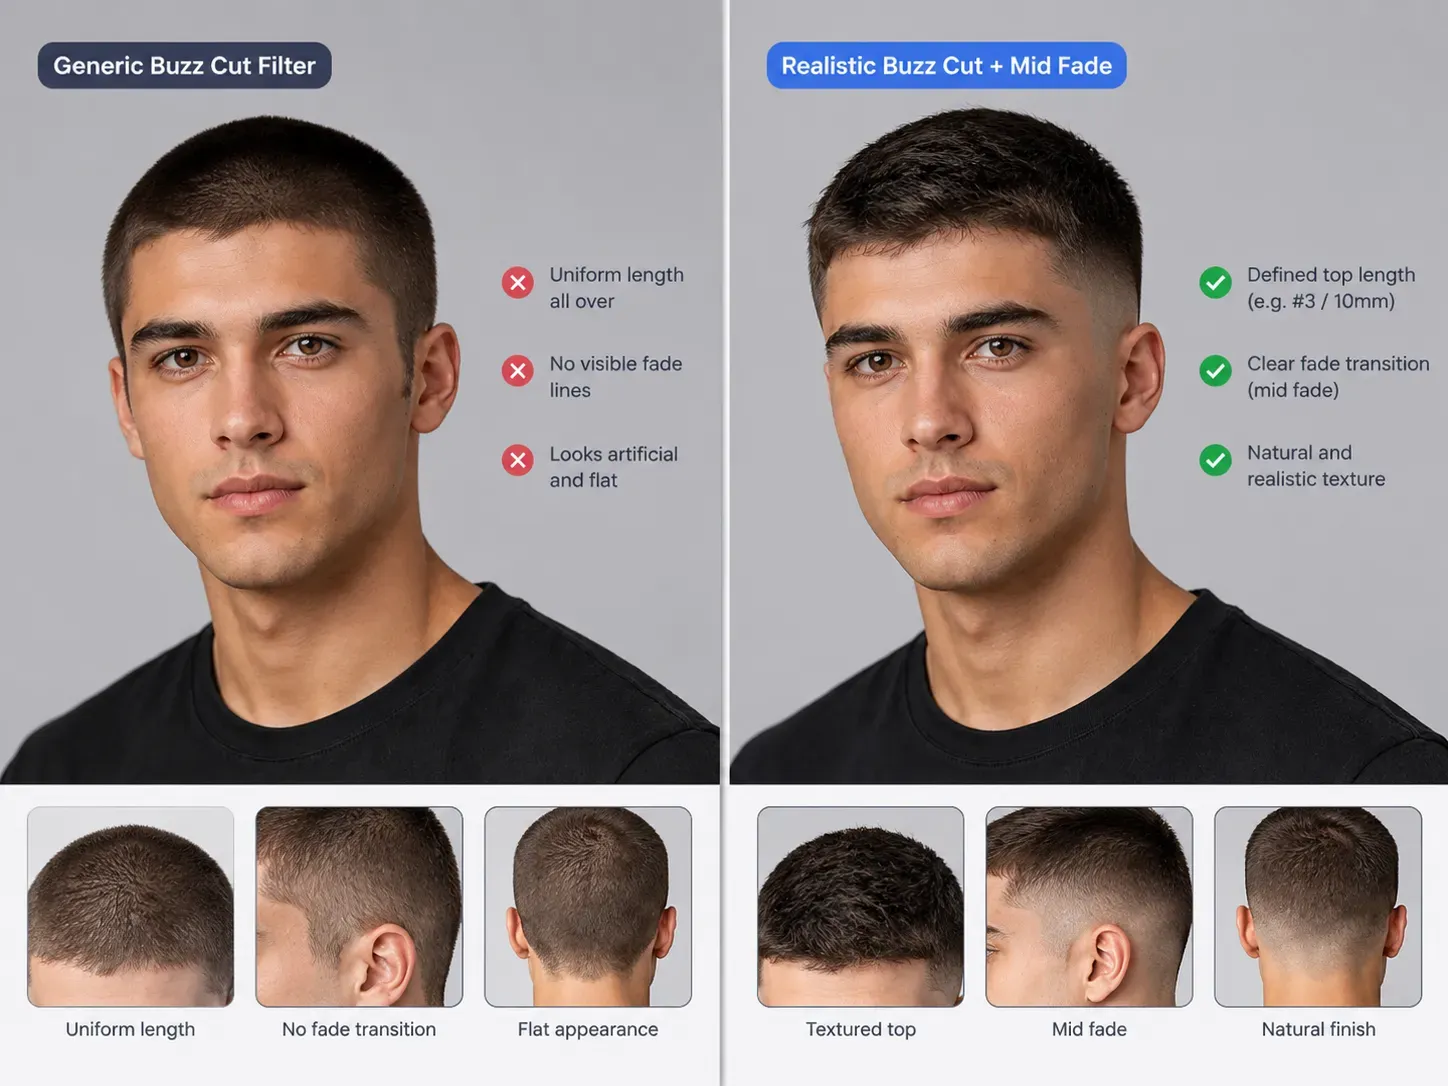
"buzz cut filter" 关键词下排名靠前的工具,其实只属于三种技术类别。其中只有一种能让你指定顶部和两侧到底该剪多短:
| 滤镜类别 | 代表工具 | 如何编辑你的头发 | 卡尺号与渐变控制 | 最适合的场景 |
| 实时 AR 相机镜头 | TikTok 与 Snapchat 寸头特效 | 使用实时头部追踪和虚拟头发叠加来模拟短发 | 大多固定,几乎无法控制卡尺长度或渐变位置 | 快速发型预览和反应类视频 |
| 基于预设的 AI 工具 | YouCam 预设模式、Media.io、AILabTools | 应用预设发型或根据上传照片生成预定义的短发造型 | 取决于可用预设;部分提供渐变变体,但详细自定义有限 | 快速对比常见寸头发型 |
| 提示词驱动的 AI 编辑器 | Atlas Cloud 免费 AI Hairstyle Changer、Fotor 自定义提示词 | 使用文字指令,根据上传照片生成自定义发型 | 可解析卡尺号、大致发长、渐变样式、发际线修剪和发色 | 在去理发店前测试具体发型组合 |
TikTok 和 Snapchat 的 AR 镜头通常是在你原有头发上叠加一层"帽子",而不是替换它。对于浓密、卷曲或长发的人来说,这会让头部看起来不自然地变宽。
网页端滤镜在静态照片上表现更好,但通用寸头工具往往忽略卡尺长度和渐变的差异。#1 号贴皮寸头和 #4 号配中部渐变的寸头看起来截然不同。若想测试全剃光头,请改用光头滤镜。
把卡尺号和渐变样式翻译成 AI 提示词
一个简单的"寸头"提示词默认是均匀的 #2 或 #3 长度。要预览特定样式,需定义三个细节:顶部卡尺尺寸、侧面渐变高度和发际线形状。
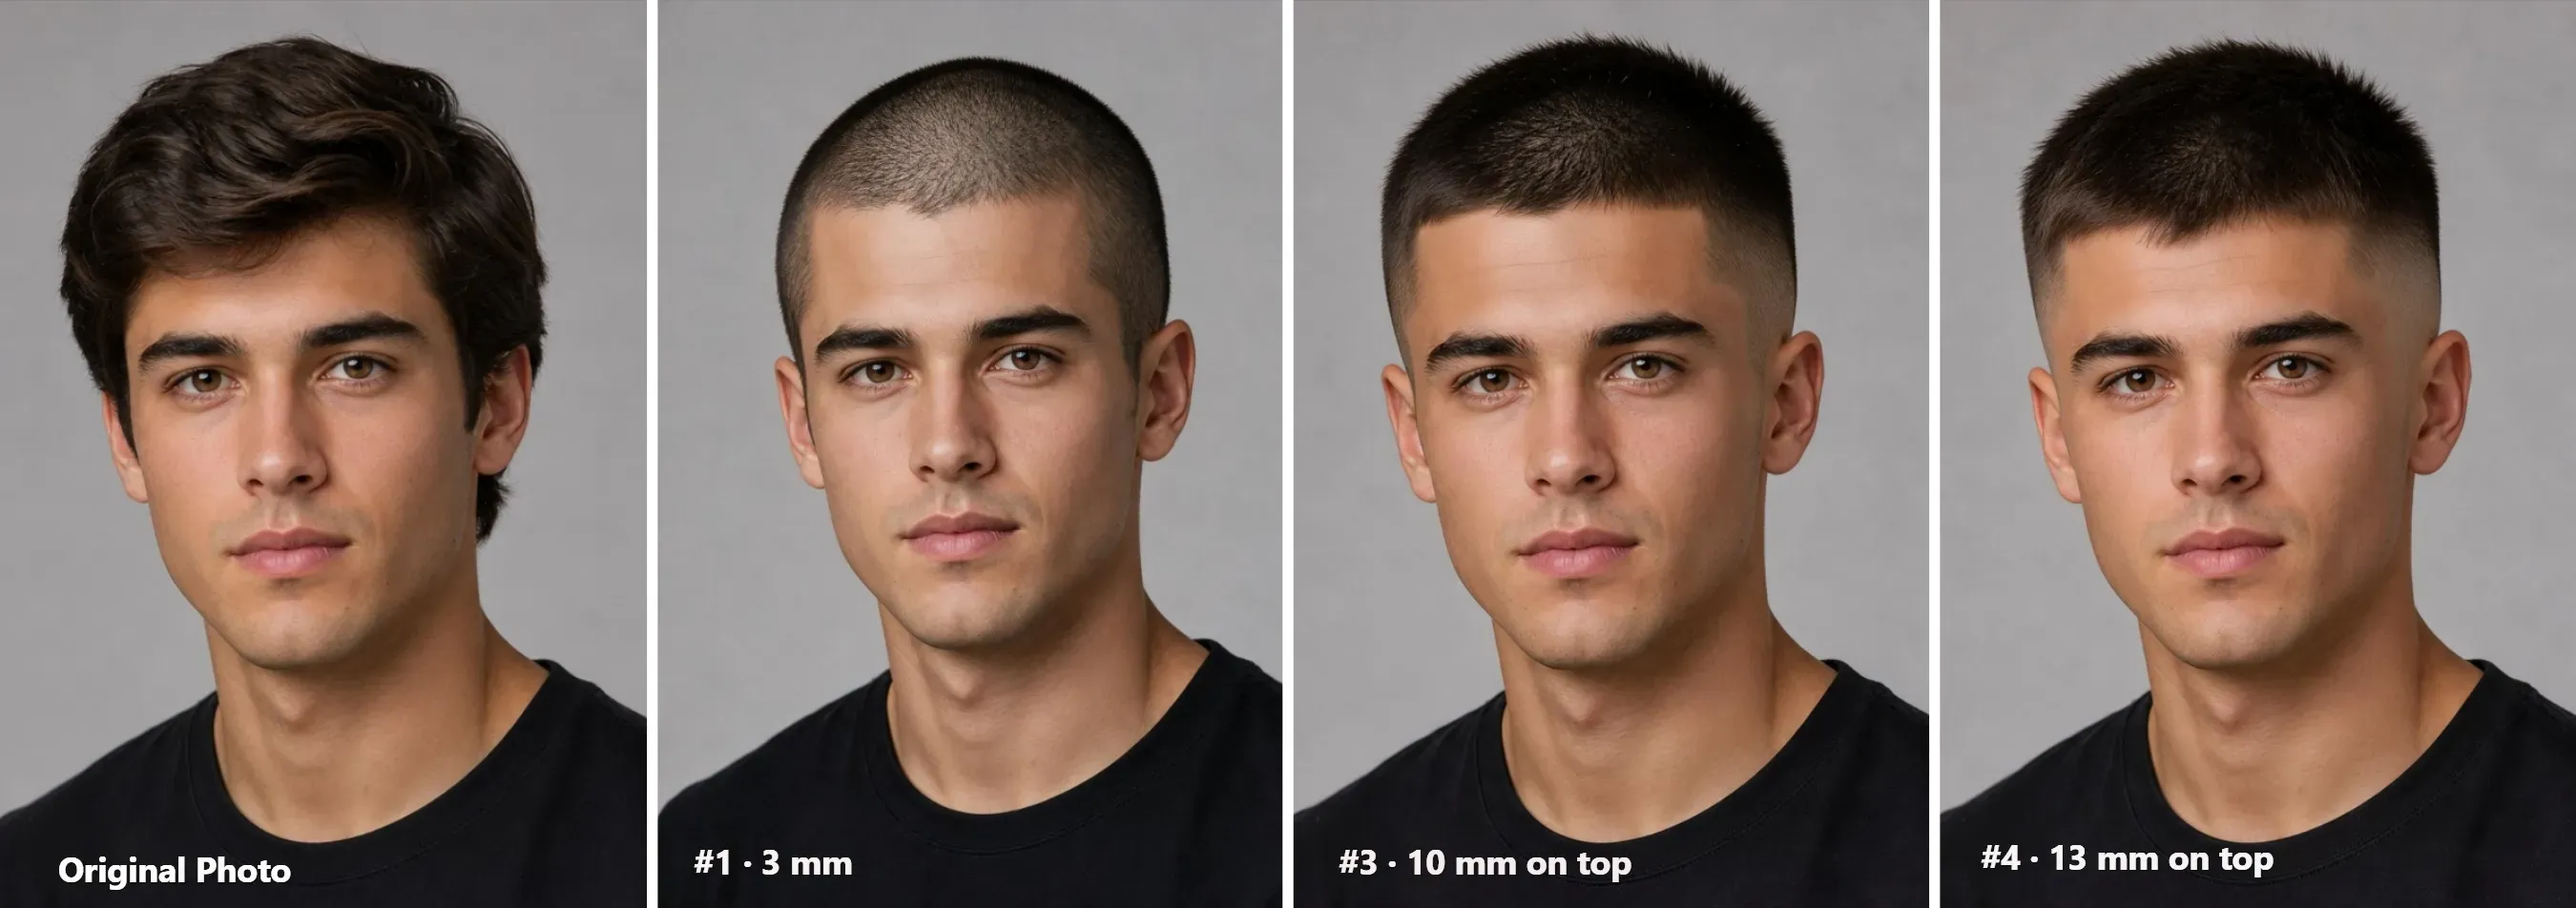
顶部卡尺长度与头皮可见度
图像模型不认毫米。请直接在提示词中描述头皮遮盖程度:
- #0 到 #1 号卡尺(1.5mm 到 3mm):贴头皮短茬,头皮明显可见。这个剪法会去掉所有头发厚度,勾勒出原始头型。
- #2 号卡尺(6mm):紧实的深色短茬。皮肤完全被遮住。头发平贴头部。
- #3 到 #4 号卡尺(10mm 到 13mm):短而浓密的发型,纹理可见。可遮盖头顶扁平的部位,与渐变的侧面形成对比。
- 3-2-1 法则:顶部用 #3,上半侧混合 #2,边缘逐渐过渡到 #1。这样可以避免头部看起来太圆。
侧面渐变与发际线
单一卡尺寸头全头一个长度。渐变是把侧面剪得比顶部短:
- 高贴皮渐变:在太阳穴高度剃到裸露皮肤。去掉最多的侧面头发。
- 中滴渐变:在耳后向后方弯曲。太阳穴周围保留深色短茬。
- 低锥形渐变:只修饰鬓角和颈线。保留侧面头发的完整密度。
- 修剪边缘 vs. 自然:提示词写"crisp razor lineup"(利落的剃刀边缘线)可得到方正的边缘。写"natural hairline"(自然发际线)可保留你自己的前额边缘。
AI Hairstyle Changer 可直接复制粘贴的提示词参考表
将以下任意提示词直接粘贴到 Free AI Hairstyle Changer 的 Hair request(头发请求) 输入框中,或其他 AI 图像编辑工具 中:
#1 号贴皮寸头:极短
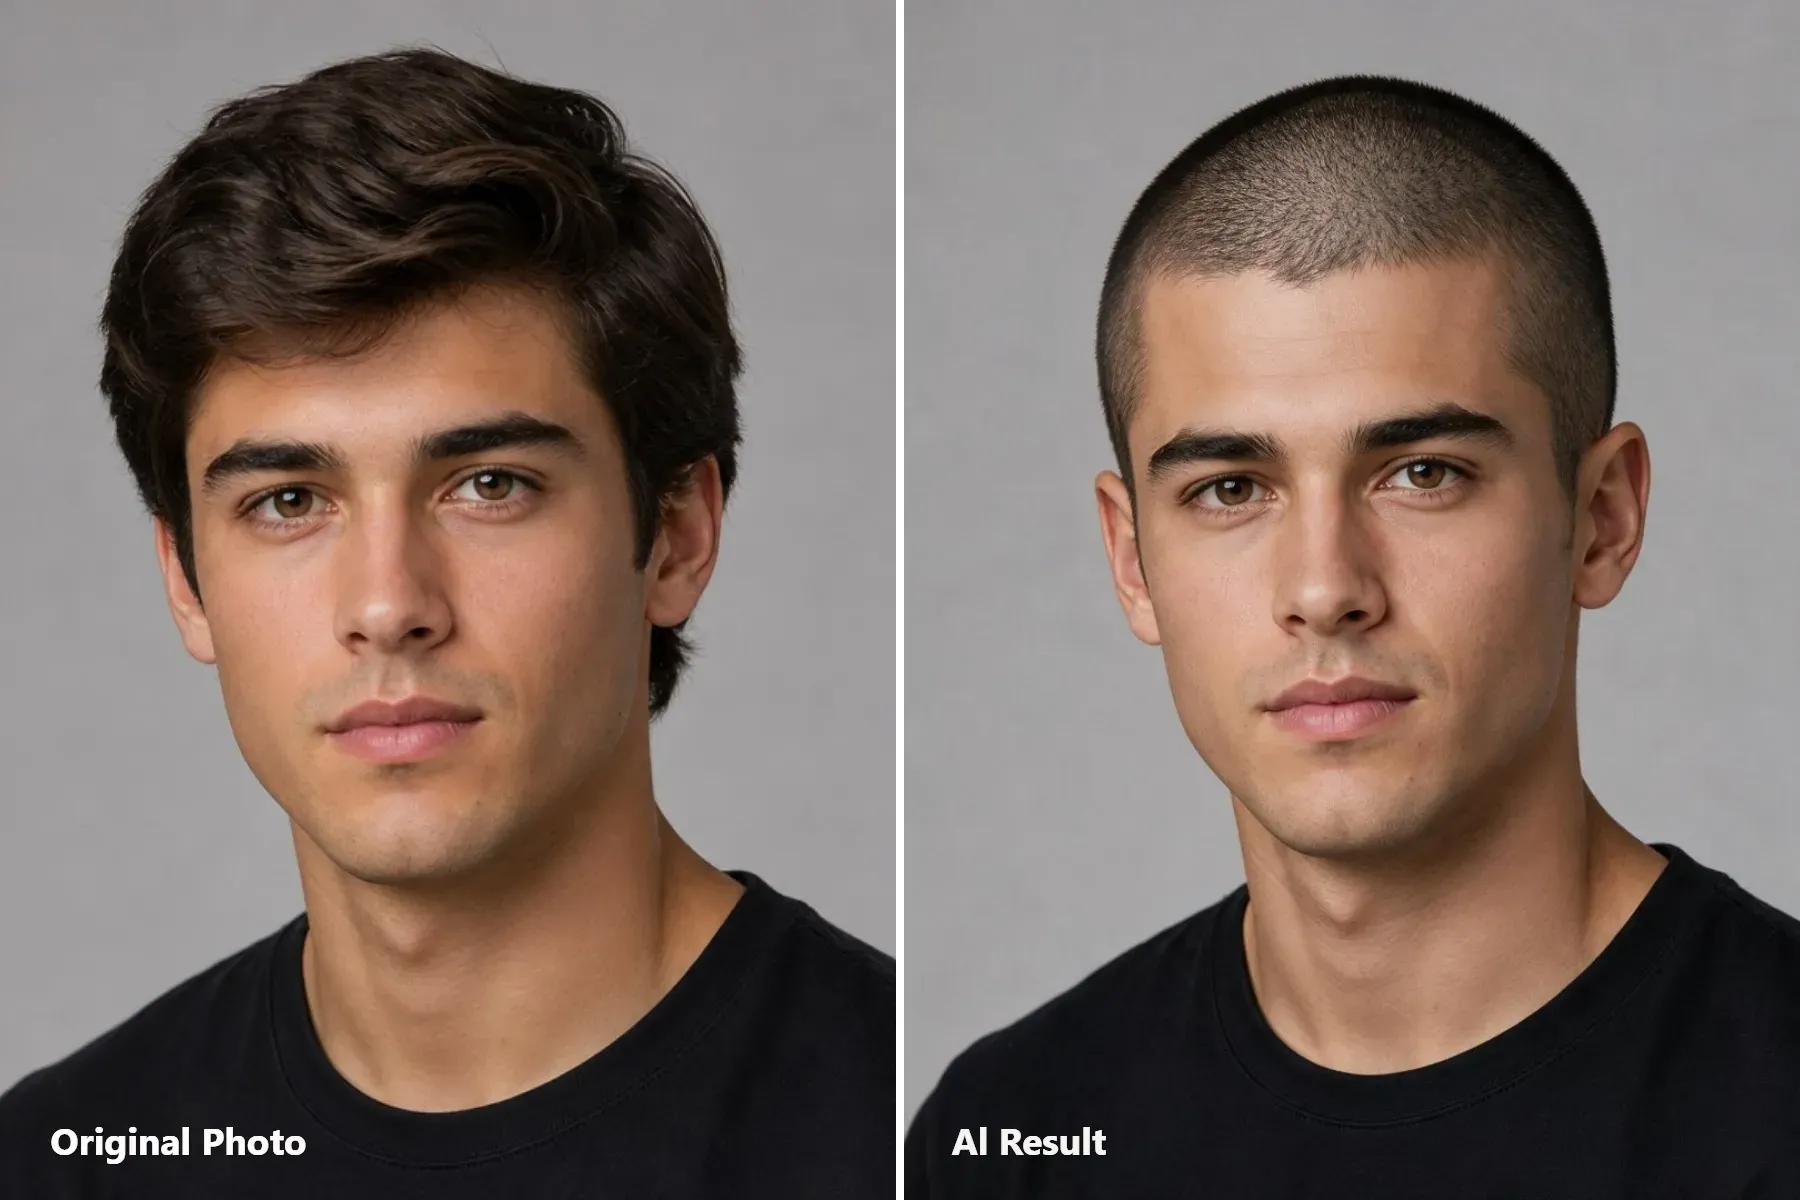
卡尺长度: #1 · 3 mm
剪发样式: 顶部和侧面均匀短长度,头皮隐约可见。
最适合脸型: 鹅蛋脸、轮廓清晰的下颌线、以及正在后移的发际线。
可复制粘贴的提示词:
plaintext1Change the hairstyle to a uniform #1 guard buzz cut, approximately 3mm long, across the entire head, including the top, sides, and back. Keep the hair very short with clearly visible fine stubble texture and slight scalp visibility between the hairs. Maintain an even length throughout, with no fade, taper, or extra length on top. Preserve the person's original hairline shape and natural hairline edges. Keep the face, facial features, ears, skin tone, lighting, and background unchanged.
#2 号寸头 + 低锥形渐变:经典款
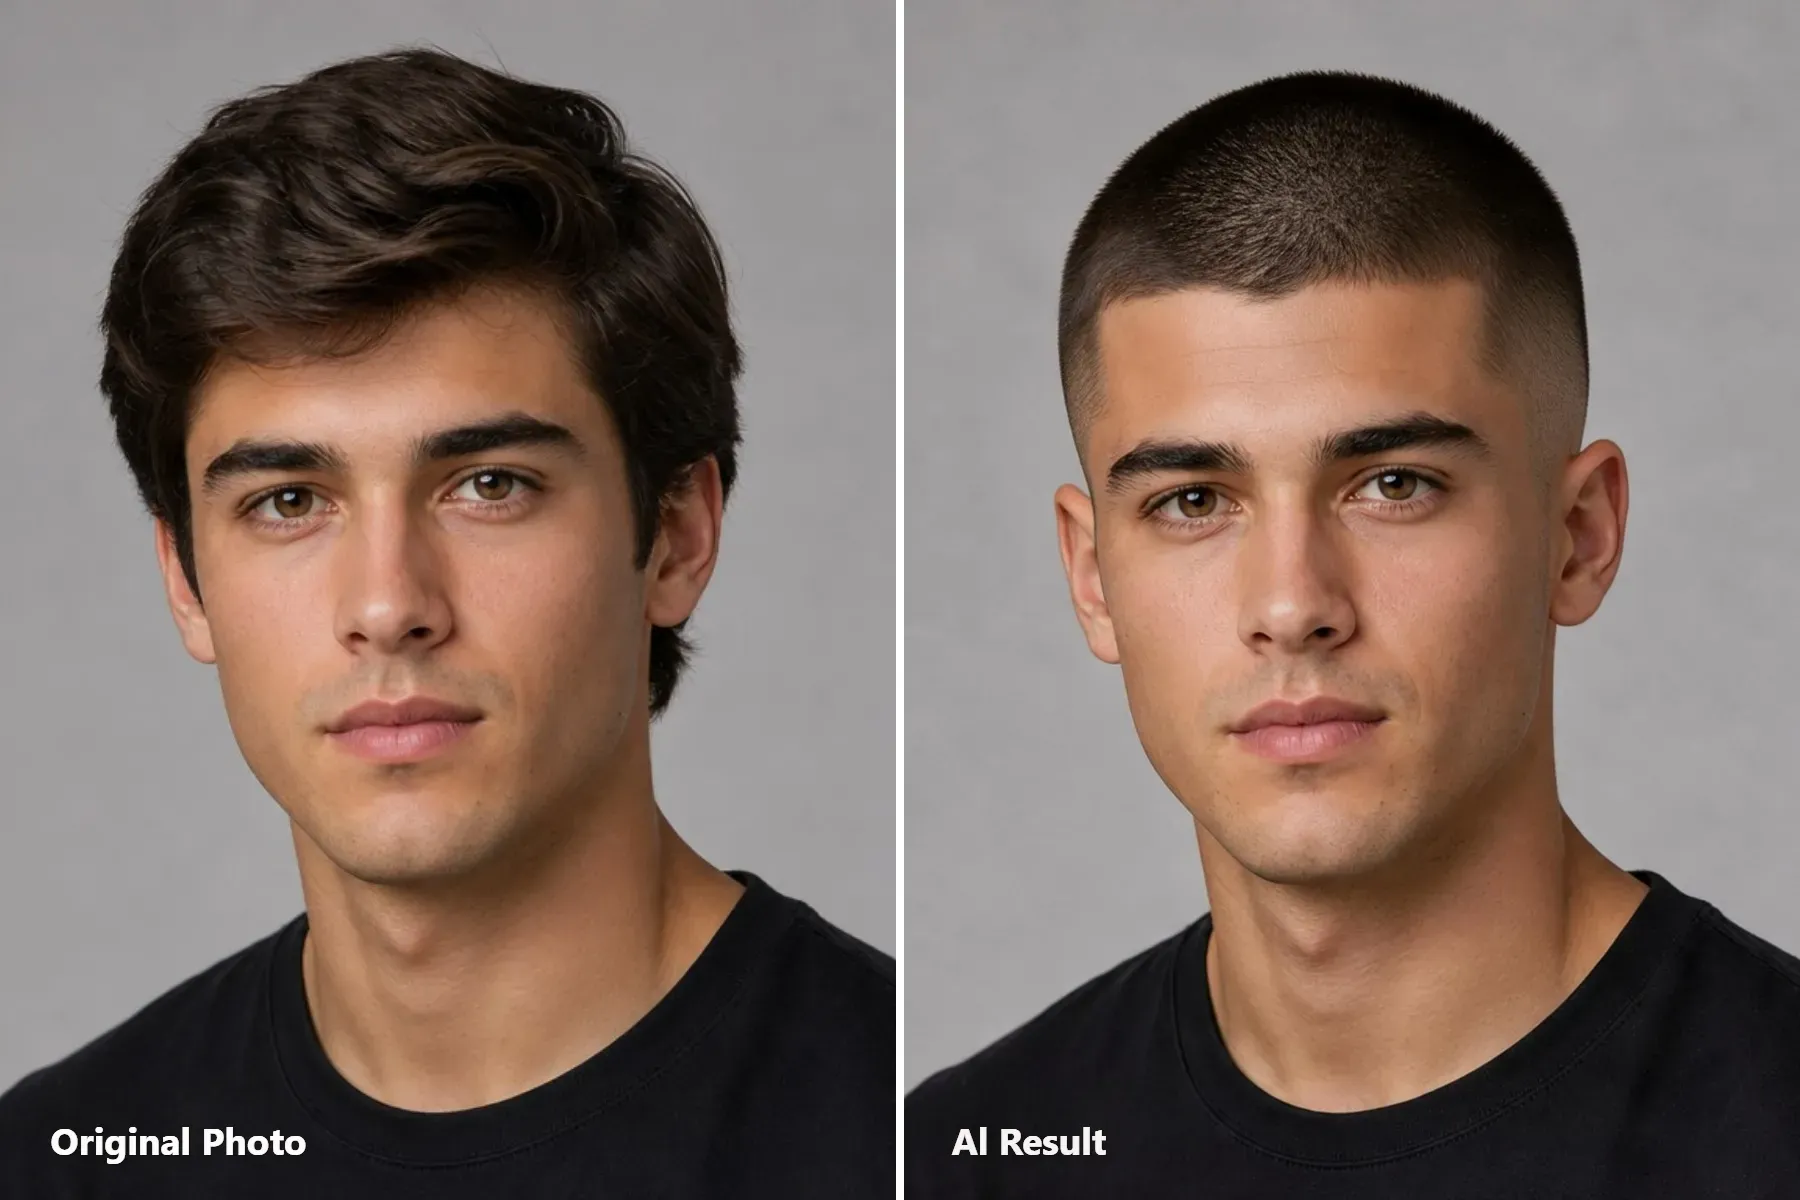
卡尺长度: 顶部 #2 · 6 mm
剪发样式: 顶部短而均匀,太阳穴和鬓角周围带有渐进式低锥形渐变。
最适合脸型: 长脸、长方脸和心形脸。
可复制粘贴的提示词:
plaintext1Change the hairstyle to a neat #2 guard buzz cut, approximately 6mm long, with an even length across the entire top. Add a subtle low taper fade starting just above the sideburns and around the temples, gradually blending the shorter hair into the longer hair above. Include a clean, natural taper around the neckline at the back. Keep the taper low and understated, without extending it high up the sides or creating a dramatic skin fade. Preserve the person's original hairline shape and natural contours. Keep the face, facial features, ears, skin tone, lighting, and background unchanged.
#3 号刷式寸头 + 中滴渐变:带纹理
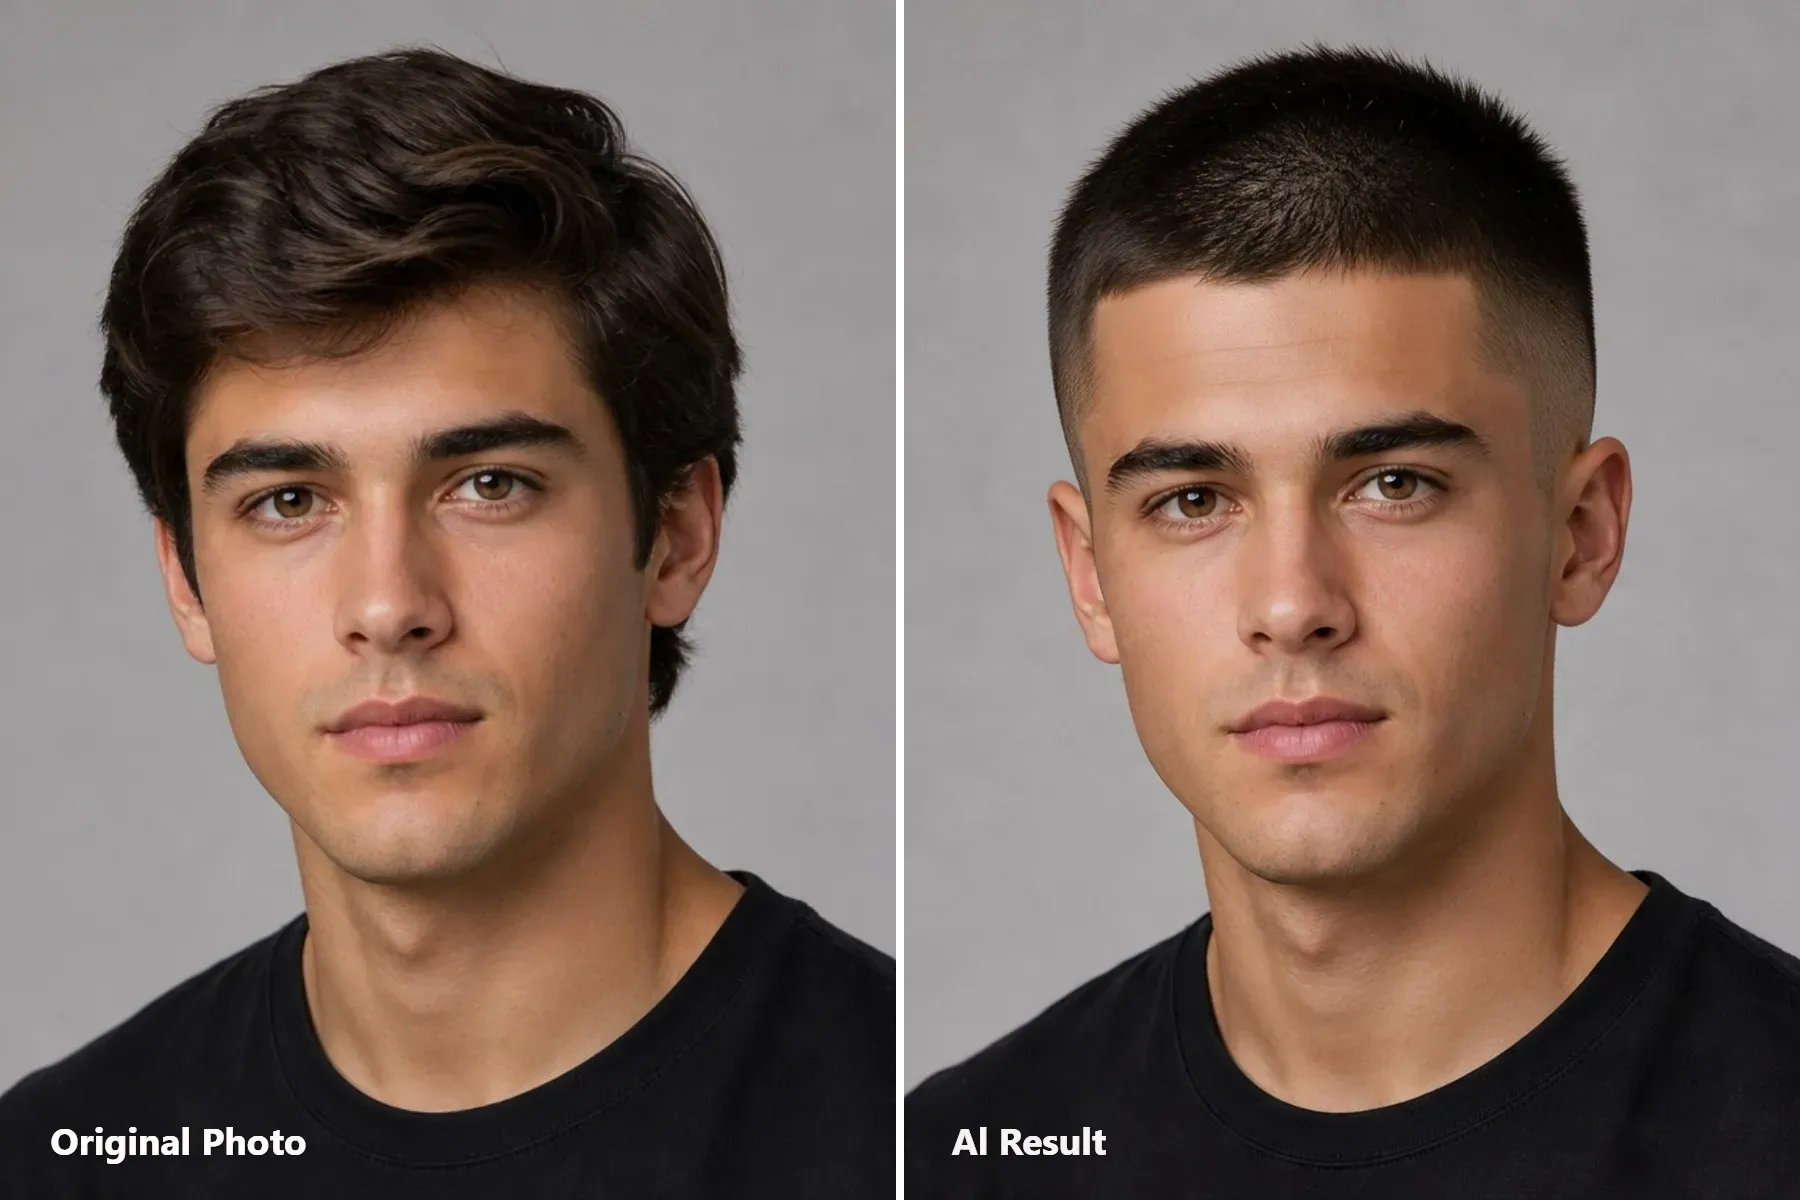
卡尺长度: 顶部 #3 · 10 mm
剪发样式: 顶部略带纹理,中滴渐变在耳后弯曲。
最适合脸型: 大多数脸型;是初次尝试寸头最稳妥的选择。
可复制粘贴的提示词:
plaintext1Change the hairstyle to a #3 guard brush buzz cut, approximately 10mm long across the top. Keep the top short and evenly trimmed, with subtle natural hair texture and a slightly brushed-up finish rather than a long or voluminous style. Add a mid drop fade that starts around the temples and gradually blends shorter toward the sides and back, following a curved shape that drops naturally behind the ears and tapers toward the neckline. Create a clean but natural temple line-up without making the hairline look overly sharp or artificial. Preserve the person's original hairline shape and contours. Keep the face, facial features, ears, skin tone, lighting, and background unchanged.
#4 号寸头 + 高贴皮渐变:大胆款
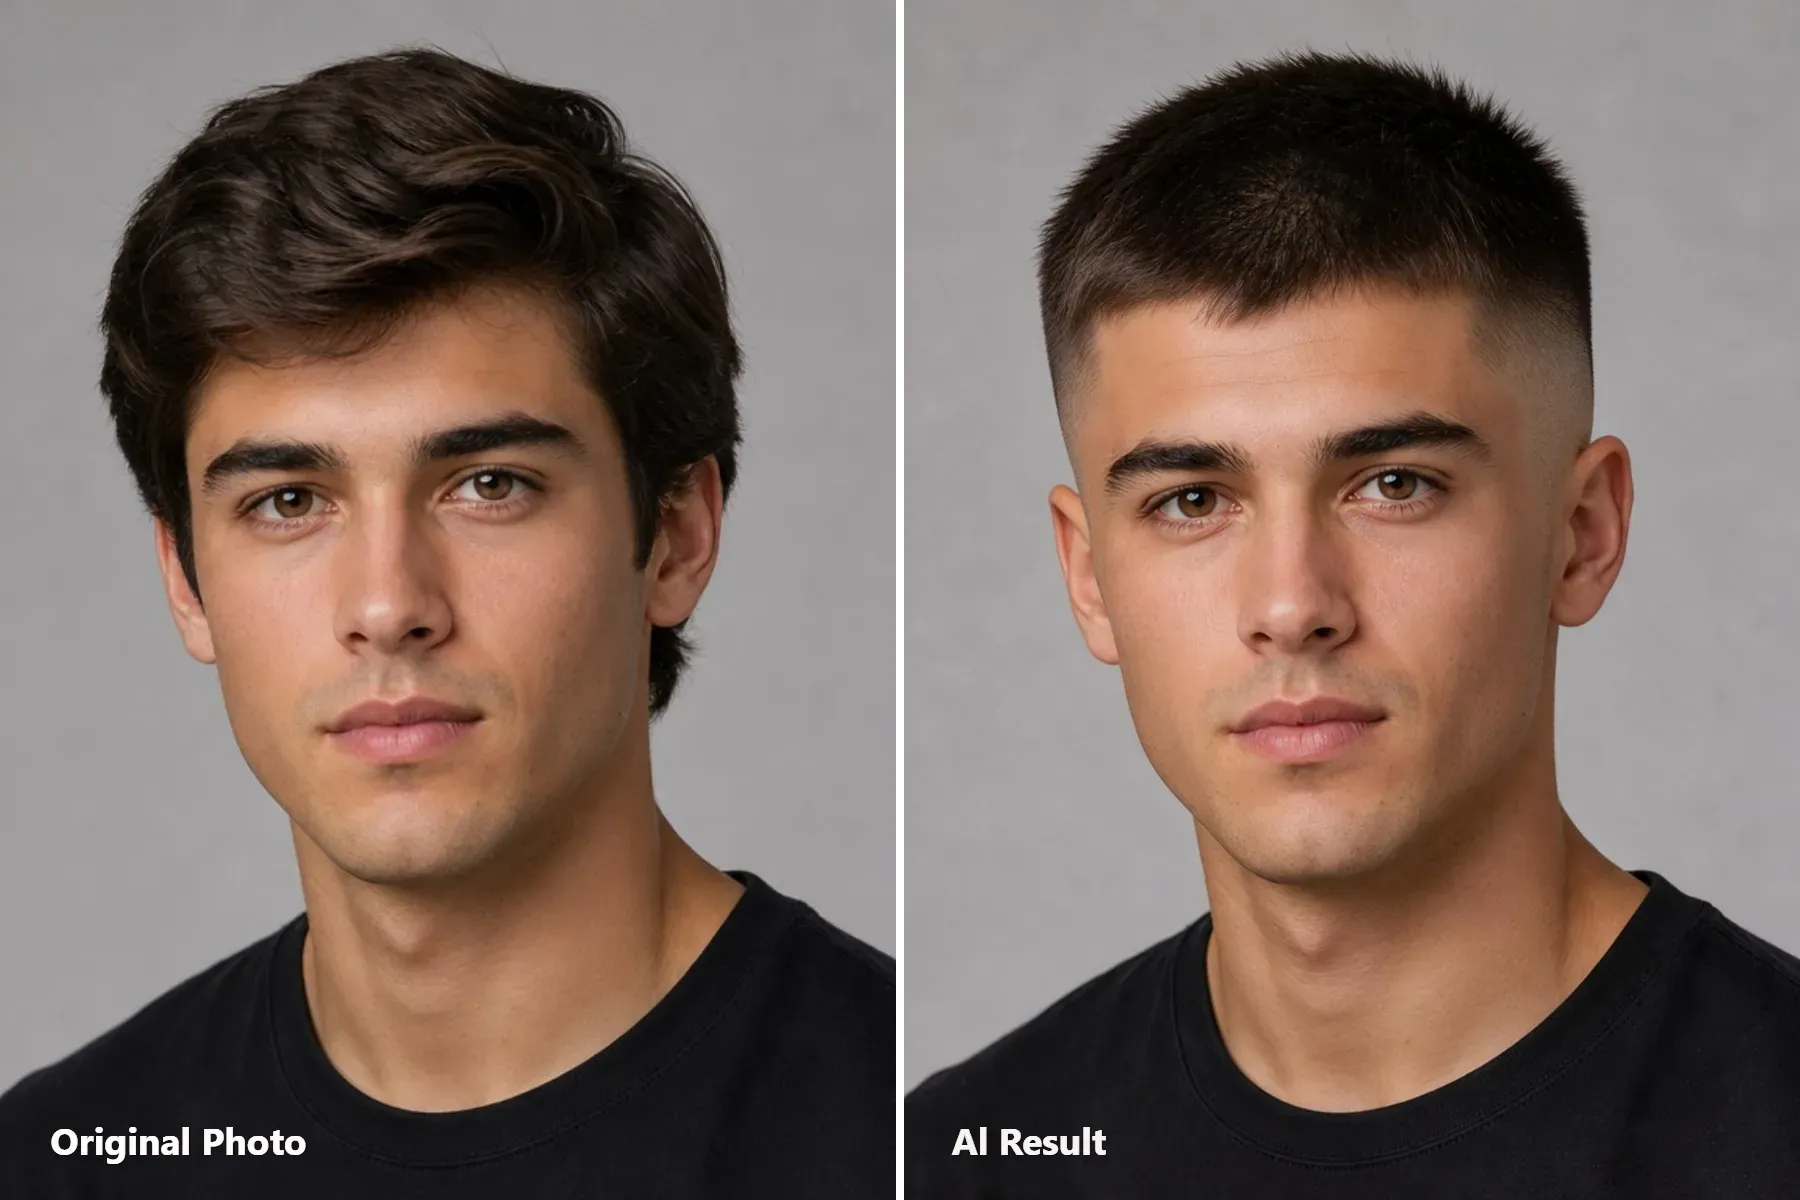
卡尺长度: 顶部 #4 · 13 mm
剪发样式: 顶部更饱满,高渐变在侧面逐渐过渡到裸露皮肤。
最适合脸型: 圆脸或脸颊饱满的脸型,可通过纵向高度来修饰。
可复制粘贴的提示词:
plaintext1Change the hairstyle to a #4 guard cut with approximately 13mm (1.3cm) of hair remaining on the entire top. The top must have clearly visible hair length, with individual short strands extending naturally from the scalp. Keep the hair slightly raised and textured rather than flat, tightly cropped, or reduced to fine stubble. Maintain a consistent 13mm length across the top without adding excessive volume or creating a long hairstyle. 2Create a distinct high skin fade on both sides and the back. The fade should begin high above the temples, transitioning smoothly from the longer top hair through progressively shorter lengths to completely bare skin around the lower sides and back. Preserve the original forehead hairline shape, with clean natural edges around the temples. Keep the face, facial features, ears, skin tone, lighting, and background unchanged.
铂金漂染 #2 号寸头:时尚前卫款
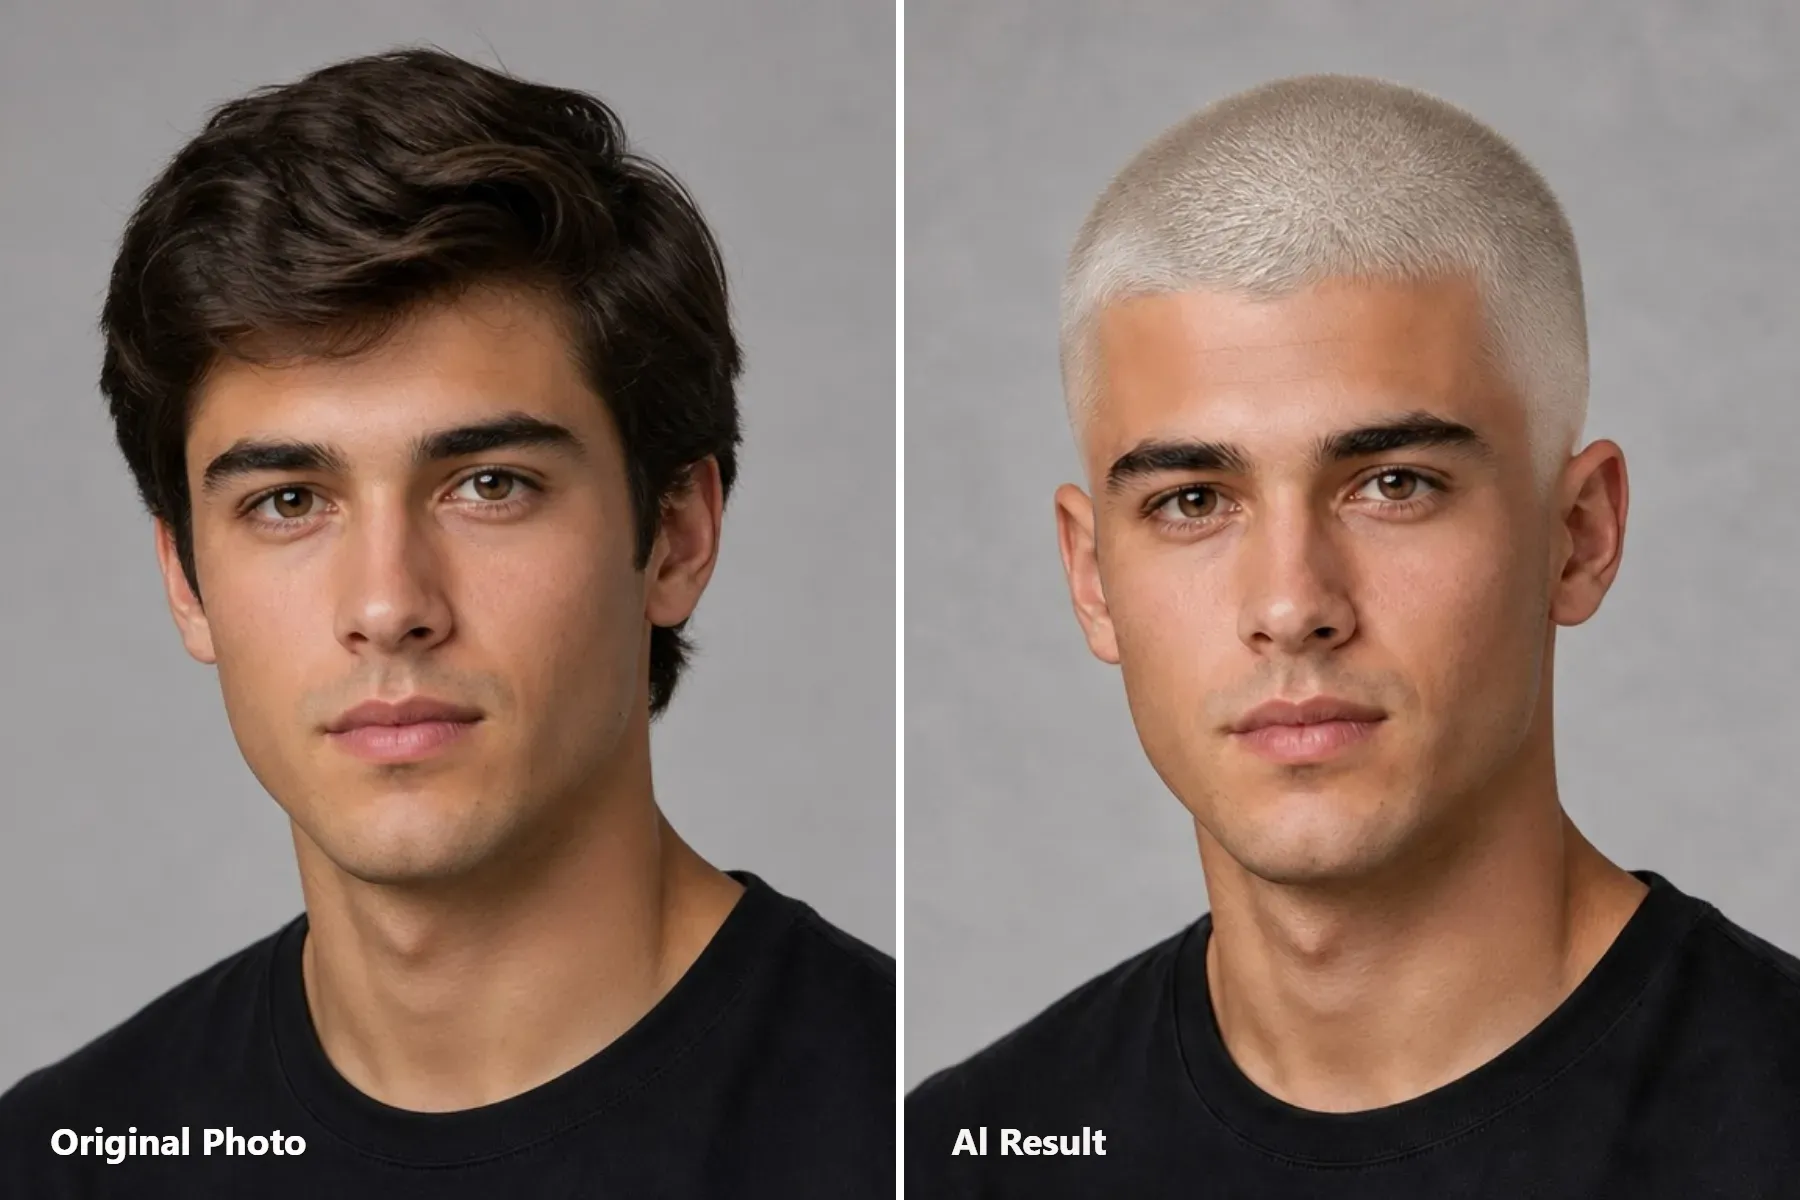
卡尺长度: #2 · 6 mm
剪发样式: 均匀短寸头,冰铂金色调。
最适合脸型: 适合男女的时尚高对比度造型。
可复制粘贴的提示词:
plaintext1Change the hairstyle to a uniform #2 guard buzz cut, approximately 6mm long across the entire head, including the top, sides, and back. Keep the hair evenly trimmed with clearly visible short hair strands and natural buzz-cut texture. Dye all the hair an icy platinum blonde with a cool, pale blonde tone, avoiding silver-gray or pure white coloring. Ensure the platinum color covers the hair evenly without changing the scalp or skin tone. Preserve the original hairline shape and natural contours. Keep the face, facial features, eyebrows, ears, skin tone, lighting, and background unchanged.
如何用 Atlas Cloud AI Hairstyle Changer 在照片上测试寸头
这款 Free AI Hairstyle Changer 只编辑你的头发。它会锁定你的脸部、肤色和背景光照。使用 Google、GitHub 或邮箱登录,即可生成并下载无水印图像。
用这一步从正面和侧面角度测试卡尺号和渐变:
步骤 1:准备并上传正面自拍或 45 度角照片
输入照片决定预览的成败。由于寸头会去掉所有头发厚度,工具必须看到你的耳朵和头型,才能正确放置发型:
- 将长发扎起或打湿后压平。侧面蓬松的头发会扭曲最终发型轮廓。
- 完全露出额头和耳朵。不要戴帽子、兜帽或留刘海。
- 在均匀光线下拍两张:一张正面角度用于发际线修剪,一张 45 度角用于侧面渐变。
步骤 2:上传照片并输入发型提示词
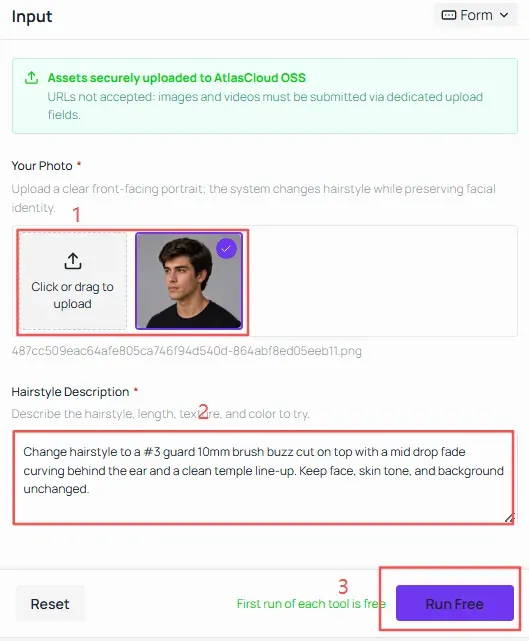
先从中等长度发型开始,再测试极端贴皮剪法。在 Hair request(头发请求) 输入框中,先粘贴以下提示词:
plaintext1Change hairstyle to a #3 guard 10mm brush buzz cut on top with a mid drop fade curving behind the ear and a clean temple line-up. Keep face, skin tone, and background unchanged.
点击"Run free"。保存结果图后,保持同一张上传的自拍不变,只在提示词框中更换卡尺号和渐变高度,例如把 #3 guard 10mm brush buzz cut 改为 #1 guard 3mm buzz cut all over。将两个结果并排对比,就能看出你的头型是配深色顶部密度更好,还是配贴皮均匀剪法更协调。
步骤 3:测试下脸平衡——配胡须渐变或漂染效果
去掉顶部头发,会把视觉重心立即下移到下颌线、颧骨和眉毛。在关闭标签页之前,运行一个变体提示词,测试下脸修饰或发色变化对该发型的影响:
测试寸头与面部毛发融合:
plaintext1Change hair to a #2 guard 6mm buzz cut on top with a low skin fade at the temples that blends smoothly into a neatly trimmed short boxed beard. Keep eyes, nose, skin tone, and background unchanged.
测试女性或长发人像的柔和或染发寸头:
plaintext1Change hair to a soft #3 guard buzz cut dyed warm platinum blonde following the natural feminine hairline contour, no harsh razor line-up. Keep face, eyebrows, earrings, and lighting unchanged.
可选步骤 4:用 Seedance 2.5 把静态预览变成转头检查
把你的测试变成一段短视频,看发型在动态下的效果。将原始照片作为首帧、寸头渲染图作为末帧上传到 Seedance 2.5。它会生成一段 5 秒的短片,展示自然的转头和前后对比过渡。
为什么你的 AI 寸头预览效果不对,以及如何修正
当 AI 剪到贴头皮短茬时,不均匀的阴影和倾斜角度会让你的头型变形。将你的糟糕渲染图对应下列修正方法:
| 预览问题 | 可能原因 | 如何修正 |
| 头型宽大、圆鼓 | 厚重或蓬松的侧面头发扭曲了头部轮廓。 | 将长发扎起,压平蓬松的侧面,并指定"follow the natural skull contour"(遵循自然头骨轮廓)。 |
| 额头深色带或模糊斑块 | 刘海或强烈阴影遮挡了自然发际线。 | 使用均匀光照,把刘海从额头拨开。 |
| 渐变看起来像均匀寸头 | 正面照片掩盖了太阳穴和耳朵上方的区域。 | 使用 30–45° 的四分之三角度照片,并指定所需渐变高度。 |
| #1 号看起来像光头,或 #4 号看起来太长 | 模糊的长度描述让模型困惑。 | 同时指定卡尺长度和纹理:"3mm stubble with slight scalp visibility"(3mm 短茬,头皮略微可见)或 "13mm dense brush texture"(13mm 浓密刷式纹理)。 |
| 脖子或肩膀上有散落头发 | 长发落在编辑区域之外。 | 拍照前将头发扎起或塞进衣服里。 |
最大的改善来自你在拍照前如何处理浓密或长发。直接在 AI Hairstyle Changer 中更换输入照片,或在现有提示词中加入修正语句,试试这些调整。
准备好尝试新造型了吗?上传你的照片,测试不同的寸头长度和渐变,在下次去理发店之前看看哪种风格最适合你!


