Kling 3.0 quietly redefined AI filmmaking the moment it launched in February 2026. The takeaway is simple: physics-accurate motion and rock-solid character identity are no longer the exception—they are the baseline. As Kuaishou's latest unified multimodal AI model series, Kling 3.0 closes the "uncanny valley" gap that used to require expensive VFX teams to fix in post.
What makes Kling 3.0 a game-changer in 2026?
- Omni One Architecture: A single unified system handling video, image, and audio together.
- Native Lip Sync: Natural, multi-language dialogue alignment without post-production stitching.
- Zero Visual Drift: Perfect multi-shot continuity keeping faces, clothing, and proportions intact.
This puts Kling 3.0 in direct competition with Seedance 2.0 and Google's Veo 3.1 as the new benchmark for hyper-realistic AI video. From multi-shot continuity to native audio sync, this guide walks through the exact playbook for getting cinema-grade results with seamless character motion in this generation of the AI video generator landscape.
What is Kling 3.0? The Physics-Driven Omni One Engine Breakdown
At its core, the Kling AI video generator runs on Kuaishou's Omni One architecture, a unified system that handles generation, understanding, and editing in one pass instead of processing frames sequentially. It models how objects move through space, how lighting changes over time, and how different elements interact physically, which is the foundation for genuine real-world physics simulation.
How 3D Spacetime Joint Attention fixes "floaty" motion
3D Spacetime Joint Attention and Chain-of-Thought reasoning extract and transfer motion with real-world physics intact, preserving gravity, balance, deformation, and inertia. The Chain-of-Thought component means the model essentially thinks before it renders, breaking the prompt into scene elements and motion paths first, which is why Kling now gets cited as a credible Sora alternative.
Kling V3 vs Kling O3
Choosing between Kling V3 and Kling O3 depends on where your creative workflow starts. Kling V3 acts as a prompt-driven powerhouse for creating hyper-realistic videos from scratch, while Kling O3 serves as a reference-driven framework designed for precise editing, character replication, and asset-based control.
| Feature / Capability | Kling V3 (Video 3.0) | Kling O3 (Omni 3.0) |
| Primary Workflow Intent | Prompt-First: Best for script-to-video and generating cinematic shots from scratch. | Control-First: Best for reference-based editing, style transfer, and remixing existing assets. |
| Input Styles Supported | Heavy Text Prompts, Single Still Images (I2V) | Multiple Image References (up to 4), Video Reference Clips, Text, and Existing Video |
| Reference-to-Video (R2V) | No dedicated route (relies purely on text/image prompting) | Yes (Full Support): Binds character/product appearance across clips via multi-image references. |
| Video-to-Video (V2V) Editing | Not supported | Yes: Includes style transfer, background swap, and seamless object/character replacement. |
| Multi-Character Coreference | Advanced: Handles complex group scenes with 3+ characters adhering tightly to scripts. | Good (Maintains stability, but primarily optimized for singular asset consistency). |
| Native Audio & Lip Sync | Yes (Generates synchronized dialogue, voiceovers, and SFX natively) | Yes (Shares identical native audio alignment and multilingual voice binding capabilities). |
| Max Clip Duration | Up to 15 seconds per single generation | Up to 15 seconds (Generations extend up to 30 seconds under specific video orientation modes). |
| Cost & Iteration Speed | Lower credit cost; perfect for rapid draft testing and high-speed prompt iteration. | Higher credit cost; designed for final-tier production renders and high-stakes consistency checks. |
Both models share the groundbreaking unified Omni One engine architecture, meaning native Kling AI Lip Sync and 16-bit HDR color come standard—powering every polished Kling AI cinematic clip regardless of the model path you choose.
Mastering Element Referencing for 100% Consistent AI Characters
Visual drift, when a character's face, outfit, or proportions shift between cuts, has been the most frustrating bug in AI video. Element referencing Kling style is the closest thing to a true visual drift killer available right now, because it stops treating each frame as a fresh guess and instead binds a character to a fixed identity profile.
Step by step: locking a character on-model
- Build an element from around four angles of the same subject, which gives the model a 3D sense of identity.
- Or skip the stills entirely: create or record a 3 to 8 second voice sample so Kling extracts the character's vocal traits and keeps that identity consistent across every shot.
- In image-to-video mode, turn on the "Bind Subject" feature to fix the face and clothing, then layer the multi-shot storyboard tool to hold that look for the full 15-second clip.
- Reuse the saved element across separate generations, not just one clip, for genuine character consistency AI video results over time.
Keeping multiple characters straight
Multi-character coreference is what stops two or three people in the same scene from blending into one face. By clearly specifying dialogue for each character in your prompt, the model automatically matches each character with their corresponding lines, even across bilingual exchanges in a single shot.
| Workflow | Best for |
| Multi-image element (2-4 photos) | One recurring lead across episodes |
| Video character reference | Performance-driven scenes, acting out motion |
| Multi-character coreference (3+) | Group dialogue, ensemble casts |
Advanced Prompt Engineering for 4K Cinematic Realism and Real Physics
Good Kling AI prompt engineering treats the model like a camera operator, not a wish list. The system responds strongly to specific camera language, since it defines the entire visual feel of the output, so the instructions about how a shot is captured matter more than a long list of what's in frame.
Short prompt vs. long prompt: a real comparison
| Prompt style | Example | Result |
| Short | "A woman walks through neon rain" | Random AI defaults, flat tracking physics, and oversaturated neon lighting effects that clash with the environment. |
| Long | Cinematic slow-motion shot, a woman in a heavy raincoat walking through dark night rain, realistic atmospheric lighting, natural fabric weight, cold color grading, 16-bit HDR, professional filmmaking style. | Perfect structural stability, natural material physics, and a deeply immersive cinematic mood |
Let's watch the actual video results. The clip on the left (the long prompt) looks much better and more put-together than the one on the right. Let's look closely at the footage to see exactly why the left side beats the right:
If you analyze these raw renders closely, you'll see how keeping things clean actually triggers a more disciplined, cinematic rendering pass. It comes down to three critical visual details:
- Pure Narrative Focus: The left video locks the viewer's eye entirely onto the character. The background depth and rain elements don't steal the show, and the clean composition leaves plenty of artistic breathing room for post-production editing.
- Natural Physical Movement: Watch how the raincoat moves. The fabric on the left sags, folds, and sways with real gravity as she walks. It does not have the weird edge-twitching that happens when an AI model gets confused by too many details.
- Simple, Cinematic Lighting: The right side has flashier neon reflections, but the dark, cold colors of the night rain on the left create a much better mood. It looks like a real movie instead of a cheap effect.
Before you burn your premium credits on a high-stakes Pro Tier render, fight the urge to mindlessly stack long descriptive phrases. More words do not automatically mean better quality. When too many complex camera movements and environmental cues are packed together, it can over-complicate things for the physical reasoning engine, causing localized artifacts. Always use Draft Mode first to test subject stability with a lean core prompt, then gradually layer in your lighting and texture modifiers once you know the shot is locked down.
A quick production tip: if you run heavy Pro Mode batches through the standard web browser, you'll often hit annoying queue bottlenecks or rendering timeouts during peak hours. To skip the wait entirely, we generated these side-by-side comparison clips directly through the Atlas Cloud Kling Text-to-Video API. It acts as a stable, high-performance pipeline that runs your generations smoothly in the background—making it an excellent workflow workaround if you are batch-testing multiple prompts or running programmatic scripts without interface lag.
Steering camera mechanics
For cinematic camera control, name one movement per prompt instead of stacking effects, since compounding moves like "dolly in while orbiting left" tends to produce camera motion that doesn't match the description:
- Dolly zoom: "Dolly zoom-in effect, lighting shift to blue, as the man's expression turns from worried to horrified"
- Tracking shot: "Camera tracks alongside her at eye level, then gently pushes into a close-up"
- Rack focus: "Focus racks from the warrior in the foreground to the monster standing behind him"
Physics cues that sell the realism
Concrete texture details like grain, lens flares, reflections, fabric sheen, condensation, smoke, and sweat make output feel physically real, and naming real light sources such as neon signs, candlelight, or golden hour produces better results than vague terms like "dramatic lighting."
Locking in 4K, HDR, and clip length
For true 4K AI film generation, select Pro Mode; native output reaches 3840×2160 with 16-bit HDR color, broadcast-ready without additional upscaling, making this genuinely 16-bit HDR video AI. The kling ai 3.0 maximum clip length 2026 sits at 15 seconds per single generation, with multi-shot mode chaining several segments into a longer sequence.
How to Use the AI Director Workflow and Multi-Shot Storyboarding
The AI Director workflow lets creators build a structured scene without touching a timeline editor. Instead of generating separate clips and stitching them together in post, multi-shot storyboarding Kling style packs up to six camera cuts into a single generation.
Building a scene without third-party editing

Smart Storyboard mode uses AI to split your story into different shots with the best camera angles and transitions automatically. Custom Storyboard mode lets you set the time, camera movement, and layout for every shot yourself, which is great for conversations or exact timing. Both choices keep everything inside a single 15-second AI video clip, so your characters and lighting look the same across every cut without extra work. The cuts can look a bit stiff compared to a human editor, so use this feature as a great rough draft instead of a finished video for big projects.
Kling Standard vs Pro tier: which one to render
| Mode | Speed | Best for |
| Draft Mode | 5 to 20x faster, often delivering previews in seconds | Testing prompts and camera angles before spending credits |
| Standard | Roughly 1 to 3 minutes for a 10-second clip | Quick deliverables where 1080p is enough |
| Pro tier | Roughly 3 to 8 minutes | Final cinema-grade output with full physics simulation and 4K |
So how long does Kling Pro take to render? Typically 3 to 8 minutes per clip, though processing times vary based on server load and your plan's priority level. Pro tier also draws noticeably more credits than Standard, so reserve it for shots that are actually shipping.
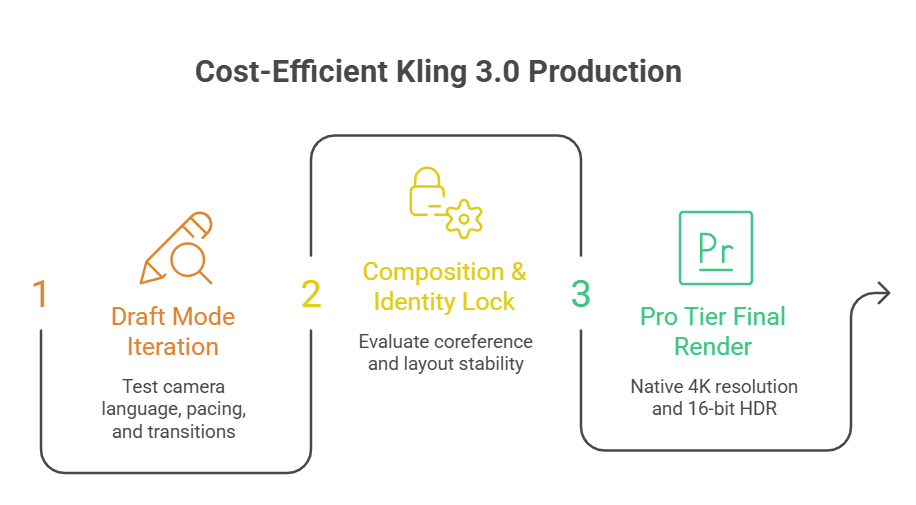
A practical workflow
To maximize your budget without sacrificing quality, do not jump straight into Pro Tier rendering. Instead, implement this industry-standard "Draft-to-Pro" loop to save up to 80% of your Kling credits.
-
Iterate & Refine in Draft Mode: 5-20 seconds per render
Generate 5 to 10 iterations using Draft Mode. Focus entirely on testing your camera language, pacing, and multi-shot transitions. Draft mode gives you a near-instant pre-visualization pass for a fraction of the cost.
-
Lock the Composition & Identity: Review stage
Evaluate your draft clips. Check for multi-character coreference stability and ensure the camera cuts feel natural. Once the framing and motion paths are locked, stop iterating.
-
Switch to Pro Tier for Final Render: 3-8 minutes per render
Toggle your settings to Pro Mode. Keep your exact seed number and prompt, then run the final render to unlock native 4K resolution, 16-bit HDR color, and full physics-accurate simulation.
Note: Think of Draft Mode as your pencil sketch and Pro Tier as your final oil painting. Never spend premium credits on a prompt or camera movement you haven't validated in Draft first.
Native Audio Sync and Video-to-Video Editing: The Production Playbook
Kling 3.0 behaves like a single multimodal engine rather than a video model bolted onto a separate audio tool. Native audio sync Kling 3.0 generates synchronized voiceovers, dialogue with lip sync, sound effects, and music all in one pass, not as a separate post-production step.
Quick kling ai lip sync tutorial
| Step | Action Tool | Production Workflow (Exactly What to Click) |
| 01. Extract Voice | Audio Reference Input | Upload or record a 3 to 8-second clean voice sample to the system. Kling will automatically extract the core vocal traits and timbre. |
| 02. Bind Character | Element Referencing | Link that exact voice sample directly to your saved character identity element inside the generation panel. |
| 03. Prompt Dialogue | Multi-Character Box | Specify the spoken lines directly within your prompt text. For bilingual scenes, write the exact dialogue cuts in English, Chinese, or Japanese. |
| 04. Final Output | Unified Render | Hit generate. The Omni One engine aligns frame-perfect lip movements to the audio track natively in one single pass. |
Pro-Tip for International Campaigns: Because the sync runs through a single architecture, Kling AI Lip Sync stays perfectly accurate even if a character switches between languages mid-video—the lip geometry automatically deforms to match shifting regional phonemes.
Deploying bilingual native audio generation
The model natively supports English, Chinese, Japanese, Korean, and Spanish, handles regional accents and dialects, and lets characters switch between languages mid-video with synchronized lip movements throughout. That's the mechanism behind what's marketed as frame-perfect lip sync AI: specify each character's line directly in the prompt, and the system matches dialogue to the right face automatically, even across bilingual exchanges.
Kling 3.0 Motion Control and Edit mode
For video-to-video editing AI work, upload a reference image for the character's appearance and a reference video for the motion you want it to follow. Two orientation modes shape the result: Image orientation keeps the character facing the same direction as the photo for clips up to 10 seconds, while Video orientation matches the character's orientation in the reference video for sequences up to 30 seconds.
Kling 3.0 motion control and its Edit mode are genuinely useful for:
| Edit type | What it does |
| Style transfer | Applies the aesthetic of one video to another using feature reference mode |
| Background swap | Swaps out environments while keeping the foreground subjects intact |
| Object/character replacement | Transforms subjects and settings while original camera movement and motion remain intact |
Because audio, motion, and editing run through one architecture, output reaches commercial-ready AI video quality without round-tripping through a separate VFX suite.
Is Kling 3.0 Right for Your Workflow and Budget?
Across this Kling 3.0 review, one verdict holds up clearly. After stress-testing it for 48 hours, reviewers call it arguably the most capable general-purpose video model available right now, on par with Veo 3.1 and possibly better in some ways.
Where it falls short
Two honest caveats matter for AI video production workflows:
- It struggles a bit with visuals that are more design-heavy or illustration-based, so Grok remains the better pick for abstract or graphic-driven content.
- Kling 3 Pro took 3+ minutes to render some clips, compared to Grok which might do it in 30 seconds, and credit costs climb fast when you need several iterations to land a usable shot.
So, is Kling AI worth it?
Kling 3.0 ships with one of the more generous free tiers in the category, around 66 credits per month with no credit card required.
| Choose Kling 3.0 when | Choose a competitor when |
| You need physics-accurate motion, multi-shot storyboarding, native multilingual audio | You're working with illustration or abstract visuals (Grok), or need the fastest turnaround |
| Budget and iteration speed matter most | You need Google's ecosystem (Veo 3.1) or longer single-shot continuity |
For marketers, solo creators, and filmmakers previsualizing scenes, Kling 3.0 earns its place as the best general-purpose AI video model on realism and price. For design-forward graphics, pair it with a faster, illustration-friendly tool instead.
Conclusion: How to Approach Kling 3.0 Today
Kling 3.0 is way more than a minor upgrade. It completely changes the game by using a smart system driven by real physics and direct assets. By packing video, movement guides, and multi-language audio into a single Omni One setup, it gets rid of the messy switching between different tools that always used to slow solo creators down.
To save your premium credits and get the best results from the platform, use this quick production checklist:
- Act Like a Director: Stick to clear camera movements and specific lighting styles instead of stacking up useless descriptive words.
- Run the Draft-to-Pro Loop: Never commit Pro Tier credits to an unverified prompt. Build, tweak, and lock your narrative pacing in Draft Mode first.
- Anchor Your Continuity: Leverage element referencing and multi-character coreference early in your script to act as a definitive visual drift killer.
- Streamline the Pipeline: If you are running complex prompt scripts or heavy multi-shot generation batches, bypass the web UI entirely and use the stable Atlas Cloud Kling Text-to-Video API channel to skip the queues.
It has never been easier to make movie-quality AI videos. Start small, test your camera movements first, and let the physics setup do the hard work for your next project.


