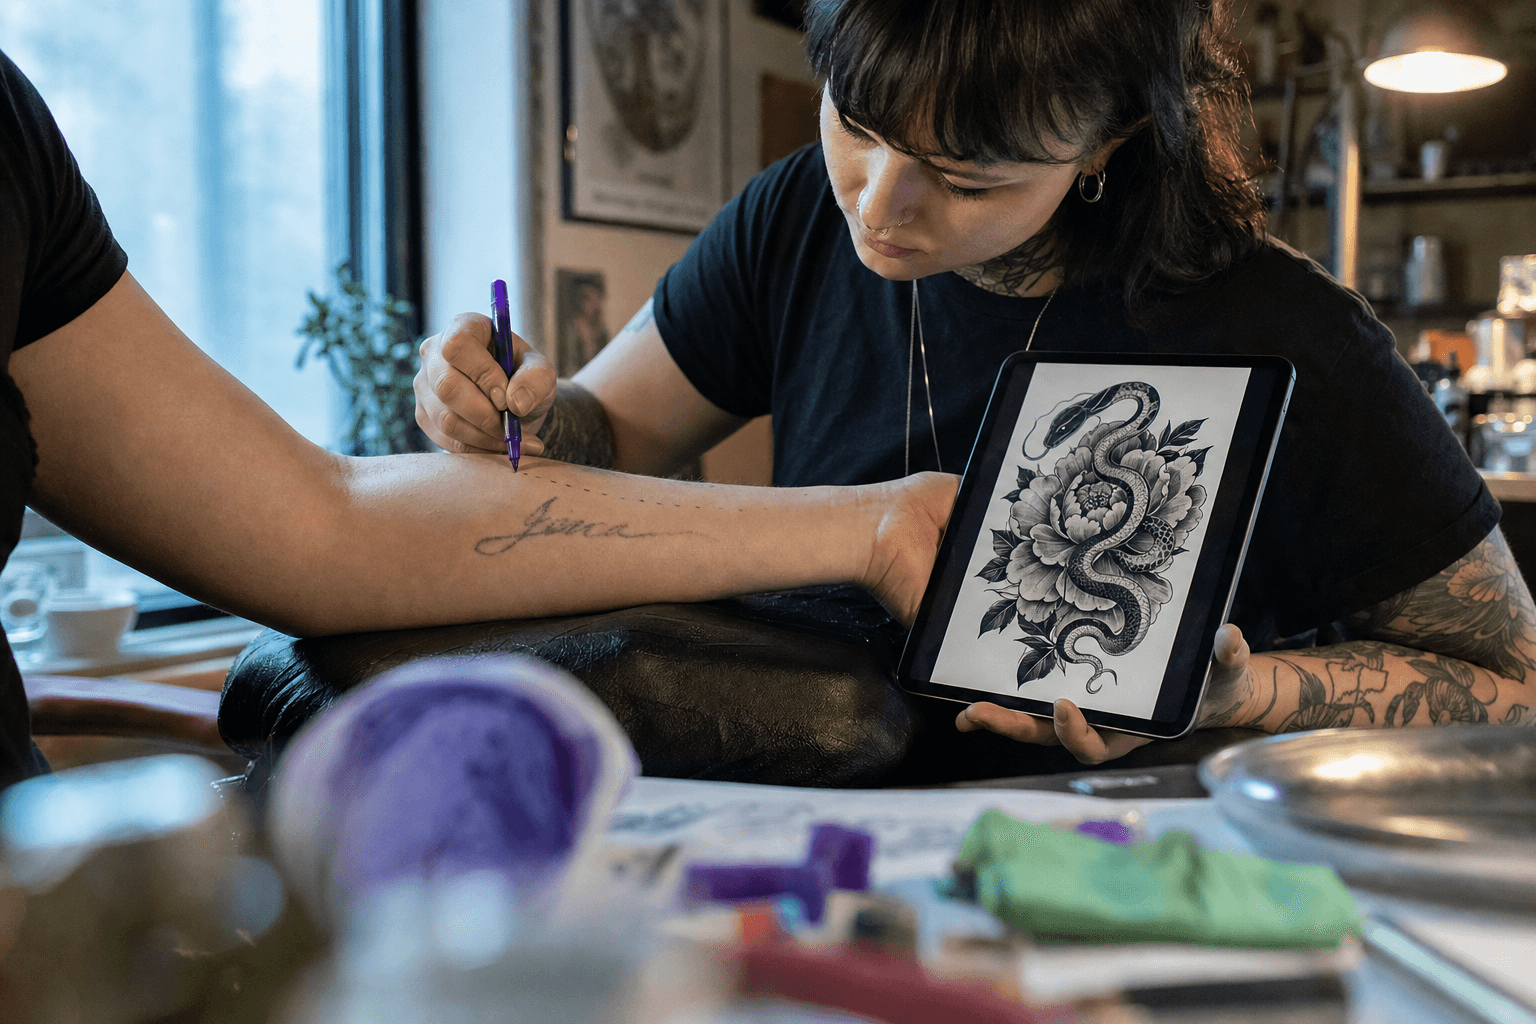
Tattoo artist holding a tablet showing a black-and-grey peony-and-snake cover-up design while steadying a client's forearm that carries a faded cursive script tattoo, transfer paper and markers on the bench
The moment the mockup meets the actual arm. This is where most AI cover-up designs die.
You did not type "tattoo design" into the search box. You typed "how to cover a name."
Ten images come back in four seconds and every single one is beautiful. Delicate single-needle linework. Soft watercolour bleed. A lot of clean, breathing negative space. You screenshot the best one, send it to a shop, and the artist replies in about two seconds: that won't cover it.
The tool did not malfunction. It did exactly what it was trained to do. A generator optimises for a pretty flat image. A cover-up optimises for opacity. Those two goals fight each other, and not one tool page will tell you that before you book.
Here is the part that makes it sting. In a July 2023 survey of 8,480 US adults, 69% of tattooed people said honouring or remembering someone was a reason they got inked, and 24% said they regret at least one of their tattoos (Pew Research Center, August 2023). A separate June 2023 study of 1,002 respondents found that lettering, script and names sit at the top of the most-regretted list, and that the forearm is the single most regretted placement on the body (Advanced Dermatology, 2023). That study is small and commercially sponsored, so treat it as directional, but the direction is clear enough.
The tattoo you most want covered is a name on your forearm. That is precisely the tattoo an AI is worst at covering.
Key takeaways
- An AI tattoo cover up generator produces a composition mockup, not a verdict on whether the old ink will disappear. Those are different questions.
- One iron rule: dark buries light, and the new piece is always bigger. Any mockup that breaks it is dead on arrival, no matter how good it looks.
- A free text-to-image tool can design the motif. Getting that motif onto your arm, in your lighting, needs an image-edit model that accepts two reference images.
- A single five-second motion test tells you more about how the design sits on a curved forearm than ten static renders.
- If the old tattoo is solid and saturated, laser fading comes first. No prompt fixes that.
What an AI Tattoo Cover Up Generator Actually Produces
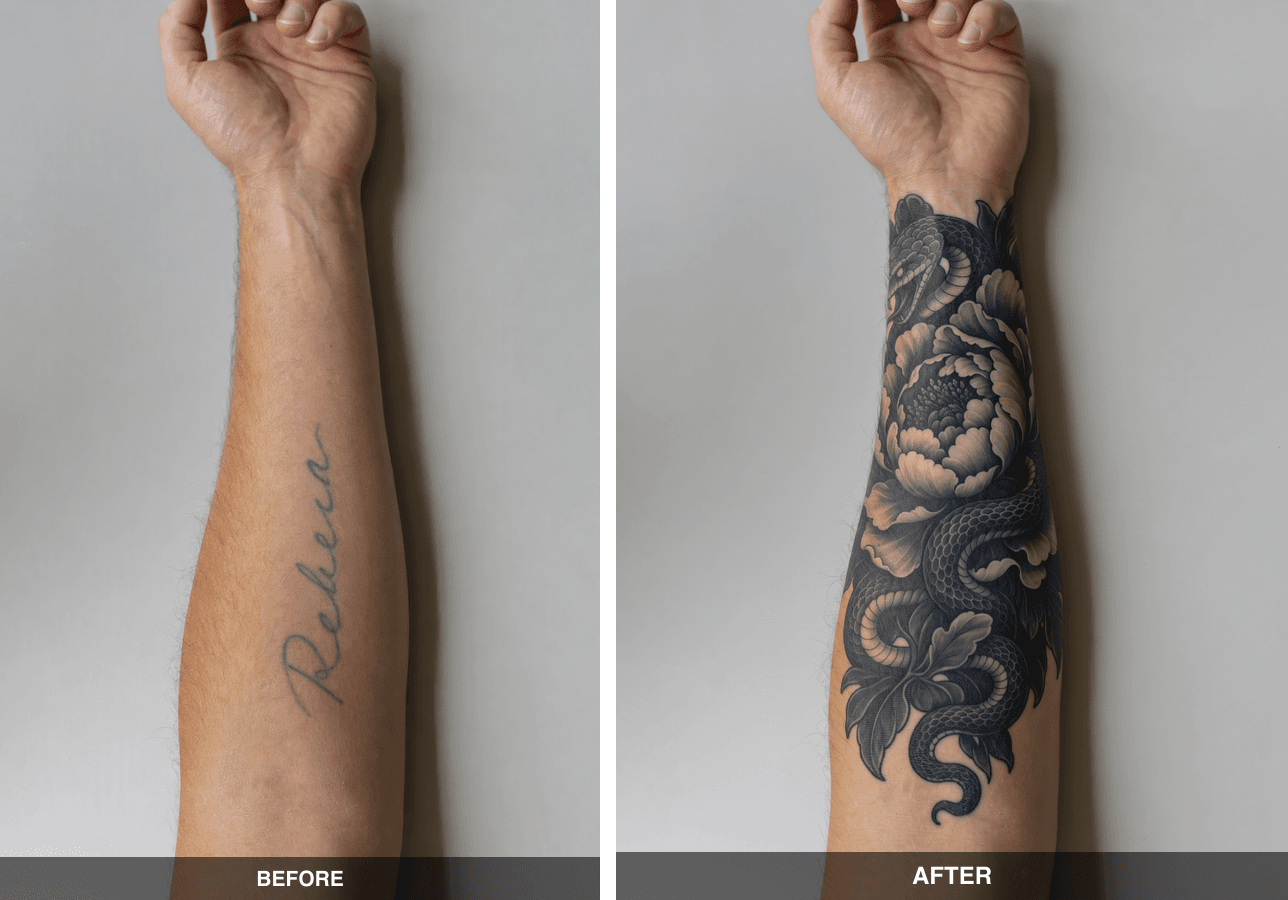
Before and after on the same inner forearm: a faded fine-line cursive name on the left, a heavy black-and-grey peony with a snake coiled through it on the right, same pose, same light, same background
Left: the starting photo. Right: the same arm after one image-edit run. Note that the old script is not faded, softened or blended. It is gone. The stand-in "before" photo was generated for this walkthrough, so use your own photo when you run it. Generated with Nano Banana 2 Edit.
Look at the right panel and count three things a generator will not do unless you force it.
The new piece covers roughly twice the footprint of the old one. The shading is solid black and heavy grey wash, with almost no bare skin left inside the boundary. And there is no ghosting: not a single stroke of the old cursive survives anywhere in the frame, not even as a faint shadow under the petals.
Now go back and look at what a stock tattoo cover up ai gave you on the first try. Thin lines. Pale washes. Gaps you can see skin through. Every one of those is a place the old name comes back after healing.
Why Most AI Tattoo Cover Up Generator Designs Fail on Real Skin
The failure is not aesthetic. It is physical, and it comes down to three things the model has no way to know.
The One Rule Every AI Tattoo Cover Up Ignores
Ink goes into skin, it does not sit on top of it. The old pigment stays where it is forever. A cover-up does not erase, it out-darkens.
That gives you the rule the whole craft runs on. Blues, browns and blacks conceal effectively. Reds, yellows and oranges frequently fail to hide what is underneath, because you cannot cover a dark red with a blue, you can only make purple (Tattoodo). And on size, the guidance is blunt: "When covering a tattoo, the new tattoo is always going to be bigger; there's no way around it." Bolder and darker is better, every time.
You will see "make it 30% bigger" quoted around the web with no source attached. Ignore it. Artists in practice talk about two to three times the area of the original, and the honest answer is that it depends entirely on how saturated the old piece is. What is not negotiable is the direction: bigger, darker, denser.
An image model knows none of this. It has been trained on photos of tattoos that people posted because they looked good, and the tattoos that look good in photos are airy, precise and high-contrast against bare skin. Ask for a cover-up and it hands you its idea of a beautiful tattoo, which is structurally the opposite of a cover-up.
The Styles AI Loves and Cover Ups Can't Use
This is the table nobody publishes next to the generate button.
| Style | Covers old ink? | Why |
|---|---|---|
| Blackwork / blackout | Yes, most reliably | Solid saturated black at maximum opacity, nothing shows through |
| Black-and-grey realism | Yes | Heavy shadow packing and deep contrast give the artist somewhere to hide old lines |
| Japanese irezumi | Yes | Bold outlines plus large filled areas of wave, cloud and smoke as connective cover |
| Ornamental mandala / dotwork | Usually | Dense repeating pattern absorbs stray lines, as long as dotwork is packed not sparse |
| Floral and botanical, heavily shaded | Usually | Large organic shapes with room for solid blacks in the leaf and shadow work |
| American traditional | Often | Thick outlines and flat bold fills, though the palette limits placement over dark ink |
| Fine line / single needle | No | Thin strokes leave the old tattoo fully visible between them |
| Watercolour | No | Translucent washes by design, they layer over old ink instead of hiding it |
| Minimalist with negative space | No | The empty space is the style, and empty space is exactly where the old name shows |
| Pastel and light colour work | No | Light pigment over dark pigment reads as the dark pigment |
The left column is what every generator gives you by default. The right column is what actually works. Your prompt has to bridge that gap, and it can, which is the whole point of Step 2 below.
Not every artist is thrilled about any of this. "The images are almost always un-tattooable, with levels of detail that are impossible on real skin," says Don Richards of Kids Love Ink in South London, who also points out that AI renders that look like real photos of healed tattoos give people "unrealistic expectations of what's possible in real life" (Stories & Ink, July 2025). In the same piece, New York artist Arvey Perez takes the other side: these tools "facilitate faster collaboration between tattoo enthusiasts and artists during the tattoo process." Both are right, and the difference between them is whether you walk in with a conversation piece or a demand.
When You Need Laser Fading First
If your old tattoo is solid, saturated and recent, no amount of prompt engineering saves you. It has to come down first.
Fading for a cover-up usually takes up to five laser sessions, and you need to wait a minimum of six weeks after the last session before the new piece goes on. If the new design is going to be smaller or more detailed than the old one, fading is not enough and you are looking at full removal (Removery). Read that last line again, because it is the exact scenario an AI mockup walks you into: a delicate, smaller, prettier design over an old bold one.
The AI For Tattoo Cover Up Workflow: Three Runs, One Tab
Here is the honest split of labour. A free text-to-image generator is genuinely good at one job, inventing the motif. It cannot see your arm. To get from a flash sheet to a picture of your actual skin, you need an image-edit model that takes two reference images at once, and then a short video model to sanity-check how it wraps.
All of it happens on model pages in one browser tab on Atlas Cloud, billed per run. No subscription, no credit pack that expires in seven days whether you used it or not. Prices below are list prices read off each model's own page in August 2026.
If you want to skip straight to a cover-up mockup, Atlas Cloud's free AI tattoo generator gives you a first design free; the model pages below are where you fuse it onto your own skin and pressure-test it.
| Job in the workflow | Model | List price | Why this one |
|---|---|---|---|
| Design the cover-up motif | Free AI Tattoo Generator | First design free, no card | Text in, clean flash sheet out, fastest way to iterate on the motif |
| Fuse the design onto your real arm | Nano Banana 2 Edit | $0.08 per image, up to 14 reference images | Best at merging two real photos while holding the original lighting and skin texture |
| Try four styles in bulk | Nano Banana 2 Lite Edit | $0.04 per image, discounted tier at $0.028 (-30%, August 2026) | 1K is plenty for shortlisting, go back to 2K for the keeper |
| Motion test on the forearm | Kling v3.0 Pro Image-to-Video | $0.095 per second, 3 to 15s, 1080P | Five seconds is enough to see whether the design deforms naturally with muscle |
| Stand-in base photo, if you have no photo yet | GPT Image 2 Text-to-Image | $0.009 per image | Only used to build this walkthrough, you should use your own arm |
| Turn the keeper into a stencil | Seedream v5.0 Pro Edit | $0.045 per image | Optional, only if your artist asks for clean linework to react to |
Every price is on the full model list if you want to check before you spend anything.
How to Use an AI Tattoo Cover Up Generator, Step by Step
One case runs through all four steps: a faded fine-line cursive name on an inner forearm, covered with a black-and-grey peony with a snake coiled through it. Old ink is light and thin. New ink is heavy and solid. That contrast is the whole lesson in one picture.
Step 1: Shoot the Old Tattoo the Way an AI Tattoo Cover Up Generator Needs It
No model runs here. This is the step everyone rushes and then wonders why Step 3 looks like a sticker.
- Natural light, near a window. No flash, no filters, no beauty mode.
- Arm relaxed, plain background. A tensed arm distorts the tattoo you are trying to match.
- Frame the whole old tattoo plus at least 5cm of bare skin around it on every side. The cover-up will expand outward and needs somewhere to go.
- Shoot straight on, not at a steep angle. Perspective distortion becomes a warped mockup.
- Vertical crop, 3:4 or 4:5.
For this walkthrough we had no real client photo, so the "before" arm was generated as a stand-in. If you want to reproduce the exact base image, the prompt was:
text1Photorealistic close-up photograph of a relaxed adult forearm, inner side facing the camera, resting on a plain light grey background in soft natural window light. On the inner forearm there is one old faded tattoo: a thin single-needle cursive script name in soft blue-black ink, roughly 10 cm long, the linework blurred and slightly spread from years of healing, clearly amateur and clearly aged. Realistic skin texture with pores, fine hair and natural tone variation. No other tattoos, no jewellery, no text overlay, no watermark. Shot on 50mm, shallow depth of field, editorial photography. 2
Settings: GPT Image 2, quality high, 1024x1536. Skip this entirely if you have an arm and a phone, which you do.
Step 2: Design the Cover Up Motif in a Free AI Tattoo Cover Up Generator
Now the motif, on a white background, with no arm involved yet. Open the free tattoo generator and paste this:
text1A bold black-and-grey cover-up tattoo design on a plain white background: a large blooming peony with a snake coiling through the petals, heavy solid black shadow packing, dense stippled and smooth grey-wash shading, thick confident outlines, strong contrast between fully black areas and mid grey. No fine line work, no thin single-needle strokes, no open negative space, no watercolour, no colour, no text, no watermark. Professional cover-up tattoo flash sheet, vertical composition, designed to fully engulf and hide an existing tattoo underneath. 2
Read the four negatives again, because they are the most useful sentence in this article. No fine line work. No thin single-needle strokes. No open negative space. No watercolour.
Those are not stylistic preferences. They are the physical conditions for coverage, written as constraints because that is the only language the model responds to. Leave them out and any generator on earth hands you delicate linework with breathing room, because in its training data that is what a good tattoo looks like. You are not asking for a beautiful tattoo. You are asking for an opaque one.
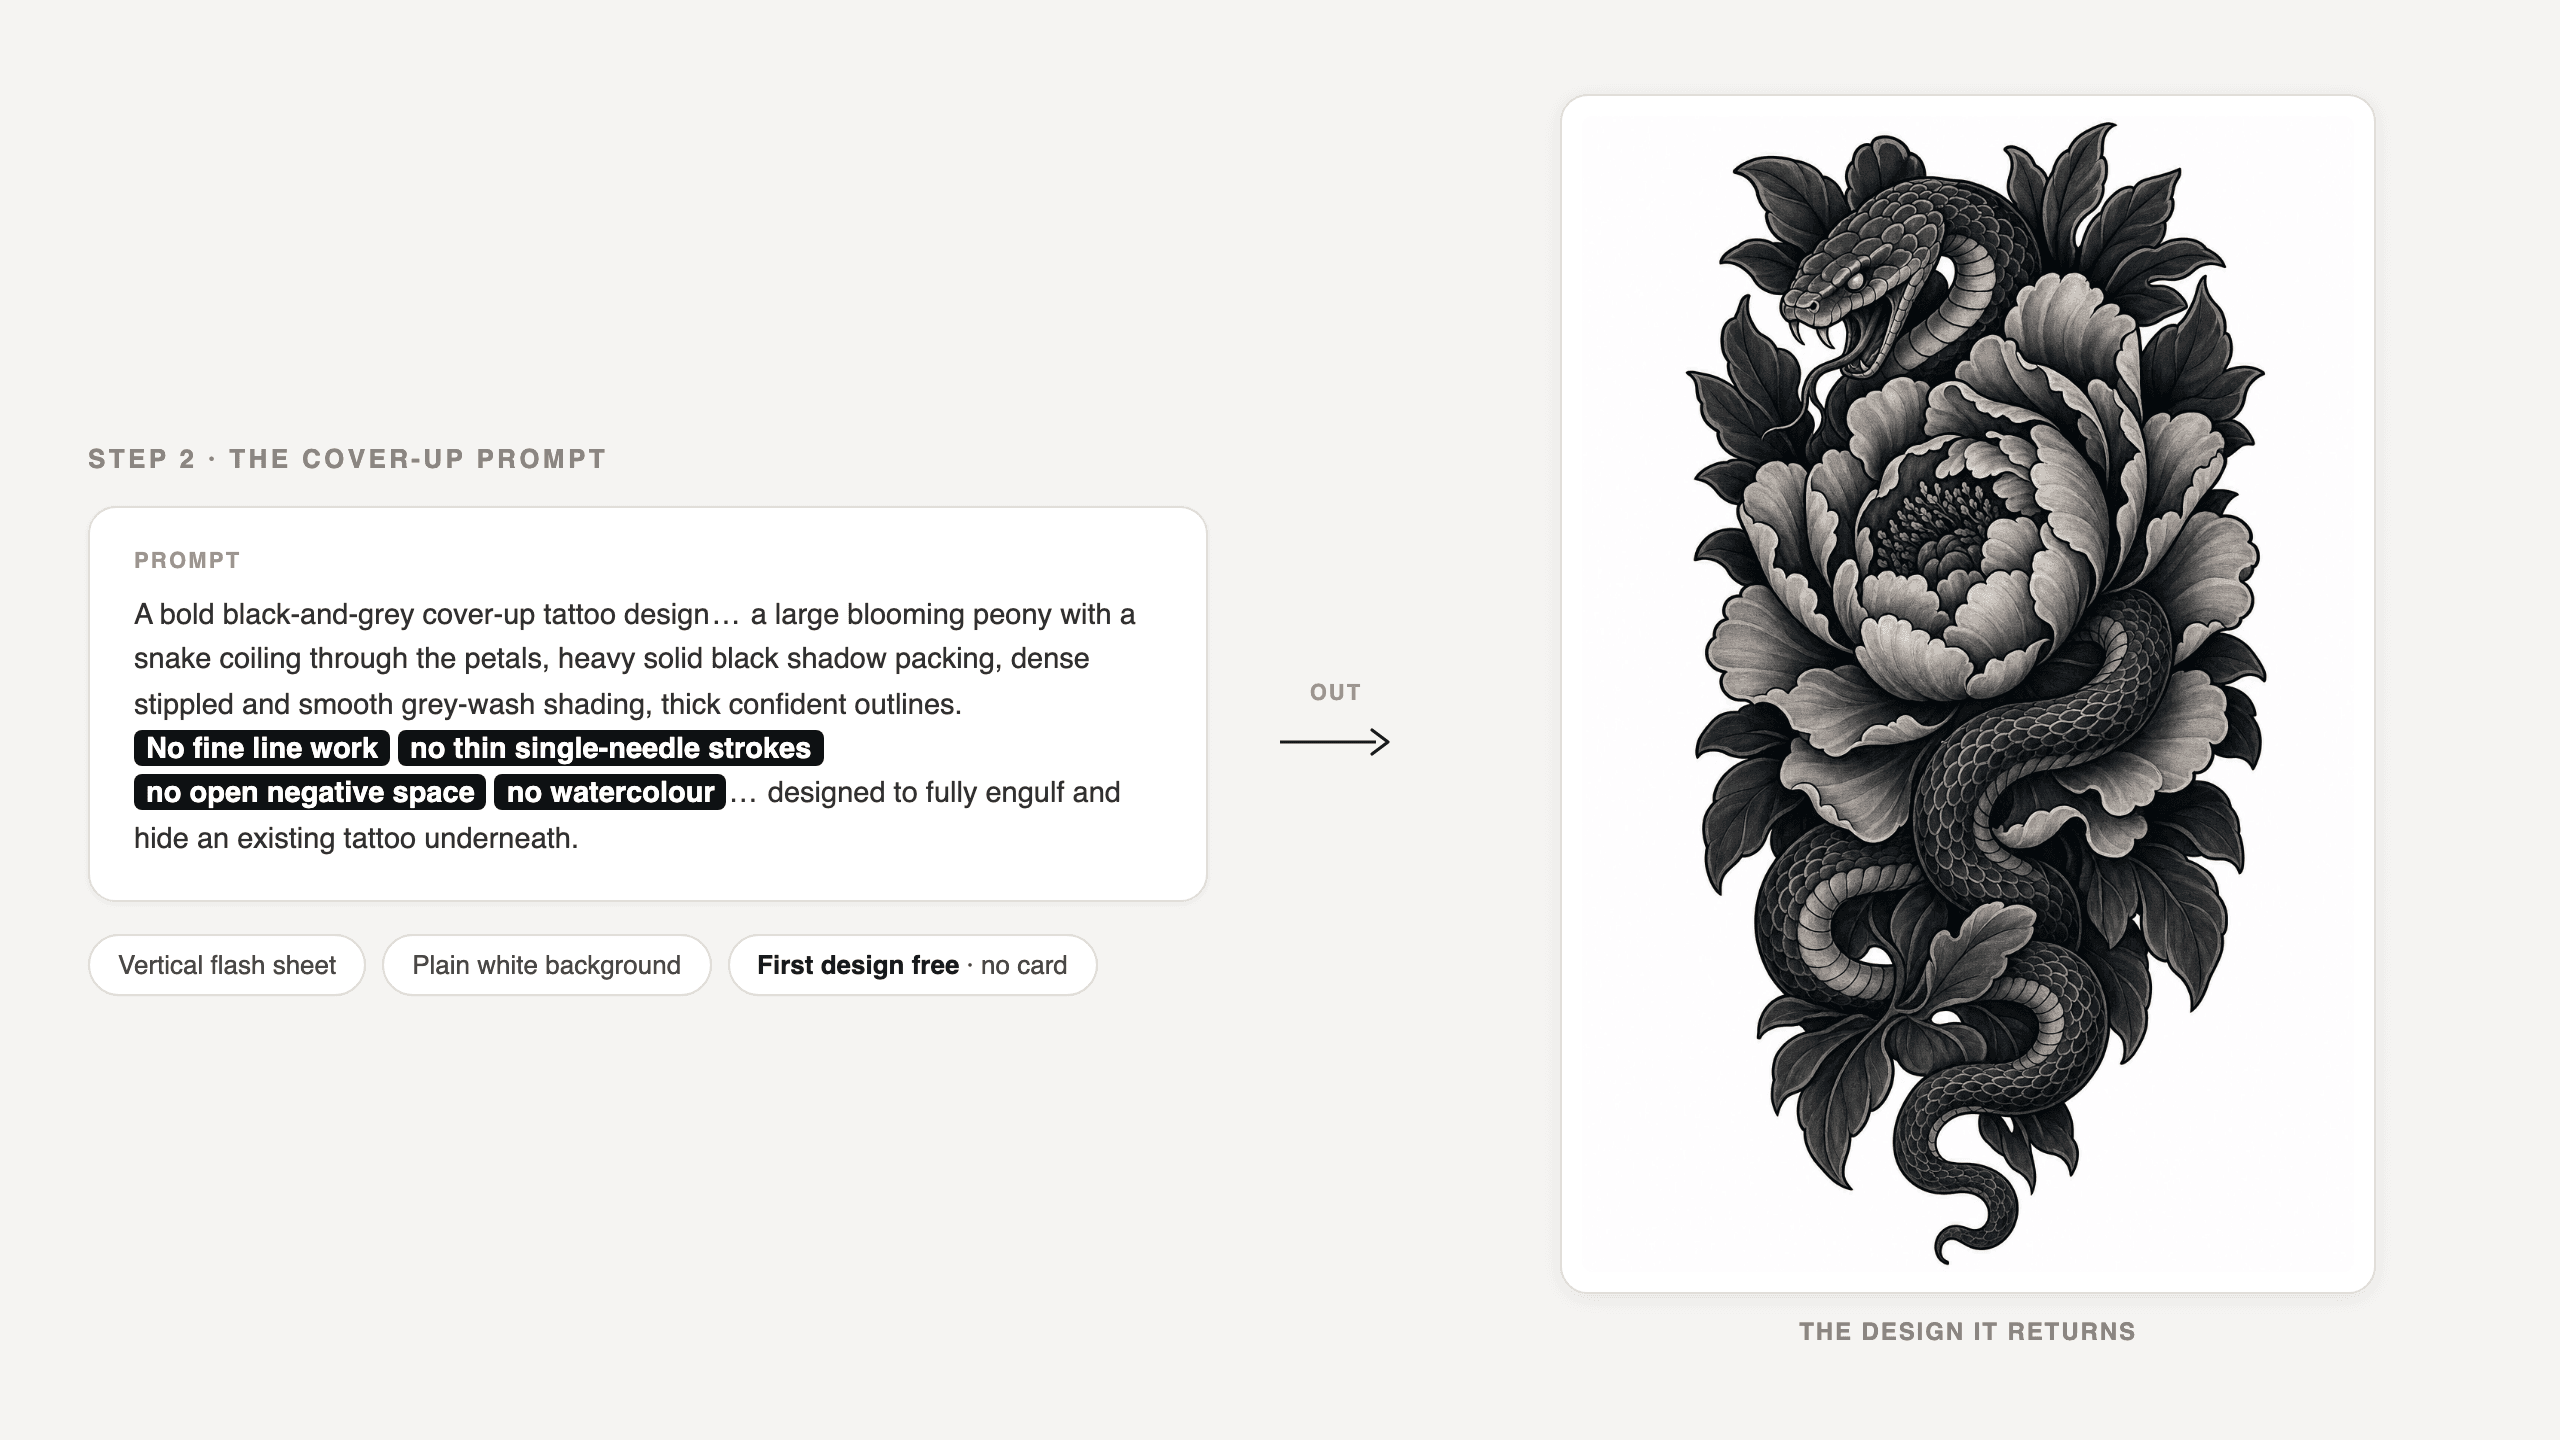
The Step 2 cover-up prompt on the left with its four negative constraints highlighted, an arrow, and the black-and-grey peony-and-snake flash design it returns on the right
The prompt in, the design out. The first design costs nothing and needs no card. Notice the output has almost no bare white showing inside the silhouette, which is the point.
Judge the result on one question only: if you filled the silhouette with a marker, how much skin would still be visible? If the answer is "a lot," add more negatives and run it again.
Step 3: Fuse the AI Tattoo Generator Cover Up Onto Your Actual Skin
This is the step the free tools cannot do, and the step that decides everything. Open Nano Banana 2 Edit and load two reference images, in this order: Image 1 is your arm photo from Step 1, Image 2 is the design from Step 2. Order matters. Swap them and the model tries to tattoo your arm onto a flash sheet.
text1Replace the existing faded script tattoo on the forearm in image 1 with the black-and-grey peony-and-snake design from image 2, tattooed directly into the skin. The new tattoo must cover at least twice the footprint of the old one and completely engulf it: no letters, no strokes and no ghosting of the old script may remain visible anywhere in the frame. Use dense solid blacks and heavy grey wash over the area where the old ink sits so it is fully buried. Wrap the design around the natural curve of the forearm and follow the skin's contour, pores and fine hair. Strictly preserve the same person, the same arm, the same pose, the same background, and the same lighting and shadows as image 1. Photorealistic healed tattoo with slightly softened ink edges. No sticker look, no decal look, no glossy overlay, no text, no watermark. 2
Settings: resolution 2K, aspect ratio matching your original photo (3:4 or 4:5), two reference images. Stay off 4K. A mockup you are going to email to a tattooist does not need it, and the headline flat rate does not hold at that tier.
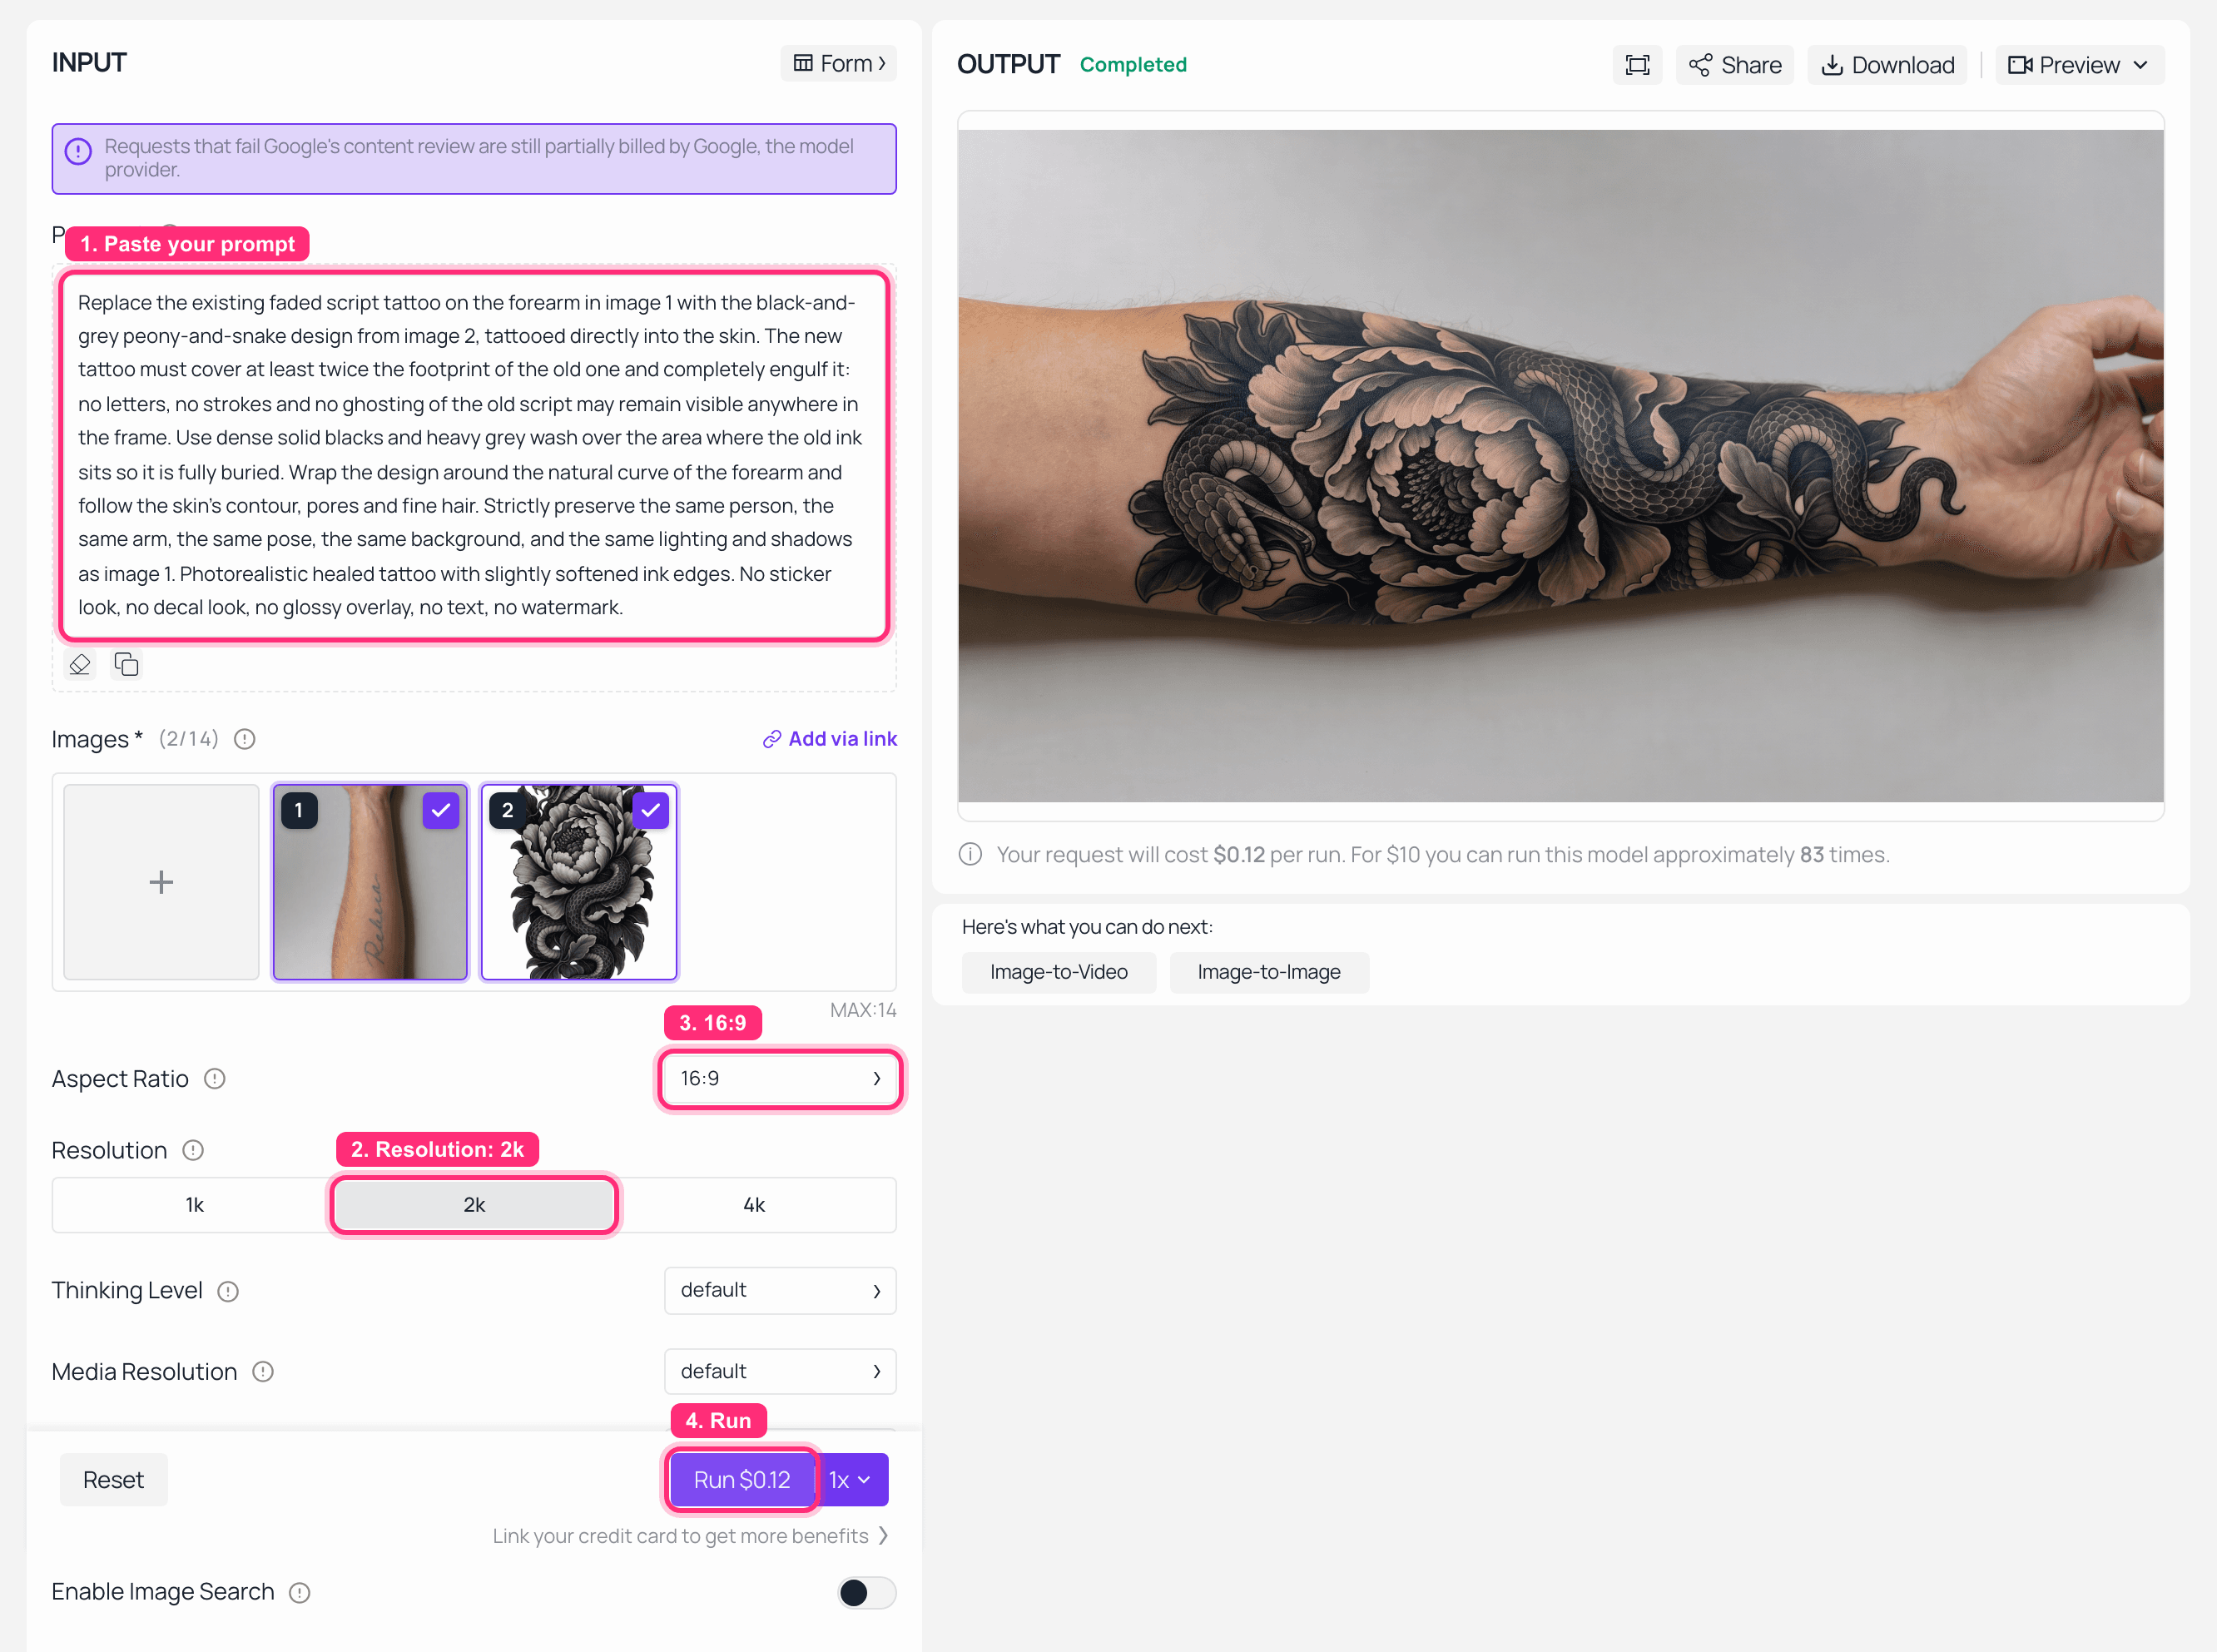
Nano Banana 2 Edit on Atlas Cloud with both reference images loaded in order and the fused cover-up result rendered in the output panel
Nano Banana 2 Edit: arm photo first, design second, 2K, with the "cover at least twice" and "no ghosting" clauses doing the heavy lifting.
Then inspect it like an artist would. Zoom to 200% and hunt for surviving letters at the edges of the new piece. Check that the shading actually sits over where the old ink was, not politely beside it. If any part of the old name is legible, the run failed. Re-run with the coverage clauses made harsher, and enlarge the motif.
Step 4: Run the Motion Test Every AI Tattoo Cover Up Generator Skips
A still image lies about curvature. Your forearm is a cylinder that changes shape when you close your fist, and a design that looks perfect flat can break across the muscle. Five seconds of video answers that.
Take the Step 3 output straight into Kling v3.0 Pro Image-to-Video as the input image:
text1The person slowly rotates their forearm toward the camera and closes their fist, the muscles tensing under the skin. Handheld camera with a slight natural drift. The black and grey peony and snake tattoo stays perfectly locked to the skin, stretching and shifting naturally with the muscle and the curve of the arm. Warm soft studio light, gentle moving shadows. No morphing, no extra limbs, no text, no watermark. 2
Settings: 1080P, 5 seconds, which is already the default. Leave the duration slider alone, set the input image, and run.
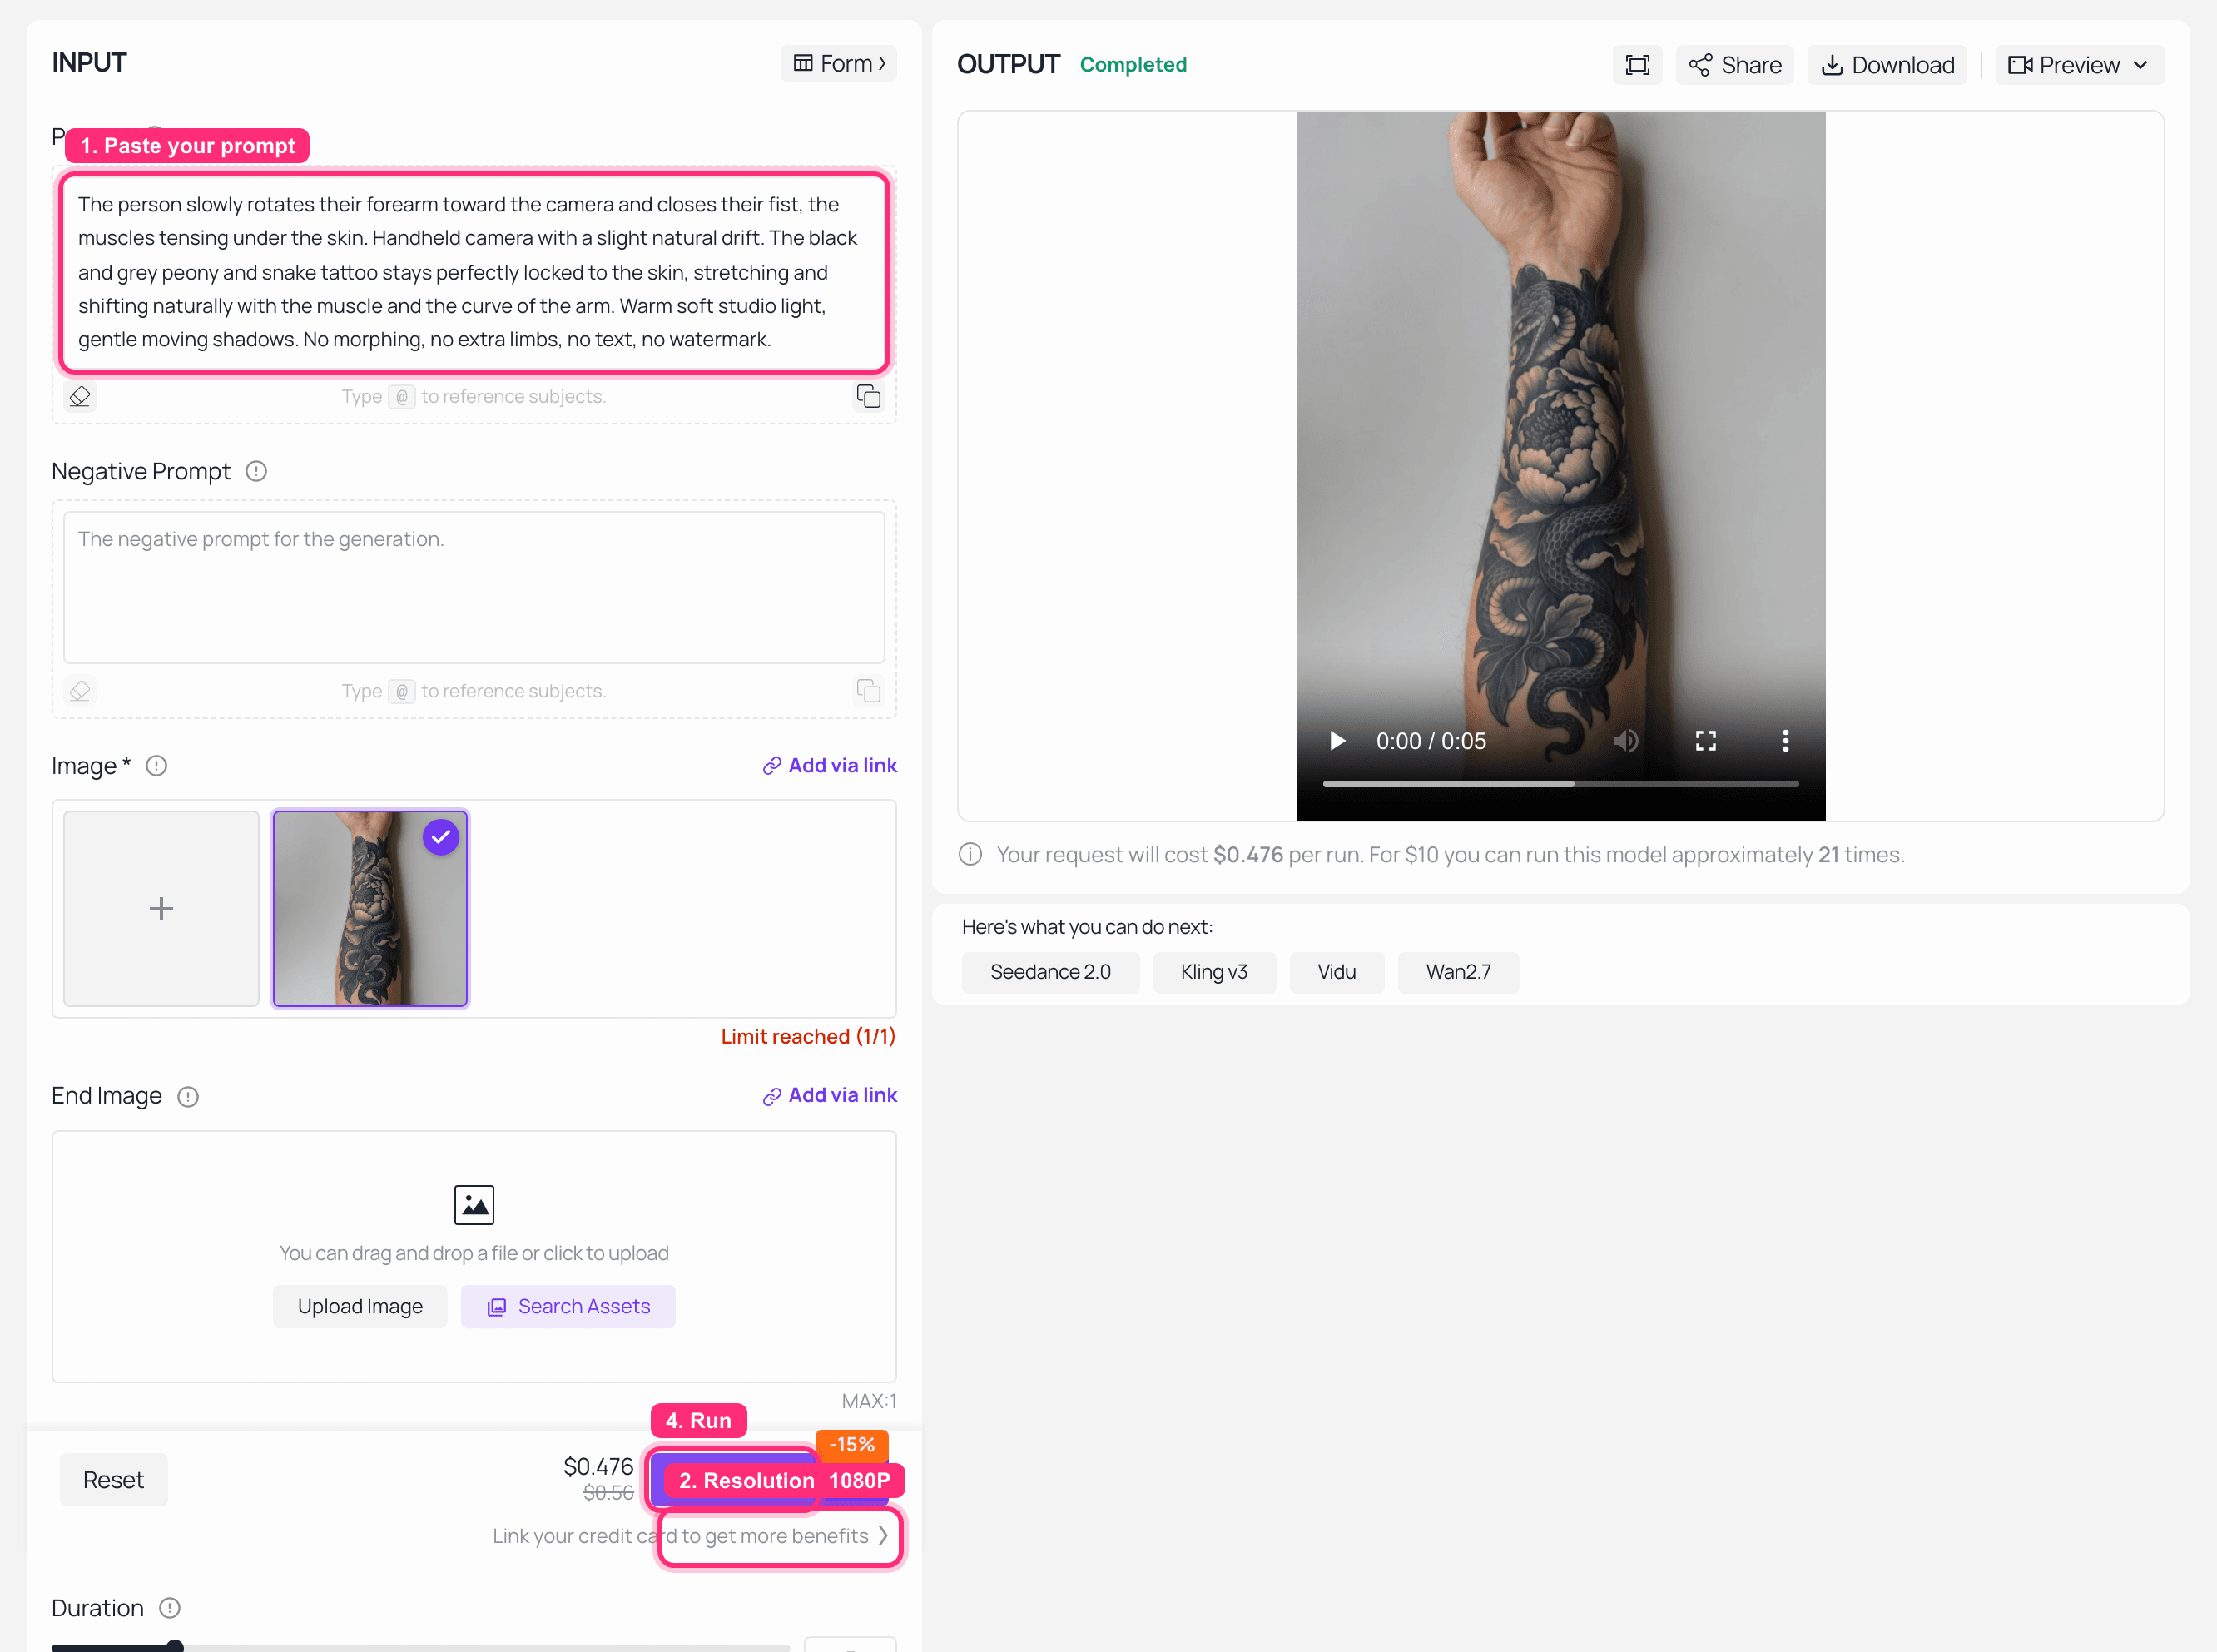
Nano Banana 2 Edit output loaded into the Kling v3.0 Pro image-to-video playground, 1080P, five seconds, with the finished clip playing in the output panel
Kling v3.0 Pro image-to-video: the Step 3 still goes in, a five-second forearm rotation comes out.
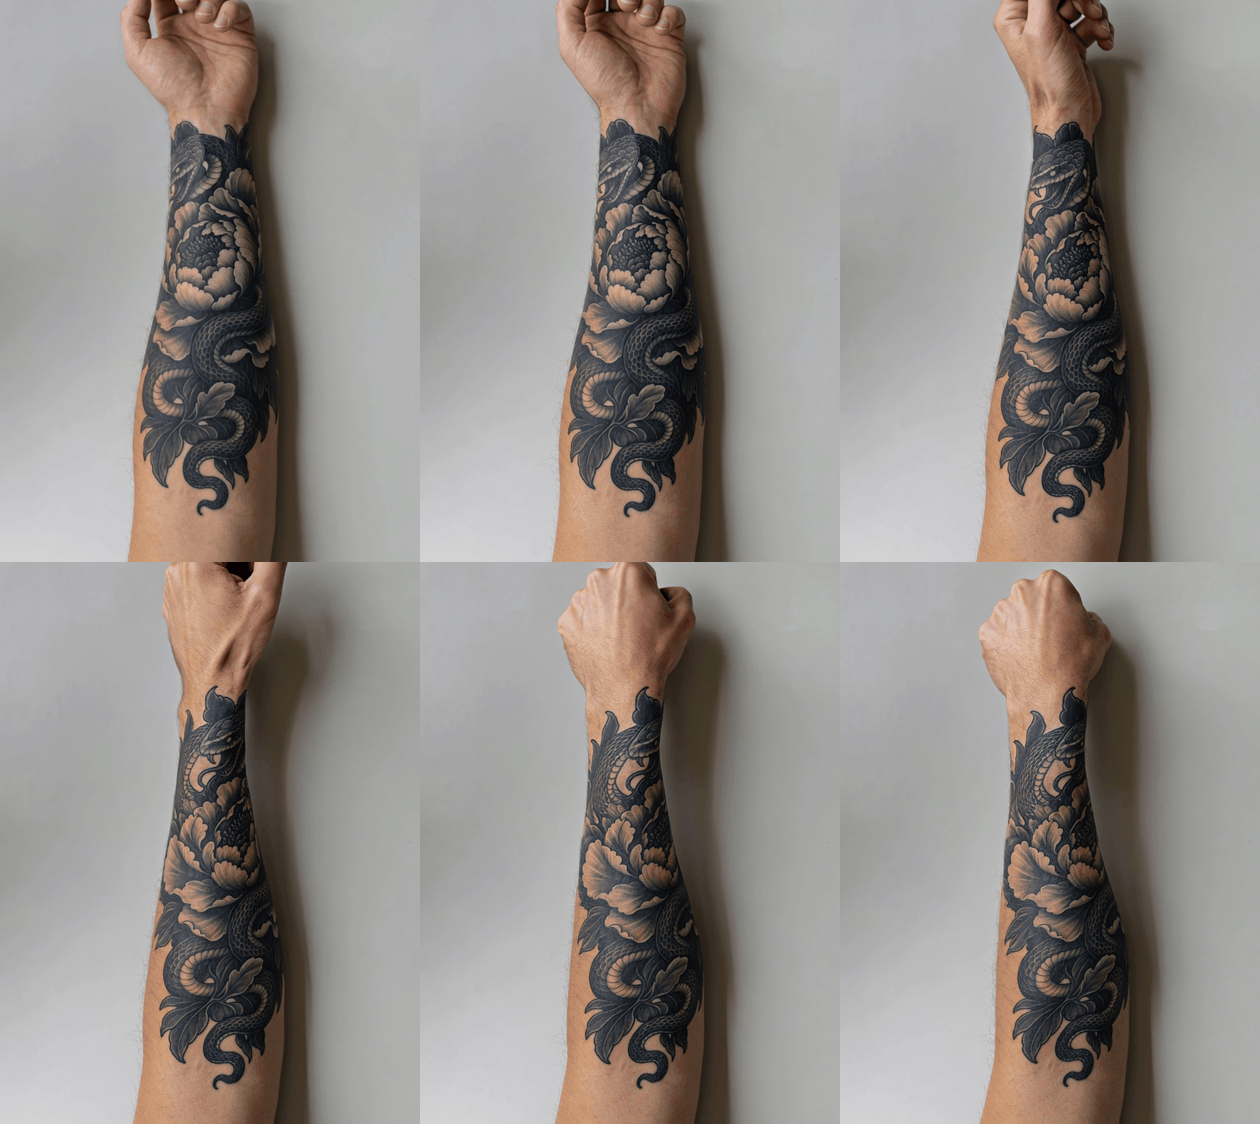
Five-second motion test: the forearm rotates and the fist closes while the black-and-grey peony and snake stretches with the muscle and stays locked to the skin
Shown here as a silent GIF. Watch the snake's body where it crosses the inner forearm. If a design is going to fight your anatomy, this is where it shows.
What you are looking for: does the ink move with the skin, or does it slide across it like a decal? Does the composition still read when the arm turns 30 degrees, or does half of it disappear around the side? A design that only works from one angle is a design you will spend the rest of your life photographing from one angle.
More Tattoo Cover Up Ideas AI Can Mock Up in One Pass
One motif is a decision made too early. Run the same arm photo through four different styles and let your eye pick, before you get attached.
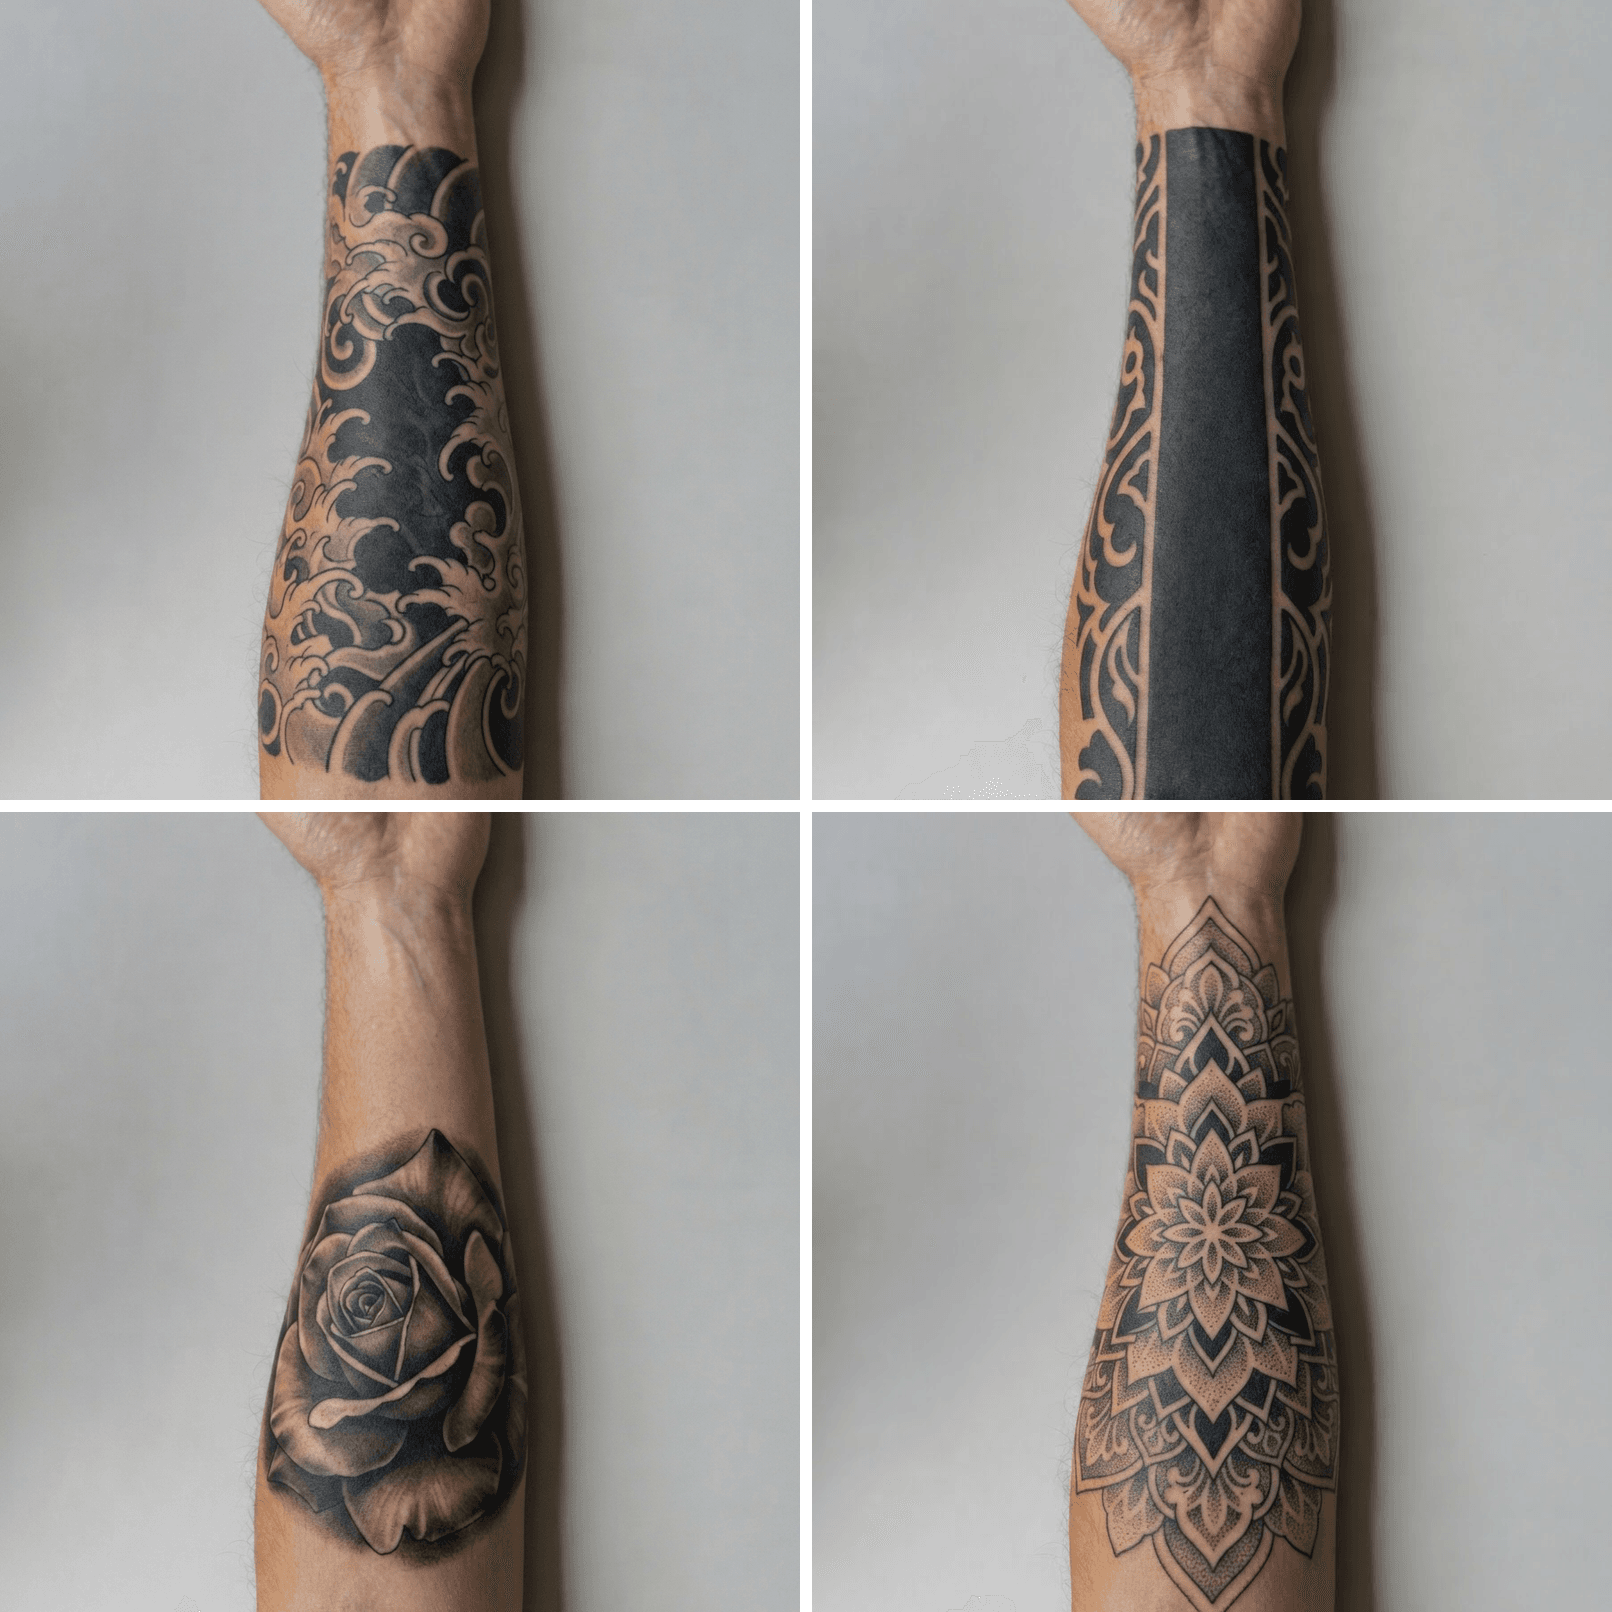
Four cover-up styles on the same inner forearm in a 2x2 grid: Japanese irezumi wave panel, solid blackwork band, black-and-grey realism rose, and an ornamental dotwork mandala
Same arm, same old script underneath, four directions. All four sit in the "yes" column of the coverage table above. Generated with Nano Banana 2 Lite Edit at 1K.
Reuse the Step 3 prompt verbatim and swap one clause, the description of the design. Keep every coverage constraint intact, because those are what make it a cover-up rather than a tattoo that happens to be nearby:
- Japanese irezumi wave sleeve panel with bold outlines and solid black smoke fill
- Solid blackwork band, full blackout from wrist to mid-forearm with negative-space cutouts only at the edges
- Black-and-grey realism rose with heavy drop shadow and deep contrast
- Ornamental mandala with dense packed dotwork and solid black anchor points
Nano Banana 2 Lite at 1K is the right tool for this stage. It is a shortlist, not a stencil. Once one of the four wins, re-run that single one through the full 2K model from Step 3 and take that file forward.
Two of these tattoo cover up ideas ai will fight you on. Blackwork wants to leave decorative gaps, and mandalas want to be sparse and airy. Add "no open negative space over the old tattoo area" and they behave.
Where "AI Tattoo Cover Up Generator Free" Ends and Real Costs Begin
Time to be specific, since "free" is doing a lot of work in this keyword.
The design step really is free. First design, no credit card, no trial countdown. That part is not a bait. What is not free is the part the free tools structurally cannot do: putting the design on your arm, and making it move.
| Step | What it costs | Notes |
|---|---|---|
| Step 1, your own photo | $0 | Your phone and a window |
| Step 2, design in the free generator | $0 | First design free, no card |
| Step 3, fuse onto your arm at 2K | $0.08 | One image-edit run |
| Step 4, five-second motion test at 1080P | $0.475 | 5s x $0.095 per second |
| Full run, one design | $0.555 | |
| Optional: four style variations at 1K | $0.16 list, $0.112 discounted | 4 x Nano Banana 2 Lite Edit |
| Optional: stencil conversion | $0.045 | Only if your artist wants one |
The video is the bill. That is exactly why it is Step 4 and not Step 1. Shortlist for free, fuse for eight cents, and only spend on motion once you have a design worth testing. If you stop after Step 3 and never make anything move, the entire workflow costs less than a dime.
Compare that to the shape of the market: a free tier that produces one usable image, then a credit pack that expires in a week whether or not you had time to use it. Per-run billing means an abandoned idea costs you nothing and a rethink three weeks later still works.
What to Hand Your Artist After the AI Tattoo Cover Up Generator
Bring three files, in this order.
- The unedited photo of your old tattoo. Not the mockup. The artist needs to judge saturation, age and how deep the old ink sits, and only the raw photo shows that.
- The Step 3 fusion. This is the conversation. It communicates scale, placement and darkness faster than any sentence you could write.
- The five-second clip. Optional, and the thing most people will not have. It shows you thought about the curve.
Then say the sentence that changes how the appointment goes: this is a reference, not a stencil. The final linework has to be redrawn by the person holding the machine, because they are the only one who knows how heavily that skin takes ink and where the old pigment will fight back. Used that way, the mockup does what Arvey Perez described, it speeds up the collaboration. Used as a demand, it does what Don Richards described, it sets an expectation the skin cannot meet.
One practical note on rights: AI-generated images sit in a murky place for copyright, and different tools carry different terms on commercial use. For a personal mockup you hand to your artist it is a non-issue. If you plan to use the design commercially, as flash you sell or shop marketing, check the terms of whatever tool produced it first.
If you want to widen the search before committing, we have compared the best AI tattoo generators head to head. If the cover-up needs to include a name or lettering of its own, the text-to-tattoo workflow covers the font problem. And if you already have a design exported from Adobe, the Firefly comparison shows where it drops into this chain.
Frequently Asked Questions
Can an AI tattoo cover up generator work from a photo of my existing tattoo?
Most cannot. The typical free generator, including the one used in Step 2 here, is text-to-image only: it invents a motif but never sees your skin. To work from your photo you need an image-edit model that accepts two reference images at once, your arm and the design, which is exactly what Step 3 does.
Will an AI tattoo cover up design actually hide my old tattoo?
The AI is judging composition, not opacity, so it cannot answer that. Coverage depends on how dark and saturated the old ink is, how much bigger and darker the new piece is, and where it sits. Blues, browns and blacks conceal, while reds, yellows and oranges often fail. Your artist makes the final call.
Is there a genuinely free AI tattoo cover up generator?
Yes for the design step. The first design costs nothing and needs no credit card. The two steps that make it useful, fusing the design onto your own arm and testing it in motion, are billed per run at a few cents. Watch out for tools whose "free credits" expire on a timer.
Do I need laser fading before a cover up, and how many sessions?
If the old tattoo is dark and saturated, usually yes. Fading for a cover-up typically takes up to five laser sessions, and you must wait at least six weeks after the last one before getting tattooed. If your new design is smaller or more detailed than the old one, fading is not enough and full removal is the honest answer.
Will my tattoo artist accept an AI tattoo cover up design?
As a reference, most will. As a finished stencil, expect a no. Artists' views split sharply between "un-tattooable, with unrealistic expectations" and "faster collaboration," and which one you get depends entirely on how you present it. Bring it as a starting point and the appointment goes well.
How much bigger does a cover up tattoo need to be?
Bigger, always. There is no fixed percentage worth trusting, and the "30% larger" figure circulating online has no traceable source. Artists in practice talk about two to three times the area of the original, and the real number depends on how saturated the old ink is and what style is going over it.