

Open any big clothing store online and look at the shirts. They hang in mid-air, collars open, the inside of the neck visible, and there is nobody inside them. That hollow look is ghost mannequin photography, and shoppers read it as a sign of a serious shop before they read a word of the listing.
The effect has always been made the hard way: dress a form, shoot it twice, then cut the form out in Photoshop and glue the inside of the collar back in. This guide walks through that two-exposure method, shows a newer route where one photo of the garment on a hanger or a visible form comes back as a finished ghost shot, and sorts out where each kind of image is allowed to go on Amazon.
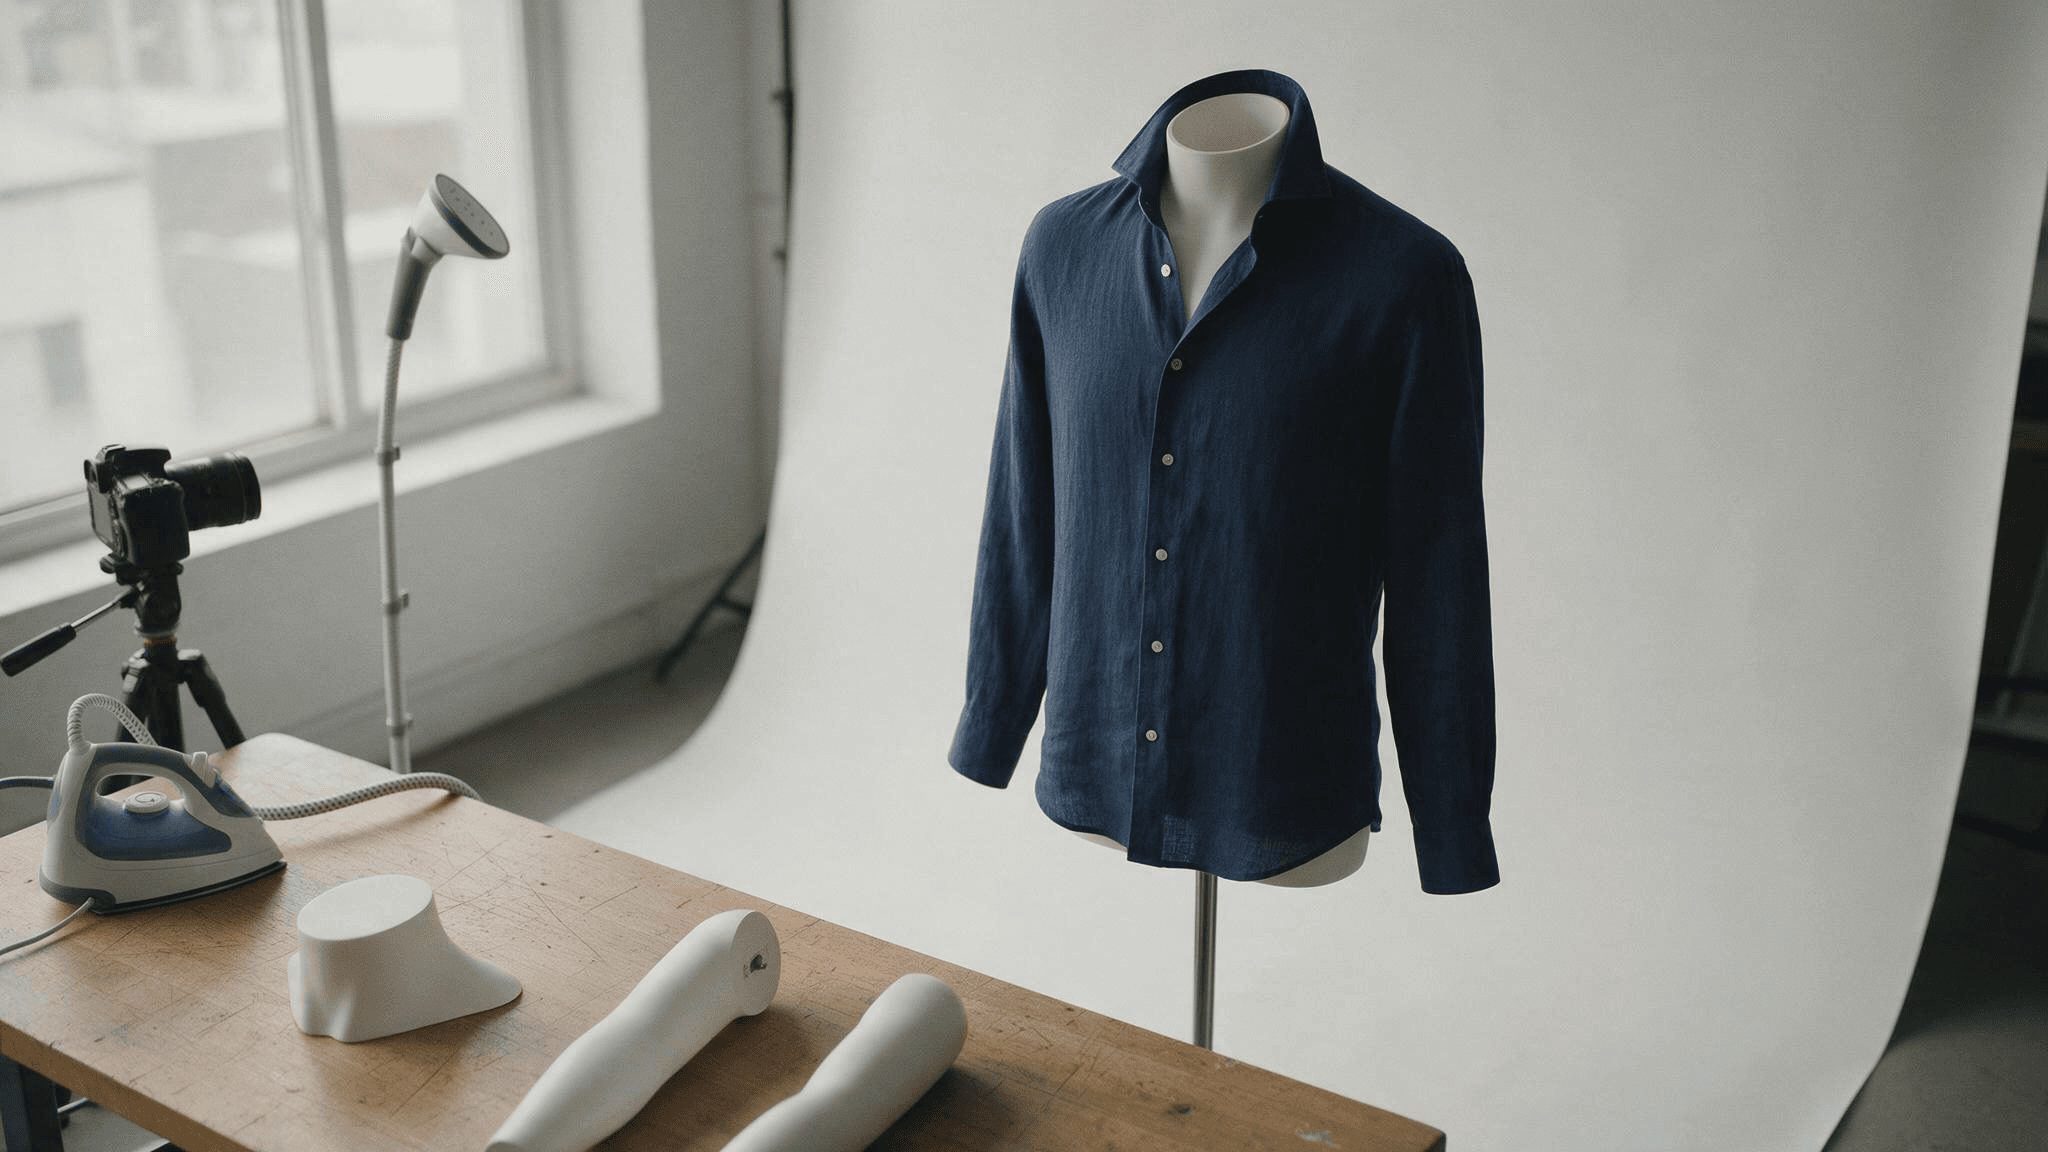
Key Takeaways
- Ghost mannequin photography shoots a garment on a form and removes the form so the clothes look worn by nobody.
- The traditional method needs two exposures per garment, an outer shot and an inside-out shot, blended in Photoshop.
- The Ghost Mannequin visual type in Apparel Photoshoot returns the hollow shot from one flatlay, hanger or mannequin photo.
- Amazon accepts ghost mannequin shots as alternate images, but adult clothing main images must show a standing model.
- A photographed ghost mannequin costs a form plus editing time per garment, while the AI route is paid per image.
What Is Ghost Mannequin Photography?
Ghost mannequin photography is a product shot in which the garment keeps the shape of a body with no body in the picture. The form that gave it that shape has been removed, digitally or by using a mannequin built in pieces. Retailers call the same thing an invisible mannequin shot or a hollow man shot, and suppliers sell the forms as invisible or ghost mannequins.
A flat lay hides how a collar sits and how a sleeve falls, and a model brings a face, a pose and a styling bill. The ghost shot keeps the fit information and drops the rest. Three details tell you it has been done well, and all three are marked on the shirt below.
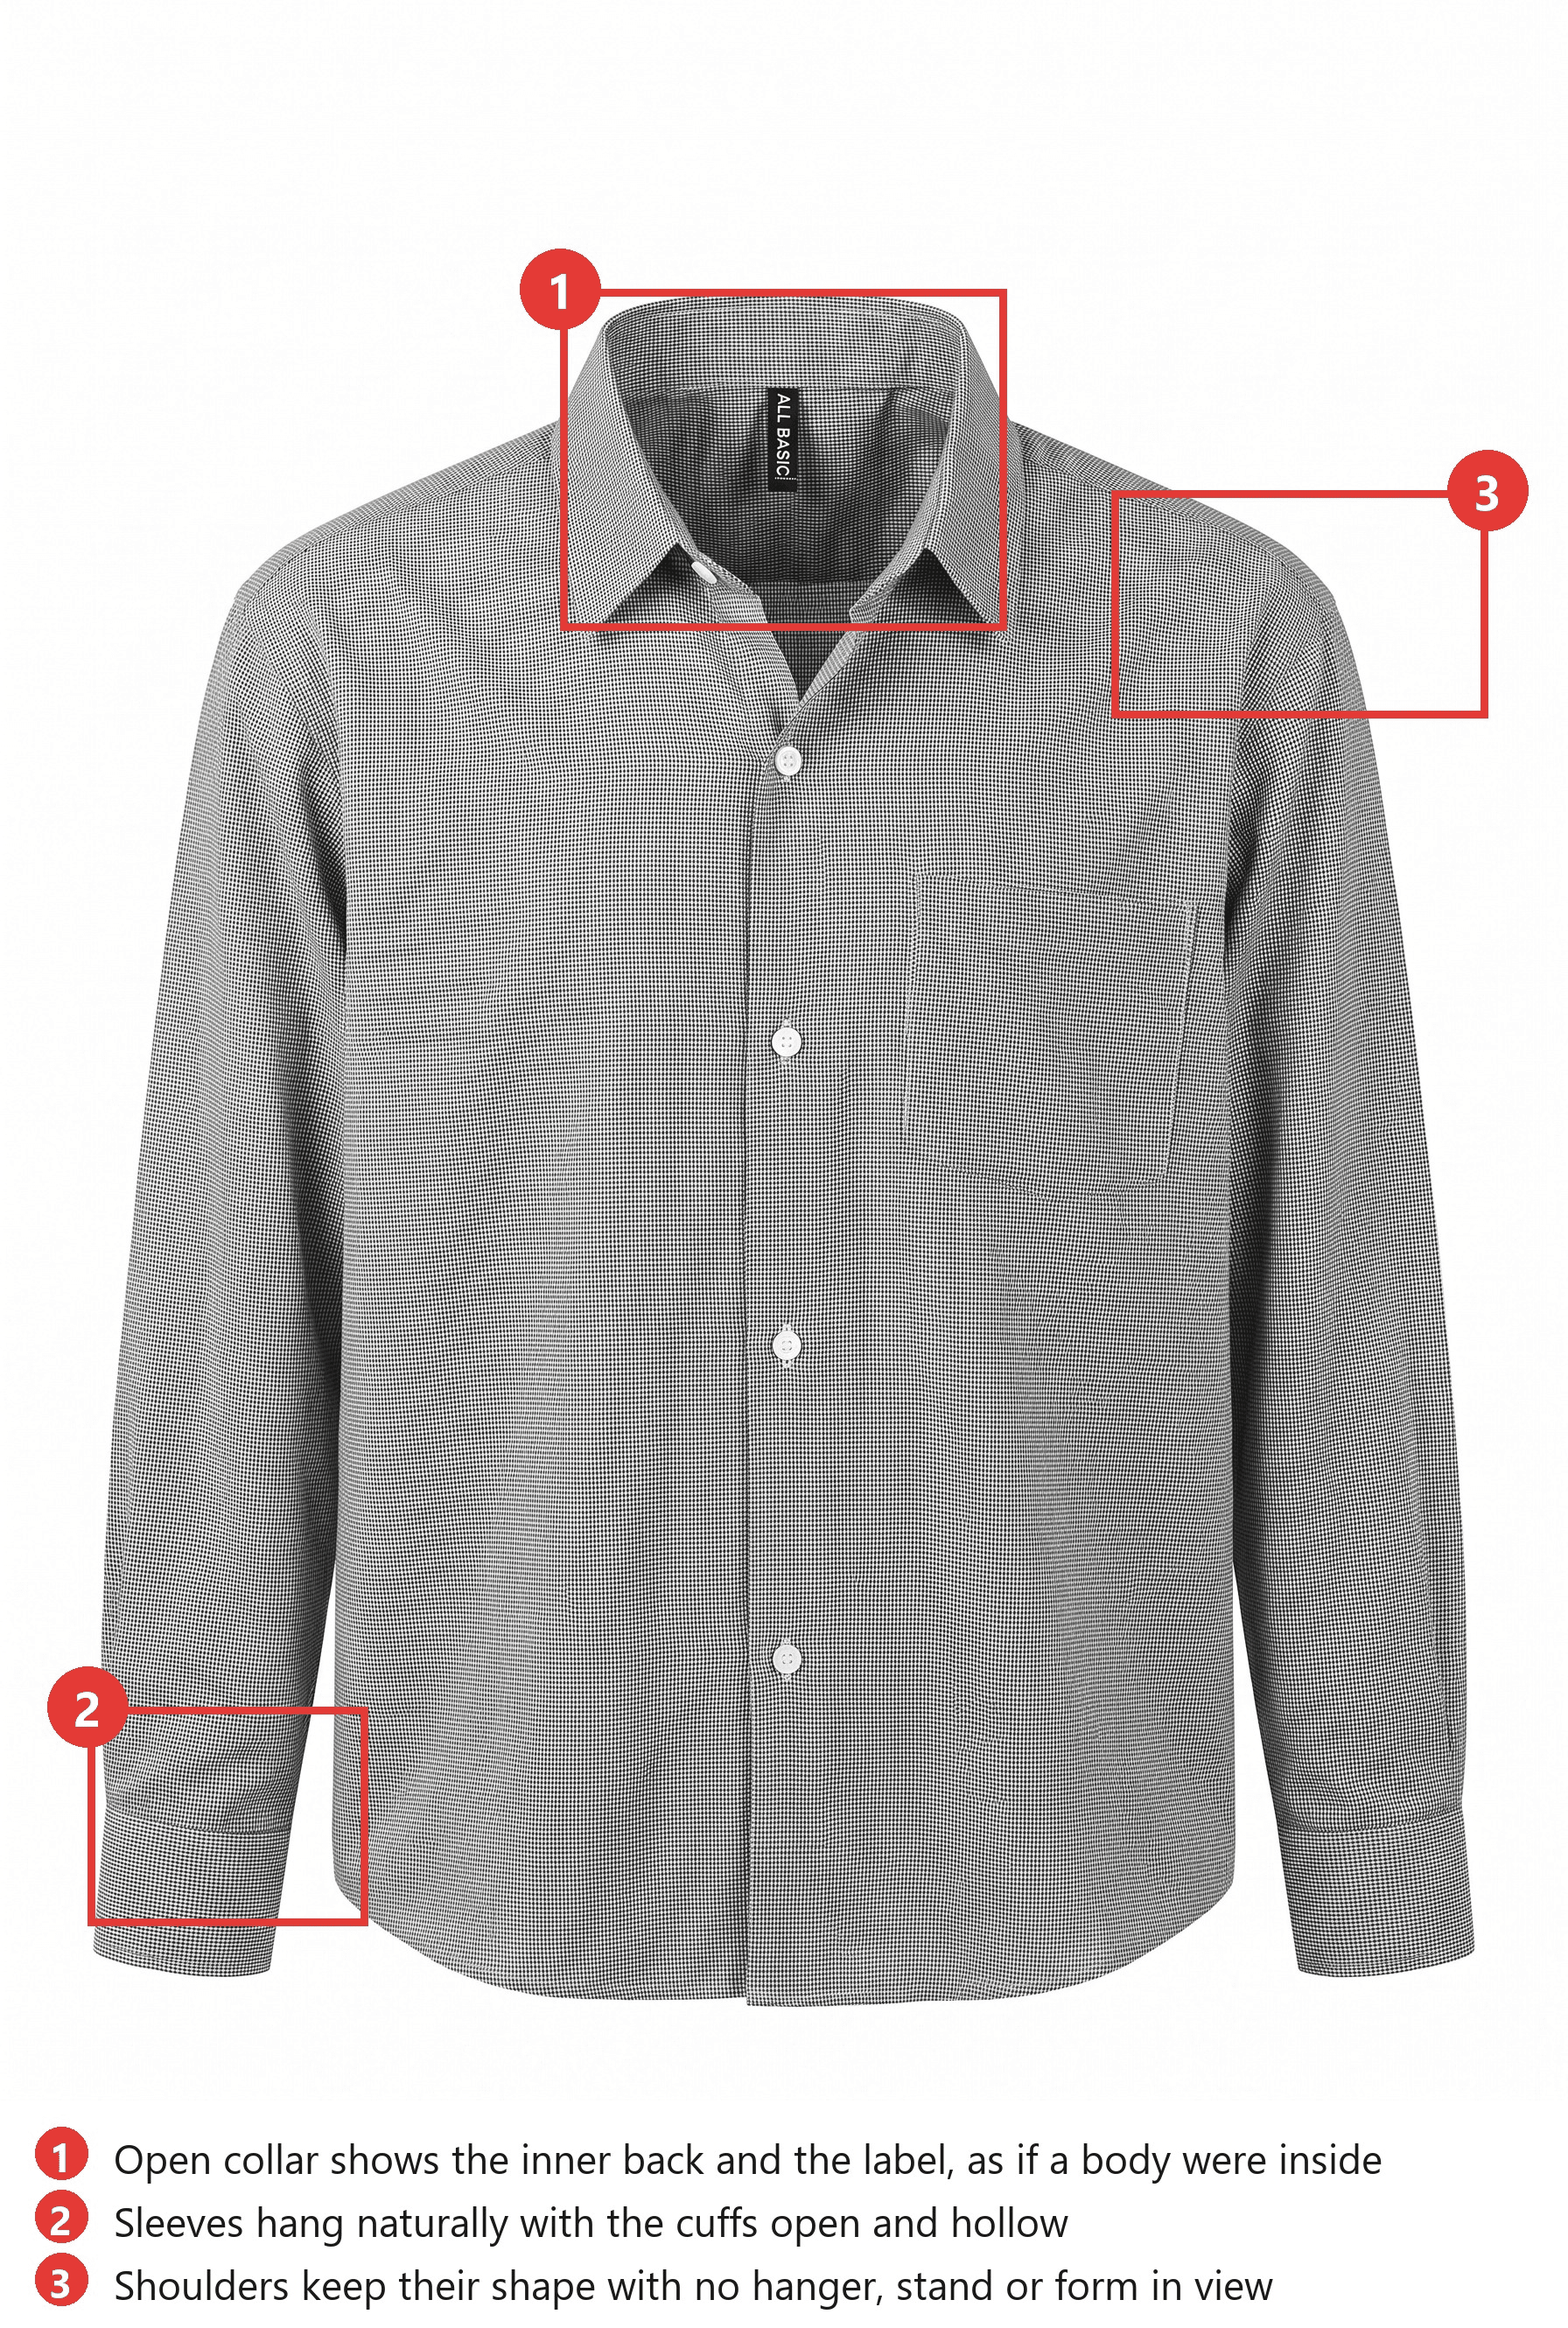
The shirt started as a photo on a wooden hanger by Fahmi Garna on Pexels; the ghost version was generated with Apparel Photoshoot and the callouts were added afterwards
The collar is the hard part. A shirt on a real body shows the inside of the back collar, usually with a label, through the opening at the front. Any method that only erases the mannequin leaves a white hole there, and that hole is what separates a convincing ghost shot from a cut-out.
Ghost Mannequin AI: The Hollow Shot From One Garment Photo
The slow part of the classic method is the second frame and the masking. Atlas Cloud replaces both with one Apparel Photoshoot run: upload a garment photo, pick Ghost Mannequin, and the model rebuilds the inside of the collar. We tested it on a blazer shot on a visible dress form in a shop, camisole and all.
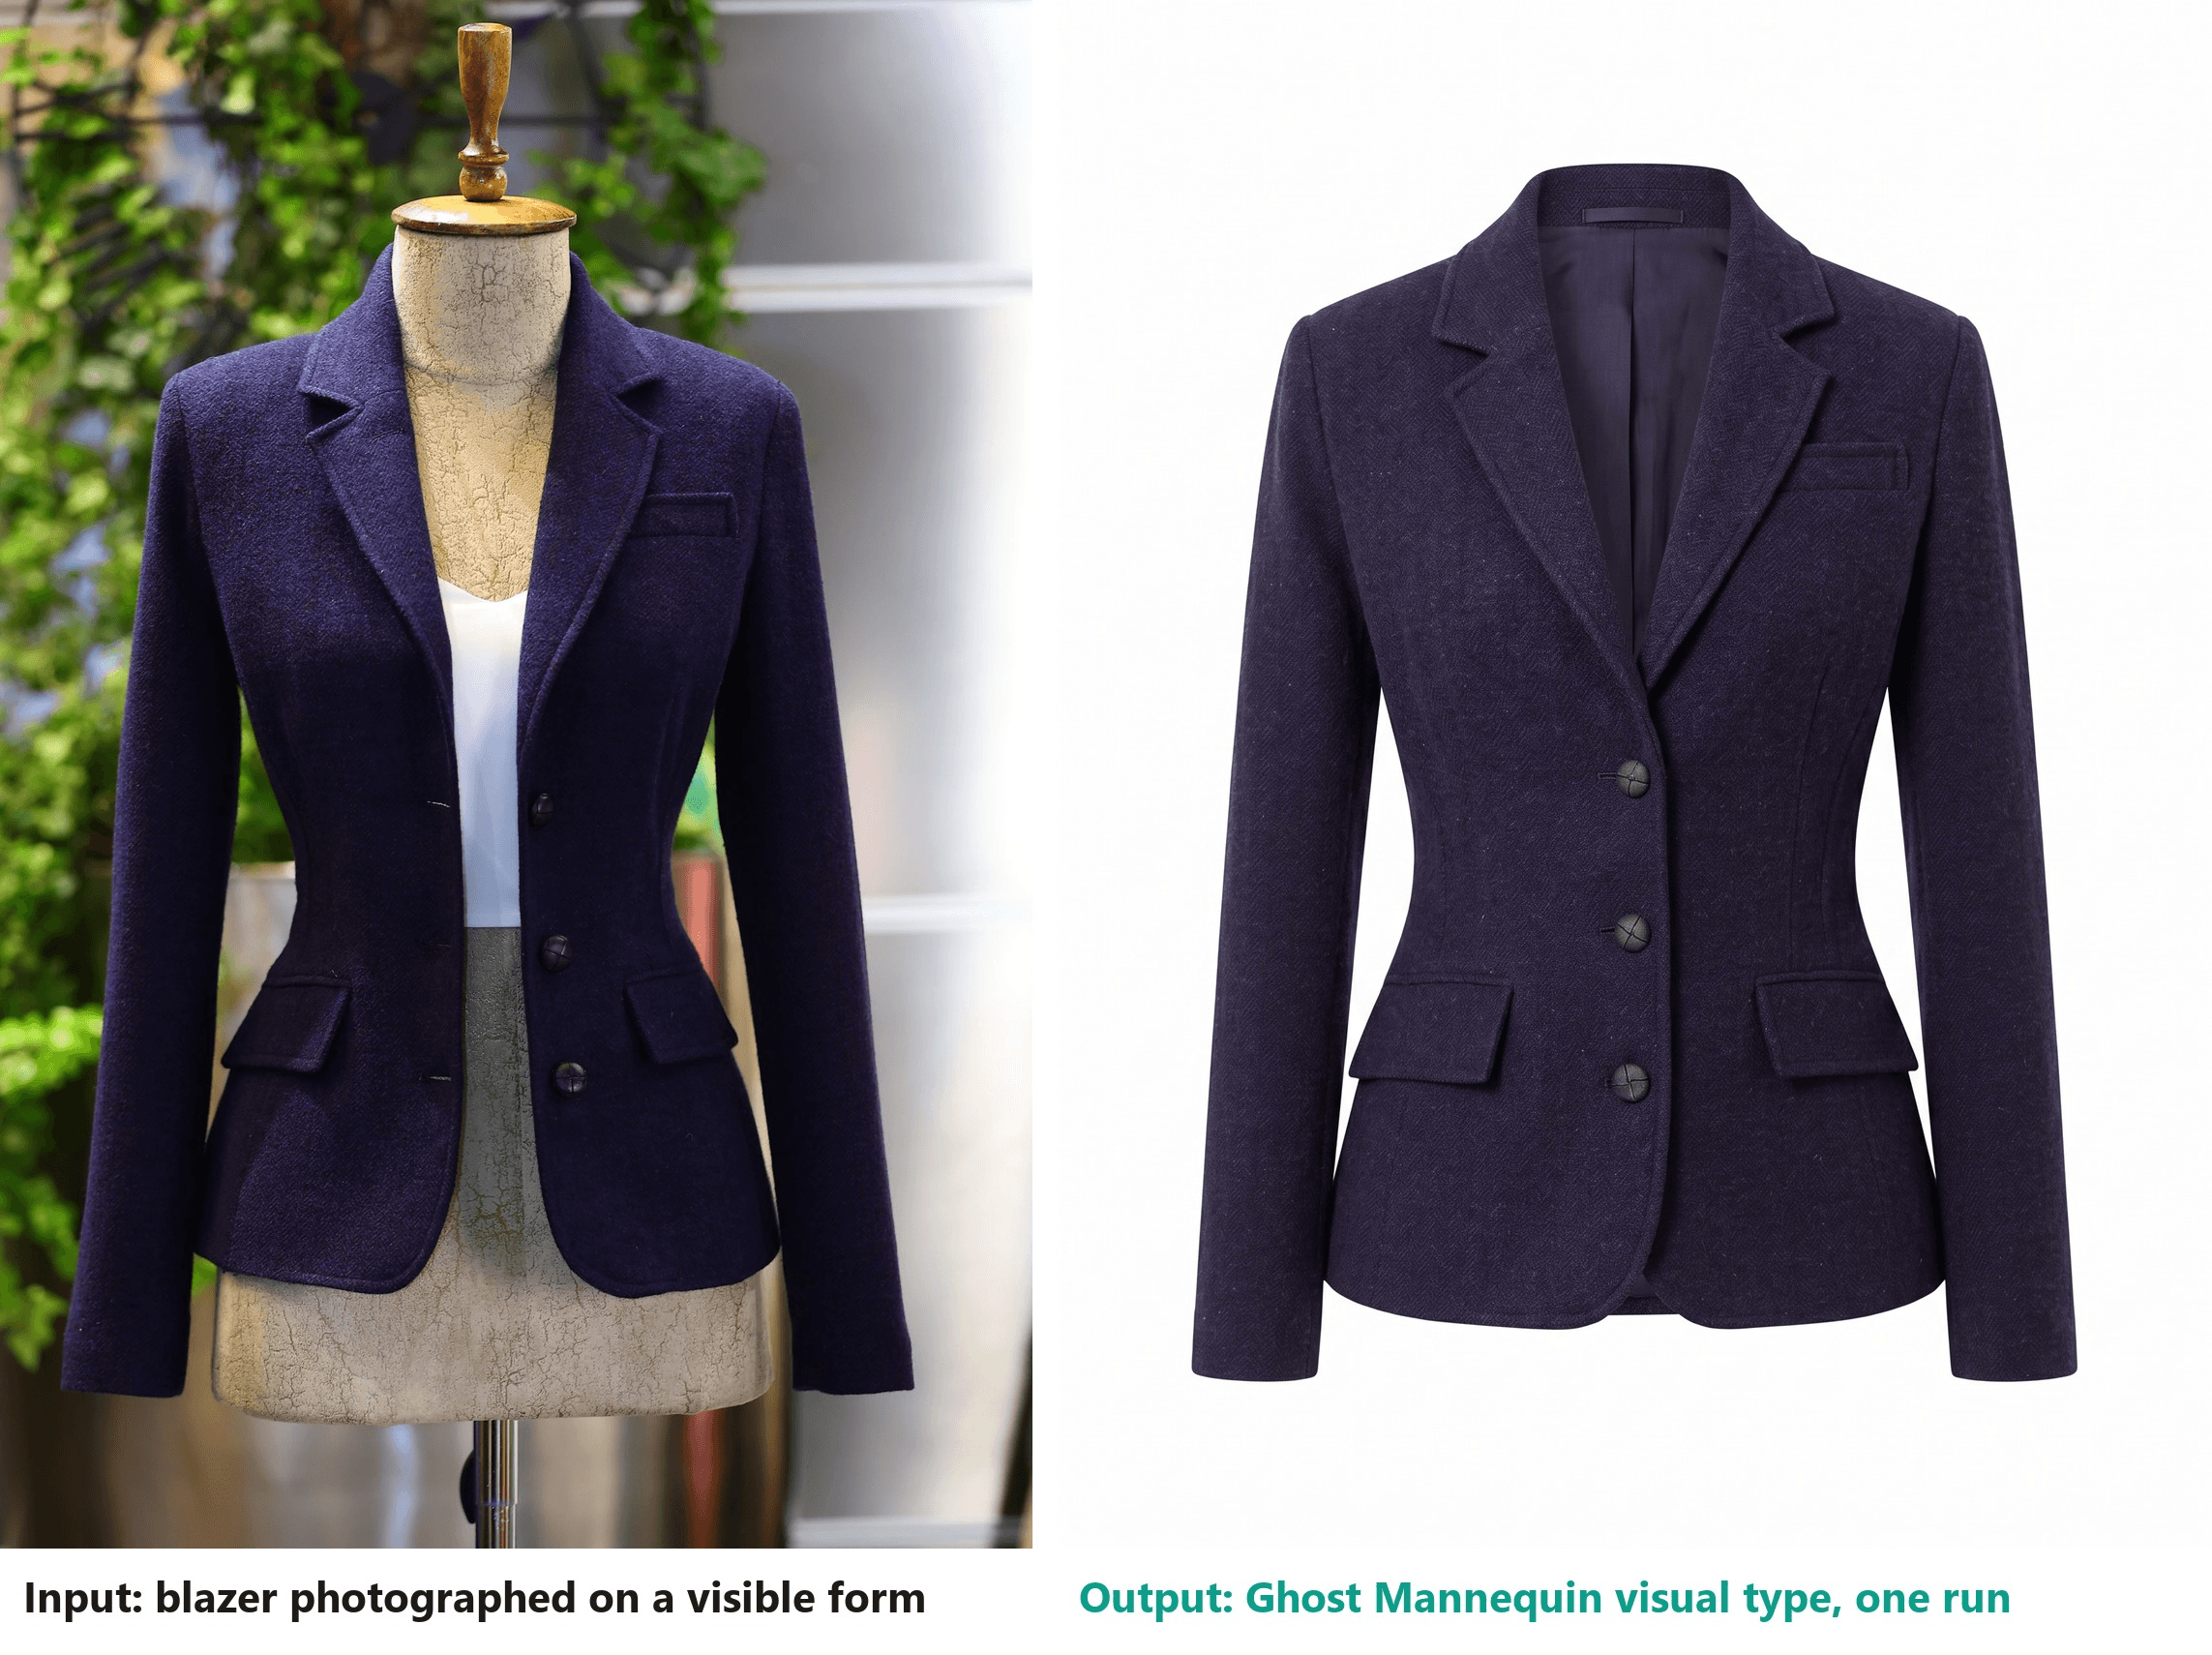
The form, the stand and the camisole are gone, the lapels keep their roll, and the lining shows through the open neck as it would on a body. The run took under two minutes, and the grey shirt above came from a hanger shot in about the same time. The same upload in the Apparel Photoshoot workflow also returns Model try-on, Detail and Flat Lay images; only the Visual type changes.
Four Steps From Upload to a Ghost Mannequin Image
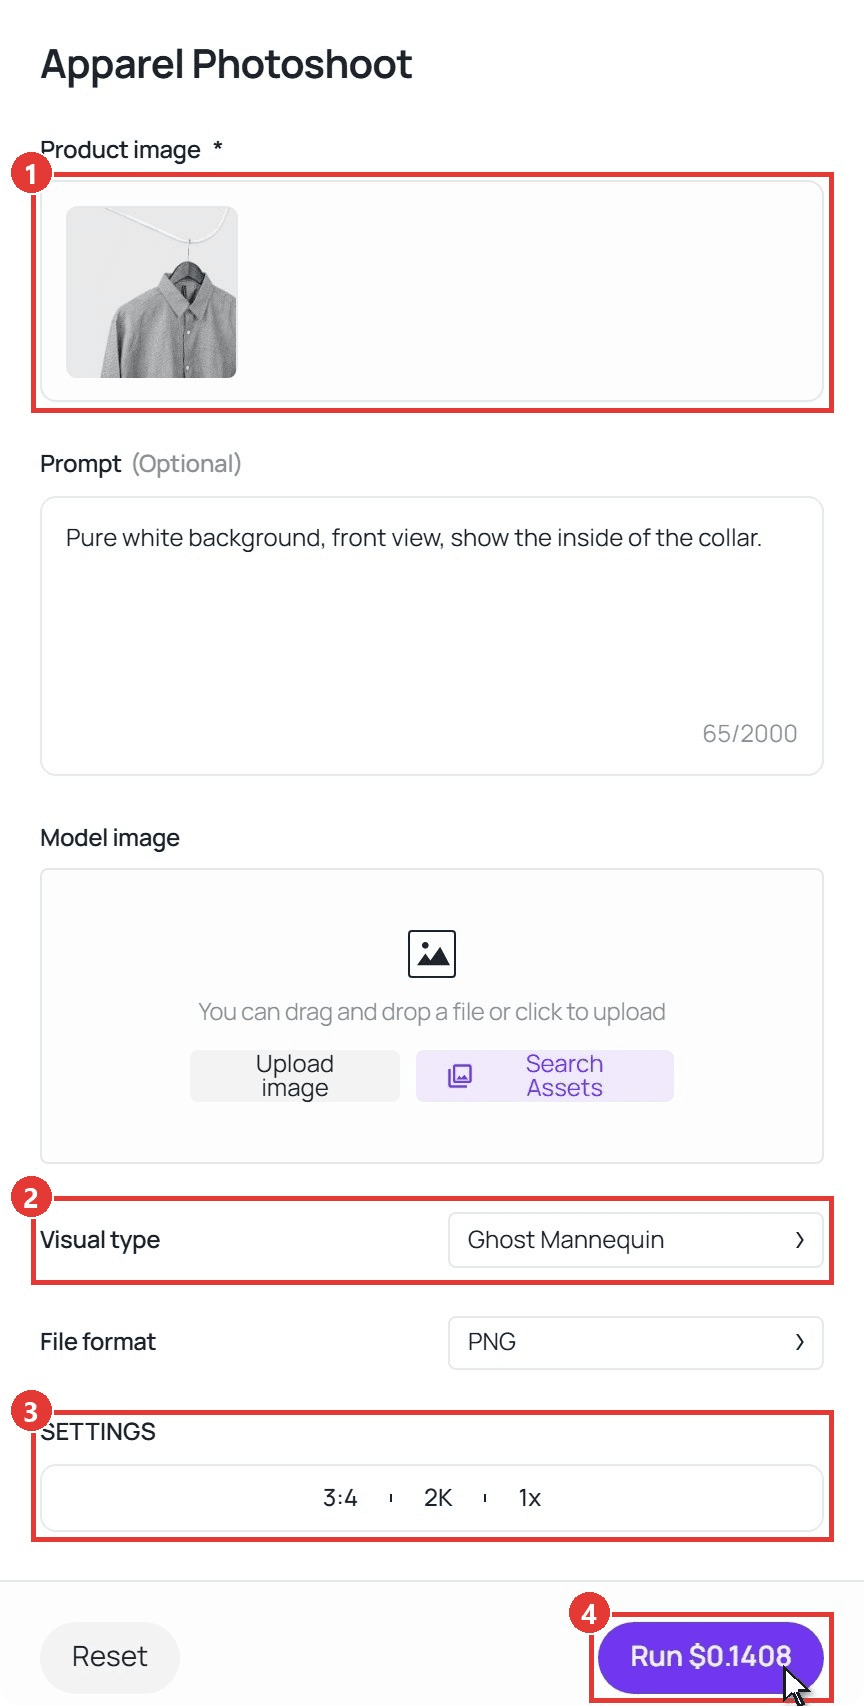
- Open the workflow page and upload the garment photo as the Product image. A hanger shot, a flat lay or a shot on your existing form all work.
- Set the Visual type to Ghost Mannequin. Add a line in the prompt box if you want a specific background or angle.
- Check Settings. The defaults of 3:4, 2K and one image suit a product gallery; switch to 4K for a zoomable hero.
- Press Run, wait a couple of minutes, and download the result from the Output panel.
Running the Same Workflow for a Whole Catalog Through the API
The browser form is fine for a dozen garments. For a season's worth of SKUs, the same workflow is a model string in the API, so a script can walk through a folder of hanger shots and write ghost images back.
Step 1: Create an API key. Generate one on the Settings page of the Atlas Cloud console and keep it on your server, out of any client-side code.
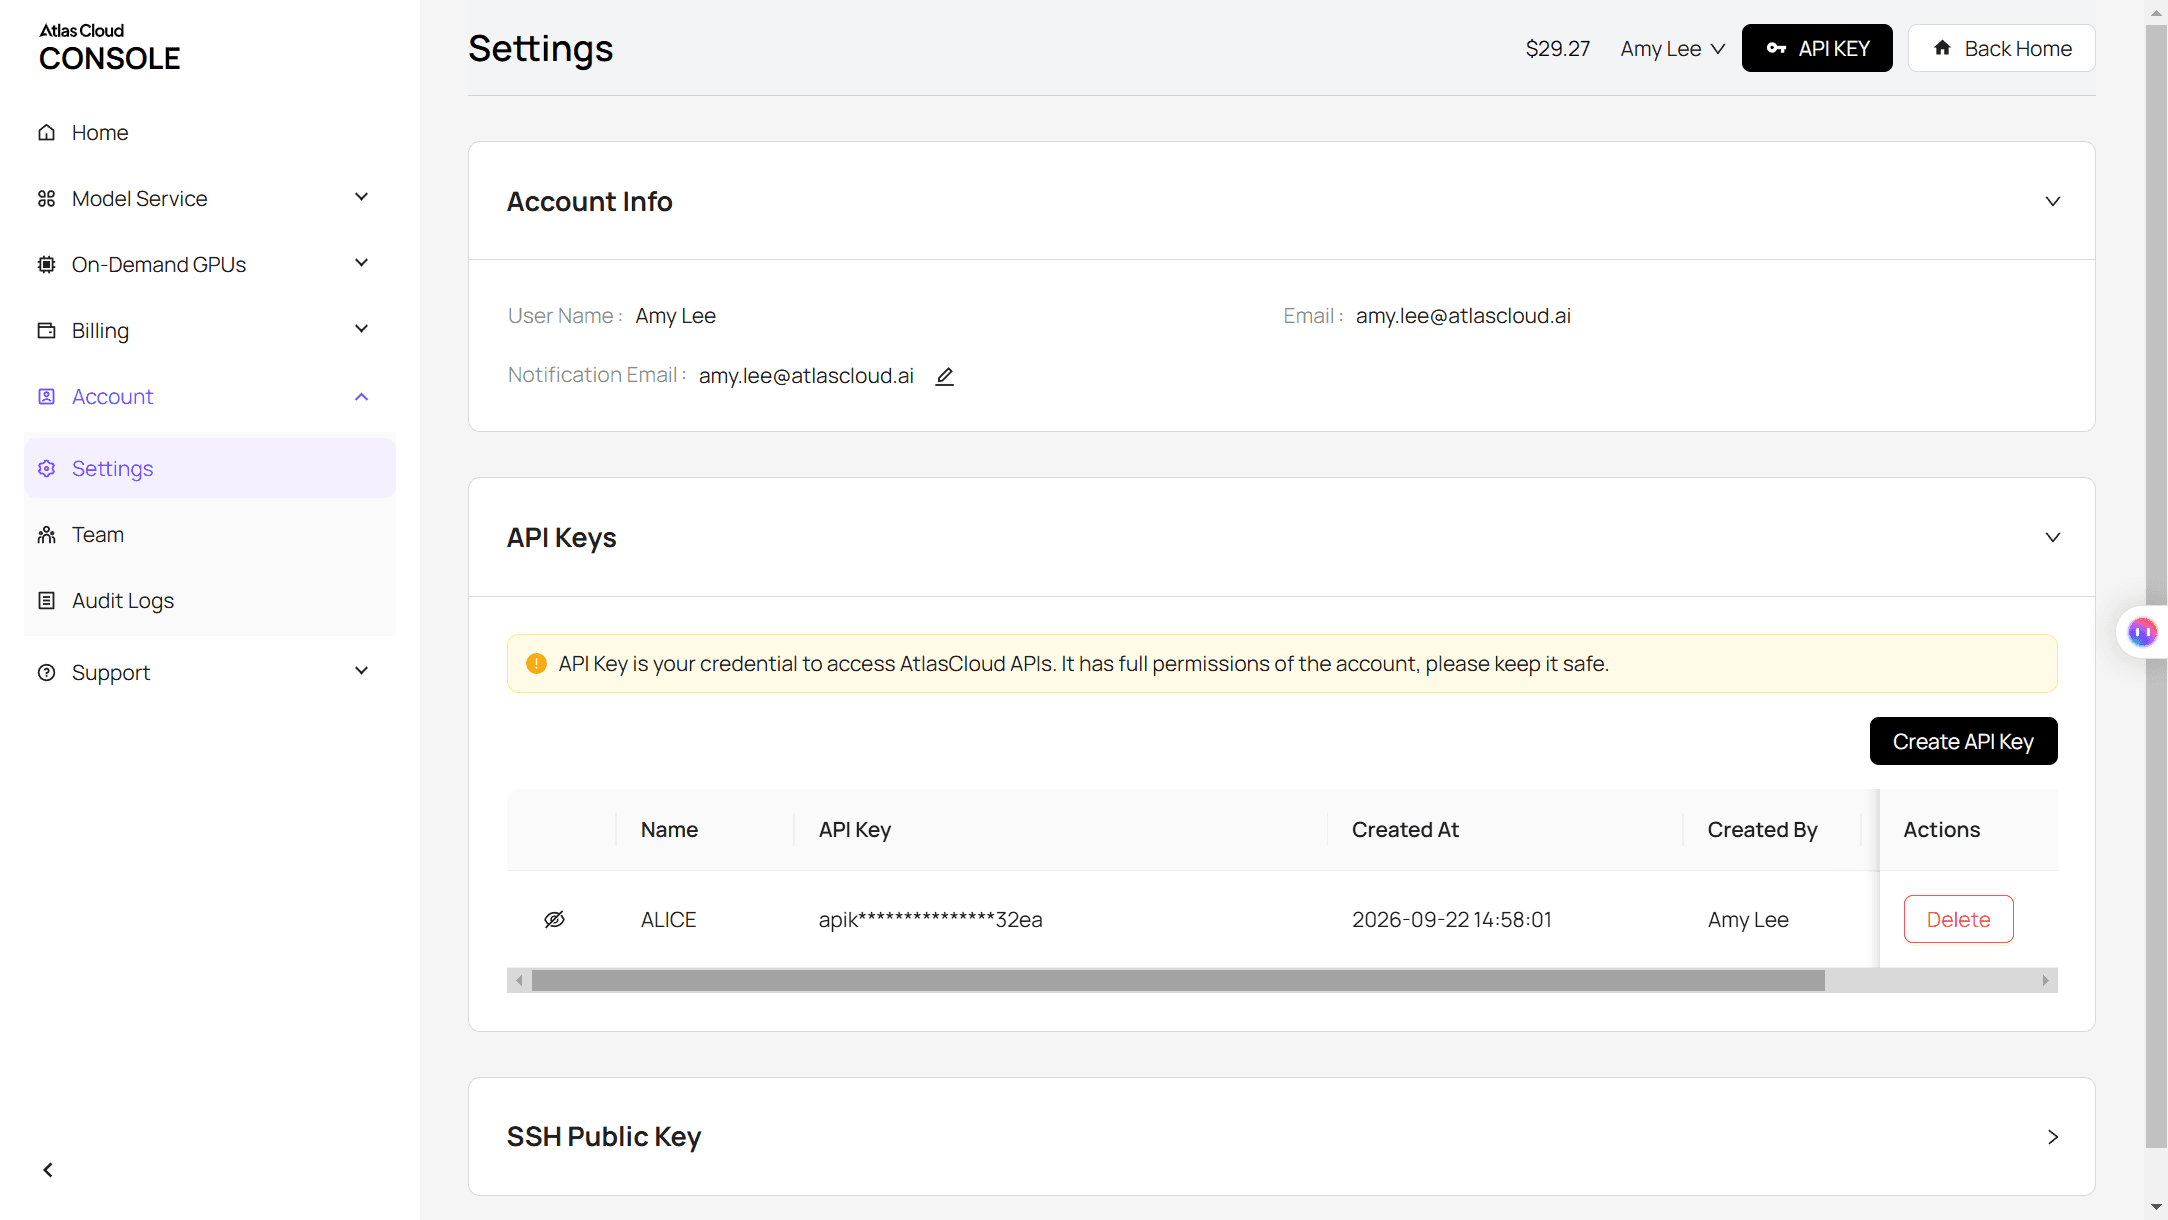
Step 2: Check the API docs. Authentication and polling are covered in the API documentation. The fields match the browser form: product_image is required, visual_type takes one of the four menu names, and model_image, user_prompt, count, ratio, resolution and format are optional.
Step 3: Send your first request. The example below asks for one 2K ghost image of a shirt at 3:4.
plaintext1curl -X POST "https://api.atlascloud.ai/api/v1/model/generateImage" \ 2 -H "Authorization: Bearer $ATLASCLOUD_API_KEY" \ 3 -H "Content-Type: application/json" \ 4 -d '{ 5 "model": "atlascloud/studio/apparel-image", 6 "product_image": "https://your-store.com/photos/grey-check-shirt-hanger.jpg", 7 "visual_type": "Ghost Mannequin", 8 "user_prompt": "Pure white background, front view, show the inside of the collar.", 9 "count": 1, 10 "ratio": "3:4", 11 "resolution": "2k", 12 "format": "png" 13 }'
Generation is asynchronous. The response carries a request ID; poll it until the status reads completed:
plaintext1curl "https://api.atlascloud.ai/api/v1/model/prediction/<request_id>" \ 2 -H "Authorization: Bearer $ATLASCLOUD_API_KEY"
The outputs array then holds the image URL. The endpoint and the key are shared with Atlas Cloud's other image models, so switching visual type, or model, is a change to one string.
How to Do Ghost Mannequin Photography the Traditional Way
The classic ghost shot is a composite of two photographs, which is why the collar is the thing to check in any ghost image, AI or not.
The accepted answer on Photography Stack Exchange, on a question read more than 23,000 times, gives the method in five steps: photograph the item on a mannequin, photograph it inside out on the same mannequin, mask the neck out of the first frame, mask and shadow the second, then stack them and heal the join.
Orbitvu's January 2024 guide says the same of the hidden areas: they need to be photographed separately and later Photoshopped into the main product photo.
Ghost Mannequin Photography at Home: The Form, the Light and the Camera
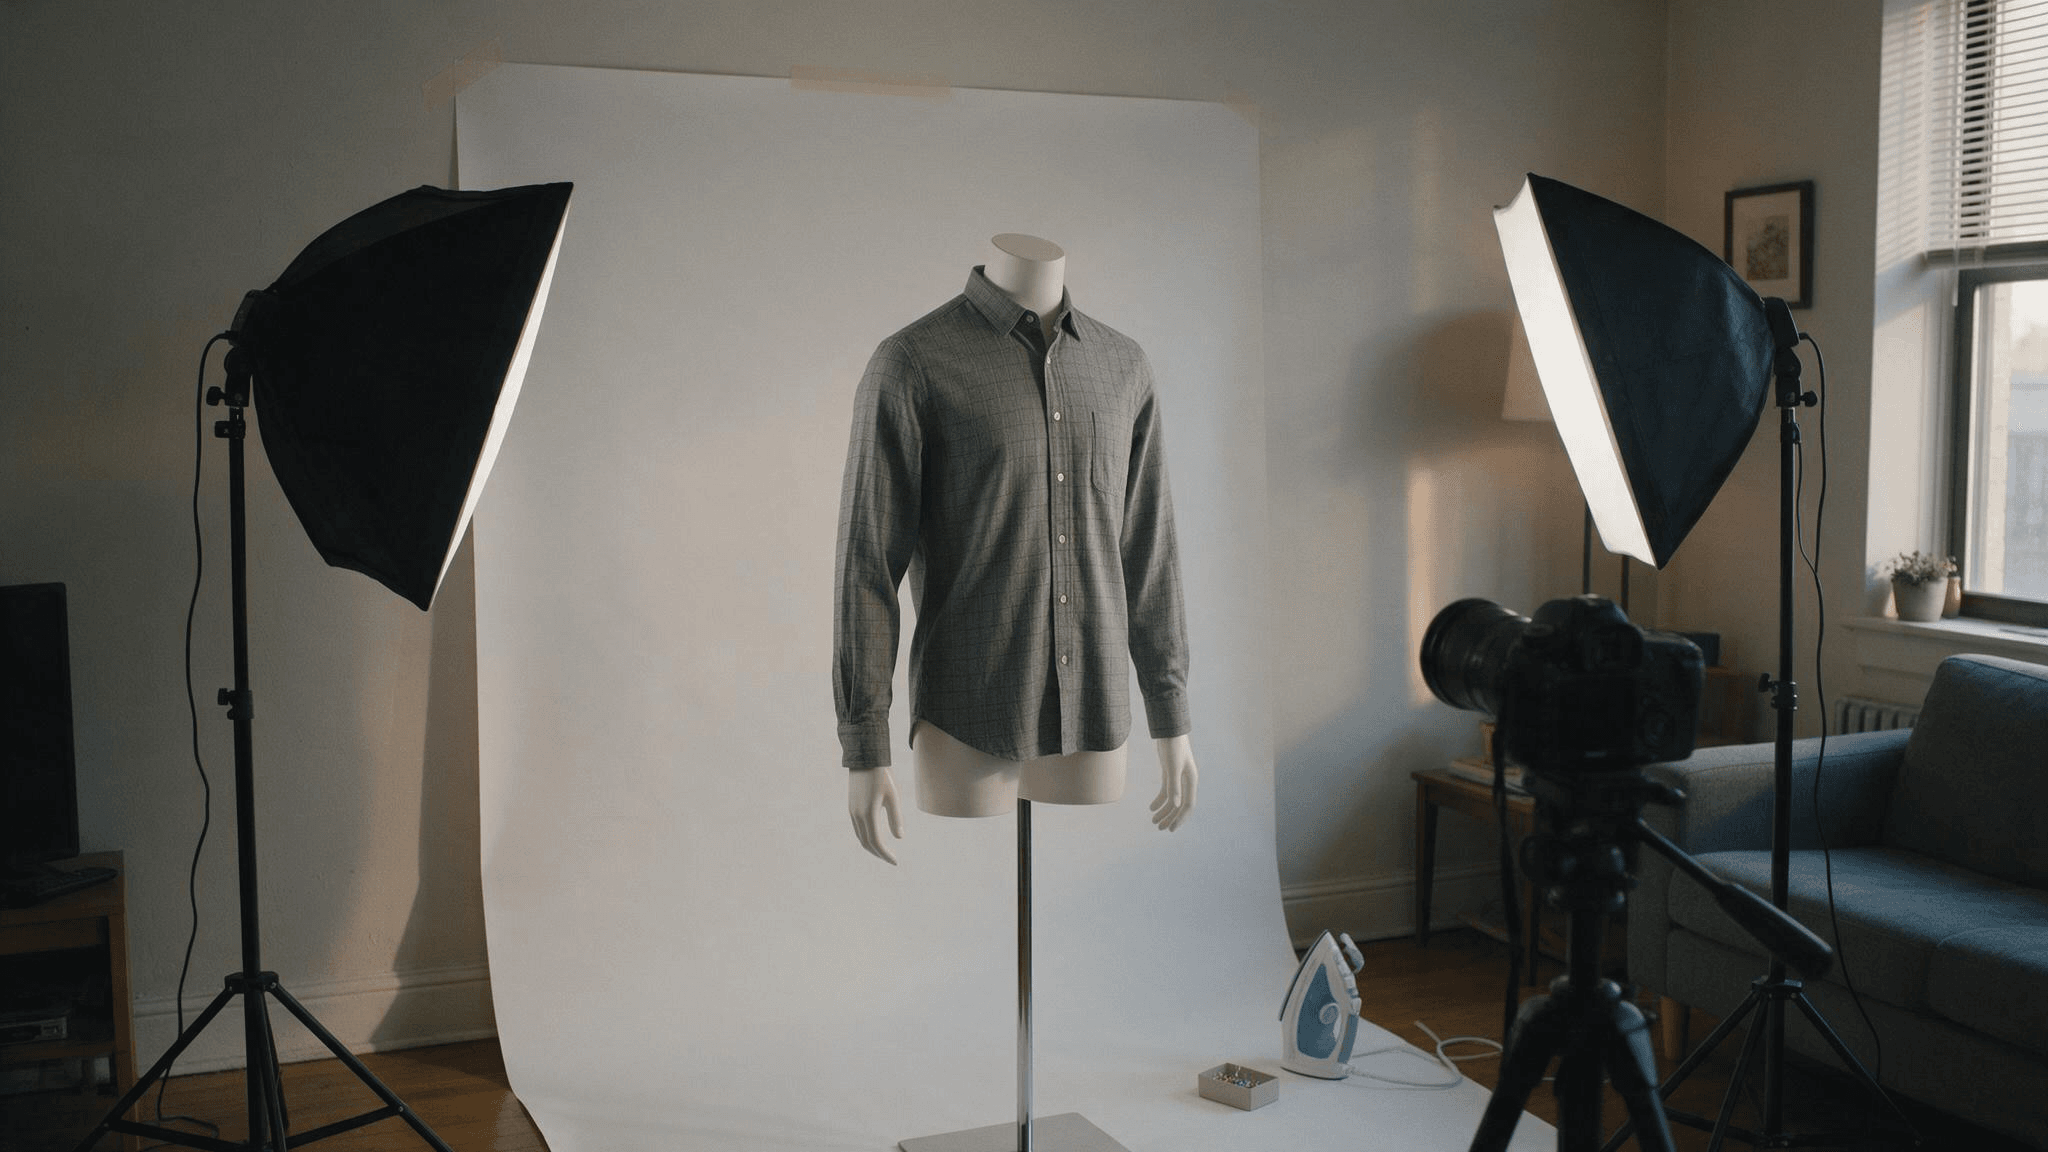
The form comes first. A photography mannequin is sold in pieces, with removable body parts such as the neck, arms, hands, and legs, as the retailer that ranks first for the term puts it. Its prices in October 2026 ran from about $398 for a torso to between $1,328 and $1,428 for a full body. Pick a torso if you only sell tops, one size smaller than your garments so the fabric can be pinned taut at the back.
Light is the next cost. A BigCommerce guide to the technique says both of its studio setups require two studio lights and umbrellas, one each side of the form, which kills the collar shadows that make masking painful.
A white paper sweep, a tripod, a steamer and a box of pins complete the kit; for a one-window version, see our guide to product photography lighting.
Shooting the Outer Frame and the Inside-Out Frame
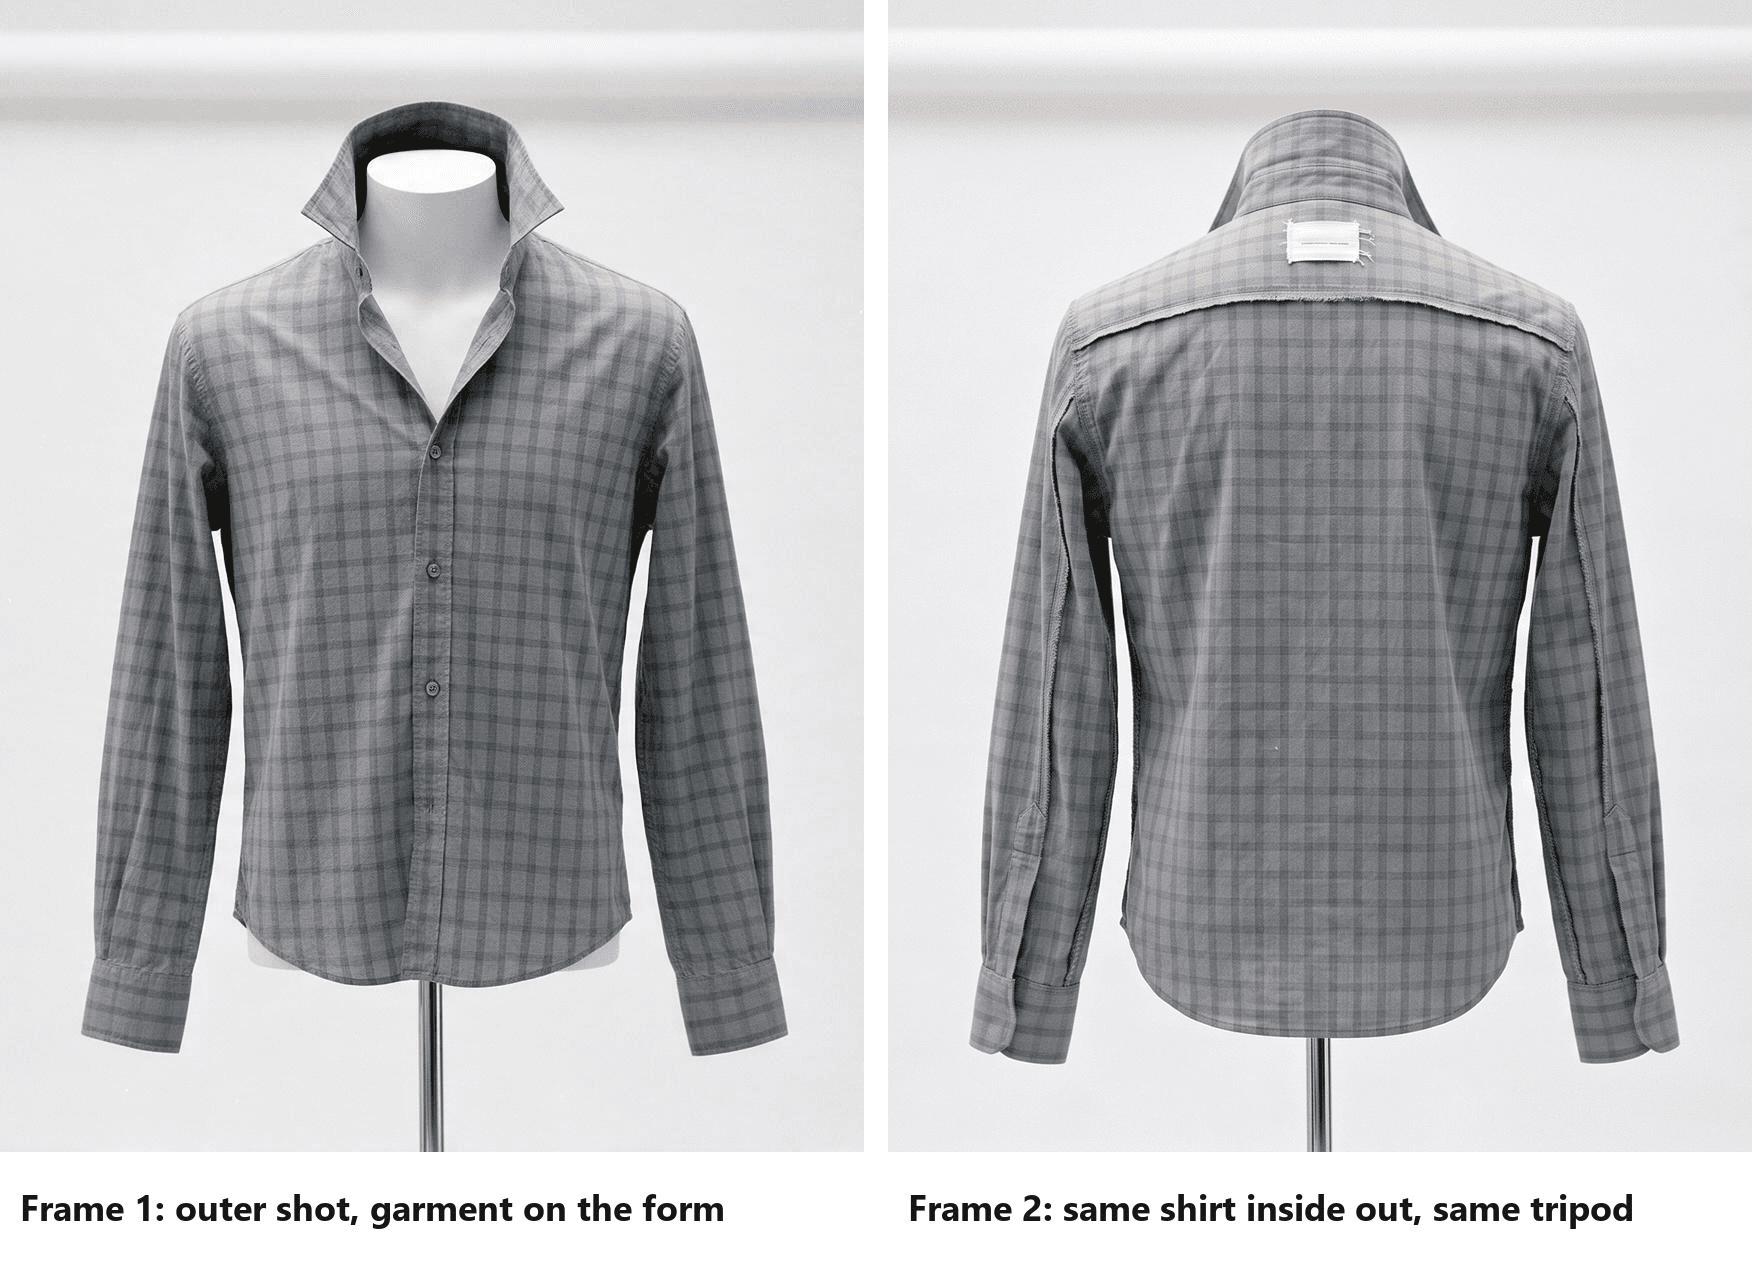
Lock the tripod and do not touch it between the two frames, because the shoulder lines of both photos have to meet in Photoshop later. BigCommerce puts the camera level with the chest for tops and with the hips for bottoms, and angles the sleeves slightly downward so the viewer cannot see up them. Remove the mannequin's neck piece, dress the form, steam it, pin the excess at the back, and take the outer frame.
The second frame records what the first one hides: the inside of the back collar. The Stack Exchange answer turns the garment inside out on the same form; BigCommerce hangs it on a piece of white foam board and photographs the front and back views again. Either way you have two frames of the same garment from the same camera position.
How to Create the Ghost Mannequin Effect in Photoshop
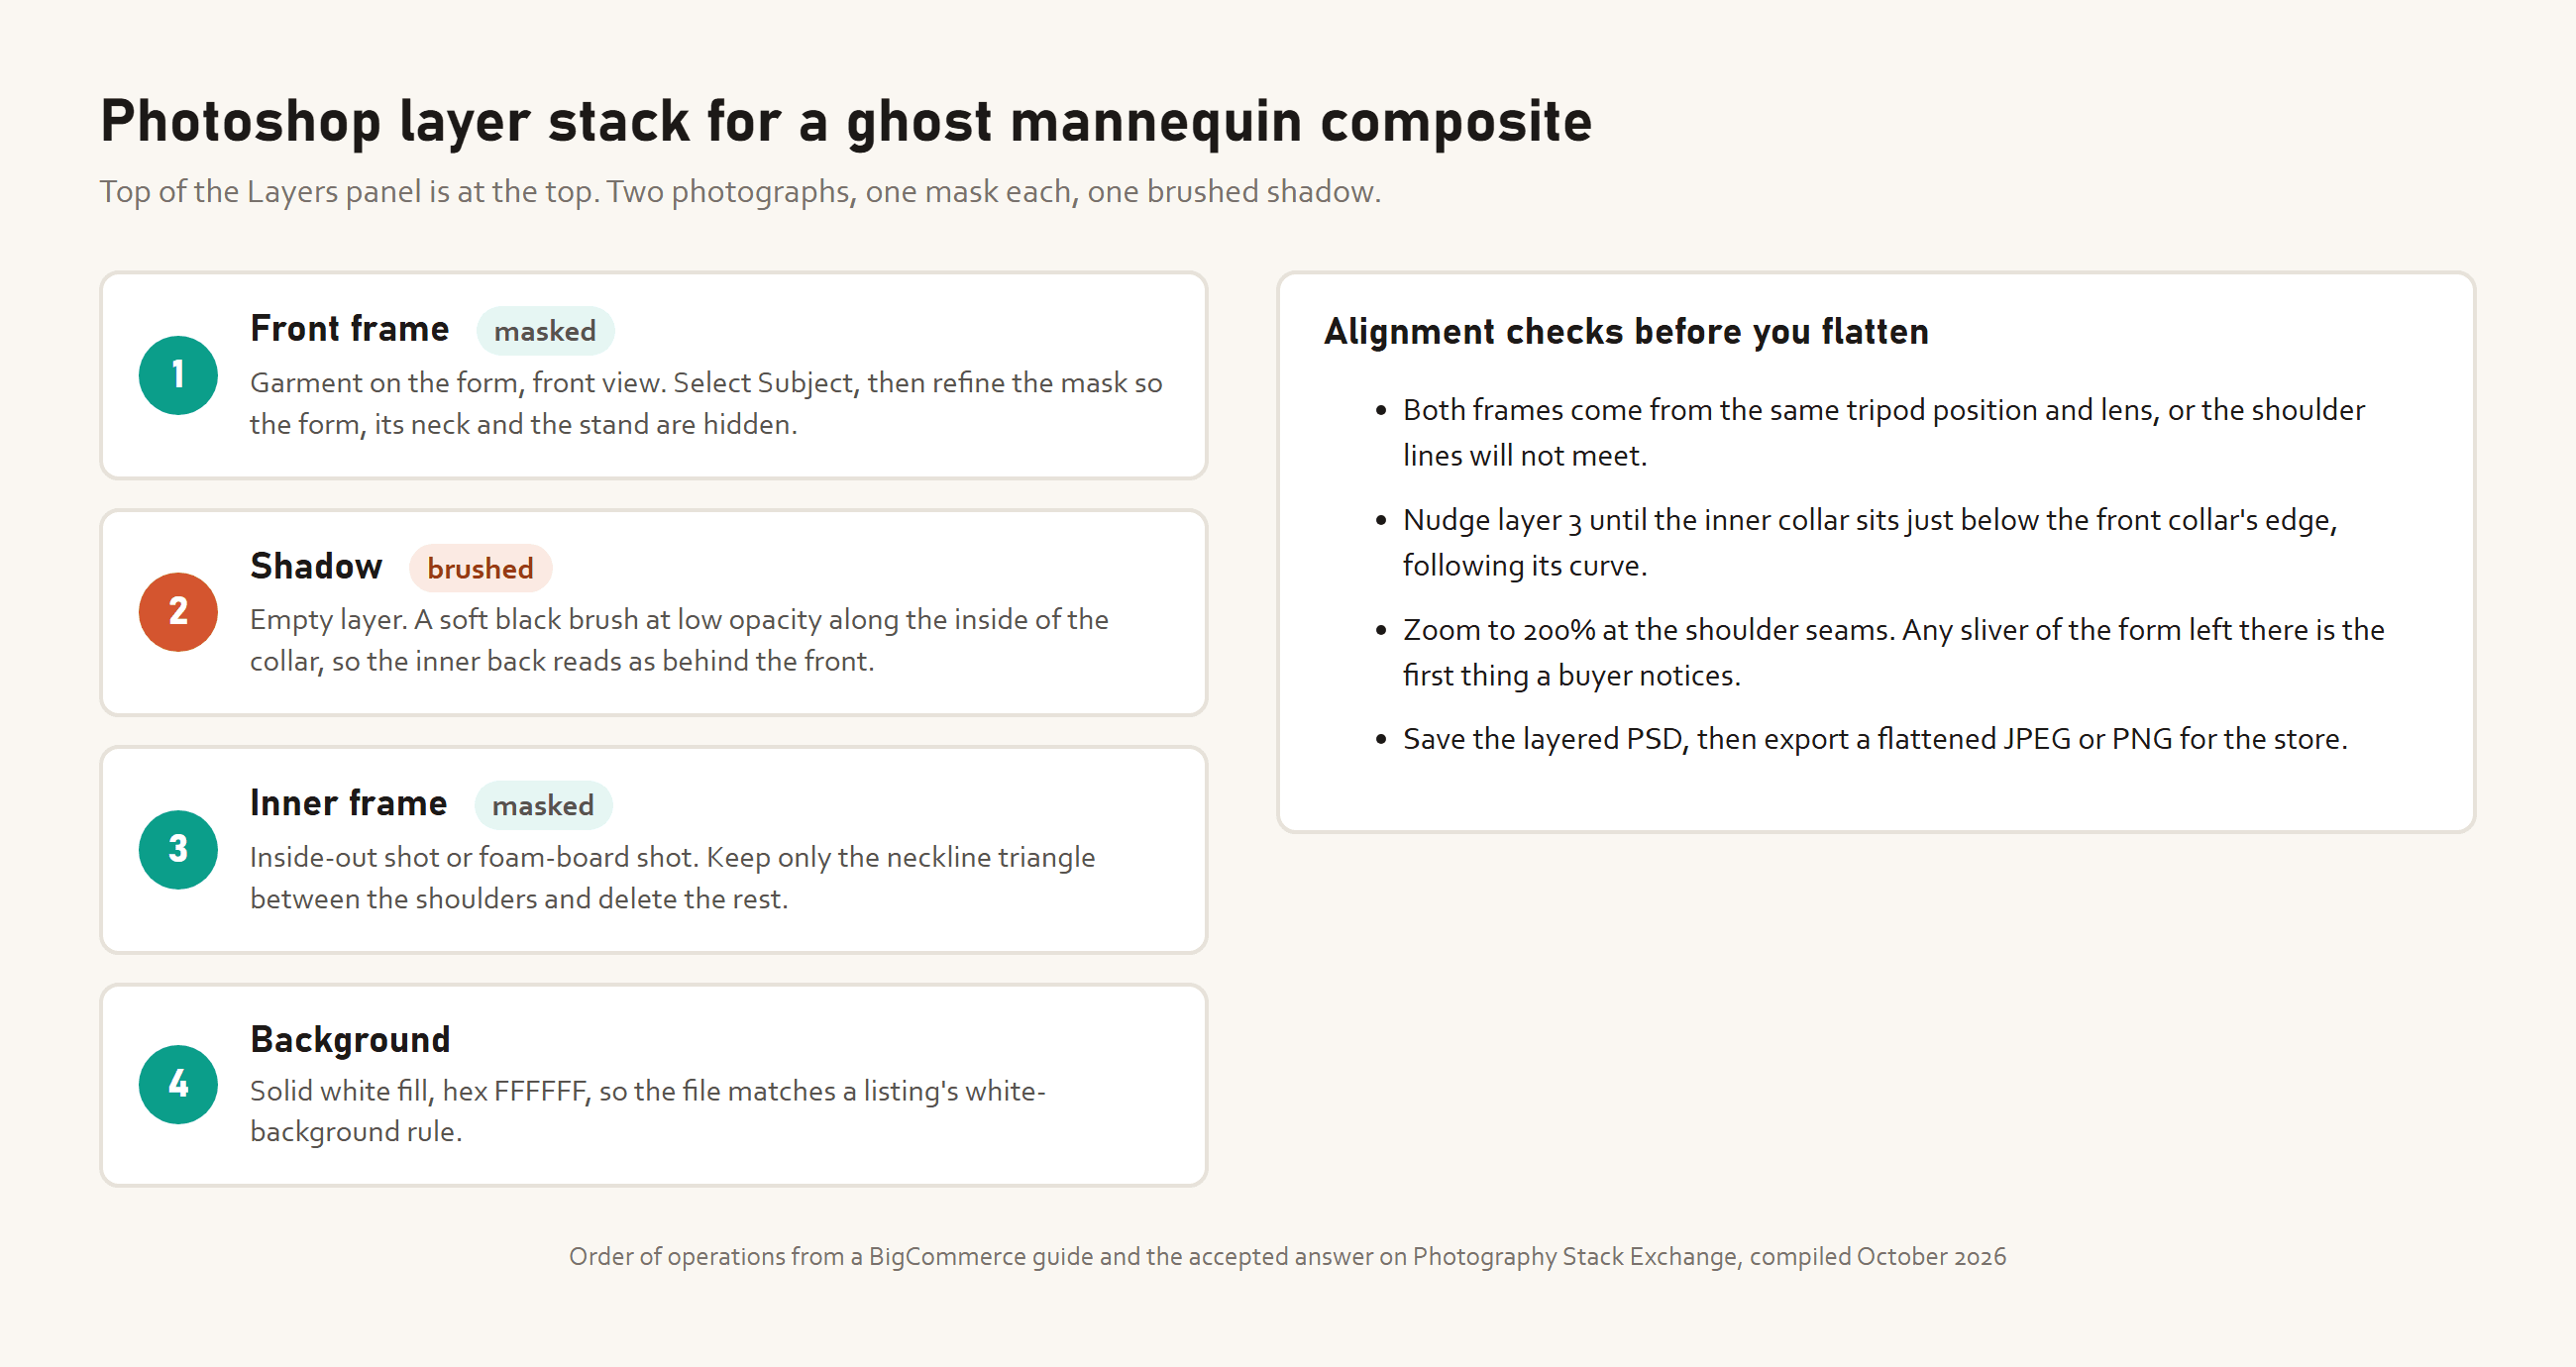
Open both frames as layers in one document, the outer frame on top. Select the garment on the outer frame with Select Subject, refine the edge, and mask so that the form, its neck opening and the stand disappear. Repeat on the inner frame, then delete everything from that layer except the inside of the collar. In BigCommerce's words, you really only need to keep that neckline triangle between the shoulders.
Slide the inner layer under the outer one until the inside edge follows the curve of the front collar. On an empty layer between them, brush a soft black shadow at low opacity, which the guide describes as adding a shadow between the two layers to give the product some depth. Fill a bottom layer with white, save the layered PSD, then export a flattened copy.
The first garment takes longest, and the mask is the slow step every time. If the tripod moved between shots, the shoulders will not meet and you are back in the studio.
Where an Invisible Mannequin Shot Belongs in a Listing
An invisible mannequin shot is welcome almost everywhere, with one large exception that is easy to miss. Amazon's image guidelines for clothing say that main images "Must be photographed on a model," and list "Product shown on a visible mannequin, hanger, or holder" among the prohibited main images.
Table 8 on the same page adds that images "must not have visible mannequins, except for stockings or socks."
So for adult clothing on Amazon, the ghost shot is an alternate image, the slot for views that clarify "detail, fabric, cut," with up to eight per product. The rule flips for children's and baby undergarments, leotards, swimwear and similar form-fitting items, which "must be displayed without models," and since a visible mannequin is also banned, a ghost or flat lay shot is what those main images call for.
| Where the image goes | Amazon's rule | What to upload |
|---|---|---|
| Main image, adult clothing | Photographed on a model, standing, pure white background | On-model shot |
| Alternate images, any clothing | Up to eight, to show detail, fabric and cut | Ghost mannequin, detail and flat lay shots |
| Main image, children's swimwear, leotards and undergarments | Displayed without models, no visible mannequin | Ghost mannequin or flat lay shot |
| Your own store or a marketplace without a model rule | No rule beyond your own style guide | Whichever shot sells the garment |
The full list of main-image rules is in our guide to Amazon image requirements. The short version: shoot the model for slot one, and let the ghost shot carry the gallery.
Ghost Mannequin Without a Studio: What Each Route Costs in Time and Gear
Three routes produce the same hollow shirt. A studio charges per garment and needs the garment in hand, so the clock includes shipping both ways. Doing it yourself means buying the kit once and paying in time per garment. The AI route skips both and bills per image from your balance. The figures below for the studio route come from one that ranks on the first page for the term, in October 2026.
| Route | One-off outlay | Work per garment | Wait |
|---|---|---|---|
| Shoot and edit it yourself | A ghost form from about $398, two lights with umbrellas, a tripod and backdrop, plus Photoshop | Two frames, then masking and alignment | Same day, once you are set up |
| Send it to a ghost mannequin studio | None | Pack and ship the garment, approve the sample; from £18 per garment before VAT | Five to ten working days, plus shipping both ways |
| Apparel Photoshoot | None | One upload and one menu choice | Under three minutes per run in our tests |
DIY still makes sense for a brand that owns a form and shoots in batches of fifty. For a shop that photographs a few new pieces a week on a hanger, the one-upload route turns the ghost shot from a project into a setting.
Frequently Asked Questions
What is the difference between ghost mannequin and invisible mannequin photography?
There is no difference. Ghost mannequin, invisible mannequin and hollow man all describe the same image, a garment that holds a body's shape with no body or form visible. Suppliers use the first two names interchangeably for forms with removable necks and arms, so search for either when buying one.
Does Amazon allow ghost mannequin images?
Yes, as alternate images for any clothing, and as main images only for the categories Amazon requires to be shown without a model, such as children's swimwear and undergarments. For adult clothing the main image must show a standing model, so plan a ghost shot and an on-model shot for each product rather than choosing one.
Can you do ghost mannequin photography without a mannequin?
Yes. The Ghost Mannequin visual type in Apparel Photoshoot builds the hollow shape from a flat lay or a hanger photo, so no form is needed. In the photographed version, foam board can stand in for the inner frame, but the outer frame still needs a body shape, which is where a cheap torso earns its place.
How much does ghost mannequin photography cost per image?
Shooting it yourself, the form and lights are a one-off outlay spread over every garment you shoot, plus your editing time; a studio charges per garment, as the table above shows. Apparel Photoshoot shows its price on the Run button before you commit: $0.1008 for one image at 1K, $0.1408 at 2K and $0.1808 at 4K, so a catalogue of ghost shots at 2K costs about 14 cents a garment and no form.
Conclusion
The ghost shot earns its place in a listing because it shows the fit without the distraction, and the collar is where it is won or lost. The traditional method pays for that collar with a second frame and a careful mask, and still works if you own a form and shoot in volume. The AI method pays with one upload, and the blazer test shows the inside of the neck coming back without anyone drawing it.
Whichever way you make it, put the image where the platform allows: the gallery on Amazon, anywhere you like on your own store. Get the collar right and ghost mannequin photography does the rest of the selling on its own.





