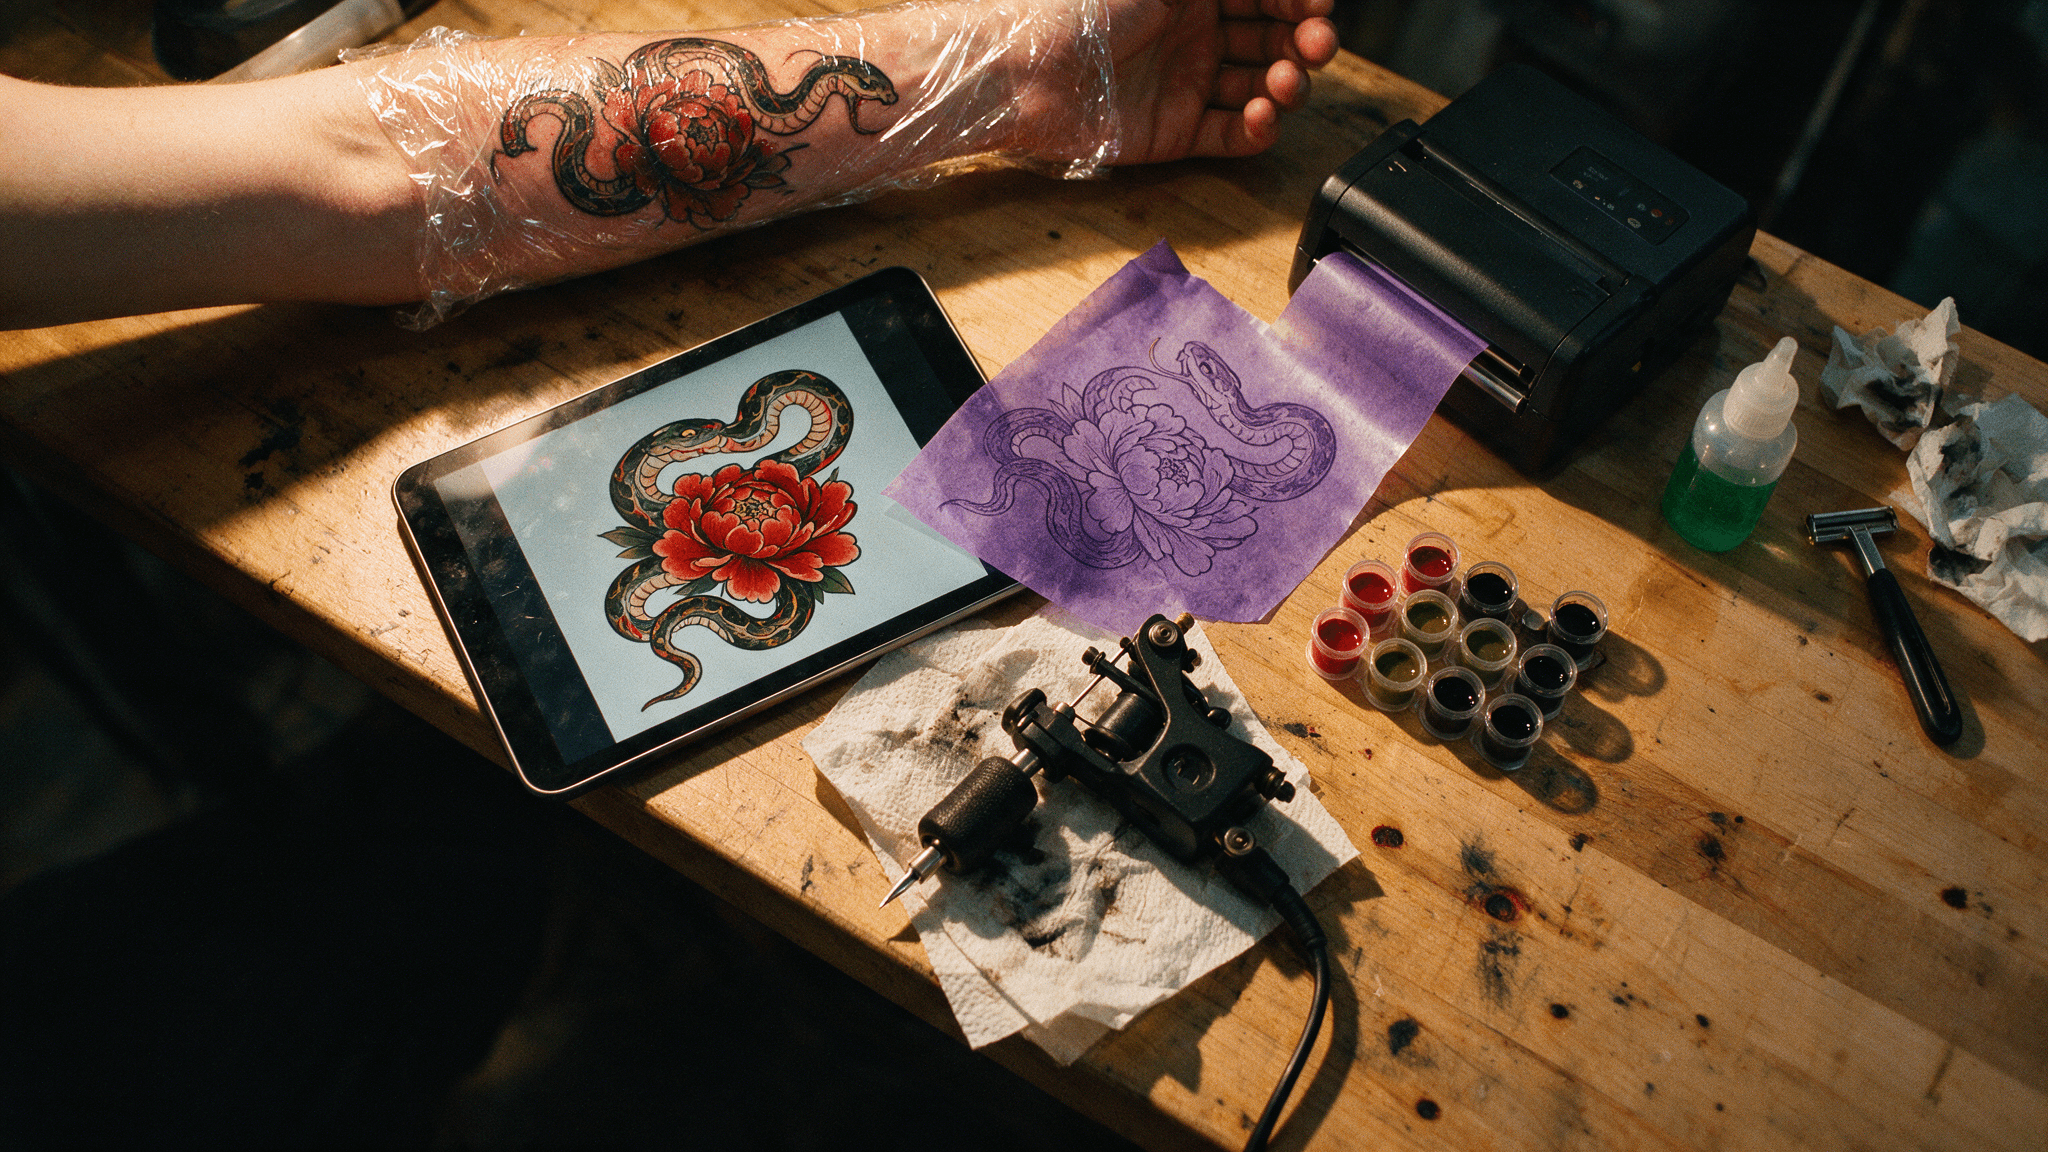
Top-down view of a tattoo studio workstation: a tablet showing the colour snake and peony design, a freshly printed purple thermal transfer stencil beside it, a transfer machine, a tattoo machine and ink caps
The three things that have to exist before a needle touches skin: the design, the purple transfer stencil, and someone who knows how the two differ.
The image on your phone is gorgeous. You slide it across the counter. The artist pinches to zoom, holds it there for a second too long, and says the sentence that every AI tattoo design eventually hears.
"I can't tattoo that. Not like this."
The problem is not that the AI drew badly. It drew beautifully. The problem is that it drew a picture, and a tattoo is not a picture. A tattoo is made one line at a time, with a needle, into skin that bleeds, swells, stretches over a joint, and quietly blurs for the next ten years.
Christy Fish of Hard Case Tattoo in Portland put it in one line: "A computer doesn't necessarily know what is tattoo-able and what is not, which will inevitably mislead clients" (HuffPost, August 2023).
Every guide you have already read stops at the pretty render. This one starts where they stop. Four steps, four models, one browser tab, and you walk into the shop holding three files instead of one screenshot: a colour concept, a clean black stencil, and a preview of the thing sitting on your own arm.
Key takeaways
- An AI tattoo designer replaces the sketchbook, not the artist. What you hand over is a starting point, and every good shop is going to redraw it.
- Most AI tattoo designs fail for six specific, fixable reasons. They are all variations of one thing: no line-weight logic.
- The single step almost everyone skips is the stencil pass. A render is not a stencil, and the gap between them is what gets your design rejected.
- Preview it on your own limb before you book. Size and flow mistakes are free to fix at this stage and cost laser money afterwards.
- The whole chain runs for around a dollar. Compare that to what a rejected consultation and a redraw fee cost you.
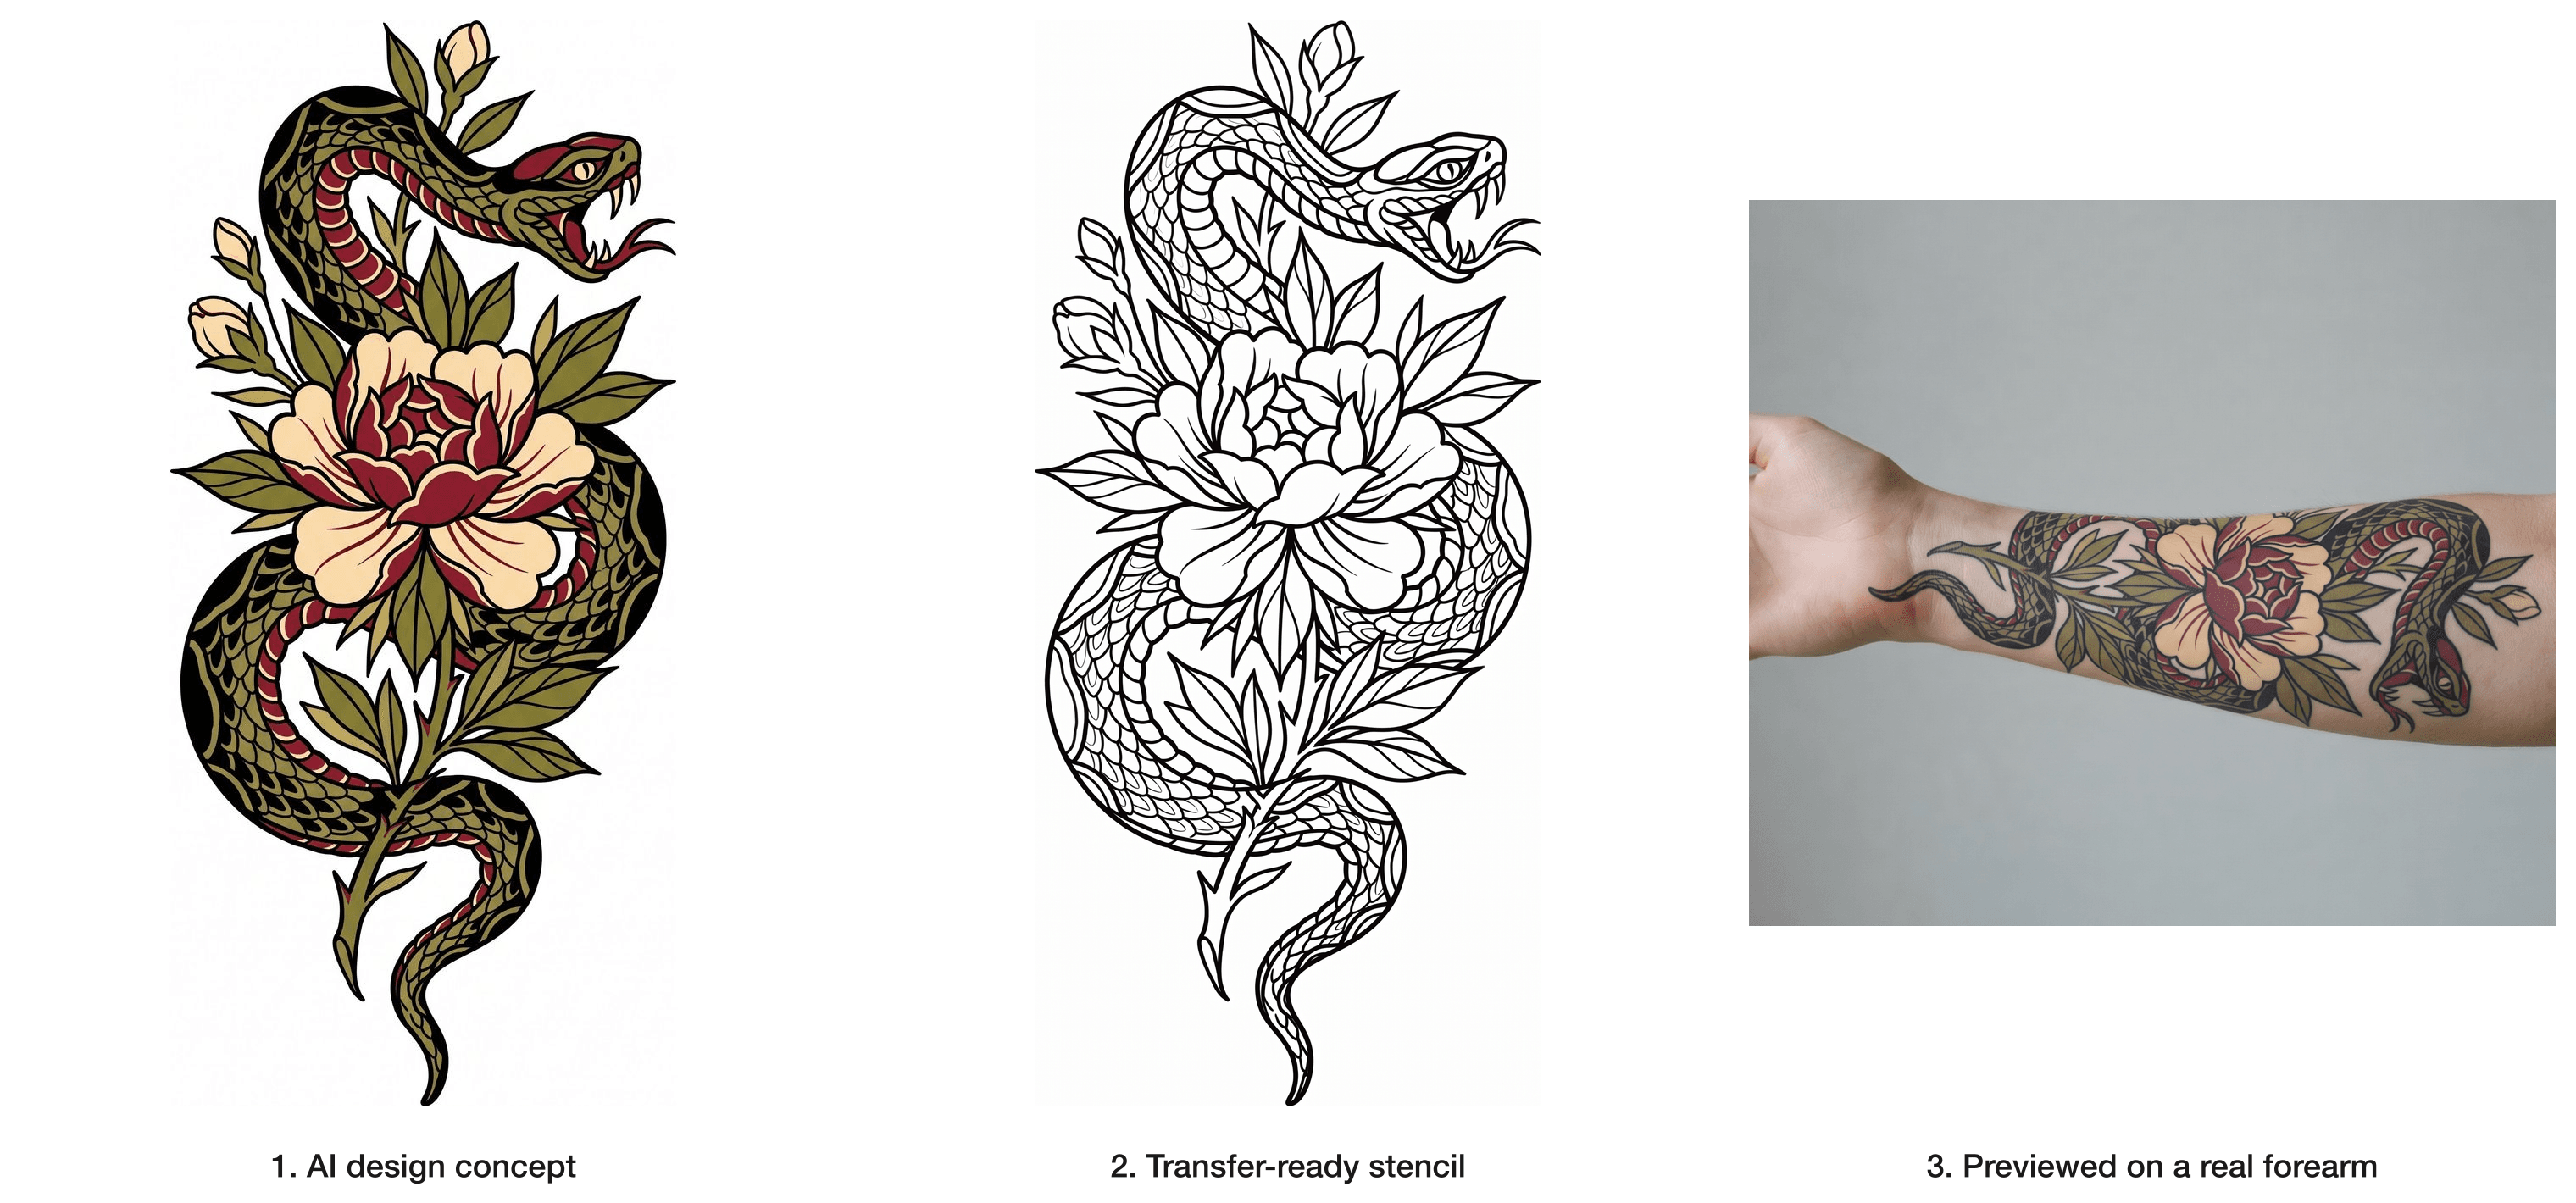
Three real stages of one AI tattoo design side by side: the colour concept, the pure black stencil, and the finished preview on a real forearm
The actual payoff of this workflow, left to right: the AI tattoo design concept, the same design converted into a transfer-ready stencil, and the stencil previewed on a real forearm. Every frame is a real output from the four steps below.
Why Most AI Tattoo Designs Never Make It Onto Skin
Ask any artist and you get the same list of complaints, and none of them are about taste. They are about physics.
An image model is trained to win at pixels. It gives you hairline strokes half a pixel wide, soft grey mist where shading should be, and a level of detail that reads beautifully at 2000 pixels and turns into a grey bruise on a forearm in year three. Then someone brings that in and expects it traced.
The good news is that this failure is boringly predictable. Run any tattoo design ai output through these six checks and you will find the same problems every time.
| What to check | What AI gives you by default | What skin actually needs | The one-line fix |
|---|---|---|---|
| Line weight | Every line the same hairline width | Thick confident outer contour, thinner interior detail | Ask for "tapered line weight, bold outer linework" |
| Grey shading | Soft airbrushed gradients everywhere | Solid black, or hatch marks, or nothing | Ask for "solid black fill, no grey wash, no gradients" |
| Contrast | Low-contrast mid-tones that look rich on screen | Hard light and dark separation that survives healing | Ask for "high contrast, strong black shapes" |
| Negative space | Detail packed edge to edge | Empty skin between elements so the eye can rest | Ask for "generous negative space, reads from two meters away" |
| Wrapping the limb | A flat design drawn for a flat rectangle | A shape that bends with a cylindrical arm or calf | Compose vertically for a limb, then preview it on the limb |
| Ageing | Micro-detail that only exists at full resolution | Anything under roughly 1mm merges as it settles | Thicken the thinnest lines on purpose at design time |
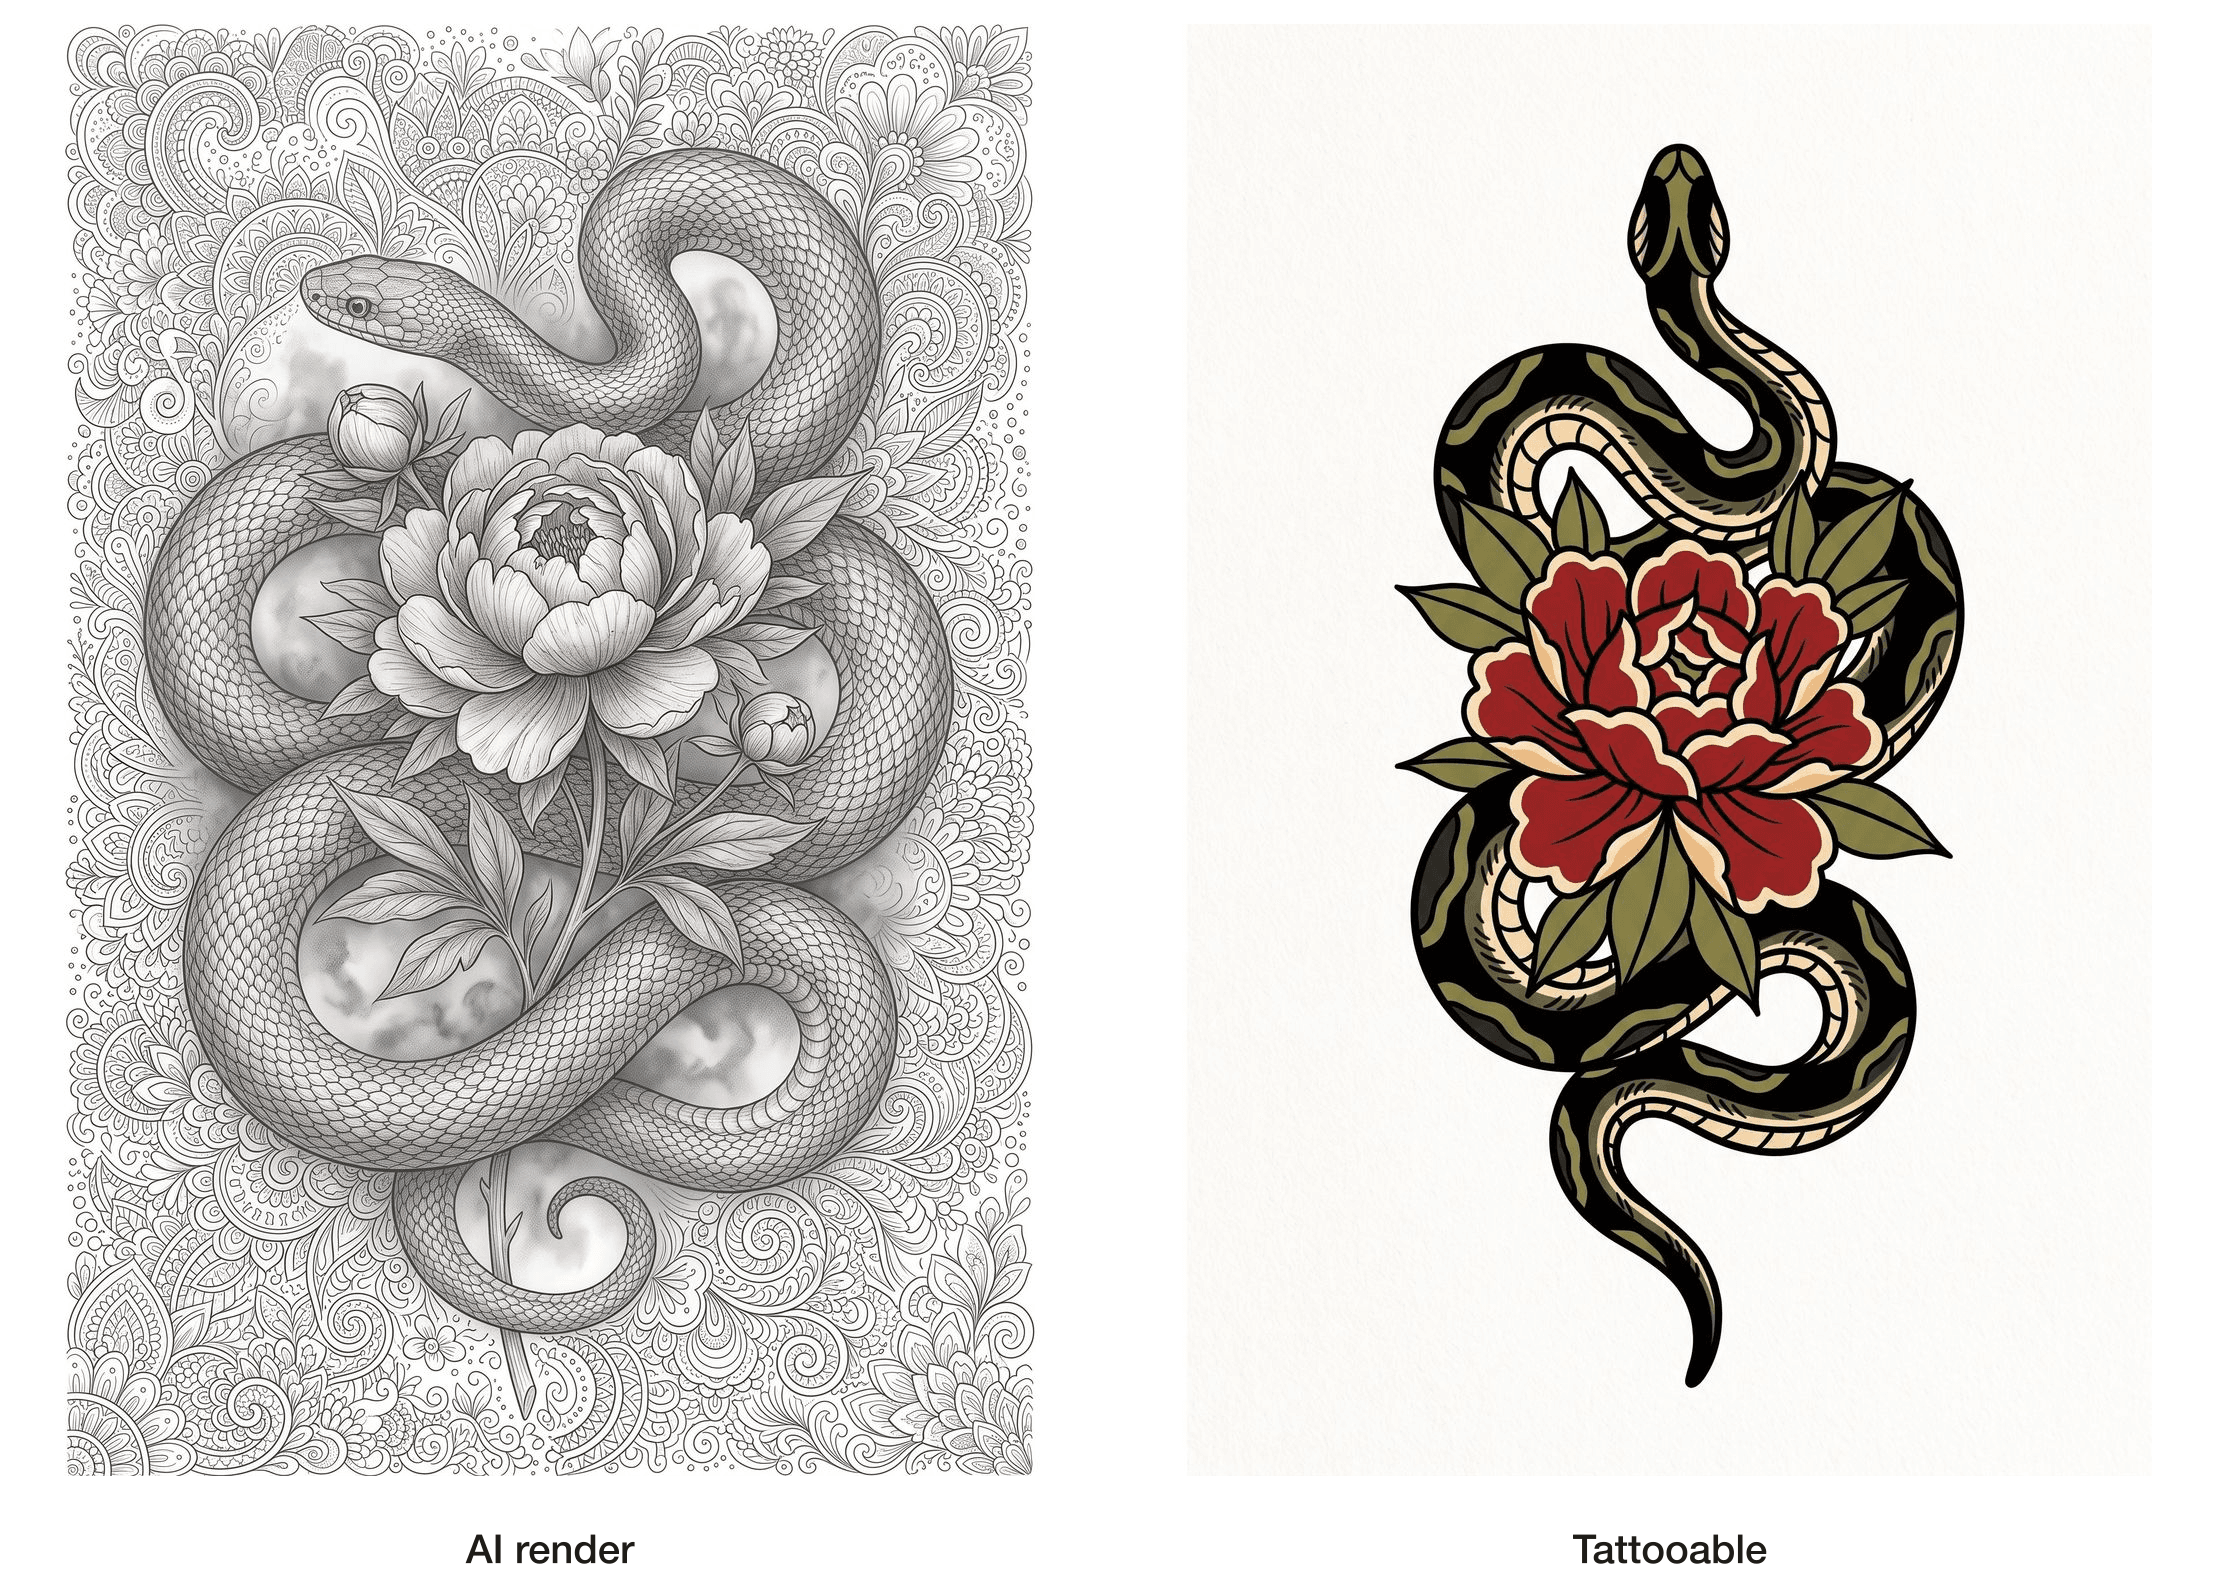
Left panel labelled AI render: the same snake and peony rendered in soft micro-realistic detail with grey haze. Right panel labelled tattooable: the identical subject with bold outer linework, solid black shapes and open negative space
Same subject, same composition, one difference. Left is what a model gives you when you ask for a tattoo. Right is what it gives you when you ask for flash. Generated with google/nano-banana-2/text-to-image.
Here is the part that surprised me. Artists are not actually anti-AI, they are anti-render. In Sioux Falls, Urban Ink Tattoos 605 owner Zachariah Davis told Dakota News Now (August 2026) that AI collapses a process that used to eat hours: "It allows people to play around with the design that they have in their head, and they are trying to get this image out, and this is what I used to try and sit with people and do, and it would take hours." His job starts when you walk in, not before: "Well, it's almost there, I see what you want. I can take it the rest of the way and give you what you want."
That is the whole target. Get it to "almost there" instead of "unfortunately not".
The AI Tattoo Design Workflow: Which Model Does What
Four jobs, and no single model is best at all four. Generating a clean flash concept is a composition-obedience problem. Stripping it to a stencil is an edit problem. Putting it on your arm is a two-image fusion problem. Checking how it wraps is a motion problem.
I run all four on Atlas Cloud for one unglamorous reason: the playgrounds sit next to each other, so each step's output is a two-second upload into the next one. Worth saying plainly, since nobody else will: there is no tattoo preset here, no one-click stencil button, no AR try-on. This is a chain you assemble yourself out of general models. That is exactly why it works on a design nobody wrote a preset for.
If you want to skip straight to a design, Atlas Cloud's free AI tattoo generator gives you a first tattoo design free; the four model pages below are where you turn it into a stencil your artist will accept.
| Step | Model | Input | Key settings | Listed price |
|---|---|---|---|---|
| Cheap concept exploration | openai/gpt-image-2/text-to-image | Text only | quality high | $0.009 per image |
| 1. The design | google/nano-banana-2/text-to-image | Text only | 2K, ratio 2:3 | $0.08 per image |
| 2. The stencil | qwen-image-3.0/edit | Step 1 output | highest resolution tier | $0.04 per image |
| 3. The skin preview | google/nano-banana-2/edit | Your arm photo + step 1 | 2K, ratio follows input | $0.08 per image |
| 4. The wrap check | kwaivgi/kling-v3.0-turbo/image-to-video | Step 3 output | 5s, 720p | $0.095 per second, 15% off $0.112 |
Prices are the listed pay-as-you-go base rates checked against the model list on 14 August 2026, and the Kling discount is live as of this month. Two honest caveats. The nano-banana-2 rates above are the base tier, and 2K or 4K output bills more than 1K, so read the quote on the Run button before you commit. And if you want to burn through twenty compositions before you care about quality, do that on gpt-image-2 at under a cent each, then come back and render the winner properly. You can check any of this yourself on the full model list.
The running example for the rest of this guide is one piece: a neo-traditional snake coiled around a peony, vertical, wrist to elbow, on a forearm. It is the most typical "I want one big arm piece" request there is, and its bold outlines and limited palette make every mistake in the table above obvious. Swap in your own subject and every step still works.
How to Design a Tattoo With AI, Step by Step
Step 1. Generate the AI tattoo design concept.
Open the Nano Banana 2 text-to-image playground. The trick in this prompt is that you are not asking for a tattoo. You are asking for flash: a flat design on paper, the thing that hangs on a shop wall. Say "tattoo" and you get a photo of an arm. Say "flash on a white background" and you get something traceable.
The other half of the prompt is the negative list. Every clause you see below stripping out gradients, texture and background is there because the model will add all three if you let it.
text1Traditional tattoo flash design on a plain white background: a coiled snake 2wrapping around a single blooming peony, vertical forearm composition, 3wrist to elbow. Neo-traditional tattoo style, bold confident outer linework 4with tapered line weight, a limited palette of deep red, olive green, warm 5cream and black, solid black shadow shapes, and generous negative space so 6the design still reads clearly from two meters away. Flat 2D illustration. 7No photographic texture, no skin, no arm, no background scenery, 8no gradients, no text, no watermark. Output one single design. 9
Settings: Resolution 2K, Aspect ratio 2:3 for a vertical limb, one image per run. Generate one at a time rather than a batch, because you are going to re-roll on composition and single runs waste less.
Before you move on, do the two-meter test. Shrink the image to thumbnail size on your phone. If you can still tell it is a snake and a peony, the negative space is working. If it turns into a coloured smudge, the design is too busy and no artist can save it later.
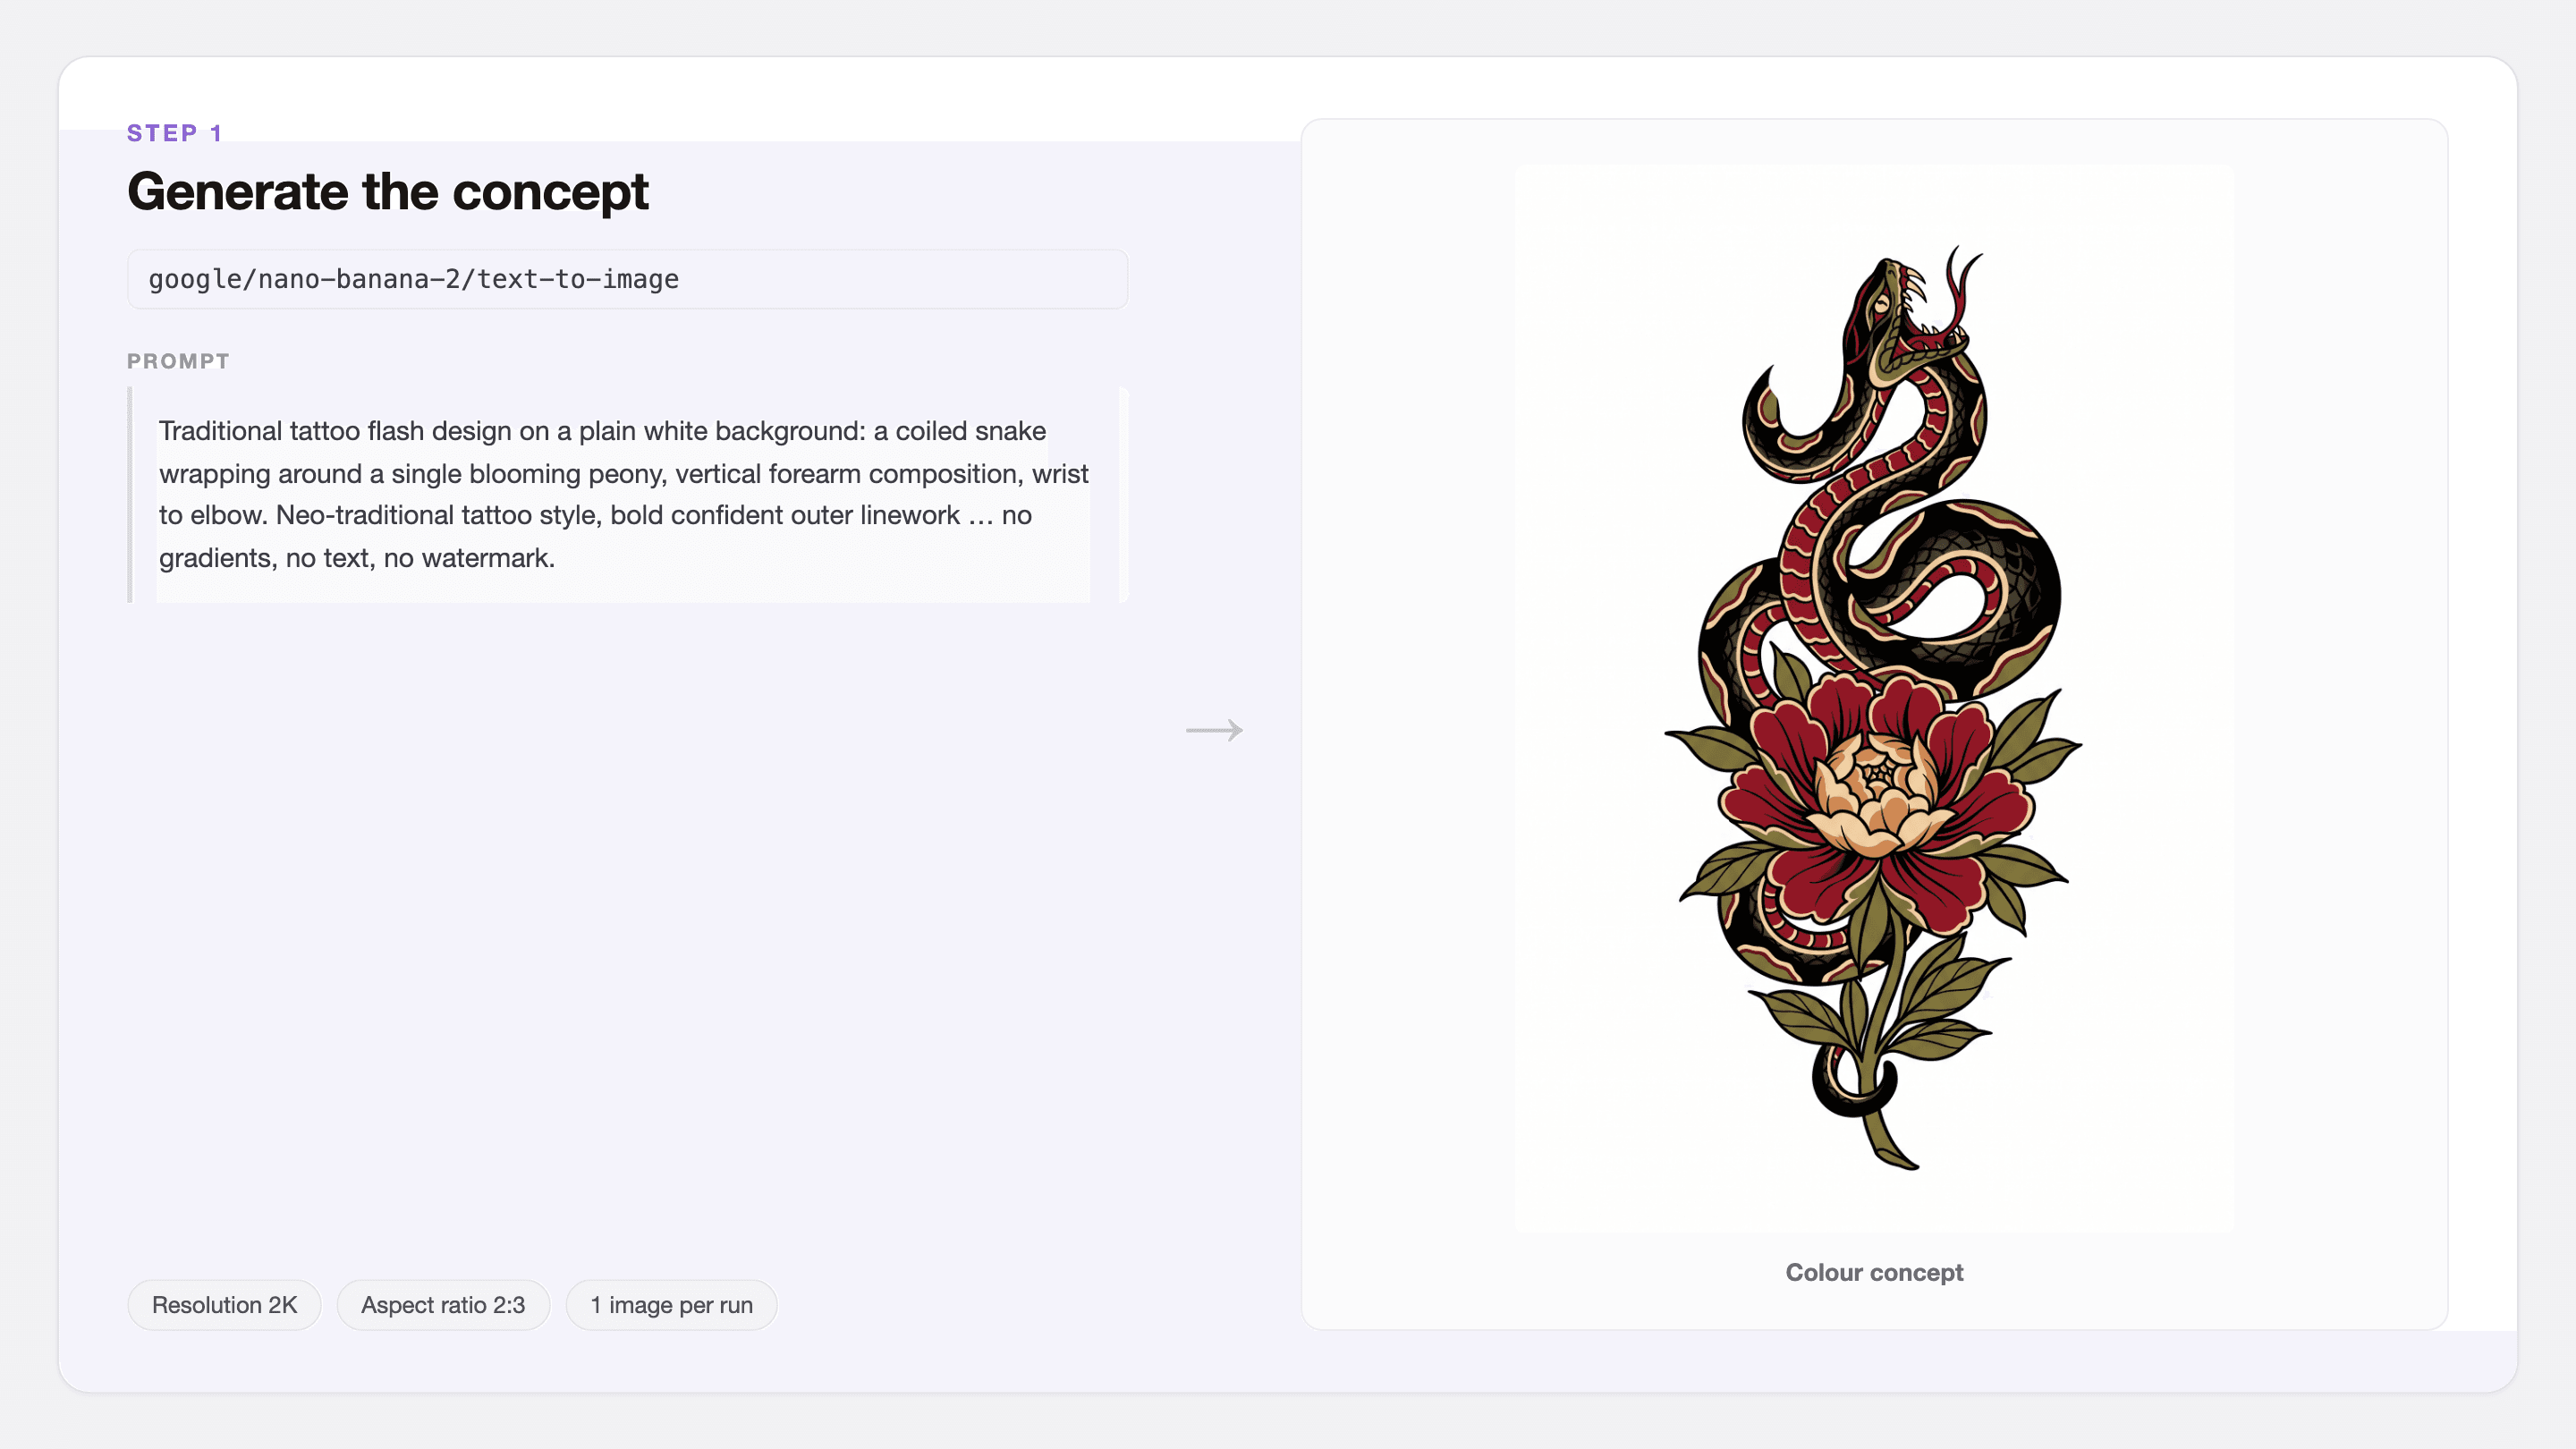
Step 1 input and output: the flash-sheet prompt and its settings on the left, the finished colour snake and peony concept on the right
Step 1, in and out: the exact prompt above, run at 2K in a 2:3 frame, and the design it returned. Generated with google/nano-banana-2/text-to-image.
Step 2. Convert it into a tattoo stencil.
This is the step that nobody on the first page of Google mentions, and it is the one that decides whether your design gets accepted.
A stencil is what actually goes through the thermal transfer machine and onto your skin. It is pure black line on white, no colour, no shading, every contour closed. Your step 1 output is none of those things. Handing an artist a colour render and expecting them to derive the stencil is handing them an hour of unpaid work.
Download the step 1 image, open the Qwen Image 3.0 edit playground, upload it, and paste this:
text1Convert this tattoo design into a tattoo stencil: pure black linework on a 2pure white background. Keep the exact same composition, proportions, and 3every element in its original position. Remove all colour, all grey wash, 4all soft shading, all rendering. Redraw everything as clean continuous 5outlines with consistent, confident line weight, and add simple 6whip-shading hatch marks only where the original had solid black fill. 7Every line must be closed and unbroken and thick enough to survive a 8thermal transfer. No gradients, no grey, no texture, no background, 9no text, no watermark. Output ONE single image. 10
Settings: highest resolution tier, aspect ratio left empty so it follows your input, one reference image loaded.
Then check the output yourself, because this pass fails in quiet ways:
- Closed lines. Follow every contour with your eye. An open line has nowhere to stop and the artist has to invent an ending.
- No surviving grey. Any soft patch means the model shaded instead of hatching. Re-run it.
- Thinnest line. Scale the design to its real size, roughly 20cm tall for a forearm. Anything under about a millimetre at that size will merge into its neighbour as the tattoo settles.
- Thumbnail test again. Black and white is less forgiving than colour. If it stops reading small, it was carrying its legibility in the colour.
If the edit drops an element or leaves the image half-rendered, run the identical prompt on Nano Banana 2 edit instead, which is the stronger of the two at leaving a composition alone while changing one property of it.
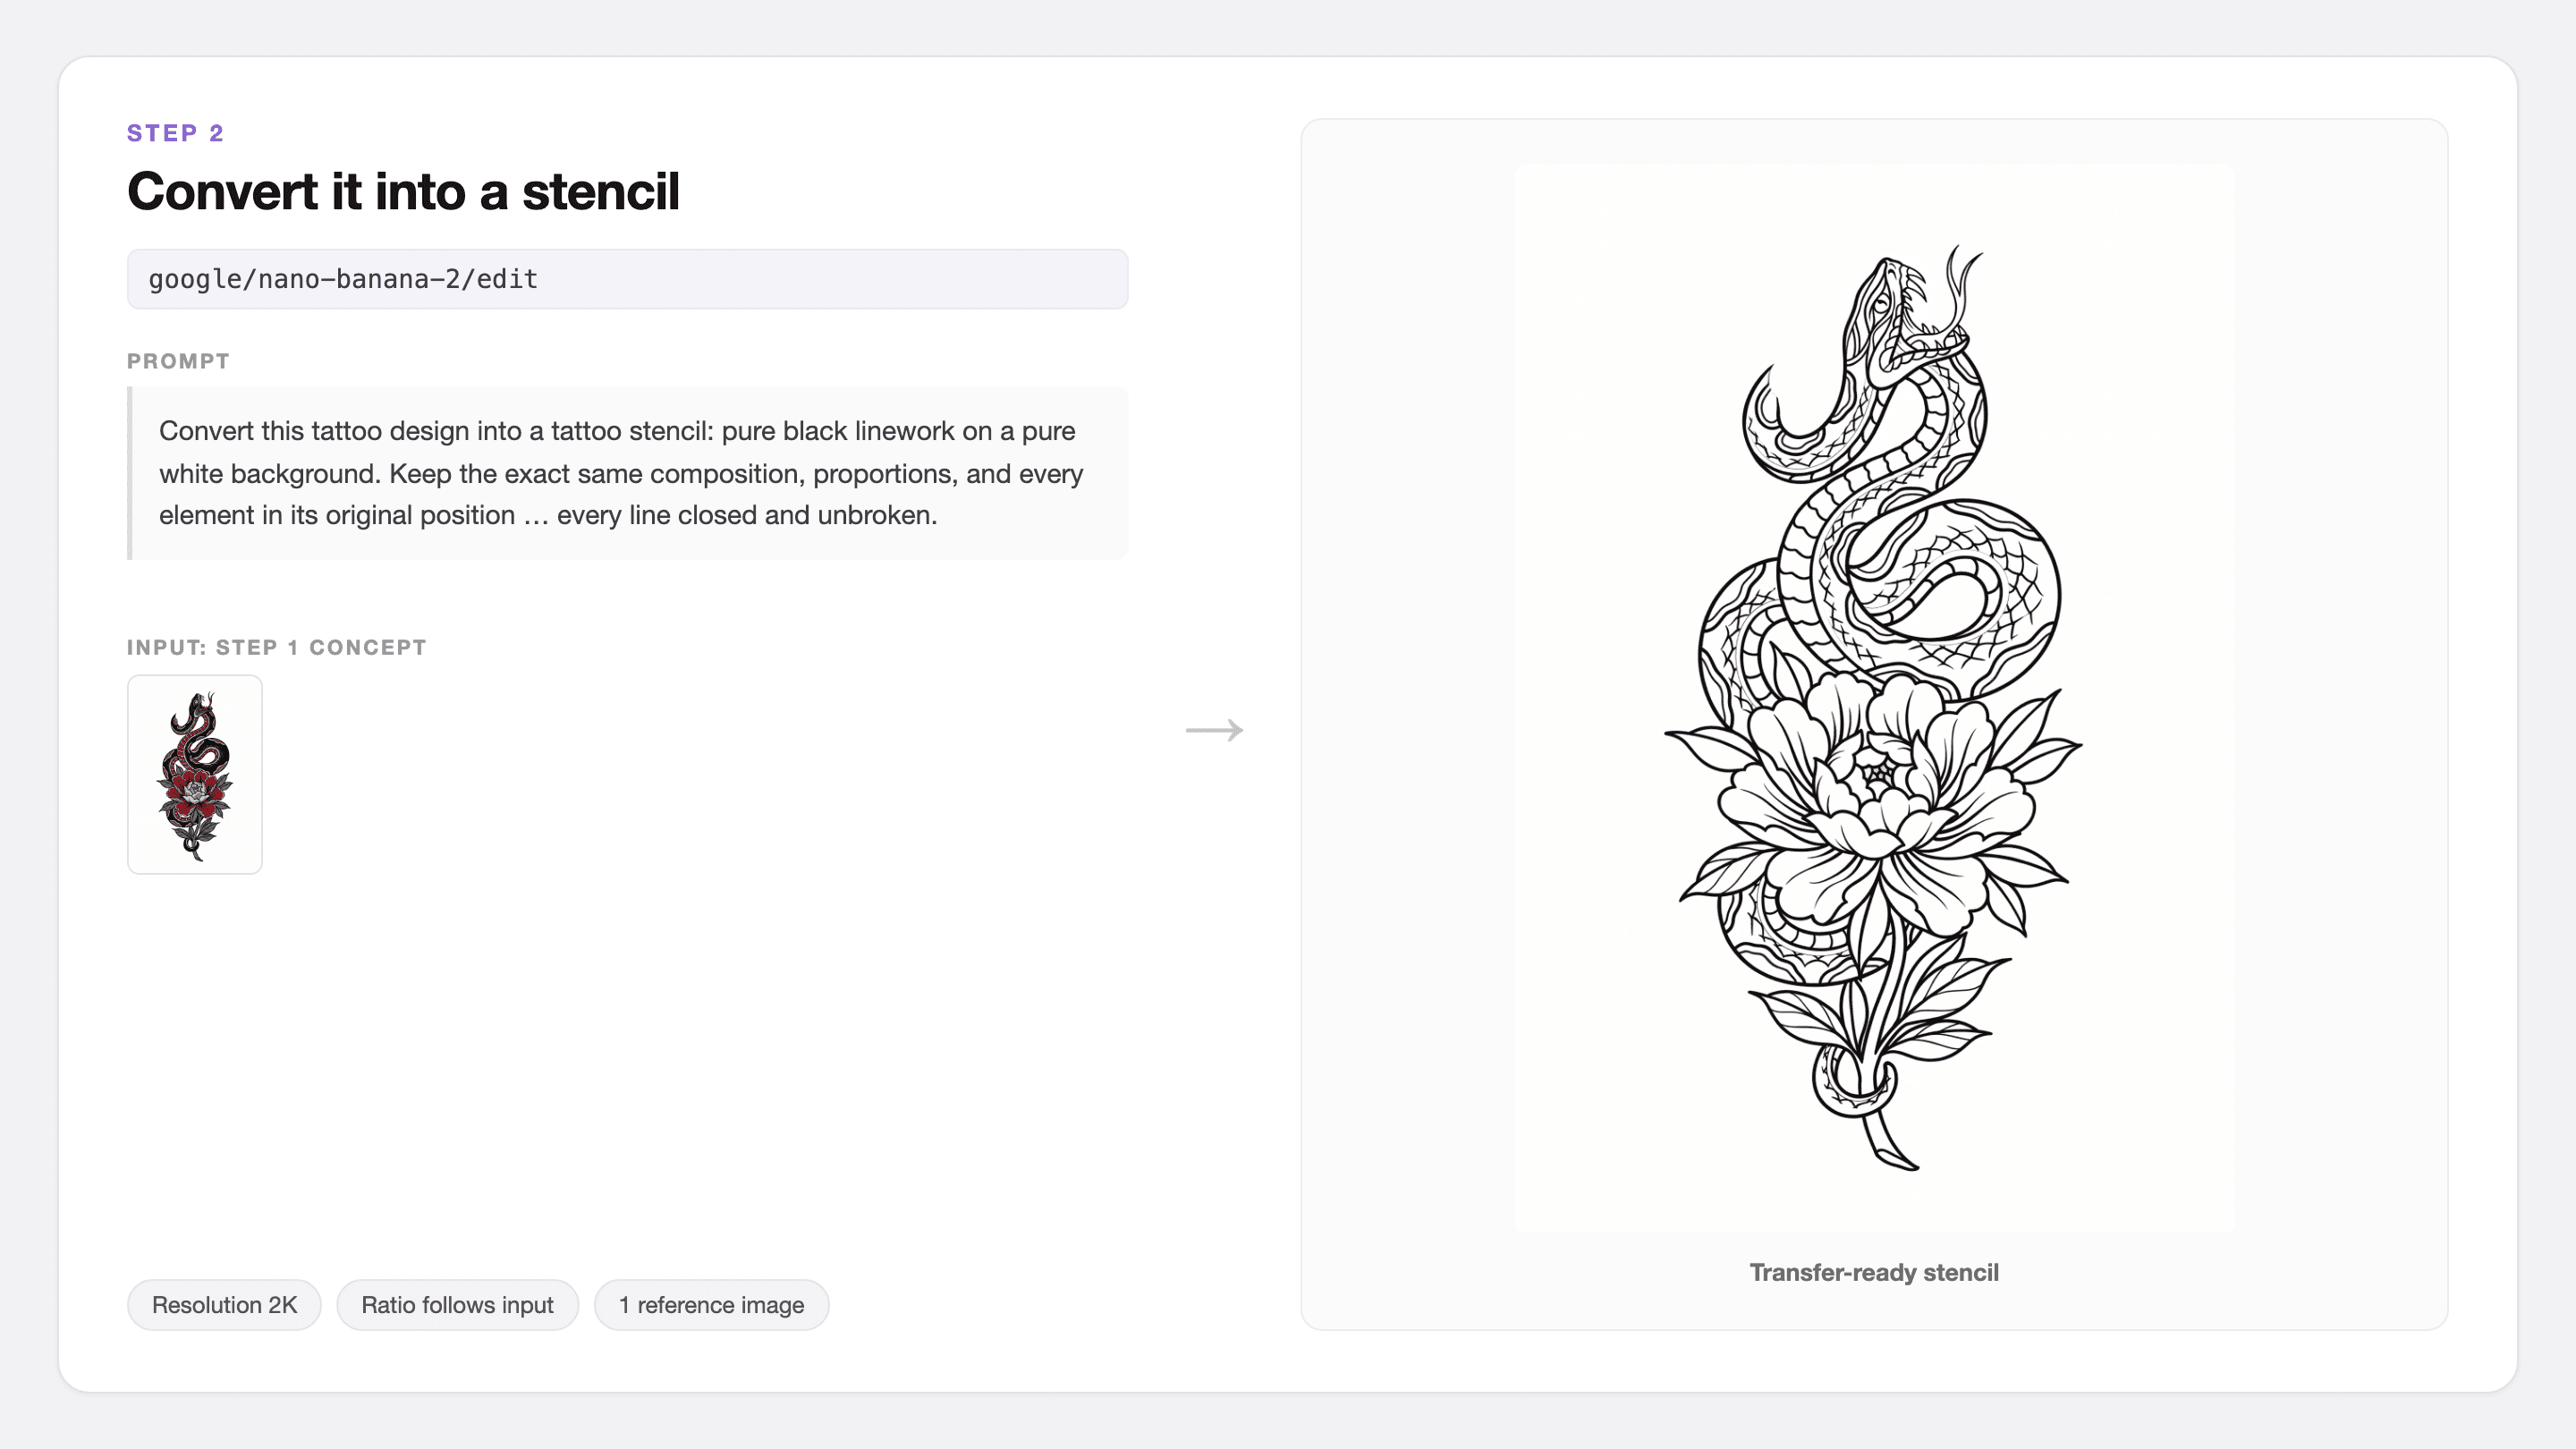
Step 2 input and output: the colour concept as the input thumbnail beside the stencil prompt, and the pure black-on-white stencil on the right
Step 2, in and out: the same design after the stencil pass, pure black on white with closed contours and even line weight. This is the fallback run, because the Qwen pass redrew the subject from scratch instead of converting it — exactly the failure described just above. Generated with google/nano-banana-2/edit.
Step 3. Preview the ai custom tattoo design on your own arm.
A design that looks perfect on a white square can be completely wrong at real size on a real limb. This is where you find that out for eight cents instead of finding out in a laser clinic.
Photograph the bare limb in daylight. Plain background, arm relaxed, no flash, no filter, no beauty mode. Resize it to roughly 1600px on the long edge and save as JPG before uploading, which keeps the edit model from choking on a 12MP phone file.
Open the Nano Banana 2 edit playground and upload two references: your forearm photo, and the colour design from step 1. The prompt below deliberately never says "Image 1" or "Image 2", because slot numbering depends on which upload finishes processing first and you cannot control that. It describes the two inputs instead.
text1One input image is a photo of a real person's bare forearm; the other input 2image is a flat tattoo design on a white background. Edit the forearm photo 3in place: apply the tattoo design onto the forearm as a healed, 4professionally tattooed piece running from wrist to elbow. The ink must 5follow the curve of the limb, lines compress and bend where the arm turns 6away, and sit under the skin rather than on top of it. Match the photo's 7existing lighting, skin tone, body hair, shadows and grain exactly. Keep 8the arm, hand, pose, background, camera angle and image grain completely 9unchanged. Do not beautify, sharpen or upscale the photo. No sticker edges, 10no glow, no outline halo, no watermark. Output ONE single edited photograph. 11
Settings: Resolution 2K, aspect ratio left empty so it inherits your photo's shape.
Run it two or three times at different described sizes. Try "size it to cover the full forearm, wrist to elbow" against "size it to about the width of three fingers, on the inner forearm". Put the results next to each other. The version people actually pick is almost never the one they expected, and this is the entire value of an ai tattoo design tool: placement and scale errors are free to fix here and permanent later.
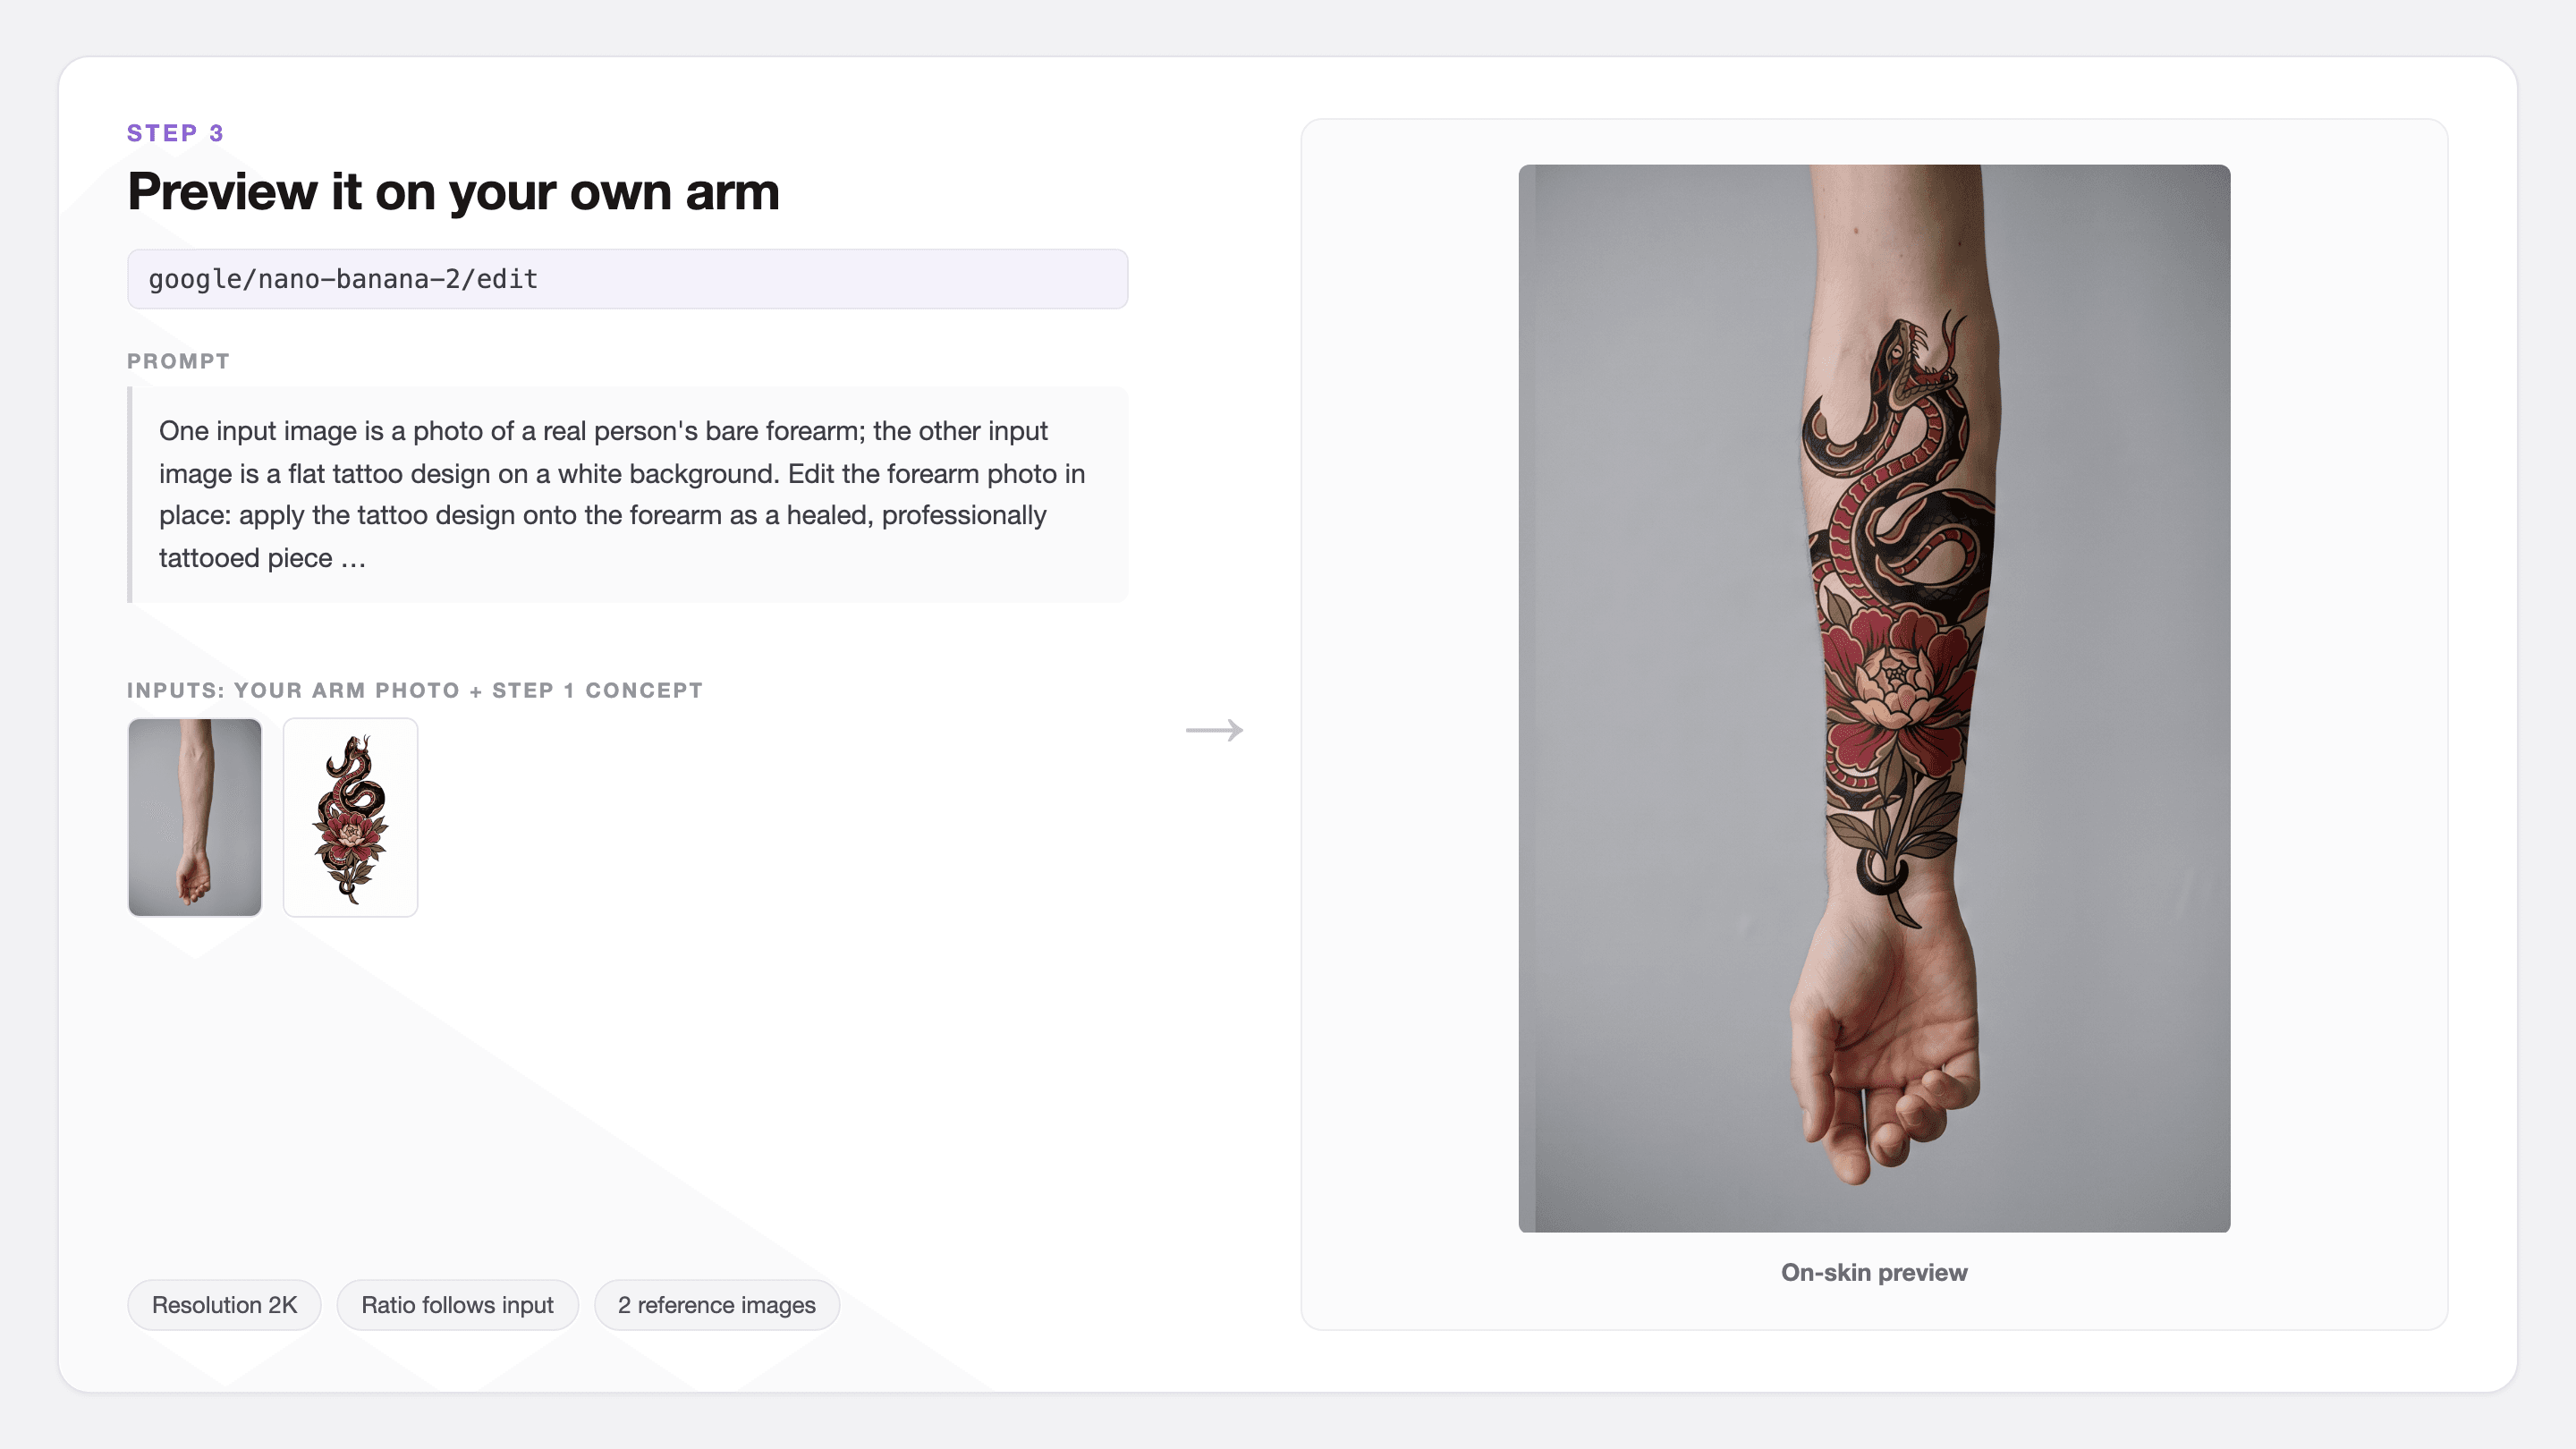
Step 3 input and output: the bare forearm photo and the colour design as two input thumbnails on the left, and the tattooed forearm preview on the right
Step 3, in and out: two reference images in, one believable on-skin preview out. Generated with google/nano-banana-2/edit.
Step 4. Animate the preview to check how it wraps.
A forearm is a cylinder. A still photo shows you one side of it. The question you cannot answer from a still is what happens to the snake's body where the arm curves away, which is exactly the region where a badly scaled design falls apart.
Five seconds of rotation answers it. Take the step 3 output into the Kling v3.0 Turbo image-to-video playground and paste this:
text1The person slowly rotates their forearm toward the camera and back, 2revealing how the tattoo wraps around the curve of the limb. Subtle natural 3skin movement and softly shifting window light. Static camera, no zoom, 4no cuts, no camera shake. Keep the tattoo artwork, its exact placement, 5the skin tone and the background unchanged. 6
Settings: Duration 5s, Resolution 720p, Aspect ratio 16:9. Keep it short. This clip is a measuring tool, not a showreel, and video is the only expensive line in this whole workflow.
One honest warning, because it matters. A video model re-renders every frame, so fine tattoo detail and skin texture will drift slightly from your step 3 image. Use this clip to judge flow and placement. Do not treat any frame of it as your final design.
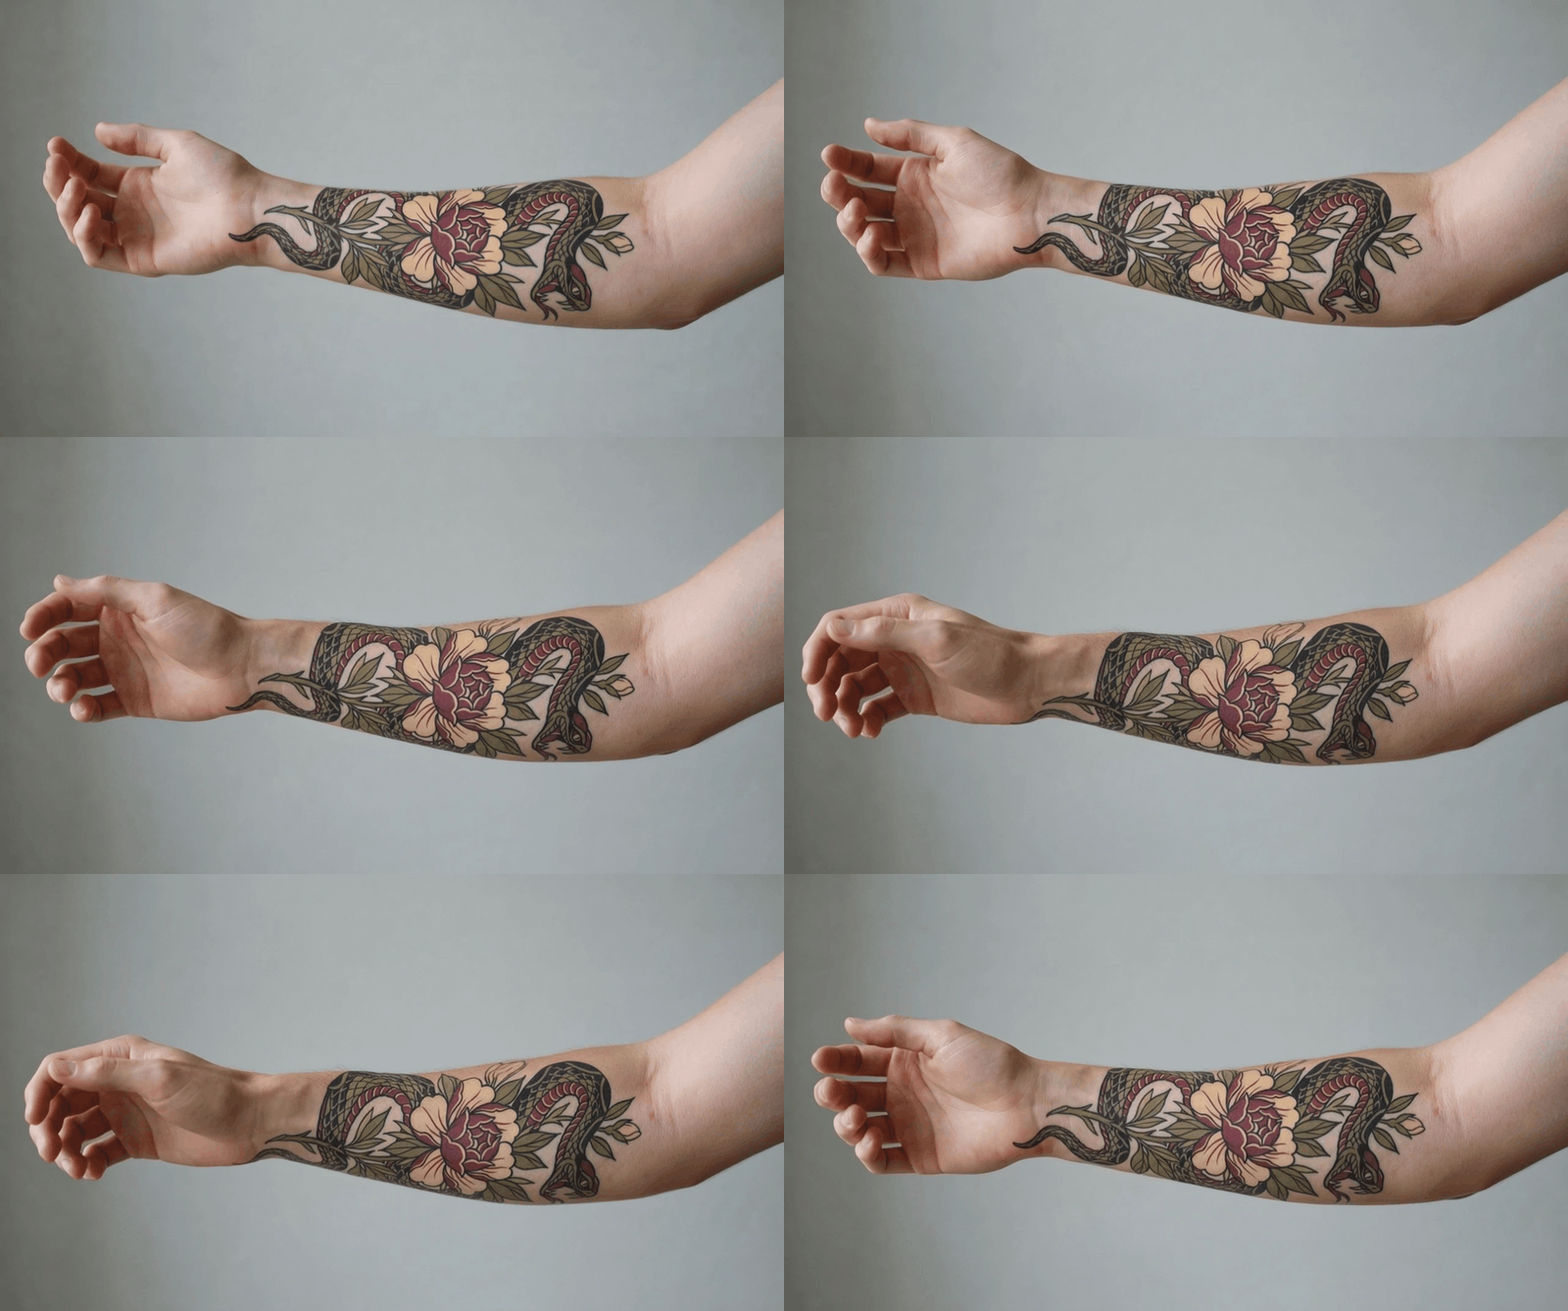
Five second clip of the forearm rotating toward the camera and back, showing how the snake and peony design wraps around the curve of the arm
The actual wrap check, shown here as a silent GIF. Watch the snake's body where the arm turns away: that is the region a flat mockup will always lie to you about.
Variations: Other AI Tattoo Designs Worth Running Through the Same Chain
The chain does not care what the subject is. Only the step 1 style clause changes, and steps 2 through 4 stay word for word identical.
- Fine-line botanical, collarbone. The most requested style going, and the most fragile. Push the thickening language in step 2 harder than you think you need to, because fine-line is exactly the style that blurs.
- Cyber sigilism, inner forearm. Models love this one and will happily give you a hundred crossing hairlines that read as a smudge. The two-meter test is not optional here.
- Micro-realism pet portrait, upper arm. The emotional heavyweight. Remembering or honouring someone or something is a major or minor reason for 69% of tattooed US adults, out of 8,480 surveyed (Pew Research Center, August 2023). Worth knowing before you commit: micro-realism holds up the worst of any style over a decade, so ask your artist about size before you fall in love with the render.
- Blackwork floral silhouette, calf. Reads as one solid black mass from a distance and resolves into line detail up close. The easiest of the four to convert into a clean stencil, since it is already thinking in solid shapes.
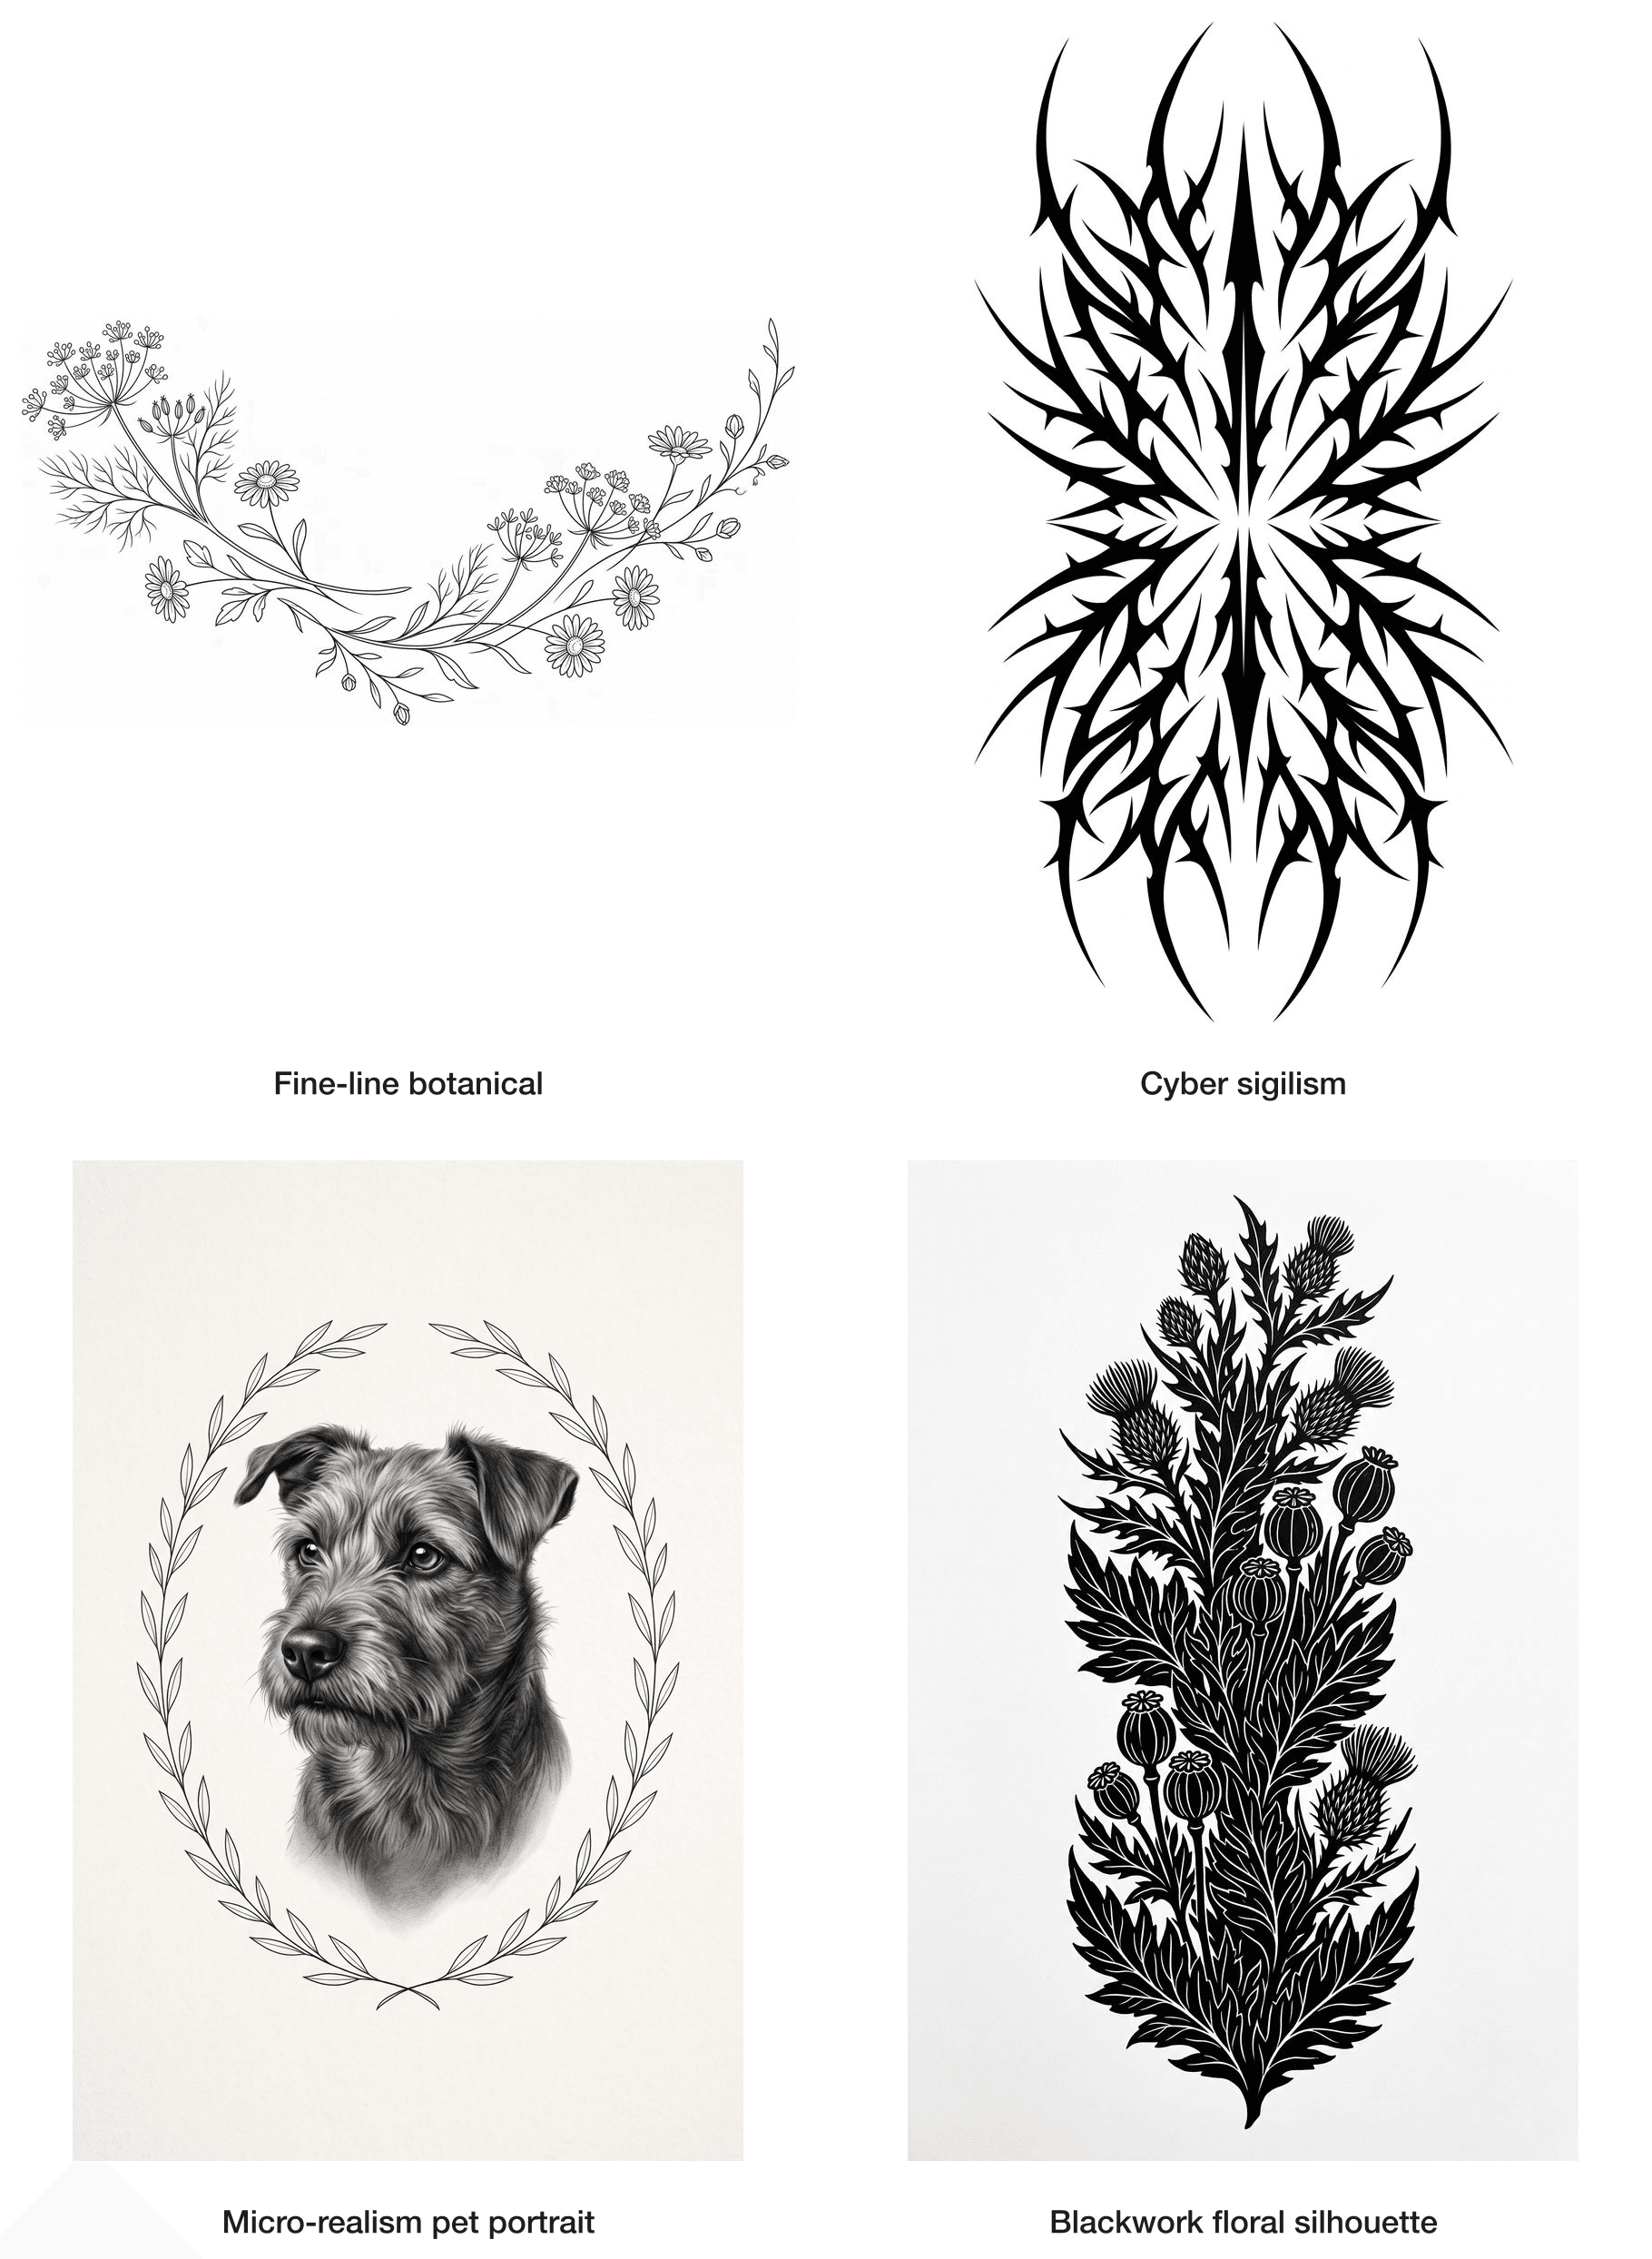
Four AI tattoo designs in a 2x2 grid, each labelled: fine-line botanical, cyber sigilism, micro-realism pet portrait, and blackwork floral silhouette
Four styles, one prompt skeleton. Only the style clause changed between them. Generated with google/nano-banana-2/text-to-image.
What This AI Tattoo Design Generator Stack Costs
Here is one complete piece, start to finish, at the listed rates above.
| Stage | Model | Runs | Cost |
|---|---|---|---|
| Composition exploration | gpt-image-2/text-to-image | 6 | $0.054 |
| Final concept | nano-banana-2/text-to-image | 2 | $0.16 |
| Stencil conversion | qwen-image-3.0/edit | 2 | $0.08 |
| On-skin preview at three sizes | nano-banana-2/edit | 3 | $0.24 |
| Wrap check, 5 seconds at 720p | kling-v3.0-turbo/image-to-video | 1 | $0.475 |
| Total | 14 runs | about $1.01 |
Two notes so this number stays honest. These are base-tier list prices, and rendering at 2K or 4K bills above the base rate, so your real total lands a little higher. And the video is nearly half the bill on its own, which is a good argument for running it once at the end rather than after every re-roll.
For context, a custom forearm piece from a competent artist runs into the hundreds, plenty of shops charge a non-refundable design or deposit fee before they draw anything, and laser removal costs multiples of the tattoo. The pixels are not the expensive part of this hobby. Iterating twenty times until the negative space is right is the cheapest insurance available to you.
Copyright and Shop Etiquette for AI Generated Tattoo Designs
The short version on ownership: in the United States, material generated purely by AI with no human authorship has generally not been accepted for copyright registration, so the render you generated is probably not yours to own in any meaningful sense. The tattoo itself is a different object, and the copyright in the finished piece usually sits with the artist who created it. This is the common understanding rather than legal advice, and it is unsettled enough across jurisdictions that you should check locally if anything commercial depends on it. For a one-off piece on your own arm, this genuinely never comes up.
Etiquette matters more in practice, and it is three rules.
Say it is AI generated. Artists can tell, and volunteering it reads as respect rather than confession. Do not ask for a 1:1 copy, because "trace this exactly" is the request that gets people turned away. Hand over the reference and the decision at the same time: this is the idea, please make it work on me. That is the difference between a client and a print job, and it is what turns a tattoo ai design into an actual tattoo.
Frequently Asked Questions About AI Tattoo Design
Can I actually get an AI generated tattoo design tattooed?
Yes, as long as you bring the right file. What gets refused is the photorealistic render, because it promises detail skin cannot physically hold. What gets accepted is flat black line art with closed contours and a sane line weight, handed over as a reference rather than an instruction. Christy Fish's point stands: the computer does not know what is tattoo-able, so the stencil pass and the artist's redraw are both doing real work.
How do I turn an AI tattoo design into a stencil?
Run an edit pass whose only job is stripping the render back to line, using the step 2 prompt above. Then check four things before you are done: every contour is closed, no grey survives anywhere, the thinnest line is still about a millimetre wide at real print size, and the design still reads when shrunk to a thumbnail. If it fails the thumbnail test in black and white, it was relying on colour to hold itself together.
Will my tattoo artist be annoyed if I bring an AI design?
Increasingly, no. The 2026 shop-floor view is that an AI concept beats yet another screenshot of a design that is already on ten thousand other arms, because at least it is specific to what you want. Zachariah Davis described AI as compressing hours of concept sketching into something you do before you arrive. What still annoys artists is being asked to copy rather than to design.
Who owns an AI generated tattoo design, and can I copyright it?
Purely AI-generated images have generally not qualified for US copyright registration without human authorship, and the copyright in the finished tattoo typically belongs to the artist who made it. Treat that as the current common understanding rather than settled law or legal advice, and check your own jurisdiction if money depends on the answer.
Can an AI tattoo designer show the design on my own body before I commit?
That is step 3, and it is the most useful thing on this whole list. Upload a plain daylight photo of the limb plus your design, and you get a preview that tells you the truth about size, placement and how the piece flows along the arm. What it does not tell you is how the ink will look once healed, how your skin takes pigment, or how it ages. Those still belong to the person holding the machine.





