The date on a finished poster is wrong. Replacing “SATURDAY 7 PM” with “SUNDAY 6 PM” sounds small, but in a flattened image the letters and background share the same pixels. GPT Image 2.6 poster editing can produce a revised image from the approved artwork. It cannot promise that the other words, spacing, or graphics will remain untouched.
Give the editor one exact replacement and name what must survive. Then review the whole output before it reaches an audience. Below is a prompt you can adapt, followed by three published GPT Image 2.6 examples from OpenAI's image prompting guide. The examples show what to examine in a real result; they are not claimed as runs of the sample event poster.
Key takeaways
- Quote the old and new text, and name every line and design element that must remain.
- Review the entire returned image at full size, including untouched copy and margins.
- Published 2.6 examples show useful edits, but they do not guarantee pixel-identical preservation for your poster.
- Use a layered design file when exact brand type, logos, or print production must be controlled.
Start With a Narrow GPT Image 2.6 Poster Edit
A poster correction needs an edit route because the artwork is the input. On Atlas Cloud, GPT Image 2.6 Sunburst Edit and GPT Image 2.6 Flare Edit accept an existing image and an instruction. An edit returns a new flat image, not editable type or design layers. The examples below show what to inspect; they do not establish that one variant is better for a particular poster.
For a concrete writing example, imagine an approved 2:3 event poster that says “OPEN STUDIO,” “COMMUNITY ART NIGHT,” “SATURDAY 7 PM,” and “FREE ENTRY.” Its coral ring, navy background, and alignment also need to survive. This is a hypothetical brief for the prompt below, not a documented model run.
Before running an edit, write down three things:
| Brief | What to specify for this poster |
|---|---|
| Change | Replace “SATURDAY 7 PM” with “SUNDAY 6 PM” exactly once. |
| Keep | Preserve the other three lines, coral ring, navy background, margins, reading order, and portrait ratio. |
| Check | Proofread every word and compare layout, color, and actual pixel dimensions with the original. |
OpenAI's image prompting guidance recommends quoting required copy and specifying what an edit must preserve. A precise brief helps the model understand the boundary, but the output still needs a human review.
Copyable prompt for a one-line date change
Upload your approved original to an image-edit route and check that the preview shows the right file. Adapt the quoted words and visual details in this example prompt to match your own poster:
plaintext1Edit the uploaded poster. Replace ONLY the line "SATURDAY 7 PM" with "SUNDAY 6 PM". Render the replacement exactly once, in the same position, alignment, type style, weight, size, and color. Preserve verbatim "OPEN STUDIO", "COMMUNITY ART NIGHT", and "FREE ENTRY". Preserve the navy background, coral ring, spacing, margins, visual hierarchy, and 2:3 portrait composition. Do not add or remove any other element, text, logo, or watermark.
Save the returned image beside the original. This article does not show a completed output for this sample prompt, so there is no implied success claim. The real decision comes after comparing the result against the brief, not after the generation finishes.
Three Published Cases That Show What to Check
Useful example articles put the task, input, output, and inspection point together. The cases below follow that format. Each image is attributed to its published source, and each case separates what is visible from what it cannot prove about your own poster.
Case 1: Translate every label without rebuilding the layout
In OpenAI's GPT Image 2.6 translation example, GPT Image 2.6 Sunburst receives an English coffee-machine infographic and the instruction to translate its text to Spanish without changing the rest of the image. The two official stills are shown here as an alternating GIF so readers can compare the large title, numbered callouts, diagram, and lower panels in the same frame.
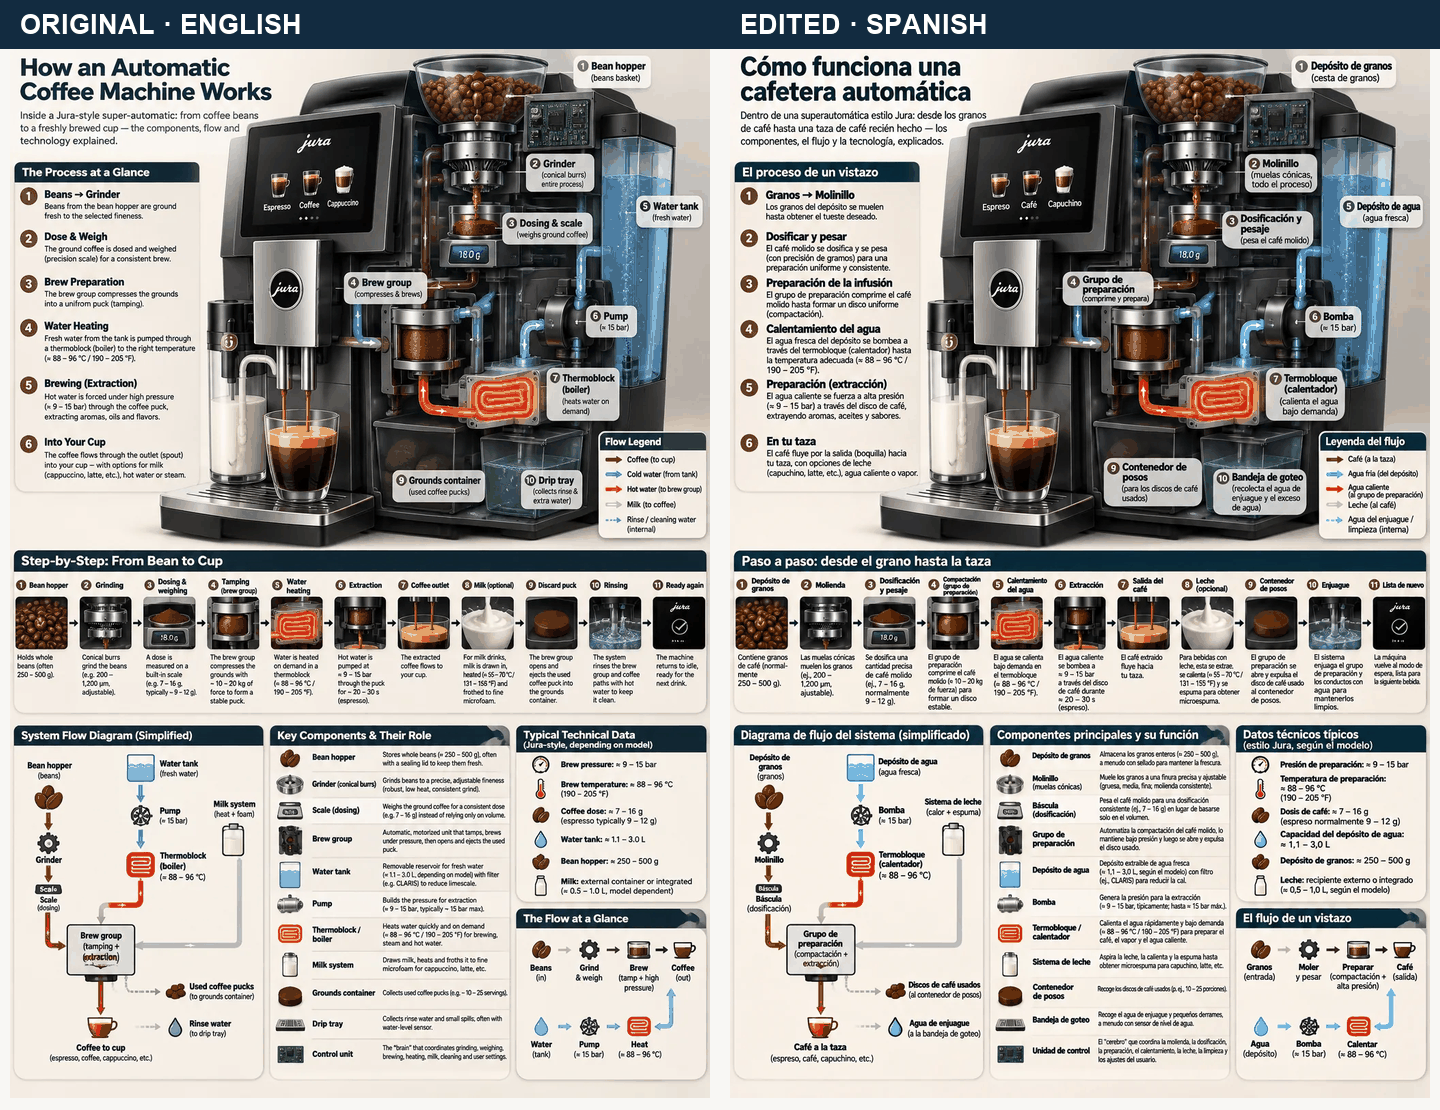
Original and Spanish output: OpenAI Image Prompting. This GIF alternates two published still images; it is a comparison aid, not a model-generated video.
The visible output retains the broad infographic structure while replacing a large amount of copy. That is the same tension a localized poster faces: the translation may fit differently even if the information hierarchy remains recognizable. The small callouts and technical terms still need a fluent Spanish reviewer. Do not infer exact pixel preservation or translation accuracy from a thumbnail.
For a campaign poster, use this example to plan a separate localization review. Start from the same approved original as the English version, supply the approved translated strings, and inspect line breaks, accents, sponsor names, and the distance between text and artwork.
Case 2: Change the scene, protect the headline
Another official GPT Image 2.6 example starts with a shampoo billboard bearing “Fresh and clean.” A follow-up edit asks for a snowy winter evening. The published GPT Image 2.6 Sunburst images make it possible to compare the billboard face and headline before and after the scene changes.
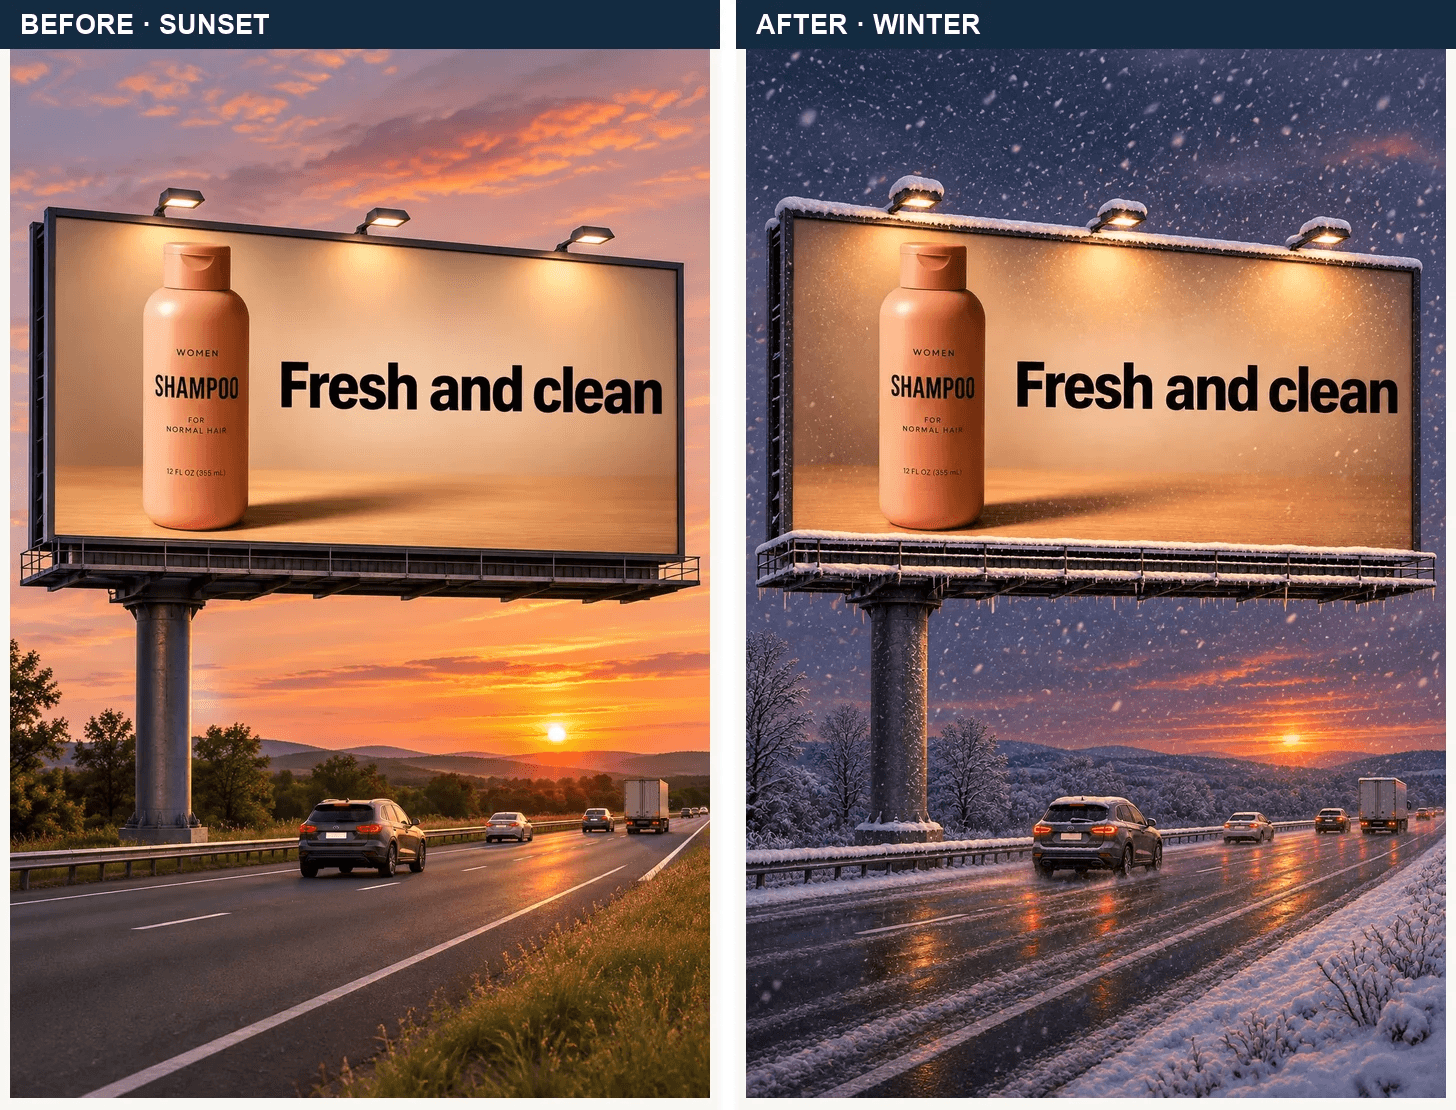
Sunset billboard and winter edit: OpenAI Image Prompting. Paired here at equal size from two official stills.
The large headline remains legible in the published pair while the sky, road, and snow change substantially. For poster revisions, the lesson is to review protected elements even when the requested edit concerns something else. Scan the product label, billboard edges, title, and placement separately. This example changes weather, not poster text, so it cannot serve as evidence that a date replacement will succeed.
Case 3: Exact copy in a new campaign image
OpenAI also publishes a GPT Image 2.6 campaign example that asks for the tagline “Yours to Create.” exactly once. The GPT Image 2.6 Sunburst output shows the requested line in a clear hierarchy below the brand name.
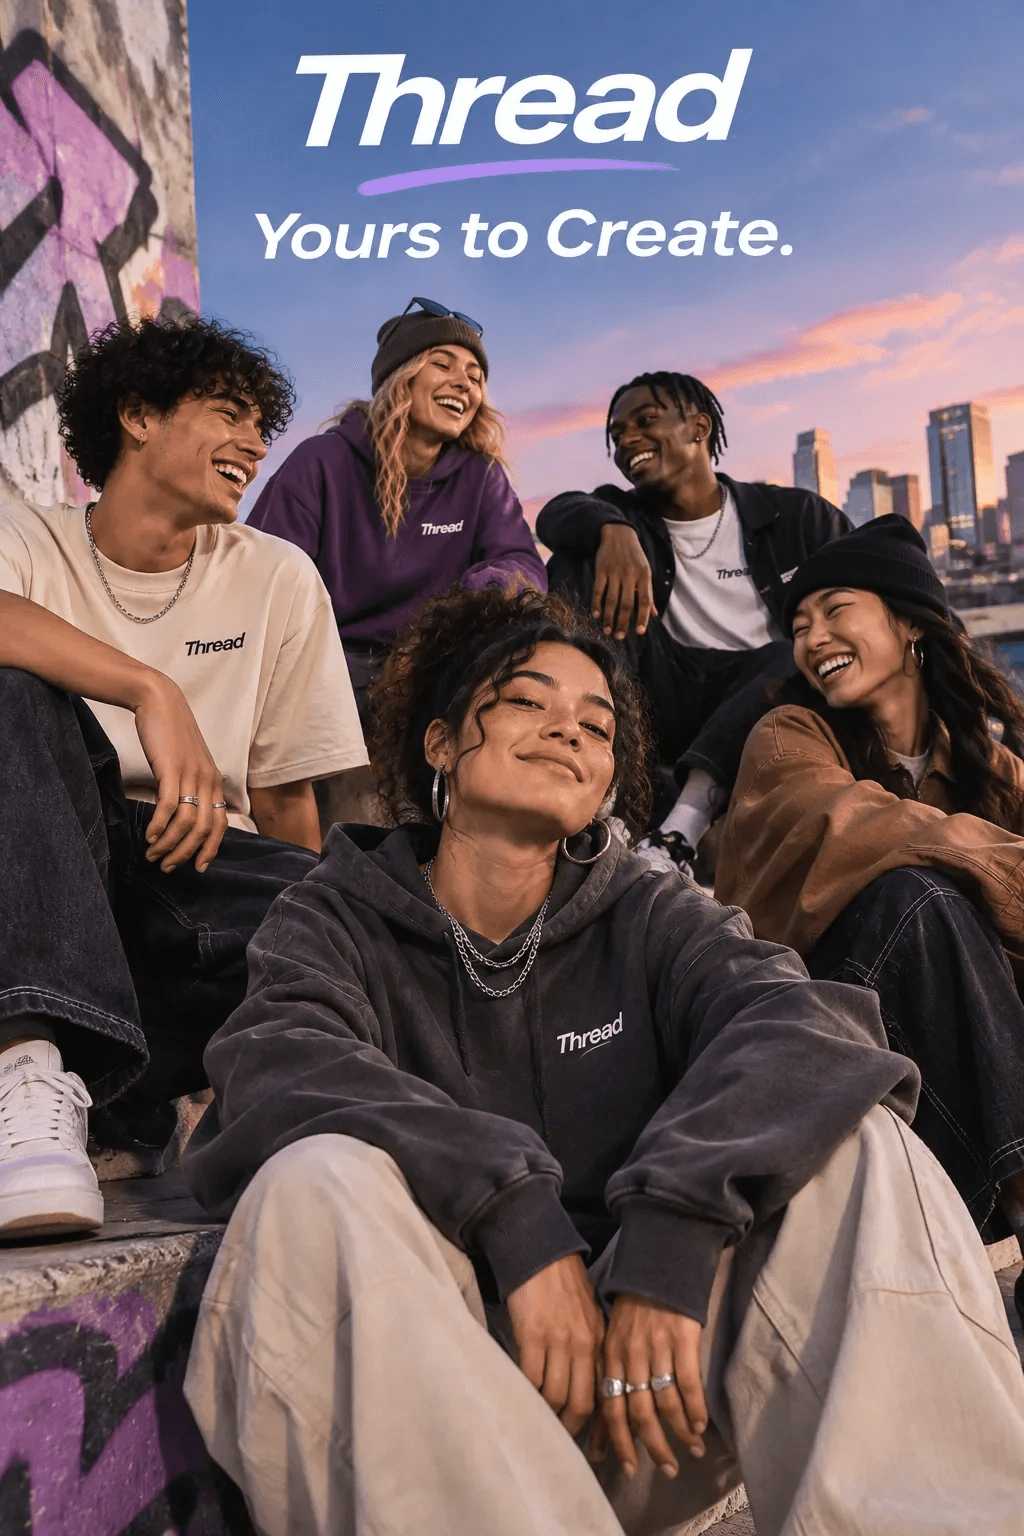
Published GPT Image 2.6 Sunburst output: OpenAI Image Prompting. This is text-to-image generation, not an edit of an existing poster.
The case shows why a copy brief should include the literal wording, count, and visual role. It does not test whether the model can preserve an already approved poster. For an edit, add the old wording and a KEEP list, then proofread the new result against the source.
Two More Poster Cases: Turn the Brief Into a Prompt
The three GPT Image 2.6 examples above show published results. Cases 4 and 5 follow two new posters from a generation prompt to a targeted edit using the images supplied for this guide. Each case pairs the original and edited output with an Atlas Cloud edit screen so you can see the prompt beside the completed result.
Case 4: Generate a workshop poster, then edit two lines
Start with a new 4:5 Coffee and Clay poster. The first prompt gives the model a warm ceramic studio scene, a cream panel for the event details, and six exact lines of copy. Save that result as the original. For the second step, upload that same file to an edit route and request only the date and venue replacements. To follow this workflow on Atlas Cloud, choose GPT Image 2.6 Sunburst Text-to-Image for the first prompt and GPT Image 2.6 Sunburst Edit for the second.
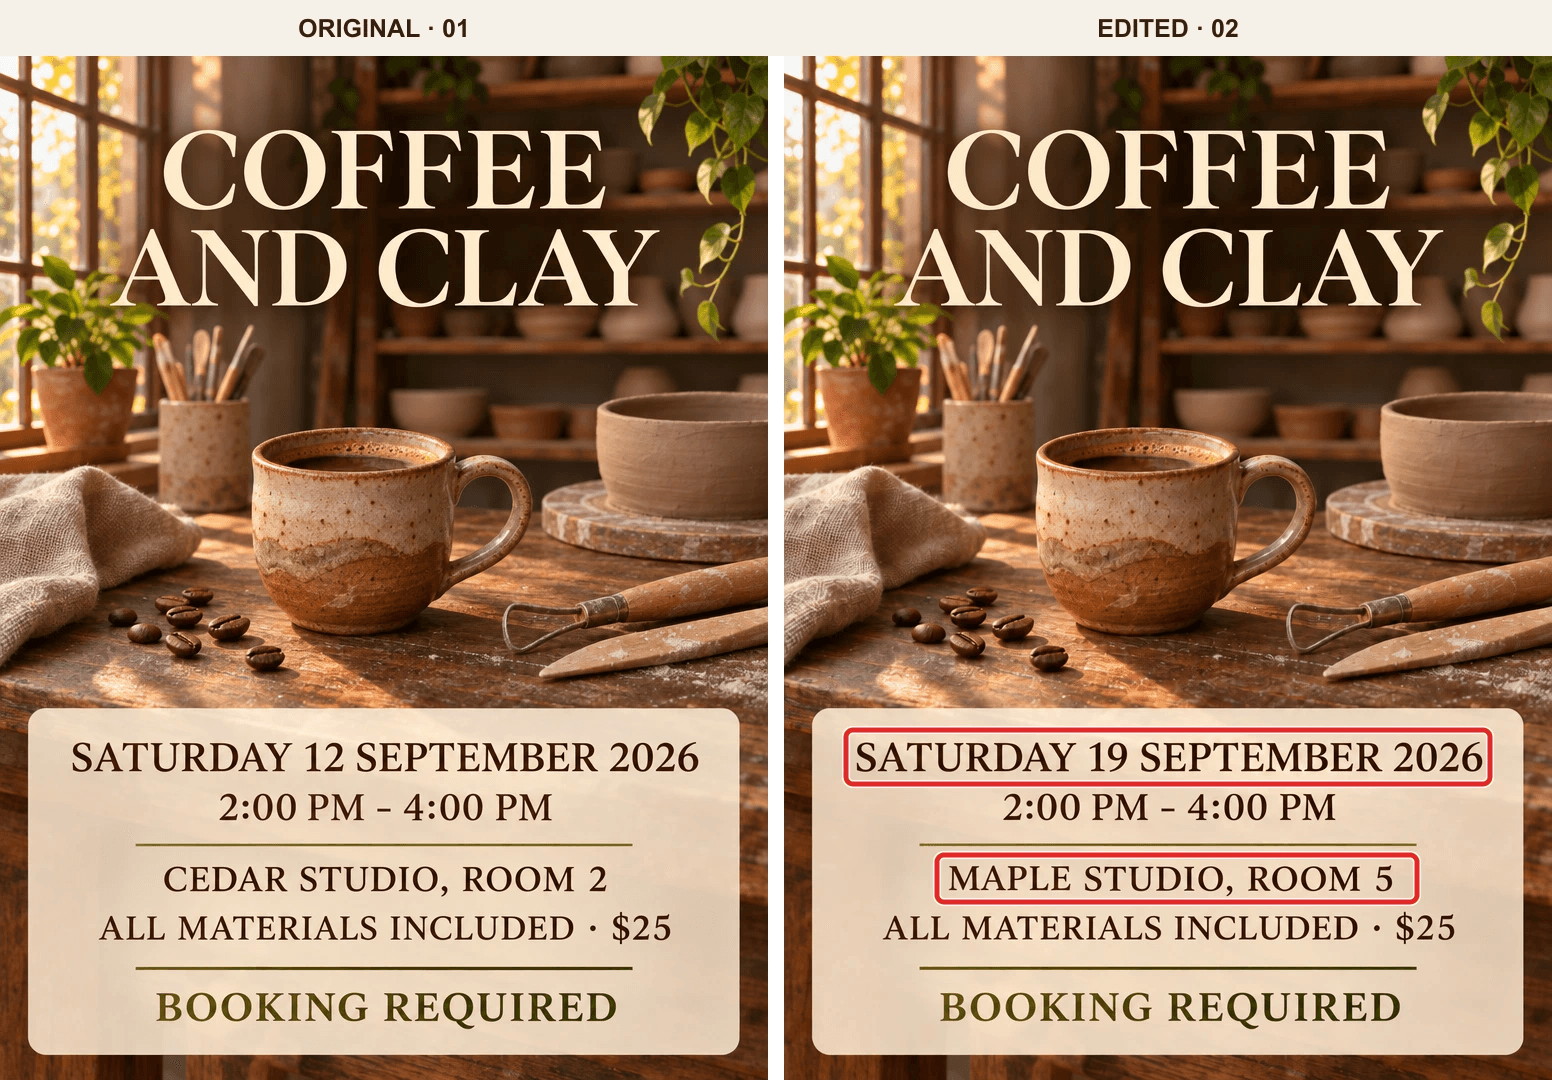
The supplied original (01) and edited image (02) are shown side by side. Red boxes were added to 02 afterward to point out the requested changes; they were not part of the generated image.
Prompt 1: generate the original poster
plaintext1Create a polished 4:5 portrait event poster for a coffee and pottery workshop. Use a realistic, inviting ceramic studio as the background: warm late-afternoon window light, a handmade coffee cup on a walnut worktable, a few clay tools and coffee beans in the foreground, and softly blurred pottery shelves and plants behind them. Use rich earthy browns, terracotta, warm cream, and subtle olive tones. The background should have depth and texture, while the text remains easy to read. 2 3Place the event title prominently in the upper third. Put the practical details in a clean, lightly translucent cream panel in the lower third. Use refined editorial typography, generous margins, and a clear reading order. Render ONLY the following text, spelled exactly as written: 4 5COFFEE AND CLAY 6SATURDAY 12 SEPTEMBER 2026 72:00 PM - 4:00 PM 8CEDAR STUDIO, ROOM 2 9ALL MATERIALS INCLUDED · $25 10BOOKING REQUIRED 11 12Do not add any other words, logos, watermarks, or decorative lettering. Return the complete poster.
Prompt 2: upload the original and edit the date and venue
plaintext1Edit the uploaded poster. Make exactly two text replacements: 2 3Replace "SATURDAY 12 SEPTEMBER 2026" with "SATURDAY 19 SEPTEMBER 2026". 4Replace "CEDAR STUDIO, ROOM 2" with "MAPLE STUDIO, ROOM 5". 5 6Keep "COFFEE AND CLAY", "2:00 PM - 4:00 PM", "ALL MATERIALS INCLUDED · $25", and "BOOKING REQUIRED" exactly as they appear. Preserve the ceramic studio photograph, coffee cup, lighting, colors, cream text panel, typography, text alignment, margins, and 4:5 composition. Do not add, remove, crop, or redesign anything else. Return the full edited poster.
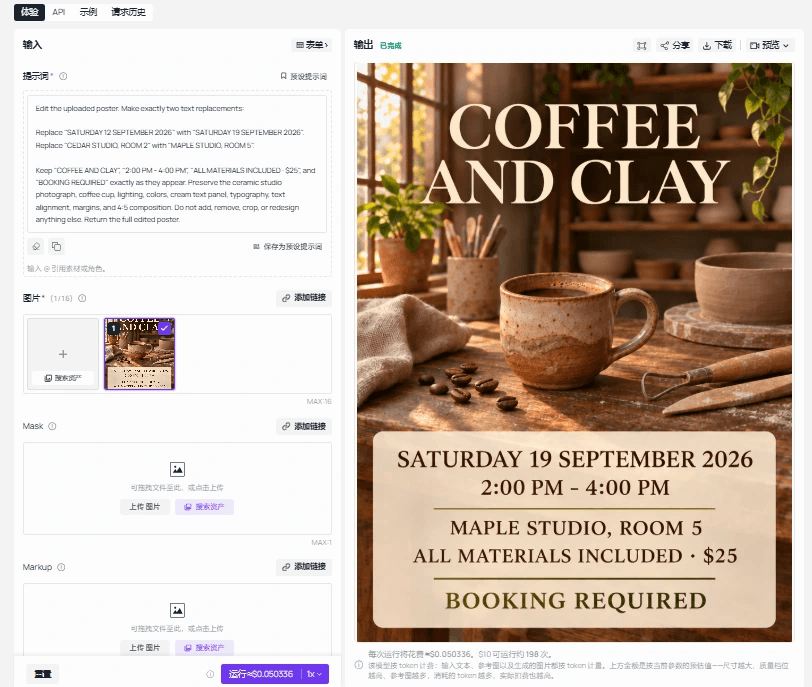
Atlas Cloud edit screen supplied with this case. The prompt is visible beside the completed poster; the red boxes in the comparison above were added separately for explanation.
Prompt 1 establishes the artwork and exact starting copy. Prompt 2 quotes both old and new strings, then names the protected words and visual elements. In the supplied pair, the requested date and venue appear correctly in 02; the two red boxes make that comparison easy to scan. Inspect the rest of the image as well: the cup and nearby photographic details vary slightly between the two outputs, so the prompt's preservation instructions should be treated as a review checklist, not a pixel-level guarantee.
Case 5: Create a botanical poster, then rewrite the headline
This second workflow tests a different kind of edit. The original poster puts “NIGHT BLOOM” and its supporting line over a richly lit glasshouse scene. The edit makes the headline longer and replaces the subtitle while retaining the date, time, venue, ticket line, and visual arrangement. Use GPT Image 2.6 Sunburst Text-to-Image for the original, save it, then upload that file to GPT Image 2.6 Sunburst Edit for the second prompt.
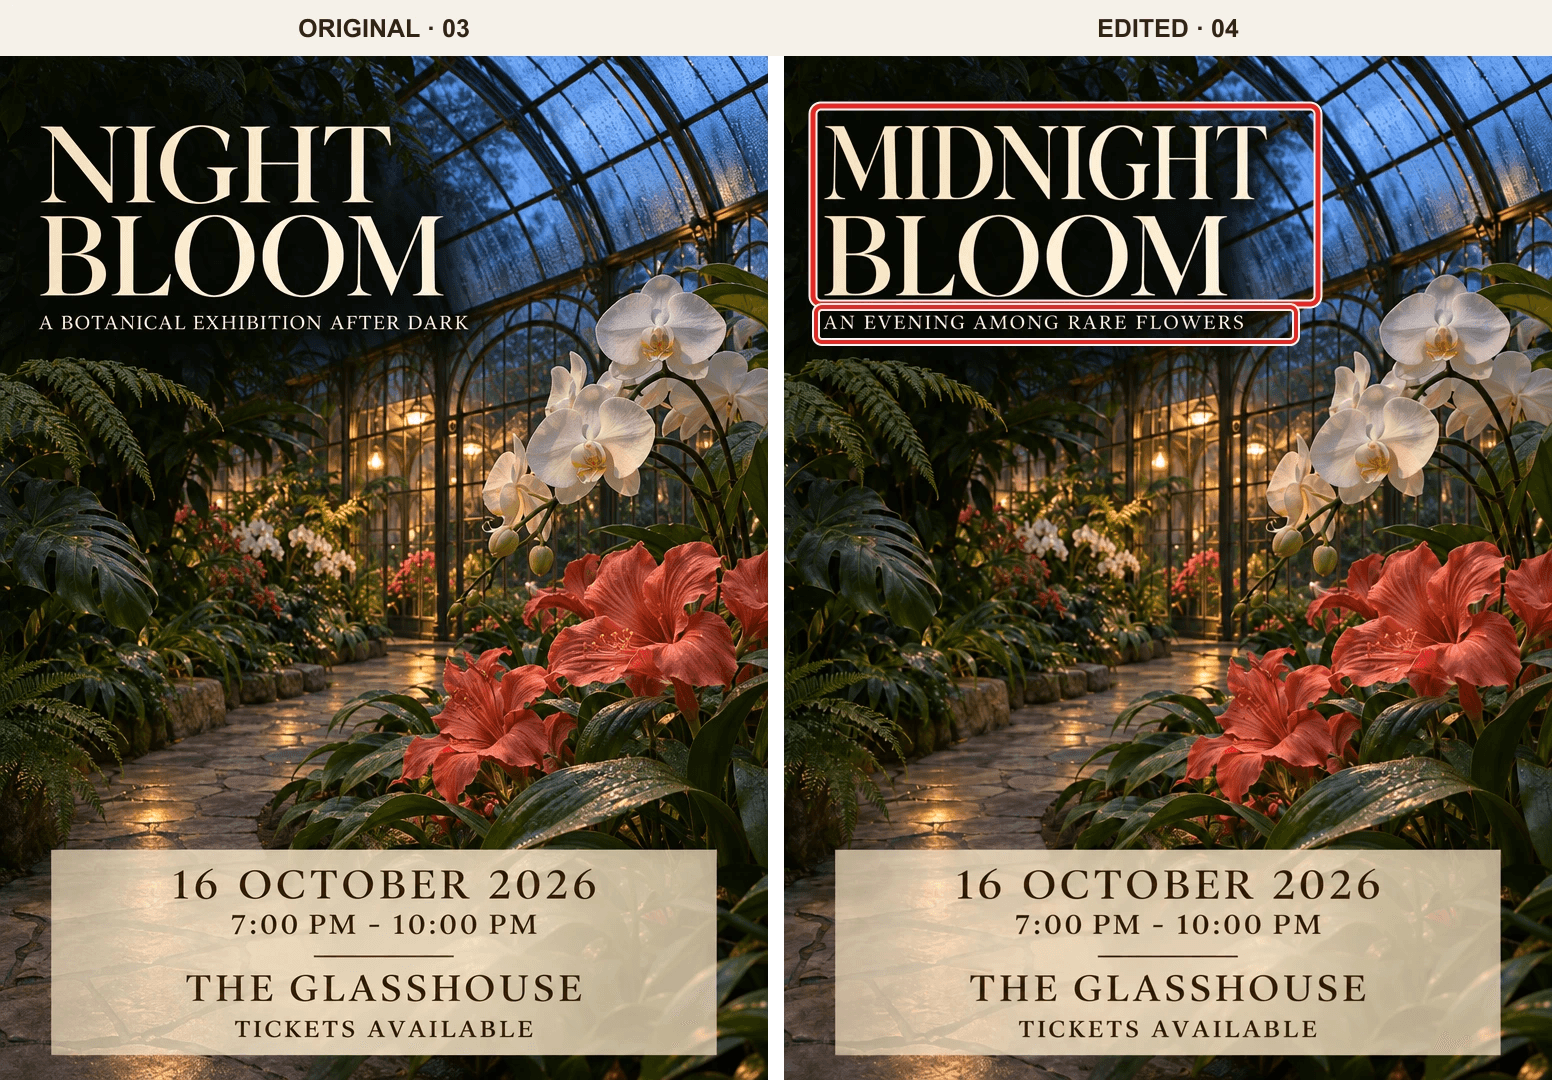
The supplied original (03) and edited image (04) are shown side by side. Red boxes were added to 04 afterward to identify the two requested copy changes; they were not part of the generated output.
Prompt 1: generate the original botanical poster
plaintext1Create a polished 4:5 portrait poster for a fictional evening botanical exhibition. Show a photorealistic glasshouse at twilight: sculptural white orchids and deep coral flowers in the foreground, layered emerald foliage, a stone walkway, subtle condensation on the glass roof, warm amber lights inside, and soft cobalt-blue evening light outside. Give the scene depth, natural textures, and the visual quality of an editorial exhibition campaign. 2 3Keep the upper-left area calm and dark enough for large, legible cream-colored typography. Place the event details in a restrained translucent cream panel near the bottom. Use generous margins and a clear reading order. Render ONLY these lines, spelled exactly as written: 4 5NIGHT BLOOM 6A BOTANICAL EXHIBITION AFTER DARK 716 OCTOBER 2026 87:00 PM - 10:00 PM 9THE GLASSHOUSE 10TICKETS AVAILABLE 11 12Do not add other words, logos, watermarks, signs, or decorative lettering. Return the complete poster.
Prompt 2: upload the original and replace the headline and subtitle
plaintext1Edit the uploaded poster. Make exactly two text replacements: 2 3Replace "NIGHT BLOOM" with "MIDNIGHT BLOOM". 4Replace "A BOTANICAL EXHIBITION AFTER DARK" with "AN EVENING AMONG RARE FLOWERS". 5 6Keep "16 OCTOBER 2026", "7:00 PM - 10:00 PM", "THE GLASSHOUSE", and "TICKETS AVAILABLE" exactly as they appear. Preserve the glasshouse photograph, flower placement, lighting, colors, cream details panel, typography style, margins, and 4:5 composition. Fit the new title and subtitle into their existing text areas without cropping. Do not add or remove any other element. Return the full edited poster.
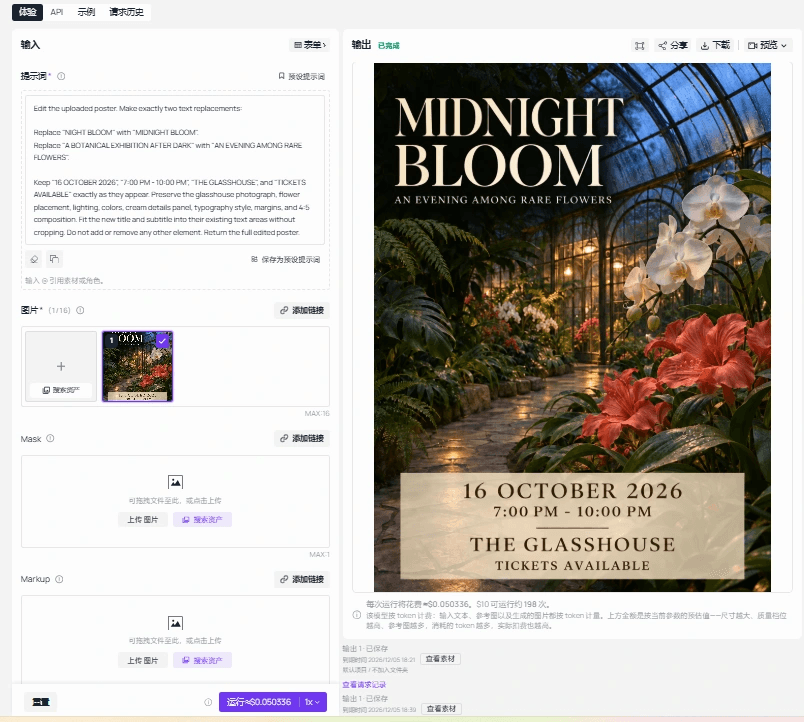
Atlas Cloud edit screen supplied with this case. It shows the targeted replacement prompt and completed poster; the red boxes in the comparison above are editorial annotations.
The new headline uses more letters than the original, so the prompt explicitly tells the model to fit it into the existing title area. In the supplied output, both requested strings are readable and the four lines in the lower panel still match the original. Compare the orchids, glass roof, flower clusters, and panel as well as the text. A prompt that says “preserve” can guide an edit, but the before-and-after pair remains the evidence for what actually changed.
Review Your Poster Result Before Publishing
Open the original and output at matched zoom. Look at the edges and spacing before reading the new date. Then check the updated line and every supposedly untouched line character by character. A result that looks right as a small preview can still contain a changed accent, duplicated word, altered logo, or shifted footer.
| Check | Pass condition for the sample date edit |
|---|---|
| Target wording | “SUNDAY 6 PM” appears once, with no old date remaining. |
| Protected copy | “OPEN STUDIO,” “COMMUNITY ART NIGHT,” and “FREE ENTRY” stay exact. |
| Design | Coral ring, navy field, alignment, margins, and reading order remain acceptable. |
| Output file | Pixel dimensions, format, legibility, and destination requirements are confirmed. |
If the model changes a protected detail, retry from the original, add that detail to the preserve list, and compare again. Avoid using the flawed output as the next input for a simple date correction. If the logo, licensed font, or fine print must be exact, return to the layered design file for the final repair.
Print requires its own proof. A 1024 × 1536 image at 300 pixels per inch works out to about 3.4 × 5.1 inches before bleed or trimming. Adobe's print-resolution guidance describes 300 PPI as a common high-quality reference, but the printer's required dimensions and viewing distance determine the real target. Changing PPI metadata does not create new pixels.
Find Changes Outside the Requested Text
The standard side-by-side review tells you whether the poster still looks right. A difference view can answer a narrower question: where did the pixels change? Open the original and edited files as aligned layers in an image editor, put the edited file above the original, and set its blend mode to Difference. Unchanged areas become dark; changed areas become visible. Adobe's explanation of the Difference mode describes the underlying channel comparison.
First confirm that both files have the same pixel dimensions. If they do not, record the size change before making any overlay. Resizing one image to force a match can hide a crop or shift, which may be the defect you need to catch. When the sizes match, align the corners exactly and inspect the difference view beyond the line you asked to replace. A bright patch around “SUNDAY 6 PM” is expected. Changes in the coral ring, headline, or footer need a closer look.
The difference view is a locator, not an automatic pass or fail. A generative edit can redraw subtle texture across the whole image even when the composition looks stable. A JPEG source may also show compression changes around edges. Conversely, a nearly dark region does not prove that a word is spelled correctly. Keep the original and output visible beside the difference layer so a reviewer can decide whether each highlighted area matters for the release.
For a team review, save a small proof with the original, the candidate, and the difference view. Label the candidate with its run date and the requested change. That lets the next reviewer examine a specific output instead of guessing which file was compared.
Check the Parts of a Poster That Have to Work
An event poster may contain a QR code, short link, address, or ticket instruction. These elements have a job beyond looking plausible. A QR code that resembles the original can still fail to scan or lead to the wrong destination. Keep the approved code as a separate source asset and place it into the final design after the AI edit when possible. Then scan the exported final poster, not just the source code, from more than one phone and at the size people will actually see.
The GS1 guidance on two-dimensional barcodes explains why a QR code's clear margin, contrast, and square grid matter for scanning. Its retail specifications are not a blanket rule for every event poster, but the failure modes are relevant: a crop, textured background, or AI-redrawn module can break a working code. Verify the destination as well as the scan. If the event URL redirects, test the final page and the ticket or registration action.
For a poster published on a webpage, put essential event facts in ordinary page text near the image: date, time, venue, and registration link. That gives readers a copyable, readable source when text baked into the image is small or inaccessible. W3C's guidance on images of text favors real text when the presentation allows it. The poster can remain the visual creative, while the page carries the functional details and can be corrected without regenerating the artwork.
Keep One Approved Version Across the Campaign
The last failure often happens after the edit, when an outdated export reaches a scheduled post. Keep a short revision record with the approved copy, source filename, prompt, model route, output filename, reviewer, and destination. For the sample poster, the record should identify “SUNDAY 6 PM” as the approved replacement and list the untouched lines. Save the original, each candidate, and the approved final as separate files. A name such as open-studio-sunday-review-01.png is more useful than final2.png.
If the campaign needs a feed image, story crop, email image, and print file, treat each export as its own deliverable. A crop can cut off a footer even when the full poster passed review. Have the copy owner check the date and venue, the designer check hierarchy and protected marks, and the publisher check that the correct approved file is attached to each placement. Record a clear approval state for every size rather than assuming approval of one size transfers to the others.
This record also makes a later correction cheaper. When the venue changes next week, the team can start from the right source and see exactly which copy was previously approved. It does not require a complicated asset system; one row per deliverable in a shared sheet or project ticket is enough if the filenames and decisions are unambiguous.
Cost and Production Limits
Image-edit cost can vary with input image, output size, and quality. Check the current Atlas Cloud model catalog and the charge shown for the actual run before budgeting multiple revisions.
The OpenAI image edit reference documents additional controls such as masks and markup. A prompt-only playground may expose different controls, so inspect the live form instead of assuming the API options are present. A mask may guide where the edit occurs, but it does not certify that all other pixels remain identical.
Use the generated file as a reviewed raster draft. Keep the original art and approved copy with it. For exact logo geometry, a brand font, editable text, or a large print master, make the final correction in a design editor and retain that layered source for the next revision.
Frequently Asked Questions
Can I use a second image as a logo or style reference?
An image edit can use references, but a reference does not certify an exact logo in the output. Supply an authorized asset, state its role, and compare the returned mark against the approved original. Place the real vector or raster logo in the design file when exact geometry matters.
Can this workflow export an editable PSD or layered poster?
The workflow described here returns a flat image. It does not provide independently editable type and graphic layers. Keep or rebuild the source design document if the date or campaign copy may change again.
Should I upload a PNG or JPEG as the original poster?
Use the highest-quality approved export that the edit route accepts. For a poster with sharp lettering and flat-color graphics, a PNG usually avoids another round of lossy compression. A JPEG is workable when that is the only authorized original, but saving it repeatedly can soften type and create edge artifacts. Adobe's file-format guidance notes that JPEG compression can degrade detail around text. Converting a low-quality JPEG to PNG will not restore detail already lost; ask for the original design export if one exists.
Can OCR tell me whether every word survived the edit?
OCR can help flag a missing or unexpected word, especially on a poster with many lines. Treat its output as a second check, not proof. Small type, stylized letters, low contrast, and punctuation can be misread by the OCR tool itself. Compare the recognized text with the approved copy, then visually inspect every important field on the image at full size. If a sponsor name or legal line must be exact, use the source design file for final typesetting.
Can I use one edited file for every social and print size?
Only if each destination's dimensions and crop leave all required content intact. A portrait image that works in a feed may lose the date or QR code in a story crop, while a print job may need more pixels and bleed than the digital file provides. Export a separate approved version for each placement, check it at its actual display size, and keep the copy and destination in the revision record. A larger pixel count produced by resizing does not recover detail that was absent from the source.


