AI से सारांश माँगें
The sofa in your generated living room has the rug's pattern. The lamp kept its shape but borrowed the chair's color. MiniMax H3 Image gives you room for up to 16 reference images, yet that capacity only helps when each image has a clear job. Start with the few references needed to define the scene. Number them in upload order, tell the model exactly what to preserve from each, and add more only when the result exposes a specific gap.
Key takeaways
- Sixteen is the maximum number of reference images for an edit, not a target or an output count.
- Assign one main role to each numbered image and state what the model should ignore.
- Keep the room and output settings fixed when comparing 4, 8, and 16 inputs.
- Check object identity and placement before increasing the reference count.
What Does “16 Image Reference” Actually Mean?
MiniMax H3 Image can make a still image from text or edit an image using 1 to 16 references. For an interior composite, the empty room can serve as the fixed scene, while separate photographs define a sofa, rug, lamp, and other objects. The edit returns the requested output image or images; 16 describes how many source images one request may contain. The MiniMax H3 Image model card shows an official example with an empty room and 9 furniture references combined into a furnished room (MiniMax model card, November 2026).
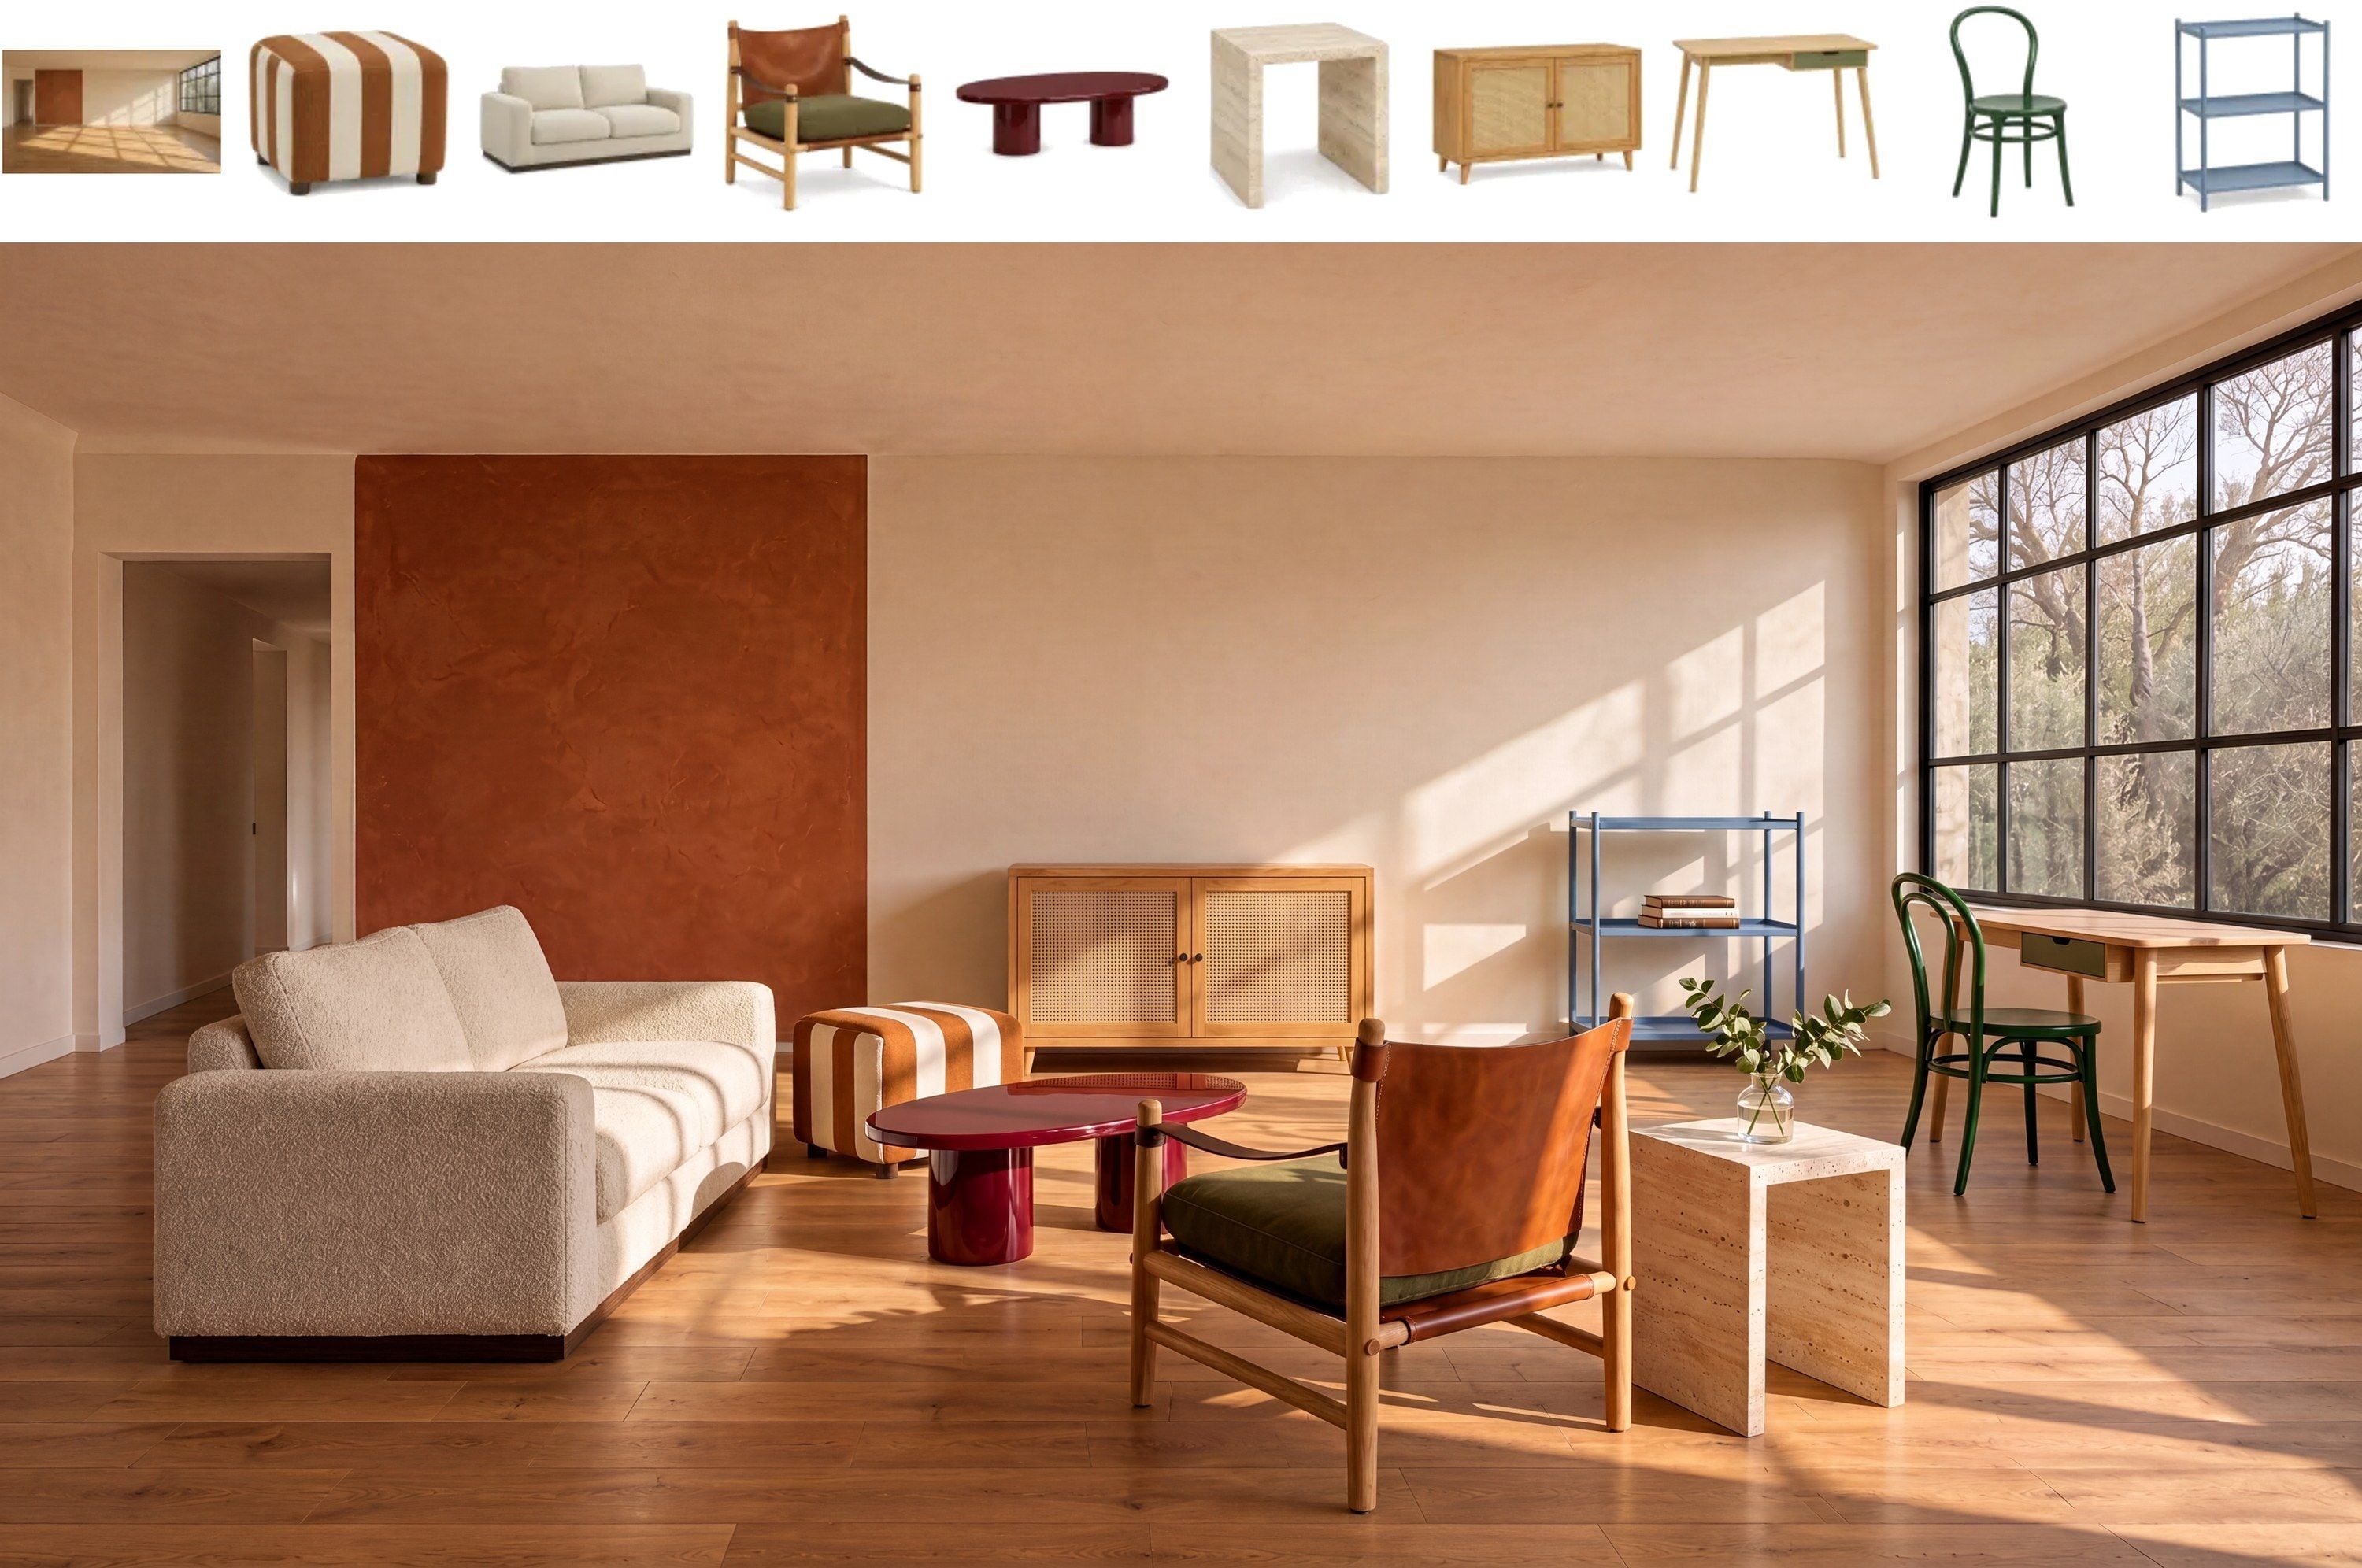
MiniMax H3 Image official model-card example: 1 empty room plus 9 furniture images above the resulting living room. This is MiniMax's example, not a run performed for this article.
The official MiniMax H3 Image edit documentation lists 1–16 references and accepts JPG, JPEG, PNG, WEBP, HEIC, and HEIF inputs. It describes two ways to set output dimensions. Use size as explicit WIDTHxHEIGHT, or leave it as auto and choose aspect_ratio with area. Supplying explicit dimensions together with aspect_ratio or area returns an error. For a 16:9 trial, n=1, aspect_ratio=16:9, and area=4K form one documented combination. Inspect the returned size rather than assuming an exact pixel count.
The model card describes roughly 16-megapixel output at its large settings. More pixels can expose small material or geometry errors as clearly as they expose detail. A high-resolution export therefore needs the same visual review as a smaller draft. MiniMax H3 Image makes still images. Video generation is a different task. A reference-to-video demonstration does not establish how faithfully the still-image editor preserves furniture or room geometry.
Choose Reference Images by Role, Not by Count
A useful reference answers one question. In a room composite, Picture 1 establishes the camera and architecture. A sofa product shot establishes the sofa's silhouette and upholstery. A rug photo establishes its pattern and pile. A lighting reference establishes the lamp, while the room photograph decides where its shadow should fall. This division keeps the prompt specific when 2 photos contain similar colors or textures.
Build the input list before opening the editor. Save files with 2-digit prefixes so the upload sequence stays visible in a file picker. Check that the license permits your intended use and record the source beside each filename. The following 16-slot sheet is a planning example for one living-room task, not a claim that these photographs were collected or tested here.
| Picture | Reference role | Detail to preserve | Detail to ignore or verify |
|---|---|---|---|
| 1 | Empty room | Camera, windows, walls, floor, daylight | Existing staging |
| 2 | Sofa | Silhouette, upholstery color, leg shape | Product-photo backdrop |
| 3 | Rug | Pattern, border, texture | Showroom floor |
| 4 | Floor lamp | Shade and stem shape | Source lighting |
| 5 | Coffee table | Top and base geometry | Source room |
| 6 | Armchair | Frame and fabric | Product-photo pose |
| 7 | Side table | Profile and finish | Nearby props |
| 8 | Plant | Species silhouette and pot | Studio background |
| 9 | Bookcase | Shelves and finish | Styling props |
| 10 | Curtains | Fabric and color | Original window |
| 11 | Pendant light | Fixture shape | Source ceiling |
| 12 | Wall art | Composition and frame | Source wall |
| 13 | Stool | Shape and upholstery | Source floor |
| 14 | Vase | Form and glaze | Flowers if unwanted |
| 15 | Cushion | Pattern and fabric | Source sofa |
| 16 | Throw | Weave and color | Source furniture |
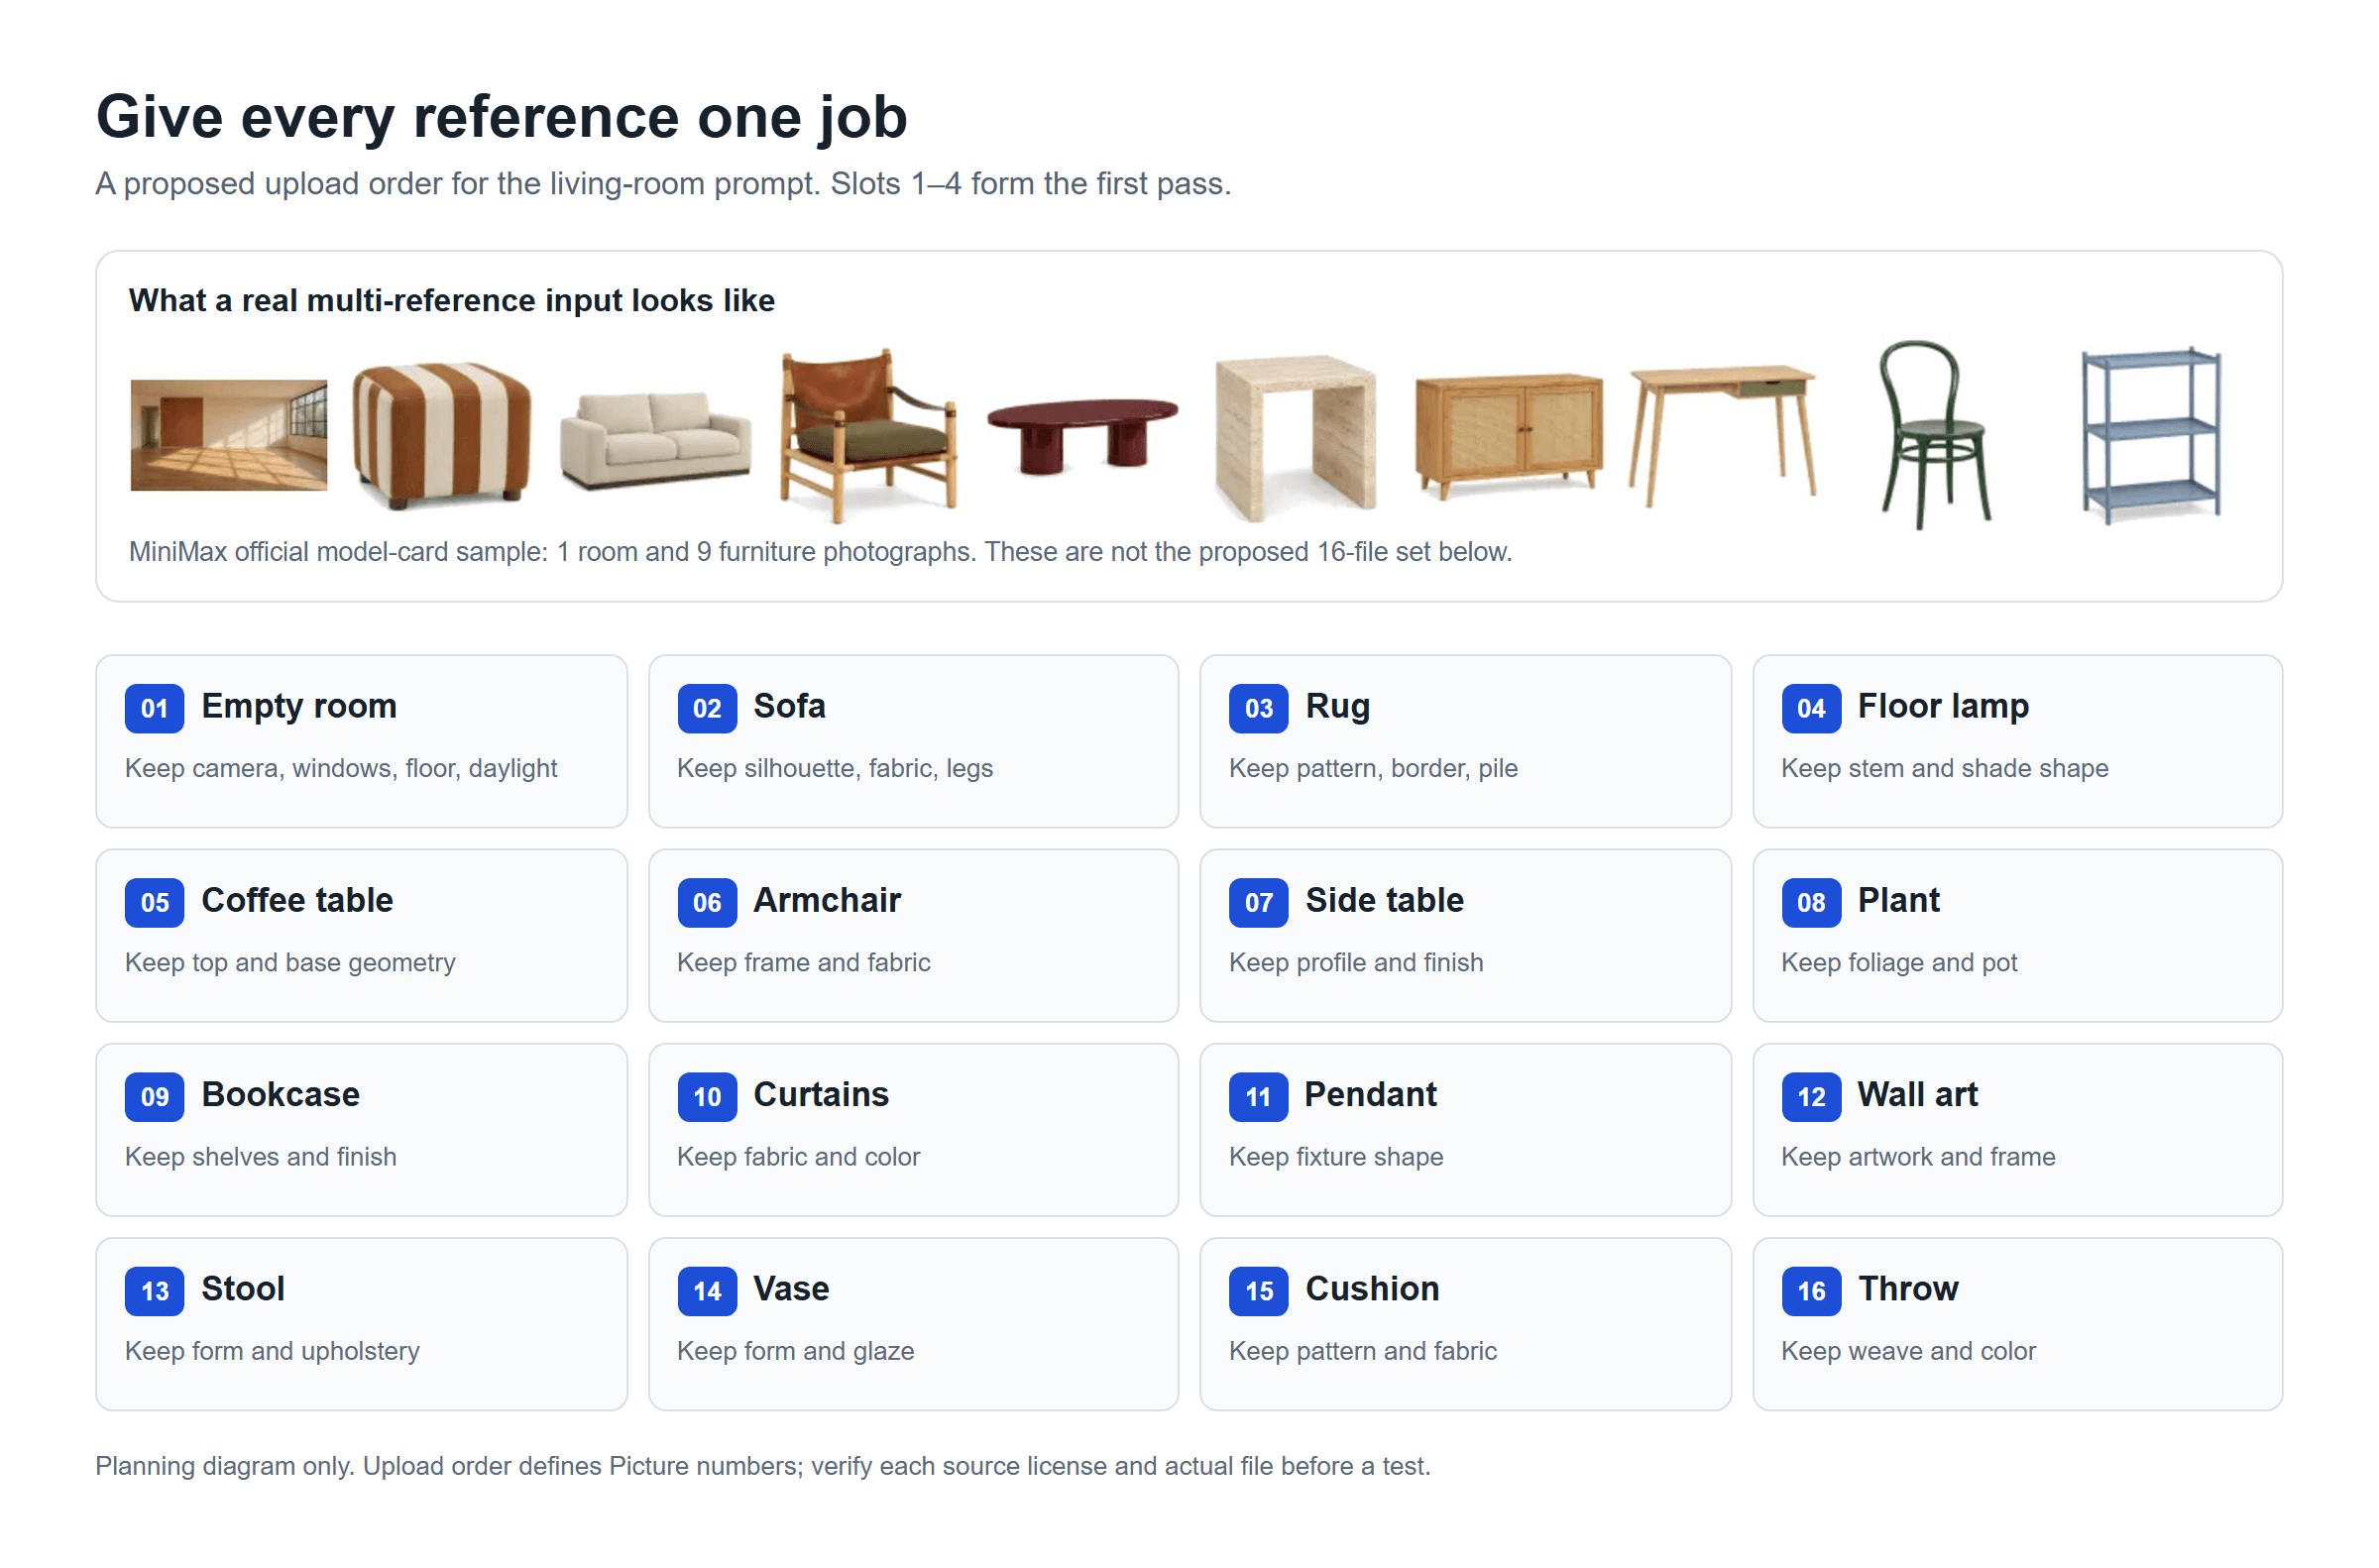
Reference planning sheet: the fixed room gets Picture 1; each later slot has a named object and one preservation check. This is a proposed upload order, not a MiniMax H3 Image output.
A reference may contain several useful details, but give it one primary job. If the lamp photo also has a sofa in the background, state that only the lamp should transfer. If 2 photos prescribe different views of the same sofa, decide whether they are complementary views or conflicting instructions. Remove near duplicates that add no new surface or angle. A sharp, well-lit source makes its distinguishing details easier to inspect later, though the documentation does not promise that sharpness alone improves adherence.
Keep the room image first in this example because every placement instruction refers back to it. The model card's upload-order convention means <Picture 1> points to the first uploaded file, not to the image you happened to call “base” in your notes. Recheck the ordered thumbnails in the actual interface before submitting.
Write a Prompt That Tells MiniMax H3 Image What to Keep
A multi-reference prompt needs 4 pieces: the fixed scene, the source-to-object mapping, the spatial relationships, and the limits on changes. “Use these images for a cozy room” leaves the model to choose which sofa, rug, and arrangement matter. Explicit assignments give you a result you can audit.
Use <Picture n> in the MiniMax H3 Image workflow described by the model card. Put the target object next to each number. Then say what must remain from the room: camera position, window placement, wall color, floor, and daylight direction. State where the imported objects belong relative to each other, and allow scale, perspective, and shadows to change so they fit. Exclude product-photo backgrounds and unlisted prominent furniture.
For the first pass, upload Picture 1 through Picture 4 in order and paste this prompt:
plaintext1Create a realistic furnished photograph of the living room in <Picture 1>. Preserve its camera position, window placement, wall color, floor, and daylight direction. Place the sofa from <Picture 2> against the main wall, the rug from <Picture 3> beneath the seating area, and the floor lamp from <Picture 4> beside the sofa. Preserve each referenced item's distinctive silhouette, color, and material. Adjust scale, perspective, and contact shadows to fit the room. Do not import the product-photo backgrounds. Do not add other prominent furniture.
Use n=1, aspect_ratio=16:9, and area=4K if your MiniMax H3 Image entry exposes the documented edit controls. Leave size unset or set it to auto. If the interface offers only direct width and height, choose a valid 16:9 size and do not also send aspect_ratio or area. Record the returned dimensions and any enhanced prompt with the output. The API docs say edits apply prompt enhancement, so a revised prompt can help explain an unexpected interpretation.
Keep instructions observable. “Preserve the curved arms and dark green upholstery of the sofa” is easier to check than “make it stylish.” If the output changes a critical contour, refine that item's preservation clause. If the room geometry drifts, strengthen the Picture 1 constraints. Avoid changing both at once because you will lose the reason for any improvement.
One Room, Three Runs: 4, 8, and 16 References
A fair comparison keeps the same licensed room photograph, source files, upload order, output ratio, area setting, and inspection checklist. Add only the named objects at each stage. Generate one output per stage and keep the original file, request settings, and returned size. The following is a reproducible test design. Its result fields stay open until the 4/8/16 MiniMax H3 Image runs are completed; the input limit alone cannot supply observed outcomes.
The Four-Image Baseline
Pictures 1–4 ask for one room, sofa, rug, and floor lamp. This is enough to test whether the editor understands the scene boundary and 3 different object roles. Inspect the sofa arms and fabric separately from the rug pattern. Check whether the lamp stands beside the sofa and whether its base meets the floor. Mark each item as retained, changed, absent, or impossible to judge from the chosen view.
Do not add another reference merely because the first output looks sparse. A sparse room is expected from a 4-picture request that forbids other prominent furniture. Add the next object only when the intended final scene actually needs it.
Add Four Missing Objects
For the 8-picture stage, retain Pictures 1–4 and append a coffee table, armchair, side table, and plant as Pictures 5–8. Keep the same settings and use this prompt:
plaintext1Create a realistic furnished photograph of the living room in <Picture 1>. Preserve its camera position, architecture, floor, window placement, and daylight direction. Place the sofa from <Picture 2> against the main wall, the rug from <Picture 3> beneath it, and the floor lamp from <Picture 4> beside the sofa. Add the coffee table from <Picture 5> in front of the sofa, the armchair from <Picture 6> opposite it, the side table from <Picture 7> next to the armchair, and the plant from <Picture 8> near the window. Preserve each object's recognizable shape, color, and material. Keep believable scale, clear walking space, consistent perspective, and contact shadows. Do not import any source-photo background or add unlisted prominent objects.
Now the question changes from “can it place 3 objects?” to “can it preserve the first 3 while adding 4 more?” Compare the same sofa, rug, and lamp checks against the baseline. Then assess the new items and the walking path. A fuller scene that loses the sofa's identifying shape may be less useful to a product team than the simpler baseline.
When a Full Set of 16 Images Is Justified
Use all 16 only if the brief genuinely calls for the remaining bookcase, curtains, pendant light, wall art, stool, vase, cushion, and throw. Those sources introduce several small, overlapping details. In a 16:9 room view, some may be hidden by furniture or too small for a confident identity check. Define which objects must be visible before running the edit.
plaintext1Create one realistic interior photograph using the empty living room in <Picture 1> as the fixed scene. Preserve its architecture, camera position, windows, flooring, and daylight direction. Furnish it with the sofa <Picture 2>, rug <Picture 3>, floor lamp <Picture 4>, coffee table <Picture 5>, armchair <Picture 6>, side table <Picture 7>, plant <Picture 8>, bookcase <Picture 9>, curtains <Picture 10>, pendant light <Picture 11>, wall art <Picture 12>, stool <Picture 13>, vase <Picture 14>, cushion <Picture 15>, and throw <Picture 16>. Use each image only for the named object's appearance, not its original background. Keep the sofa and armchair as the seating focus; place the rug beneath them, keep the coffee table reachable, and leave a clear path from the door to the window. Preserve each item's distinctive color, silhouette, and material where visible. Make scale, perspective, illumination, reflections, and contact shadows consistent with <Picture 1>. Do not duplicate objects or invent additional prominent furnishings.
The comparison sheet below tells you what to record after real runs. Empty findings are deliberate; they prevent a planned experiment from being mistaken for a measured result.
| Run | Input set | Main question | Record after running |
|---|---|---|---|
| 4 | Room, sofa, rug, lamp | Are the room and 3 objects distinct? | Retained details, missing details, placement errors |
| 8 | First 4 plus table, chair, side table, plant | Did added items displace earlier ones? | Same 4-item checks plus new-object checks |
| 16 | First 8 plus 8 finishing objects | Are all required items visible and identifiable? | Per-object visibility, duplication, occlusion, room drift |
Count the objects correctly before comparing visual quality. A missing stool and a duplicated vase are different failures. If the 8-image run meets the brief, stop there. More references mean more details to verify and potentially more input cost; the official input limit does not establish that 16 always improves fidelity.
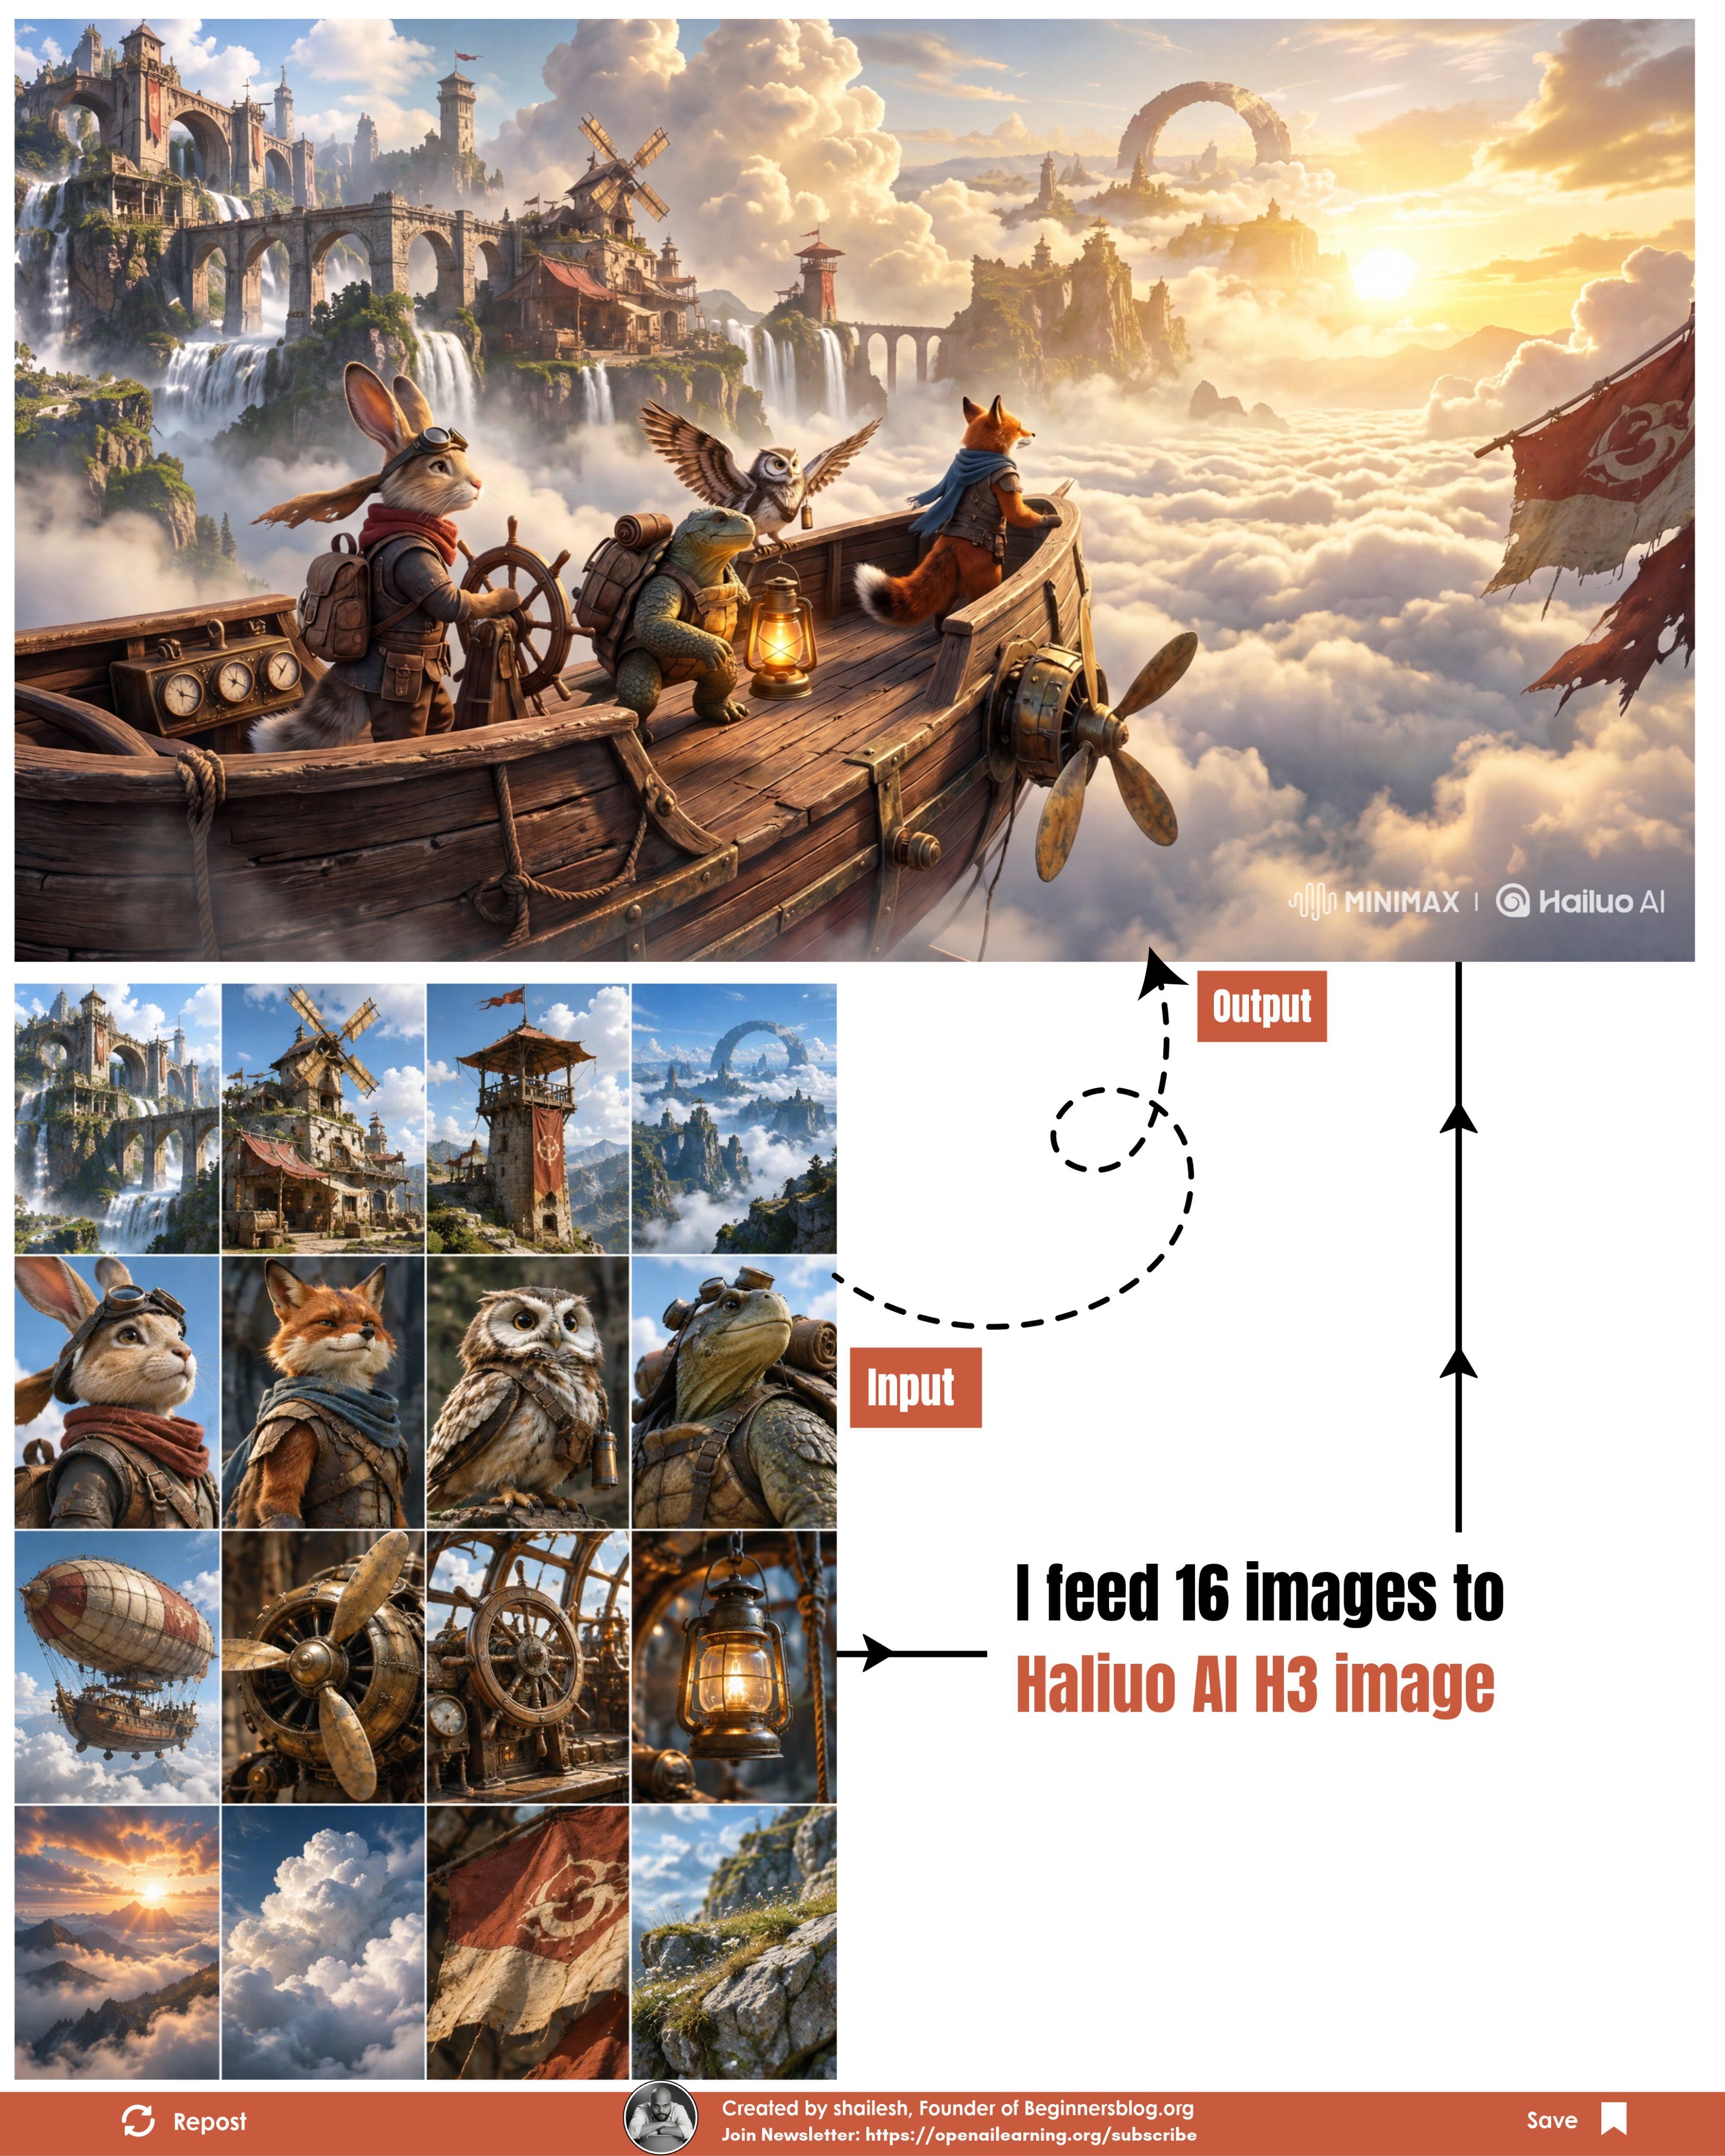
The first published case shows how separate visual roles can meet in one scene. Its location references define stone bridges and a cloud-filled horizon; character portraits define the rabbit, fox, owl, and turtle; the remaining images guide the flying ship, its props, and the light. Compare the lower input grid with the single result above it to see which details carried through.
Sixteen references, one output: a MiniMax H3 Image case published by Beginnersblog shows four location views, four animal characters, four airship details, and four atmosphere or prop references in the lower grid. The single flying-ship scene appears above them.
The second case makes identity matching especially easy to inspect. Its numbered sheet pairs four robot heads with distinct outfits and instruments. In the resulting band scene, the arch, radial floor, lunar backdrop, and two light colors also come from the setting references.
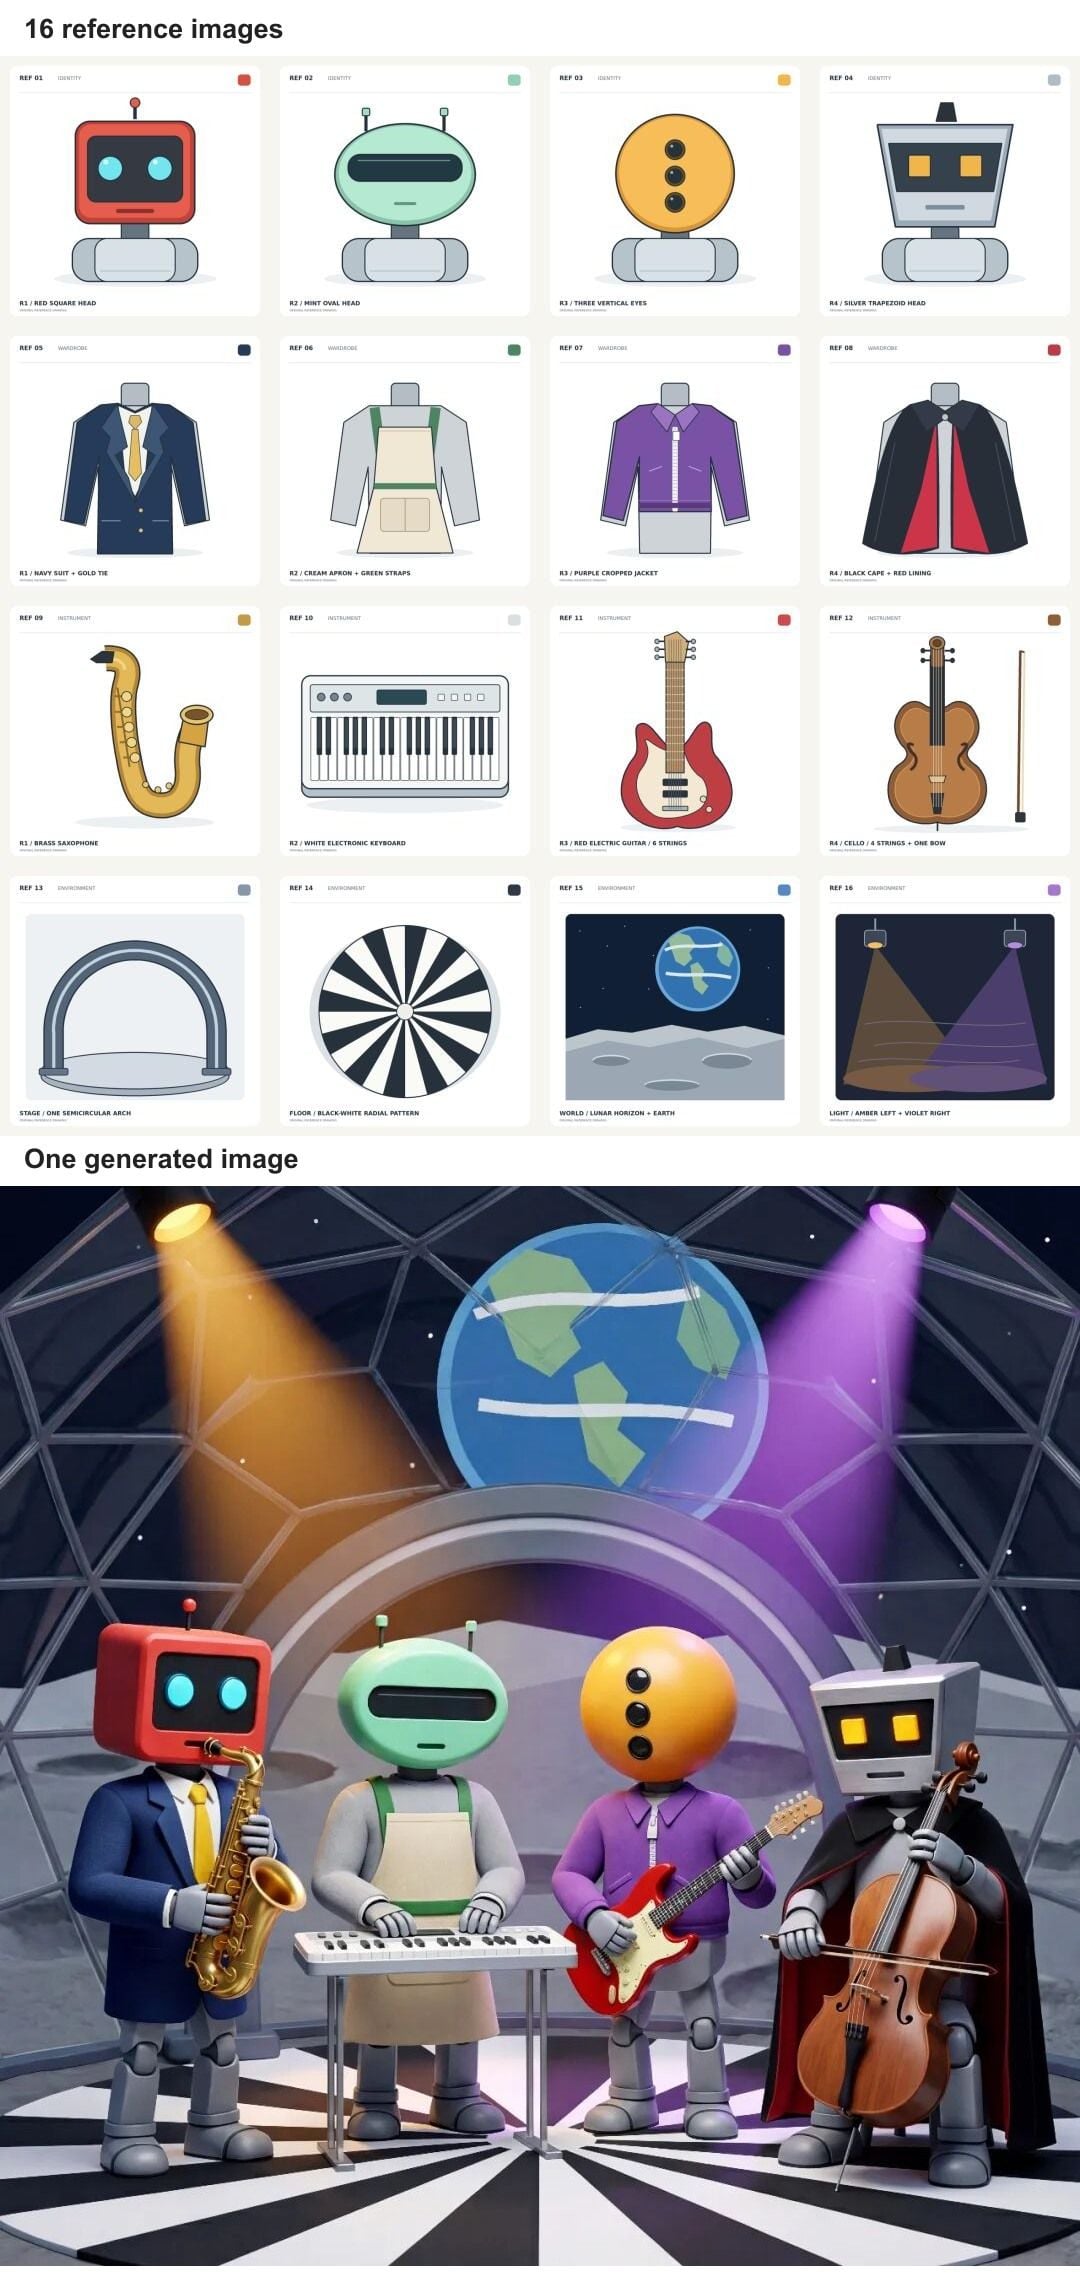
Sixteen references, one output: a MiniMax H3 Image test published by 36Kr supplies four robot heads, four outfits, four instruments, and four setting cues (top) to assemble one band scene (bottom).
Check the Result Before You Reuse It
Open the output at its delivered resolution beside the source sheet. Begin with the fixed room. Does the window remain on the same wall? Is the camera still at roughly the same height and angle? If the architecture changed, a convincing sofa texture does not rescue the edit for an interior presentation tied to a real space.
Next, inspect each requested object in a fixed order. Confirm the silhouette first, then color and material. A green sofa with straight arms does not preserve a curved-arm source merely because the hue matches. For patterned textiles, inspect whether the pattern belongs to the correct object. The opening sofa-rug failure is a cross-reference mix, so changing only a color adjective may not solve it; restate the source-to-object boundary.
Check number and location separately. A model may create 2 lamps, hide the specified side table, or place the armchair in front of the door. Look for clear floor contact, plausible scale against the window, consistent shadows, and reflections where the room warrants them. Review wall art or labels at full size if readable text matters. Generated text can require separate correction even when the broader composition works.
Keep an issue log with columns for picture number, required feature, observed difference, and next change. Modify one assignment or constraint per retry. Save the old output, since the next generation can fix one object and change another. For client-facing use, treat the result as a visual proposal until you have checked source rights, dimensions, and every product detail that the image might imply is accurate.
Where to Run It, and What to Verify First
MiniMax offers MiniMax H3 Image through its own API and apps, and publishes open weights. ComfyUI also documents a node workflow for the model. Before starting, check that the interface is specifically the still-image MiniMax H3 Image editor and supports the number of references and output controls your test needs. Record the model name shown by the service. Avoid confusing video reference workflows with MiniMax H3 Image editing.
For an Atlas Cloud workflow today, the Atlas Cloud model directory is the place to confirm the current catalog. At the time of this review, I could verify the OpenAI GPT Image 2.5 Sunburst Edit model page, which specifies up to 16 input images and quality and size controls. This is a separate model that can practice the same reference-role discipline. Its output is not evidence of MiniMax H3 Image behavior, and I could not verify an Atlas Cloud MiniMax H3 Image edit entry for this article.
Check the live quote for the exact quality, size, output count, and number of references before running. The Atlas model page lists a starting per-image price, but that starting rate does not establish the cost of a max-quality 3840×2160 edit. MiniMax's own edit cost is also separate. A useful comparison records the quote and returned size beside each result instead of mixing the 2 providers' prices.
Open weights introduce a different decision: whether your organization may deploy them for its audience and territory. The MiniMax H3 Image community license includes territory exclusions and extra conditions for certain commercial or hosted services (MiniMax license, November 2026). Read the current terms for your deployment before making a commercial-use claim.
For your first MiniMax H3 Image project with multiple references, prepare a rights-cleared room and 3 unmistakable objects, run the 4-picture baseline, and fill the check sheet. Let the observed errors decide whether Pictures 5–8 or 9–16 have a real job.
FAQ
Does MiniMax H3 Image require 16 reference images?
No. Sixteen is the maximum for one edit, not a target. Start with the room and the objects the scene needs. Add another reference only when it has a clear role or the result shows a specific gap.
Does 16 Image Reference mean 16 output images?
No. It describes the maximum number of input reference images. Output count is a separate setting; the article uses n=1 to request one result for each comparison run.
How does MiniMax H3 Image identify each reference in a prompt?
It uses upload order. <Picture 1> is the first uploaded file, <Picture 2> is the second, and so on. Number your files and check the ordered thumbnails before submitting.
Can I combine an explicit size with aspect ratio and area settings?
No. For the documented edit controls, either set size to explicit WIDTHxHEIGHT, or use size=auto with aspect_ratio and area. Supplying both methods together returns an error.
How do I know whether more reference images helped?
Keep the room, earlier references, upload order, and output settings fixed. Compare each run for object identity, placement, duplication, and room geometry. If the smaller set meets the brief, there is no need to fill the remaining slots.


