It took me four minutes to get my face into that door from The Shining. Four minutes. I sat there grinning at my own screen like an idiot.
Then I hit Download, and a diagonal watermark landed directly across the teeth.
So I re-ran it. Different angle, cleaner source photo, better lighting. Same problem, plus a new one: the face was sharp and smooth, and the door around it was grainy 1980s film stock. It looked like someone glued a printed passport photo into the splintered wood. The watermark didn't kill the joke. The sticker look did.
This is the whole story of one-click face swap tools. They are genuinely good at the first 80% and completely blind to the last 20%, which is the only part anyone actually laughs at.  A dim editing room at night with printed film stills scattered across a wooden desk and a face swap job rendering on the monitor
Key takeaways
- Pica AI face swap really does work for quick photo swaps, and the official limit is up to 3 faces in a single photo or video, with uploads deleted within 24 hours.
- The free tier is where it stings. Third-party reviews consistently report watermarked exports and capped resolution, and Pica does not publish an open pricing page as of writing.
- Movie scenes expose one-click tools because they replace the face region without relighting it or re-adding film grain. That is a paste, not a fusion.
- The fused version takes three paid runs, not a better swap button: generate a source face, fuse it with an edit model that has a keep-list, animate five seconds, then convert to GIF locally.
- Atlas Cloud's free AI face swap tool covers the plain swap with neither of Pica's free-tier catches: free per its own FAQ, no usage cap, and no watermark on the export.
Same door, different guy. Here is the payoff before any theory. Left is the actual film still, downloaded and used as the edit base. Right is the fused version. Nothing was recreated, nothing was cleaned up, and the grain survived. 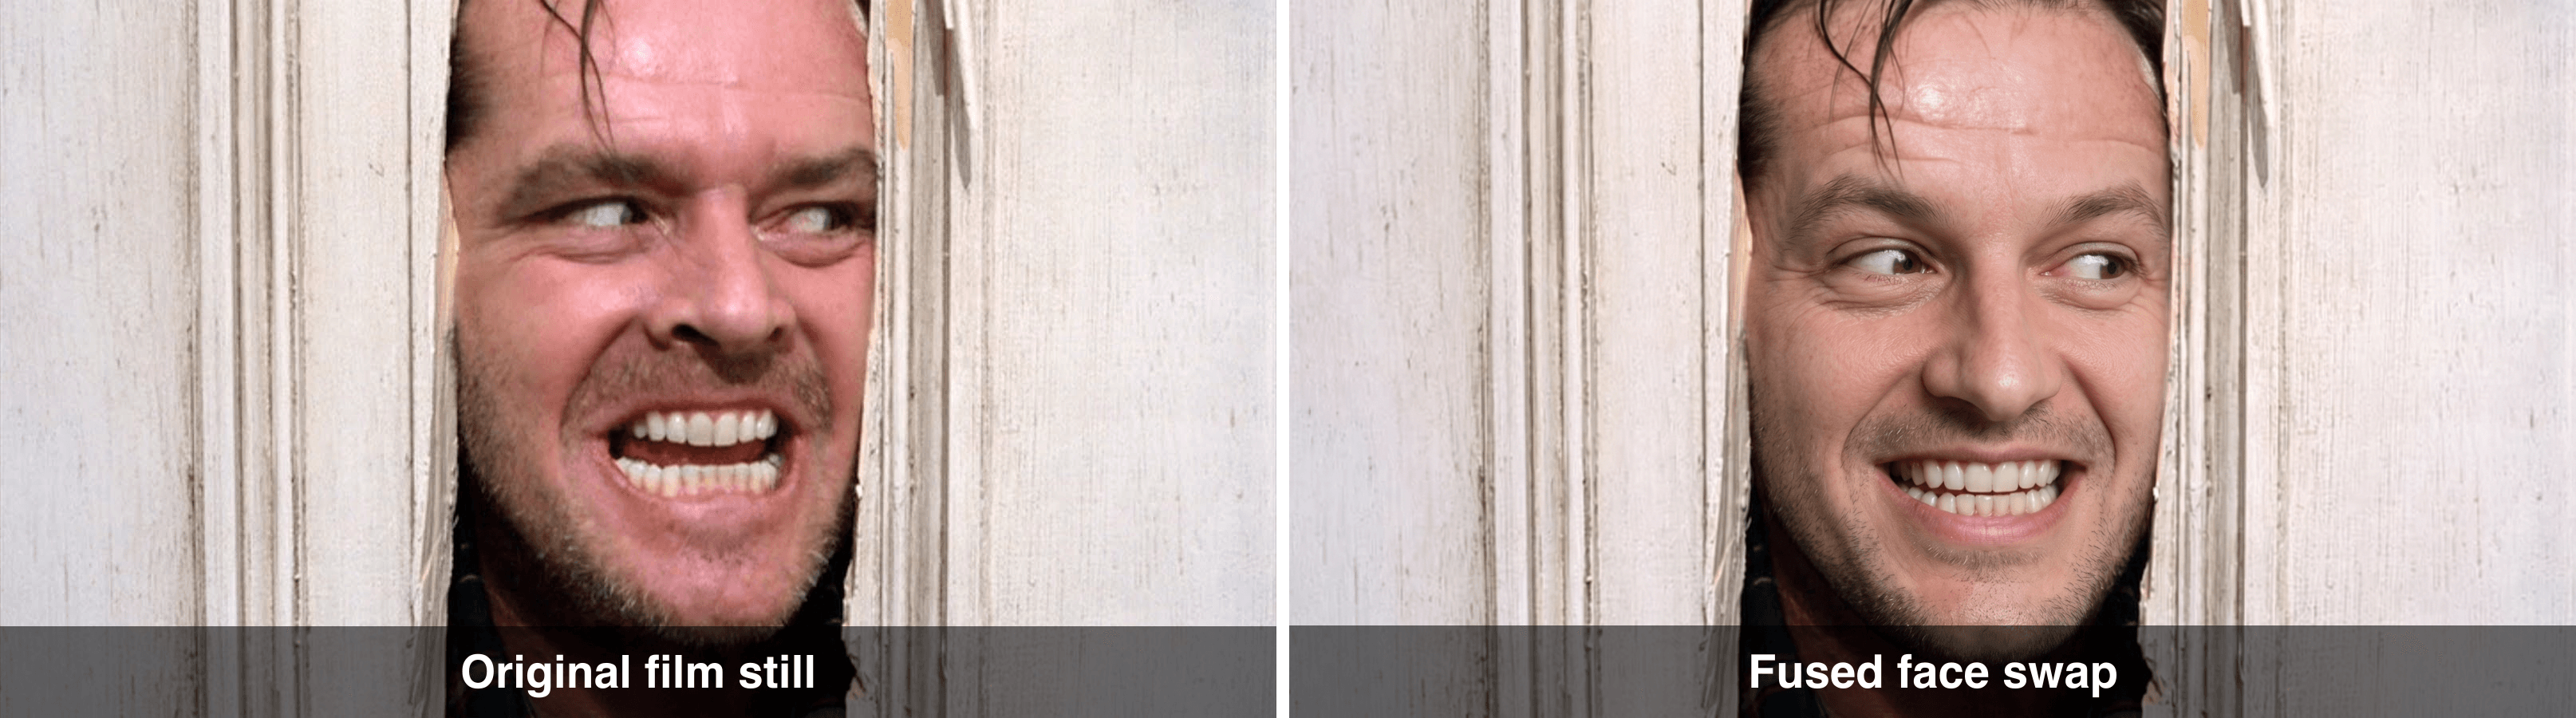 Side by side comparison of the Here's Johnny film still from The Shining and the same shot with a different face fused in
Look at what had to survive for the joke to survive: eyes rolled hard to the left, eyebrows up, teeth fully bared, head wedged in a hole he made himself. That expression is the punchline. A technically flawless swap that calms the face down is a failed swap.
Why Everyone Is Searching "Pica AI Face Swap" Right Now
Putting yourself into a famous scene used to be a weekend in Photoshop. Now it is four clicks and a phone photo, and the template libraries are enormous. That collapse in effort is why the search volume exists at all.
It is also why the security industry is nervous about the same technology. Face swap attacks on identity verification systems rose 300% in 2024 compared to 2023, and native virtual camera attacks jumped 2665% (iProov, February 2025). Nobody builds a 2665% increase out of a niche tool. That number exists because face swapping got easy enough for everyone, including people you would rather not hand it to.
Quick spelling note, because search results are messy here: people type pica.ai face swap, pica ai face swap, and pica ai video face swap and all three land on the same product at pica-ai.com. There is no separate pica.ai domain doing something different. 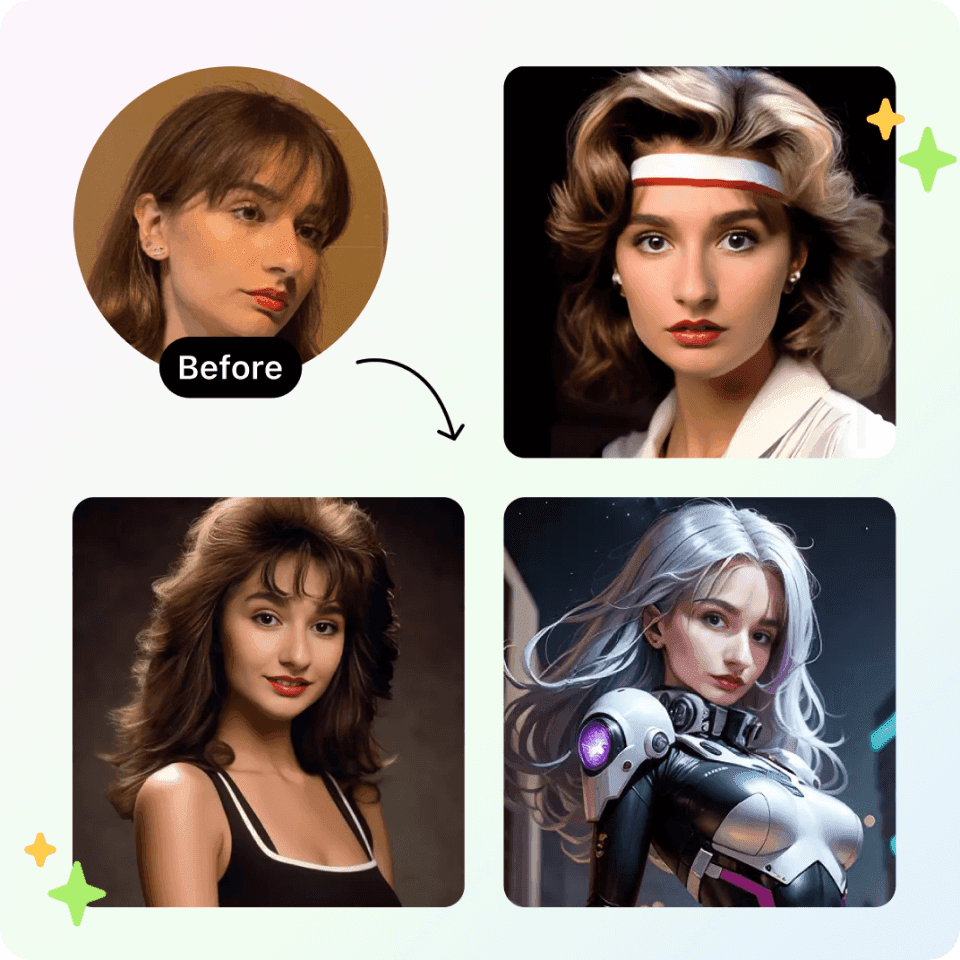 Pica AI marketing example showing one uploaded face rendered into four different styles
Image: Pica AI (pica-ai.com)
How to Use Pica AI Face Swap Free (Photos and Video)
The tool is honestly simple, and I want to give it full credit before I criticise it. There is no install, no account required to preview a result, and the photo path takes seconds.
Step 1. Open the face swap page and add your face. Go to the face swap tool and upload the photo of the face you want to swap in. Even front lighting, a straight-on angle, no sunglasses, no hair across the cheek. This single choice decides most of your result quality.
Step 2. Upload the target photo or video. This is the scene you want to be in. The closer its head angle and lighting are to your source photo, the fewer artifacts you get. Or pick something from the template library if you just want to test it.
Step 3. Hit Swap. Photos are processed in seconds; videos may take minutes (Pica AI, 2026).
Step 4. Download. Results can be pulled as MP4 or GIF on the video side.
The official numbers worth knowing before you plan anything around it: up to 3 faces in a single photo or video, and uploaded files are deleted within 24 hours of upload. On the video side specifically, Pica's own documentation says the system detects up to 5 faces and accepts files up to 500MB, with processing time varying by length and complexity (Pica AI video guide, 2026). 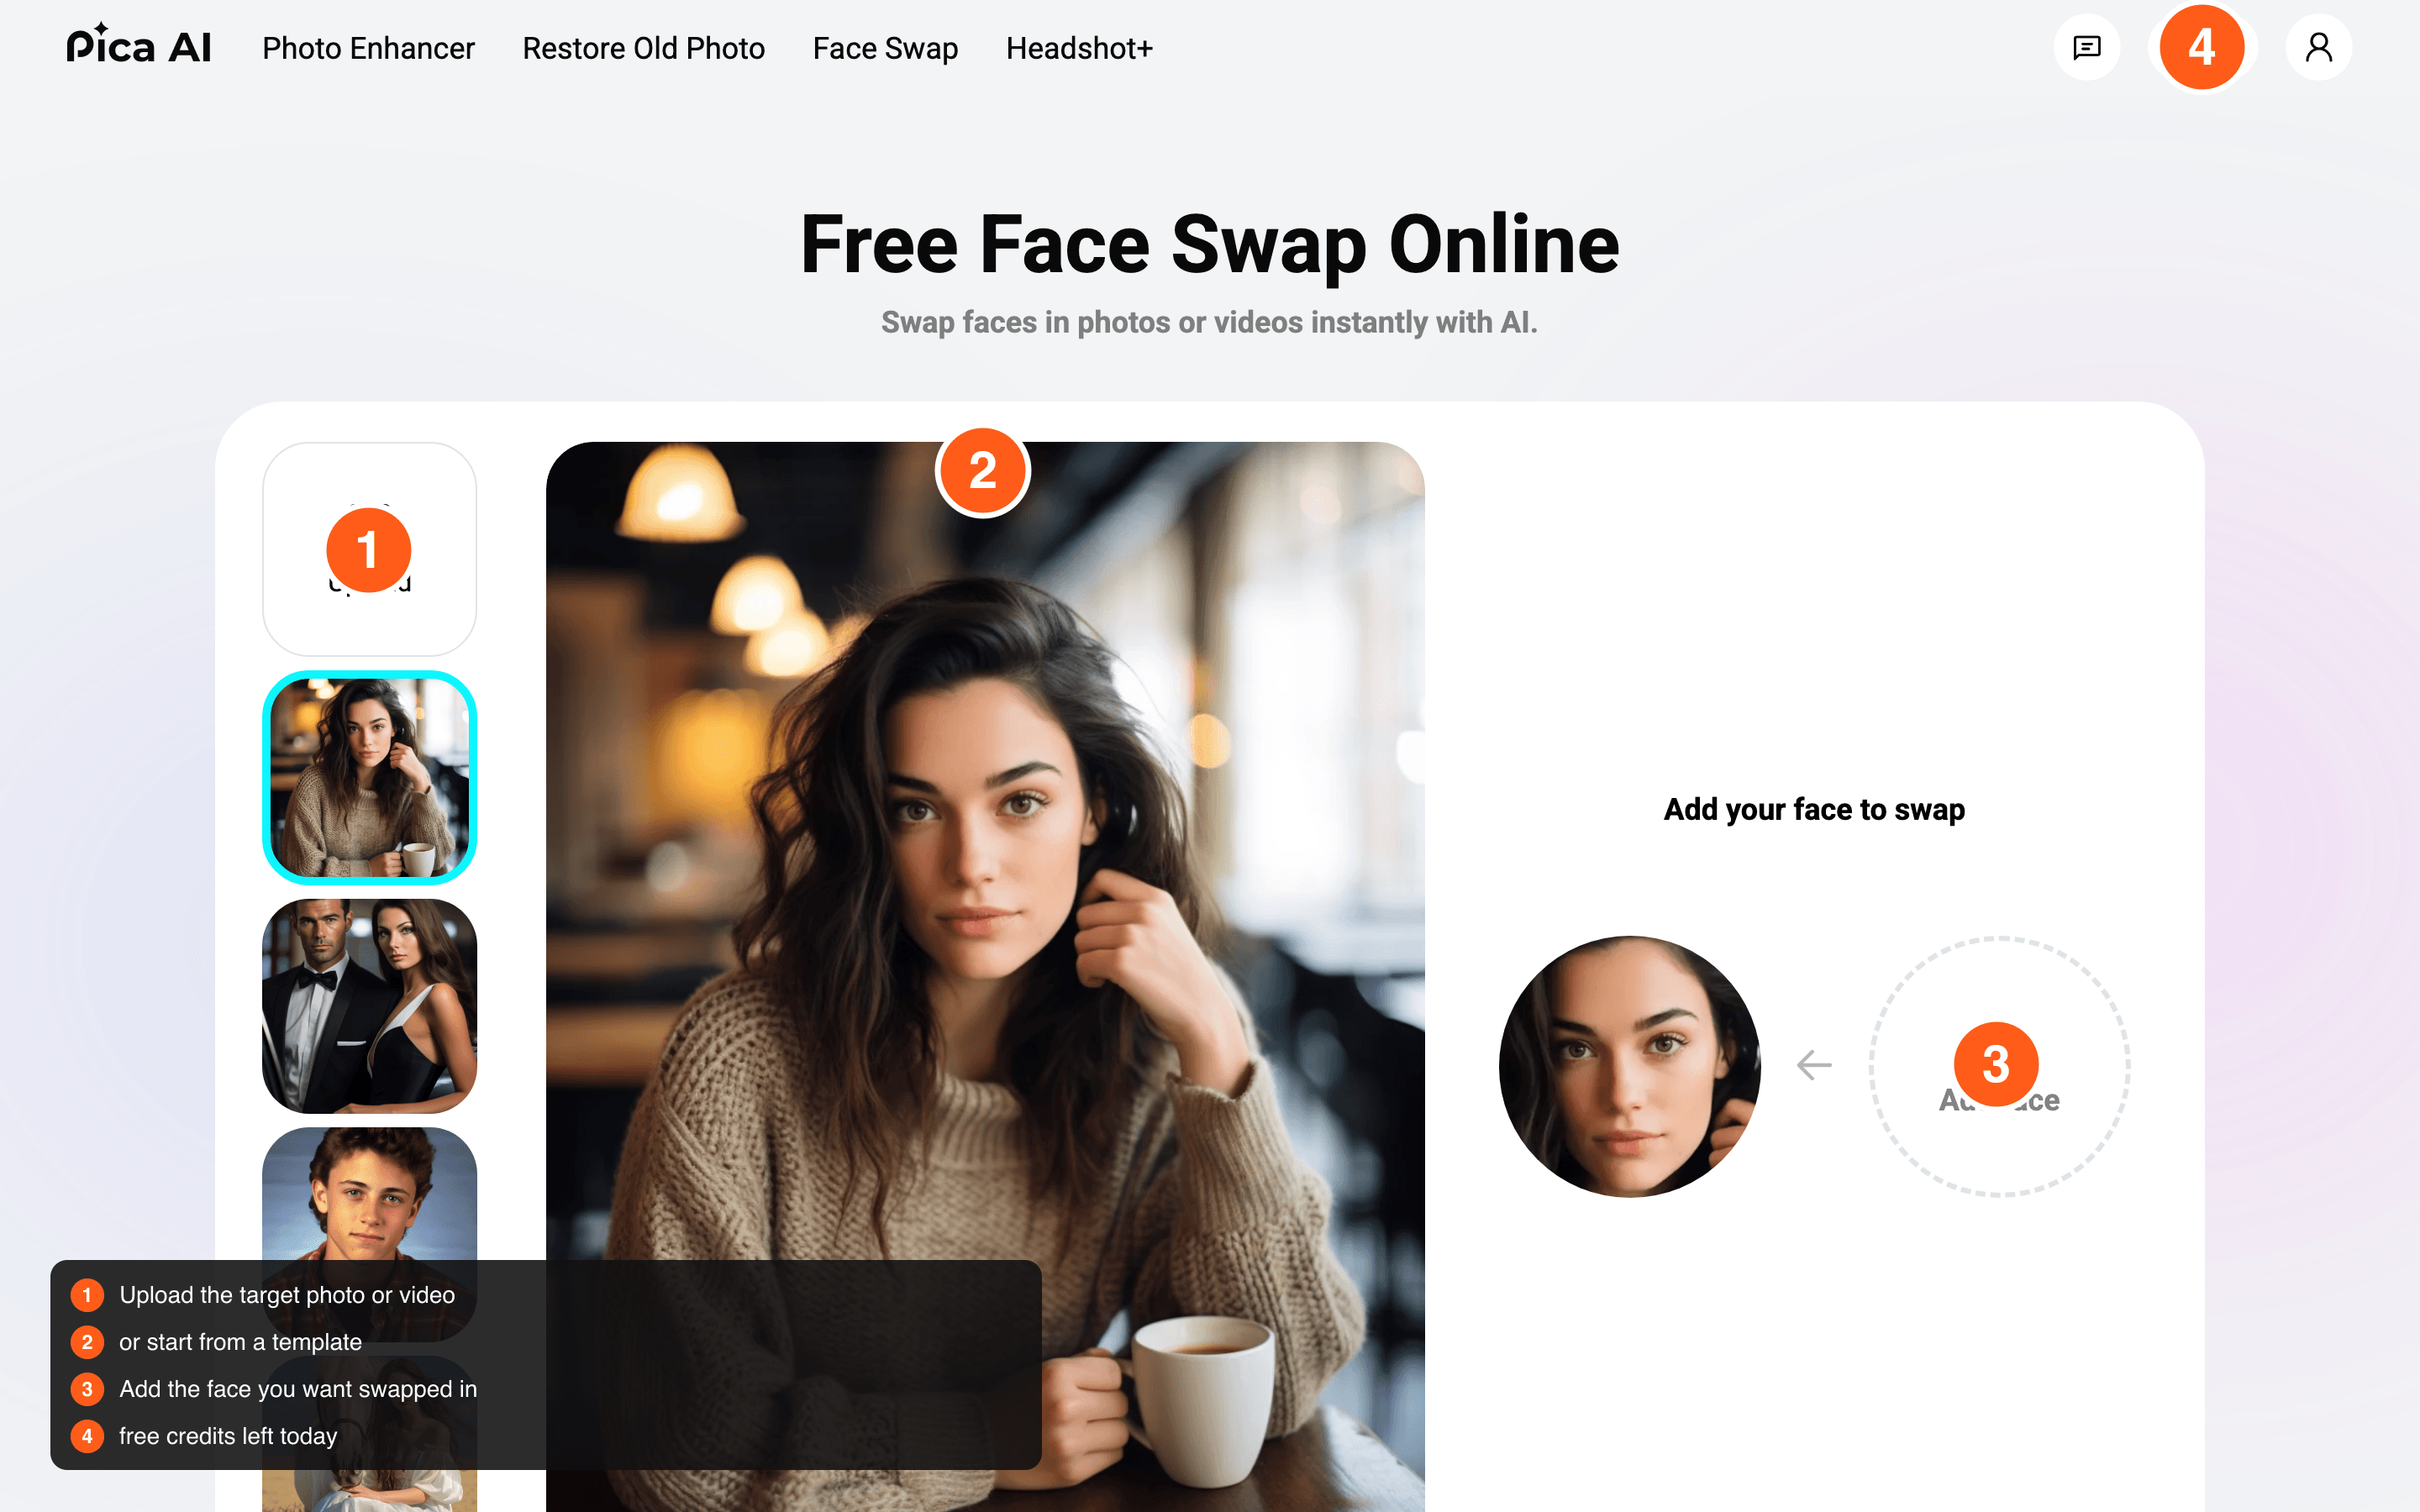 The Pica AI face swap page with numbered callouts marking the upload area, the template strip, the add-face control and the free credit counter
The live Pica AI face swap page. Note the credit counter top right, that is your daily free allowance.
Multi-face group photos are the feature that impresses people most, and it does work. Their own before/after example puts new faces on an entire lineup at once. 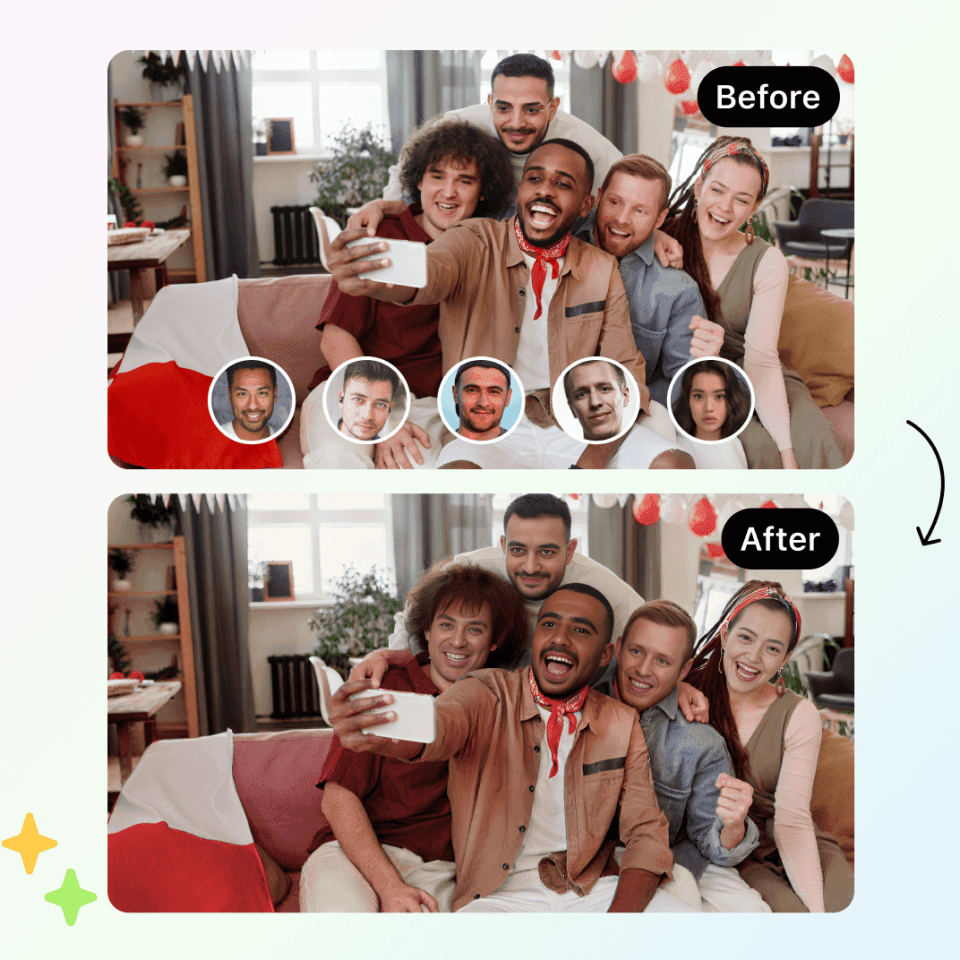 Pica AI multi-face before and after example replacing five faces in a single group photo
Image: Pica AI, multi-face example
About "free": there are daily free credits for trial use, which the site confirms. The counter in my own page header sat at 4. Everything past that gets vague fast. Pica does not publish an open pricing page as of writing, and the specifics people quote about the free tier come from third-party reviews rather than official docs. Those reviews consistently report the same two things: exports carry a watermark and resolution is capped on the free plan. Treat any dollar figure you see repeated in listicles as unverified and check the checkout page yourself.
Where Pica AI Video Face Swap Falls Apart, and the Stack That Fixes It
Three walls, in the order you hit them.
Wall one: the export. A watermark across your punchline is not a cosmetic issue on a meme. The meme is the punchline. Capped resolution has the same effect, quietly, when you crop.
Wall two: the wait. Pica's official language is that video processing time varies with length and complexity, and you do not need to stay online. That is a polite way of saying it can be a while. If you were hoping to iterate on a joke five times in ten minutes, video face swap is the wrong tool shape entirely.
Wall three, and this is the real one: it pastes, it does not fuse. A one-click swapper replaces the face region. It does not relight the new face to match the scene's key light, and it does not re-add the film grain it just smoothed away. On a modern flat-lit selfie target you never notice. On a 1980s film still with hard practical light, visible grain, and an extreme facial expression, it is the only thing you notice. 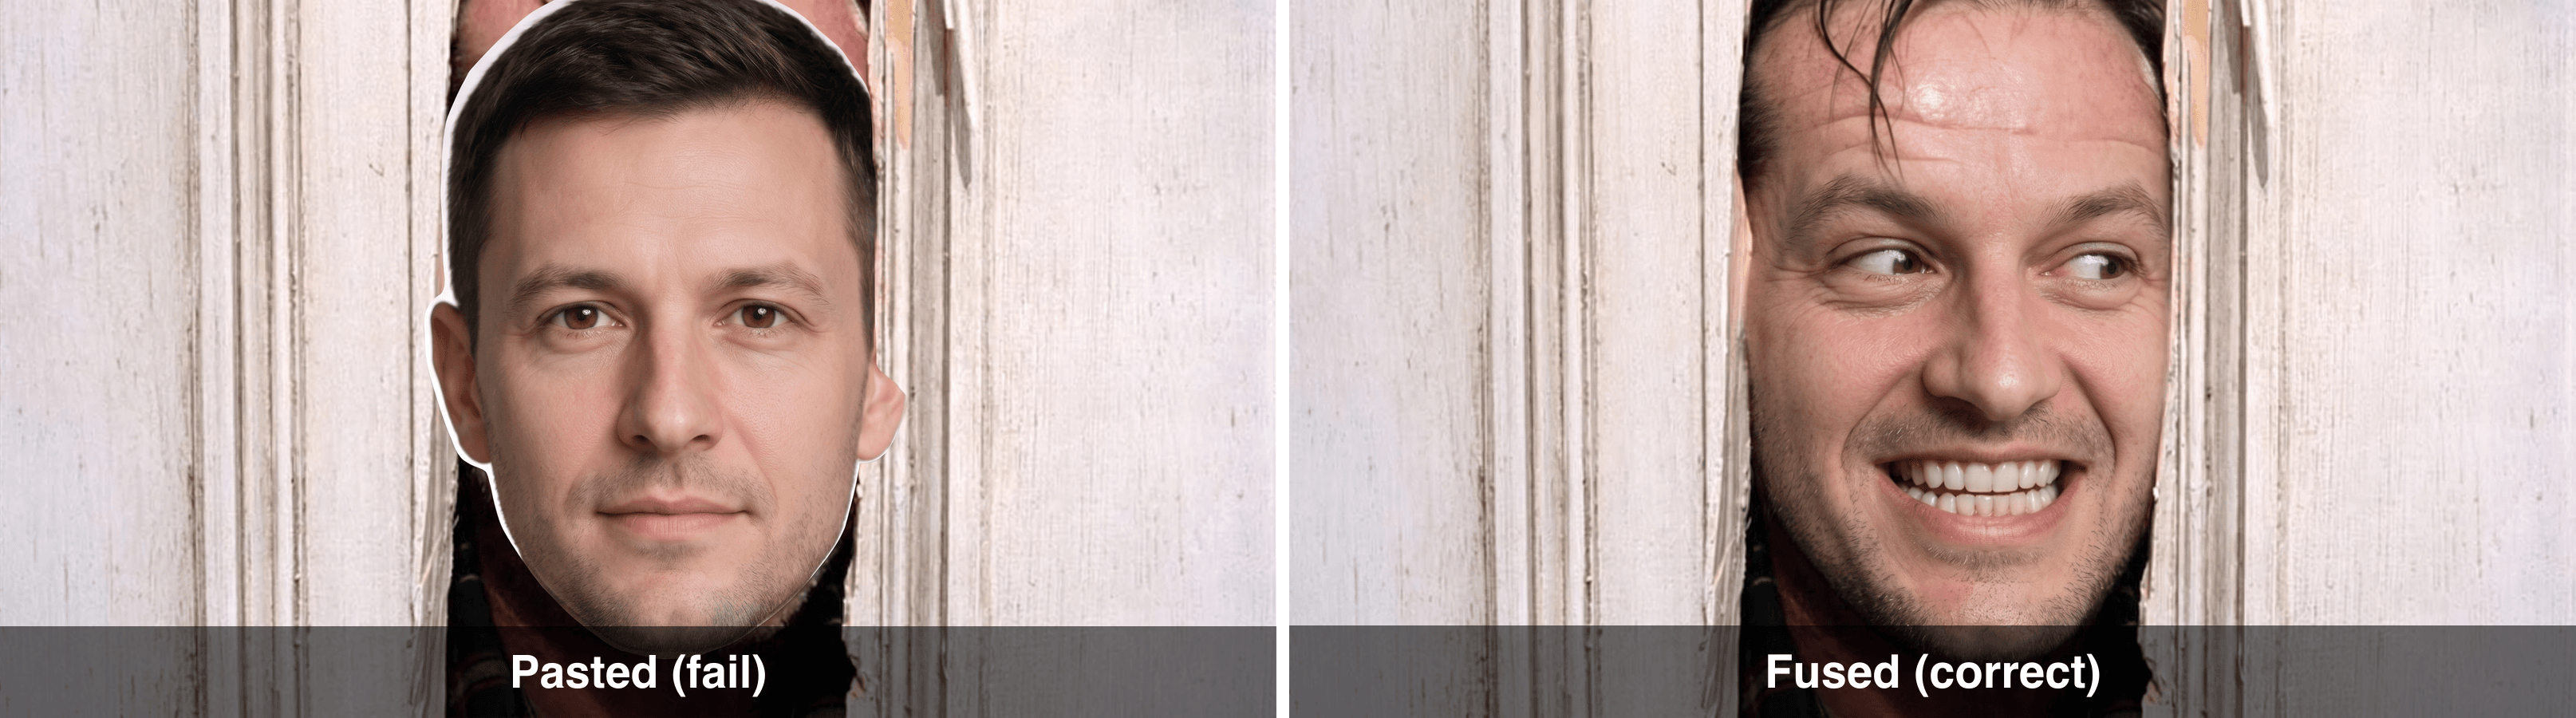 Left, a face pasted onto the film still as a flat cutout with hard edges. Right, the same face properly fused with matched grain and lighting
I made the left image on purpose, by asking an edit model to paste a flat cutout with a hard edge and no blending. The right one is the same two source images with a prompt that carries a keep-list. Identical inputs. The difference is entirely in what you told the model to preserve.
That is the actual insight here. You do not need a better swap button. You need an image editing model, and you need to tell it what not to touch.
So here is the stack. Three runs, one browser tab, in this order:
- Get a face. Either use a selfie, or generate a consistent one so the tutorial is reproducible.
- Fuse it into the original still with an edit model that accepts two reference images and respects a keep-list.
- Animate five seconds with an image-to-video model, then convert the MP4 to a GIF locally.
Every model below runs in the same playground on Atlas Cloud, which is where I ran all of this. The metered models are one half of the shelf; the other half is the AI tools page, a collection of free, fixed-function utilities that includes the free AI face swap this article circles back to after the chain. Prices below are per run, pulled from each model page and re-checked in August 2026.
| Step | Model | Job | Output | Price (July 2026) |
|---|---|---|---|---|
| 1 | Seedream v5.0 Pro (text-to-image) | Generate the source face | 2K still | $0.045 per image at 2K, with a 20% promo rate showing in the catalogue |
| 2 | Nano Banana 2 Edit | Fuse the face into the film still | 2K still | $0.12 at 2K ($0.08 at 1K, $0.16 at 4K) |
| 3 | Kling v3.0 Turbo (image-to-video) | Animate 5 seconds | 720p MP4 | $0.095 per second, down from $0.112 (15% off) |
| 4 | Any LLM, e.g. DeepSeek V4 Pro | Write the ffmpeg command | Text | Token-priced, effectively nothing |
One thing to be upfront about: none of these image or video models accept or return GIF. Step 4 is a local ffmpeg pass. The LLM just writes the command for you.
Step 1: Get a Clean Source Face
If you have a decent front-lit selfie, skip the generation and use it. It will work as well or better. I generated one so that anyone can reproduce this article exactly.
Open the Seedream v5.0 Pro text-to-image page and paste this:
plaintext1Head-and-shoulders portrait photograph of a 34-year-old man with short dark 2brown hair, light stubble and brown eyes, neutral closed-mouth expression, 3looking straight into the camera. Even soft studio lighting, plain light grey 4background, sharp focus on the face, natural skin texture with visible pores. 5No glasses, no hat, no jewellery. Photorealistic, 85mm lens.
Settings: Size 2048x1152 (the 16:9 default is fine, 1:1 works too), Output Format jpeg, Thinking enabled, one image. Framing barely matters here because the next model reads this purely as an identity reference, not as a composition. What matters is that the face is front-on, evenly lit and unobstructed. 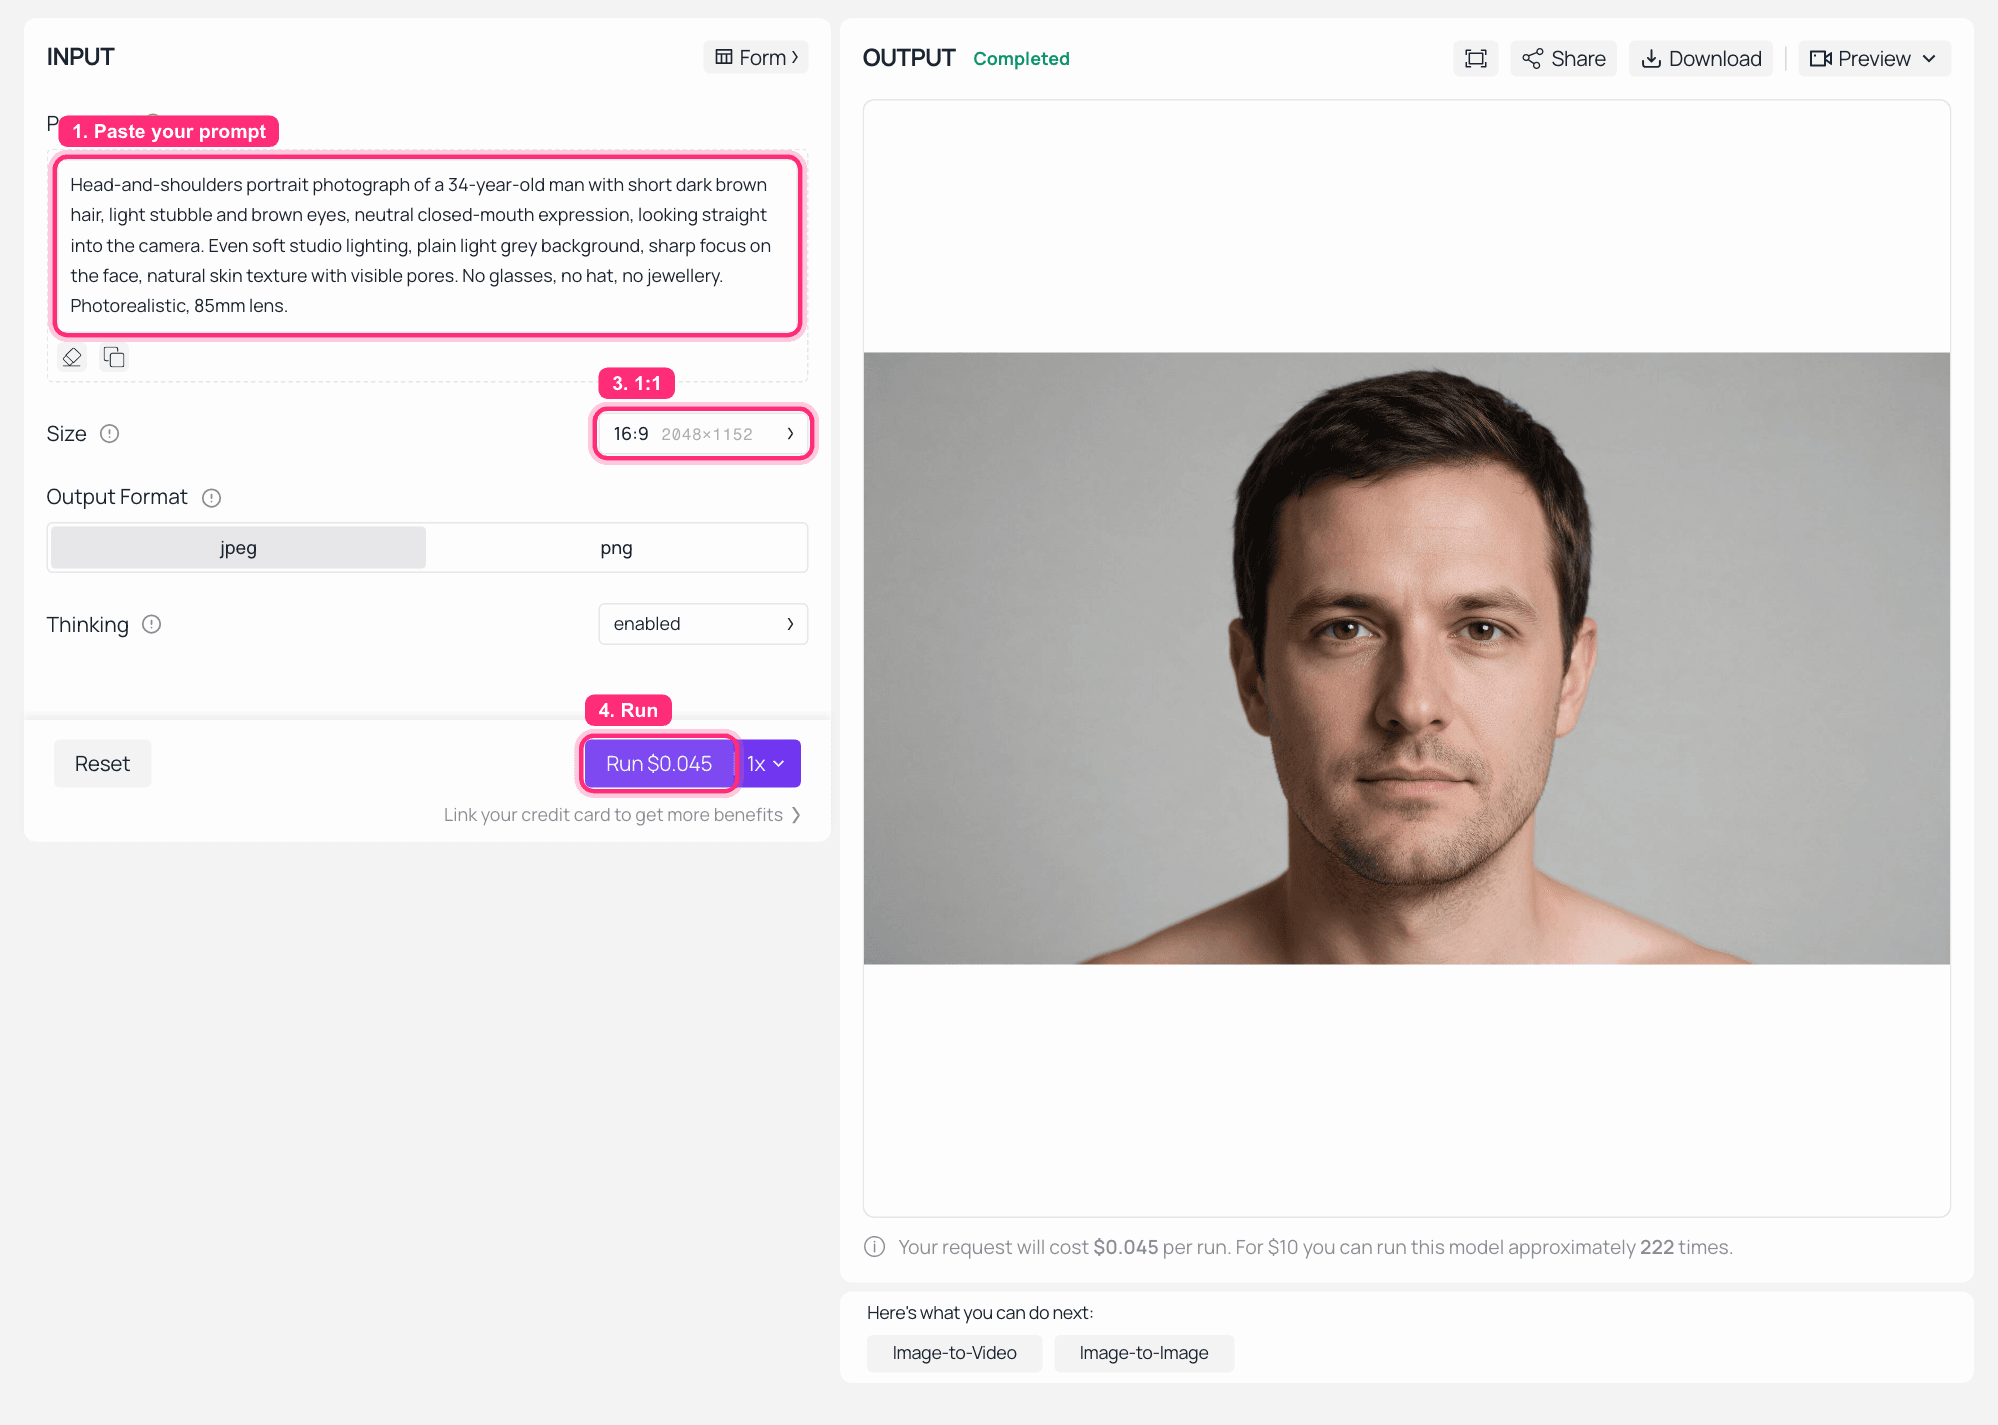 Seedream v5.0 Pro text-to-image playground on Atlas Cloud with the portrait prompt filled in and the finished 2K face on the right
Seedream v5.0 Pro on Atlas Cloud: prompt on the left, the generated source face in OUTPUT.
Swap out the age, hair and build description and you can spin up a whole cast of consistent source faces from the same prompt skeleton. Worth checking the catalogue price before you batch: this model is the one currently carrying a 20% promo rate.

Seedream 5.0 Pro discount banner from Atlas Cloud
Generated in Seedream 5.0 Pro.
Step 2: Fuse the Face Into the Real Film Still
This is the step that decides everything, and it starts with a download, not a generation.
Grab the actual still: https://i.imgflip.com/19rnx5.jpg at 1600x900. Do not let a model draw you a lookalike of a famous scene. An AI recreation of the Here's Johnny door is not the Here's Johnny door, people clock it instantly, and the recognition is the joke.
Open the Nano Banana 2 Edit page, upload the film still and your face from Step 1, and paste this:
plaintext1Image 1 is a 16:9 film still: a man's face pushed through a jagged hole he has 2smashed in a white painted wooden door, eyes rolled hard to the left, eyebrows 3raised, teeth bared in a wide manic grin, dark hair damp and messy, a plaid 4shirt collar just visible at the bottom. Image 2 is a studio portrait of a 5different man. 6 7Edit Image 1 in place: perform a complete head swap so the man in the doorway 8now has the face and identity of the man in Image 2. This identity change is 9required, do not keep the original man's face. The new face must stay fully 10human, with his own eyes, nose and mouth, and must wear the exact same 11expression: eyes rolled hard to the left, eyebrows raised, teeth bared in the 12same wide manic grin. 13 14Keep the splintered white door, the jagged hole, the plaid collar, the damp 15messy hair, the head angle, the flat 1980s film lighting and the original film 16grain exactly unchanged. Fully fuse the new face into the shot, match the same 17grain, softness and colour cast, do not clean up or sharpen the image, and do 18not produce a pasted cut-out or sticker look. 19 20Output only the single edited film still. No diptych, no before-and-after.
Settings: resolution 2K, leave aspect ratio empty so it inherits the still, two reference images.
Two things make or break this prompt. First, the line "this identity change is required". Without it the model frequently decides you wanted a light retouch and hands back the original face. Second, the keep-list. Every element you do not name is an element the model feels free to improve, and "improve" means clean, sharp, modern, and completely wrong for a 1980s frame.
Also worth knowing: playground image slots are numbered in upload order, so referring to "the film still" and "the portrait" rather than trusting slot numbers is the more stable habit. 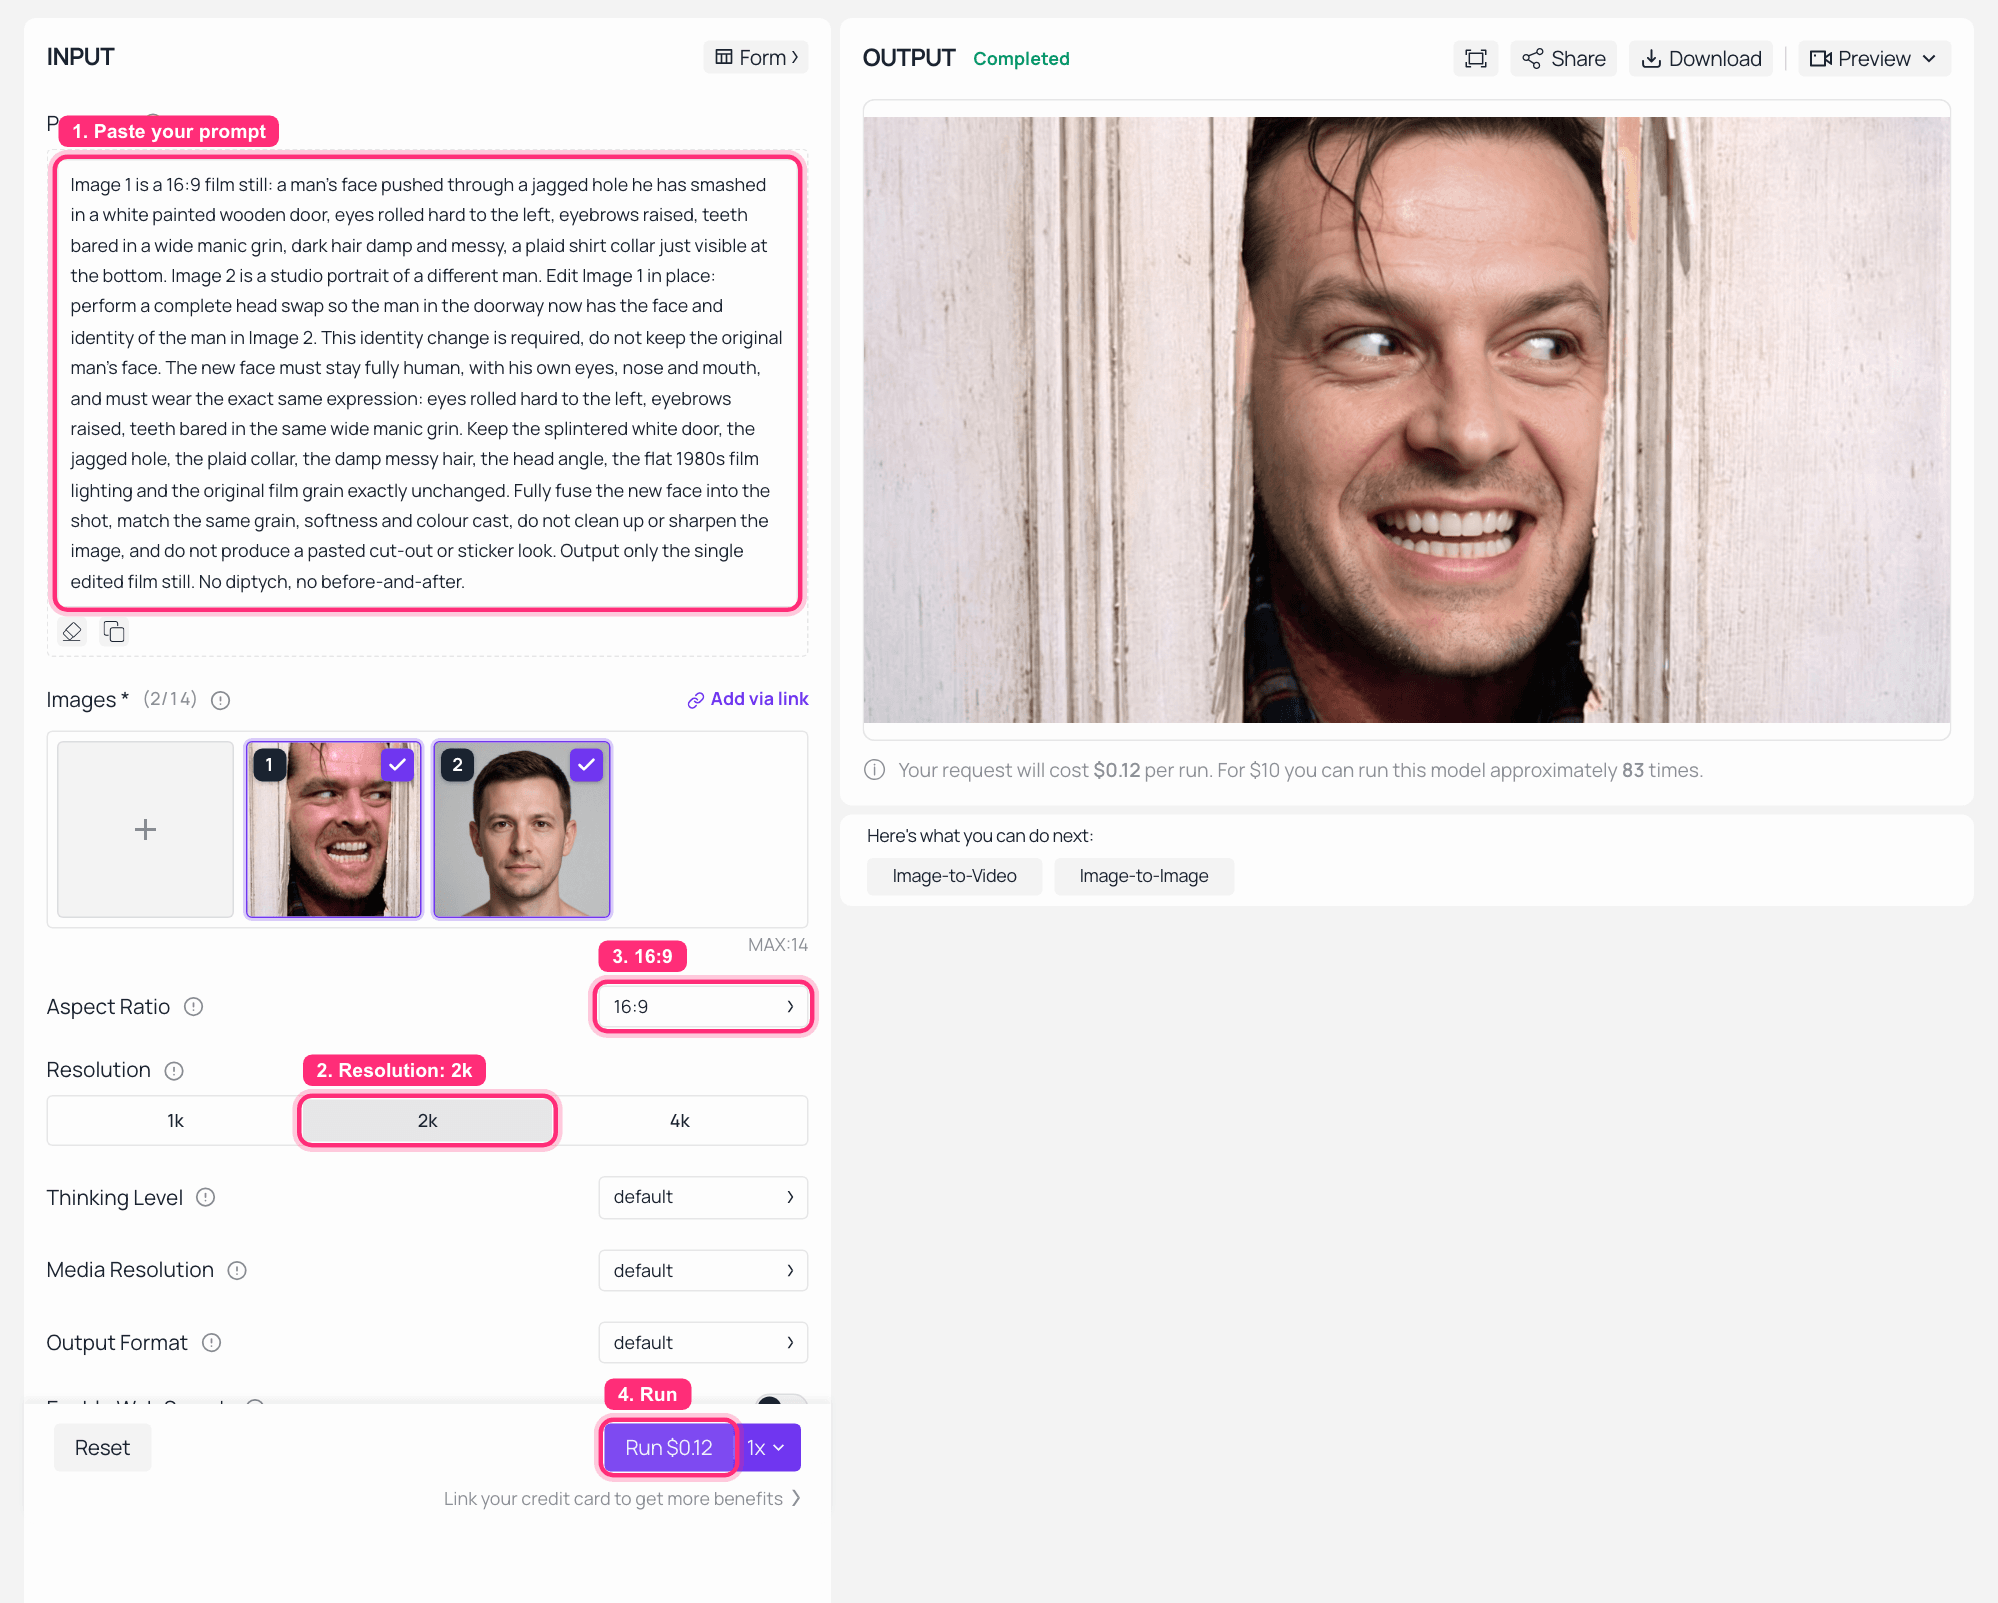 Nano Banana 2 Edit playground on Atlas Cloud with the film still and the portrait loaded as references and the fused result in OUTPUT
Nano Banana 2 Edit on Atlas Cloud: both references loaded, the fused still on the right.
One face per run. If a scene has two people you want swapped, that is two runs. Asking one edit pass to handle two identities reliably produces one good face and one melted one.
Step 3: Animate It and Export a Looping GIF
Take the fused still from Step 2 into Kling v3.0 Turbo image-to-video.
plaintext1The man keeps his face pressed through the jagged hole in the splintered white 2door. He tilts his head slowly to the left, his eyes dart once toward the 3camera, and his manic grin widens. Locked-off static camera, no zoom, no pan. 4Keep the same face, the same plaid shirt, the same white door, the same dim 51980s film lighting and grain. No new characters, no scene change, no restyling.
Settings: duration 5s, resolution 720p, one input image. Five seconds is the right length for a loop and keeps the run cheap. Locked-off camera language matters more than it sounds; without it the model will invent a slow push-in and break the flat theatrical framing. 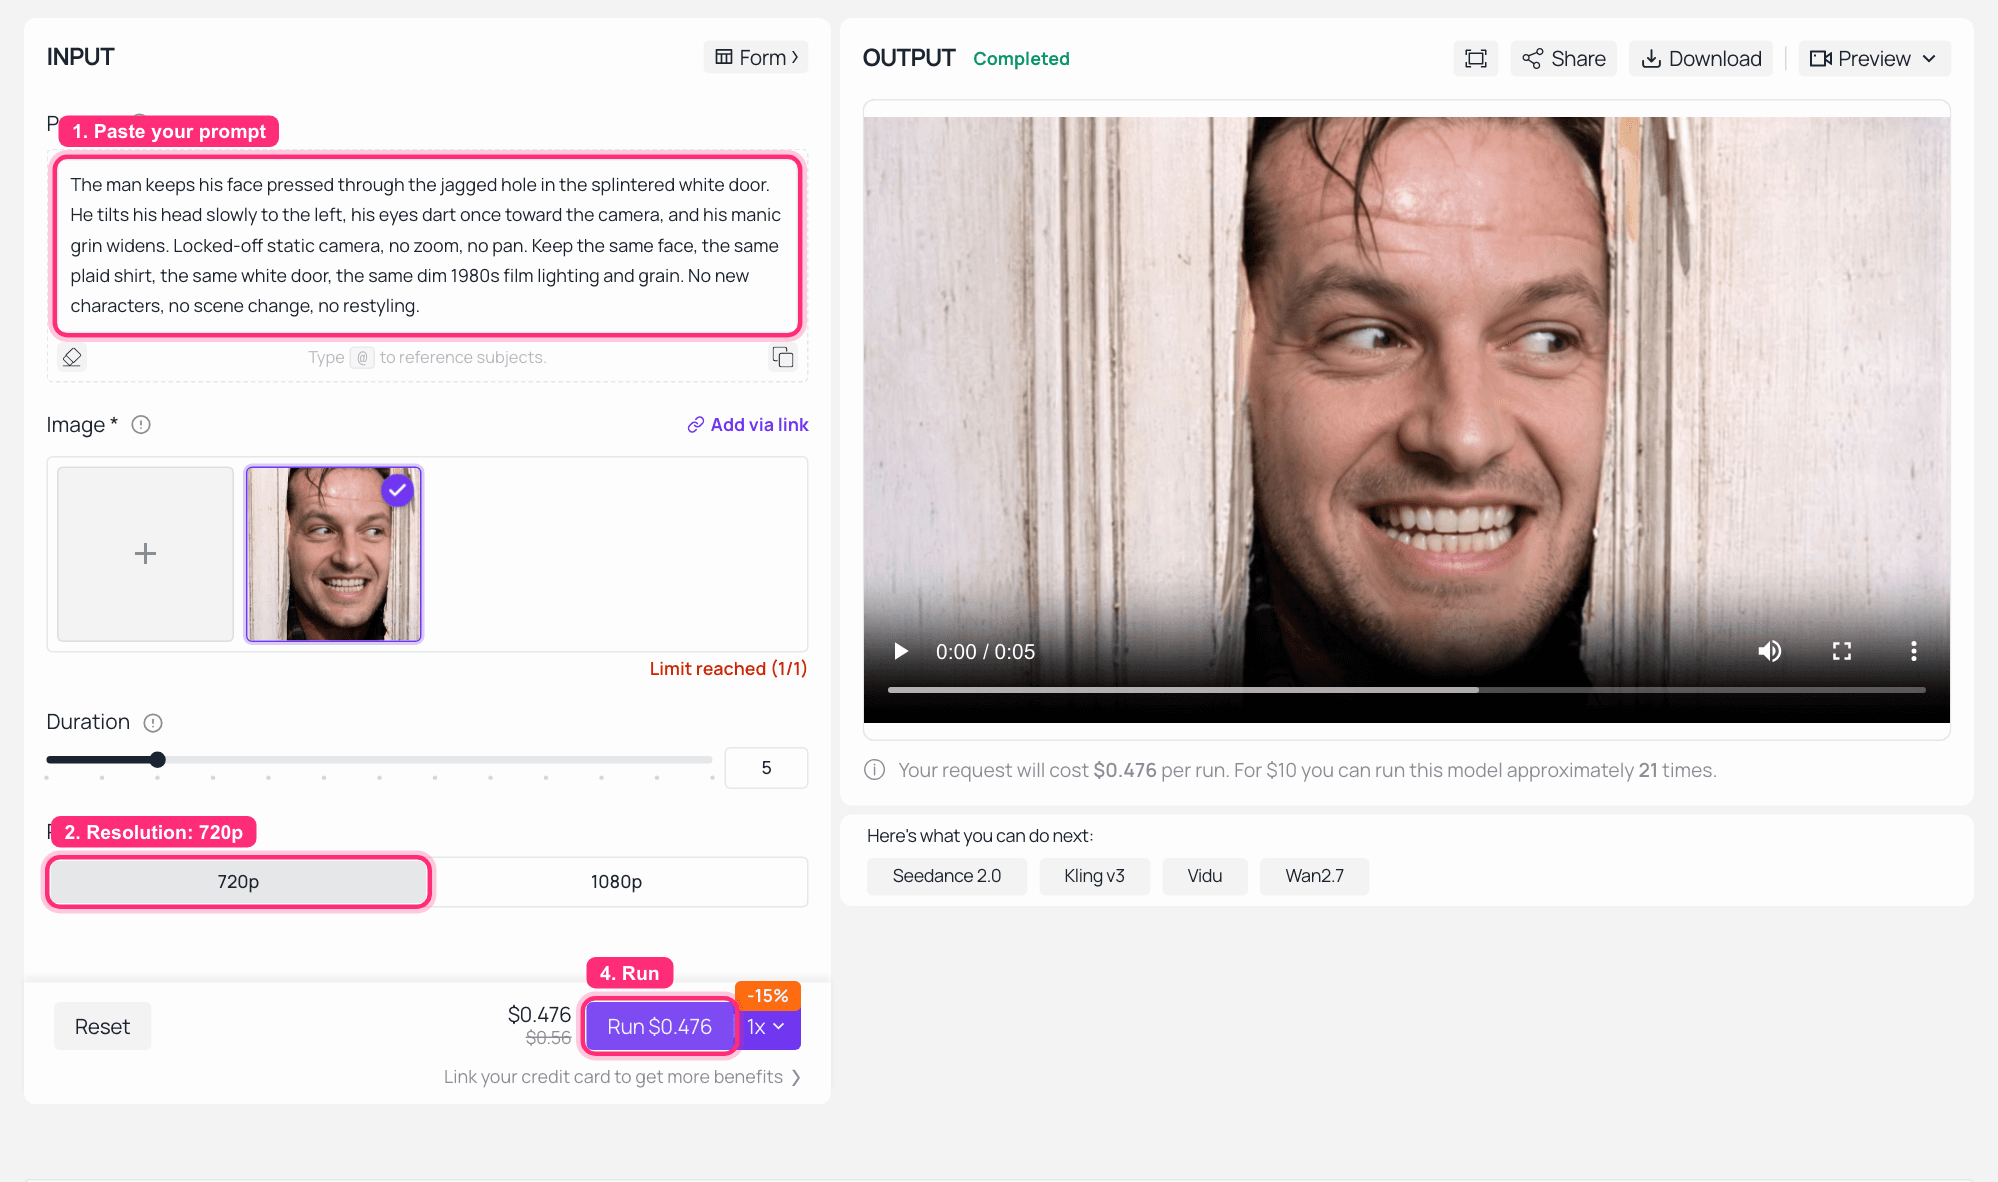 Kling v3.0 Turbo image-to-video playground on Atlas Cloud with the fused still loaded and the finished five second clip in OUTPUT
Kling v3.0 Turbo on Atlas Cloud: the fused still in, a finished 5 second clip out.
Be honest with yourself about what happens here. Video models re-render the face every frame, so features drift slightly across five seconds. Ship the still as your hero image and treat the clip as the bonus, not the other way around. 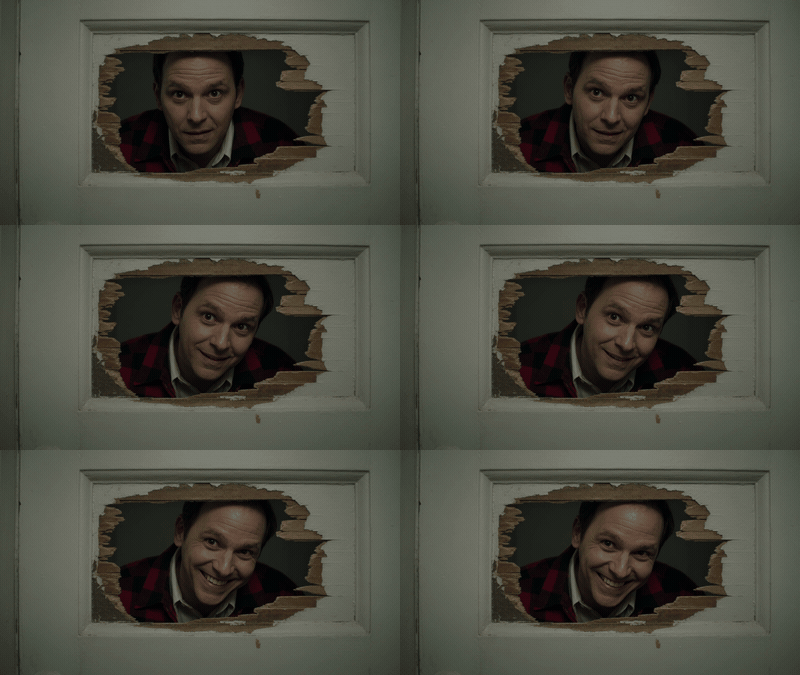 Animated GIF of the fused face swap in the smashed door, head moving and grin widening
The GIF, and a useful reality check. This run pulled the framing wider than the still I fed it and softened the grin. Same prompt, same input, different roll of the dice.
Last step, MP4 to GIF. Neither model touches GIF, so this runs locally. Paste this into any LLM to get the command:
plaintext1I have a 5-second 1280x720 MP4 at ./swap.mp4. Give me a single ffmpeg command 2that converts it into a looping GIF under 5 MB: two-pass palettegen / 3paletteuse, 400px wide, 12 fps, 128 colours, bayer dithering, infinite loop. 4Return only the command, no explanation.
Two-pass palette generation is not optional. Single-pass GIF conversion is where clean film grain turns into colour-banded mud.
Four more scenes worth stealing. Same chain, same prompt skeleton, different keep-list. Confused Travolta lives entirely in the shoulders and the swivelling head, so keep the pose, the long coat and the dim apartment. Salt Bae is all wrist and elbow, so the face can be calm as long as the arm and the falling salt stay theatrical. Ancient Aliens needs the hair, the raised hands and that low-res broadcast texture, and it is funnier the more the face refuses to explain itself. Absolute Cinema needs the black-and-white grade and the open palms, and it is still an active format (Know Your Meme, 2026).
One caution from doing this for real: the edit model refused the DiCaprio-pointing-at-the-TV frame outright with a rights-infringement block, so I swapped in Ancient Aliens instead. Some recognisable frames get screened. When that happens, pick the next scene rather than trying to prompt your way around it. 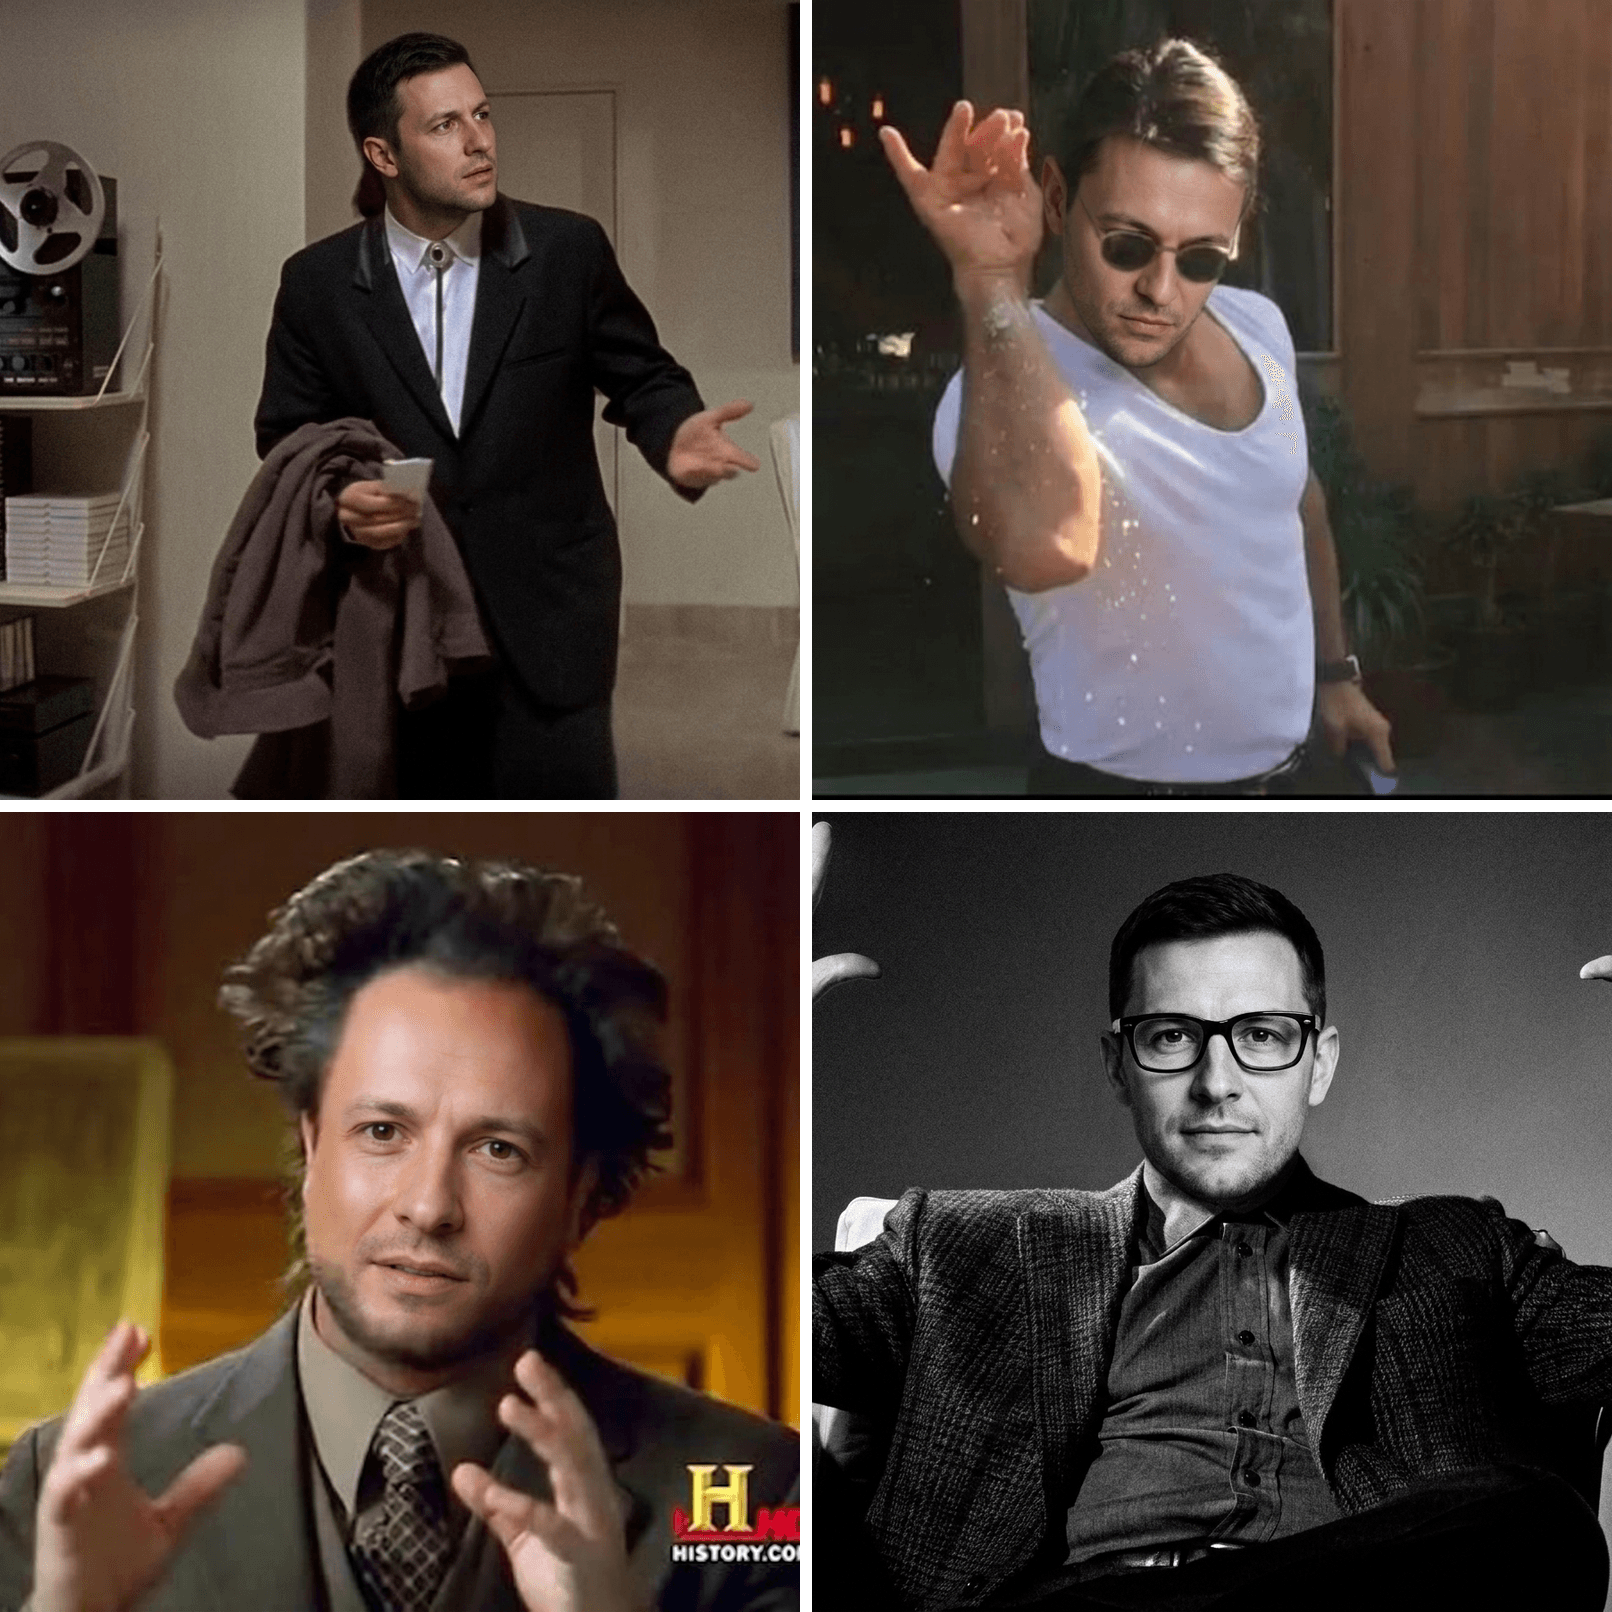 Two by two grid of four fused movie and TV face swaps: Confused Travolta, Salt Bae, Ancient Aliens, and Absolute Cinema
What a full run actually costs. Three paid runs, one still and one clip, no subscription, no queue.
| Pica free tier | This three-run chain | |
|---|---|---|
| Watermark on export | Yes, per third-party reviews | No |
| Export resolution | Capped on free plans | 2K still, 720p clip |
| Multiple faces in one image | Up to 3 (5 detected in video) | One per run, unlimited runs |
| Keeps original film grain and lighting | No, smooths and relights | Yes, if the prompt says so |
| Clip length control | Whole source video | Exact, 5s here |
| GIF export | Built in | Local ffmpeg pass |
| Cost per full run | Free tier, then unclear | $0.045 + $0.12 + $0.476 = about $0.64 |
| Batchable via API | No | Yes |
If you want to trim that further, the model pages above carry the levers: Nano Banana 2 at 1K instead of 2K brings the fuse run down by a third, and there is a discounted developer tier if you are running volume.
Eight Seconds, Zero Watermark: The Free Atlas Face Swap
There is also a third answer to that cost row, and it is $0. This article opened with four minutes and a diagonal watermark across the teeth; here is the eight-second version with neither. Atlas Cloud's free AI face swap tool runs the same promptless job Pica does — target photo in one slot, face photo in the other, swap — and its own FAQ answers the money question with a plain yes: free, no usage cap, no watermark. No counter sitting at 4, either.
The door scene is the friendly kind of test case: exactly one face in frame, so the one-face-per-run rule costs you nothing. Drop the same 1600x900 imgflip still into the target slot and the Step 1 portrait — or your own selfie — into the face slot. Instead of a prompt you get two sliders, Blend and Feather, and on splintered wood and 1980s grain, widening Feather is what keeps the jawline from reading as a sticker edge.
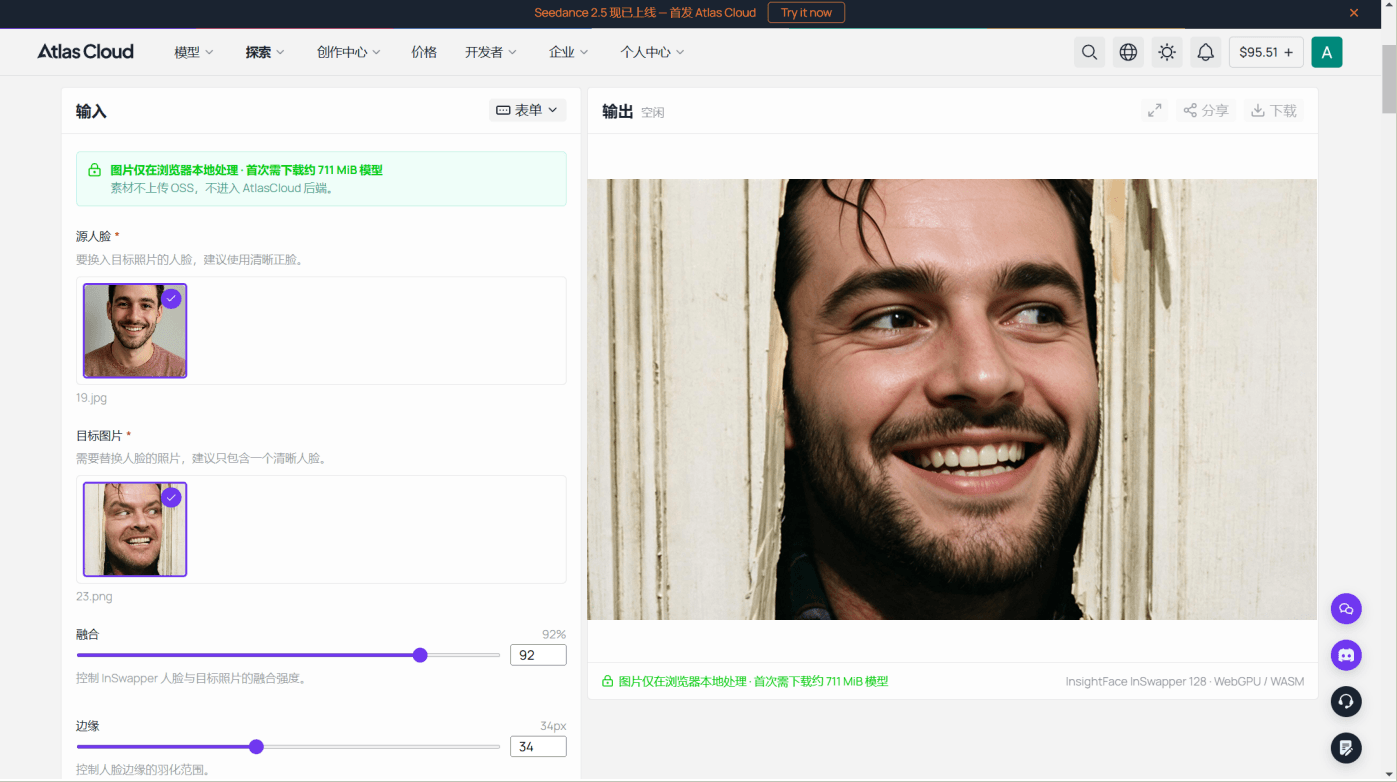
Honesty about where it sits in the chain: it is a swap, not a keep-list fusion. It will not re-add grain or relight the face the way the Step 2 prompt does, and output tops out at 1280 pixels on the longest side, below the 2K still Nano Banana returns. But retries cost nothing: if the plain swap already survives your group chat, you are done for $0 instead of $0.64, and if the sticker tells show up, Step 2 is the fix. Either way the winning still feeds Step 3.
The fair-use line, briefly, and it covers the free lane too. Swap your own face or a face you have permission to use. Film stills belong to their studios, and memeing or commentary is a very different thing from putting a studio's frame in a paid ad, so keep it in the first bucket. Do not use any of this to impersonate a real person or to get past identity verification, which is precisely the abuse pattern that iProov number describes. Video models also screen recognisable IP and will sometimes redraw or refuse a prompt.
Pica AI Face Swap FAQ
Is Pica AI face swap free, and does the free version watermark exports?
There are daily free credits for trial use. Pica does not publish an open pricing page as of writing, and third-party reviews consistently report that free exports carry a watermark and capped resolution. Verify the current terms on the checkout page before paying.
How long does Pica AI video face swap take?
Pica's official position is that photos take seconds and videos may take minutes, with duration depending on length and complexity. You do not have to stay on the page. If you need fast iteration, swap a single frame and animate that instead of processing a whole video.
Why does my Pica AI face swap look like a pasted sticker?
Because one-click tools replace the face region without relighting it or restoring the scene's grain. The fix is an edit model with an explicit keep-list: name the grain, the lighting, the colour cast and the surrounding objects, and tell it not to sharpen or clean up.
Can Pica AI face swap work on a GIF?
Pica can export video results as GIF. The chain in this article gets there differently: swap a single frame, animate five seconds, then convert locally with ffmpeg, because these image and video models neither accept nor return GIF.
Is a Pica AI face swap of a movie scene legal?
Personal memes, jokes and commentary are generally fine. The still itself is still the studio's copyright, so avoid commercial use. Only swap faces you own or have permission to use, and never use a swap to impersonate someone or defeat identity verification.
Does the video model keep the exact same face as the swapped still?
No. Video models re-render facial features every frame, so expect slight drift over five seconds. Use the still from Step 2 as your final image and treat the clip as a bonus asset.





