Built-in TikTok and Instagram PS2 filter lenses ruin facial geometry. They act like flat digital stickers. Instead of rendering sharp polygon edges, rigid hair meshes, and unlit vertex textures, standard social AR cameras simply smudge your skin.
This two-stage pipeline converts any portrait into a playable sixth-generation console asset. You first turn a photo into a PS2 character using a low poly character generator, then animate a looping PS2 filter video. Your facial structure stays intact.
The Two-Stage PS2 Filter Workflow
| Stage | Core Action | What to Focus On |
| 1. Image Generation | Transform a portrait into a PS2-style character. | Facial resemblance, angular geometry, chunky hair, and consistent low-poly backgrounds. |
| 2. Video Generation | Animate the generated character using image-to-video models. | Character consistency, connected movements, camera behavior, and PS2-style visuals. |
Before writing a single prompt, you must account for sixth-generation console hardware constraints. Modern diffusion models default to smooth lighting and high-resolution pores unless your prompt explicitly enforces early-2000s polygon budgets and color limits. Hardware rules dictate every parameter.
The Visual Anatomy of an Authentic PS2 Filter Character
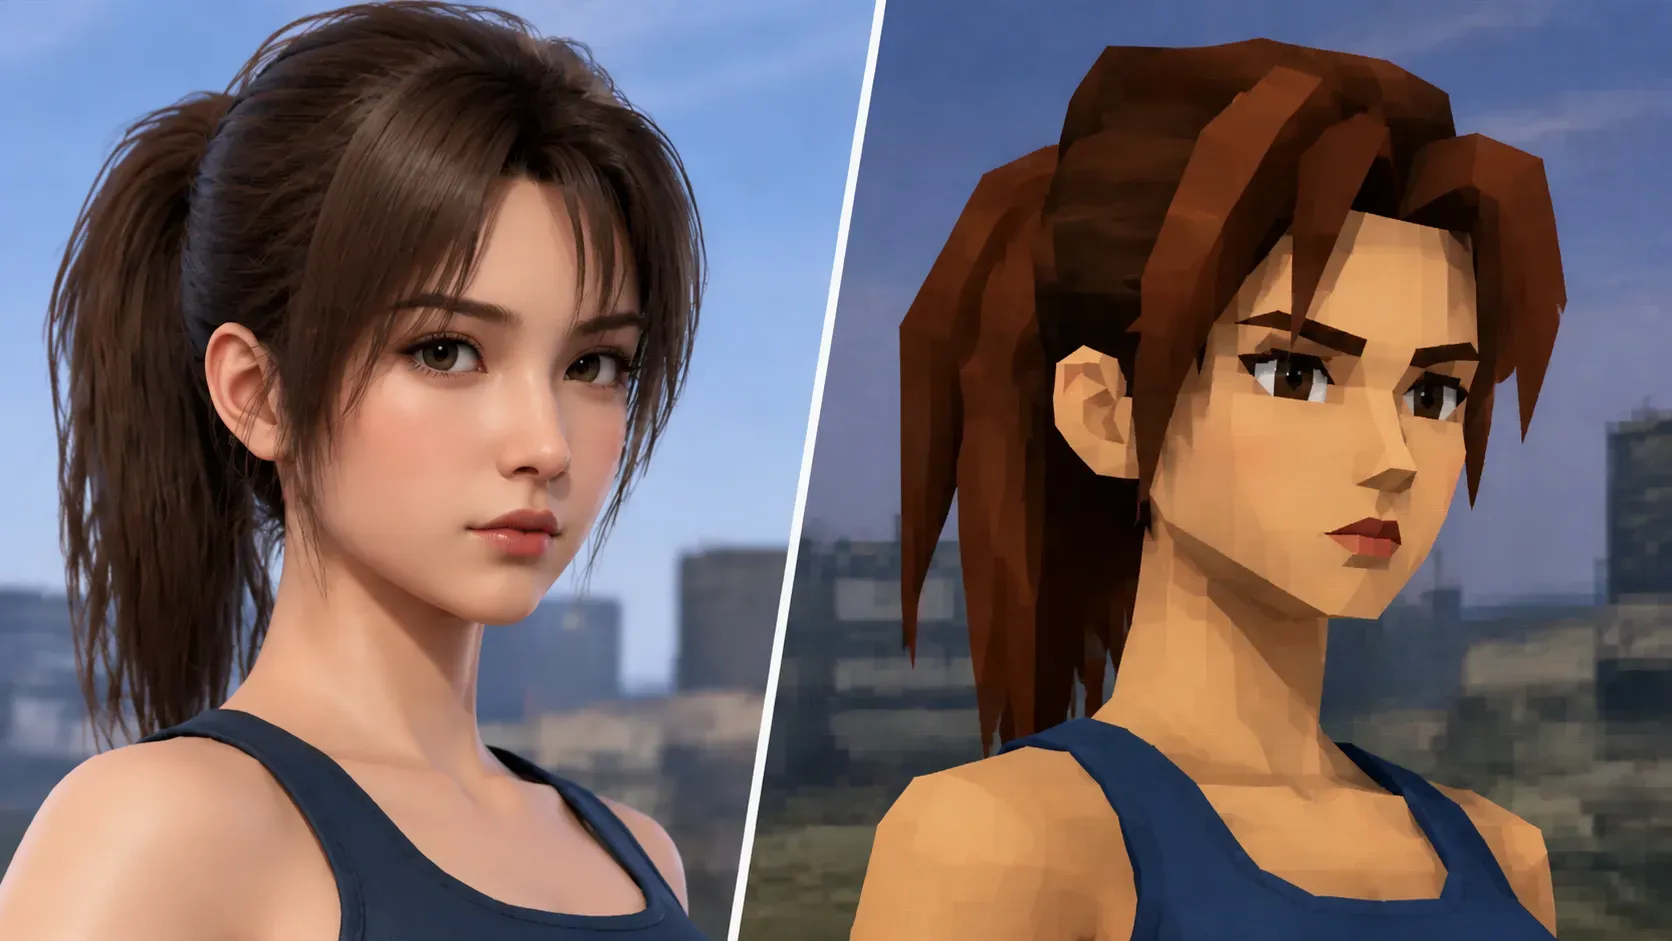
Typing "retro game" into a standard image generator usually produces glossy plastic skin over a neon grid. Geometry fails immediately. The PS2’s Graphics Synthesizer capped main characters at 3,000–5,000 triangles.
Core Hardware Constraints
- Polygon Budgeting: Unable to render individual strands, PS2-era artists built hair from solid chunks with alpha cards.
- Shading and Lighting: To nail the PS2 look, strip modern lighting like ray tracing and SSS down to crunchy Gouraud vertex shading.
- Output Resolution: Capped at 480i or 480p, original signals produced visible dithering and faint CRT scanlines.
Generic AI Filters vs. Authentic PS2 Rendering
| Visual Attribute | Generic Mobile AI Filter | Authentic PS2 Character Mesh |
| Facial Geometry | Smooth, high-poly curves | Sharp, angular 3,000-triangle facets |
| Hair Structure | Fine, blurred strands | Solid block cards with stiff edges |
| Surface Lighting | Soft ambient occlusion | Baked flat textures and Gouraud shading |
| Display Output | Clean 1080p digital canvas | 480i resolution with CRT scanlines |
Source lighting still matters. Even precise PS2 AI filter prompts fail when heavy shadows obscure the jaw. Flatten studio lighting and smooth out skin pores before running the low-poly pass.
Prepare Your Source Photo for Accurate Facial Likeness
Uploading a moody, dramatic portrait into a low poly character generator usually replaces your face with a generic stranger. Identity drift ruins the render. When heavy shadows hide half of your jawline, the diffusion model guesses the missing bone structure and overwrites your features.

Actionable Input Criteria
- Lighting Conditions: Shoot with directional front-flash or flat overcast daylight to establish a clean baseline. Heavy studio shadows confuse depth estimators, producing muddy, untextured polygon clusters.
- Framing and Expression: Crop tightly to a head-and-shoulders frame with a neutral expression; extreme camera angles break mesh symmetry when you turn a photo into a PS2 character.
- Resolution Hygiene: Downscale 4K smartphone selfies to 1024x1024 pixels before uploading. High-megapixel files force the denoiser to preserve modern skin pores instead of flat vertex planes.
Three Photo Mistakes That Trigger Identity Drift
| Source Photo Mistake | Model Failure Mode | Pre-Upload Fix |
| Dramatic Side Lighting | Shadowed cheeks collapse into black voids | Use direct front flash or even window light |
| Wide Full-Body Shot | Face receives too few pixels for sharp facets | Crop to a tight bust portrait |
| 4K Uncompressed RAW | Skin retains photorealistic pores and shine | Resize image to 1024px to flatten detail |
Clean geometry requires a clean reference. Once your cropped, flatly lit portrait is ready, load it into the diffusion engine and lock in your PS2 AI filter prompts.
Turn Your Photo Into a PS2-Style 3D Game Character
Most image diffusion models botch the PS2 aesthetic entirely. When fed retro gaming prompts, tools like FLUX and Seedream mistake early 3D console graphics for modern vector art, pasting flat origami facets onto photographic faces while leaving modern background textures untouched.
Core Positive and Negative Prompt Formulas
Paste these tested PS2 AI filter prompts into your generator to force sixth-generation console geometry:
plaintext1PlayStation 2 in-engine 3D cutscene portrait of [Subject description], 2001–2004 sixth-generation console graphics, RenderWare engine style. The entire scene converted into period-accurate 3D game level assets. Coarse 3D polygonal character mesh, blocky hair cards, compressed low-resolution diffuse bitmap textures wrapped over geometric facial bones, Gouraud vertex shading with simple baked lighting, authentic 480i NTSC CRT television scanlines, slight pixel dithering, aliased edges.
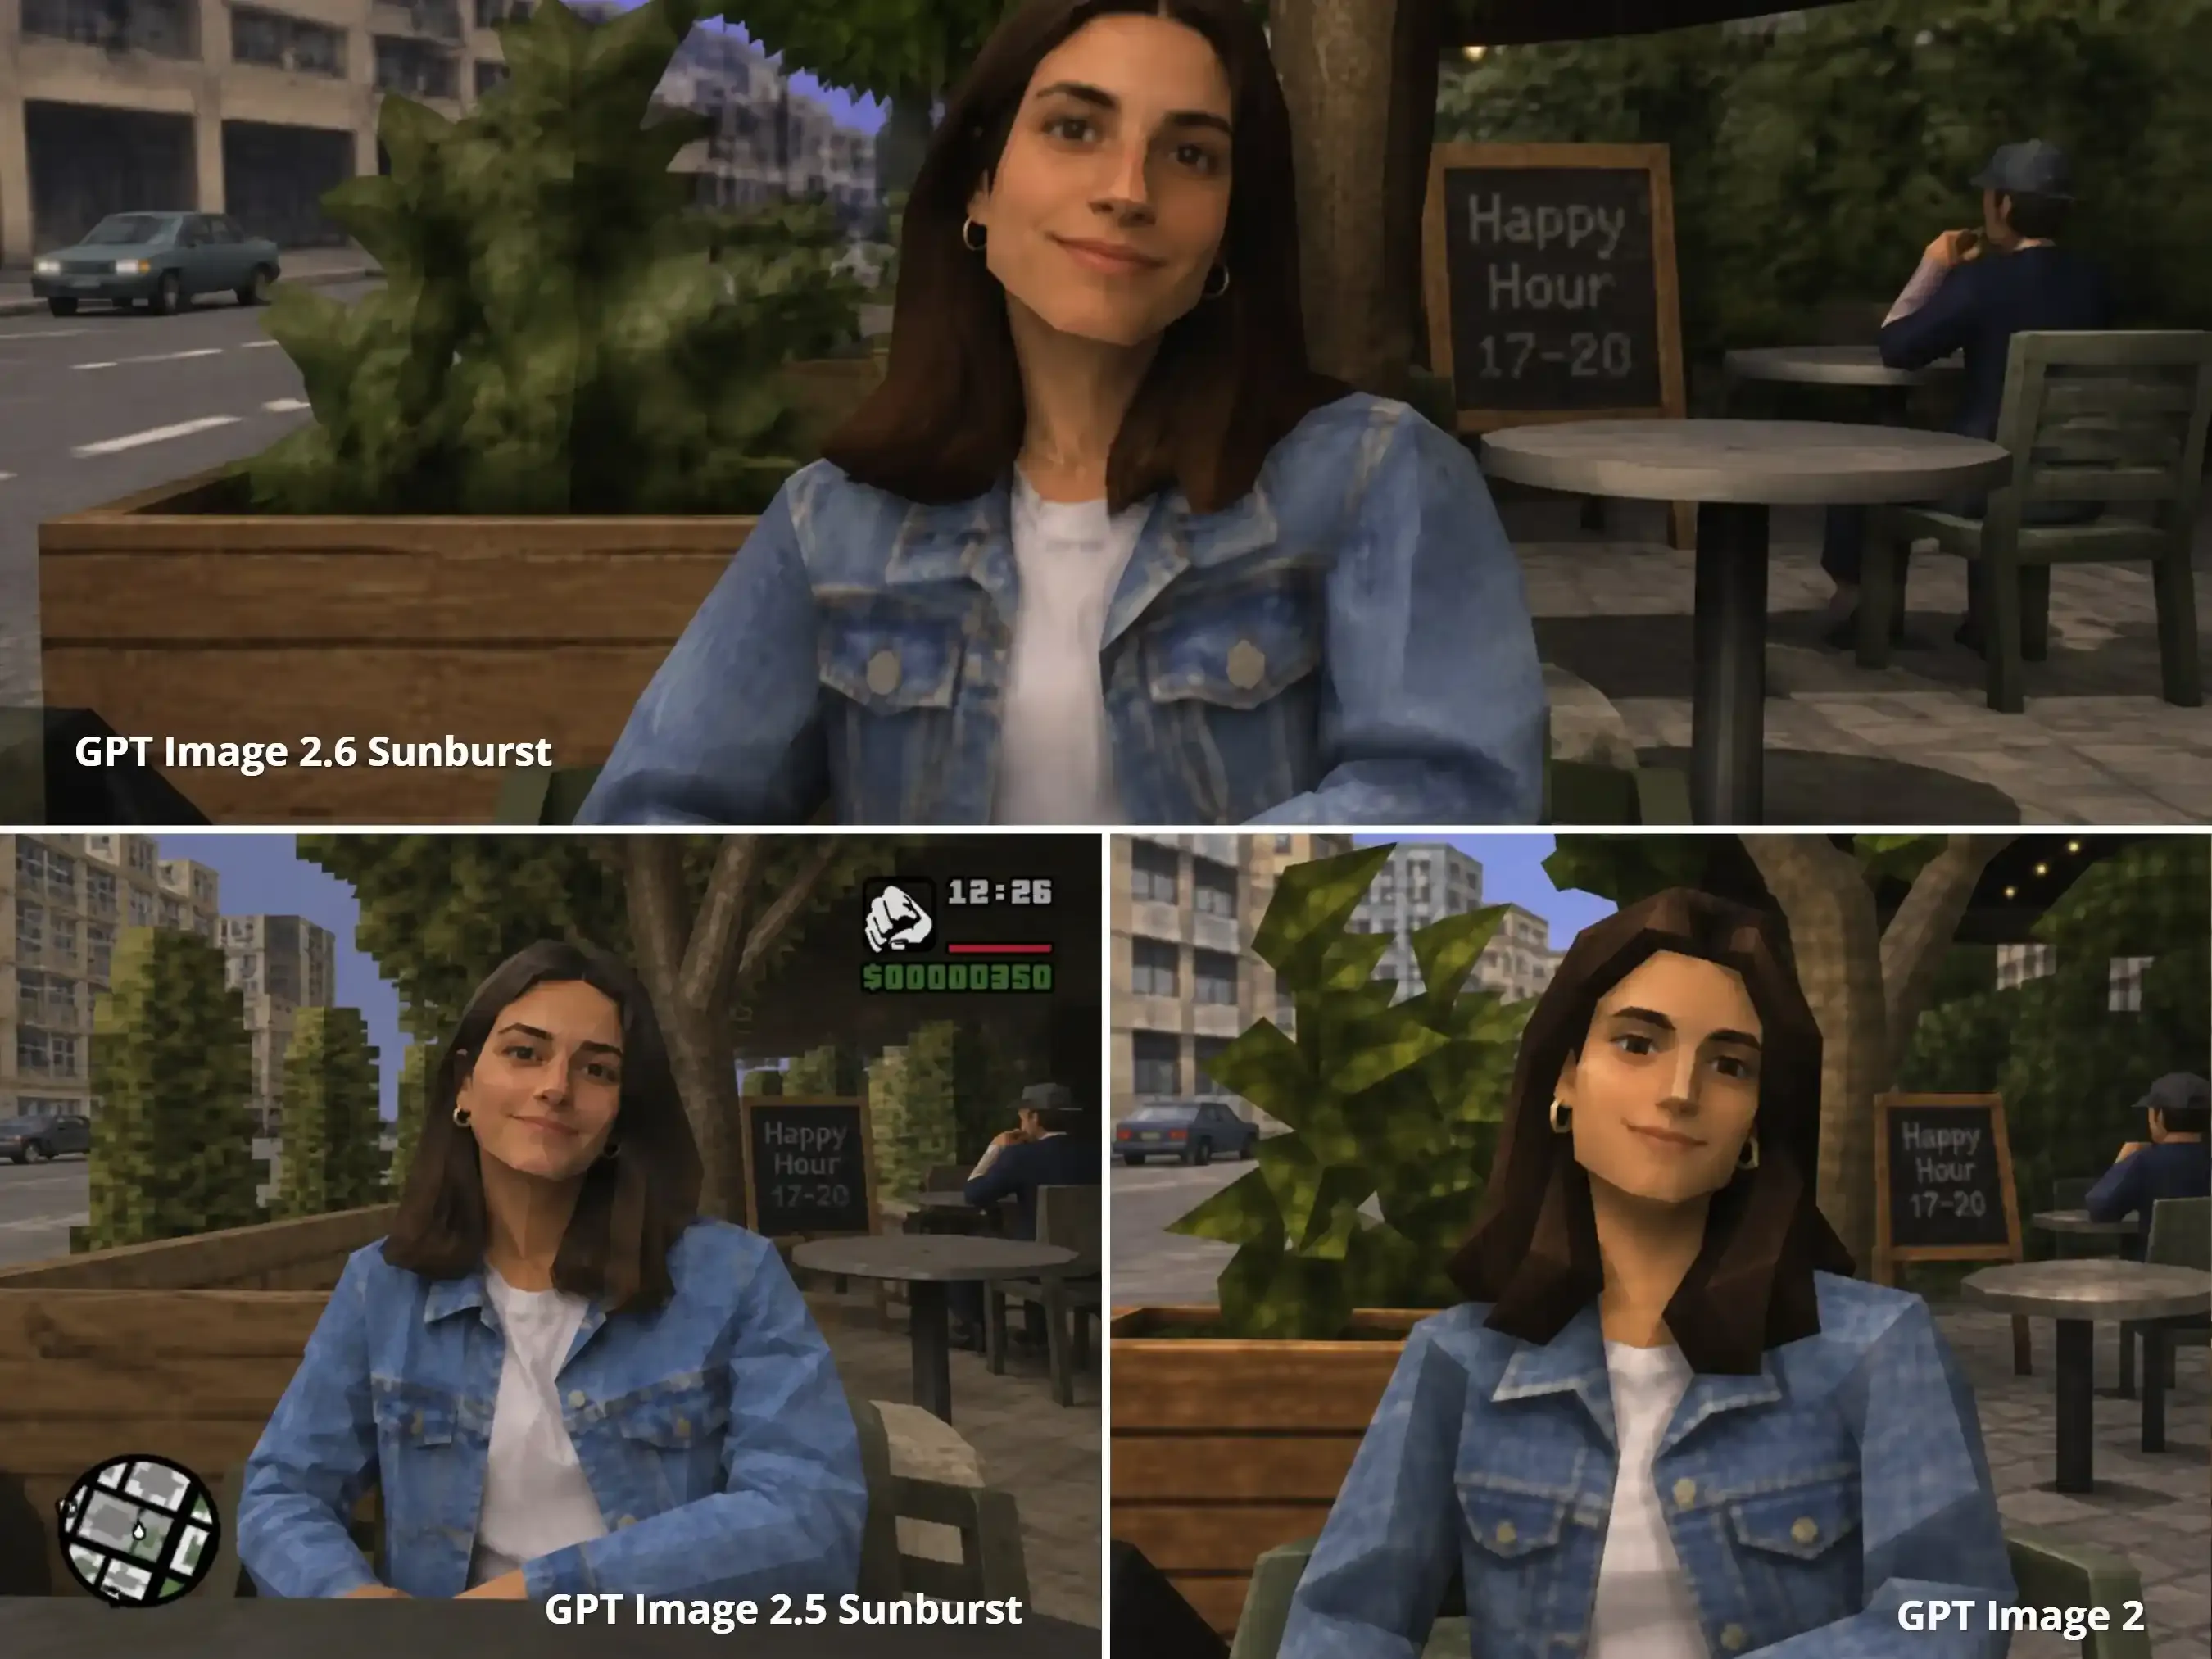
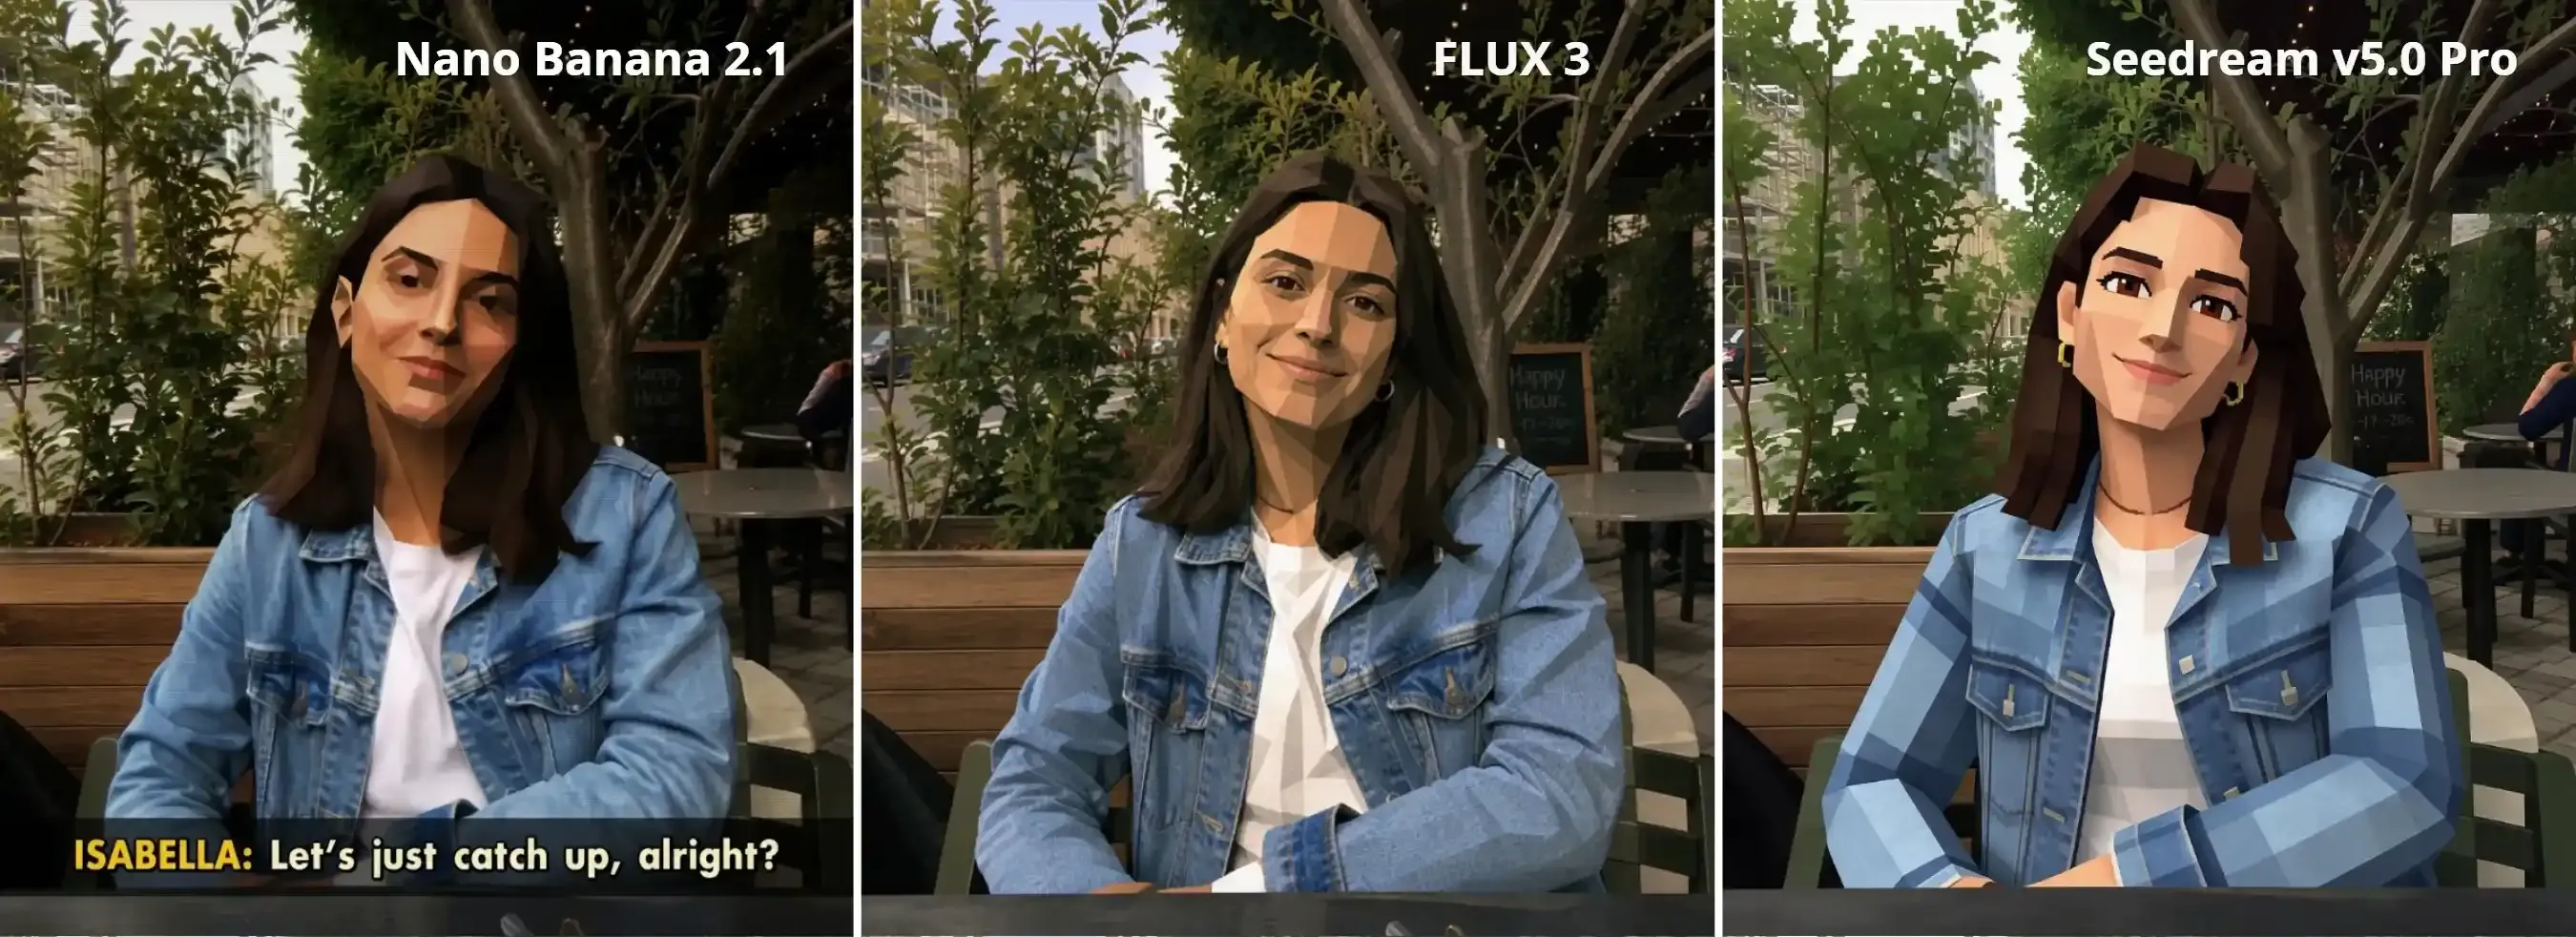
I tested six models (GPT, FLUX, Seedream, Nano Banana), there is no single winner.
GPT series' results:
Nano Banana 2.1/FLUX 3/Seedream v5.0 Pro results:
| Model | Identity Preservation | Low-Poly Geometry | PS2 Visual Authenticity | Main Limitation |
| GPT Image 2.6 Sunburst | 9/10 | 6/10 | 7/10 | Smooth facial surfaces and relatively detailed backgrounds |
| GPT Image 2.5 Sunburst | 7/10 | 6/10 | 7.5/10 | Hallucinated GTA-style HUD elements and inconsistent character geometry |
| GPT Image 2 | 7/10 | 9/10 | 6.5/10 | Strong stylization and less consistent facial resemblance |
| Nano Banana 2.1 | 7.5/10 | 8.5/10 | 7.5/10 | Unwanted subtitle and UI artifacts |
| FLUX 3 | 8.5/10 | 7.5/10 | 8/10 | Relatively smooth facial geometry |
| Seedream v5.0 Pro | 8/10 | 9/10 | 8/10 | Clean, modern low-poly appearance |
Note: Scores are subjective assessments based on the supplied test images, not standardized benchmark results.
Which Model to Pick
- Default to FLUX 3. It hits the cleanest balance between facial likeness and retro console geometry.
- Need sharper polygons? Use Seedream v5.0 Pro. It treats hair and clothes like actual chunky 3D game assets.
- Prioritizing your exact face? Use GPT Image 2.6. Just know you'll lose some of the chunky low-poly aesthetic.
- Chasing extreme retro blockiness? Test GPT Image 2. Your face will distort, but the mesh will look genuinely dated.
- Skip Nano Banana 2.1 unless you don't mind inpainting out stray game HUDs and subtitles.
Animate Your Character Into a PS2 Video Cutscene
Feeding a sharp low-poly image into a standard video generator usually melts angular triangles into rubbery modern skin within two seconds. Fluid motion ruins the illusion. When you build a PS2 filter video, you must stop the temporal denoiser from smoothing out hard vertex seams. Upload your verified low-poly portrait as the locked first frame inside a retro game cutscene AI engine such as Omni 1.1 Flash, Kling 4.0, or Minimax h3.
Copy-Paste Cutscene Motion Prompts
Run one of these two motion prompts depending on your target game style. Use the first template for an arcade selection screen, swap in the second for a story cutscene, or the third for a third-person gameplay sequence:
Arcade-style selection screen template:
plaintext1A [DURATION]-second arcade-style PS2 fighting game character selection animation, starting from the exact character and pose in the reference image. 2The character [INITIAL MOVEMENT], then [MAIN ACTION], and finishes by [FINAL POSE]. Keep the movements clear and connected, with subtle idle movements at the end. 3Place the character in a [BACKGROUND STYLE] arcade game selection environment, with [LIGHTING OR VISUAL EFFECTS] and subtle retro game interface elements. 4Preserve the character's identity, angular low-poly facial geometry, chunky hair, clothing design, and proportions throughout the animation. Maintain authentic PS2-era graphics, low-resolution textures, polygonal geometry, and simple lighting. 5Use a fixed camera and one continuous shot. No scene cuts, no photorealism, no modern CGI, no character morphing.
Example results:
Story-driven cutscene template:
plaintext1An [DURATION]-second story-driven cutscene from an early-2000s PS2 game, starting with the exact character and scene from the reference image. 2The character [INITIAL ACTION]. After [STORY TRIGGER], they [REACTION 1], then [REACTION 2]. Their expression changes to [EMOTION] as they [FINAL ACTION], reacting to [OFF-SCREEN EVENT OR CHARACTER]. 3The camera [CAMERA MOVEMENT], emphasizing [KEY STORY MOMENT]. Use a [ATMOSPHERE] environment with [ENVIRONMENT DETAILS] and [LIGHTING EFFECTS]. 4Preserve the character's identity, angular low-poly facial geometry, chunky hair, clothing design, and proportions throughout the animation. Maintain authentic early-2000s PS2 cutscene graphics, low-resolution textures, polygonal geometry, and simple lighting. 5Use cinematic camera movement and natural, connected character motion. Keep the sequence in [SHOT STRUCTURE]. No photorealism, no modern CGI, no character morphing.
Example results:
Third-person gameplay sequence template:
plaintext1A [DURATION]-second continuous PS2-era 3D video game sequence, starting from the exact scene in the reference image. 2[CHARACTER ACTION]: The character [INITIAL ACTION], then [MAIN MOVEMENT], followed by [FINAL ACTION]. Make each movement clear, connected, and physically natural. 3[SCENE DEVELOPMENT]: As the character moves, [DESCRIBE HOW THE ENVIRONMENT EXTENDS OR CHANGES]. Include [BACKGROUND OBJECTS OR ENVIRONMENTAL ACTIVITY] to create a cohesive game world. 4Keep the character's identity, facial features, angular low-poly geometry, chunky hair, clothing, and proportions consistent throughout the animation. Extend the surroundings into a cohesive early-2000s PlayStation 2 game environment, with low-resolution textures, angular geometry, simple lighting, and basic shadows. 5Use continuous, natural movement with no abrupt transitions or scene cuts. Maintain authentic PS2-era graphics throughout. No photorealism, no modern CGI, no character morphing.
Example results:
Pro Tips: Design video actions around the original photo's setting and the character's starting pose. This gives the AI a clear starting point and makes the movement more coherent.
Fix Common Visual Glitches and Texture Melting
Characters nail the low-poly look early on, but melt over time. Facial features can shift, angular edges can become smoother, and the background may change during character movement. When your PS2 filter video warps or drops facial likeness, tweak the specific broken parameter instead of rebuilding your entire project.
Use this troubleshooting table to diagnose rendering failures across your low poly character generator and video engine:
| Visual Glitch | What Happens | How to Fix It |
| Geometry Melting | Low-poly edges become smooth or distorted. | Reinforce angular geometry and consistent polygon edges in the prompt. |
| Identity Drift | Facial features, hair, or clothing change. | Use a clear reference image and explicitly lock character details. |
| Modern CGI Look | Textures and lighting become too realistic. | Reinforce low-resolution textures, simple lighting, and PS2-era graphics. |
| Face Distortion | Facial details warp during movement. | Simplify head movements and avoid complex actions. |
| Background Distortion | Buildings or objects shift between frames. | Use a clear environment reference and specify a fixed camera when appropriate. |
| Unwanted UI or Text | Random subtitles, logos, or HUD elements appear. | Explicitly exclude text and interface elements in the prompt. |
A few prompt rules to keep the PS2 look stable across the clip:
- Lock the aesthetic in text: Never rely just on the reference frame. Keep prompting low-poly meshes, low-res textures, and flat lighting.
- Chain movements logically: Use a clear start, main action, and end pose instead of disjointed actions.
- Ground actions in the setup: Match motion to the starting pose—don't force a sitting character to sprint immediately.
- Match camera to context: Use a static cam for idle select screens; use a slow push-in for story cutscenes.
Save CRT scanlines, HUD overlays, and crunchy audio for post.
Export and Style Your Retro Gaming Cutscene for Social Feeds
Uploading a raw clip from a retro game cutscene AI straight to TikTok often flops because clean MP4 files lack television warmth. Raw exports look too modern. Wrap your PS2 filter video in CRT display artifacts, pixelated HUD graphics, and compressed console audio before publishing.
Post-Processing and HUD Overlay Specs
Apply these finishing layers in your video editor after you turn a photo into a PS2 character:
| Production Layer | Target Parameter | Visual and Audio Impact |
| Aspect Ratio | 9:16 vertical or 4:3 pillarboxed | 9:16 fills mobile feeds; 4:3 preserves authentic CRT monitor framing. |
| CRT Shader | Interlaced scanlines (15% opacity) + faint bloom | Replicates glass tube glow and masks minor AI edge flicker. |
| Retro UI Overlays | Green health bar, nameplate, pixel dialogue box | Frames the PS2 filter render as an interactive game screen. |
| Audio Bitrate | 32kHz sample rate + synthesized menu SFX | Mimics sixth-generation disc streaming and mechanical button clicks. |
Platform Distribution Tactics for Short-Form Feeds
- Thumbnail Framing: Freeze your cover frame on the exact beat the pixelated dialogue box appears beside your angular face mesh. High-contrast UI text hooks scrollers.
- Sound Selection: Layer low-bitrate UI chimes over jungle breakbeats or save-room loops to drive short-form shares.
- Comment Hooks: Pin your PS2 AI filter prompts and low poly character generator weights in the top comment to drive viewer saves and shares.
Test 4:3 pillarboxed against 9:16. Stick to the style to turn one selfie into a series.


