Natural freckles aren't uniform dots; they shift in size, fade over uneven skin texture, and react to lighting. AI generation, manual brush masks, and filter presets each handle these details with varying degrees of precision. Here is how to choose the right approach for your edit.
Key Takeaways
- AI Prompts: Maximum styling control. Type out pigment warmth and density to build freckles from scratch.
- Brush Inpainting: Best when you need pinpoint placement along the bridge without touching cheeks.
- Web Presets: Zero learning curve, fixed slider adjustments, but repetitive dot patterns.
- AR & Video: Live lens previews on phone; good for motion clips, weak on high-res stills.
At a Glance How the 4 Freckles Filter Methods Compare
Every freckle tool trades placement speed against close-up skin fidelity. Browser presets finish in one click, whereas prompt-driven generators and studio retouchers preserve micro-pore texture across shadows and facial contours. Match the tool first.
| Method | Core Mechanism | Representative Tools | Skin & Lighting Realism | Placement Control | Best Use Case | Pricing |
| 1. AI Prompt Editing | Text-guided editing | GPT Image 2.5, Nano Banana 2.1, Seedream 5.0 Pro Edit | Model-dependent | Prompt-based | Custom freckle styles | Free credits / Paid |
| 2. Brush-Based Area Editing | Brush selection + AI editing | OpenArt Area Edit | Model-dependent | Brush-selected areas | Targeted facial edits | 6 credits per generation |
| 3. Online Freckle Effects & Makeup Presets | Presets + manual adjustments | Pixoate, StockUnlimited Makeup Studio | Preset-dependent | Preset-defined areas | Quick selfie try-ons | Free / Credit-based |
| 4. Live AR & AI Video Reveals | Facial tracking / Image-to-video | TikTok, Seedance 2.5, Kling 4.0 | Variable | Face-tracked / Reference-guided | Live previews and video reveals | Free AR / Paid AI credits |
OpenArt's tested interface showed a cost of 6 credits per generation. Pricing and access may change.
Tip: Feed the model an unretouched original. Built-in camera smoothing erases natural pores; without that surface texture, AI models render freckles as floating smudges over plastic skin. Keep the grain, ditch the beauty mode.
Way 1 Instruction-Based AI Portrait Editing for Pore-Level Realism
Instruction-based image editors read facial geometry and directional shadows before placing a single speck of pigment on your uploaded portrait. Pores stay completely sharp.
- Prep your source portrait. Pick an unblurred photo shot in soft window light or a 45-degree outdoor angle; harsh overhead shadows confuse pigment placement around the eye sockets.
- Select an identity-locking edit model. Choose ChatGPT image 2.5, Nano Banana 2.1 or Seedream 5.0 Pro Edit. Skin grain holds tight.
- Paste a zone-constrained prompt. Copy one of the three formulas below into the instruction box and keep strength parameters moderate so bone structure never drifts.
For the recipes below, I'll use GPT Image 2.5 to edit portraits.
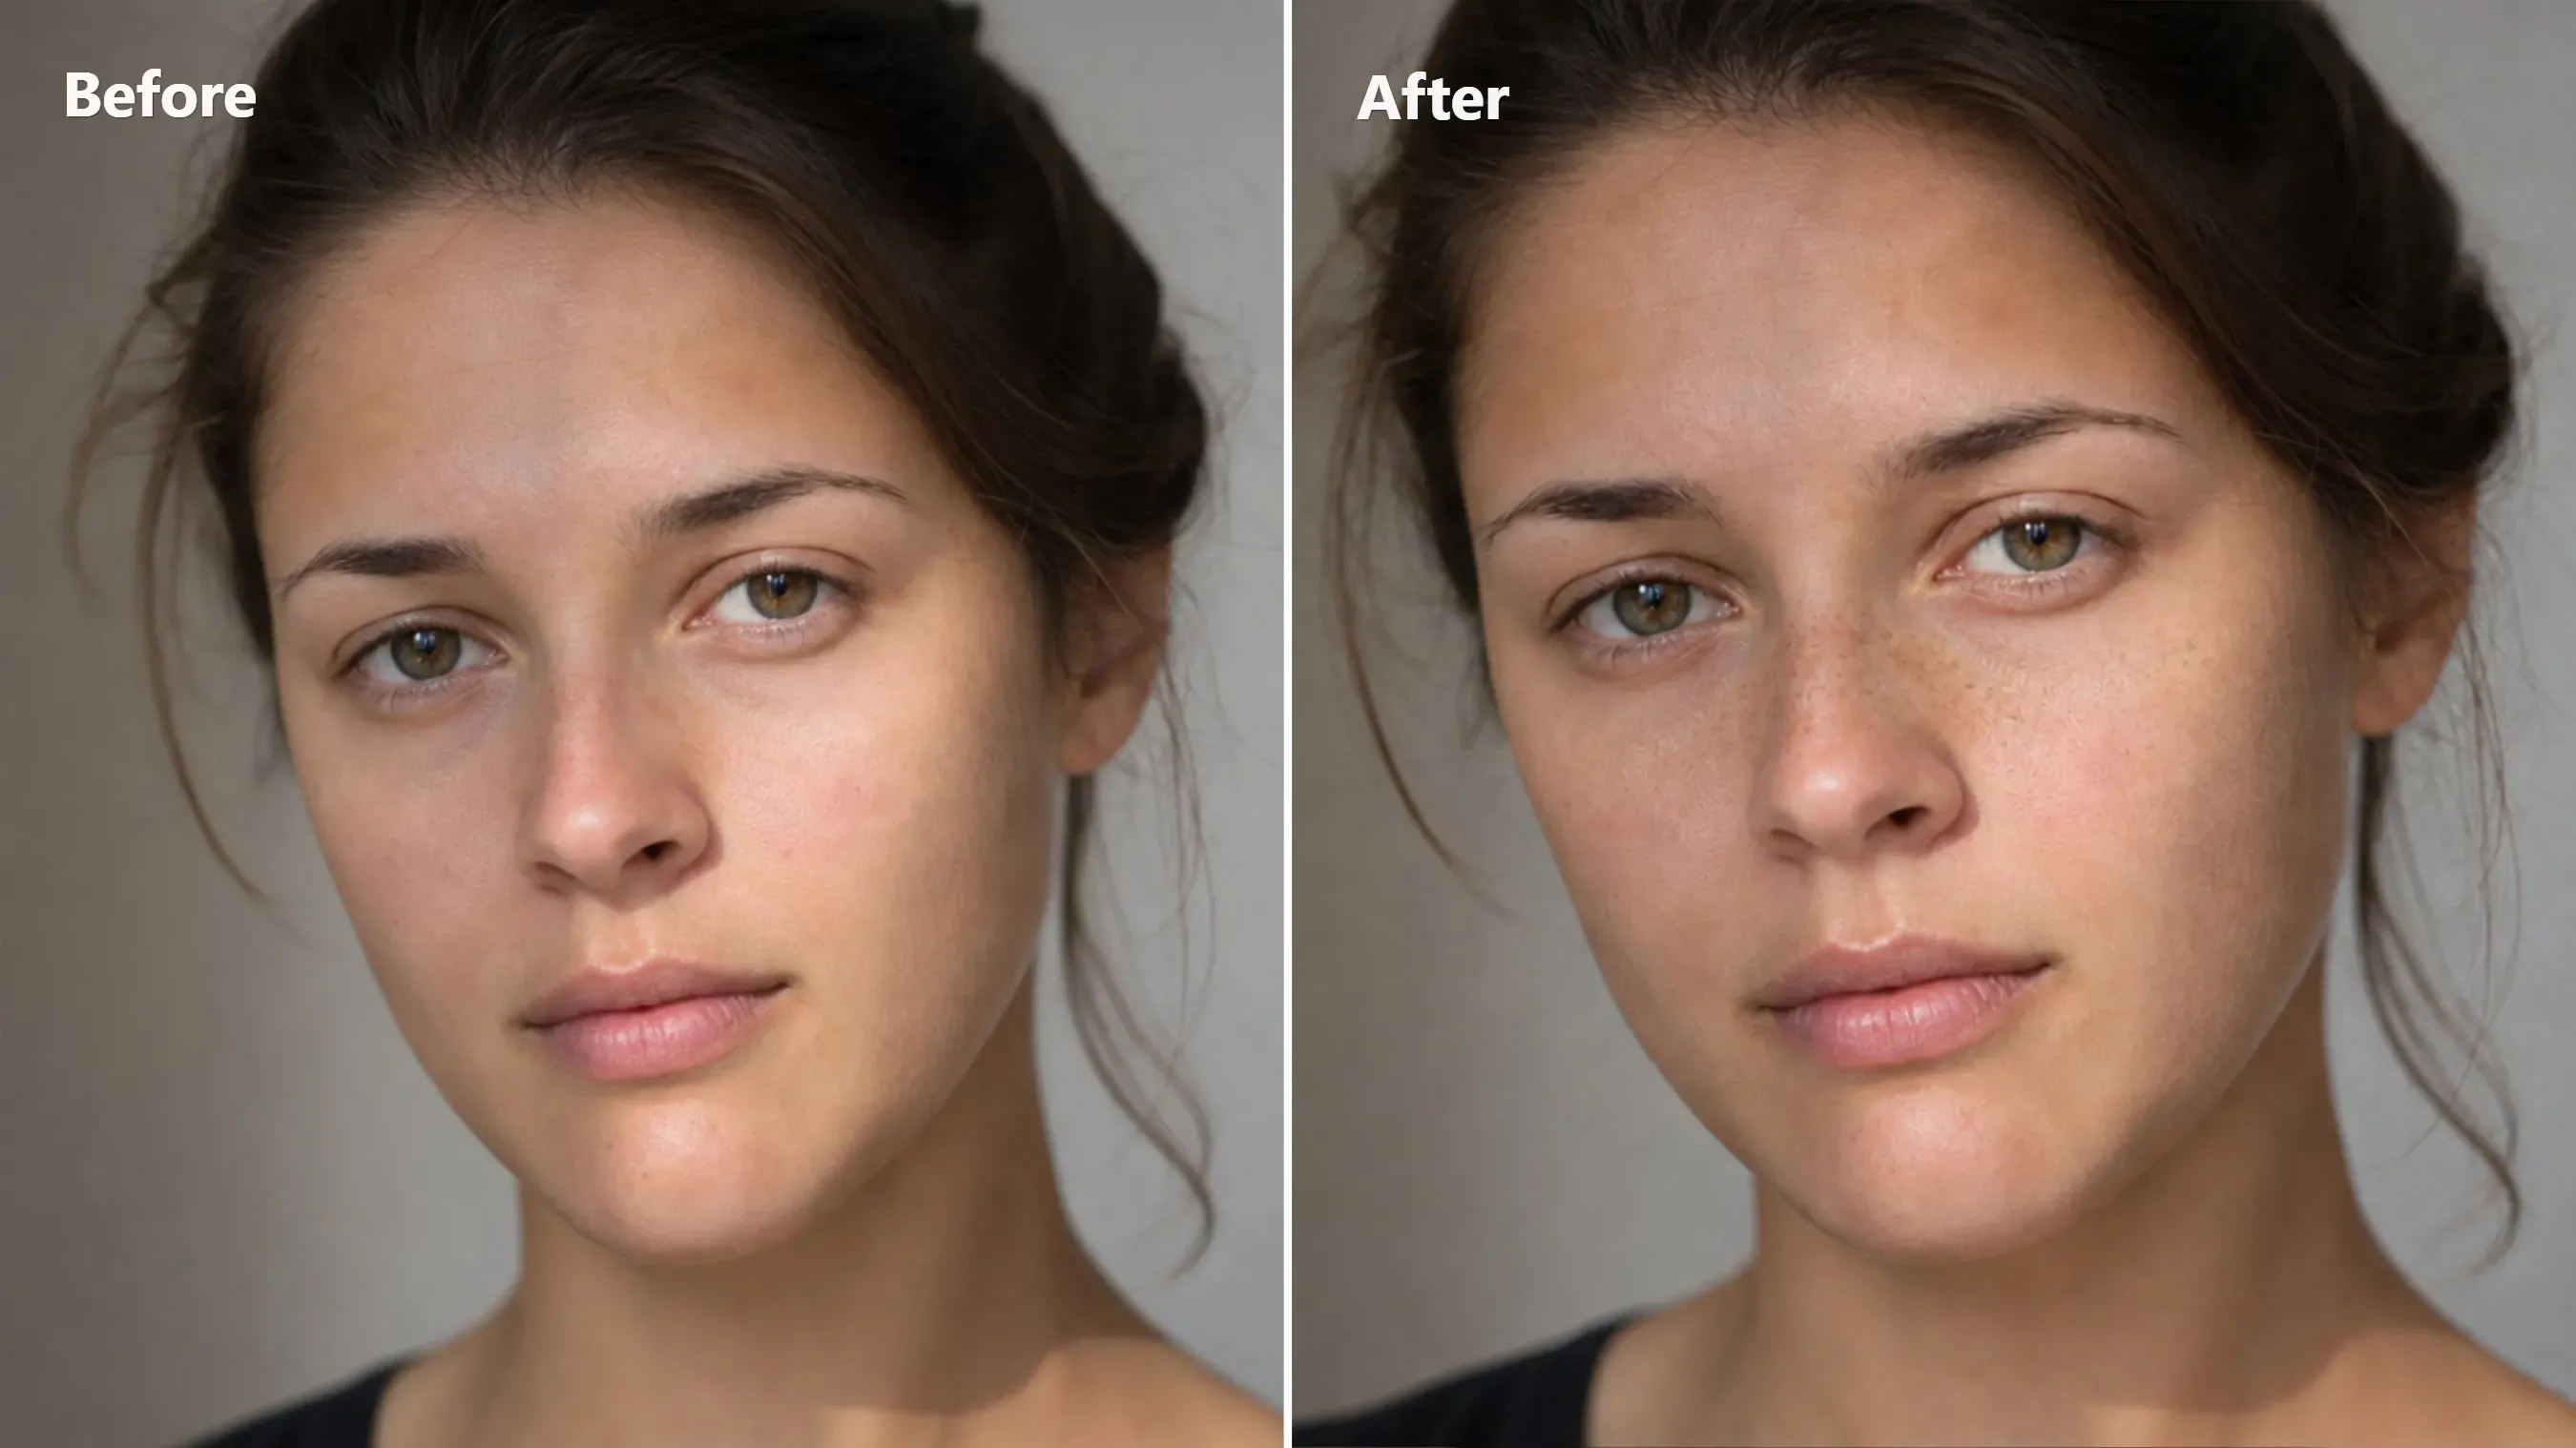
Recipe A Subtle Nose-Bridge and Upper-Cheek Dusting
Everyday bare-faced edits work best when speckles stay sparse and tiny. Dust faint freckles only across the nose and cheeks. Less density looks real.
plaintext1Add a subtle, sparse dusting of tiny natural freckles strictly across the bridge of the nose and upper cheekbones. Use irregular sub-millimeter to 1.5mm light golden-taupe specks at 35% to 55% opacity, blending softly into existing skin pores and directional shadows. Keep the forehead, eyelids, lips, philtrum, chin, facial bone structure, and background 100% unchanged.
Recipe B Golden-Hour Sun-Kissed Scatter
Outdoor summer portraits handle wider pigment distribution across secondary facial high points. Sunlight hits more skin. Extending secondary clusters up toward the temples and collarbones connects the facial edit to the rest of your framing naturally.
plaintext1Add a natural sun-kissed scatter of freckles across the nose bridge, upper cheeks, outer temples, and exposed shoulders. Create irregular, naturally varied clusters with different speck sizes, spacing, and subtle color variations. Keep the nose slightly denser, with freckles becoming progressively sparser toward the temples and shoulders. Preserve the original skin tone, brightness, exposure, facial features, and skin texture. Do not darken or tan the skin, apply an overall color shift, or create uniform dotted patterns.
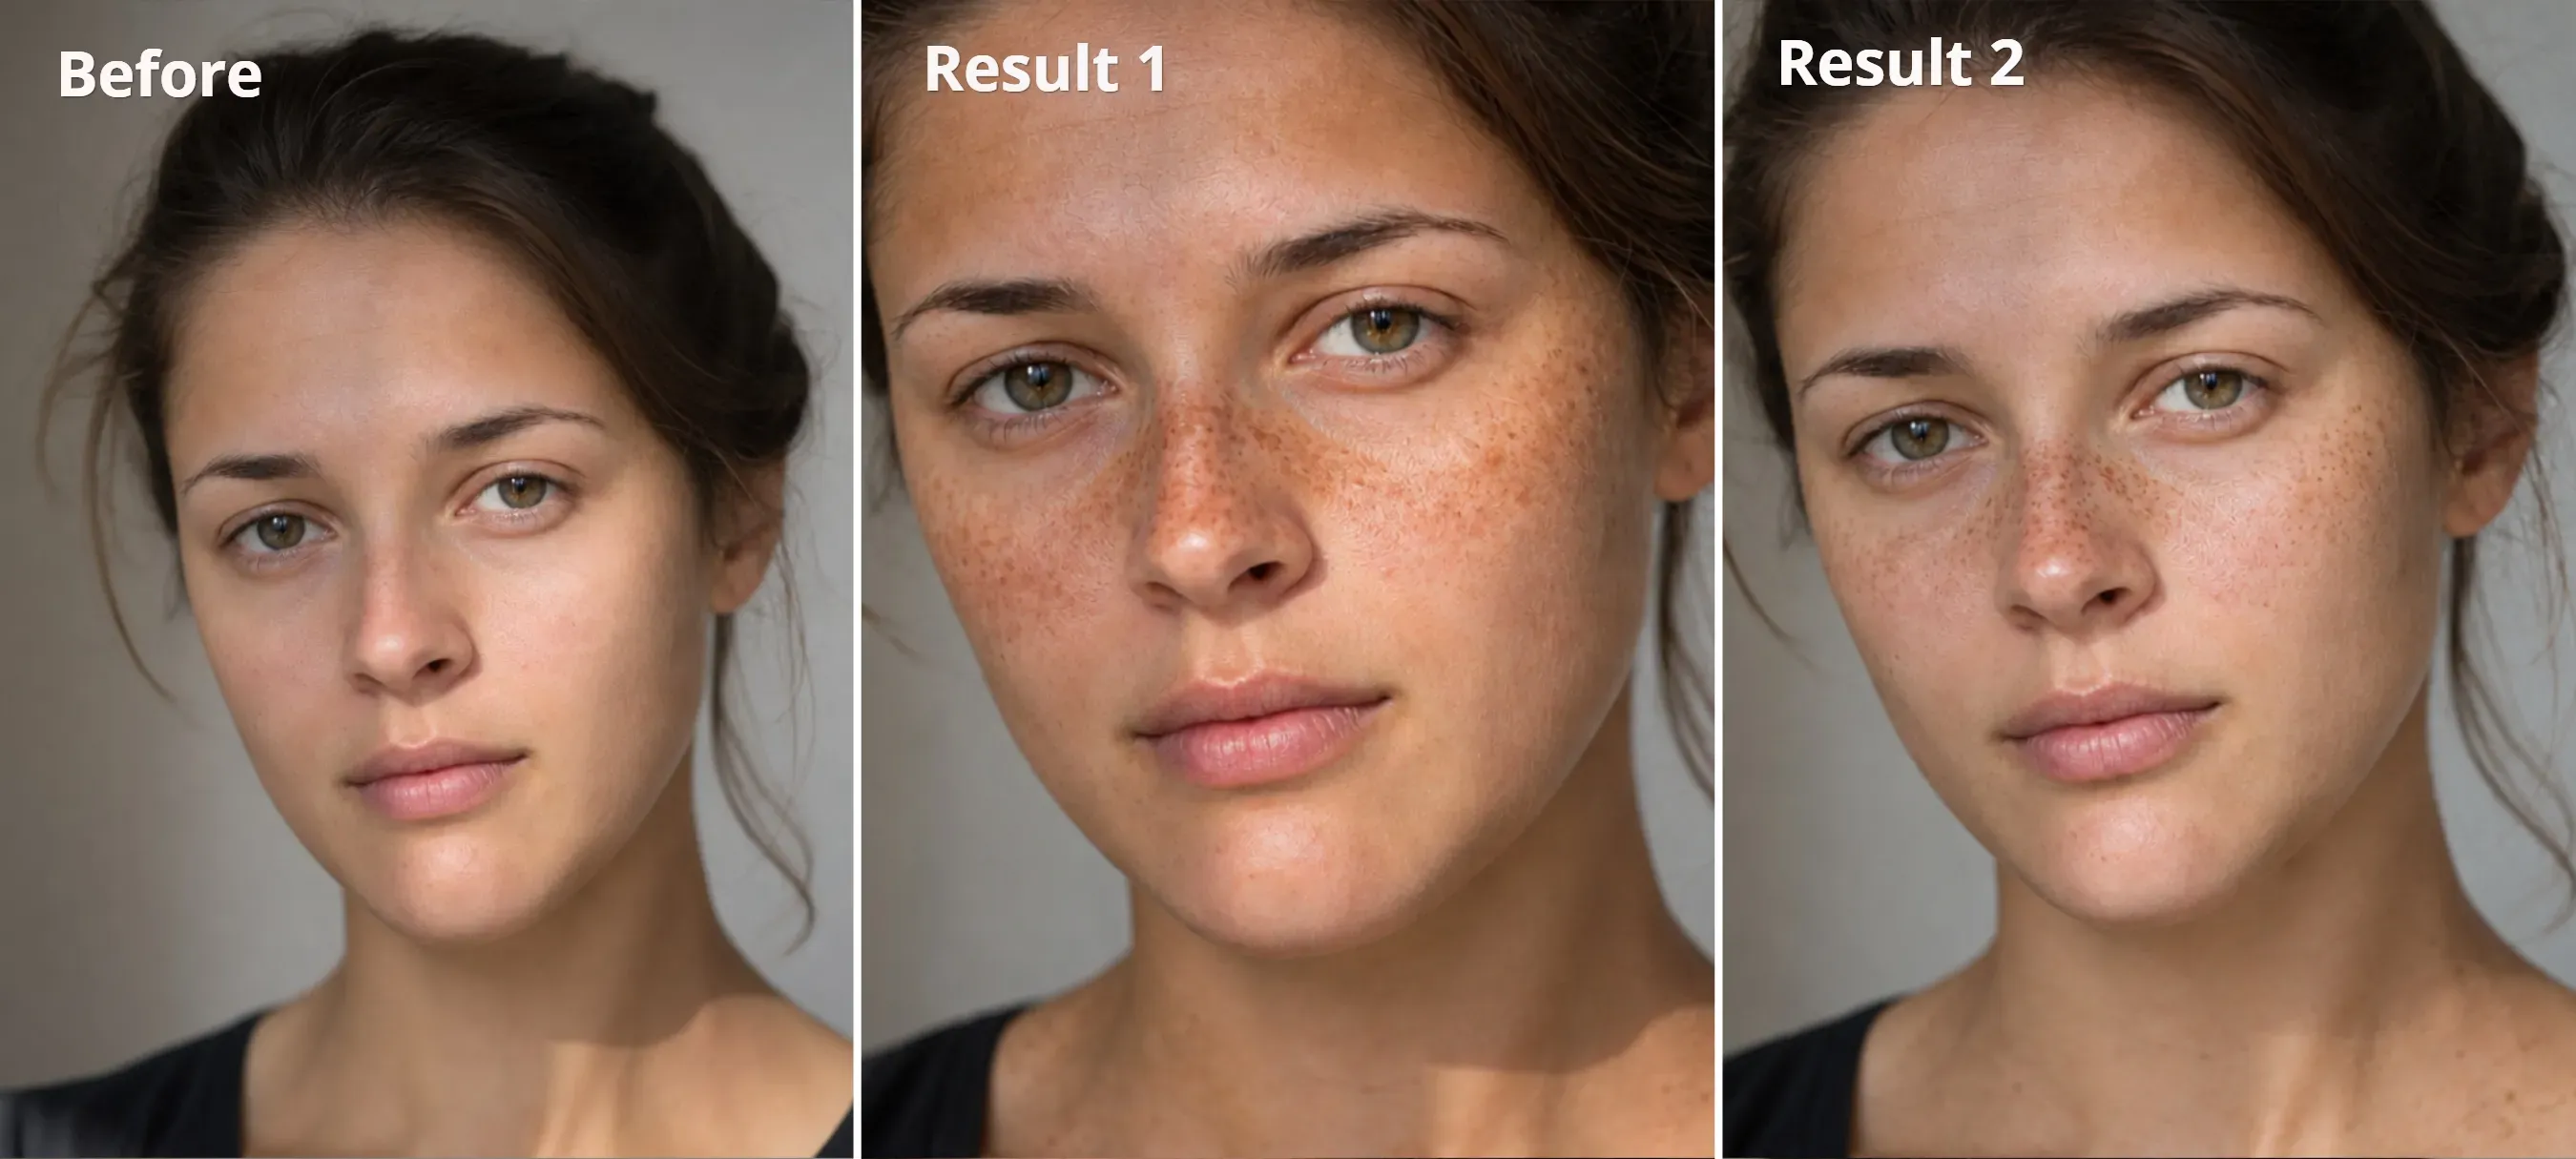
Practical Tip: My first attempt made the freckles look too uniform and darkened the skin. Adding instructions to preserve the original skin tone and vary freckle size and spacing gave a much more natural result.
Recipe C Undertone-Matched Pigment Rules
Default brown tints often fail. Generic color tokens turn neon orange on cool complexions or muddy gray on deep skin; Swap the color modifier in your prompt to match your exact complexion.
plaintext1Add clearly visible, realistic, irregular freckles across the nose bridge and upper cheeks using [INSERT UNDERTONE PIGMENT RULE], Vary speck sizes, spacing, and color intensity for a natural, non-uniform distribution. Blend the freckles into the existing skin texture without making them too faint. Preserve the original skin tone, undertone, color balance, exposure, facial features, pores, eyes, and lighting. Do not alter the overall complexion or apply skin smoothing.
[INSERT UNDERTONE PIGMENT RULE]for Fair Cool or Neutral Skin: soft neutral taupe and cool beige-brown pigments with subtle but noticeable contrast. Avoid reddish, orange, or overly warm tones against pale pink or porcelain undertones.[INSERT UNDERTONE PIGMENT RULE]for Medium, Warm, or Olive Skin: muted warm beige-brown and soft golden-tan pigments with moderate, natural contrast, using sparse, scattered specks rather than dense clusters, while keeping the original skin tone and brightness.[INSERT UNDERTONE PIGMENT RULE]for Deep Rich Skin: Swap in deep espresso and rich cocoa pinpoint speckles at 65% opacity with subtle shadow contrast to render visible, dimensionally accurate pigment without washing out dark skin.
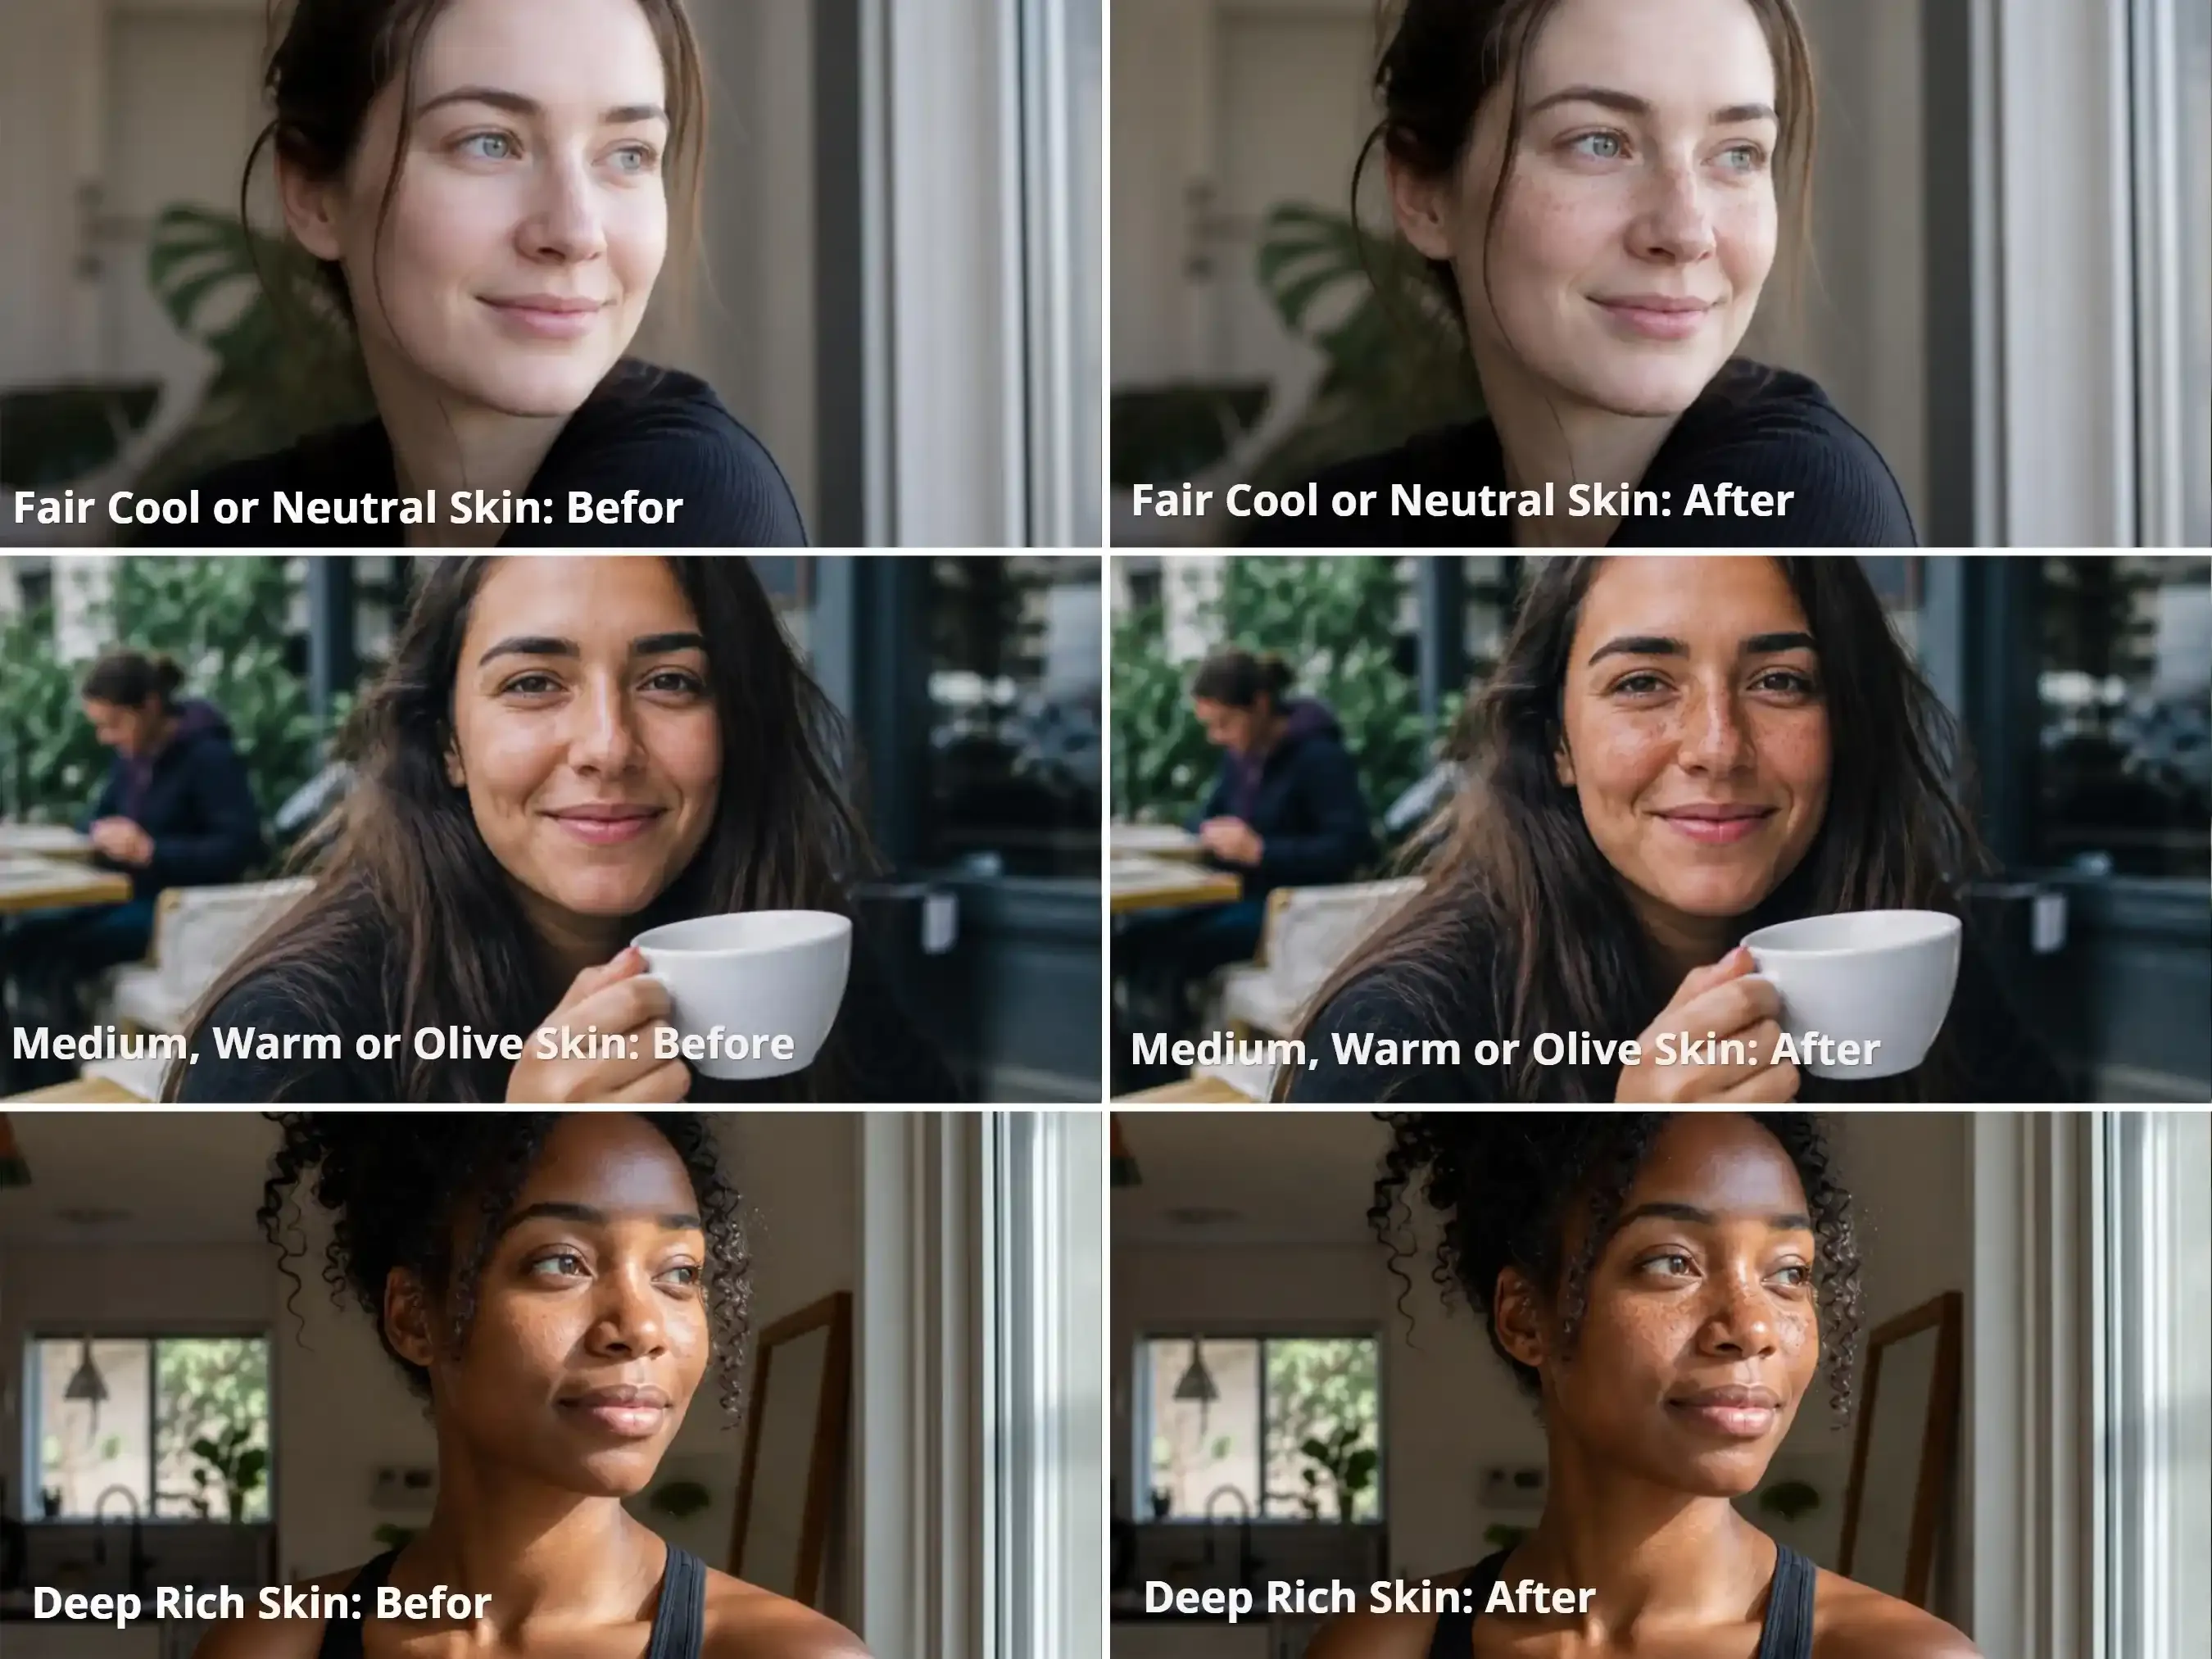
Practical Tips: In my first Fair Cool or Neutral Skin test, the freckles looked too faint and the skin tone became slightly redder. I replaced the warm cinnamon pigment with neutral taupe and cool beige-brown. For Medium Warm or Olive Skin, my first attempt made the skin look darker and spread freckles too densely across the nose. Switching to muted warm beige-brown and soft golden-tan pigments, with moderate contrast and sparse distribution, gave me a more natural result. I also found that describing pigment colors and spacing worked better than relying on opacity percentages.
Way 2 Brush-Based Area Editing for Localized Freckles
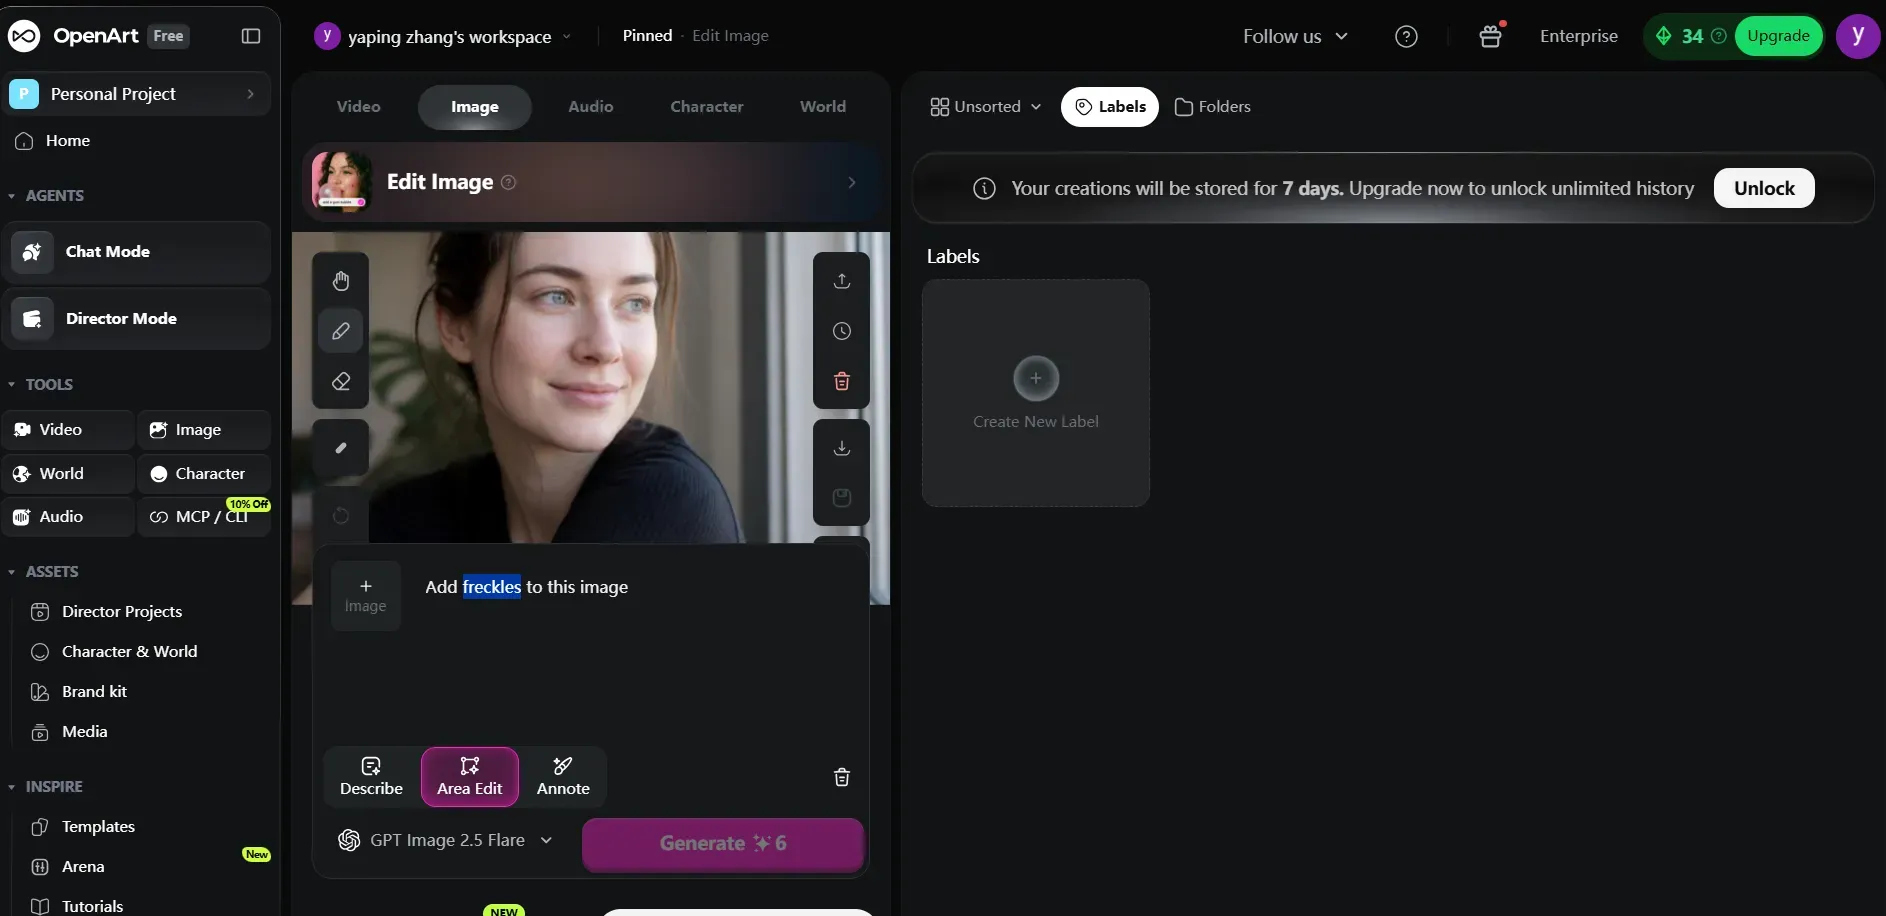
Full-image edits can sometimes add stray freckles to areas such as the lower eyelids or upper lip. OpenArt's Area Edit mode lets you brush over a specific region and describe the changes you want.
-
Upload a portrait. Open your photo in Edit Image and select Area Edit.
-
Brush over the target area. Select the brush tool and paint over the nose bridge and upper cheeks. Use the eraser to remove unwanted selections, keeping the lower eyelids, nostrils, and lips outside the mask.
-
Enter "Add freckles to this image", or insert the appropriate pigment rule from Recipe C, then generate the edit and inspect the result.
Next, I’ll try “GPT image 2.5 flare,” as it consumes the fewest credits. For this, I’m using the default prompt provided by OpenArt"Add freckles to this image", Let's take a look at the result:
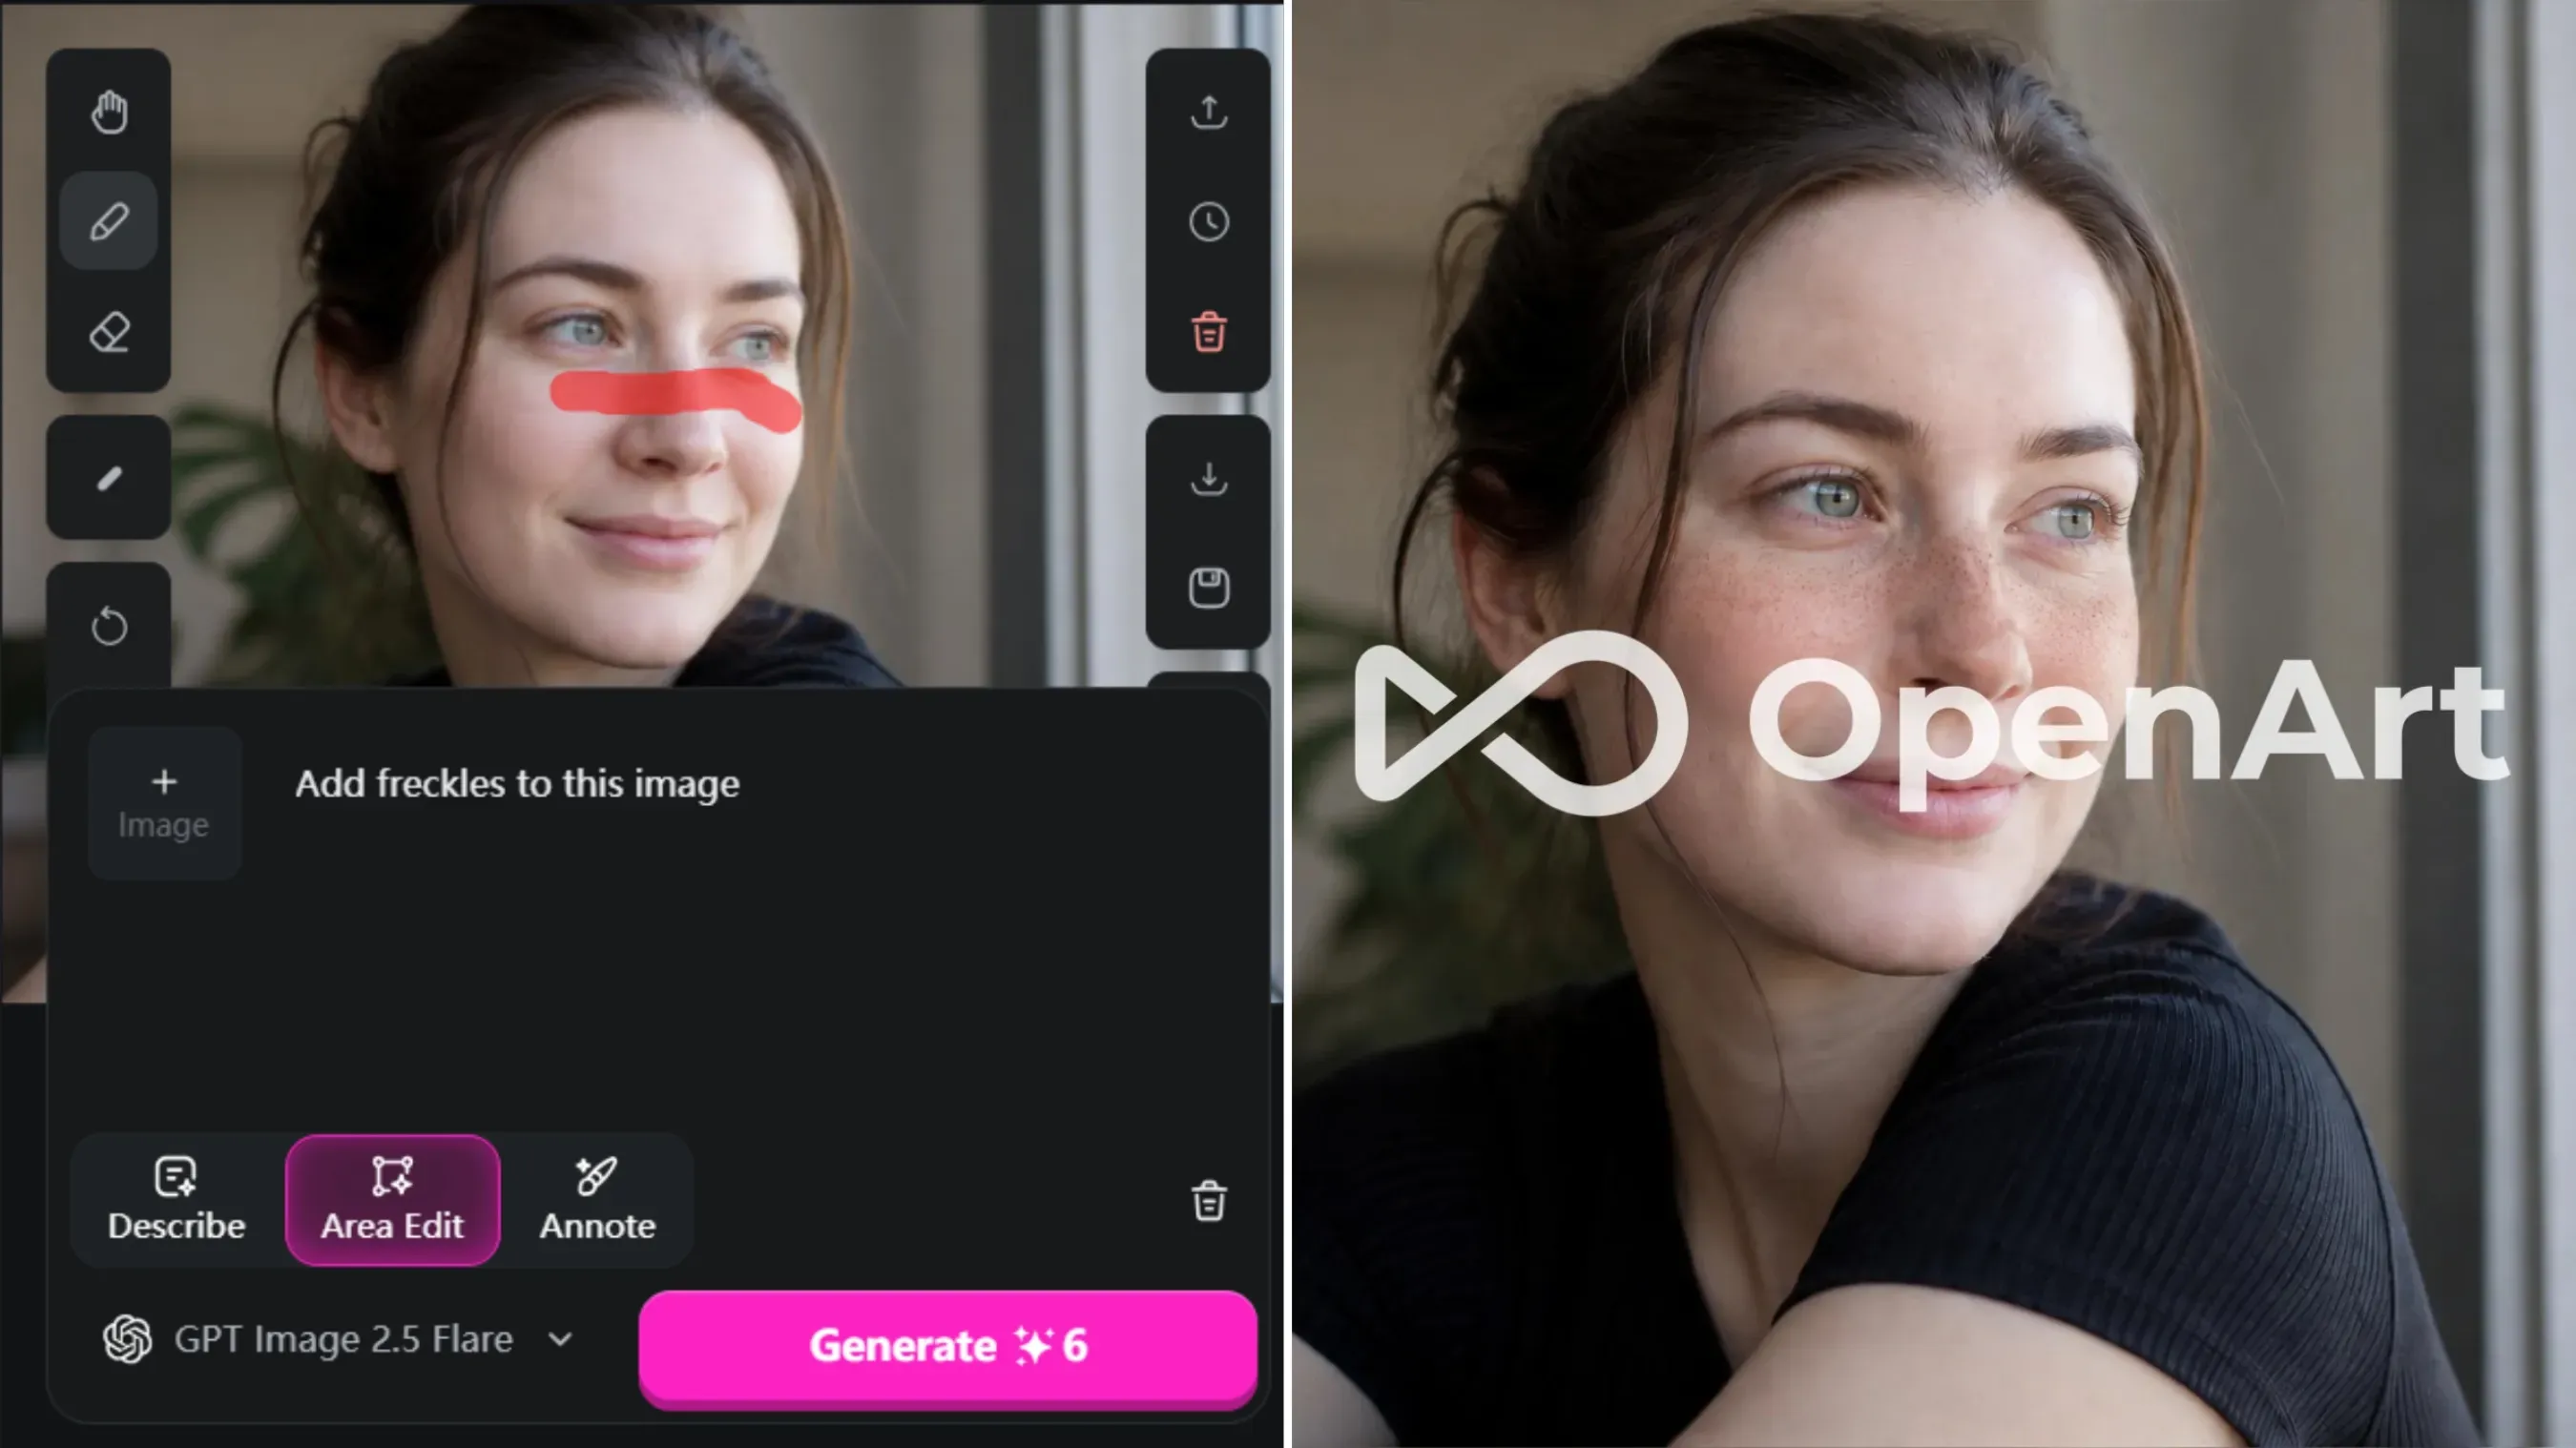
The process is quick and simple. It's a great option if you don’t want to put much effort into crafting prompts. To get images without watermarks, you can simply opt for the entry-level plan, which costs $14 per month.
Way 3 Online Freckle Effects and Makeup Presets for Quick Selfie Try-Ons
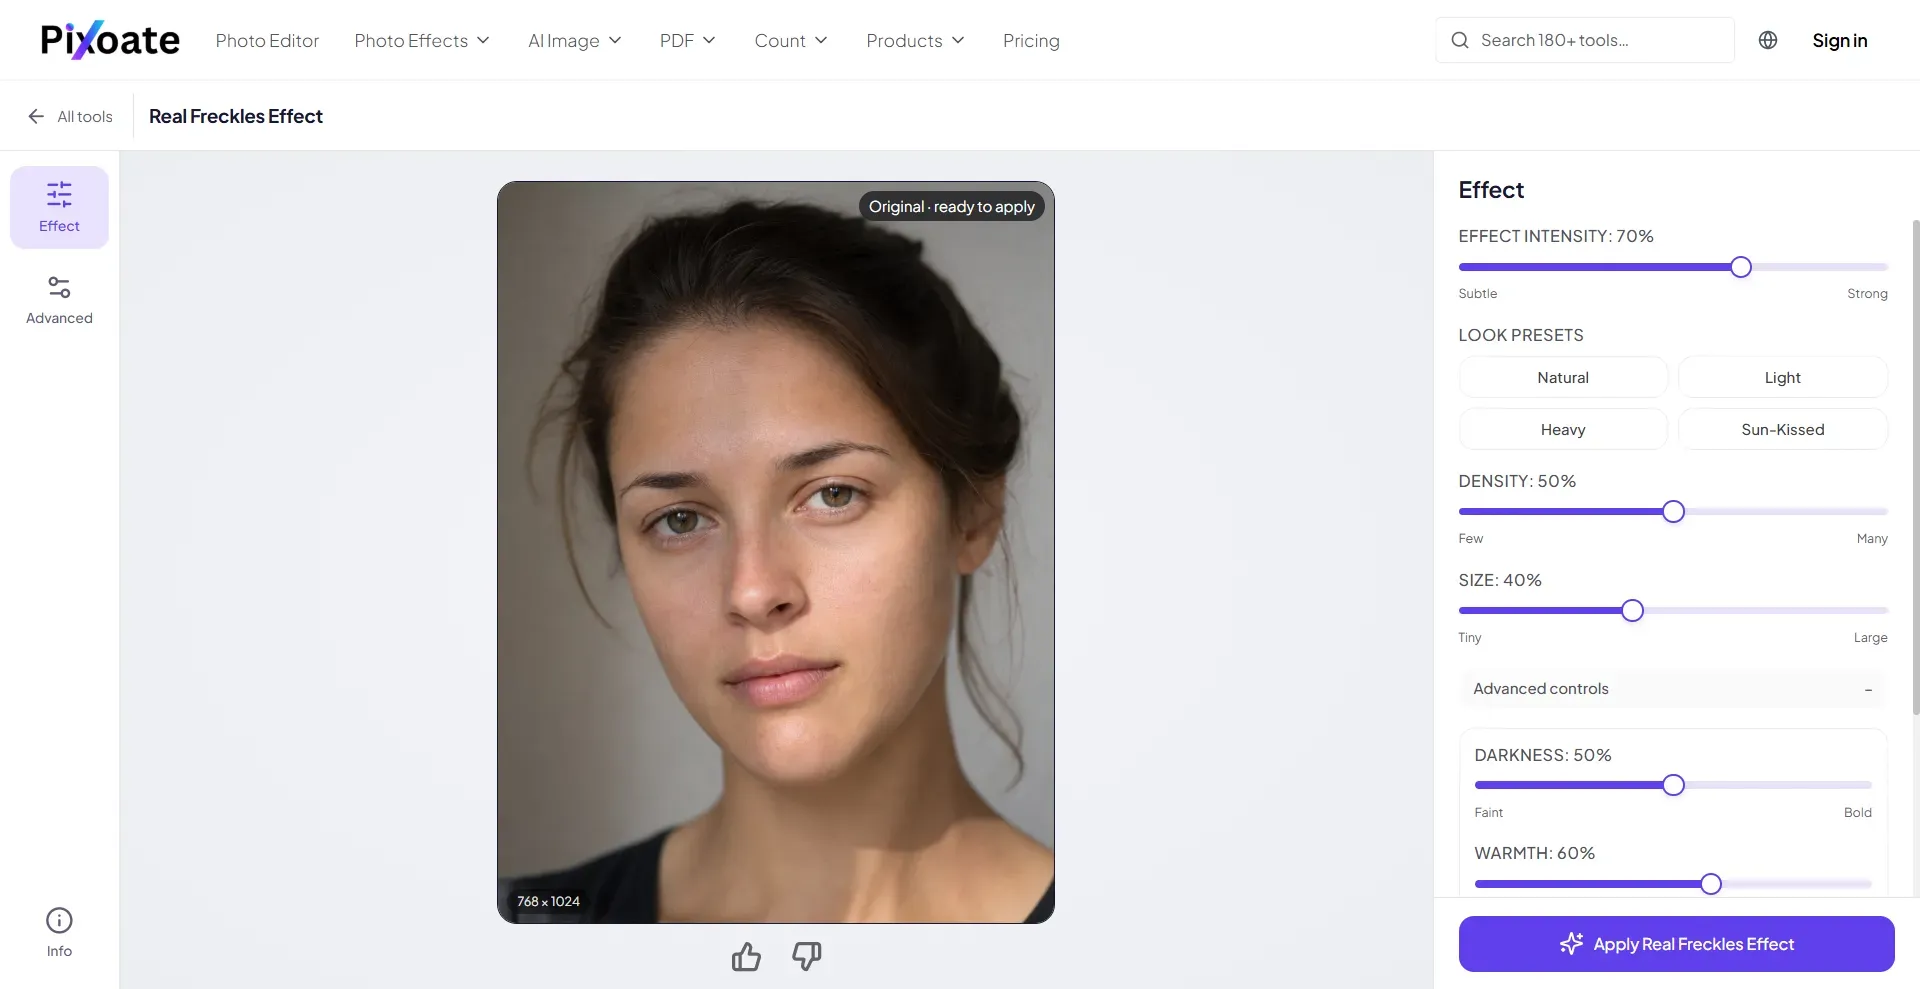
If you want to preview freckles without writing prompts or manually brushing over your face, online beauty editors offer a quicker option. Pixoate provides a dedicated Real Freckles Effect, while StockUnlimited Makeup Studio includes a Faux freckles look alongside other makeup presets.
- Upload your portrait. Open Pixoate's Real Freckles Effect or StockUnlimited Makeup Studio and upload the selfie you want to edit.
- Choose a starting look. In Pixoate, select a freckle style such as Natural, Light, Heavy, or Sun-Kissed.
In StockUnlimited, open the Looks tab and choose Faux freckles from the available makeup presets.
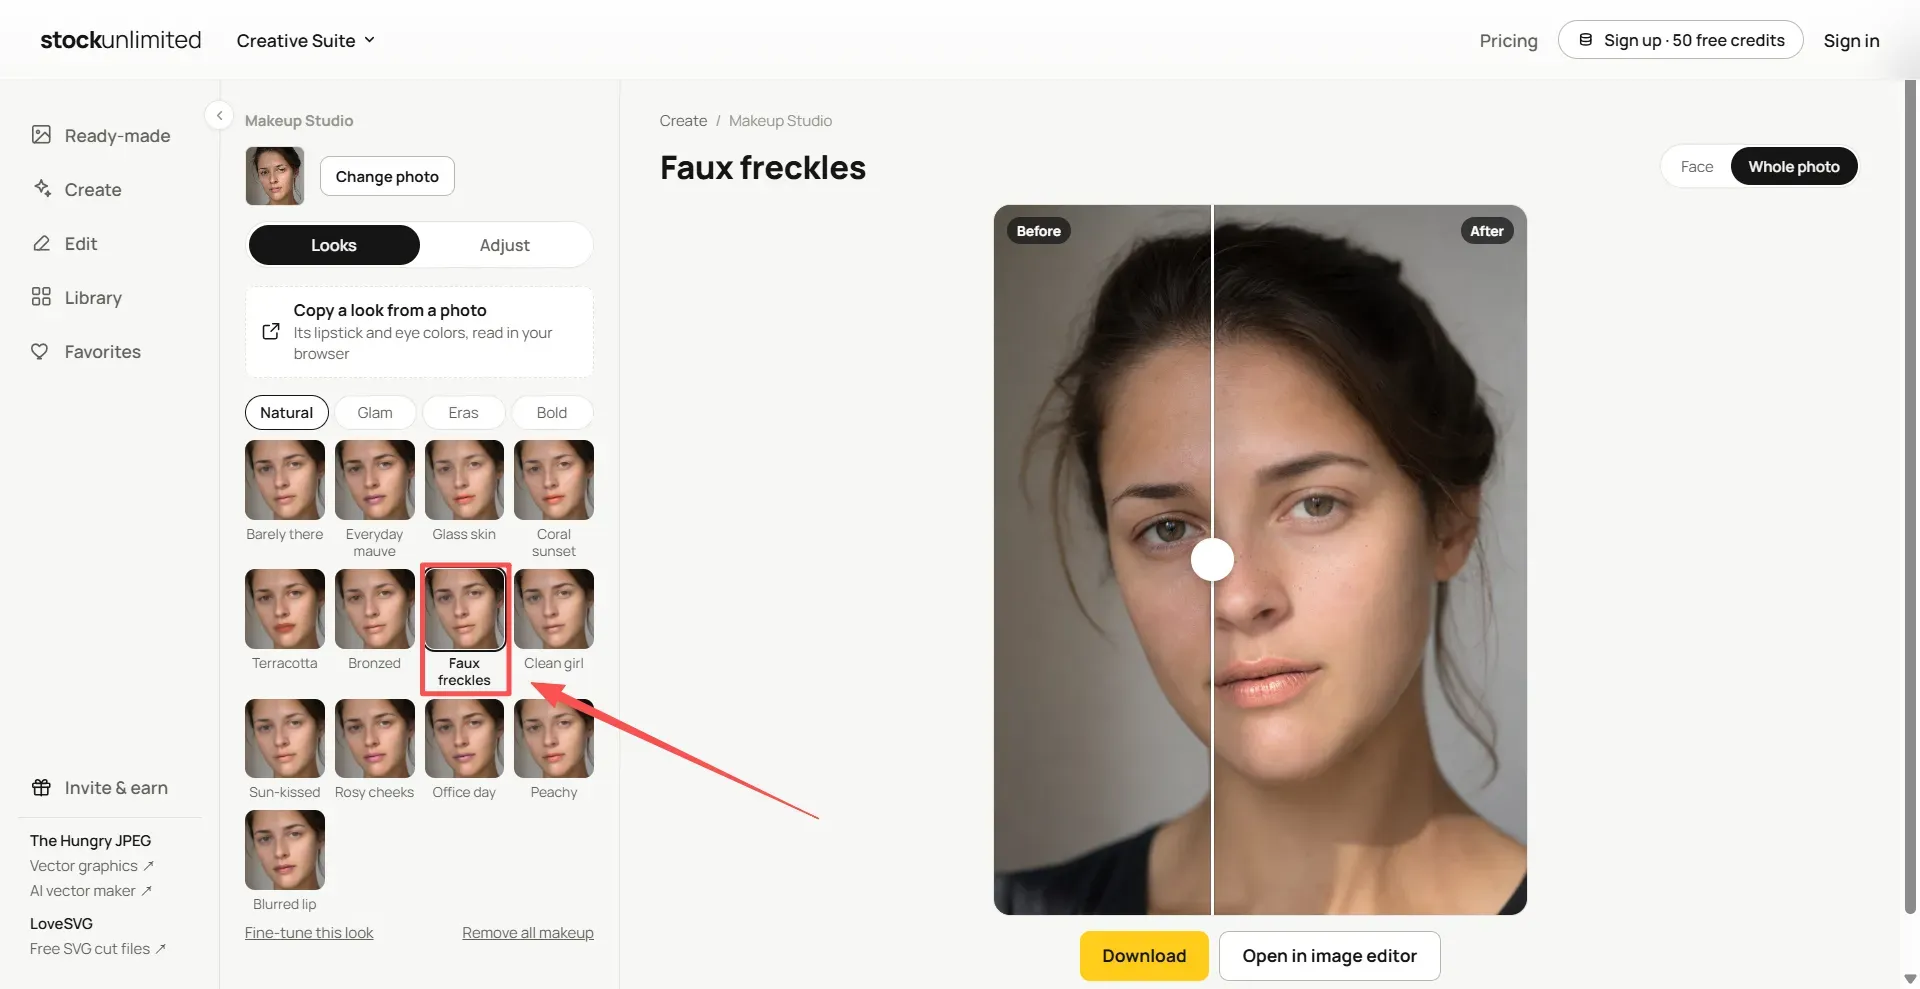
Adjust the result. Pixoate lets you fine-tune effect intensity, density, and freckle size, with additional darkness and warmth controls under Advanced controls. In StockUnlimited, switch to Adjust to enable freckles, choose a pigment color, and change the amount. You can also use the Face or Whole photo view to check the result.
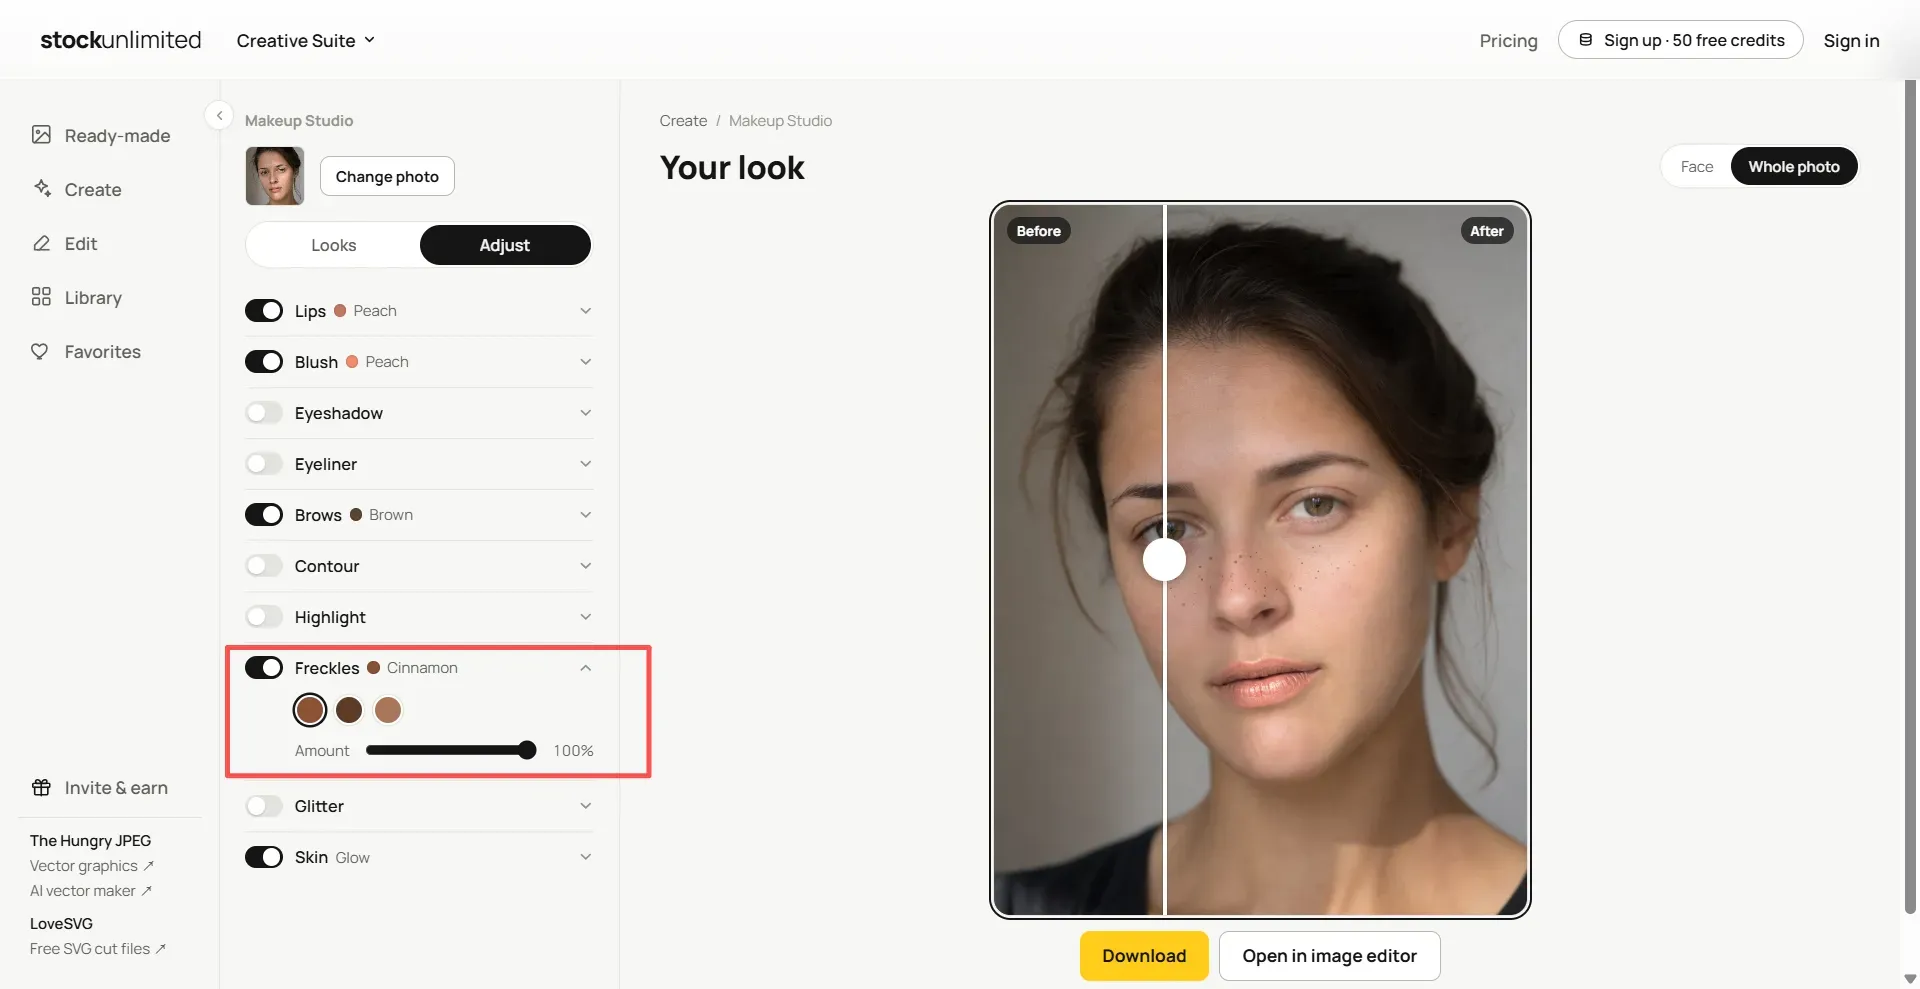
These tools are useful for quick selfie try-ons, but they offer less control over freckle placement than prompt-based editing or brush-based area selection. However, I would personally recommend StockUnlimited. It offers a free plan with no credit card required:
- 5 licensed stock photos
- 3 AI image generations or edits per day
- Access to 300 million stock photos
- 61,600+ editable design templates
- Photo and video editors
- Background remover and Magic Eraser
- Makeup Studio, including the Faux freckles preset
- No watermark and a commercial license
New users also receive 50 starting credits. Some AI features are credit-limited.
Way 4 Live Social AR Lenses vs Camera-Roll Video Reveals
Live AR lenses on TikTok and Instagram track facial landmarks to position virtual freckles on your face in real time.
Fast movements, partial face occlusion, or changing lighting can sometimes make the overlay look less stable. The freckles may shift slightly or lose alignment with the skin.
Using matching start and end portraits can create a more controlled freckle reveal without relying on a live AR overlay.
- Load your Start and End frames. Upload the bare-skinned original photo into the Start Frame slot and drop your freckled edit from Way 1 into the End Frame slot inside Seedance 2.5, Omni 1.1 Flash or Kling 4.0.
- Lock aspect ratio and duration. Set the output size to match your target social media platform and pick a 5-30 duration so the skin transition has enough frames to settle cleanly.
- Anchor the reveal with a lighting prompt. Paste the motion instruction below to tie the pigment transition to a warm sunbeam sweep rather than a flat cross-dissolve.
Simple transformation prompt template:
plaintext1Use Image 1 as the opening frame and Image 2 as the final look. Begin with [INITIAL APPEARANCE]. Then, make clearly visible [FRECKLE EFFECT] appear across [TARGET AREAS], building into the exact look shown in Image 2. Make the transformation obvious at a glance, with naturally varied freckles. As they appear, the subject [SUBTLE ACTION]. Hold the finished look at the end. Preserve facial identity, features, skin tone, and realistic skin texture. Fixed camera, no cuts or facial distortion. 2Audio: Add a [MUSIC STYLE] beat with a subtle rising shimmer, a crisp sparkle sound synchronized with the freckle reveal, and a rhythmic accent at the final reveal. No vocals.
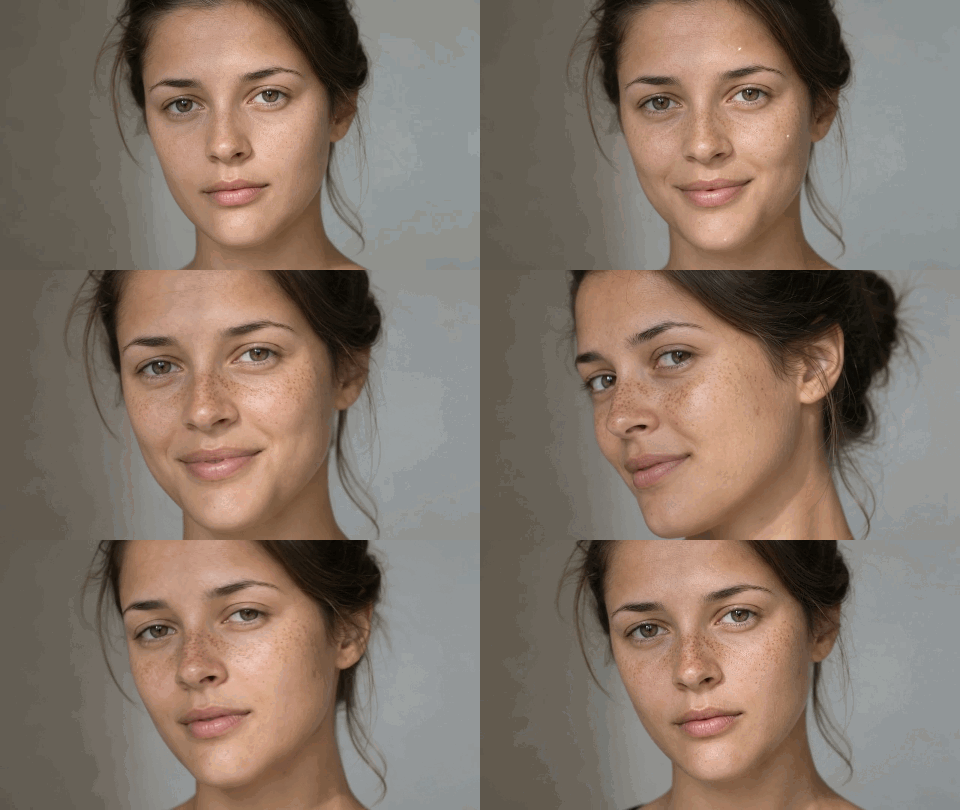
1, 2, 3 Transformation Prompt Templates
plaintext110s single-shot selfie video. 20–3s: Close-up of a bare-faced [Subject] looking at camera, counting aloud "One, two, three". Clear lip-sync. 33–4s: Right on "three", [Transformation detail, e.g., freckles instantly appear across her nose and cheeks]. 44–7s: Slow push-in. She gently turns her face side to side to show the [new detail]. 57–10s: Camera pulls back slightly. She smiles directly at the camera. 6Audio: Female voice counting "1, 2, 3", followed by a subtle pop sparkle sound. Keep facial identity and clothing consistent throughout.
You can customize the duration yourself.
Troubleshooting Common Freckles Filter Flaws
Ignore lighting direction or space your dots in a tight grid, and even a crisp shot turns instantly fake. Five specific texture mistakes cause almost every bad render.
| Visual Flaw | Likely Cause | Quick Fix |
| Uniform Polka-Dot Pattern | Repetitive spot sizes and spacing | Request irregular freckle sizes, spacing, and color intensity. |
| Orange or Grayish Freckles | Pigment clashes with the skin undertone | Use undertone-matched pigment colors from Recipe C. |
| Stray Freckles on Eyelids or Lips | Full-image editing or oversized selection areas | Exclude these areas in the prompt or narrow the Area Edit selection. |
| Waxy Skin or Lost Pores | Automatic skin smoothing or texture replacement | Ask the model to preserve original skin texture and visible pores. |
| Unnatural or Inconsistent Video Reveal | Subtle transitions, changing freckle patterns, or facial distortion | Use matching Start and End Frames, emphasize a visible freckle reveal, and ask the model to hold the final look. |
Before exporting, inspect the freckles for natural distribution, matching skin tones, and preserved skin texture. For videos, check that the transformation is easy to notice and the final freckle pattern remains consistent.