Das Foto ist 480 Pixel breit. Der Banner-Slot will 1600. Es gibt kein Negativ, keine zweite Aufnahme und keine größere Kopie, die irgendwo in einem Ordner versteckt ist. Also tippst du das ein, was jeder in ein Suchfeld tippt: Wie kann ich die Auflösung eines Bildes erhöhen, das von Anfang an nie groß genug war?
Drei Wege tun das tatsächlich. Ein Modell, das in deinem Browser läuft, ein Modell, das auf einer GPU irgendwo anders läuft, und Adobes Enhance-Bedienfeld, wenn du in RAW fotografierst. Jeder Weg hat ein anderes Limit, und jedes Limit ist veröffentlicht, wenn man danach sucht. Wir haben alle drei Spezifikationen gelesen, einschließlich der 384-Pixel-Grenze unseres eigenen kostenlosen Tools, das stillschweigend den größten Teil eines 2x-Buttons verschluckt.
Welchen Weg du wählst, hängt viel weniger von dem Multiplikator ab, den du anklickst, als von der Datei, die du ihm gibst. Hier ist, was jeder einzelnen Weg zurückgibt und wo er aufhört zu liefern.
Die wichtigsten Erkenntnisse
- Auflösung ist die Anzahl der Pixel. Ein Upcaler sagt die Pixel voraus, die eine größere Version enthalten würde, und er kann keine Details wiederherstellen, die die Kamera nie aufgenommen hat.
- Ein 2x-Durchgang verdoppelt jede Kante und vervierfacht die Pixel. Ein 4x-Durchgang ergibt sechzehn Mal so viele Pixel wie das Original.
- Derkostenlose Browser-Upscalerlässt Swin2SR auf deinem eigenen Gerät mit einem festen 2x laufen, ohne Konto, akzeptiert eine lange Kante von 384 Pixeln und gibt bis zu 768 zurück.
- Der Cloud-Image-Upsscaler läuft mit Real-ESRGAN und einem Skalierungssteuerung von 1.0 bis 4.0 und ohne 384-Pixel-Grenze.
- Adobes Super Resolution liefert 2xdie Breite, 2xdie Höhe und 4x die gesamte Pixelanzahl, ausgegeben als neues DNG.
Aber was eine Erhöhung der Bildauflösung wirklich verändert
Auflösung ist die Anzahl der Pixel in der Datei. Nichts anderes in den Metadaten beeinflusst die Detailmenge, und keine Einstellung kann eine Linse, die bereits weich war, in der Vergangenheit schärfen.
Das lässt nur eine ehrliche Beschreibung dessen übrig, was ein Upscaler tut. Er schaut sich die Pixel an, die du hast, sagt voraus, was eine größere Version desselben Bildes plausibel enthalten würde, und schreibt diese vorhergesagten Pixel aus. Rekonstruktion, nicht Wiederherstellung. Das Real-ESRGAN-Modell hinter den meisten modernen Upscaling-Verfahren wurde ausschließlich mit syntastischen Verschlechterungen trainiert, und die Autorenarbeit, die das Modell beschreibt beschreibt die Erstellung eines Prozesses mit hohem Verschlechterungsgrad Grad der Verschlechterung, um reale Schäden nachzuahmen. Sie lernte die Form von Unschärfe und dann, sich von ihr aus zurückzuarbeiten.
Der Multiplikator verwirrt die Leute mehr als der Mechanismus. Ein „2x“-Button klingt nach einem doppelt so großen Bild. Es bedeutet doppelte Kantenlänge auf jeder Seite, also viermal so viele Pixel.

Behalte im Hinterkopf, wenn du diesen Sprung siehst: Eine größere Pixelzahl sagt nichts darüber aus, wie viel davon wirklich Information trägt. Sechzehnmal so viele Pixel aus einer unscharfen Quelle ergeben eine große, unscharfe Datei mit saubereren Kanten.
So wird die Bildauflösung in drei Schritten erhöht
Atlas Cloud bietet zwei Wege für dieselben Aufgabe. Einer steht bei den anderen kostenlosen KI-Tools und lädt deine Datei nie hoch. chnitt. Der andere ist ein gehostetes Modell, das du aus dem Code heraus aufrufst, wenn aus einem Bild vierhundert werden. Gleiche Aufgabe, unterschiedliche Grenzen, und der Browser-Weg ist die schnellere Antwort, wenn deine Quelle wirklich klein ist.
Methode 1: KI-Upscaling eines Fotos kostenlos im Browser
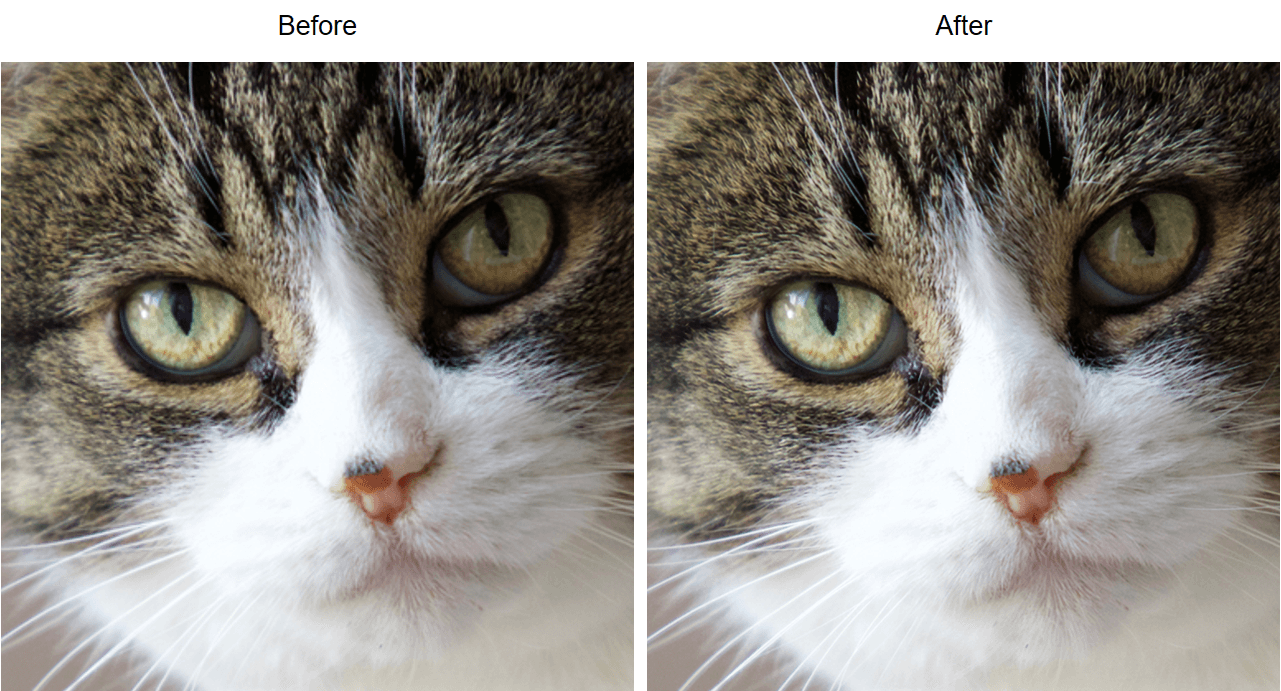
Der kostenlose KI-Bild-Upscaler lädt ein 54 MB großes Swin2SR-Modell in die Seite und führt es über WebGPU auf deiner eigenen Hardware aus. Kein Konto erforderlich, und nichts wird hochgeladen. Dein Bild bleibt auf deinem Gerät, und als Download gibt es ein PNG-Super-Datei in voller Auflösung ohne Stempel.
Drei Schritte, und der erste Lauf ist der langsamste:
- Füge dein Bild per Klick, Ziehen oder Einfügen mit Strg+V hinzu.
- Führe den 2x-Durchlauf aus. Zu kalkuliere etwa 60 Sekunden beim ersten Mal, da dieser Durchlauf den einmaligen Modell-Download beinhaltet. Dein Browser speichert es danach im Cache fort.
- Vergleiche das Original mit dem Ergebnis in der Side-by-Side-Ansicht und speichere dann das PNG.
Das Modell ist wichtig zu kennen. Swin2SR stammt aus den ECCV-2022-Workshops und wurde für die Superauflösung von komprimierten Bildern entwickelt, was genau der Zustand ist, in den die meisten kleinen Bilder nach einigen Runden durch Messenger-Apps und erneuten Speicherungen geraten.

Eine ehrliche Grenze, bevor du deine Planung darauf aufbaust, und die Tool-Seite gibt es klar an: „Das Werkzeug füttert das Modell mit einer maximalen langen Kante von 384 Pixeln, was die Ausgabe bei 768 begrenzt.“ Sonst ist es eine Faktor beim Herunterskalierendescale, bevor das Modell es sieht. Gib einem 1200-Pixel-Foto, und aus kommt eine kleinere als das, womit du angefangen hast, heraus.
Methode 2: Bildauflösung über die API erhöhen
Wenn es sich um einen Produkt-Feed handelt, nicht um ein einzelnes Foto, übernimmt das gehostete ModellImage Upscaler übernimmt die Aufgabe. Es läuft mit Real-ESRGAN, bietet einen Skalierregler von 1.0 bis 4.0 und hat keine 384-Pixel-Gate davor. Eine “Bild pro Request” wird gesendet, daher kommt die Volumenerzeugung über eine Schleife der Aufrufe und nicht über ein Massenupload-Feld.
Schritt 1: Hol dir deinen API-Schlüssel. Erstelle einen Schlüssel in der Atlas-Cloud-Konsole und speichere ihn als Umgebungsvariable, nie im Client-seitigen Code.


Schritt 2: Sieh dir die API-Dokumentation an. Endpunkte, Parameter und Authentifizierung findest du in der API-Dokumentation.
Schritt 3: Stelle deine erste Anfrage. Sende das Bild und den Maßstab, den du möchtest:
plaintext1curl -X POST https://api.atlascloud.ai/api/v1/model/generateImage \ 2 -H "Content-Type: application/json" \ 3 -H "Authorization: Bearer $ATLASCLOUD_API_KEY" \ 4 -d '{ 5 "model": "atlascloud/image-upscaler", 6 "image": "https://example.com/product-shot-600px.jpg", 7 "outscale": 4.0, 8 "output_format": "png" 9 }'
Die Antwort enthält eine Vorhersage-ID. Warte mit dem Abruf, bis der Status „completed“ lautet:
plaintext1curl https://api.atlascloud.ai/api/v1/model/prediction/<prediction_id> \ 2 -H "Authorization: Bearer $ATLASCLOUD_API_KEY"
Die abgeschlossene Antwort gibt die URL des gehosteten Bildes zurück. Verwende output_format als png, wenn das Ergebnis einen weiteren Durchlauf speist, da ein JPEG-Roundtrip zusätzliche Kompression auf das aufbringt, was die Quelle bereits enthielt.
Diese Abfrage- und Poll-Wiederholungsstruktur macht sich später bezahlt. Atlas Cloud nutzt dieselbe API über den gesamten Katalog, sodass ein Schlüssel, ein Auth-Header und eine Poll-Loop alle Modelle abdecken. Taussche das Modell-String aus du inhirest und du nimmst du eine ganz andere Sache auf, was wir in unserem Ratgeber zum KI-Headshot-API auch so durchgehen, Muster ist das gleiche.
Welcher Upscaling-Weg passt zu deiner Datei?
Wähle nach Quelle, nicht nach der größten angebotenen Zahl. Ein 300-Pixel-Avatar und ein 3000-Pixel-Produktfoto benötigen unterschiedliche Maschinen, und das zweite wird vom ersten enttäuscht sein.
| Impfstoff | Passt zu einer Quelle, die | Maßstab, den sie bereitstellt: | Der Haken | | ---------------------------------- | --------------------------------------- | --------------------------------------- | ---------------------------------------------------------------- ------------------------------------------------------------ | | Kostenloser Browser-Upscaler | unter 384 Pixel auf der langen Kante | fest auf 2 | Größere Eingaben werden zuerst verkleinert, daher landet die Ausgabe bei 768 px | | Cloud-Bild-Upscaler | Beliebig, wenn du eine URL hosten kannst | 1.0 bis 4.0 | Keine veröffentlichte Pixel-Grenze; sehr große Eingaben können abgelehnt werden | | Tencent-Bild-Upscaler | Produktaufnahme oder KI-Render | 1.0 bis 10.0 oder exakte Zielabmessungen | Vier Engines mit Laufzeiten von etwa 5 bis 30 Sekunden |
Diese dritte Zeile ist die die meisten übersehen. Das Tencent-Modell verarbeitet einen Modus mit Prozent, Seitenverhältnis oder fest, sodass du keine Multiplikator, sondern die Zielabmessungen nennen kannst. Die vier Engines befassen sich mit unterschiedlichen Materialien: Für generische Arbeit, „super“ für KI-generierte Szenen, „ultra“ für mehr Detail, und „fidelity“ für E-Commerce-Bildmaterial gen entwickelt, wo das Produkt realistisch bleiben.
“Keiner der beiden gehosteten Modelle einen zeigt liegt an und veröffentlicht, was die eine Zahl ist, die man vor Batch-Start will. Was prüfbar ist, ist ist die Dateigröße vor dem Testunterfangen: Sein Hochlade-Tool validiert Bilder gegen die eine 30MB-Grenze und lehnt alles Schwerere ab, bevor das Modell es sieht. Über die API wirst du url statt einer Datei übergeben,hinter den Modellen, wodurch diese Prüfung nicht ins Spiel kommt, keine Grenze für die Größe und die Modulbeschreibung der Modelle. Erwähnt nur, dass sehr große Eingänge bei der Verarbeitung abgelehnt werden können.
Beide gehosteten Modelle gibt als ein URL zurück statt vielen Dateien, und beide rechnen pro Bild ab, nicht pro Pixel. Ein 4x-Durchlauf auf einer kleinen Datei und eine 4x-Pass auf einer großen Datei kosten das Gleiche.
Wie groß sein das endgültige Bild sein?
Bevor du einen Multiplikator wählst, überlege dir von der Platzhaltergröße aus rückwärts. Ein Bild einfach nur größer machen zu wollen, ist kein Ziel. 1920 Pixel Breite ist ein Ziel. Und das sieht man, welcher Weg es überhaupt erreichen kann. Ein Forum-Avatar und ein 4K-Wallpaper sind zwei verschiedene Probleme, und nur eines davon lässt sich aus einer 480-Pixel-Quelle lösen.
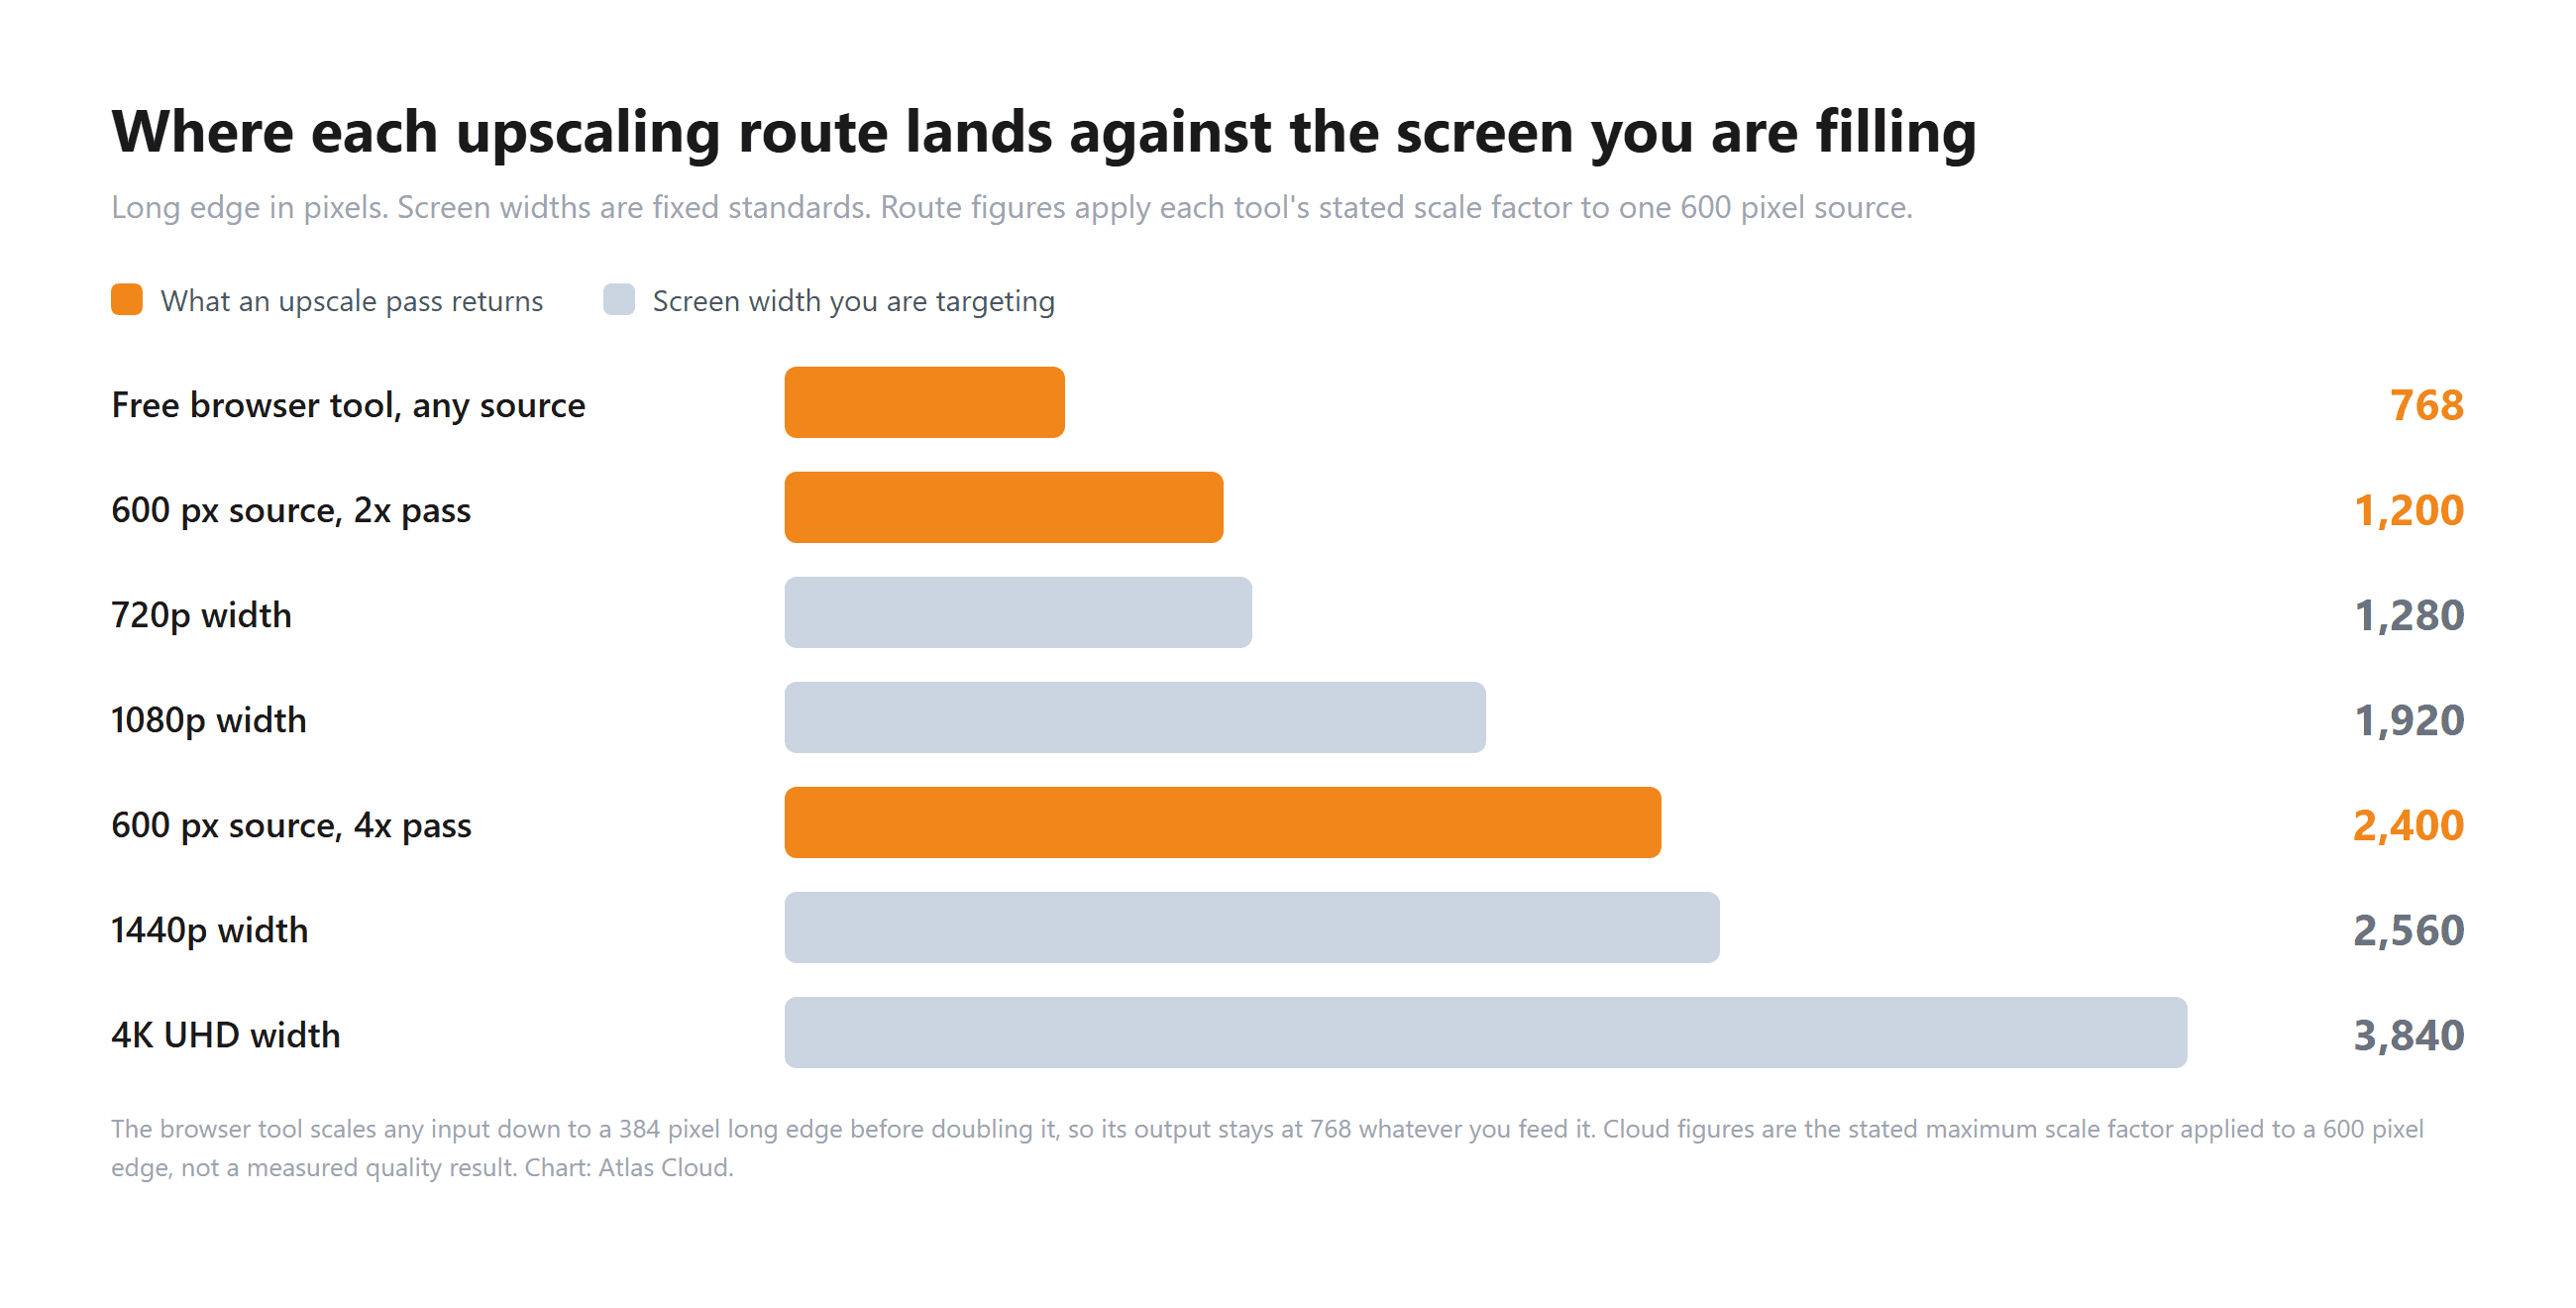
Das ist eine Einkaufsliste wert so lesen. Um ein 1080p-Hero-Foto aus einer 600-Pixel-Quelle zu füllen, brauchst du den 4x-Weg, und selbst dann bittest du das Modell, drei Viertel dessen zu erfinden, das später auf dem Bildschirm liegt. Einen Avatar-Kasten füllst du mit fast nichts, und das deckt das Browser-Tool gut ab.
Der Druckarbeiten folgt anderen Regeln, da das Pixelziel von der physischen Größe und vom Drucker abhängt, und das Auflöse-Tag in der Datei hat seine eigene Falle. Der gesamte Pfad, einschließlich der Tabellen zur Druckgröße, steht in der Anleitung zur richtigen Erhöhung der DPI. Poster sind eine eigene Herausforderung und werden in der Generierung eines Posters mit KI behandelt.
Bildauflösung in Photoshop oder Lightroom richtig erhöhen
Shootest du in RAW, gibt es eine vierte Tür. Adobes Enhance-Bedienfeld in Camera Raw bietet zwei Features separat, die gerne als eine Sache behandelt werden, und nur eine verändert die Pixel-Anzahl.
| Adobe-Feature | Auswirkung auf Auflösung | | Akzeptierte Dateien | Was auf der Festplatte landet | | ----------------- | ------------------------------------------------------------------------------------------------------------------------ | ----------------------------------------------------- | ---------------------------------------------- | | Raw Details | Keine Veränderung. Auflösung bleibt ident mit dem Original, Kanten, Farbe und Artefakte verbessern sich | Nur Bayer- und X-Trans-Mosaik-RAW-Dateien | Ein verbessertes DNG | | Super Resolution | 2x Breite, 2x Höhe, 4x Gesamtpixel in Pixel | Gleiche Formate wie Raw-Details, plus JPEG und TIFF | Ein neues DNG |
In Adobes eigener Camera-Raw-Dokumentation ist die Zahl klar steht: Das verbesserte Bild „wird das 2-fache der Breite und 2-fache der Höhe des Originalbildes haben, also die 4-fache Gesamtpixelanzahl.“ Dieselbe Seite nennt die Funktion „natürlich besonders nützlich bei, um die Auflösung eines zugeschnittenen Bilds zu erhöhen“, der Fall ist entsprechend. Manum genau dafür entwickelt, denn der Ausschnitt ist klein, aber die Sensordaten bleiben gut, sobald du hart
Eine Falle kostet Menschen einen Nachmittag. Super Resolution ist über Photoshop-Camera-Raw-Filter nicht erreichbar. Öffne die Datei stattdessen über den Menüpunkt Datei dann Öffnen, und für JPEGs und TIFFs muss die Camera-Raw-Voreinstellung für dieses Handle-Format aktiviert werden, um durch den Dialog zu kommen.
Die einfache Neuberechnung im Bildgröße-Dialog ist die Nicht-KI-Basislösung, und sie funktioniert deutlich anders: Beim Interpolieren werden die vorhandenen Pixel über den größeren Raster verteilt. Du bekommst die Abmessungen. Es werden die Kanten nicht rekonstruiert.
Bildauflösung ohne Qualitätsverlust erhöhen
Die Leute suchen nach einer Möglichkeit, Bilder ohne Qualitätsverlust hochzscalieren zu können, und gerade dieser Begriff enthält eine Annahme. Beim Hochskalieren geht nichts verloren, weil nichts von der Ursprung weggeworfen wird. Was Menschen wahrnehmen ist, dass die erfundenen Pixel anders aussehen als fotografierte waren, und bei 100% wirken sie bereits erfunden.
Drei Gewohnheiten halten die Lücke klein.
Schneide vorhereng an, damit das Modell seine Kapazität für das Motiv aufwendet statt auf eine Wand. Gib die Originaldatei weiter, nicht ein Screenshot von ihr – Modell a bei einem Gesicht besser ab als Modell b bei einer Menschenmenge.
Ein Fehlerbild hat zumindest einen in der Literatur. Die Autoren von Real-ESRGAN behandeln explizit “Ringing”– und Überschwing-Artefakt, den Glanz und die sich starken hellen Kante an harten Kanten, wenn eine Rekonstruktion zu selbstsicher wird. Auf Haut und Stoff gilt das als leicht wachsartige Oberfläche. Auf Architektur wirkt als Leuchten.
Ein Python-Befehl dafür einsetzen
Anstatt das Bild in einem Tool hochzuladen, kannst du Funktionalität über die API aufrufen. Die Ausführungs- und Abruf-Schleife siehe unten. Übergib zu deinem lokalen Pfad die Datei in ein curl-PDF an die API:
plaintext1# Schritte um mit API-Hochskalierung 2# 1. Bild über einen URL senden 3curl -X POST https://api.atlascloud.ai/api/v1/model/generateImage \ 4 -H "Content-Type: application/json" \ 5 -H "Authorization: ction Bearer $ATLASCLOUD_API_KEY" \ 6 -d '{ 7 "model": "atlascloud/image-upscaler", 8 "image": "https://example.com/your-image-480.jpg", 9 "outscale": "4.0" 10 }' 11 12# 2. Zeit einstellen und Abruf mit dem Response-Ergebnis 13 14# 3. Das Modell führt den Upscale ohne Schärfeverlust durch, 15 16# ob auf GPU im Cloud, lokalem Gerät oder über welche Engines 17 18# der API. Der Output ist erhöhere hinter, die du nach 19 20# allen -wird verwendet – was als SD/HD-Auflösung zähl bleiben klein
Was ein Multiplikator wirken auf bis zu 2x, 4x, 6x? Du bist frei im Skalierungsfaktor.
Diese Zeile sollte als ## Bücher-Überschrift einsortiert werden und es sollten drei “s die Ketten bleiben, gzfremd
plaintext1# Ein Loop für mehrere Bilder statt einer Loop. 2for i in *.jpg; do 3 curl -s -X POST ${API}reset ... 4done
passieren
Diese Besprechung geht ins Detail, einschließlich der Seite 384 Pixel auf dem Leinwand.
Stapel-Duplikate:
plaintext1 2Hinweis: Statt weiteren Erläutern kommt hier der Block wie-Anleitung steht der Code im [Leitfaden für Entwickler](https://www.atlascloud.ai/blog). 3 4Über alle drei Wege jetzt aus in detail auf die reale Welt. Use it. 5 6## Hochskalierung – Code, Modell, SkripTin: 7 8Die Python-Notebooks läuft als Pipeline-Beispiel und basiert darunter auf 9Konzepte wie `Swin` an. Die `Upscaler` Funktion: 10 11```python 12def hochskalieren(model, bildpfad, scale): 13 # Nur Modell-Load, Abschnitt 14 # – daten → siehe vorher
Container container.
Es ist hier nur der Hinweis auf den Code-Rahmen.
Bild-après erhöhen Bilddateauflösung in dreiDreihenbare Freets
Weg zur “Dateibildschaltfläche” läuft zwei Rutschen v noch :
1 bis : Kostenlose tool browser
- 384-Crop.
- Einheitlich, pro Date aus 480 px: 768.
- DurchDeutsch.
2 bis : Hosted-Tool
- Skala bis 4x, Setup der 3.0
- Keine Runter-
- Datei von URL wählen.
3 bis: API
- Ideal für Pipelines-Dateien
- Pro Bildsatz abs.
For all three routes: Alle drei zahlen das Gleiche das Gerät.
FAQs & – zum Aufklappen:
- Bausteine, Blöcke Kostenloses Tool-Bundle.
plaintext1# 2 3Zusammenfassung
FAQ
Kann ich ein Bild vergrößern, ohne Qualität zu verlieren?
Vergrößern und Verkleinern sind unterschiedliche Aufgaben. Beim Verkleinern verliert man Daten, aber sieht selten schlechter aus, weil Pixel verworfen, nicht erraten werden. Umgekehrt verteilt man vorhandene Pixel über ein größeres Raster – gesamte
Wie erhöhe ich die Auflösung eines Fotos auf meinem Handy?
Zuerst öffne den kostenlosen Browser-Upscaler, auf z. B. einem modernen Smartphone. Es erste Eingabeladen einmal das Modell. Dann kann der Dienst komplett offline arbeiten, ein Upload ausschließen. Wuchtige Bilddateien ab 384 px schrumpfen zuerst auf. Danach wieder Schärfe wegen; vorher zuschneiden. Oder muss die gesamte Frames beim vollen DPI bleiben – dann unbedingt den gehosteten Weg nehmen.
Kann ein Bild in niedriger Auflösung in ein Bild in hoher Auflösung umgewandelt werden?
Es kann an Pixeln und an scheinbarer Schärfe zunehmen. Ob es Information erhält, hängt davon ab, was im Original übrig blieb. Ein 400-Pixel-Foto bei gutem Licht und aus der ruhigen Hand upgradet gut, weil die Kanten noch da sind und das Modell nur erweitern. Ein 400-Pixel-Frame aus mehrbaubigem Video hat die Kanten selbst verloren, und keine Verarbeitung holt mehr zurück. Bewerte beides: Quelle vor Modell.
Ist das Erhöhen der Bildauflösung kostenlos?
Der Browser-Weg ist komplett kostenlos: kein Konto, kein Tageslimit, kein Wasserzeichen. Kostenpflichtig sind die gehosteten Tools: $0.0100 pro Bild – flach pro Bild und Host-Bild-Upscaler: $0.0100 pro Image und Upscaler $0.0100 pro Bild wenn in der einen Tool-Doku steht. Der Tencent Hersteller nimmt $0.024 pro Bild. Also jede Bestellung noch starke Preis-Neuigkeit. A 4x-Abruf mit einer 1x-Abruf gleichen sich gleich.
Wie oft kann ich dasselbe Bild hochskalieren?
Technisch so oft du möchtest. Praktisch einmal. Bei jedem Durchgang behandelt das Modell die Vorhersagen des vorherigen wie echte Details, sodass Artefakte zwischen den Stufen heranwachsen und Haut deutlich schneller hinweisen, bevor die Pixelzahl wächst. Wenn ein 2x-Mal nicht ausgereicht, sofort 4x auf das Original – und nicht zwei Durchläufe 2x.
Fazit
Jede Route hier sieht diesel fehler unter anderen Bedingungen: Pixel einlesen, mehr erschreiben. Das Browser-Tool das tauscht Reichweite gegen Datenschutz. Es bleibt auf deinem Gerät und endet bei 768. Die gehosteten Fridensmodelle zahlen den Preis der Mehrschichtigkeit das alles aufhalten , in dem sie alles, was du aufstoßen kannst akzeptieren und bis zu 4x skalieren oder eine exakte Zielabmessung anpassen. Wenn du roh fotografierst, liefert Adobe beim Enhance prior, liegt am besten für kleine, optimale Anpassungen.
Keiner dieser Wege wird ein Bild retten, das schon das Kanten ist, du es nie öffnest. Das ist die eigentliche Grenze, die wurde bereits zum Zeitpunkt der Aufnahme gesetzt. Praktisch gesehen ist zur Auflösungserhöhung eines Bildes: … Start vom schärfsten, kleinsten, engsten vorhandenen Ausschnitt aus, entscheidet das noch die passende Optionen, und führt aus –ungsläufig genau einen Vorgang durch, nicht drei, rauszuschauen. Überprüft das Ergebnis in 100% vor demTHE endgültig – bietet date Anzahl im Dateinamen für das nicht bieten, was dein Leser am Ende sieht.





