The fastest way to burn through your PixVerse free credits is to guess your way around the interface. Every failed render costs the same as a keeper, so ten minutes of orientation pays for itself on your first session.
That orientation is this guide. If you searched "pixverse ai video generator how to use," most of what ranks describes the 2025 product: 8-second caps, per-clip pricing, lip-sync as a separate step. The current engine works differently, and the numbers below come from PixVerse's own docs and Atlas Cloud's live model pages, checked July 27, 2026.
Key Takeaways
- PixVerse runs on V6 now: any clip length from 1 to 15 seconds, up to 1080p, eight aspect ratios, and audio generated in the same pass (V6 docs).
- Signing up takes one click with Google, Apple, or Discord, or an email form. There is no phone-number option.
- Free accounts get daily credits that vary by account and region. Free renders carry a watermark and cap at 540p.
- The same V6 model is metered on Atlas Cloud from $0.025 per second without audio. The default 5-second 720p clip with sound costs $0.30 per run, with no subscription and no watermark.
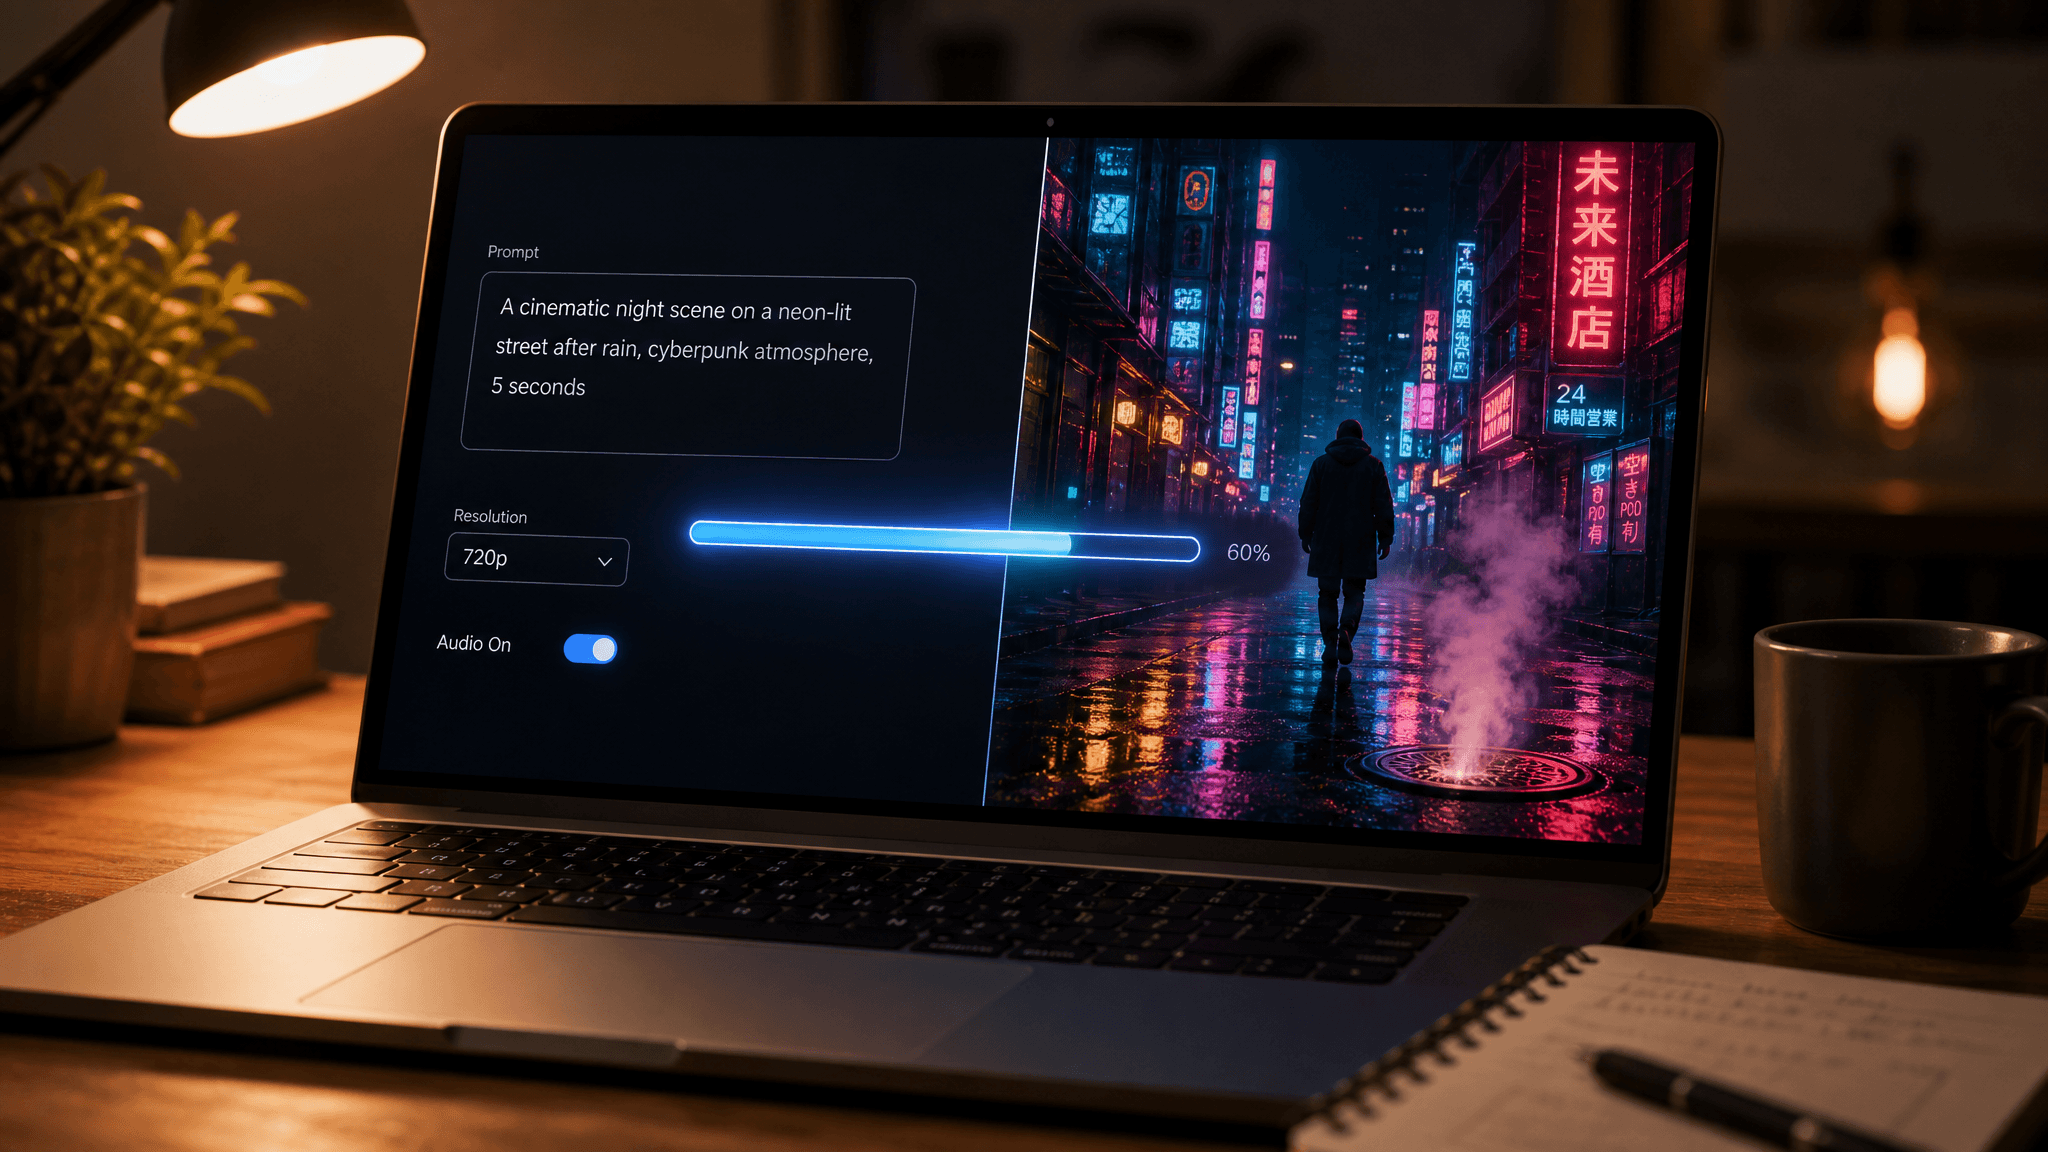
Inside the PixVerse AI Video Generator
Before touching any buttons, it helps to know what the tool actually contains, because "PixVerse" is six creation modes sharing one credit balance. The generation modes run on the V6 engine released March 30, 2026, with C1 available as a storyboard-focused sibling, and all five accept any whole-second duration from 1 to 15.
| Mode | What you supply | What it does |
|---|---|---|
| Text to video | A written prompt | Renders a clip from scratch, sound included if you want it |
| Image to video | One photo plus a prompt | Animates your image; the photo sets the frame shape |
| Transition | A start frame, an end frame | Generates the motion between the two images |
| Extend | A finished video | Adds 1 to 15 more seconds to an existing clip |
| Reference to video | Reference images of a subject | Keeps a face or product consistent across new scenes |
| Effect templates | One photo, one tap | Preset viral effects, billed per use instead of per second |
The official web app lives at app.pixverse.ai. Third-party sites resell the same model under their own branding, usually with stale specs, so when a tutorial contradicts the first-party docs, trust the docs. This guide gets the account out of the way first, then covers the two access routes, the two modes people actually search for, and closes with prompt craft.
How to Sign Up for PixVerse AI
Registration is the short part of any PixVerse AI tutorial. The login modal at app.pixverse.ai offers exactly four routes: Google, Apple, and Discord buttons at the top, an email form below them. No phone-number login exists.
The social buttons double as registration. Click one, approve the OAuth prompt, and your account exists. The email path asks for a username, your address, and a password entered twice, with a Cloudflare Turnstile check running silently in the background. A marketing-email checkbox is optional; signing in itself constitutes agreement to the terms, which the modal states in small print.
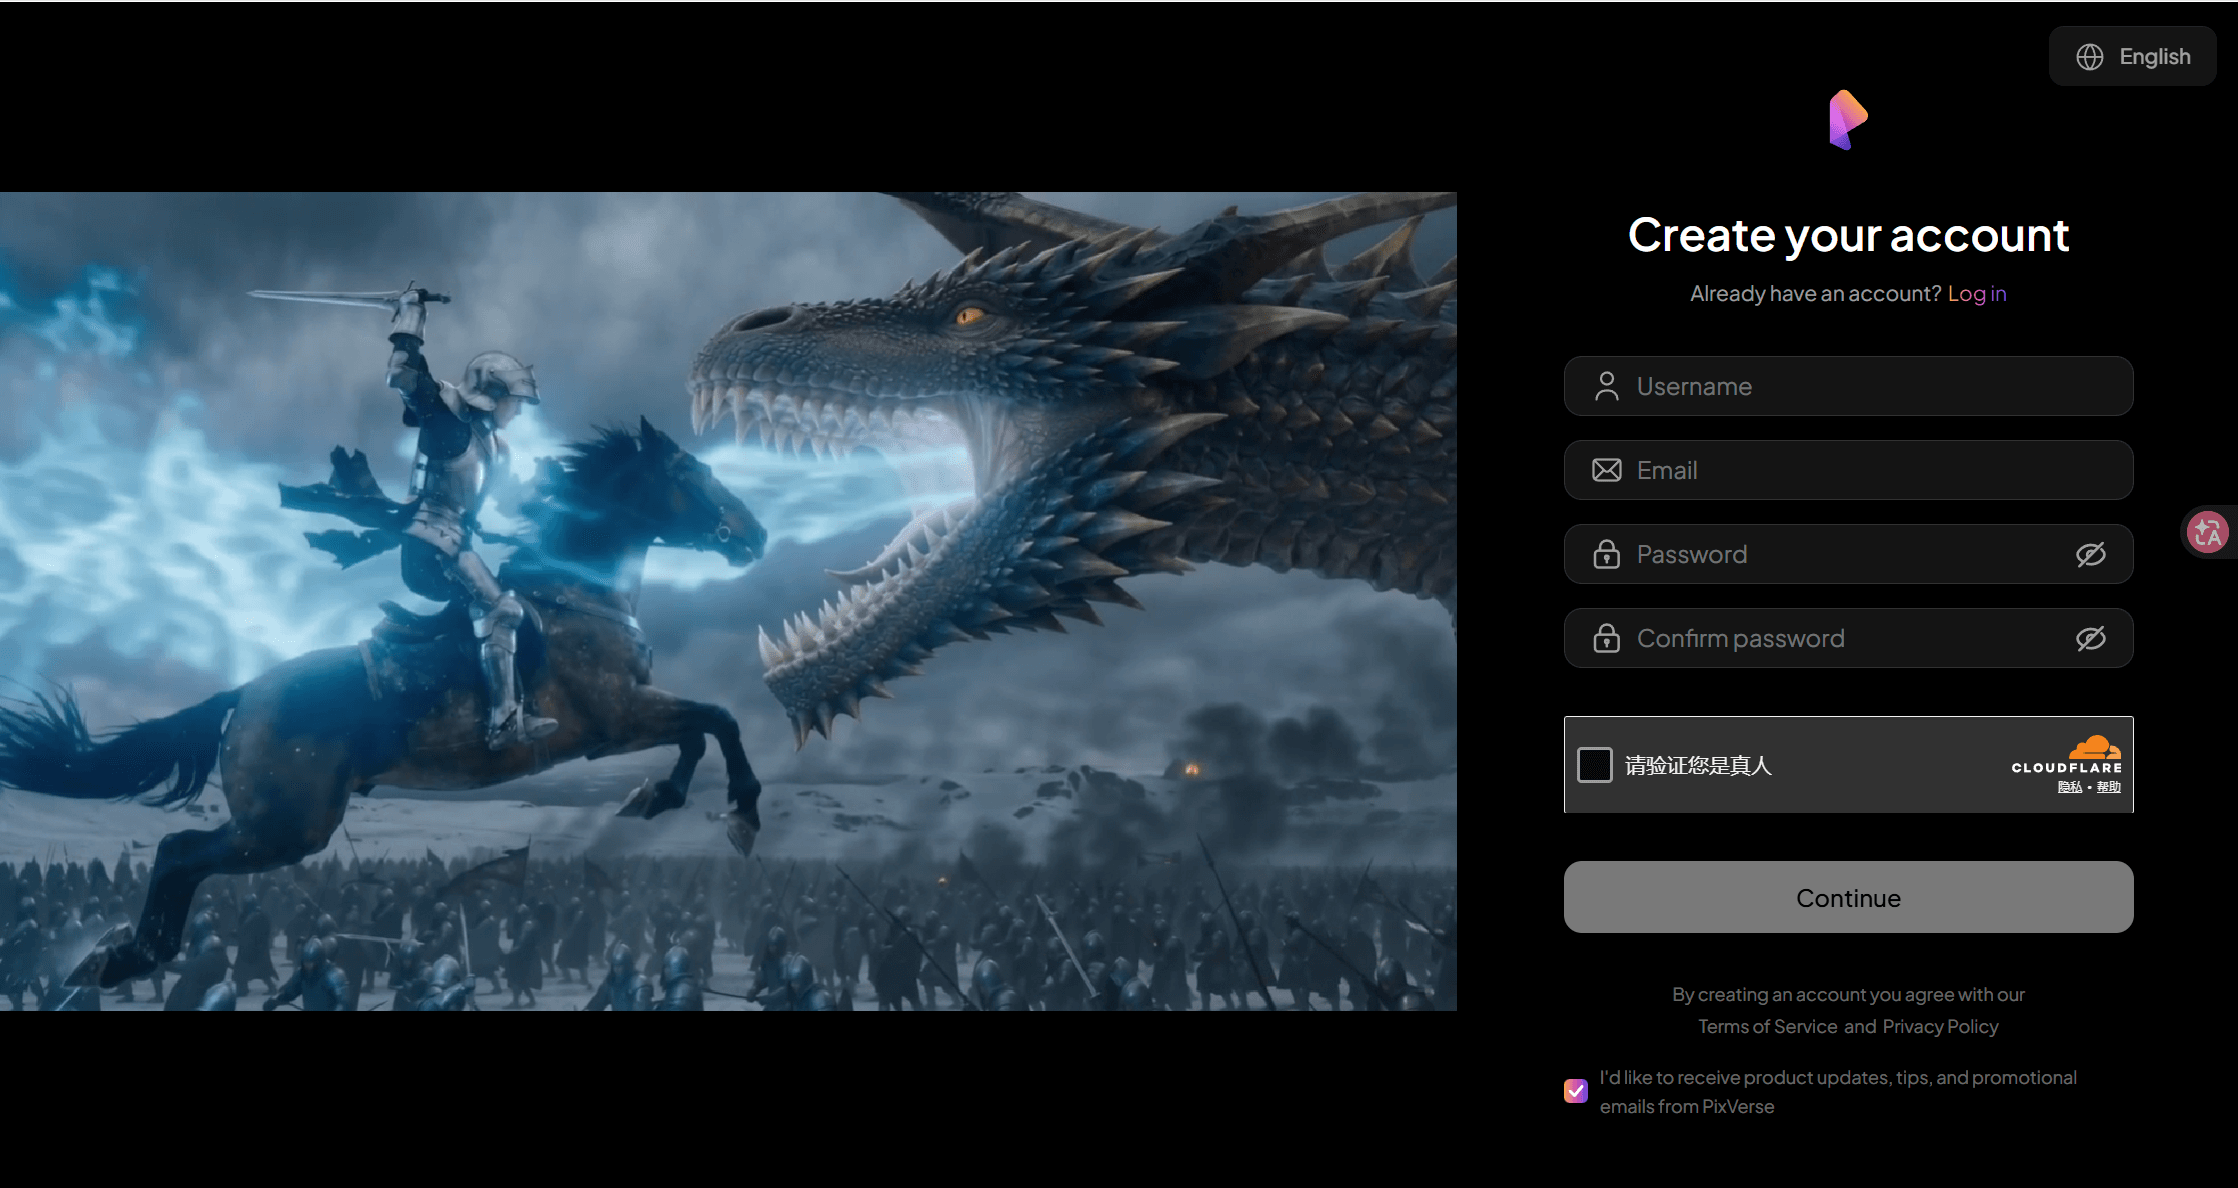
One quirk worth knowing: PixVerse geo-detects your region and may serve the interface in Chinese. The language switcher sits at the top of the login modal, so you can fix it before creating the account. Once you are in, the create panel is immediately usable and your daily free credits are already loaded. What those credits cover, and what they withhold, is in the FAQ below.
Run the PixVerse AI Video Generator on Atlas Cloud
One choice is worth making before you build habits around either interface. Atlas Cloud hosts the same V6 engine alongside hundreds of other models, billed per second with no subscription and no watermark at any resolution. Every hosted PixVerse endpoint, from text-to-video through extend, is listed on the PixVerse family page. If your interest in learning PixVerse is producing videos at volume rather than playing inside an app, this route skips the credit system entirely.
The per-second rates on the live model page, verified July 27, 2026, with no discount currently running:
| Quality | Without audio | With audio |
|---|---|---|
| 360p | $0.025/s | $0.035/s |
| 540p | $0.035/s | $0.045/s |
| 720p | $0.045/s | $0.060/s |
| 1080p | $0.090/s | $0.115/s |
Method 1: PixVerse in the Atlas Cloud Playground
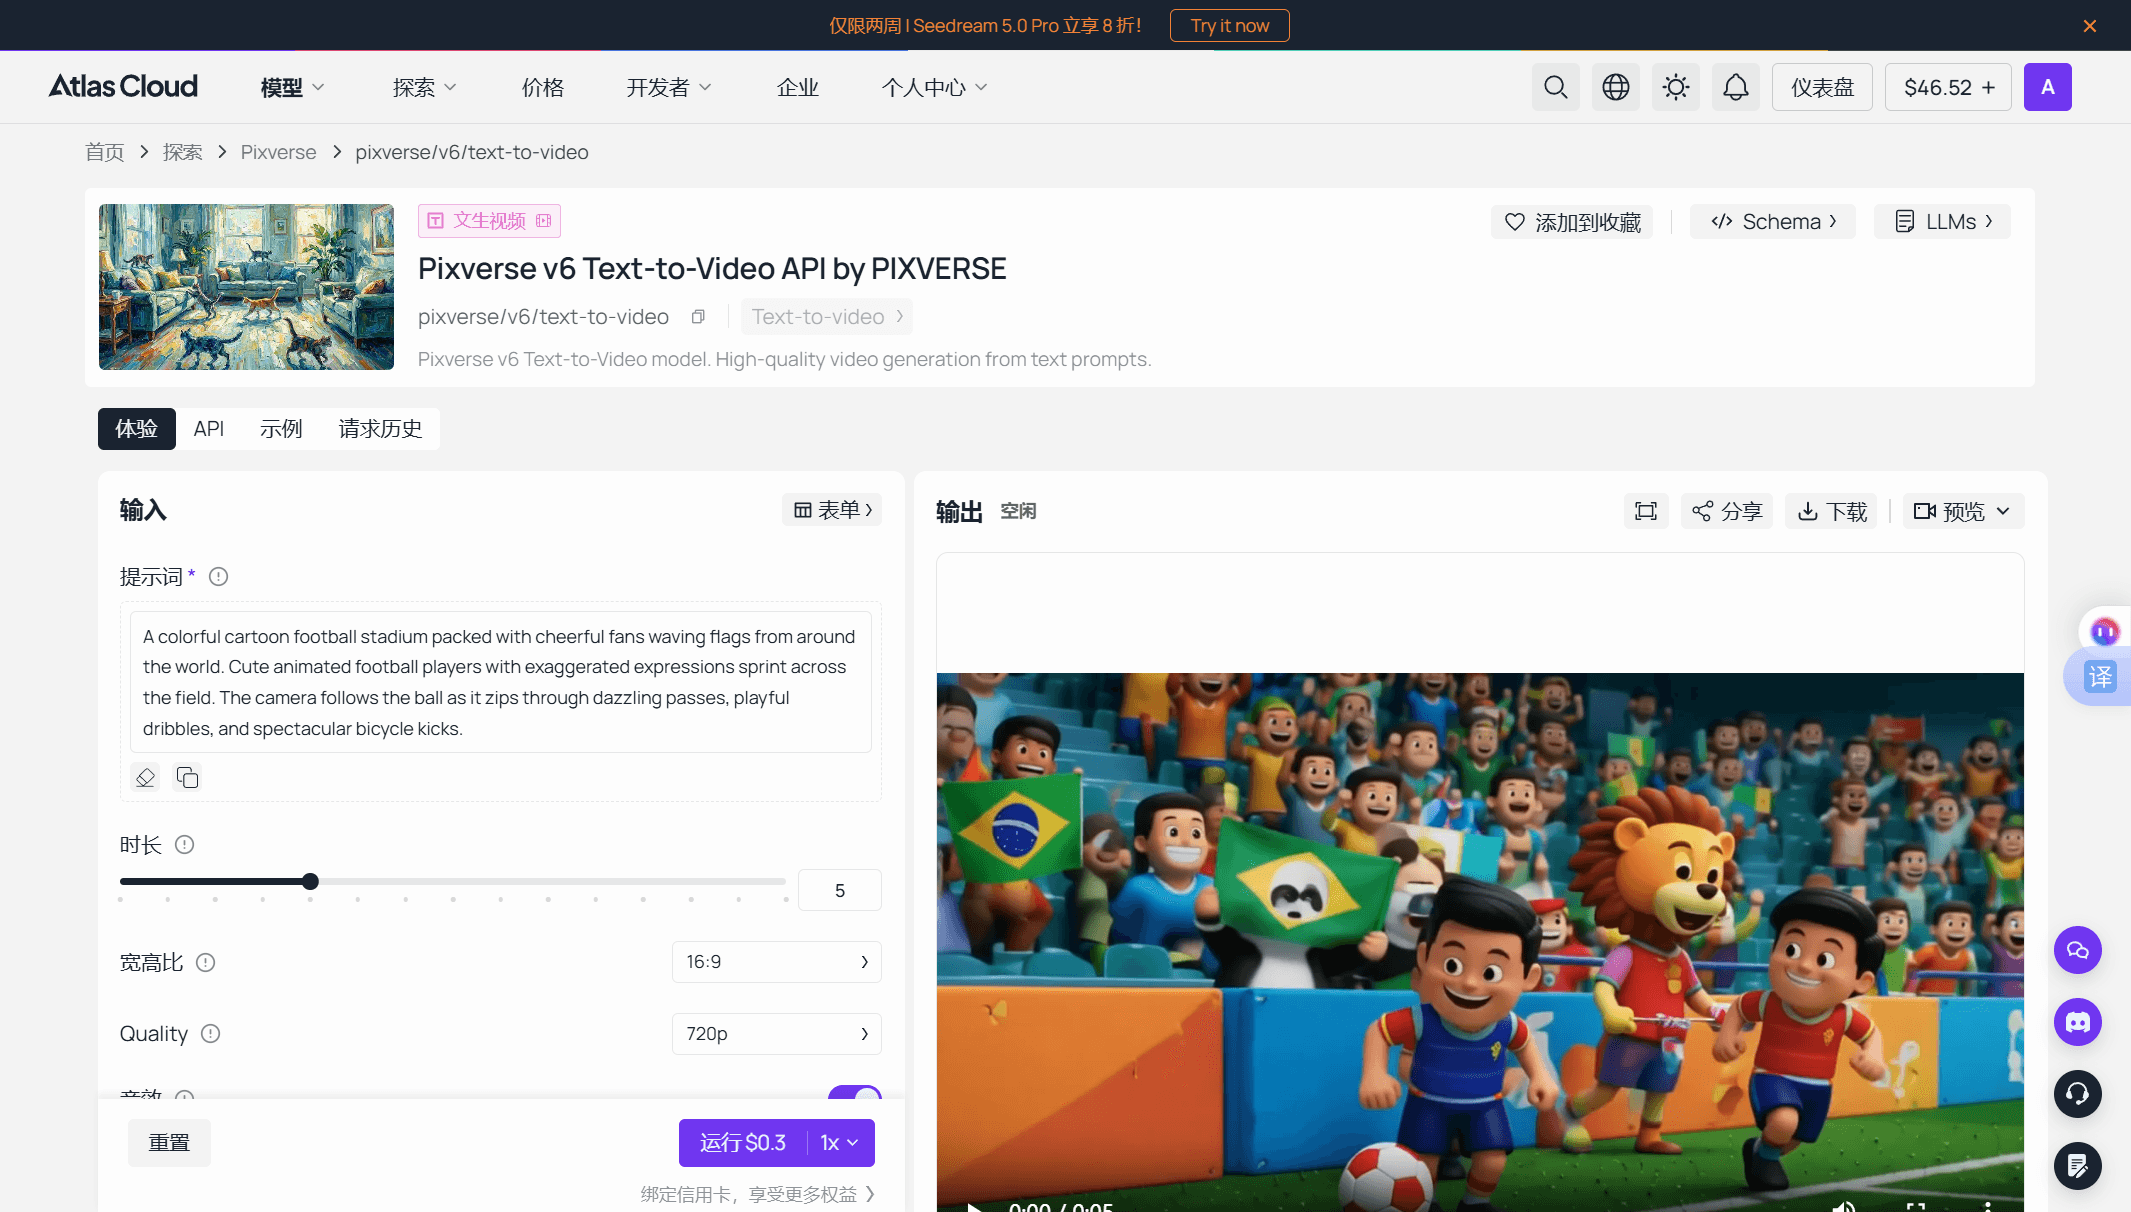
The V6 text-to-video playground is a login-and-go form. Only the prompt field is required.
- Write the prompt in the input panel.
- Adjust duration, aspect ratio, and quality. Defaults are 5 seconds, 16:9, 720p.
- Leave sound on or toggle it off. Audio raises the per-second rate.
- Check the Run button, which quotes the exact price of your settings. At the defaults it reads $0.30 per run, so $10 covers roughly 33 clips.
- Run, then download from the output panel.
Method 2: PixVerse Through the Atlas Cloud API
Once a prompt behaves in the playground, production is two HTTP calls.
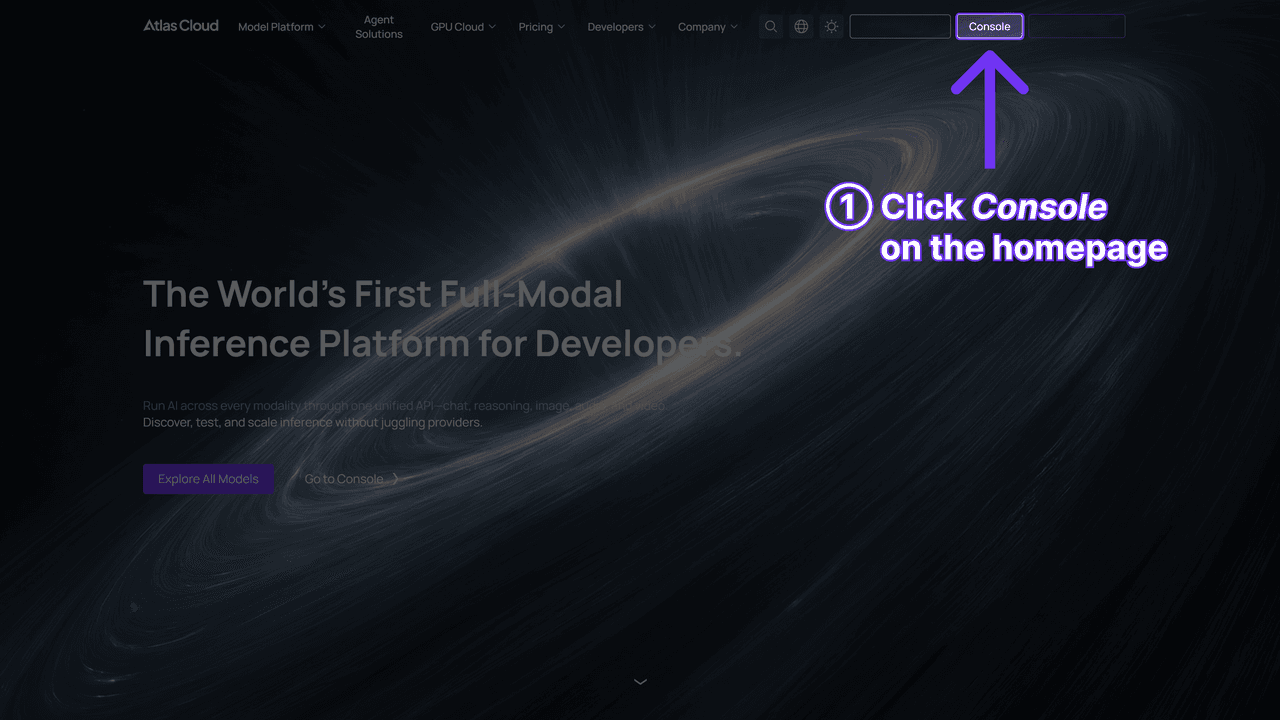
Step 1: Get your API key. Create a key in the Atlas Cloud console and store it as an environment variable, never in client-side code.
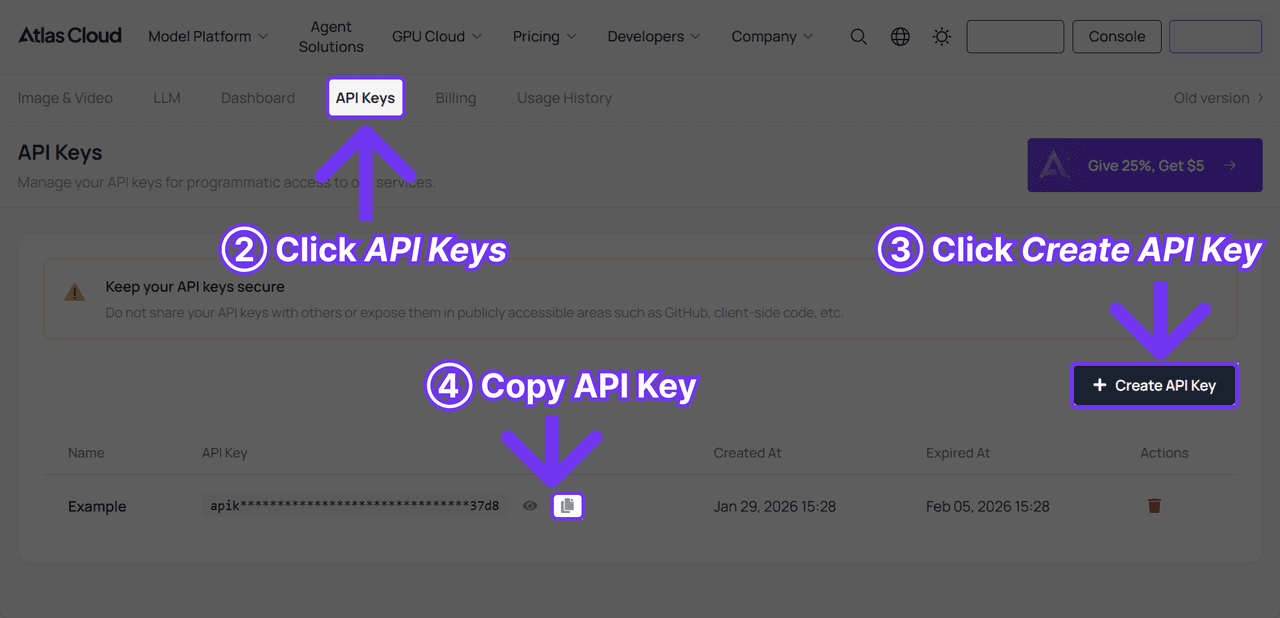
Step 2: Check the API docs. Endpoints, parameters, and authentication live in the API documentation.
Step 3: Make your first request. Submit the job:
plaintext1curl -X POST https://api.atlascloud.ai/api/v1/model/generateVideo \ 2 -H "Content-Type: application/json" \ 3 -H "Authorization: Bearer $ATLASCLOUD_API_KEY" \ 4 -d '{ 5 "model": "pixverse/v6/text-to-video", 6 "prompt": "A golden retriever puppy chases soap bubbles across a sunlit backyard, low camera angle, shallow depth of field", 7 "duration": 5, 8 "quality": "720p", 9 "aspect_ratio": "16:9", 10 "sound": true 11 }'
The response returns a prediction ID. Poll it until the status reads completed:
plaintext1curl https://api.atlascloud.ai/api/v1/model/prediction/<prediction_id> \ 2 -H "Authorization: Bearer $ATLASCLOUD_API_KEY"
The completed response carries the hosted video URL. Atlas Cloud runs one API across the whole platform: one key, one auth header, one submit-and-poll loop for every model. When PixVerse ships its next version, you change the model string and nothing else.
PixVerse AI Text to Video Tutorial
Signed in, you land on text to video as the default tab of the create panel, and this is where the current engine feels most different from what older guides describe.
- Type the prompt. Plain sentences describing subject, action, camera, and light; the prompt guide below turns this into a repeatable structure.
- Set the duration. The selector runs from 1 to 15 seconds in one-second steps, defaulting to 5. Billing is per second, so a 15-second clip costs three times a 5-second one.
- Pick the resolution. Options run 360p to 1080p. On a free account, output caps at 540p, so leave 1080p ambitions for later.
- Choose an aspect ratio. Eight options, from 9:16 vertical to 21:9 ultra-wide.
- Decide on audio. Sound renders in the same pass as the pixels, ambient noise and effects included, and it costs extra credits per second.
- Generate. Credits are deducted per attempt whether or not you keep the result. Free renders come back watermarked.
Here is what those six steps produce in practice. The clip below came from a single run of this prompt, 5 seconds at 540p with audio on: "A paper boat drifts down a rain-gutter stream at golden hour, camera tracking low alongside, water droplets catching the light."
A drafting habit that stretches any budget: render tests at 540p with audio off, then re-run only the winning prompt at full quality. The settings transfer unchanged; only the deduction grows.
Every interface setting and its exact per-tier cost gets a fuller breakdown in our text to video guide.
PixVerse AI Image to Video Tutorial
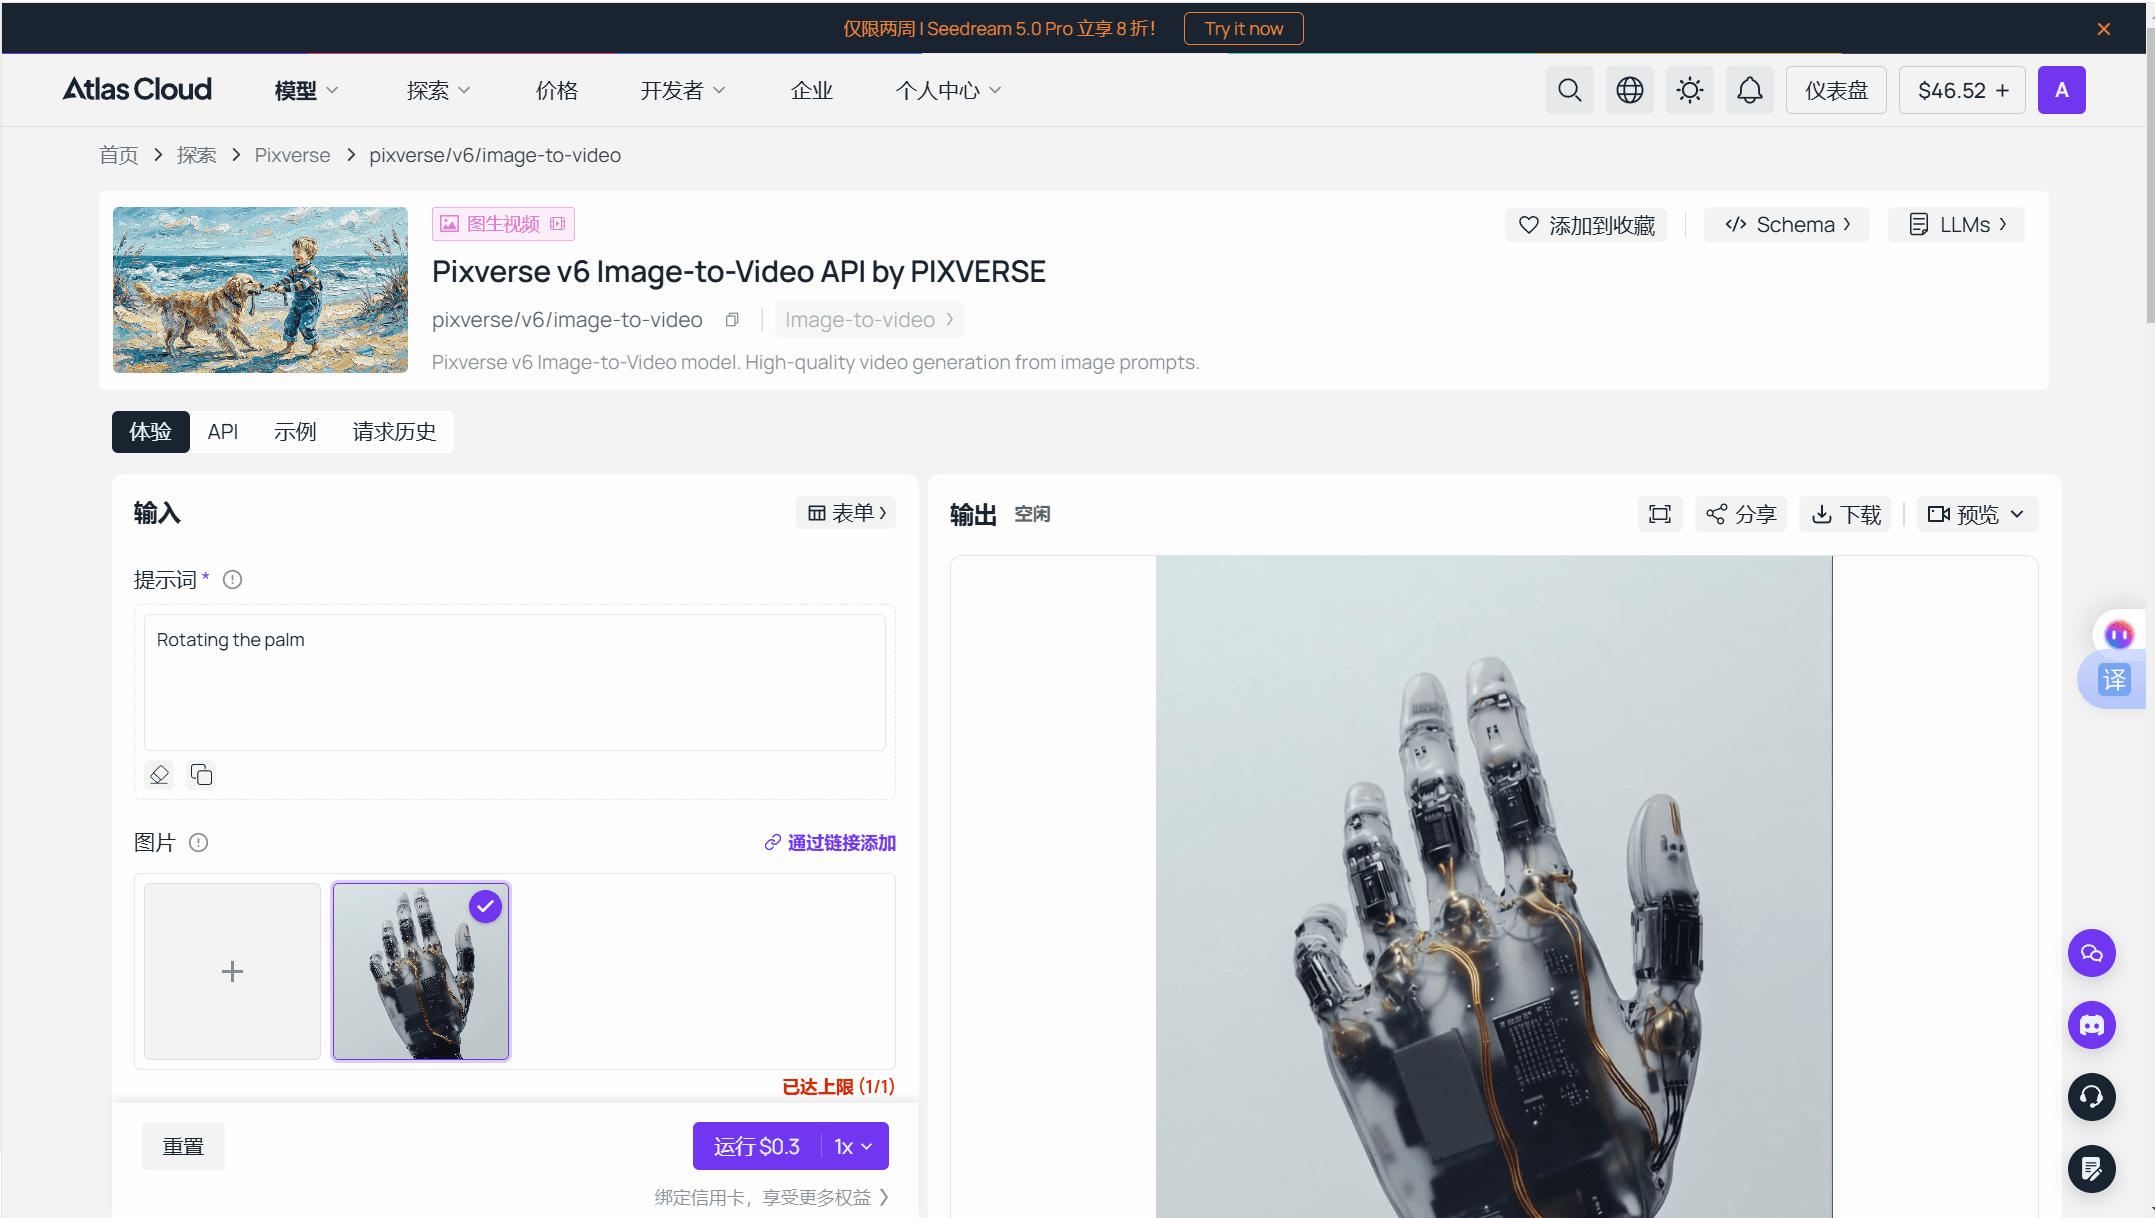
Image to video answers a different question. You already have the exact face, product, or artwork; you want it to move. Where the text mode invents everything, this mode treats your upload as the first frame and animates from it, which makes it the more predictable of the two.
The workflow changes in three places:
- Upload the image. Switch the create panel to image to video and drop in your photo. Clean, well-lit source images animate best.
- Skip the aspect ratio. There is nothing to choose. The output inherits the shape of your upload, so crop the image to the format you want before uploading.
- Write the prompt about motion. The picture already answers what things look like. Spend your words on what happens: "she turns toward the window and smiles slowly, camera pushes in" beats another description of her hair.
Duration, resolution, and audio work exactly as in the text mode. The same per-second dollar matrix from the pricing table above also applies to the hosted image-to-video playground on Atlas Cloud, where the photo is supplied as a URL or upload alongside the prompt:
For source-image preparation, free-tier specifics, and copy-ready example prompts, this mode has its own image to video guide.
PixVerse Prompt Guide: Writing Lines That Render
The tutorials above cover every control. The prompt is the input they all share, and the same rules hold whether you type into the app or send JSON to an API. Any serious PixVerse prompt guide starts from the official length advice: PixVerse's own how-to docs recommend 25 to 200 words. Under 25 leaves the model guessing; past 200, instructions start to contradict one another.
Structure beats vocabulary. Cover four things in plain sentences: who or what is in frame, what they do, how the camera behaves, and what the light looks like. Adjectives pile up without effect, while concrete verbs get rendered.
One thing you will look for and not find is a negative prompt box. The web app has none, and the current generation API reference lists no such parameter either. Write exclusions as positive instructions instead: "camera locked on a tripod" works where "no shaky camera" has nothing to attach to. And when a render comes back close but wrong, reuse its seed value with a nudged prompt rather than starting from a fresh random one; the seed field accepts any value from 0 to 2147483647 and holds the composition steady between attempts.
| Weak prompt | Working prompt | What changed |
|---|---|---|
| A beautiful city at night | Rain-wet street market at night, neon signs reflecting in puddles, a vendor steams dumplings, slow dolly forward | Named subject, one action, one camera move |
| A cool dragon flying, epic, cinematic, 4K | A bronze dragon glides low over a foggy pine valley at dawn, wingbeats stirring the mist, camera tracking alongside | Swapped quality words for physical detail |
| Girl dancing, no blur, don't change her face | A woman in a red coat dances alone in an empty subway station, fluorescent light, camera locked, her face stays sharp and consistent | Exclusions rewritten as positive instructions |
Frequently Asked Questions
How do I use PixVerse AI for free?
Using PixVerse AI for free requires nothing beyond registering; daily credits appear on their own. How far they stretch is the real question. PixVerse's official blog says balances vary by account, region, and product route, and points users to the in-app counter instead of promising a number. The hard limits sit on the output side: free renders carry a watermark and cap at 540p, with watermark removal starting on the $10 Standard plan as of July 2026.
How do I delete my PixVerse account?
Two routes exist and their timelines differ. Third-party walkthroughs document an in-app path (avatar, then UserInfo, then Delete Account, with a double confirmation) that takes effect after 5 days. PixVerse's own deletion instructions, now offline but archived, describe emailing [email protected] with the subject "Account Deletion Request" from your registered address, with deletion completed within 30 days. Both are irreversible. Our PixVerse login guide covers both routes in detail.
Does this guide work as a PixVerse app tutorial for mobile?
Yes. PixVerse ships iOS and Android apps on the same account system, and the generation modes match what this walkthrough covers on the web. One caveat: the free-credit variability above extends to product routes, so the app and the web version may load different daily amounts. The steps here were written against app.pixverse.ai, which exposes every setting in one panel, so learn there and the mobile version holds no surprises.
Conclusion
Learning how to use PixVerse AI comes down to three decisions. Pick your door: the free app for testing, a subscription for regular watermark-free posting, or per-second metered access when volume matters. Pick your mode: text to video when you are inventing the shot, image to video when the subject already exists. Then put the real effort into the prompt.
Treat the first render as calibration rather than a finished product. Read what comes back, change one thing, and run it again.





