
You generate an AI headshot, add “hyper-realistic, 8k, masterpiece,” and still get that plastic, airbrushed face that screams synthetic. Whether using premium APIs or evaluating free AI headshot generation tools, the model architecture itself is rarely the problem—over-prompting for artificial perfection is.
To achieve authentic photorealism, you must shift from quality buzzwords to camera-native photography language. Realism is built through intentional imperfection.
| Prompting Strategy | Standard Approach (Looks Synthetic) | Pro Approach (Camera-Native Realism) |
| Texture & Skin | "smooth flawless skin, perfect face" | "visible pores, subtle skin texture, natural asymmetry" |
| Lighting | "studio lighting, cinematic glow" | "diffused overcast daylight, soft window fill, natural shadows" |
| Camera Optics | "photorealistic, highly detailed, 8k" | "shot on 85mm f/1.8 lens, raw photograph, shallow depth of field" |
Diffusion models process optic metadata better than subjective adjectives. Specifying a physical focal length (like an 85mm prime lens) forces the model to calculate realistic optical compression and focal falloff rather than applying a flat digital filter. By prompting for optical constraints, natural lighting, and micro-imperfections, your outputs move past the uncanny valley.
Key Takeaways
- Stop Quality Buzzwords: Words like "hyper-realistic" or "8k" trigger over-processed digital filters. Realism comes from camera optics, lighting angles, and skin micro-imperfections.
- Use Style-Specific Optics: Match focal length and lighting to the profession—85mm f/2.0 for sharp corporate shots, broad window daylight for creative leaders, and 50mm golden hour for outdoor thought leaders.
- Match Model Architectures: When running prompts on platforms like Atlas Cloud, use raw optical metadata for technical models (Flux/Seedream) and relational context for natural language models (GPT Image 2).
Why Most AI Headshots Look Synthetic And How to Stop It
You generate a professional avatar, only to receive a wax figure with dead eyes, porcelain skin, and blinding teeth. This unsettling effect is known as the uncanny valley.
Over-smoothed AI photos stem from two habits. First, quality keywords such as “hyper-realistic” or “masterpiece” push models toward idealized averages rather than photographic truth. Second, common negative prompts that ban “blur” or “noise” strip away the very micro-details that signal real skin. AI image quality then collapses into plastic surfaces.
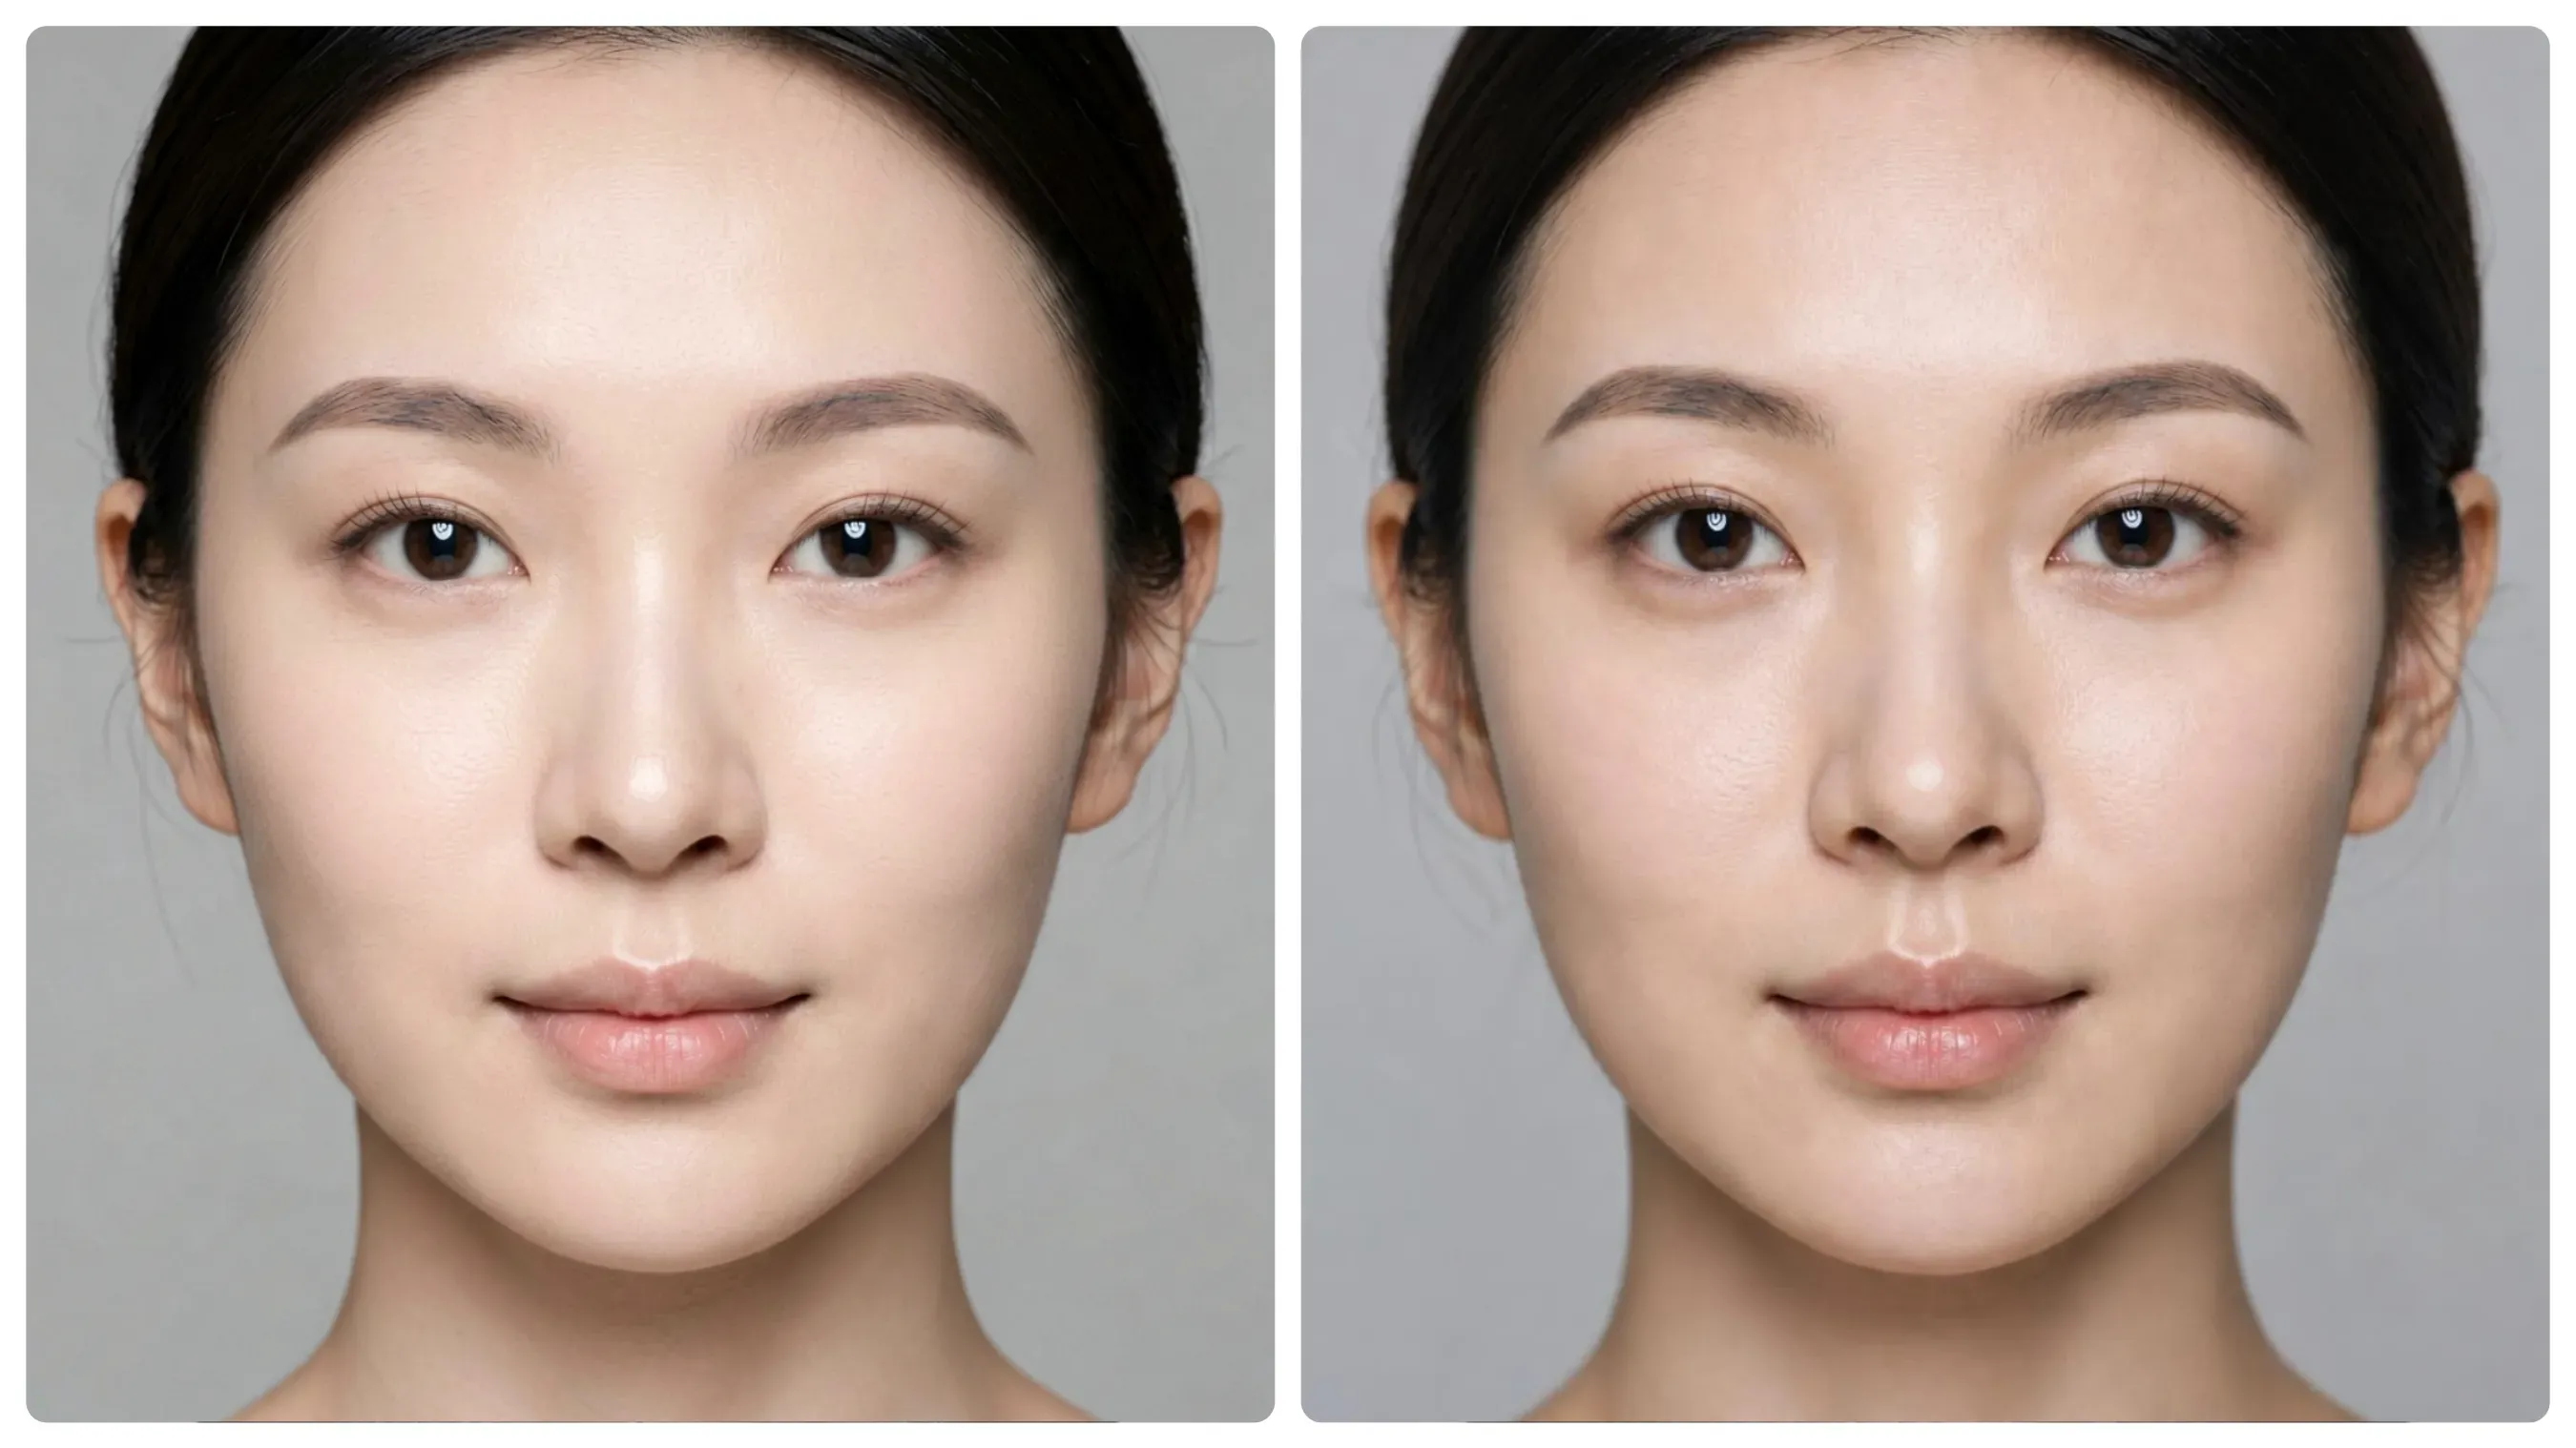
Side-by-side identity-consistent comparison. Left: Standard prompt with quality buzzwords produces flat, over-smoothed plastic skin. Right: Camera-native optics prompt restores natural skin micro-pores, organic light fall-off, and realistic specular highlights.
The Root Cause of Synthetic Skin
- Subsurface Scattering Gaps: Human skin is partially translucent. When models miss 3D light-transport optics during training, skin renders as opaque, light-reflecting plastic rather than organic tissue.
- Over-Constrained Negative Prompts: Cutting words like flaws or wrinkles removes needed fine detail. The model reacts by shifting to an overly smooth, filtered look.
The Anatomy of a Pro-Grade Portrait Prompt
You type a long description of yourself in a suit, hit generate, and still receive a plastic face under studio lights that never existed. Random adjectives fail because they leave the model free to invent. Structured AI portrait prompt engineering fixes that.
Break every request into four locked modules: Subject, Environment, Camera Settings, and Lighting. Each module constrains one variable the generator otherwise invents.
The modular formula
- Subject: age, expression, clothing, and exact facial landmarks
- Environment: background distance and material
- Camera Settings: focal length, aperture, and sensor behavior
- Lighting: direction, softness, and color temperature
Stack them in that order. The model then treats the prompt as a photography brief rather than a creative wish list.
Copy-paste template for photorealistic AI image prompts
plaintext1[Professional Subject Description], wearing [Clothing], [Specific Lighting Setup], shot on [Camera Model/Lens], [Photography Style], raw photo, highly detailed skin texture, 35mm film grain.
Example:
plaintext140-year-old woman, slight closed-mouth smile, wearing charcoal blazer over white shirt, soft north-facing window light with gentle fall-off, shot on Canon EOS R5 with 85mm f/1.8 lens, commercial headshot style, raw photo, highly detailed skin texture, 35mm film grain.
This ranks among the best AI headshot prompts because it replaces vague quality words with measurable camera behavior. Competitors usually stop at “add pores.” They rarely show how swapping only the focal length changes skin rendering or how film grain masks residual smoothness.
Let's try it out in practice:
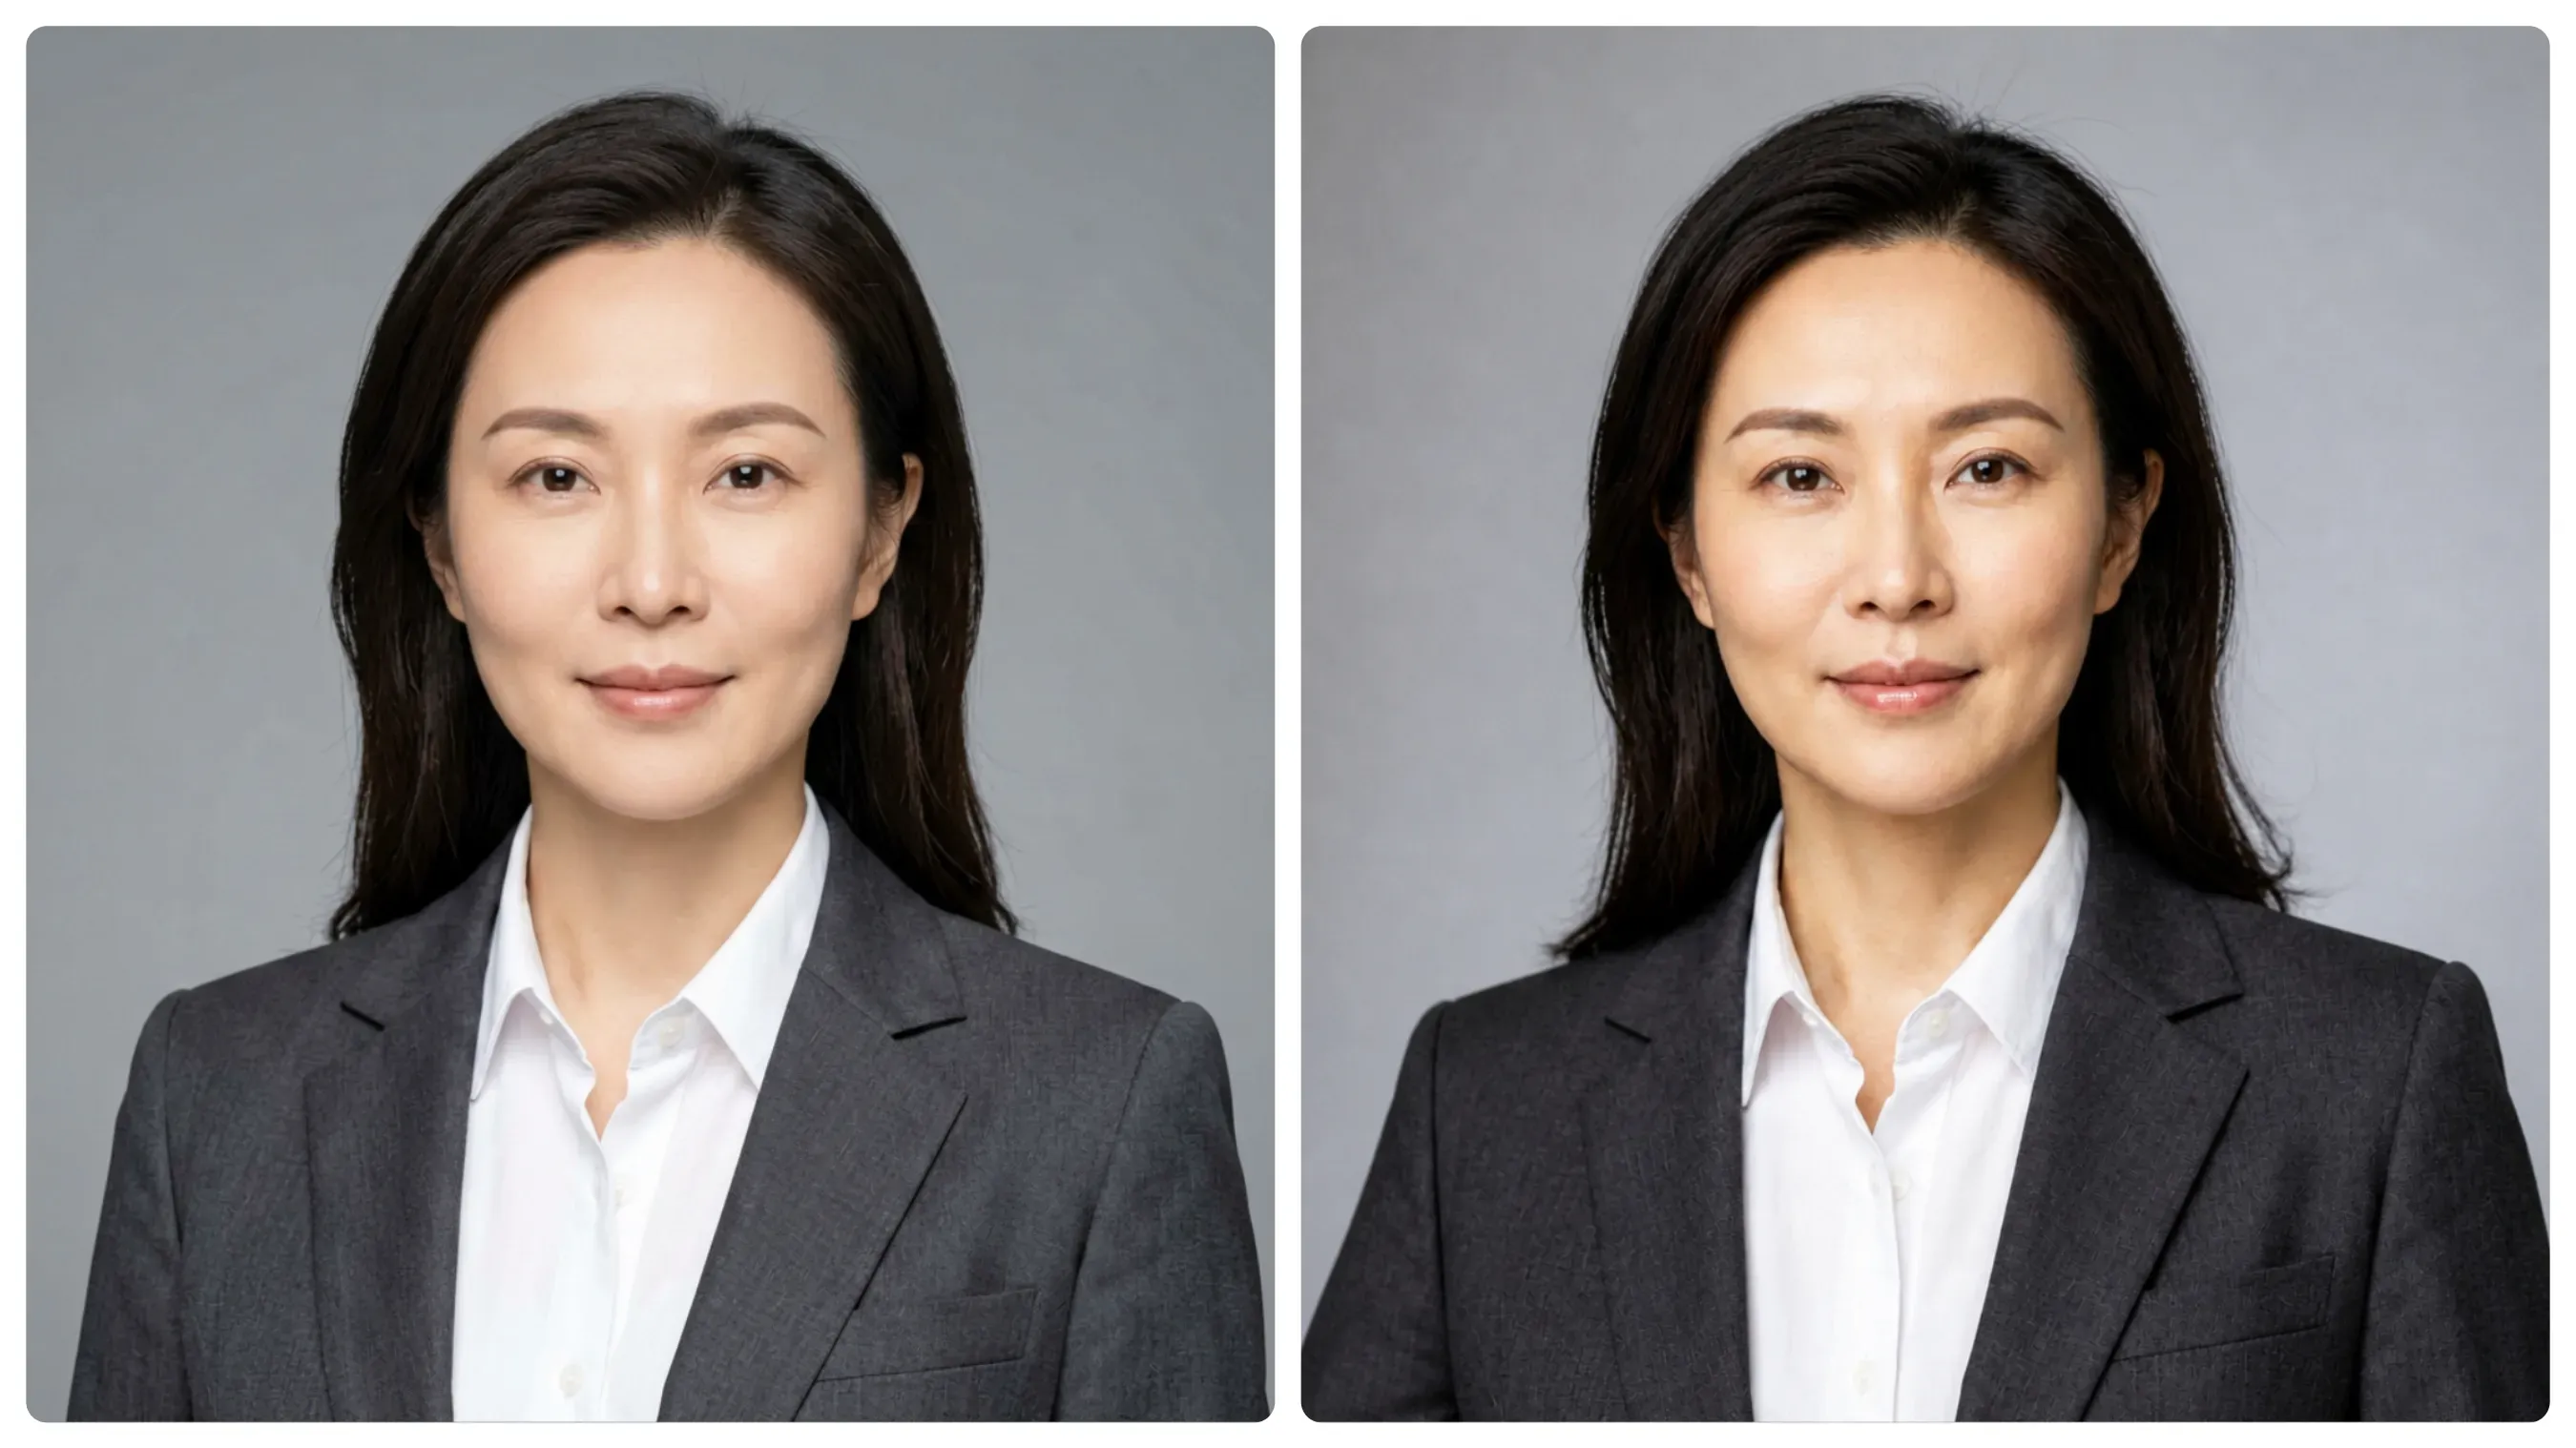
Identity-consistent headshot comparison. Left: Generic prompt yields smooth plastic skin and flat studio lighting. Right: Camera-native optical parameters restore organic micro-pores, directional light fall-off, and realistic hair dynamics.
Replacing buzzwords with optical parameters directly changes how the diffusion model handles skin and light. Instead of the left image's waxy skin and uniform front flash, the right prompt creates directional window light with soft shadow transitions. It also restores fine cheek micro-texture and subtle flyaway hair, making the subject look shot on location rather than rendered.
Adapting the Formula for Different Professional Vibes
A sharp corporate headshot requires a completely different optical logic than an editorial portrait for a tech founder. Rather than changing your base prompt structure, adjust the physical environment and light drop-off to fit the industry tone:
Corporate & Executive
- Visual Baseline: High structural contrast, deep background fall-off, clean separation from architectural elements.
- Lighting Logic: Hard-soft directional light with a subtle hair/rim light to define shoulders against dark interiors.
- Prompt Template:
[Subject], [confident/authoritative posture], wearing [tailored formal attire], set in [high-rise office/architectural interior] with softly blurred background, illuminated by [45-degree key light] and [discrete rim lighting], shot on [85mm f/2.0 lens], natural micro-pore detail, raw photo.
To see this formula in action, we tested it on a plain studio baseline. Using a single white-background portrait as our anchor seed, we ran the prompt variation through ChatGPT Image 2 to swap the attire, background, and camera physics while locking the subject's identity.
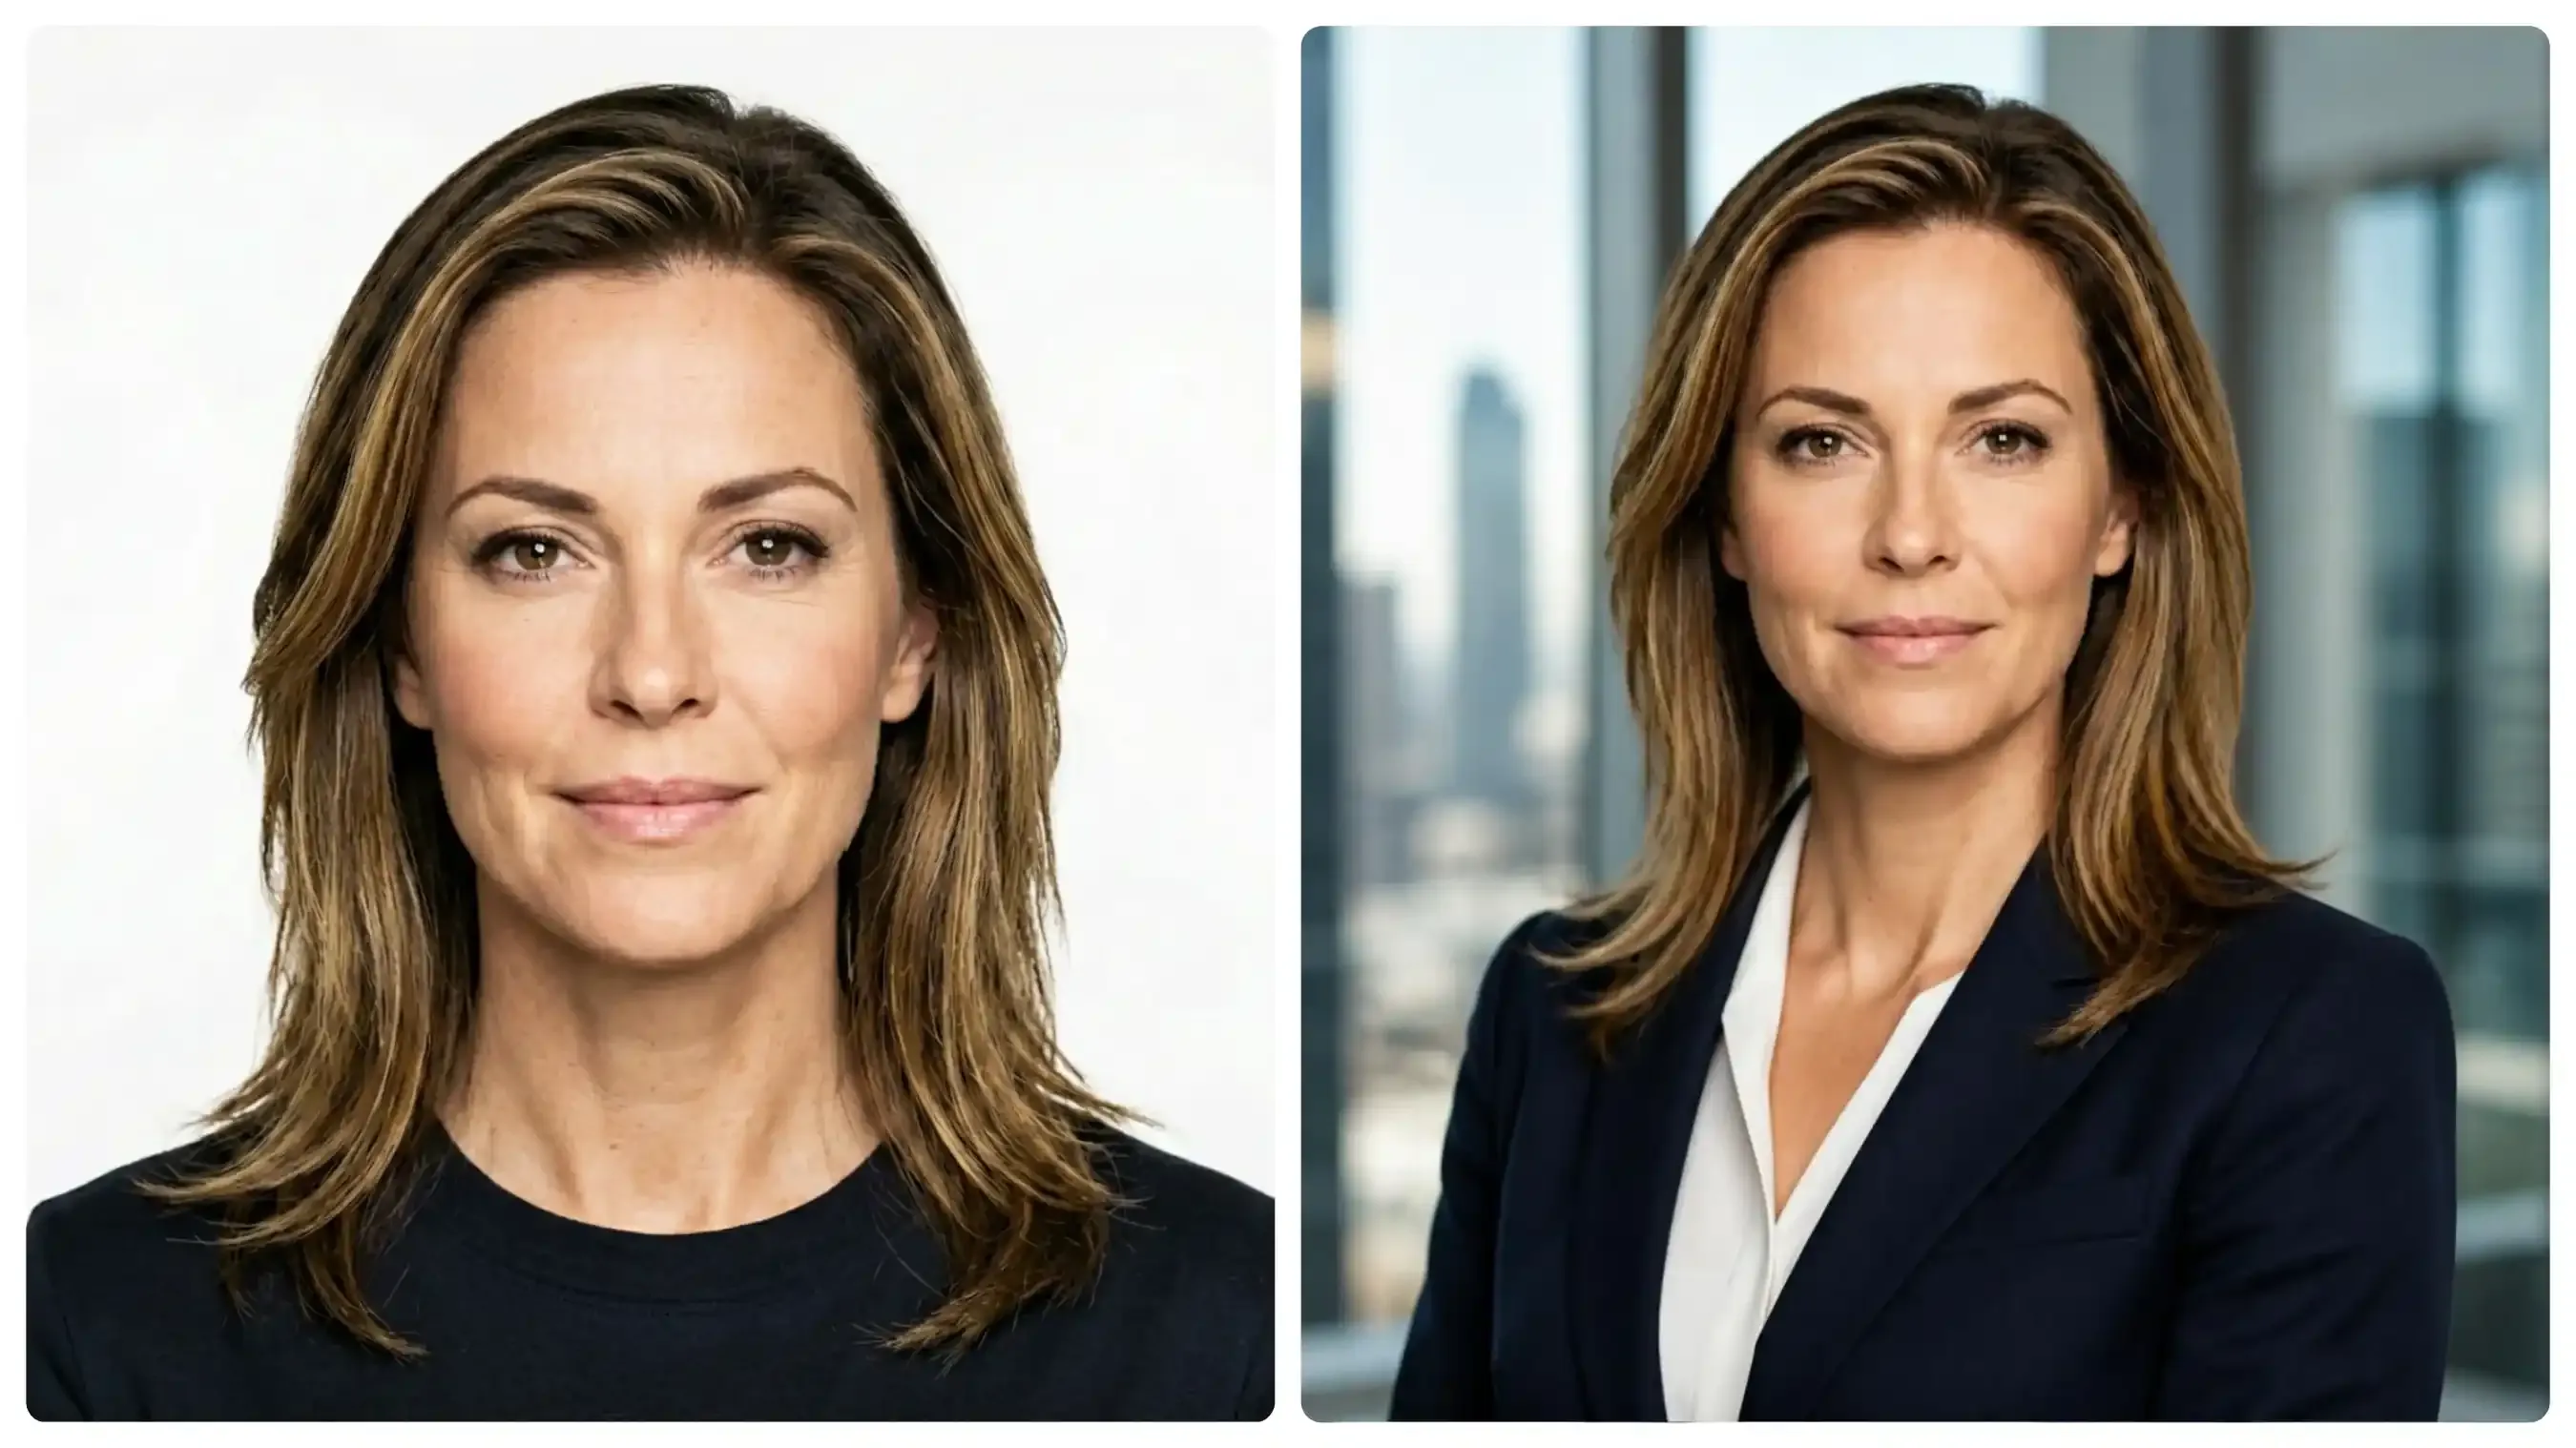
Left: Plain studio anchor seed with flat frontal light. Right: Corporate prompt variation applying a 15-degree posture turn, navy blazer, 45-degree key lighting, and an out-of-focus office backdrop.
Looking at both frames, the physical changes are straightforward. Turning the shoulders slightly gets rid of the rigid passport-style pose from the original photo. The 45-degree light creates natural shadow along the jawline, and the blurred office background gives the navy blazer clean separation while keeping her face completely recognizable.
Founder & Creative Lead
- Visual Baseline: Muted color palettes, flat-diffused ambient light, minimalist structural textures (concrete, matte wall).
- Lighting Logic: Broad north-facing window light, zero heavy shadows, low-contrast specular highlights.
- Prompt Template:
[Subject], [approachable/relaxed expression], optional [minimalist eyewear/accessory], wearing [casual fine-knit or structured monochrome top], set against [seamless matte concrete or textured studio wall], illuminated by [broad diffused window daylight], shot on [85mm f/1.8 lens], authentic skin micro-texture, raw photo.
Next, we swap out the high-contrast corporate lighting for a minimalist studio setup, keeping the same plain anchor photo to test the founder aesthetic:
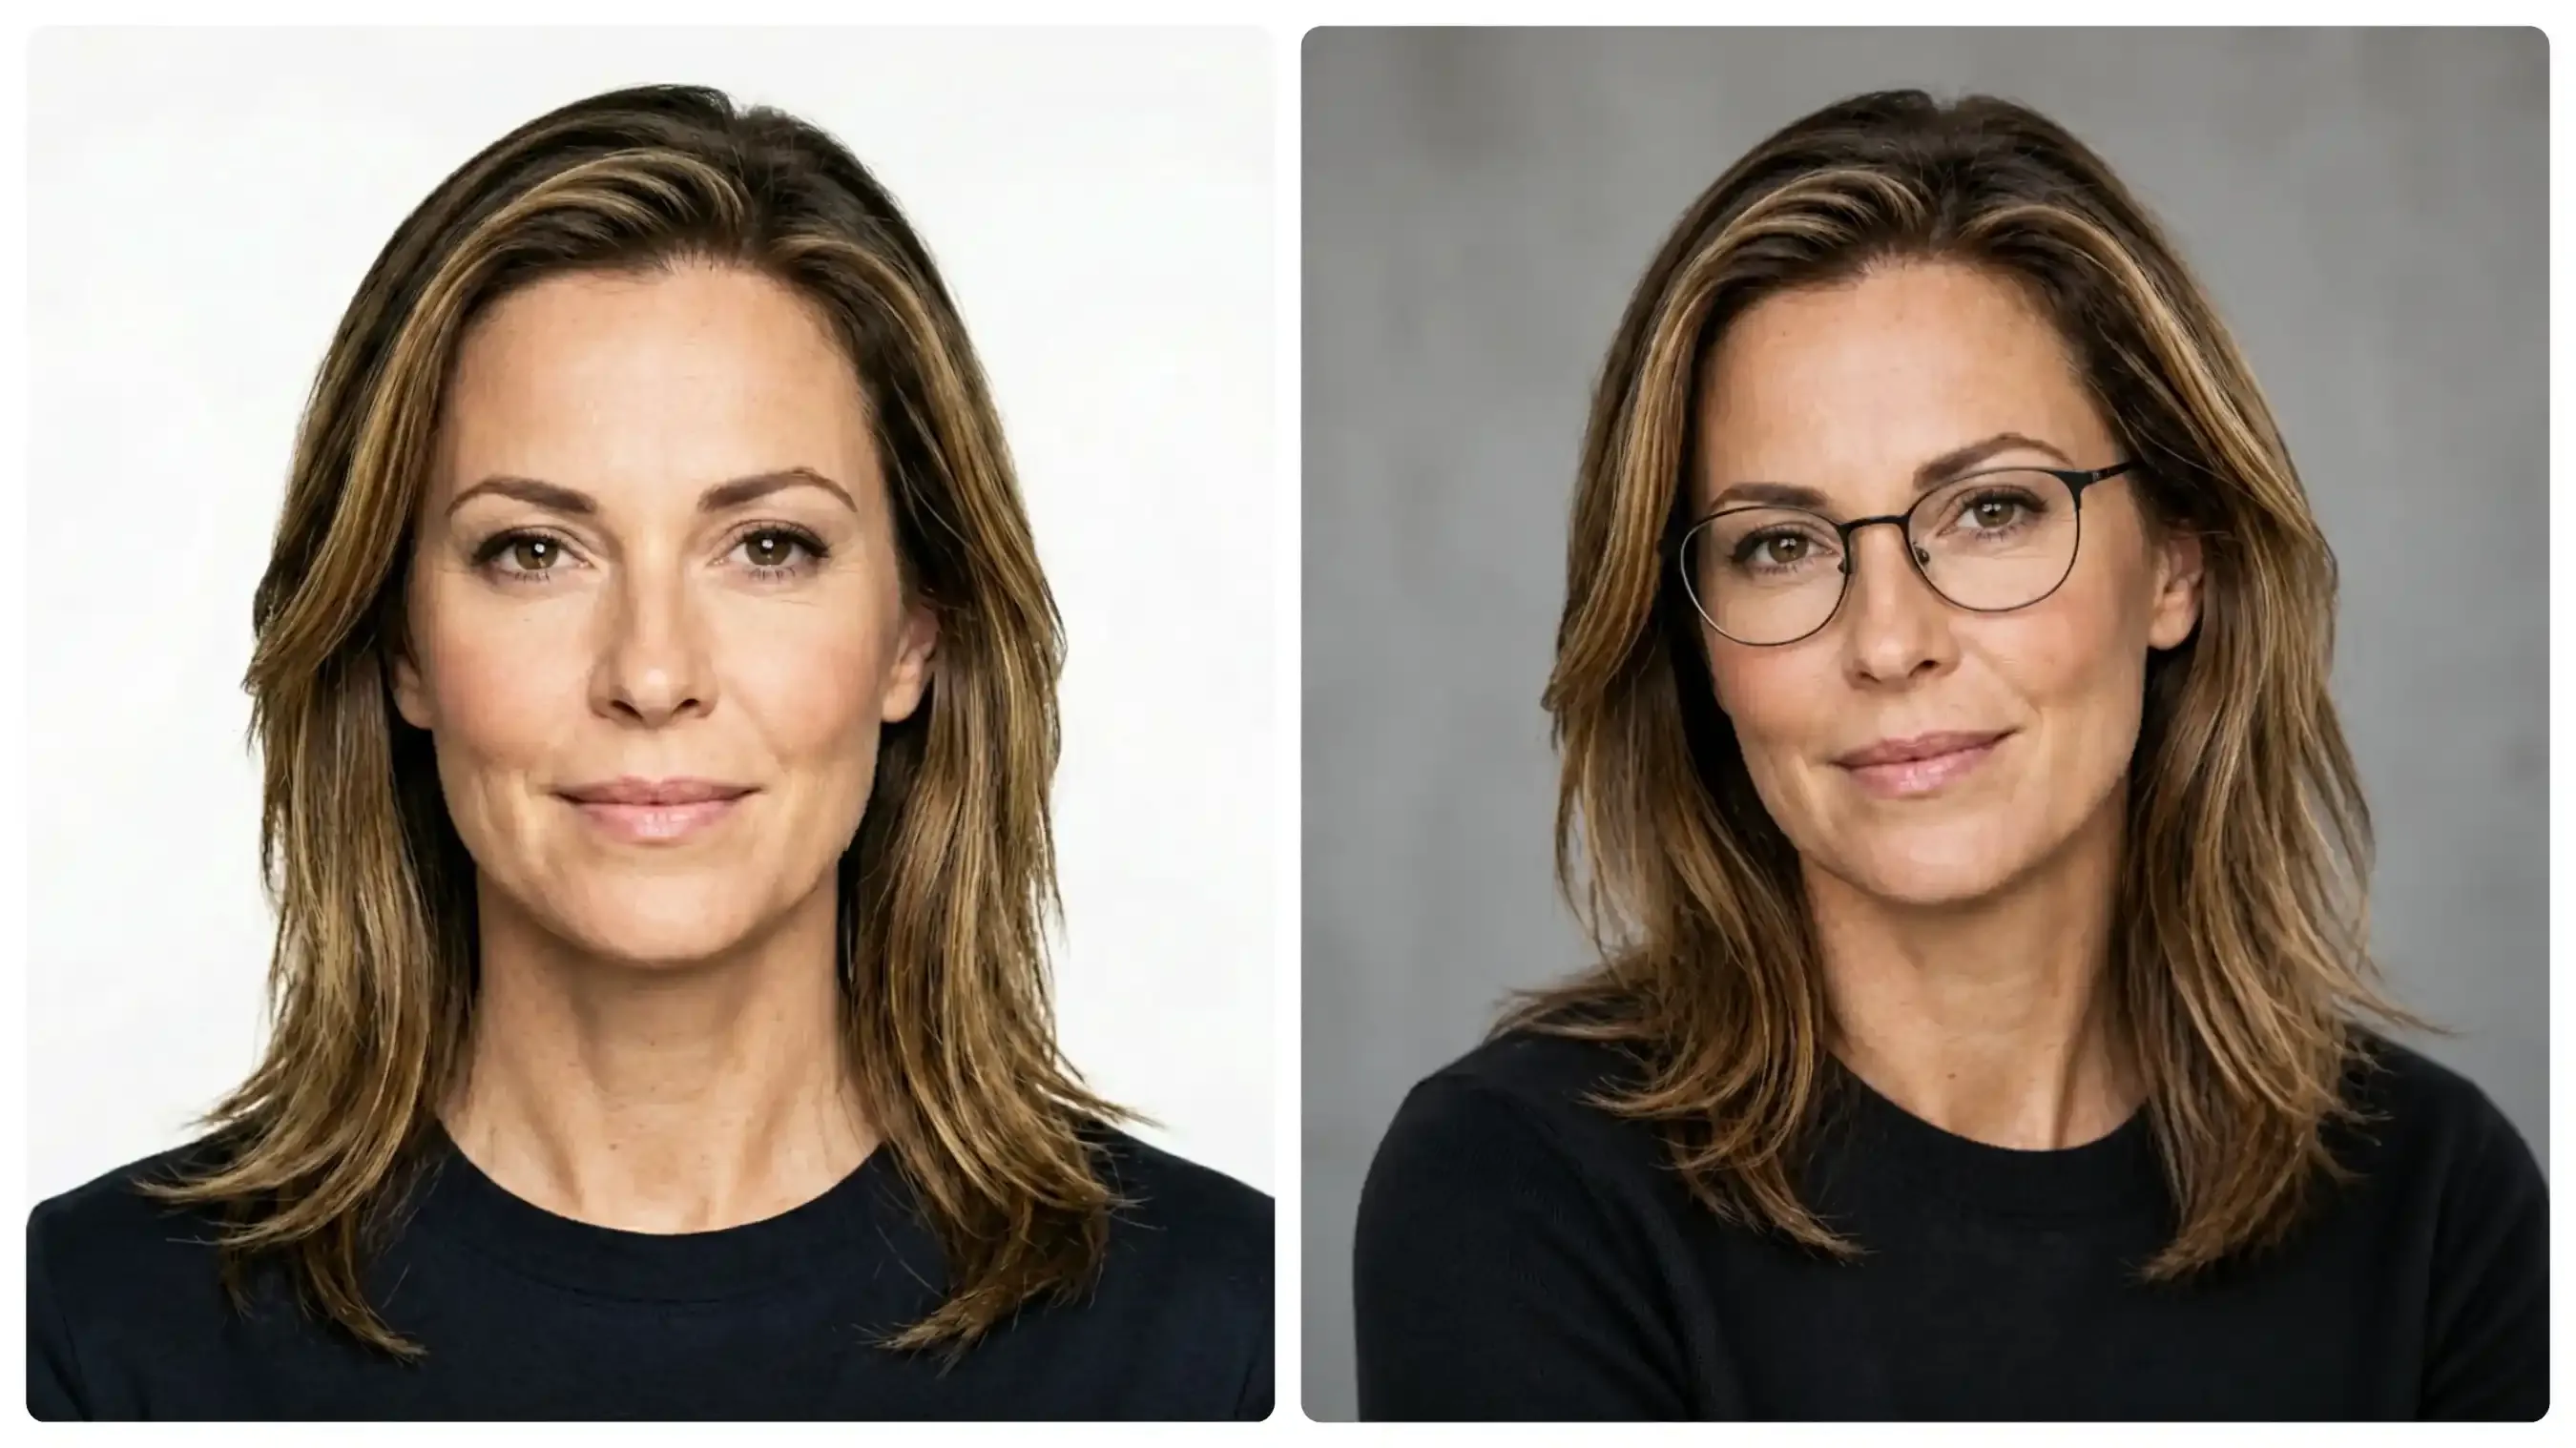
Adapting the anchor photo (left) into a creative founder portrait (right) using a black fine-knit crewneck, wire-rimmed glasses, and soft window daylight against a matte wall.
Soft light takes away the hard contrast without washing out her features. Thin wire glasses and a black crewneck give the outfit some personality, while the flat grey background keeps the focus right on her face.
On-Location & Thought Leader
- Visual Baseline: Wider field of view, contextual environmental elements, warm directional highlights.
- Lighting Logic: Natural exterior backlight (golden hour) balanced with subtle front fill; slight optical optical flare.
- Prompt Template:
[Subject], [candid half-body framing], wearing [unstructured smart-casual jacket], set against [softly blurred urban street or architectural background], illuminated by [low-angle golden hour backlight] with [soft front fill light], shot on [50mm f/1.8 lens], natural eye catchlights, raw photo.
Finally, we test the prompt outdoors by replacing the plain background with a warm city street setting:
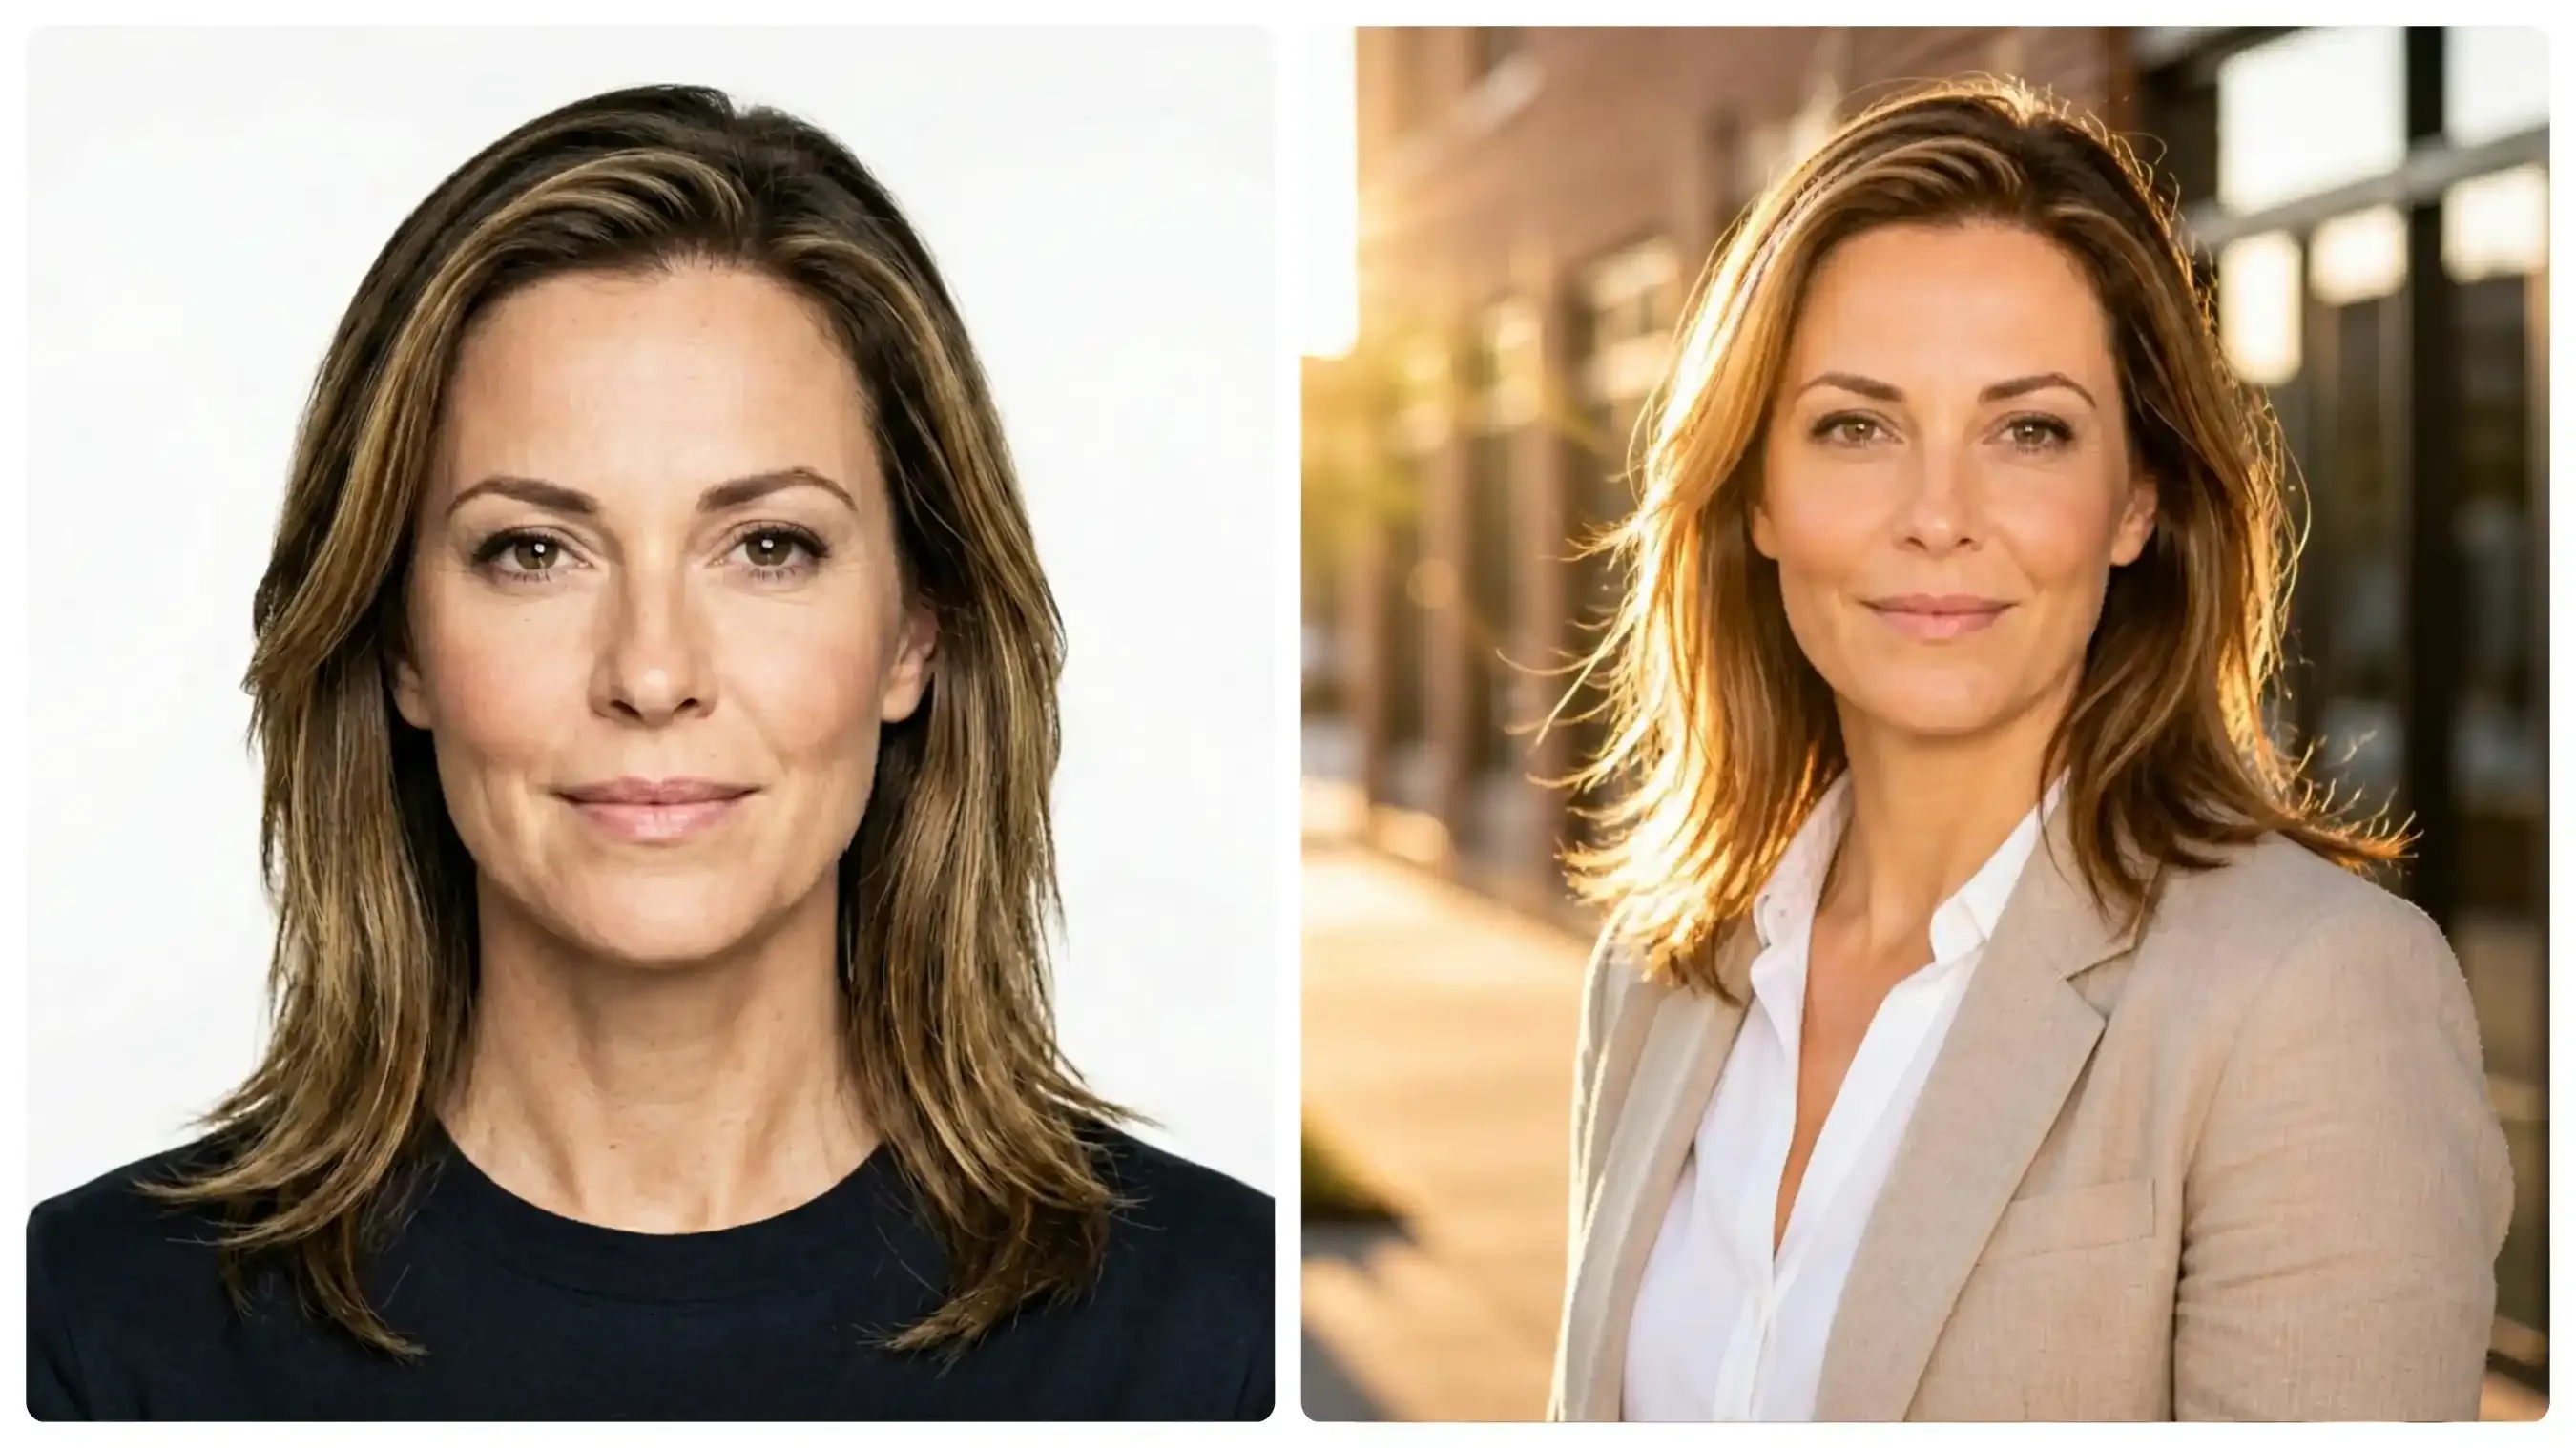
Changing the basic white background photo (left) into an outdoor portrait (right) using a beige linen jacket, 50mm lens framing, and warm late-day sun.
Shooting with a 50mm lens outdoors brings in the street background without making the frame messy. The late afternoon sun lights up the back of her hair, and the beige linen blazer over a white shirt fits a clear on-location style while keeping her face sharp.
Technical Modifiers for Authentic Lens and Depth Behavior
You specify “professional headshot” and still get a face that looks stretched or flattened because the model invents its own focal length. Style words alone never fix perspective. Technical photography terms do.
Models such as Flux and Seedream treat certain lens and aperture phrases as ground-truth signals rather than decorative language. Inserting them forces consistent optical behavior instead of random facial geometry.
Best camera lens setting for AI portraits
Two focal lengths produce opposite effects on the same face:
| Lens | Facial Effect | Background Behavior | Best Use Case |
| 85mm | Mild compression, rounded features, flattering proportions | Smooth, creamy bokeh | Classic head-and-shoulders |
| 35mm | Wider field, slight edge stretch if subject is close | More environmental context, less isolation | Environmental portraits |
An 85mm prompt keeps the nose-to-ear relationship natural. A 35mm prompt pulls the background into the frame and can subtly widen the face unless you also control distance.
AI depth of field and f/stop photography settings
Pair the lens with an explicit f-stop.
f/1.8orf/2.0creates shallow AI depth of field and a strong bokeh effect that softens background edges.f/5.6or higher keeps more of the face and environment sharp.
Example string that models recognize:
plaintext1shot on 85mm lens at f/1.8, shallow depth of field, natural bokeh, subject isolation
This combination consistently reduces the “everything-in-focus” look that marks many synthetic portraits.
Prompting for "Imperfection" to Achieve Skin Realism
You generate a clean headshot and the skin still looks like polished plastic under studio lights. The model filtered out every pore and fine line because most training data rewards smoothness. Real faces carry biological noise. You must force the model to restore it.
AI skin texture refinement in practice
Positive prompts alone rarely restore texture. Pair them with explicit biological cues:
- visible natural skin pores
- subtle under-eye texture
- mild freckles or uneven tone
- fine facial hair where appropriate
- soft specular highlights on skin oil
These terms push realistic facial features in AI away from the default porcelain finish.
Negative prompts that fix AI generated skin
Negative prompts act as a constraint layer, forcing the model to steer clear of the "beautification" patterns learned from synthetic datasets. Weight the common defects so the model actively avoids them:
plaintext1(plastic skin:1.5), (airbrushed:1.4), (smooth porcelain:1.3), (waxy skin:1.3), (overly smooth:1.2)
The higher weights on plastic and airbrushed terms produce the strongest correction in current models. Lower weights often leave residual gloss.
| Prompt Type | Example Phrase | Effect on Skin |
| Positive | natural skin pores, subsurface detail | Adds micro-texture |
| Positive | slight skin imperfections, fine lines | Breaks uniformity |
| Negative | (plastic skin:1.5) | Suppresses wax look |
| Negative | (airbrushed:1.4) | Reduces beauty-filter finish |
Combine both sides in the same prompt. One without the other usually fails.
Tips: True realism requires embracing asymmetry. Models default to perfect bilateral symmetry, which the human eye instantly recognizes as artificial. To counter this, include keywords like slight asymmetrical facial expression or uneven natural lighting.
Troubleshooting Common AI Headshot Artifacts
Even with a structured camera-native prompt, individual model biases can still cause subtle visual errors. Instead of regenerating from scratch, use these targeted adjustments to debug your results.
Quick Fix Matrix for Common Artifacts
| Artifact & Cause | How to Fix It (Prompt Adjustment) |
| "Wax Figure" Skin (Cause: Model defaulting to beauty averages) | Negative: (plastic skin:1.4), (airbrushed:1.3); Positive: subtle specular highlights, micro-pores |
| Dead / Crossed Eyes (Cause: Missing optical light or gaze context) | Positive: directional key light, natural iris details;Negative: (crossed eyes:1.4), (asymmetrical irises:1.3) |
| Flat, CGI-like Lighting (Cause: Undefined ambient light source) | Specify direction & fall-off: soft window light from the left, gentle shadow fall-off |
| Over-Sharpened Features (Cause: Over-prompting for "8k/detailed") | Remove 8k / hyper-detailed; Add optical mechanics: shot on 85mm lens, organic film grain |
The "Prompt Weighting" Debug Method
When a single element (like skin texture or lighting) dominates or ruins the headshot, adjust its token weight rather than re-writing the entire prompt:
- To boost subtle textures: Wrap the target phrase in brackets with a slight weight increase:
(visible natural skin pores:1.2). - To tone down overpowering styles: Decrease the weight of dominant descriptive words:
(studio lighting:0.8).
Pro Tip: Change only one setting at a time while troubleshooting. Adjusting both the lens focal length and lighting together stops you from figuring out which fix worked.
Choosing the Right Model for Your Headshots on Atlas Cloud
A prompt that yields a clean corporate portrait in one model might render as an over-processed 3D character in another. This comes down to how each image architecture interprets technical specs versus natural language.

When generating headshots through Atlas Cloud, you have access to multiple underlying models. To get consistent results without wasting API credits on trial and error, tailor your prompting strategy to the specific model you select:
- For Technical Precision (Flux / Seedream on Atlas Cloud):
These models treats camera specs as strict physical constraints. Focus heavily on explicit photographic tokens (85mm f/2.0, 45-degree key light, focal length) and avoid vague descriptive adjectives.
- For Natural Scene Reasoning (GPT Image 2 via Atlas Cloud):
This architecture excels at understanding spatial relationships and environmental context. Write natural, descriptive scenes ("a professional seated near floor-to-ceiling windows with soft daylight") rather than just stacking optical metadata.
- For Quick Profile Renderings (Nano Banana 2 on Atlas Cloud):
Best suited for clean, single-subject corporate shots. Building an effective free AI headshot generator for LinkedIn workflow requires keeping prompts concise and object-focused, without overloading lighting parameters.
Beyond Prompting: Essential Workflow Refinements
You dial in the perfect prompt, generate a strong headshot, and still notice soft edges, uneven eyes, or residual plastic texture at full resolution. Prompt engineering reaches a ceiling. The final step is deliberate post-processing.
AI headshot post-processing that actually works
Two techniques close the remaining gap between a good generation and a usable professional image: upscaling and in-painting.
- Upscaling restores localized resolution that raw model outputs leave blurry. Run images through a facial-structure upscaler with conservative detail-enhancement settings. This adds back clean skin pores and sharpens fine details without distorting facial symmetry.
- In-painting AI portraits handles localized defects. Mask the problem area and regenerate only that region while locking the rest of the face. This is the primary method for AI facial feature correction.
How to Fix Distorted Eyes in AI Generated Images
Use in-painting tools to mask the ocular area specifically, then regenerate with a short targeted prompt such as “natural eye shape, realistic iris detail, matching catchlights.” Keep the surrounding face masked so identity and lighting stay consistent. Multiple short passes usually outperform one aggressive regeneration.
| Step | Tool Focus | Typical Result |
| Upscale | Facial detail recovery | Sharper pores, cleaner edges |
| In-paint eyes | Local regeneration | Corrected shape and symmetry |
| In-paint skin | Texture pass | Reduced residual smoothness |
Preserves identity best: upscale first for overall fidelity, then targeted in-painting for remaining defects. Publish side-by-side sequences that show the same image before and after each stage, including the precise mask and secondary prompt used. That practical workflow data fills a clear content gap and strengthens topical authority.
Building Your Photorealistic Workflow: The Final Blueprint
Getting realistic AI headshots takes more than just one lucky prompt. It requires a careful, step-by-step technical process that connects real camera optics with smart editing work.
To maintain consistency across your production workflow, follow this master execution sequence:
- Construct the Brief: Build your initial prompt using the camera-native 4-module framework (Subject, Environment, Optics, Lighting). Replace all subjective quality buzzwords with precise focal lengths and light sources.
- Isolate and Debug: If the model introduces synthetic artifacts (waxy skin, distorted eyes, or flat lighting), adjust individual token weights or swap optic specs before re-rolling the entire prompt.
- Recover Micro-Detail: Run your final output through a dedicated structure-aware upscaler to restore pore-level micro-texture lost during base generation.
- Targeted In-Painting: Mask remaining edge cases—specifically iris symmetry and catchlights—and regenerate locally using short, highly focused constraint strings.
Replacing descriptive fluff with explicit camera optics is what turns flat digital generations into authentic photographs.





