

The mug looks lovely on your kitchen shelf. On your phone it comes out yellow and a little gray, the rim looks stretched, and the ceiling light glows right in the glaze. The light, the lens and the background are doing the damage, and all three cost almost nothing to fix.
This guide shows how to take product photos with your phone at home: where to put the table, how to bend poster board into a seamless backdrop, which settings to lock on an iPhone or a Pixel, and what size each marketplace wants.
Each common mistake comes with a side-by-side of the wrong and the right version. We also take one clean phone shot into Atlas Cloud and turn it into lifestyle scenes, so you can see what a good input buys you.
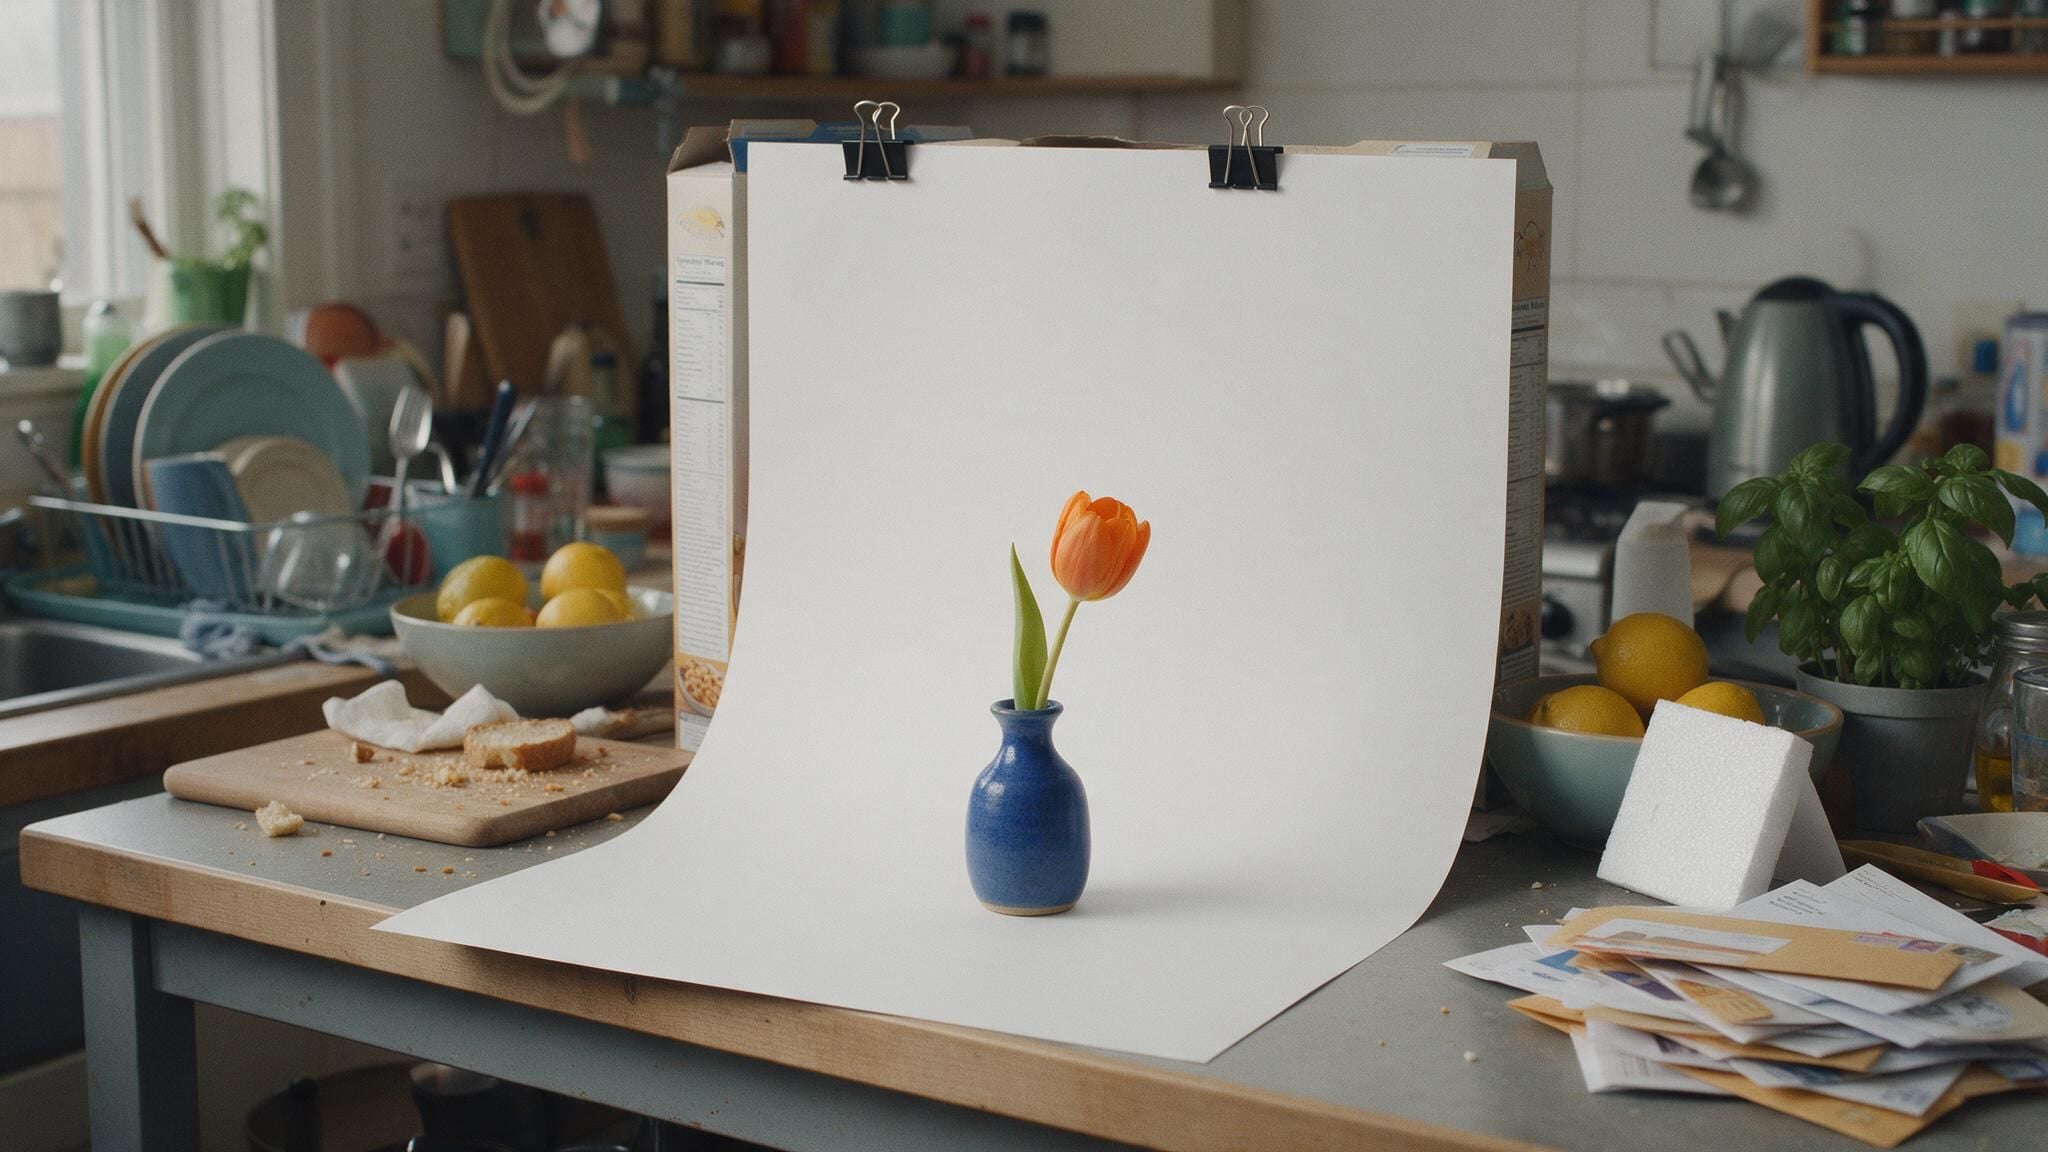
Key Takeaways
- Any recent phone is enough,becauseside light from a window decides more than the camera does.
- Curvewhite poster board from a chair back to thetabletopso the product sits on a seamless sweep.
- Shoot at 1x or 2x instead of 0.5x, then hold a finger on the product until AE/AF Lock appears.
- On a white backdrop, drag exposure up until the background reads white instead of gray.
- One clean phone shot gives the Image ads workflow enough to build lifestyle scenes and detail-page images.
DIY Product Photography: What Your Phone Setup Actually Needs
Short answer: the phone you already own. A 12-megapixel photo is 4032 x 3024 pixels, which is already larger than any marketplace in this guide asks for. What separates a usable shot from a bad one is everything around the phone: where the light comes from, what sits behind the product, and which lens you pick.
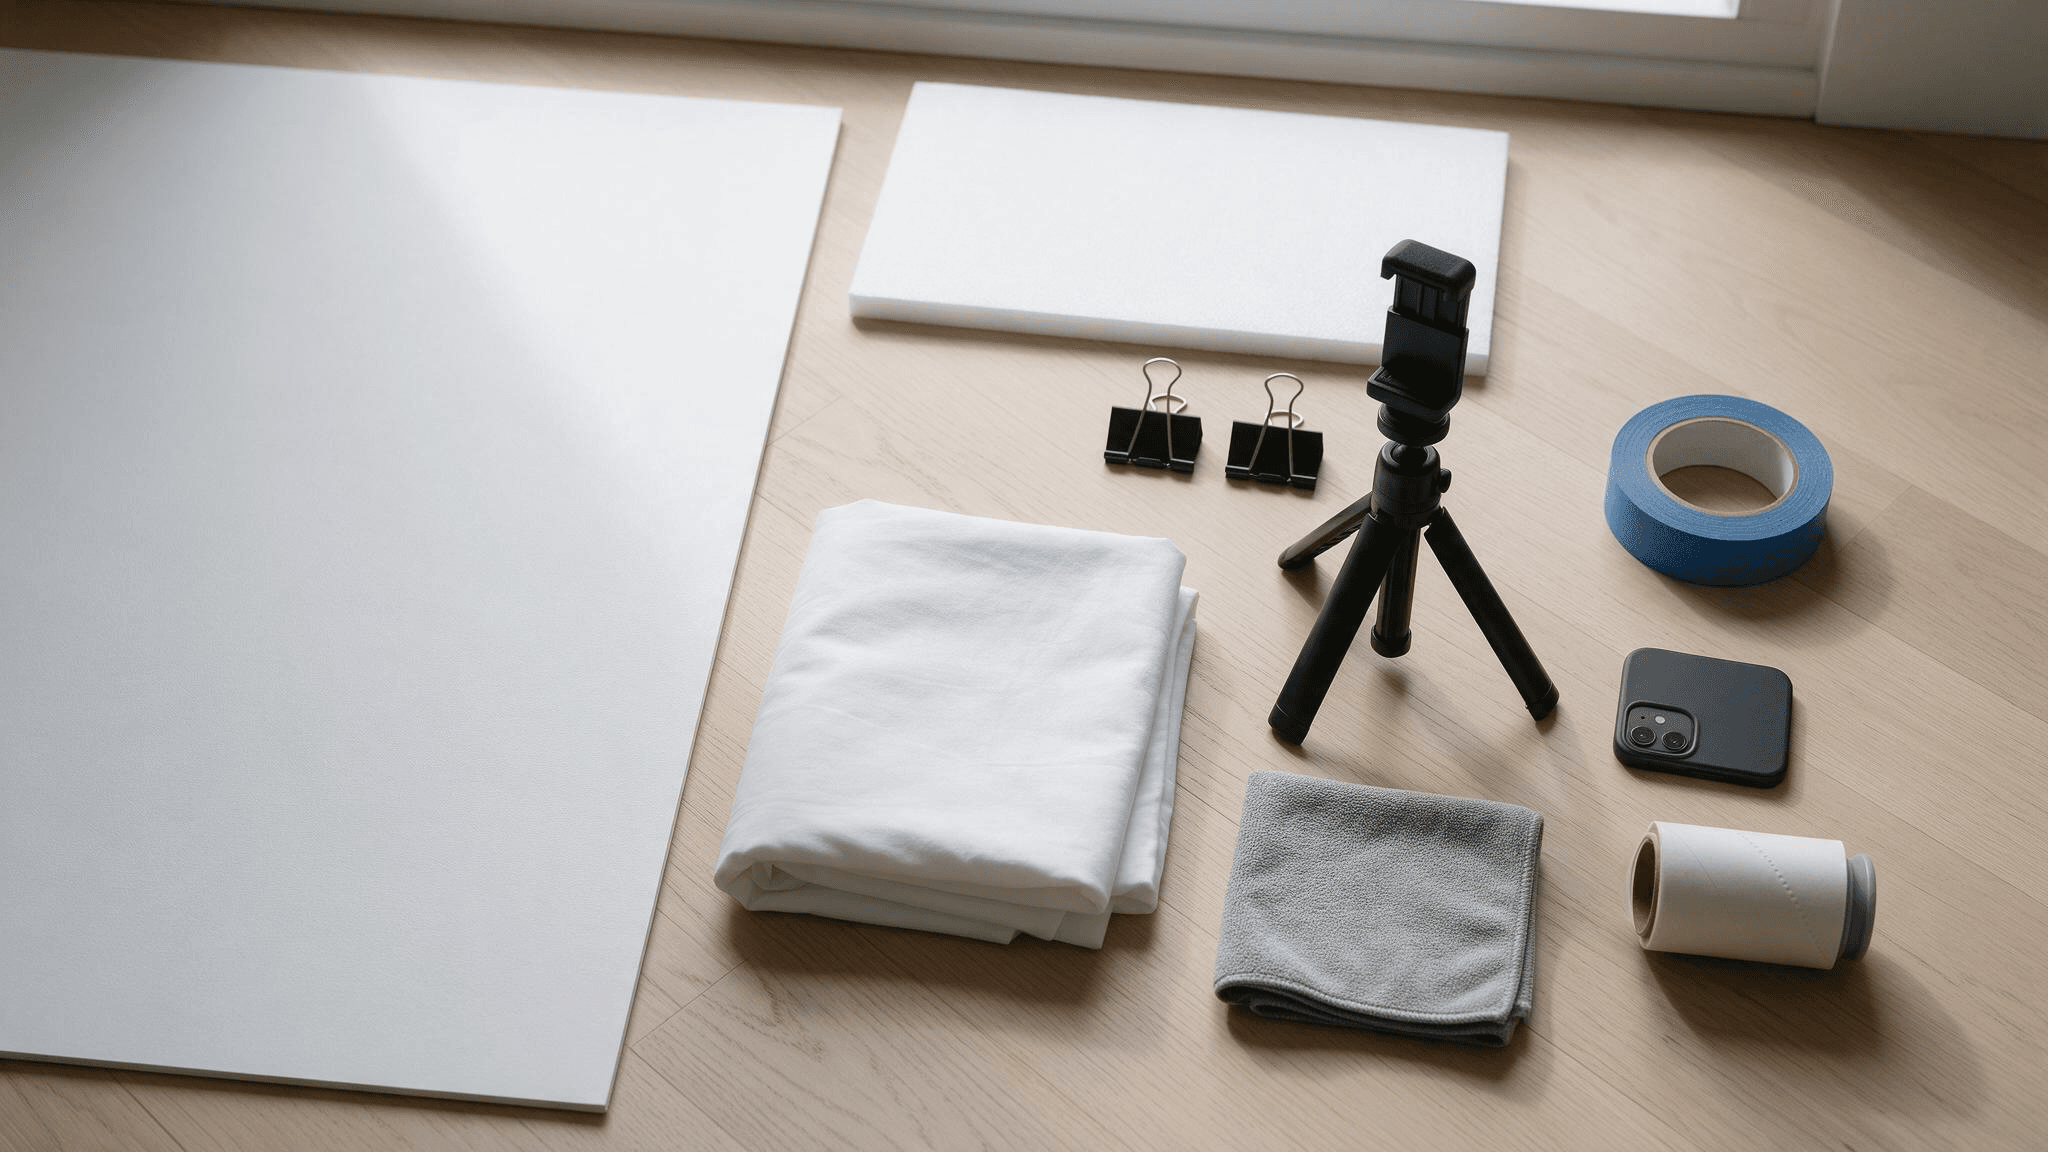
Here's the whole kit for a product photography setup at home:
- A sheet of white poster board. This is the backdrop. Pick matte over glossy so it doesn't throw a shine back at the lens.
- A white foam board. It bounces window light back into the shadow side. A second sheet of poster board works too.
- Two binder clips or a roll of painter's tape. They hold the board to a chair back or a wall.
- A white bedsheet. It doubles as a sun diffuser and, for bigger items, a backdrop.
- Something steady for the phone. A small tripod with a phone clamp, or a stack of books. Either one keeps the angle identical from shot to shot.
- A microfiber cloth and a lint roller. Dust and fibers show up far more on camera than they do in your hand.
Turn Phone Product Photos Into Lifestyle Scenes With Image ads
A clean shot on white takes care of the listing. Lifestyle scenes are the expensive part: props, a styled table, a second location and a fresh shoot every season.
The Marketing Studio workflows on Atlas Cloud take over that step. Image ads takes one product photo and a short brief, then renders a product hero image, a product detail page or a promotional poster around it.
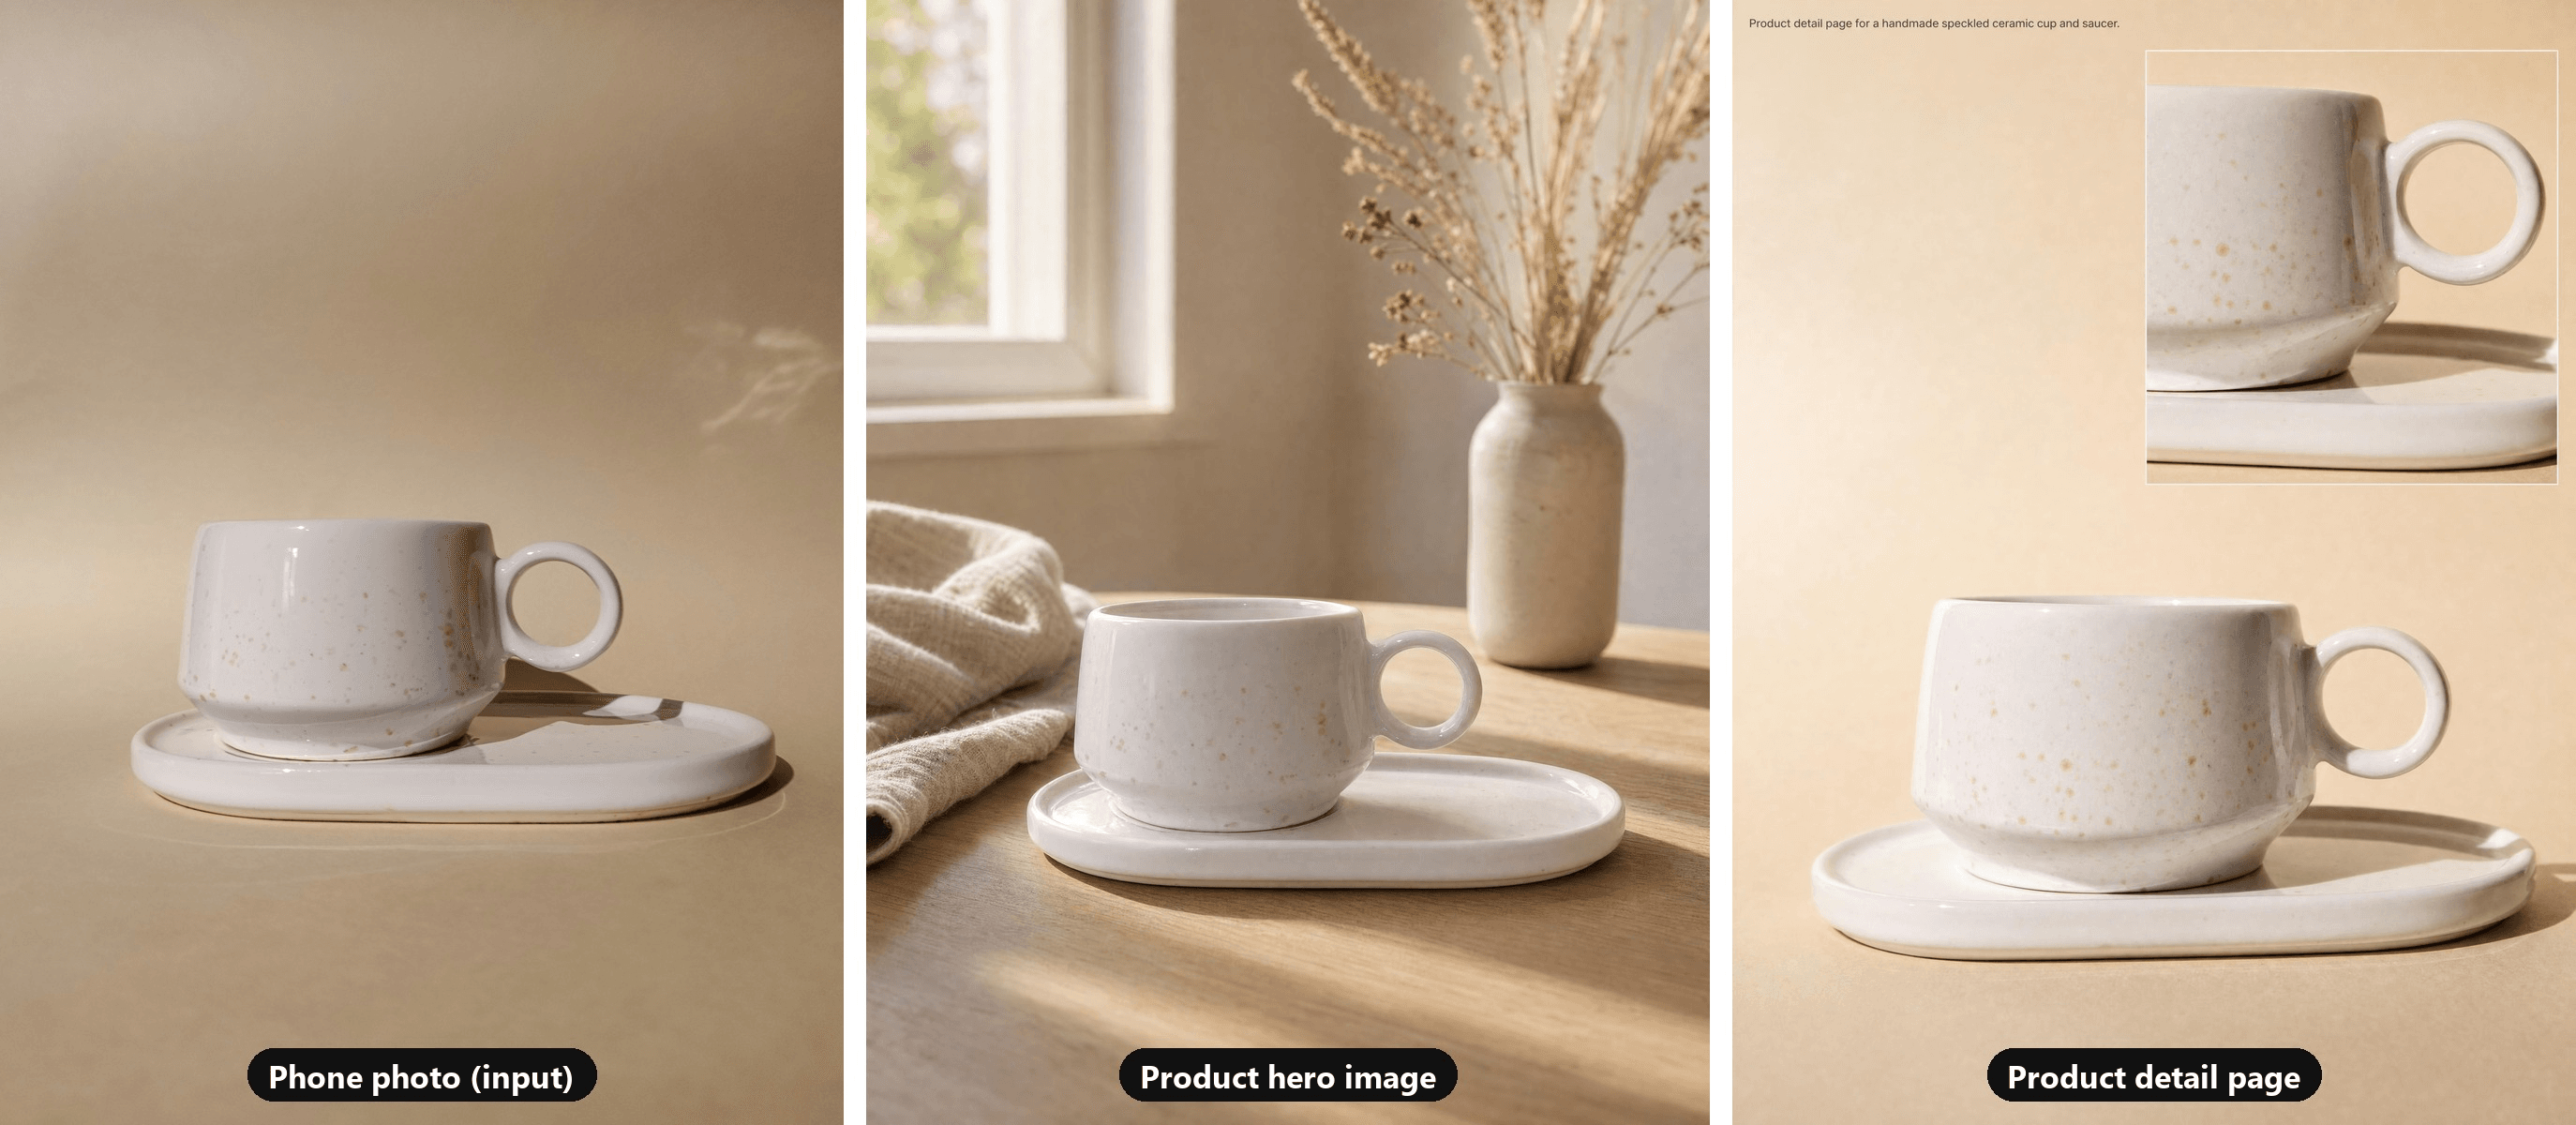
Input photo by hosseinqs on Unsplash, shot on a Xiaomi phone. Both outputs came from Image ads at 3:4 and 2K.
We picked an input that already follows this guide: a speckled ceramic cup on a beige paper sweep in soft daylight.
The hero image kept the speckled glaze, the ring handle and the oval saucer, then set the cup on an oak breakfast table in morning sun. The detail page run used the same photo and placed the full cup next to a tight crop of the glaze and handle.
Here's the run, step by step:
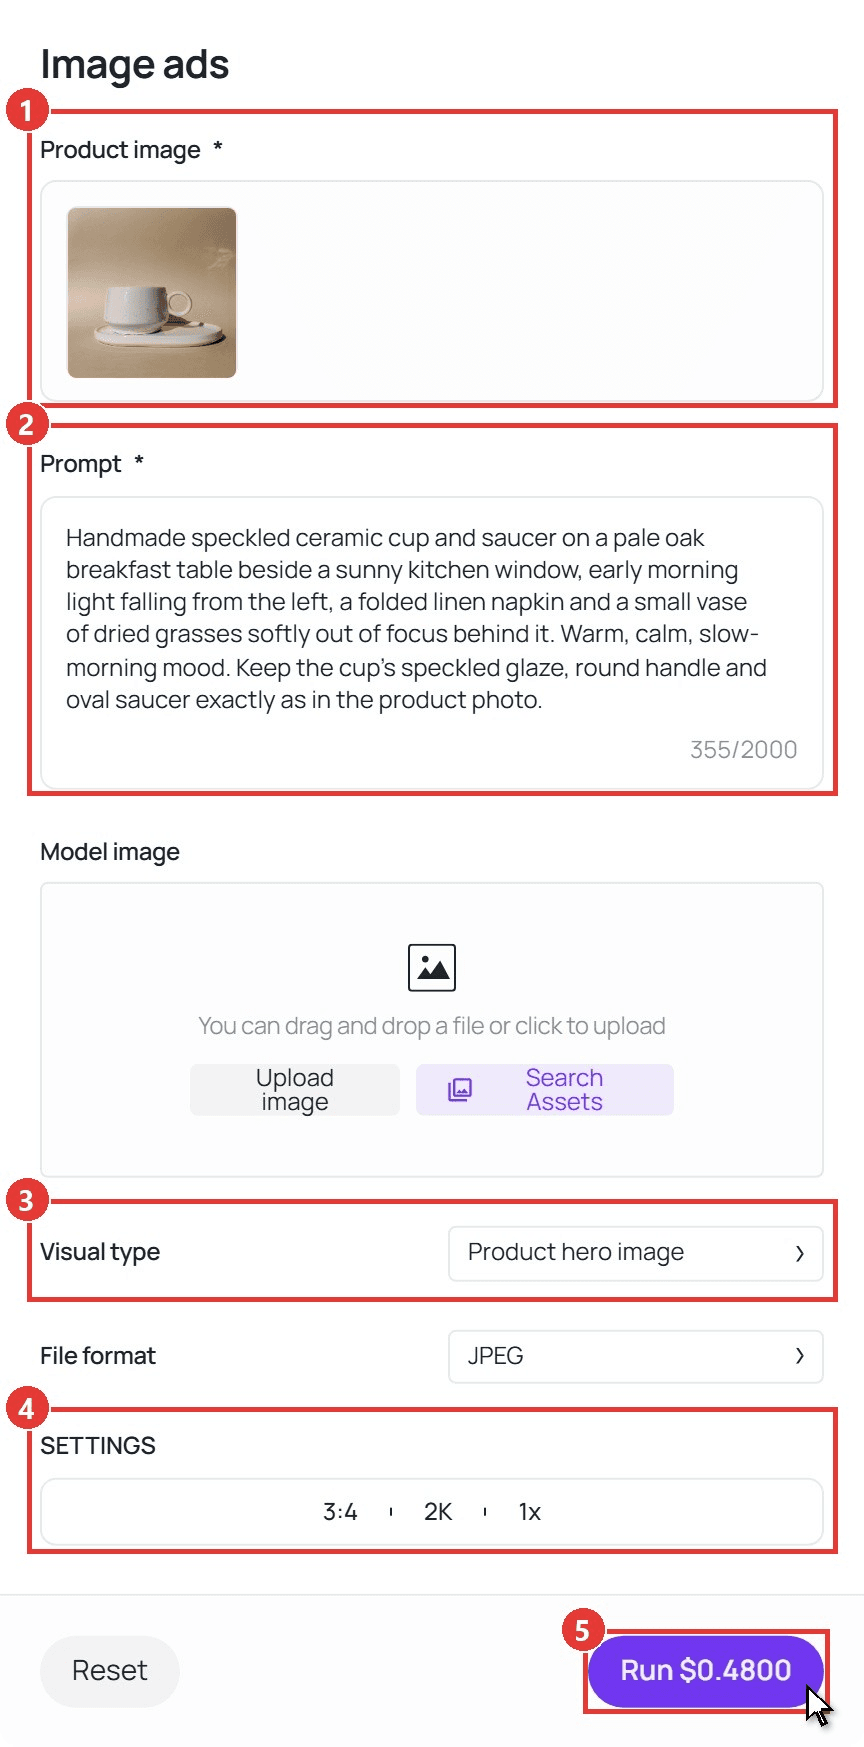
- Upload your shot under Product image. Use the sharpest, best-lit frame you have, since every scene is built around it.
- Describe the scene in Prompt. Name the surface, the light and the mood, and ask for the product's details to stay put. This is the brief behind the hero image:
plaintext1Handmade speckled ceramic cup and saucer on a pale oak breakfast table beside a sunny kitchen window, early morning light falling from the left, a folded linen napkin and a small vase of dried grasses softly out of focus behind it. Warm, calm, slow-morning mood. Keep the cup's speckled glaze, round handle and oval saucer exactly as in the product photo.
- Pick the Visual type. Product hero image builds a styled scene, Product detail page lays the product out with close-up views, and Promotional poster adds a campaign layout. We ran the first two on the same photo.
- Set the output under SETTINGS. Choose the ratio (1:1, 3:4, 4:3, 16:9 or 9:16), the resolution (1K, 2K or 4K) and up to four images per run. We used 3:4 at 2K.
- Click Run. The result lands under Output, with a Download button next to it.
The Model image field between Prompt and Visual type is optional. We left it empty, because a cup doesn't need a person.
Put these scenes to work on your own storefront, in ads and on social. Marketplace listings follow their own photo rules, which the FAQ covers.
Product Photography With Natural Light: Where to Put the Table
Window light costs nothing, and its direction is the one thing you control. Set the table beside the window so the light reaches the product from the side. Light from behind the product turns it into a silhouette, and light from behind you flattens it and puts your own shadow in the frame.
Three habits decide whether that light works:
- Turn off the ceiling lights. A warm bulb and a cool window light the product in two different colors at once, and a single white balance setting can't neutralize both.
- Soften direct sun. Hard sun can blow out the top of the product and draw a black shadow beside it. Hang a white bedsheet over the window, or wait for a bright overcast day.
- Fill the shadow side with a white card. Stand the foam board opposite the window, about a hand's width from the product. The dark side lifts to a soft gray.
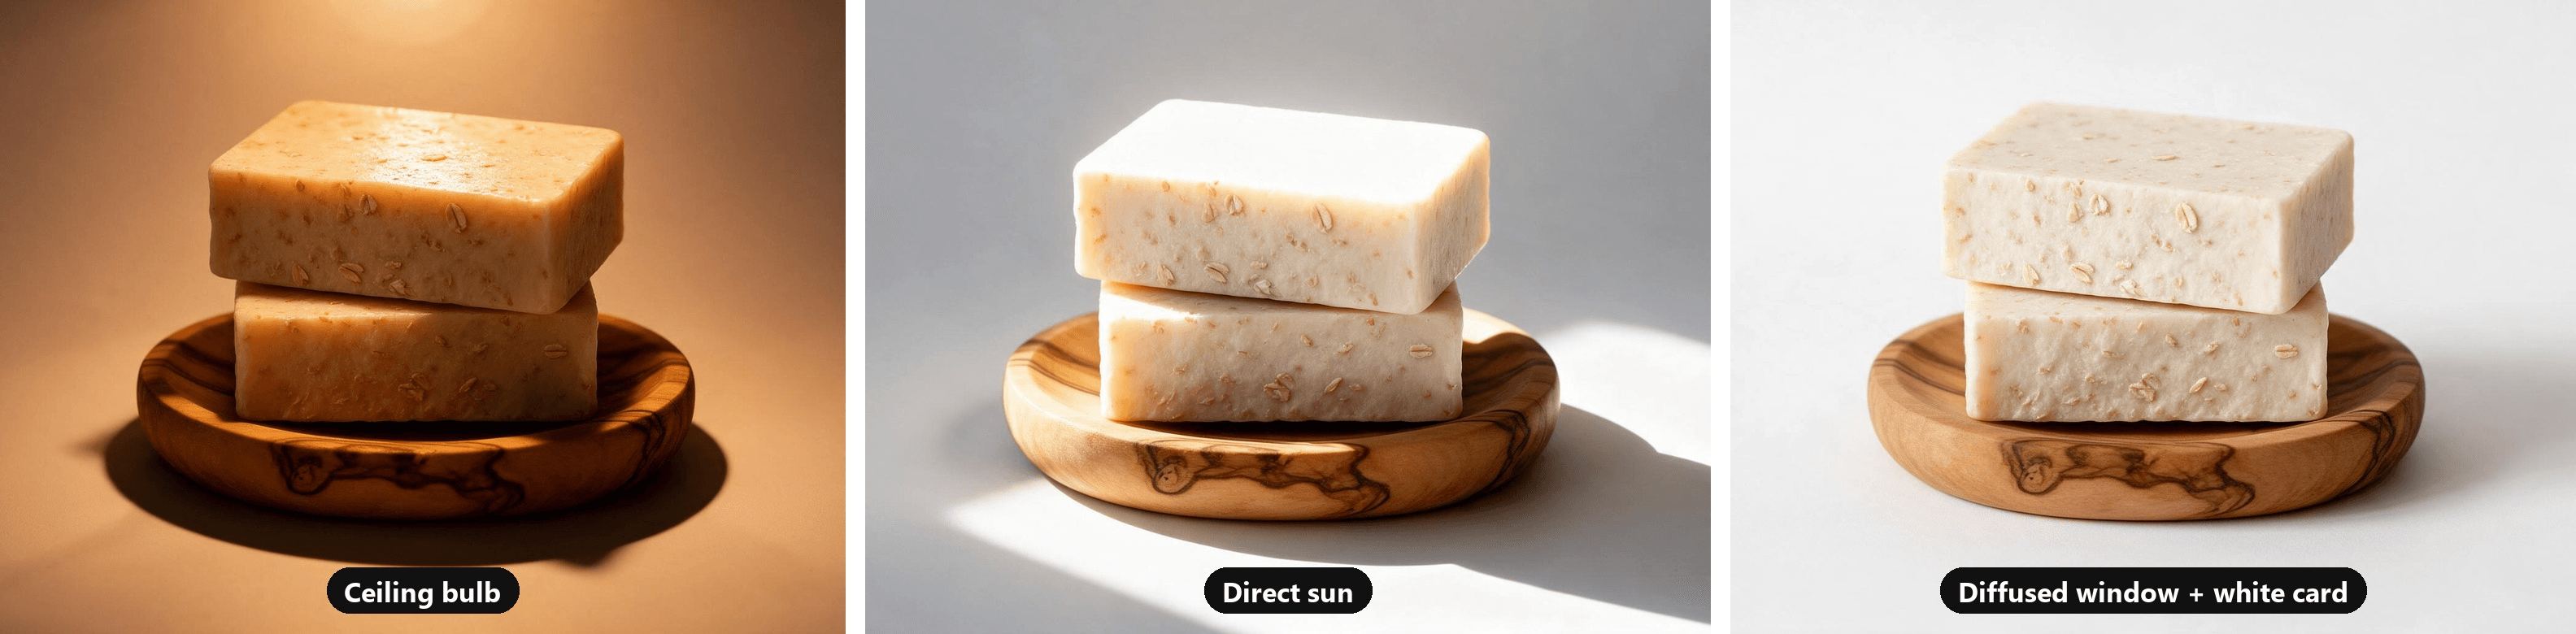
All three frames were made with AI from one base image, so only the light changes between them.
Lamps, softboxes and multi-light setups are a topic of their own. Everything in this guide works with one window.
How to Make a Product Photography Backdrop From Poster Board
A product photography backdrop has one job, which is to disappear. A board propped flat against the wall can't do it. The line where the board meets the table runs straight across the frame like a horizon, right behind your product. Curving the board removes that line.
- Clip the top edge to a chair back, or tape it to the wall, so the board stands well above the height of the product.
- Let the board fall forward and lie flat on the table. Don't crease it. A soft curve at the bend is what makes the background read as one surface.
- Place the product on the flat part, well in front of the curve. The gap keeps the product's shadow off the curve and lets the background fall off evenly.
- Tape the front edge to the table so the sweep doesn't slide when you move things around.
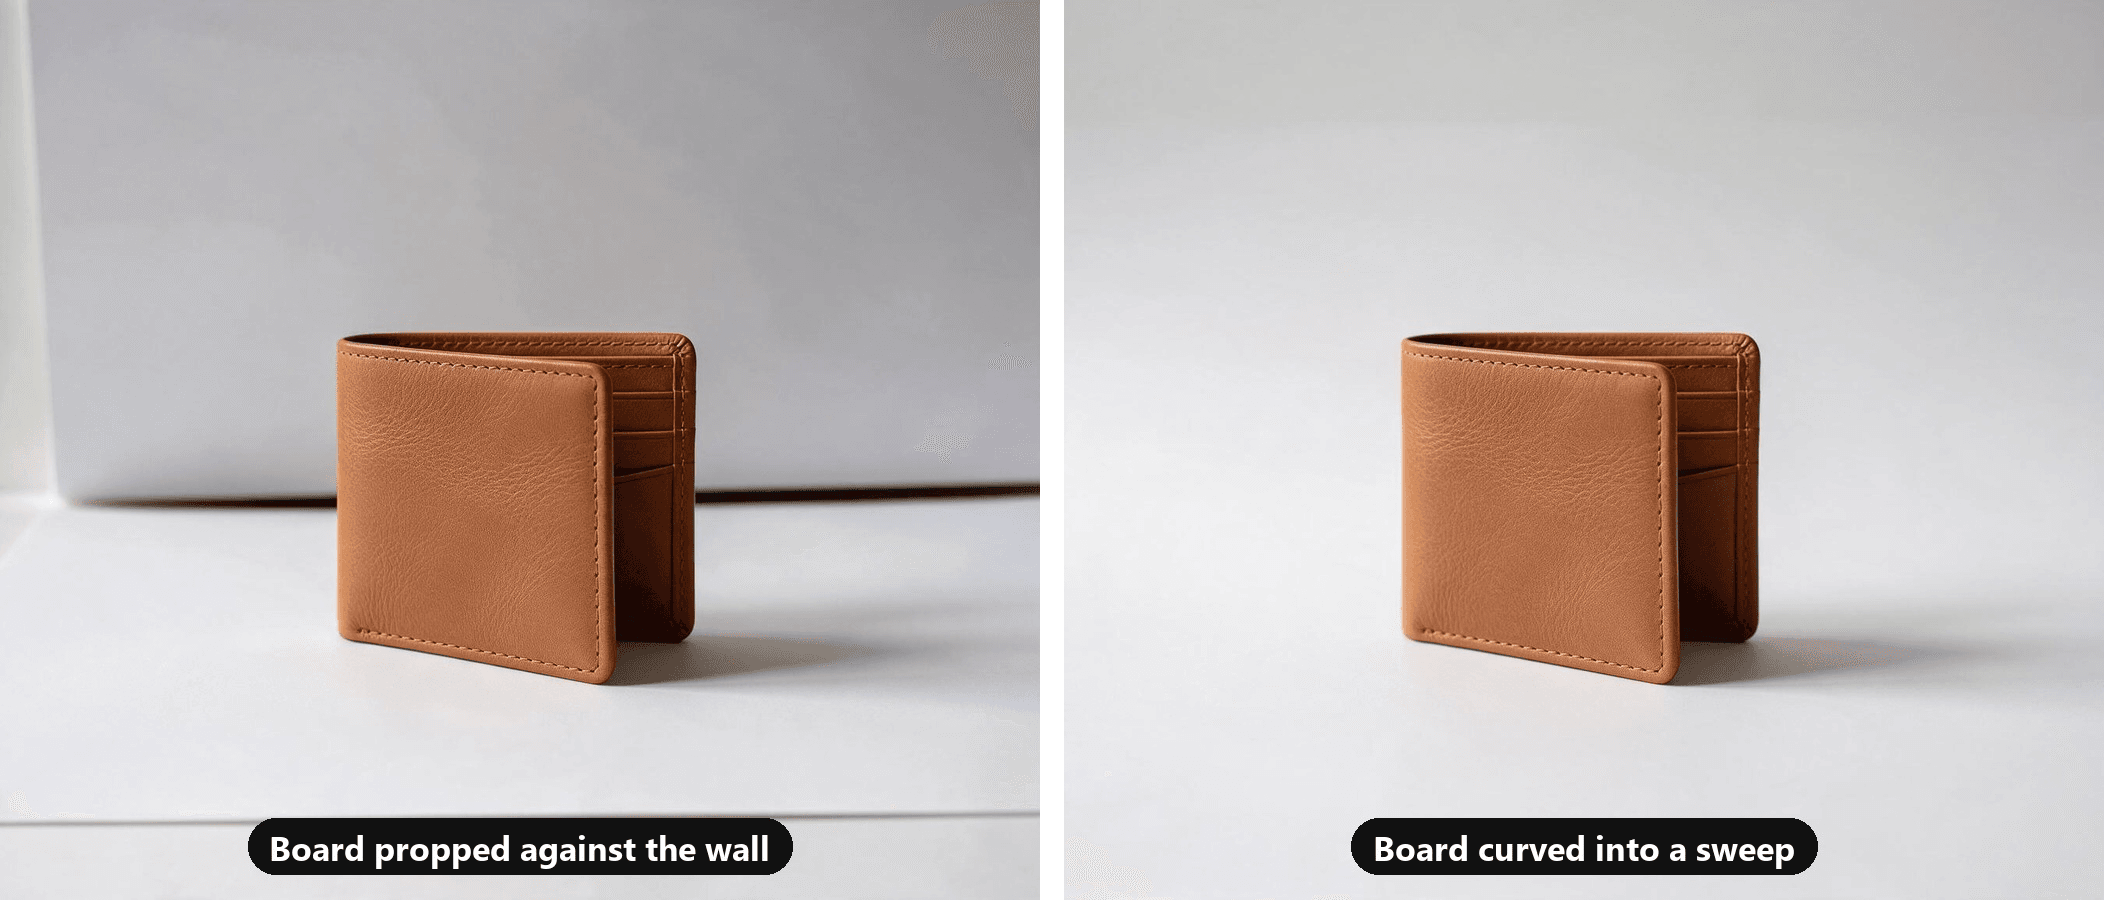
A sheet of poster board handles mugs, candles, skincare bottles and anything smaller. For shoes, bags or small appliances, hang a roll of seamless paper or an ironed white bedsheet the same way.
White isn't the only choice either. Wood, linen or a stone tile makes a good surface for lifestyle frames, while plain white or light gray keeps the first photo clean.
How to Photograph Products on White Background
A phone's auto exposure tends to pull the whole frame toward a middle gray. Point one at a white backdrop and the white comes out gray, sometimes with a cool cast, while the product darkens along with it.
Fix it in camera:
- Move the product forward so it sits away from the curve.
- Tap the product, then drag exposure up until the background looks white on screen.
- Stop when the brightest highlight on the product is about to lose its detail.
- Lock that exposure so the next shot doesn't drift back.
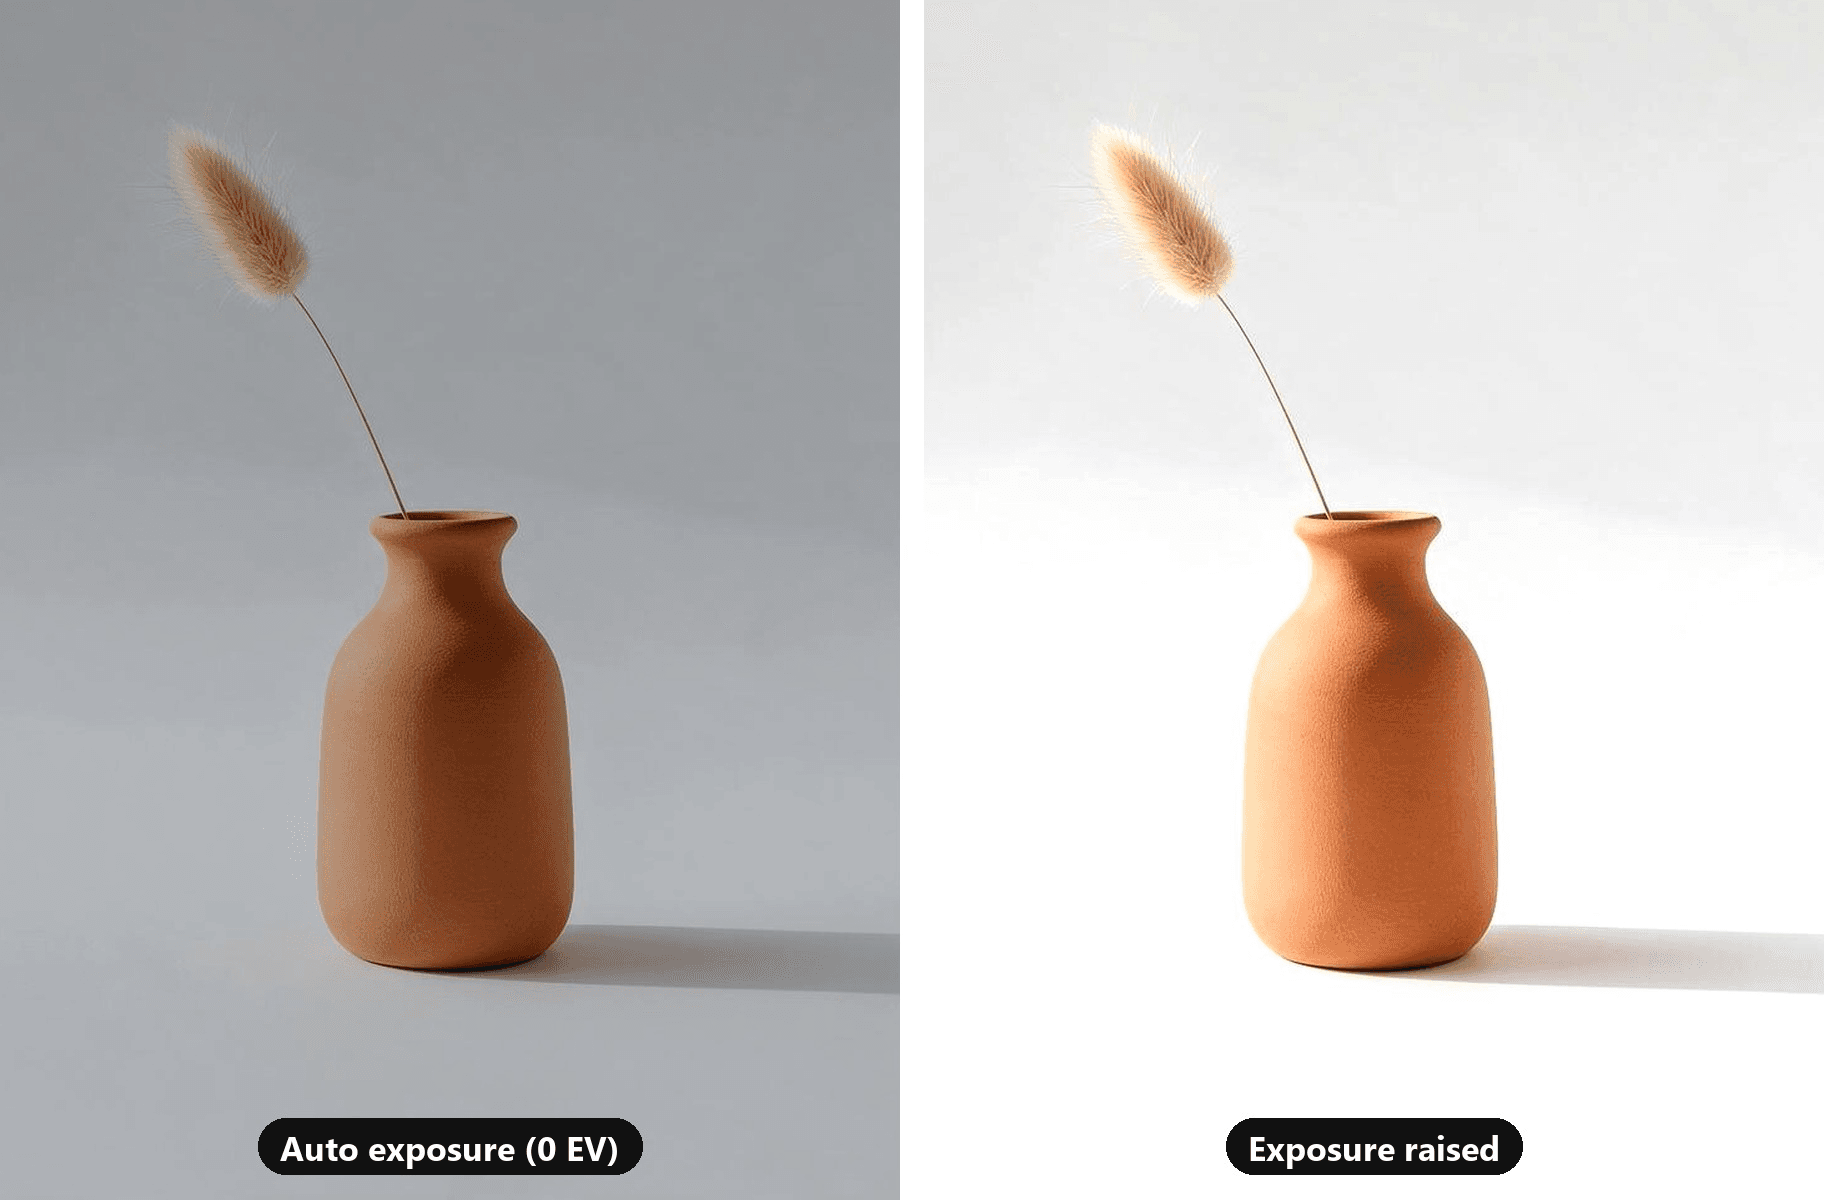
Both frames come from one AI-generated photo. The left frame is pulled down to roughly where auto exposure lands on a white backdrop.
If a marketplace asks for pure white, get close in camera and finish the job in an editor. Our guide to changing a background to white walks through the cleanup and the cases where pure white backfires.
How to Take Product Photos With iPhone: The Settings That Matter
Each setting below sits either in the iPhone Camera app or under Settings > Camera, and each has a Pixel counterpart. The iPhone paths come from Apple's camera guide and the Pixel ones from Google's Pixel camera help.
| Setting | iPhone | Pixel | Why it matters for product photos |
|---|---|---|---|
| Lens | Tap 1x, or the next zoom step your model offers; skip 0.5x | Pinch to zoom; on supported models, Manual Lens Selection in the Pro settings tab swaps the zoom control for one button per lens (UW, W, T) | Up close, the ultra wide lens stretches whatever sits nearest the phone |
| Focus and exposure lock | Touch and hold the product until AE/AF Lock appears | Tap the product, then tap Lock | Moving a prop or your hand no longer resets focus and brightness |
| Exposure | Drag the Adjust Exposure button next to the focus box up or down | On Pixel 4a 5G and later, tap Edit, then Adjust | A white backdrop needs more exposure than the phone picks on its own |
| Grid | Settings > Camera > Grid and Level | Camera settings > More Settings > Grid type | Keeps product edges straight and every crop lined up |
| Flash | Tap the Flash control and choose Off | Camera settings > Flash | Light from the lens axis flattens the product and throws a hard shadow behind it |
| Portrait mode | Stay in Photo mode | Stay in Photo mode | The background blur is computed, and it can blur the product's own outline too |
| File format | Settings > Camera > Formats > Most Compatible saves JPEG | Saves JPEG unless you turn on RAW + JPEG in Camera settings | Not every marketplace accepts HEIC files |
Two rows deserve a sentence more. For a long session, the Exposure control in the iPhone camera controls is handier than the slider beside the focus box: Apple says it stays locked until you next open Camera, and Settings > Camera > Preserve Settings > Exposure Adjustment keeps it beyond that.
Apple's HEIF page recommends the High Efficiency format, which it says offers "better compression than JPEG" at the same visual quality. If you sell somewhere that doesn't take HEIC (the marketplace table below shows which), switch to Most Compatible before the shoot.
How to Photograph Small Products Without Distortion
Small things tempt you to move the phone in close, and that's exactly where they get distorted.
A few centimeters from the lens, the nearest corner of a box is far closer than the back corner, so it swells and the edges lean outward. The phone can also end up between the window and the product and drop its own shadow on top.
Step back and zoom instead:
- Shoot at 2x, or your phone's next telephoto step, from about 30 to 40 cm away. Crop in afterward if you need a tighter frame.
- Raise the productona book or a wooden block under the sweep so the lens sits level with it, not looking down into it.
- Clean it right before the shot. Roll a lint roller over fabric and wipe hard surfaces. At this size, a single fiber reads as a scratch.
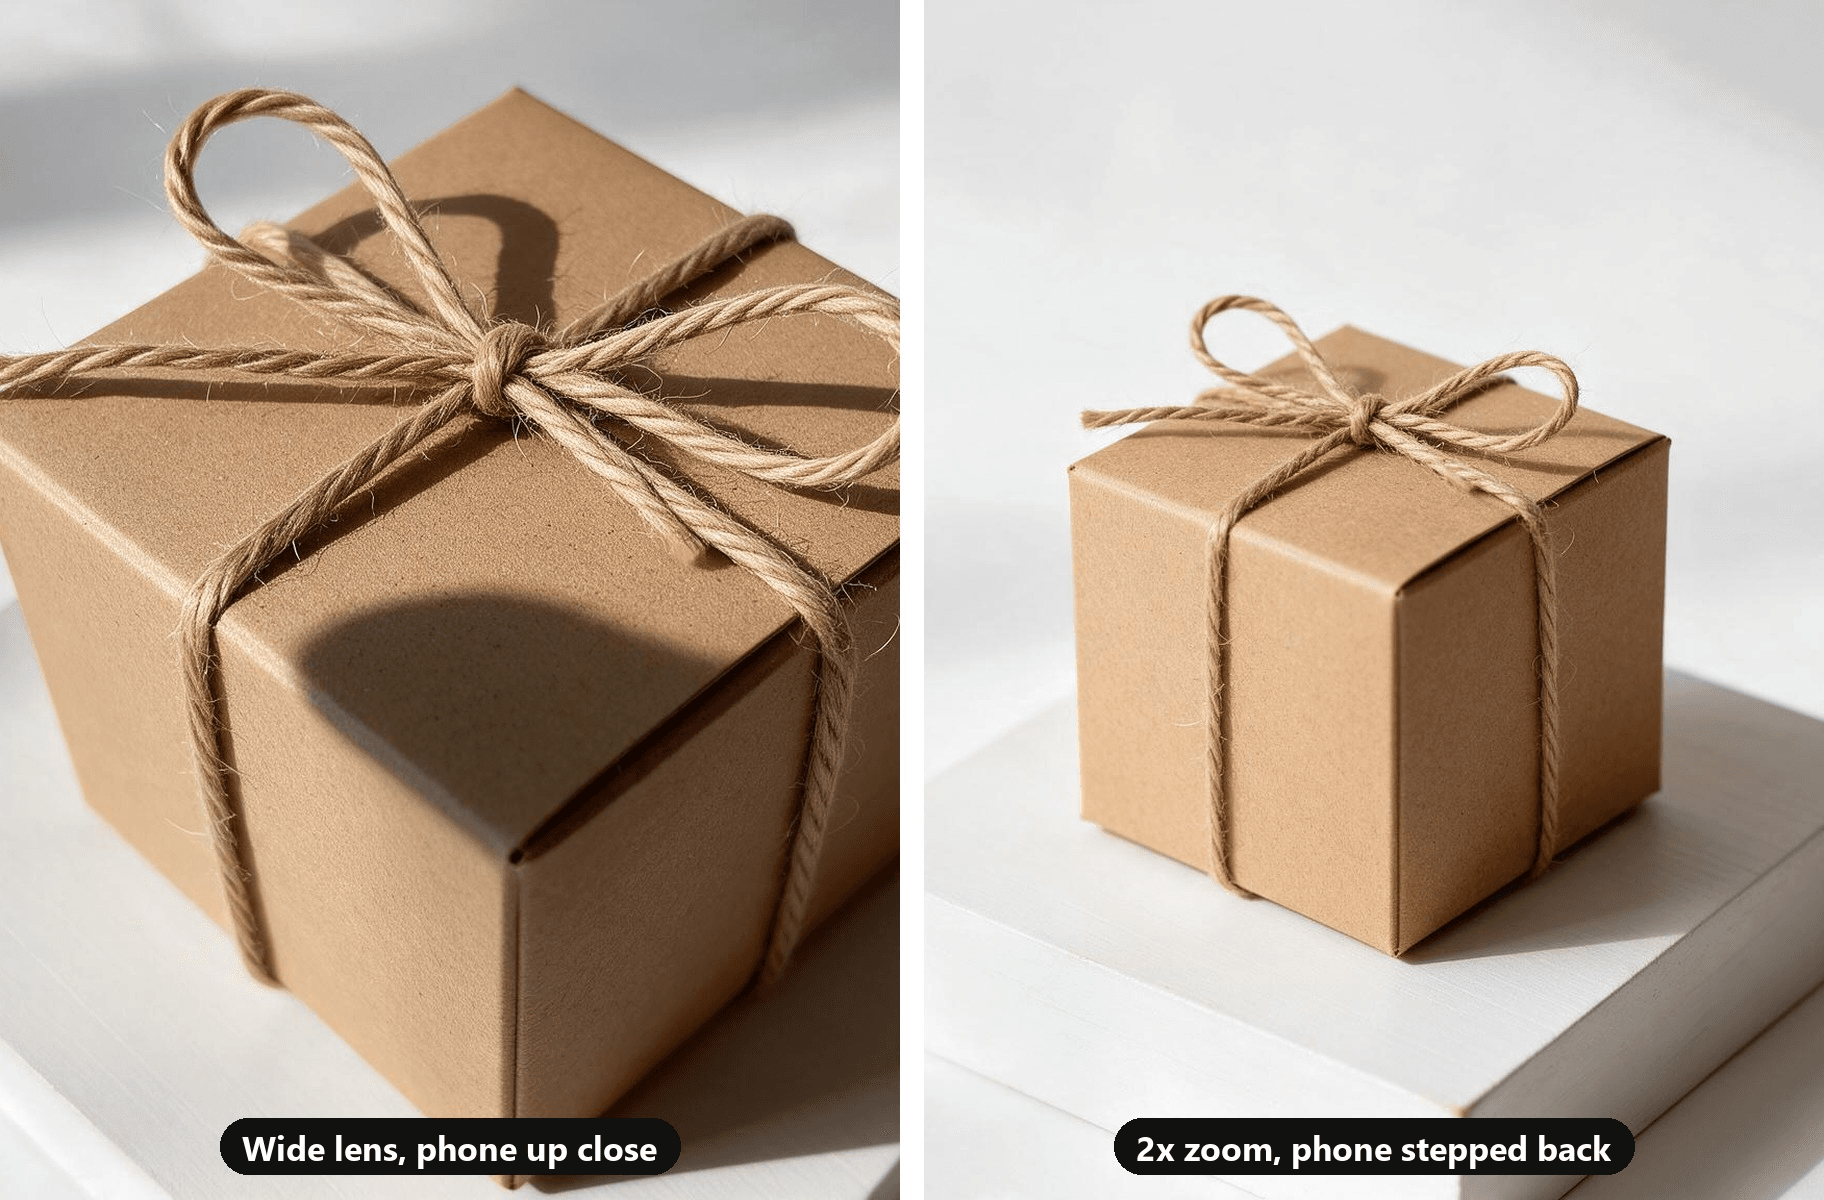
For tiny details like a clasp, a stitch or an engraving, switch to macro mode on phones that have it: Macro mode on supported iPhones, Macro Focus on recent Pixels.
Product Photography Tips for Shooting a Whole Catalog Consistently
One great photo is easy. Forty that match is the real job, and shoppers notice when a shop grid jumps between warm and cool, close and far.
- Mark the spots with tape. Tape where the product sits and where the tripod legs stand, and put every item on the same mark.
- Shoot in one session at one time of day. Window light shifts in color and direction through the day, so a morning batch and an evening batch won't match.
- Lock exposure on the first product and keep it. Auto exposure tends to brighten a dark item and darken a light one, and the backdrop changes shade from shot to shot.
- Keep the zoom and distance fixed. Any size difference in the grid then comes from the products themselves.
- Pick the crop before you shoot. If the store uses square images, frame every product with that square in mind.
- Name files by SKU as you go. Sorting forty files named IMG_ later is how the wrong photo ends up on the wrong listing.
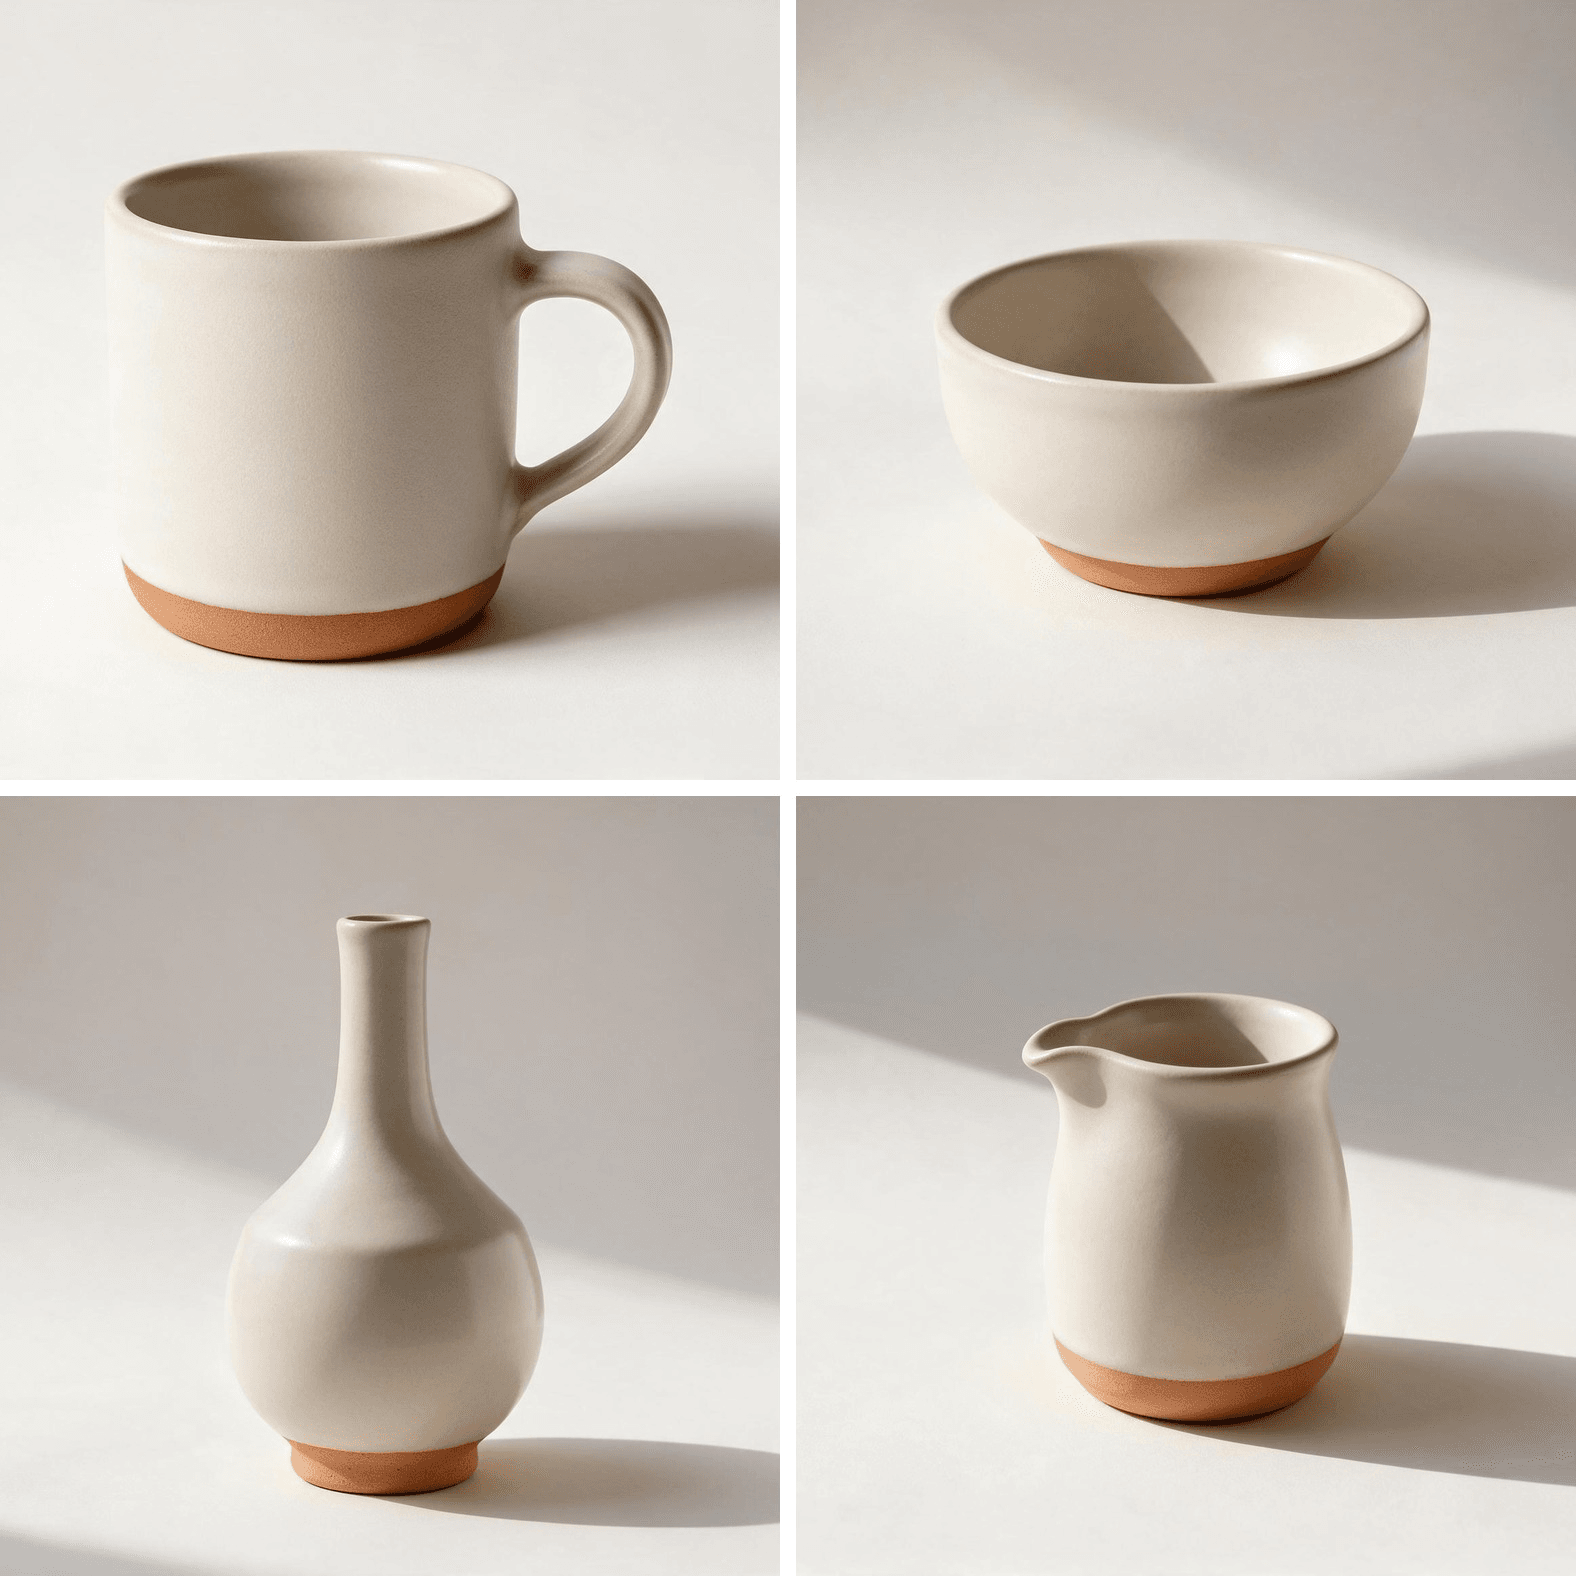
AI-generated example: four images from the same scene description, with the light, angle and zoom held constant.
Edit and Size Your Phone Product Photos for Each Marketplace
Editing a product photo is mostly housekeeping. Straighten the edges, nudge exposure, set white balance from the white background, and crop. If dust or a stray thread slipped into the frame, our guide to removing objects on iPhone walks through the built-in Clean Up tool and a no-app route.
Then size the file for where it's going. Shopify's numbers come from its product media help page, Amazon's from its Seller Central product image guide, Google's from the Merchant Center image link spec, and Etsy's from its image help page and listing image policy.
| Platform | Recommended size | Background rule | Formats |
|---|---|---|---|
| Shopify | 2048 x 2048 px for square images; up to 5000 x 5000 px and under 20 MB | Not set on the help page; keep one style across the store | PNG first, then JPEG; HEIC and WebP also accepted |
| Amazon | 1,000+ px on the longest side to enable zoom; 500 px minimum, 10,000 px maximum | Main image on pure white (RGB 255, 255, 255), product filling 85% of the frame | JPEG (recommended), TIFF, PNG, non-animated GIF |
| Google Merchant Center | 1500 x 1500 px or larger; at least 500 x 500 px for all products from January 31, 2027 | No promotional text, watermarks or added logos over the product | JPEG, WebP, PNG, GIF, BMP, TIFF, up to 16 MB |
| Etsy | At least 2,000 px wide and tall; first photo at least 635 px | Original photos of the actual item | JPG, GIF, PNG, SVG, HEIC; transparent PNG areas show up black |
Export one full-resolution master and let each platform scale it down. On Etsy, keep an eye on file size: its help page warns that images over 1 MB may not finish uploading on a slow connection.
FAQ
What is the best app for taking product photos?
The camera app already on your phone. On iPhone and Pixel it locks focus and exposure, shows a grid and lets you set exposure by hand, which covers every step in this guide. A manual camera app earns its place when you want to lock white balance across a batch or shoot RAW on a phone that doesn't offer it.
Can you take product photos at night without a window?
Yes, with one lamp and a daylight bulb. Turn off every other light, aim the lamp at the ceiling or at a white board so the light bounces before it reaches the product, and keep the white card on the opposite side. A bounced lamp behaves a lot like a cloudy window.
How do you take product photos of clothes with your phone?
Lay the garment flat on a white sheet or poster board on the floor, steam out the creases, and shoot from directly above with the phone parallel to the floor. Turn on the grid to keep the hem square to the frame. For long pieces, stand on a chair and zoom to 2x rather than dropping to 0.5x, which bends the edges.
Can you use AI scene images on Amazon or Etsy?
Not in place of real listing photos. Etsy asks for original photos of the actual product, and Amazon's guide says the main image must accurately represent the product's real scale, quantity and color. Amazon also asks sellers to tag images that show photorealistic AI-generated people with the keyword contains-synthetic-performer.
Google Merchant Center requires AI-generated images to carry metadata that says so, such as the IPTC DigitalSourceType tag. AI scenes fit best on your own store, in ads and on social.
Conclusion
The yellow, gray, stretched mug from the start had three causes: a ceiling bulb, a lens too wide and too close, and a phone metering white down to gray. Side window light with a white card, a poster board sweep and a locked exposure at 1x or 2x fix all three for the price of a craft-store trip.
Once you know how to take product photos with your phone, mark the setup with tape and every new product takes minutes. Keep those real shots for your listings, and hand the best one to Image ads when you need scenes, detail pages or posters for your own store and ads.





