Carichi una foto da telefono morbida e leggermente opaca su un miglioratore di foto, aspetti quattro secondi e ricevi qualcosa che sembra più pulito. Poi la mandi in stampa in formato poster e si sbriciola in una poltiglia. Lo strumento ha fatto il suo lavoro. Gli hai posto la domanda sbagliata.
È questo il nocciolo della questione. Un miglioratore cambia l'aspetto dei pixel che hai già. Un upscaler cambia quanti pixel hai. Gli strumenti che si posizionano nelle ricerche di miglioratori di foto IA tendono a includere entrambe le cose silenziosamente, ed è lì che soldi e qualità si disperdono.
Abbiamo letto riga per riga le pagine delle funzionalità di Canva, Picsart e Airbrush, le abbiamo messe accanto ai limiti pubblicati dell'upscaler gratuito di Atlas Cloud e abbiamo mappato quale intervento appartiene a quale problema. Inizia con le due definizioni, perché tutto il resto dipende da esse.
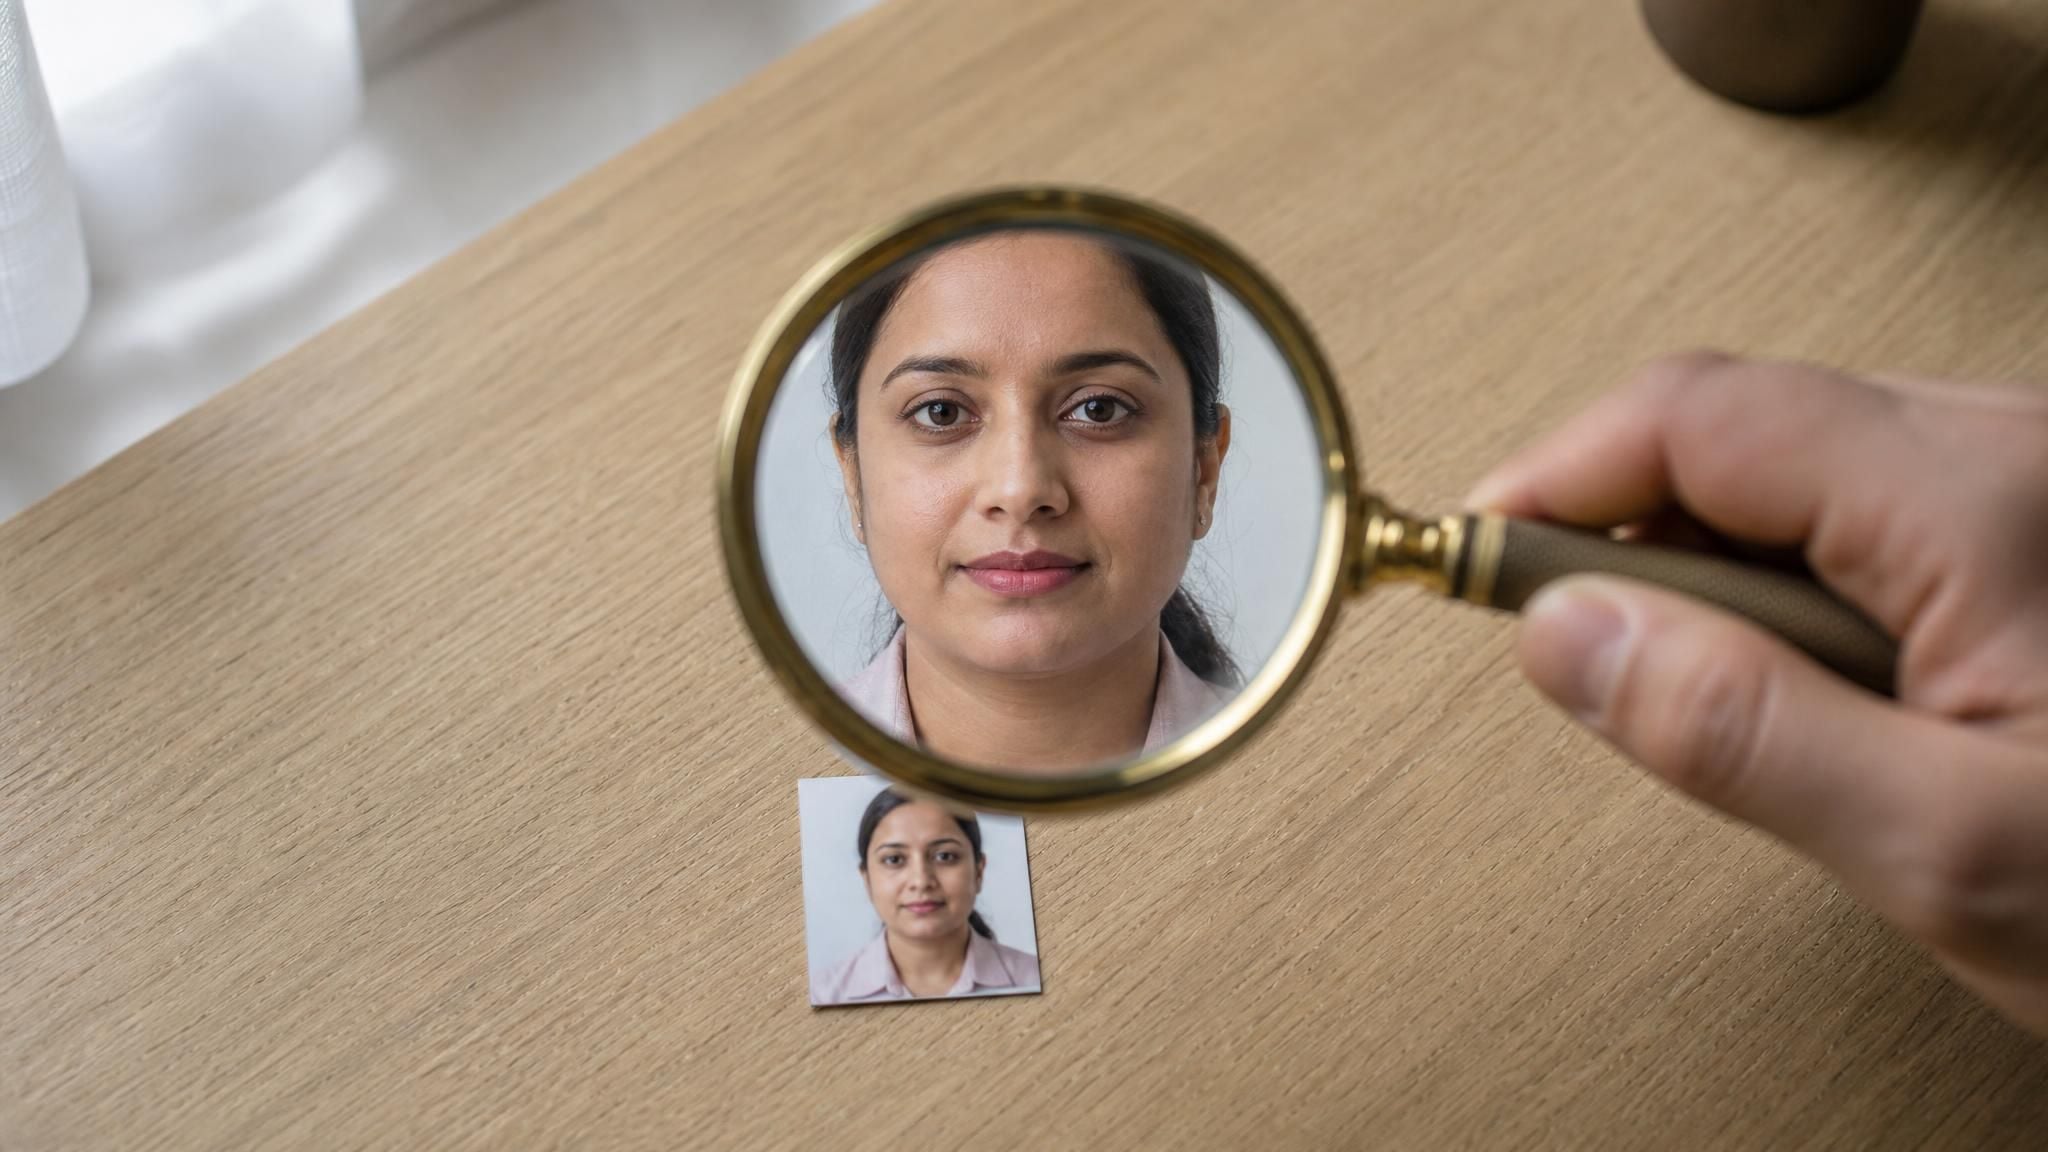
Punti chiave
- Un miglioratore di foto modifica l'aspetto dei pixel esistenti. Un upscaler aggiunge pixel che non sono mai stati catturati.
- Su Canva, Picsart e Airbrush, l'etichetta "enhancer" copre tre diversi pacchetti di operazioni e ogni pagina di funzionalità specifica il proprio.
- I piani gratuiti possono trattenere il download a piena risoluzione. La pagina di Picsart dice che i salvataggi a risoluzione inferiore sono la parte gratuita.
- L'upscaler di immagini gratuitodi Atlas Cloud aggiunge solo pixel: fisso 2x, massimo 768 px in output, nessuna registrazione, nessuna correzione di colore o rumore.
- Pulisci la qualità prima di aggiungere dimensioni. Fare upscale di una foto rumorosa ti dà rumore più grande.
Cosa cambia davvero un miglioratore di foto
Cerca un miglioratore di foto e gli strumenti su cui ti imbatti promettono immagini più chiare, più nitide e migliori. Leggi cosa elencano sotto e le operazioni sono sempre della stessa famiglia: schiarire le ombre, recuperare le luci bruciate, aumentare il contrasto, ridurre il rumore, affilare i bordi, correggere il bilanciamento del colore. Ognuna di queste tocca i valori di pixel che esistono già. Nessuna crea un pixel.
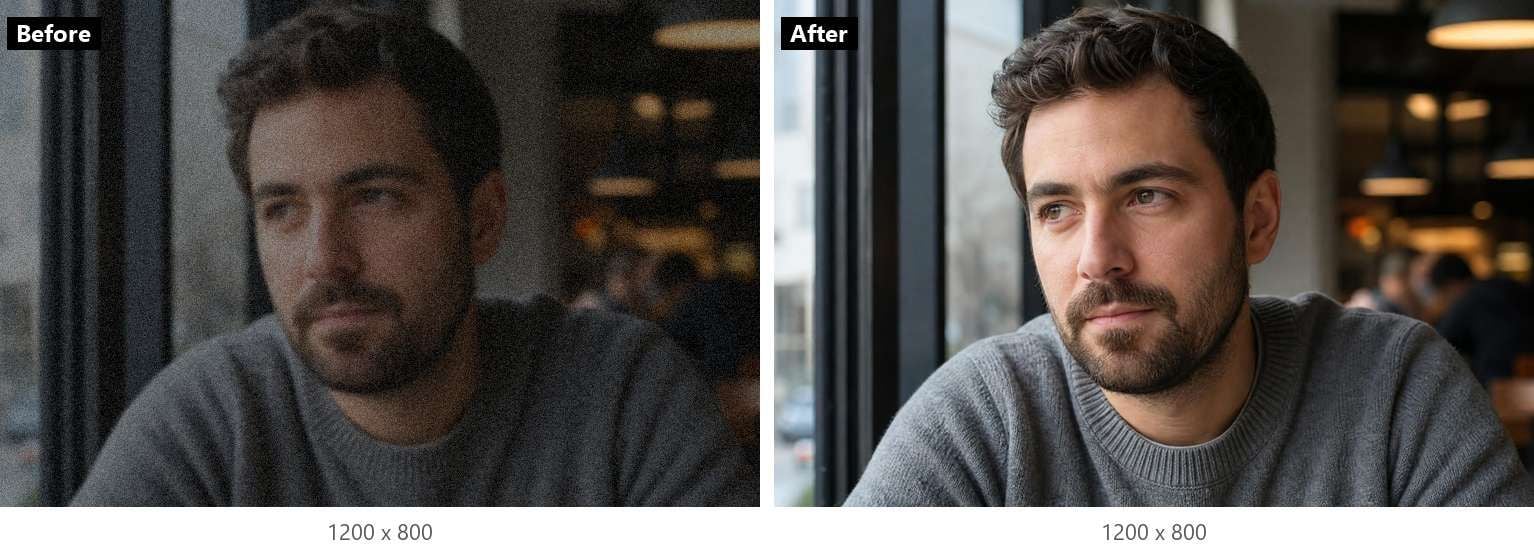
Questa è la caratteristica distintiva. Dai in pasto una foto 1200 x 800 a un puro miglioratore e ricevi indietro una foto 1200 x 800. La pelle appare più liscia perché il rumore è stato mediato. I bordi sembrano più netti perché il contrasto è stato spinto lungo di essi. L'immagine risulta di qualità superiore su uno schermo di telefono, esattamente alle dimensioni di prima.
Dove entra in gioco l'IA? Le precedenti funzioni di miglioramento automatico applicavano curve di regolazione fisse. Quelle attuali in genere eseguono modelli addestrati su coppie di immagini danneggiate e pulite, pensati per trattare un'ombra rumorosa in modo diverso da un tessuto strutturato. Picsart descrive la sua versione come addestrata a identificare e correggere rumore, sfocatura e basso contrasto. È un riassunto corretto dell'intera categoria. Nota cosa manca dall'elenco: le dimensioni.
Cosa fa invece un upscaler di immagini
Un upscaler di immagini inizia dove si ferma il miglioratore. Il suo input è una foto che va bene alla dimensione attuale ed è inutile più grande: l'avatar da 300 pixel che ti serve a 600, la miniatura web che qualcuno vuole su un volantino, il volto ritagliato che diventa a blocchi quando ingrandisci.
L'allungamento non risolve il problema. Qualsiasi editor può ridimensionare un'immagine da 300 pixel a 600, ma lo fa distribuendo le stesse informazioni su un'area quattro volte più grande, e il risultato è morbido.
Un modello super risoluzione invece prevede cosa avrebbero contenuto i pixel aggiuntivi. La pagina dello strumento Atlas Cloud lo spiega chiaramente: il modello "ricostruisce bordi e texture invece di assottigliare i pixel esistenti, ed è per questo che un avatar da 300 pixel esce a 600 come se fosse stato renderizzato a quella dimensione, invece che semplicemente ingrandito."
Colore, esposizione e bilanciamento del bianco passano attraverso un upscaler invariati. Se la foto piccola era troppo scura, la foto grande è troppo scura. È voluto: l'upscaler gestisce solo le dimensioni e le prossime sezioni mostrano cosa succede quando gli strumenti offuscano il confine.
Atlas Cloud: un miglioratore di qualità dell'immagine che aggiunge solo pixel
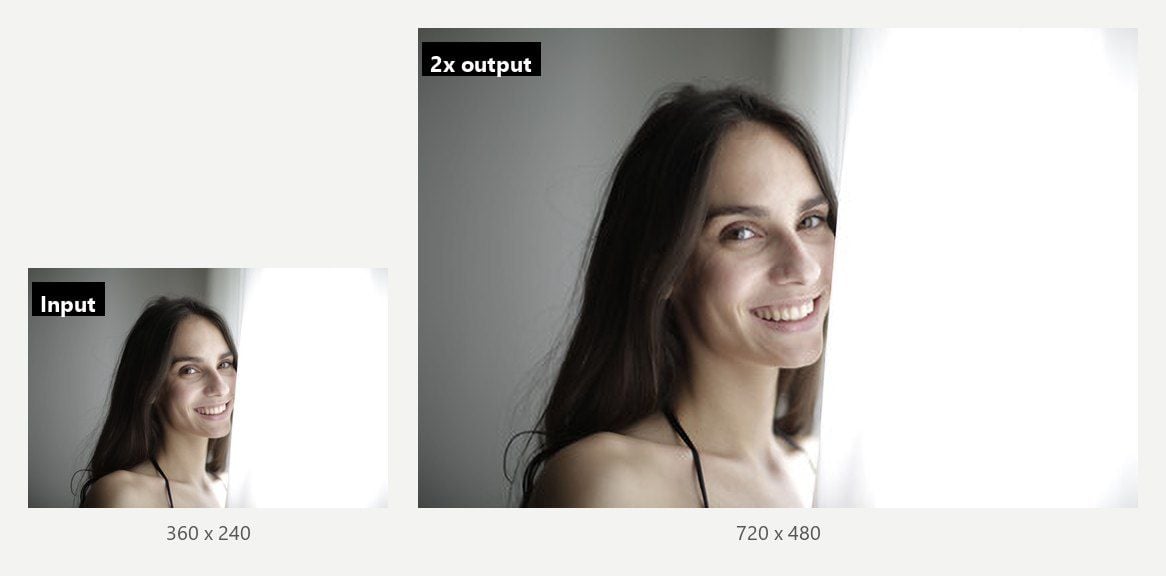
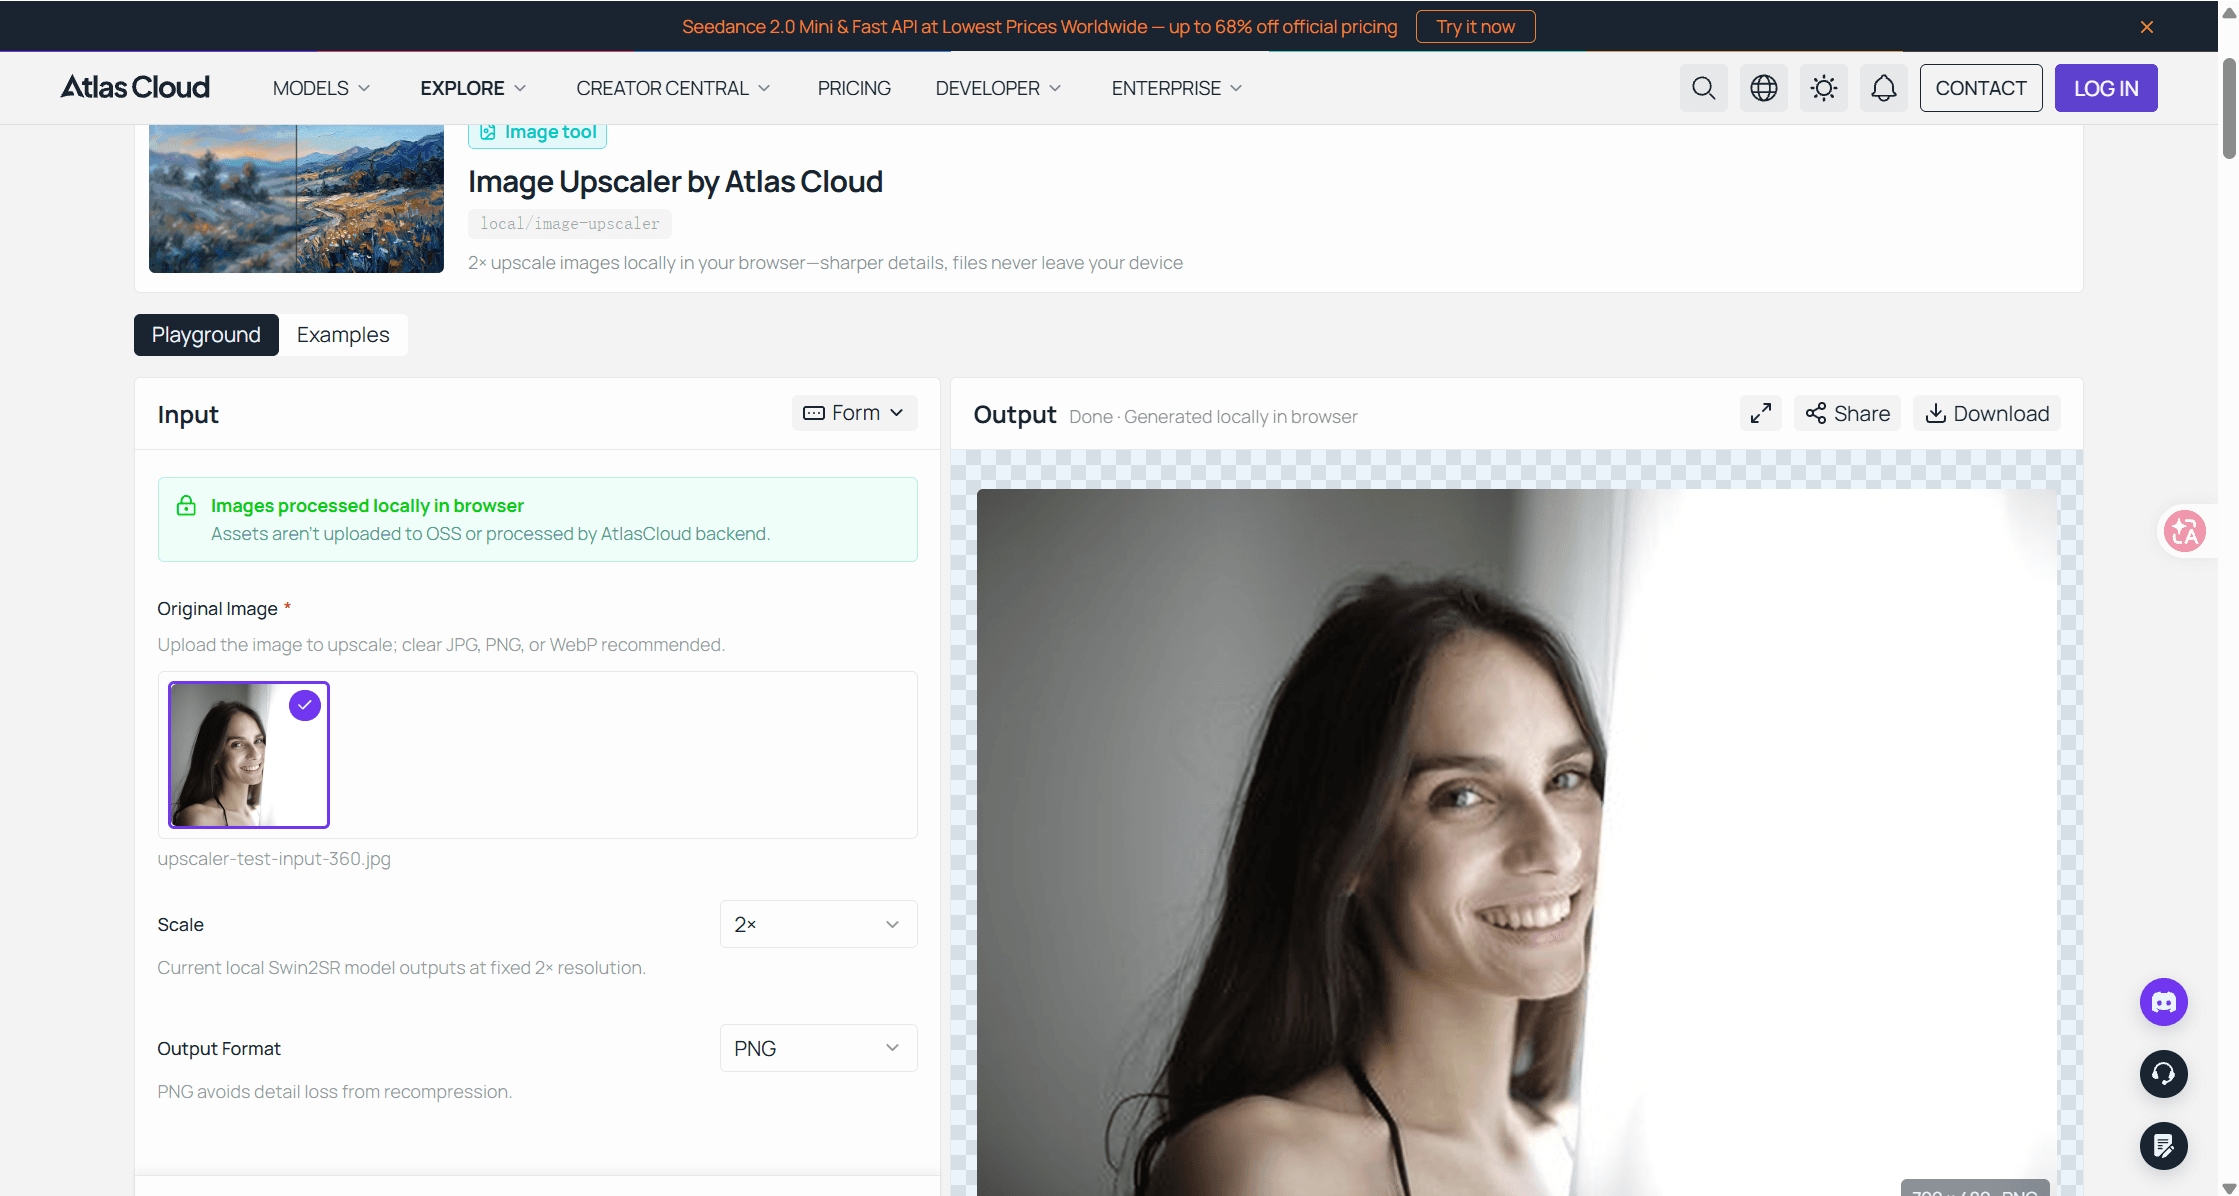
Digiti "miglioratore di qualità dell'immagine" in un motore di ricerca e non troverai Atlas Cloud che finge di esserlo. La sua gamma di strumenti IA gratuiti include un rimuovi sfondo, un cancellatore di oggetti e un upscaler, e quest'ultimo è trasparente sull'essere un upscaler. Non affila nulla, non schiarisce nulla e non tocca il colore. Esegue un modello super risoluzione Swin2SR nel tuo browser e restituisce un'immagine con il doppio dei pixel per lato.
I limiti sono scritti nella pagina. Lo strumento "passa al modello un lato lungo massimo di 384 pixel, il che limita l'output a 768". Qualsiasi cosa più grande viene prima ridimensionata, quindi una foto da 2000 pixel non ritorna a 4000. Questo lo rende lo strumento sbagliato per un fotogramma a piena risoluzione di una fotocamera e quello giusto per il caso che molte persone hanno davvero: un piccolo avatar, un volto ritagliato, una miniatura presa da una chat.
L'output è un PNG a piena dimensione e la pagina dichiara che "non c'è logo nell'angolo, né un'export a qualità ridotta trattenuta per gli utenti paganti". Inoltre non c'è nessun account da creare. L'upscaler fa parte del piccolo gruppo di strumenti IA Atlas completamente gratuiti e aperti senza registrazione, un accesso più pulito rispetto a un miglioratore che ti instrada attraverso un editor di design o tiene il file a piena risoluzione dietro un piano.
Per usarlo, apri l'upscaler di immagini IA gratuito, trascina o incolla un'immagine, attendi il download una tantum del modello da 54 MB al primo utilizzo e salva il risultato 2x. I lavori più grandi vanno al modello upscaler ospitato da Atlas Cloud, che accetta un valore di outscale fino a 4.0 per immagine. Per lo strumento browser la proposta è volutamente limitata: fa un solo lavoro, aggiungere pixel, e ti dice il tetto massimo prima di iniziare.
Canva, Picsart, Airbrush: cosa offrono davvero tre miglioratori
Questi tre compaiono ai primi posti nei risultati per miglioratori di foto e tutti e tre chiamano la funzionalità "enhancer". Le loro stesse pagine descrivono tre prodotti diversi. Le differenze contano più dell'etichetta condivisa, quindi ecco cosa dice ciascuno di sé.
Il miglioratore di immagini di Canva è in realtà un pulsante di upscale
La pagina del miglioratore di immagini di Canva è intitolata come un miglioratore di foto IA, ma le istruzioni passo passo nella stessa pagina ti mandano a uno strumento chiamato Upscale: "Fai clic sull'immagine, poi seleziona Modifica nel pannello orizzontale in alto. In Strumenti, cerca la funzione Upscale". Questa è la parte IA, ed è un upscaler.
Tutto ciò che le persone di solito intendono per "miglioramento" arriva dopo, manualmente. La pagina lo dice direttamente: "Dopo aver aumentato la risoluzione dell'immagine, migliorala ulteriormente correggendo la scarsa illuminazione, regolando il contrasto o aumentando la saturazione". Foto sfocata? Le FAQ ti indirizzano alla scheda Regola, poi a Texture, poi al cursore Nitidezza. Ti servono più pixel di quelli che dà Upscale? Le FAQ ti indirizzano a Magic Resize, che nella stessa frase viene indicato come disponibile per gli utenti Pro.
Quindi il miglioratore di immagini di Canva è la somma di due prodotti sovrapposti: un upscaler che scatta una volta e un editor a cursori convenzionale che gestisci tu. Nessuno dei due è male. L'etichetta nasconde solo la giuntura. Inoltre, tutto avviene dentro l'editor di Canva, il che è comodo se stai già creando un post lì, e una deviazione se volevi solo riavere il file.
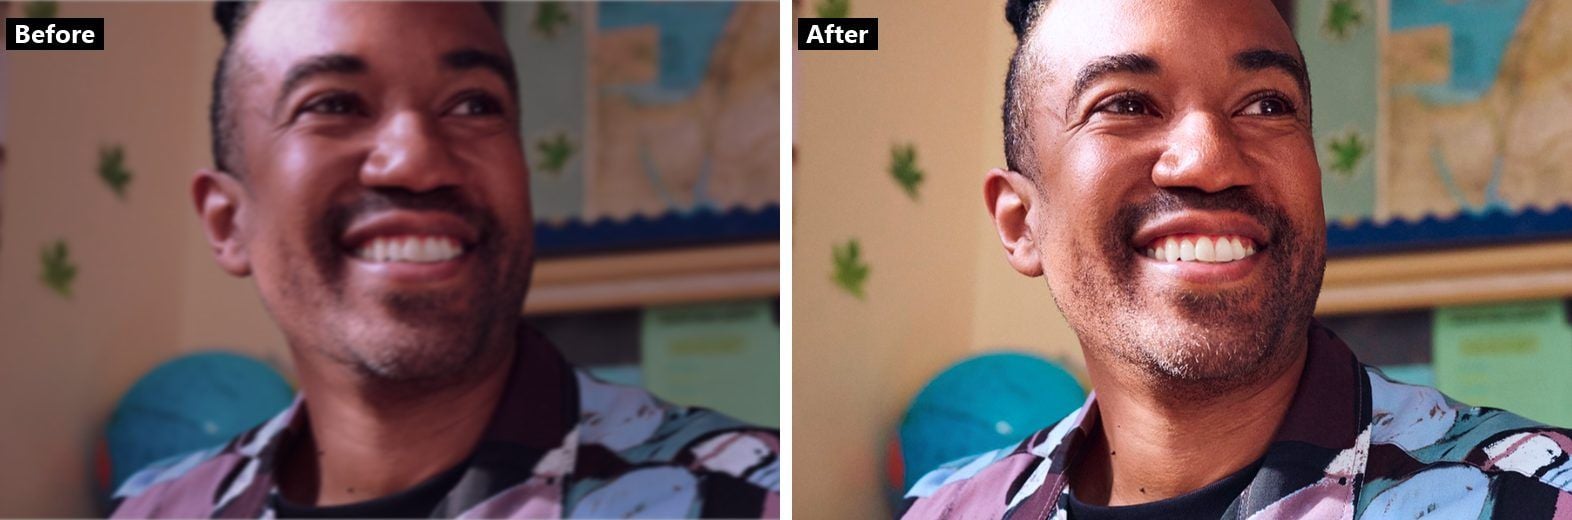
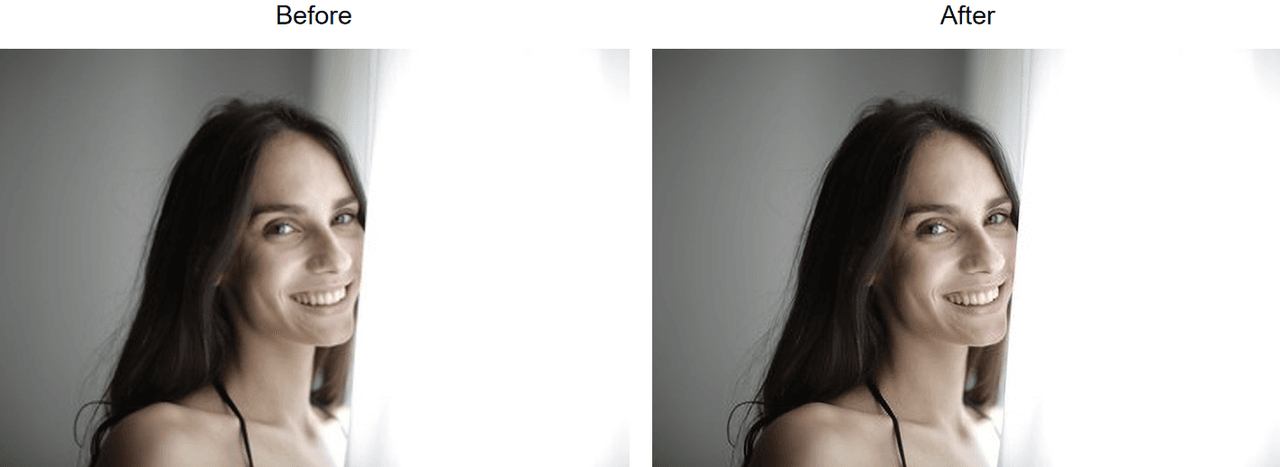
Fonte: immagini campione pubblicate sulla pagina della funzionalità miglioratore di immagini di Canva.
Picsart AI Image Enhancer: dove si ferma il piano gratuito
La pagina di Picsart è esplicita su ciò che fa il modello. Il Picsart AI image enhancer è "addestrato a identificare e correggere problemi come rumore, sfocatura e basso contrasto", e aumenta anche il numero di pixel, cosa che la pagina archivia sotto un'intestazione che recita "Aumento momentaneo della risoluzione". Un clic, entrambi i lavori. Se vuoi un vero miglioratore con un solo pulsante, ecco come si presenta.
L'inghippo sta nella formulazione dei prezzi e la pagina si contraddice al riguardo. Il titolo definisce lo strumento "Miglioratore di foto gratuito". Una risposta nelle FAQ più in basso nella stessa pagina dice: "L'AI Image Enhancer è uno strumento di editing online premium". La frase che li concilia si trova nel paragrafo di apertura: "Inoltre, puoi salvare immagini a risoluzione inferiore gratuitamente!"
Leggilo con attenzione. Puoi migliorare gratuitamente e puoi tenere gratuitamente una versione piccola. Il risultato a piena risoluzione, ciò per cui un upscaler esiste, è la parte a pagamento. Lo stesso schema appare nel blocco Pro di Canva su Magic Resize. Picsart merita credito per averlo scritto dove puoi trovarlo. Significa anche che un'esecuzione gratuita di Picsart è un'anteprima, e dovresti fare i tuoi piani in base al download, non al pulsante.
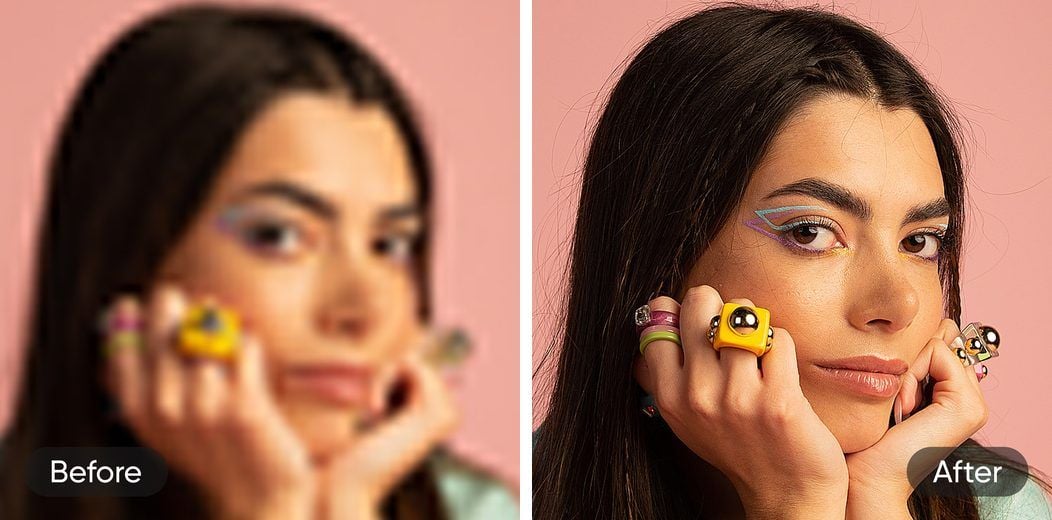
Fonte: immagini campione pubblicate sulla pagina del Picsart AI image enhancer.
Il miglioratore di immagini Airbrush divide il lavoro in sei strumenti
Airbrush adotta l'approccio opposto a Picsart, ed è istruttivo. La pagina del miglioratore di immagini Airbrush descrive uno strumento che "migliora i colori, affila i dettagli, riduce il rumore e aumenta la risoluzione con il minimo sforzo". Poi la sua stessa navigazione elenca molti di questi verbi come prodotti separati con pagine proprie.
| Pagina dello strumento Airbrush separata | Sovrapposizione con la descrizione della pagina del miglioratore |
|---|---|
| Image Upscaler | "aumenta la risoluzione" |
| Sharpen Images | "affila i dettagli" |
| Unblur Image | Non uno dei quattro verbi elencati dal miglioratore |
| Unpixelate Image | Non uno dei quattro verbi elencati dal miglioratore |
| Photo Restoration | Non uno dei quattro verbi elencati dal miglioratore |
| Bulk Image Enhancer | Versione batch, come suggerisce il nome |
Questo ti dice qualcosa: anche un venditore che propone un pulsante tutto-in-uno tratta upscaling, affilatura e de-sfocatura come operazioni abbastanza distinte da meritare ognuna la propria porta d'ingresso. Quando decidi di cosa ha bisogno la tua foto, prendi in prestito questa mappa. Sul costo, la pagina di Airbrush pubblicizza una prova gratuita di 7 giorni accanto ai link per il download dell'app e niente di più specifico; la soglia gratuita dello strumento web, il tetto massimo di output e la politica sulla filigrana non sono dichiarati nella pagina, quindi non faremo supposizioni.
Quale intervento serve alla tua foto?
Rimuovi il branding e la decisione è semplice. Chiediti cosa c'è che non va nella foto, non quale strumento è il migliore.
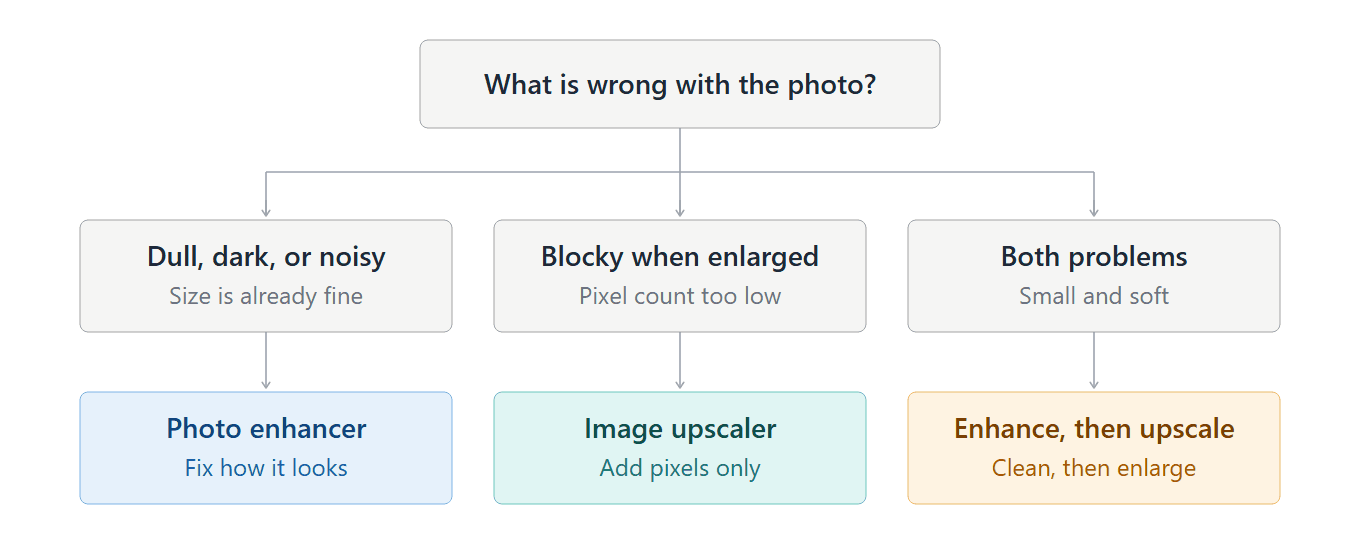
Se la foto ha la dimensione giusta ma appare sbagliata (spenta, scura, rumorosa, piatta), ti serve un miglioramento: esposizione, contrasto, riduzione del rumore, nitidezza. Uno qualsiasi dei tre strumenti sopra lo fa, e anche il pannello Regola dell'editor che già possiedi.
Se la foto sembra a posto ed è troppo piccola, ti serve un upscaler. Nessuno strumento di miglioramento aggiunge pixel, e aumentare la nitidezza su un'immagine piccola rende solo i blocchi più nitidi.
Se entrambe le cose sono vere, come accade di solito per vecchie foto da telefono e screenshot, ti servono entrambe le operazioni, e l'ordine conta. Questa è la prossima sezione.
Perché il miglioramento viene prima dell'upscaling
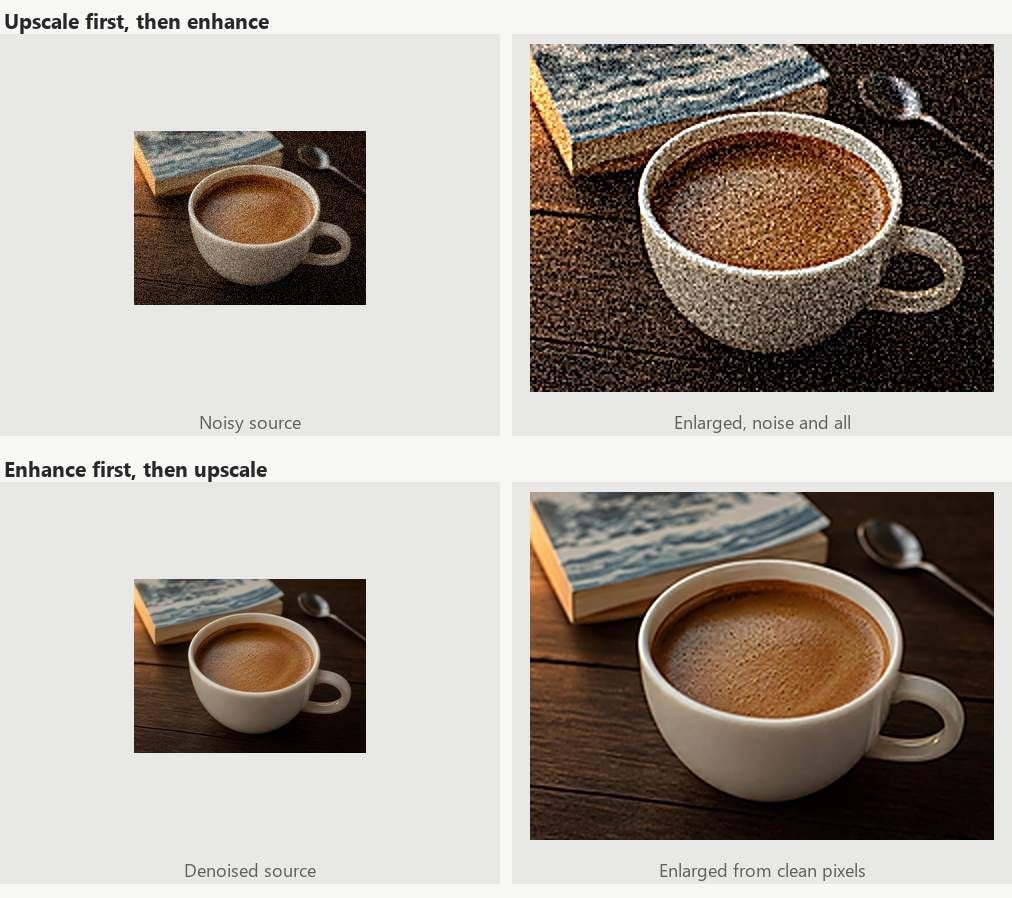
Esegui un upscaler su una foto rumorosa e il modello deve trattare ogni granello di grana come rumore o come texture. Una parte può essere ricostruita come dettaglio. Ti ritrovi con lo stesso schema di rumore al doppio delle dimensioni, ora disegnato con bordi decisi, e il miglioratore che esegui dopo ha un lavoro più difficile per rimuoverlo.
Inverti l'ordine e l'upscaler riceve una sorgente pulita. Riduci il rumore, correggi l'esposizione, poi aggiungi pixel. L'affilatura è l'unico passaggio da tenere per ultimo, e anche in quel caso con leggerezza, perché l'upscaler ricostruisce già i bordi e una seconda affilatura sovrapposta tende a lasciare aloni.
C'è un caso in cui vale la pena provare il contrario. Se la sorgente è minuscola, sotto qualche centinaio di pixel, un riduttore di rumore ha poco da leggere a quella dimensione, e fare prima l'upscaling può dare al miglioratore più materiale con cui lavorare. Prova entrambi gli ordini su una copia e tieni quello che regge. Il terzo ramo del diagramma presuppone una normale foto da telefono; per un avatar grande come un francobollo, controlla.
Cosa inventa il miglioramento IA che non c'era mai stato
Nelle loro forme IA, entrambi i tipi di strumento generano contenuto. Un miglioratore che rimuove la sfocatura sta indovinando come appariva la versione nitida. Un upscaler che aggiunge pixel sta indovinando cosa c'era tra quelli che aveva. Di solito l'ipotesi è buona, ed è proprio questo il rischio: sembra giusta, che lo sia o no.
Nessun aggiornamento risolve questo problema. Un articolo del 2018 di Yochai Blau e Tomer Michaeli, The Perception-Distortion Tradeoff, ha mostrato che spingere un algoritmo di restauro delle immagini verso output che appaiono naturali lo allontana necessariamente da output che corrispondono fedelmente all'originale, e che il risultato "vale per qualsiasi misura di distorsione". Più è bello l'output, meno puoi fidartene come documento.
È sui volti che il problema si fa più sentire. PULSE, un upsampler di volti sperimentale, contiene un avviso nel suo stesso README: crea "volti immaginari di persone che non esistono, che non devono essere confusi con persone reali" e "non aiuterà a identificare o ricostruire l'immagine originale". I miglioratori commerciali usano modelli diversi, ma lo scambio che fanno è quello descritto dall'articolo.
Quindi, per qualsiasi cosa in cui i pixel sono una prova (foto di prodotto di cui un acquirente ti chiederà conto, scansioni di documenti e carte d'identità, testo che devi leggere, immagini mediche o legali), usa il miglioramento per la visualizzazione e conserva l'originale come riferimento.
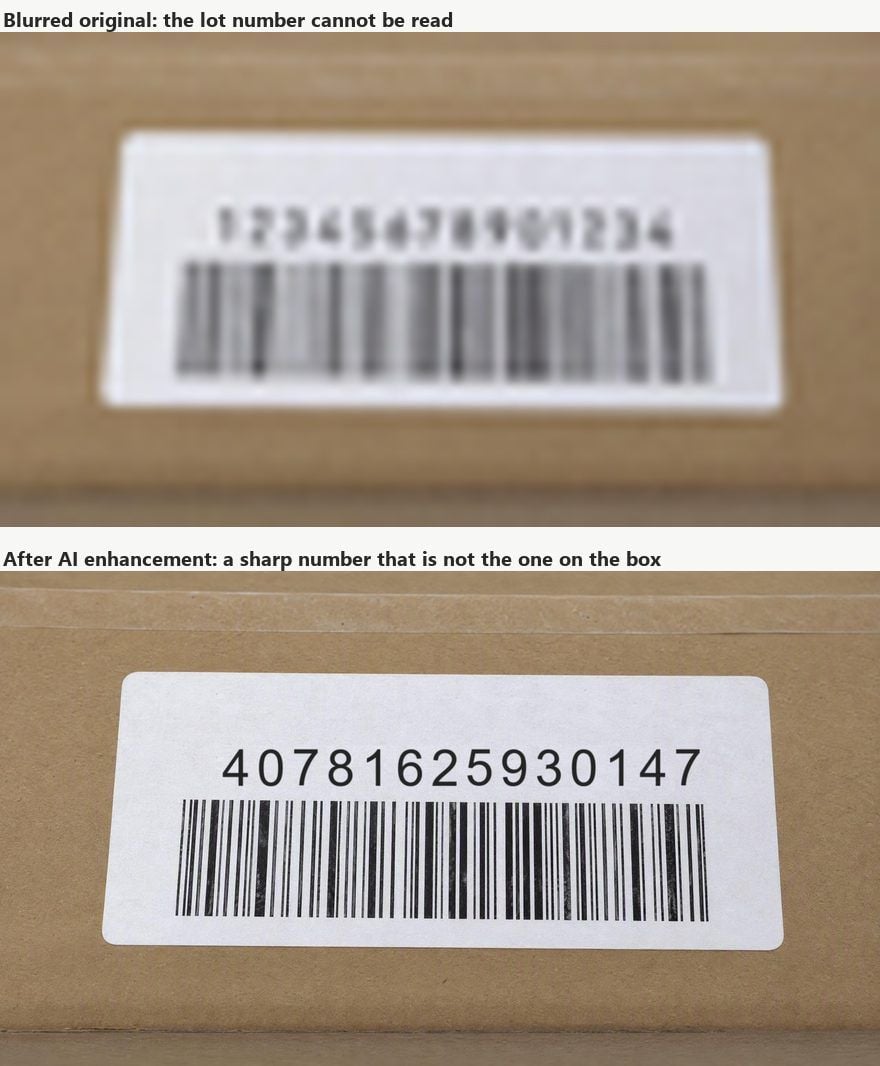
Il testo è un caso speciale: un'etichetta sfocata passata attraverso un miglioratore può tornare nitida e sbagliata, con lettere che si leggono chiaramente e non corrispondono a nulla sull'oggetto. Un upscaler cambia meno cose, perché lascia colore e tono invariati, ma un modello 2x riempie comunque bordi che non ha mai visto. Controlla l'output rispetto alla sorgente al 100% prima di inviarlo ovunque conti.
Domande frequenti
Un miglioratore di foto è uguale a un upscaler di immagini?
No. Un miglioratore di foto regola pixel che esistono già: esposizione, contrasto, colore, rumore, nitidezza. Un upscaler di immagini crea nuovi pixel così la foto può essere visualizzata o stampata più grande. Molti prodotti raggruppano entrambe le cose sotto l'etichetta "enhancer", ed è per questo che i termini si confondono.
I miglioratori di foto IA gratuiti sono davvero gratuiti?
Di solito l'elaborazione lo è. Il download a piena dimensione spesso non lo è: nelle pagine che abbiamo letto, il piano gratuito salvava un file più piccolo o teneva il ridimensionamento in pixel dietro un piano a pagamento. L'upscaler browser di Atlas Cloud è gratuito senza account, ma fa solo upscaling; porta con te un miglioratore per colore e rumore. Leggi il passaggio del download prima di affidarti a qualsiasi piano gratuito per una stampa.
Posso migliorare e fare upscale della stessa foto?
Sì, e per molte vecchie foto da telefono dovresti. Migliora prima per rimuovere il rumore e correggere l'esposizione, poi fai l'upscale, quindi applica con leggerezza un'eventuale affilatura finale. Eseguire prima l'upscaler tende a ingrandire il rumore e a renderlo più difficile da rimuovere.
Fare upscale migliora la qualità della foto?
Migliora la risoluzione, che è una componente della qualità. Non risolve un'immagine scura, piatta o con dominante di colore; quelle tornano scure, piatte o con dominante di colore a una dimensione maggiore. Ridimensionare in un editor normale è di nuovo un'altra cosa: un semplice ridimensionamento allunga i pixel che ha già, mentre un upscaler IA ne prevede di nuovi.
Conclusione
La foto andata in pezzi all'inizio non è mai stata un solo problema. Metà aveva bisogno di pixel migliori, metà di più pixel, e gli strumenti che si posizionano per entrambi i lavori mettono principalmente in primo piano l'uno e accennano all'altro. Il miglioratore di Canva è un pulsante di upscale accanto a un pannello di cursori. Quello di Picsart fa entrambe le cose con un clic e fa pagare il file a piena risoluzione. Airbrush vende gli stessi verbi come sei porte. Lo strumento gratuito di Atlas Cloud salta l'etichetta "enhancer" e dichiara in anticipo il suo tetto di 768 pixel.
Quindi diagnostica prima di caricare. Se l'immagine appare sbagliata alla dimensione attuale, correggi esposizione e rumore con un miglioratore. Se sembra a posto e ha bisogno di essere più grande, aggiungi pixel con un upscaler, poi controlla il risultato al 100% per i dettagli che non c'erano. Fai le due cose in quest'ordine quando ti servono entrambe, e un miglioratore di foto diventa uno strumento che scegli apposta, invece di un'etichetta che speri copra tutto.





